Grandstream GXP 2020 Quick Installation Guide - Goldfish
Grandstream GXP 2020 Quick Installation Guide - Goldfish
Grandstream GXP 2020 Quick Installation Guide - Goldfish
Create successful ePaper yourself
Turn your PDF publications into a flip-book with our unique Google optimized e-Paper software.
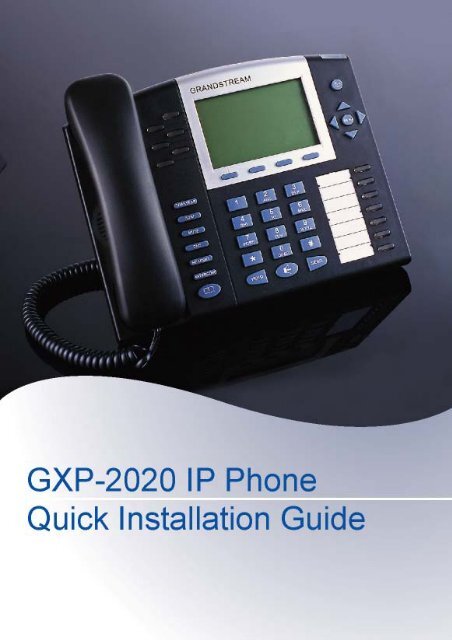
<strong>GXP</strong>-<strong>2020</strong> 6-line SIP Enterprise Phone<br />
<strong>Quick</strong> <strong>Installation</strong> <strong>Guide</strong><br />
WARNING: Please DO NOT power cycle the <strong>GXP</strong>-<strong>2020</strong> when LED lights<br />
are flashing during system boot up or firmware upgrade. You may corrupt<br />
firmware images and cause the unit to malfunction.<br />
WARNING: use only the power adapter included in the <strong>GXP</strong>-<strong>2020</strong><br />
package. Using an alternative non-qualified power adapter may possibly<br />
damage the unit.<br />
Overview<br />
<strong>GXP</strong>-<strong>2020</strong> features 6 lines, each with an individual SIP account and offers a<br />
large graphical LCD display, four (4) XML programmable soft keys, and<br />
seven (7) programmable hard keys. It offers intuitive user interfaces, 5-way<br />
conferencing, 2 headset jacks, and three (3) adjustable positioning angles.<br />
The <strong>GXP</strong>-<strong>2020</strong> also offers dual 10/100Mbps auto-sensing Ethernet ports<br />
with integrated P-o-E, secure central configuration with AES Encryption,<br />
superior audio quality (using G.722 wide-band codec) and excellent<br />
manageability. The <strong>GXP</strong> series is fully compatible and interoperable with<br />
most SIP end-user devices, IPPBX and Softswitches.<br />
Equipment Packaging<br />
Unpack and check all accessories<br />
The <strong>GXP</strong>-<strong>2020</strong> phone package contains<br />
1. One <strong>GXP</strong>-<strong>2020</strong> Main Case<br />
2. One Handset<br />
3. One Phone Cord<br />
4. One Universal Power Adaptor<br />
5. One Ethernet Cable<br />
6. One High Phone Stand<br />
7. One Low Phone Stand<br />
8. Two Wall Mount Spacers<br />
2
Connect the <strong>GXP</strong>-<strong>2020</strong> Enterprise IP Phone<br />
Please use the equipment included in the packaging. Using any other<br />
power source may damage the product.<br />
1. Connect the handset and main phone case with the phone cord.<br />
2. Connect the LAN port of the phone to the RJ-45 socket of a hub/switch or<br />
a router (LAN side of the router) using the Ethernet cable.<br />
3. Connect the 5V DC output plug to the power jack on the phone; plug the<br />
power adapter into an electrical outlet.<br />
4. The LCD will display provisioning or firmware upgrade information.<br />
Before continuing, wait for the date/time icon to light up.<br />
5. Using the phone embedded web server or keypad configuration menu,<br />
you can further configure the phone using either a static IP or DHCP<br />
Figure 1: Connectors on the bottom of the <strong>GXP</strong>-<strong>2020</strong><br />
Wall Mount<br />
<strong>GXP</strong>-<strong>2020</strong> can be wall mounted. For proper wall mounting please place the<br />
two wall-mount spacers into the proper holes on the bottom of the <strong>GXP</strong>-<strong>2020</strong><br />
as show below:<br />
3
Figure 2: Attach the wall mount spacers to the <strong>GXP</strong>-<strong>2020</strong><br />
To position the phone on the wall, place two fixed hangers on the wall, hang<br />
the back of the phone on the fixed hangers.<br />
Figure 3: Location of the fixed hangers on <strong>GXP</strong>-<strong>2020</strong><br />
To use the handset, pull out the tab (extension downward) from the handset<br />
cradle, rotate the tab and plug it back into the slot with the extension up to<br />
hold the handset.<br />
Figure 4: Placing tab for mounting phone to wall<br />
4
Configuring the <strong>GXP</strong>-<strong>2020</strong> using a Web Browser<br />
• If DHCP is enabled in your network, the phone’s IP address will be displayed.<br />
• Using a PC on the same network, type the IP address (from the screen<br />
display) in the URL of your browser. This will enable you to configure<br />
the <strong>GXP</strong>-<strong>2020</strong><br />
• The default administrator password is “admin”; the default end-user<br />
password is “123”.<br />
To configure the phone via the web browser, you will need the following<br />
information:<br />
1. IP address, subnet mask and gateway IP or available DHCP<br />
2. SIP server and/or Outbound Proxy FQDN or IP address<br />
3. User subscriber information: User ID, Authentication ID, Password<br />
(provided by your VoIP service provider)<br />
4. <strong>GXP</strong><strong>2020</strong> supports “Plug N Call” if your ITSP (Internet Telephony Service<br />
Provider) provides this automatic provisioning service. Ensure the phone<br />
has an internet connection (either DHCP or static IP in your internet ready<br />
network), then power up the phone.<br />
5. Please contact your ITSP for additional settings that may be necessary to<br />
configure the phone.<br />
Configure the <strong>GXP</strong>-<strong>2020</strong> using the Keypad<br />
1. Make sure the phone is idle.<br />
2. Press the “OK” button to enter the keypad MENU to configure the phone.<br />
3. Follow MENU options to configure the basic features of the phone – for<br />
example: the IP address if using a static IP. For details, please check<br />
<strong>GXP</strong> Series User Manual.<br />
Using the Keypad<br />
1. To enter the MENU, press round MENU button.<br />
2. Navigate the menu by using the UP/DOWN and LEFT/RIGHT<br />
3. Press the round MENU button to confirm a menu selection.<br />
4. To delete an entry by pressing the MUTE button.<br />
5. The phone automatically exits MENU mode with an incoming call, the<br />
phone is off-hook or the MENU mode if left idle for 20 seconds<br />
5
<strong>GXP</strong>-<strong>2020</strong> Key Pad Configuration Menu<br />
Call History<br />
Status<br />
Phone Book<br />
Instant Messages<br />
Direct IP call<br />
Preference<br />
Config<br />
Factory Functions<br />
Reboot<br />
Exit<br />
Displays histories of incoming, dialed and missed<br />
calls.<br />
Displays the network status, account statuses,<br />
software version and MAC-address of the phone.<br />
Displays the phonebook.<br />
Goes to Instant Messages if the Presence is<br />
supported by the service provider or PBX.<br />
Displays the IP-call options menu.<br />
Displays user preference sub-menu, such as ring<br />
tone, ring volume, customized XML idle screen or<br />
logo.<br />
Display configuration sub-menu, such as Network,<br />
SIP account, audio codec, firmware upgrade path<br />
and method, and Factory Reset function, etc.<br />
Extra diagnostic tools reside here.<br />
Makes the phone reboot itself.<br />
Exit from this menu.<br />
<strong>Grandstream</strong> Networks, Inc. Corporate Headquarters<br />
www.grandstream.com 1297 Beacon Street, 2 nd Floor,<br />
info@grandstream.com Brookline, MA USA 02446<br />
Tel : +1 (617) 566 – 9300<br />
Fax: +1 (617) 247 – 1987<br />
About <strong>Grandstream</strong> Networks<br />
<strong>Grandstream</strong> Networks, Inc. is an award-winning designer and manufacturer of<br />
next generation IP voice & video products for broadband networks. <strong>Grandstream</strong>’s<br />
products deliver superb sound and picture quality, rich telephony features, full<br />
compliance with industry standards, and broad interoperability with most service<br />
providers and 3 rd party SIP based VoIP products. <strong>Grandstream</strong> is consistently<br />
recognized in the VoIP industry for their innovation, affordability and superior value<br />
in their products. <strong>Grandstream</strong> Networks is a private company headquartered in<br />
Brookline, MA with offices in Los Angeles, Dallas and China. For more information,<br />
please visit www.grandstream.com.<br />
6


