GReddy Supercharger Kit
GReddy Supercharger Kit
GReddy Supercharger Kit

You also want an ePaper? Increase the reach of your titles
YUMPU automatically turns print PDFs into web optimized ePapers that Google loves.
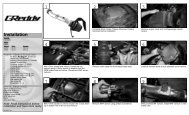
(6) Route the e-manage ultimate wire harness safely though the engine bay and use cable ties to secure the<br />
harness and prevent it from moving. Place the A/C line grommet in its original location.<br />
※ Use cable ties to secure the harness to the accelerator control cable secure areas. 〈Part №18〉<br />
(7) Adjust the dipswitches on the e-manage Ultimate unit. Secure the unit and plug in the harness<br />
connectors.<br />
※ Refer to the diagram below for dipswitch instructions.<br />
It is important that you adjust these switches properly.<br />
Engine damage may be caused if not set properly<br />
※<br />
※<br />
Secure the e-manage unit in an area free from moisture, dust, sunlight, and direct heat from<br />
the heater vents.<br />
Please try to avoid placing the e-manage unit under the carpet or floor mats.<br />
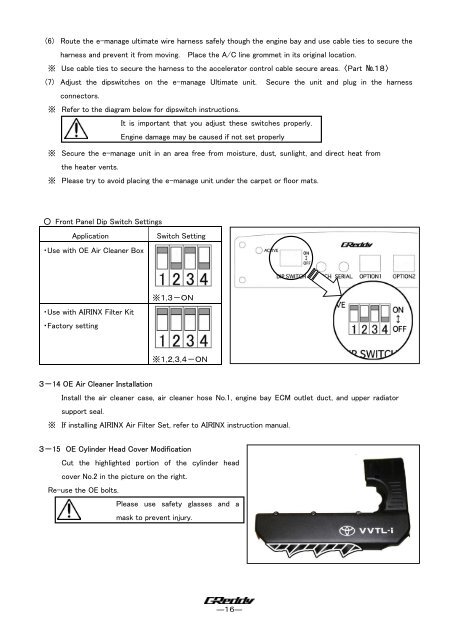
○ Front Panel Dip Switch Settings<br />
Application<br />
Switch Setting<br />
・Use with OE Air Cleaner Box<br />
・Use with AIRINX Filter <strong>Kit</strong><br />
・Factory setting<br />
※1,3-ON<br />
※1,2,3,4-ON<br />
3-14 OE Air Cleaner Installation<br />
Install the air cleaner case, air cleaner hose No.1, engine bay ECM outlet duct, and upper radiator<br />
support seal.<br />
※ If installing AIRINX Air Filter Set, refer to AIRINX instruction manual.<br />
3-15 OE Cylinder Head Cover Modification<br />
Cut the highlighted portion of the cylinder head<br />
cover No.2 in the picture on the right.<br />
Re-use the OE bolts.<br />
Please use safety glasses and a<br />
mask to prevent injury.<br />
―16―