GReddy Supercharger Kit
GReddy Supercharger Kit
GReddy Supercharger Kit

You also want an ePaper? Increase the reach of your titles
YUMPU automatically turns print PDFs into web optimized ePapers that Google loves.
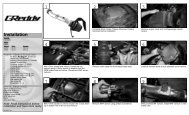
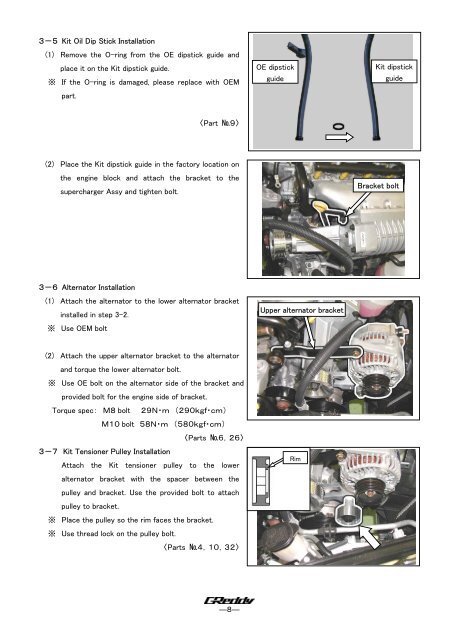
3-5 <strong>Kit</strong> Oil Dip Stick Installation<br />
(1) Remove the O-ring from the OE dipstick guide and<br />
place it on the <strong>Kit</strong> dipstick guide.<br />
※ If the O-ring is damaged, please replace with OEM<br />
part.<br />
OE dipstick<br />
guide<br />
<strong>Kit</strong> dipstick<br />
guide<br />
〈Part №9〉<br />
(2) Place the <strong>Kit</strong> dipstick guide in the factory location on<br />
the engine block and attach the bracket to the<br />
supercharger Assy and tighten bolt.<br />
Bracket bolt<br />
3-6 Alternator Installation<br />
(1) Attach the alternator to the lower alternator bracket<br />
installed in step 3-2.<br />
※ Use OEM bolt<br />
Upper alternator bracket<br />
(2) Attach the upper alternator bracket to the alternator<br />
and torque the lower alternator bolt.<br />
※ Use OE bolt on the alternator side of the bracket and<br />
provided bolt for the engine side of bracket.<br />
Torque spec: M8 bolt 29N・m (290kgf・cm)<br />
M10 bolt 58N・m (580kgf・cm)<br />
〈Parts №6,26〉<br />
3-7 <strong>Kit</strong> Tensioner Pulley Installation<br />
Attach the <strong>Kit</strong> tensioner pulley to the lower<br />
alternator bracket with the spacer between the<br />
pulley and bracket. Use the provided bolt to attach<br />
pulley to bracket.<br />
※ Place the pulley so the rim faces the bracket.<br />
※ Use thread lock on the pulley bolt.<br />
〈Parts №4,10,32〉<br />
Rim<br />
―8―