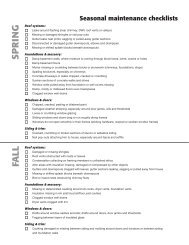
Download this Stacked Stone Wall article as a pdf - Handyman Club ...
Download this Stacked Stone Wall article as a pdf - Handyman Club ...
Download this Stacked Stone Wall article as a pdf - Handyman Club ...

Create successful ePaper yourself
Turn your PDF publications into a flip-book with our unique Google optimized e-Paper software.
HARDSCAPING<br />
By COnnie b<strong>as</strong>tyr i Photos by tracY walsh<br />
22<br />
APRIL/MAY 2013
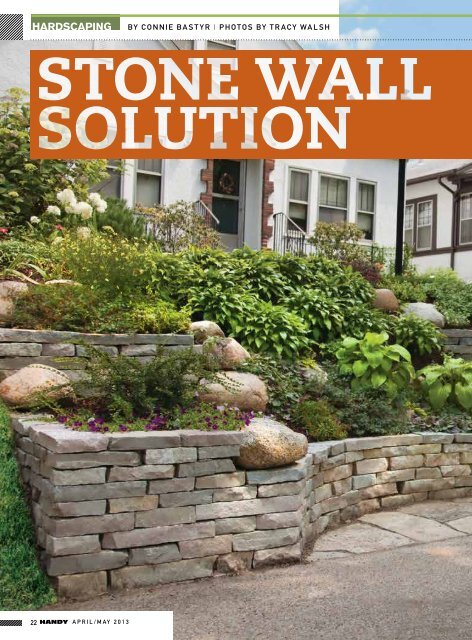
This stone retaining wall blends naturally<br />
into the hillside and complements<br />
the bungalow-style home beyond.<br />
No matter how small your yard,<br />
mowing a steep slope can be a<br />
dreadful t<strong>as</strong>k. And if you’re a m<strong>as</strong>ter<br />
gardener (like the owner of <strong>this</strong> city<br />
lot), you might enjoy grooming a series<br />
of beds rather than maneuvering<br />
a mower on a horrible hill. So when<br />
landscaper Scott Reynolds of Creative<br />
Habitats Inc. in Minnetonka, Minnesota,<br />
transformed <strong>this</strong> sloping lot with<br />
a series of beautiful stone walls, we<br />
documented the process to show you<br />
how it’s done.<br />
Although building a dry-stacked<br />
stone wall like <strong>this</strong> one is timeconsuming,<br />
it does not require special<br />
m<strong>as</strong>onry skills, and it can be less<br />
strenuous than working with manufactured<br />
concrete blocks, which are<br />
typically heavier than limestone.<br />
Scott and his crew of two tamed <strong>this</strong><br />
bank (with the help of some power<br />
equipment) in a little more than a<br />
week. Though it might take a bit longer,<br />
a handy DIYer can tackle <strong>this</strong><br />
project and create a timeless and enduring<br />
structure.<br />
HANDYMANCLUB.COM 23
tech art & design<br />
Getting ready<br />
In <strong>this</strong> dry-stacked wall, only the top<br />
course is set in mortar; gravity holds<br />
the other stones in place. The cut Chilton<br />
stones vary in thickness and length<br />
but are a uniform 8-in. width. Chilton<br />
is a type of limestone from Wisconsin<br />
that is available at most stone yards;<br />
you could also use other types of locally<br />
quarried limestone.<br />
For any stone wall that is higher than<br />
24 in., drain tile (surrounded by aggregate)<br />
must be installed.<br />
For inspiration, look at stone walls<br />
in your area and check out stone suppliers’<br />
displays to find types of rock<br />
and designs that you like. This wall is<br />
built in a b<strong>as</strong>ic running bond pattern<br />
in which all of the stones in each row<br />
are the same height, and the joints are<br />
staggered (strengthening the wall).<br />
Using a scale drawing and the dimensions<br />
of the rise and span of the<br />
hill (see “Design,” p. 26), Scott calculated<br />
the wall’s surface area and ordered<br />
20 percent more stone than<br />
the plan required to allow<br />
for w<strong>as</strong>te. (He also included<br />
the buried b<strong>as</strong>e layers<br />
of walls in his calculations.)<br />
Before you begin<br />
designing your wall, Scott<br />
recommends these preparatory<br />
steps:<br />
• Obtain a survey of your property<br />
to be sure your project<br />
fits within the boundaries.<br />
• Dial 8-1-1 to have utilities<br />
marked.<br />
• Tell your neighbors about the project<br />
beforehand; they’ll be more tolerant<br />
of the mess or any inconvenience and<br />
noise if they’re in on the plan.<br />
• Check with your city regarding code<br />
requirements, setbacks, etc., and<br />
about street restrictions for deliveries<br />
of stone and gravel.<br />
•Determine a convenient staging area<br />
for piling extra soil and supplies.<br />
• Know your soil. Is it sand or clay?<br />
• Collect all of the tools and gear you’ll<br />
need before you begin (see “Tool for<br />
the Project,” p. 28).<br />
Laying groundwork<br />
Cut stone is delivered in mixed<br />
lengths and thicknesses (ranging<br />
from about 2 in. to 3 in. thick), but<br />
each course of the wall must be made<br />
of stones of the same thickness. (Aesthetically<br />
and structurally, it’s best to<br />
use the thickest stones for the lower<br />
courses.) To save installation time,<br />
Scott sorts the stones into piles according<br />
to their thickness in 1/4-in.<br />
A<br />
B<br />
Add gravel backfill<br />
<strong>as</strong> each course<br />
of stone is completed.<br />
This allows you<br />
to completely and<br />
e<strong>as</strong>ily fill any gaps<br />
between the rocks<br />
before the row is<br />
covered by the next<br />
course.<br />
A power plate compactor is f<strong>as</strong>ter and<br />
more effective than hand tamping, and<br />
you can rent one from most home centers<br />
and rental companies. They weigh nearly<br />
200 pounds but move along e<strong>as</strong>ily when<br />
running. Wear hearing and eye protection,<br />
gloves and reinforced-toe boots.<br />
A maul’s top end<br />
is ideal for tamping<br />
down the high<br />
end of a stone or<br />
for packing smaller<br />
are<strong>as</strong> of gravel. The<br />
tool’s weight and<br />
long handle make<br />
it e<strong>as</strong>y to lift and<br />
drop, and the flat<br />
top works <strong>as</strong> a mini<br />
plate compactor.<br />
C<br />
24<br />
APRIL/MAY 2013
Digging in<br />
When terracing a hill, always work<br />
from the bottom up. The crew began<br />
by digging a 12-in.-wide x 7-in.-deep<br />
trench along the edge of the sidewalk,<br />
being careful not to disturb the soil<br />
below. They smoothed the b<strong>as</strong>e, making<br />
sure it w<strong>as</strong> level with the horizon<br />
(which is typically not parallel with the<br />
grade of the sidewalk).<br />
The next step is to spread a 2-in. layincrements<br />
before starting the project.<br />
The maximum allowed height for a<br />
dry-stacked stone wall is 4 ft. Because<br />
<strong>this</strong> site’s walls are less than 24 in.<br />
high, they do not require the installation<br />
of drain tile. If they were higher<br />
than 2 ft., they would have needed a<br />
perforated drainpipe under the b<strong>as</strong>e<br />
(see illustration, opposite), and the first<br />
12 in. of stones would need to be 18 in.<br />
wide front-to-back.<br />
er of compactable three-quarter-clear<br />
gravel, which is angular and contains<br />
no crushed material. The angled surfaces<br />
of the stones help to lock them<br />
in place, preventing shifting, and the<br />
absence of crushed material allows water<br />
to drain more e<strong>as</strong>ily. (Scott says you<br />
can use three-quarter-minus gravel for<br />
<strong>this</strong> purpose but only if you have sandy,<br />
good-draining soil.)<br />
Pack the 2-in. layer using a power<br />
Cutting stone<br />
For most of the project, you can pick<br />
through the stones to find a good fit,<br />
but sometimes you need a custom<br />
shape or size. You can use these<br />
methods for cutting stone:<br />
• Chisel and hammer (score and tap<br />
along the score line with the chisel<br />
several times)<br />
• Maul (whack and hope to get lucky)<br />
• Diamond-blade g<strong>as</strong> saw (rental)<br />
• Hydraulic splitter<br />
Get the free stone mobile app at<br />
splitter<br />
Some stones have visible grain lines that http:/ / gettag.mobi<br />
To watch Scott<br />
may indicate where they are likely to demonstrate how<br />
to use a hydraulic<br />
split, but in most c<strong>as</strong>es your results will<br />
stone splitter,<br />
depend on luck. You (and any bystanders<br />
or helpers) should always wear eye<br />
scan <strong>this</strong><br />
tag or visit<br />
<strong>Handyman</strong><strong>Club</strong>.<br />
and hearing protection when cutting or com/magazine.<br />
breaking stone. — CB<br />
D<br />
For times when<br />
a stone’s fit is<br />
almost (but not<br />
quite) perfect,<br />
Scott’s crew keeps<br />
a bucket of limestone<br />
chips handy<br />
to prop the gap.<br />
These shims become<br />
tightly affixed<br />
under the<br />
weight of the wall.<br />
E<br />
<strong>Stone</strong> shim<br />
F<br />
<strong>Stone</strong> shim<br />
Each row of stones is stepped back (battered)<br />
1/4 in. along the front faces. It’s a<br />
subtle graduation, apparent only when<br />
compared with a level. Battering adds significant<br />
strength to a dry-stacked wall.<br />
Put a stone sliver (shim) in any wedge-shape openings along the back sides; then fill<br />
behind it with gravel. The shim prevents gravel from sneaking through the spaces.<br />
HANDYMANCLUB.COM 25
G<br />
To adhere capstones, mortar is applied along the rear half of the previous row, filling<br />
voids and helping to lock the entire system and to protect the most vulnerable layer<br />
from being disturbed.<br />
Even though the<br />
ends of the return<br />
walls will be buried<br />
in soil (and in<br />
<strong>this</strong> c<strong>as</strong>e, abutted<br />
to concrete steps),<br />
they must have the<br />
same gravel b<strong>as</strong>e<br />
and backfill <strong>as</strong> the<br />
face walls.<br />
I<br />
H<br />
Lucky rock<br />
Fieldstone boulders complement the natural-stone walls and add height and interest to the<br />
planting are<strong>as</strong>. In some spots, the wall stone is shaped to wrap around the boulder (inset).<br />
J<br />
Wide gaps between<br />
the patio<br />
flagstones allow<br />
for future planting<br />
of moss or<br />
ground cover:<br />
The homeowner<br />
can simply remove<br />
pockets<br />
of the crushedgranite<br />
sand and<br />
add planting soil.<br />
plate compacter (photo A, p. 24), the top<br />
of a maul or a tamper. Add another 2 in.<br />
of gravel and pack again, continuing until<br />
you have a smooth, level 4-in.-thick<br />
b<strong>as</strong>e. (The remaining 3 in. of trench<br />
depth allows the first course of stone to<br />
be below grade.)<br />
Regardless of their finished height,<br />
stone walls require an 8- to 10-in.-wide<br />
layer of gravel behind them (photo B).<br />
This site h<strong>as</strong> clay soil, which is prone<br />
to hydrostatic pressure and can cause<br />
any retaining wall to bulge and heave,<br />
so Scott used three-quarter-clear gravel<br />
(not three-quarter-minus) behind the<br />
wall <strong>as</strong> well to allow rain and melting<br />
snow to drain.<br />
DESIGN<br />
“I always look at the house for patterns<br />
to mimic in the landscape.<br />
It’s important to consider the entire<br />
composition.”<br />
– Scott Reynolds, Creative Habitats<br />
Scott incorporated arcs in the shape<br />
of the wall partially to give the<br />
natural-stone structure an organic,<br />
flowing design, but also to reflect<br />
curves featured in the entrance area<br />
of the house. He used a 5-ft.-radius<br />
cutout for the patio area. (The center<br />
is about 18 in. from the sidewalk’s<br />
edge.) The same radius w<strong>as</strong> repeated<br />
in the two curved walls on the upper<br />
level. Although the patio side of<br />
the design is different from the wall<br />
on the opposite side of the steps, an<br />
overall balance is achieved through<br />
the careful placement of shrubs and<br />
plantings. — CB<br />
26<br />
APRIL/MAY 2013
Tools<br />
for the<br />
project<br />
In addition to shovels and levels, these are some essential<br />
hand tools for <strong>this</strong> type of project. Although<br />
none are motorized, most of them call for hearing<br />
protection, and all require protective eyewear.<br />
Hand<br />
guard<br />
Pick (pick mattock)<br />
This tool combines an ax<br />
head and a pick for chopping<br />
away at hard soil,<br />
roots and rocks before you<br />
shovel the soil out.<br />
Sledgehammer<br />
Its long handle and 10- to<br />
20-pound weight deliver<br />
great force for packing soil<br />
or gravel or pounding down<br />
a high spot in a stone.<br />
M<strong>as</strong>on’s hammer<br />
Also called a bricklayer’s<br />
hammer, <strong>this</strong> tool’s flat<br />
face and chisel-shape<br />
blade help to chip off<br />
edges of a stone.<br />
Wrecking bar<br />
It works <strong>as</strong> a lever to loosen<br />
and lift large boulders<br />
or adjust heavy stones, or<br />
you can use it <strong>as</strong> a pick to<br />
loosen hard soil.<br />
M<strong>as</strong>on’s chisel<br />
To score a cut line in<br />
stone, tap the top of a<br />
m<strong>as</strong>on’s chisel with a hammer;<br />
then deliver a heavy<br />
blow to split the stone.<br />
Setting stone<br />
As with any wall construction, the b<strong>as</strong>e<br />
course sets the stage for the rest of the<br />
project. For <strong>this</strong> first layer, you can use<br />
stones that have odd shapes or different<br />
thicknesses, <strong>as</strong> long <strong>as</strong> the top surfaces<br />
are all even and level. Just pound<br />
down any high spots using the top end<br />
of a maul (photo C, p. 24). Check for<br />
level front-to-back and side-to-side. (If<br />
you can’t get it perfect, err on the side<br />
of a slightly higher front edge than<br />
back.) Make each course level before<br />
you start the next layer — don’t plan to<br />
compensate for height differences later.<br />
As you install each stone, flip and turn<br />
it until you have a solid fit. You might<br />
need to try a different one for compatibility<br />
with neighboring stones and with<br />
the b<strong>as</strong>e. Set the front face of each new<br />
row 1/4 in. back from the previous row<br />
(photo D, p. 25).<br />
Natural stones’ irregular shapes<br />
sometimes make a slight “rocking”<br />
movement unavoidable. You can compensate<br />
by shimming with a stone chip<br />
(called chinking) under the offending<br />
rock (photo E). Where needed, you can<br />
knock off protruding edges of stones<br />
with a maul. Try to avoid leaving gaps<br />
between neighboring stones, but where<br />
they occur, fill vertical spaces with a<br />
stone chip and gravel (photo F).<br />
Use various sizes of levels to check<br />
each stone <strong>as</strong> you install it, adjusting for<br />
level front-to-back and side-to-side. Continue<br />
to backfill with gravel <strong>as</strong> you add<br />
each new course. Scott did not install<br />
landscape fabric because it tends to prevent<br />
drainage and to build hydrostatic Adding outcroppings<br />
pressure — especially in clay soil. If your To help support mounds of soil and<br />
soil is very sandy, you can add landscape plants within each tier, Scott placed<br />
fabric between the gravel backfill and the small boulders <strong>as</strong> outcroppings within<br />
soil behind it. Do not lay fabric directly the tiers (photo I). Strategically set to<br />
against the back of the wall.<br />
support the greatest elevation changes,<br />
For the top course (called capstones), these rocks are partially submerged in<br />
Scott used the thinner (2-in.) stones, the soil to help them stay in position.<br />
being careful to fit the shapes together (One of these boulders w<strong>as</strong> a lucky find:<br />
well (see “Cutting <strong>Stone</strong>,” p. 25). Once When excavating the patio area, Scott<br />
the entire top course w<strong>as</strong> in place, he discovered a large rock buried right in<br />
folded back the row of capstones and the spot where he had planned for one!)<br />
applied mortar (photo G, p. 26) before A small patio created along the sidewalk<br />
(photo J) provides room for potted<br />
pressing them in place. To prevent<br />
soil from seeping p<strong>as</strong>t the top layer of plants or a small sitting area. The flagstone<br />
floor w<strong>as</strong> laid over a 1-in.-thick<br />
stone, you can pack mortar along the<br />
back of the capstone row <strong>as</strong> well. ) b<strong>as</strong>e of compacted granite sand which,<br />
To allow room for a layer of soil and like the gravel used for b<strong>as</strong>e in the walls,<br />
plants, stop adding gravel backfill when is angular rather than rounded so it<br />
you’re 5 in. shy of the top of the wall. You locks together and stays in place. Once<br />
may choose to place landscape fabric on the 1-1/2- to 2-in.-thick flagstones were<br />
top of the gravel before adding the soil. in place, gaps between them were filled<br />
with more granite sand.<br />
Building up<br />
The upper walls are constructed like<br />
the first: Dig a trench, pack in a 4-in.-<br />
thick gravel b<strong>as</strong>e and install level<br />
courses of stone with 8 to 10 in. of<br />
gravel backfill behind. Dig the trench<br />
deep enough that the top of the b<strong>as</strong>e<br />
course is level with (or slightly lower<br />
than) the capstone of the lower wall.<br />
The return walls (the sections that Get the free Proper mobile app at<br />
Planting<br />
run alongside the steps and into the hill) http:/ / gettag.mobi<br />
To see a planting<br />
need to extend into the soil at le<strong>as</strong>t 6 in.<br />
secret from<br />
m<strong>as</strong>ter gardener<br />
beyond their exposed portions (photo H).<br />
Amy Sitze, scan<br />
The hidden portions must also be supported<br />
with packed gravel and a course<br />
com/magazine.<br />
<strong>this</strong> tag to or visit<br />
<strong>Handyman</strong><strong>Club</strong>.<br />
of b<strong>as</strong>e stone.<br />
28<br />
APRIL/MAY 2013