

HKTS 30SAT-2 - Harman Kardon
HKTS 30SAT-2 - Harman Kardon
HKTS 30SAT-2 - Harman Kardon

You also want an ePaper? Increase the reach of your titles
YUMPU automatically turns print PDFs into web optimized ePapers that Google loves.
User Guide<br />
English................................<br />
Deutsch..............................<br />
Suomi................................<br />
Français..............................<br />
Italiano................................<br />
Español...............................<br />
Svenska..............................<br />
.............................<br />
Nederlands..........................<br />
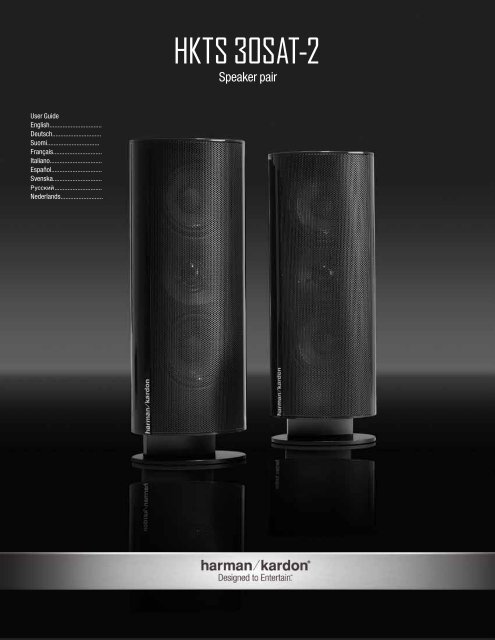
<strong>HKTS</strong> <strong>30SAT</strong>-2<br />
Speaker pair
<strong>Harman</strong> <strong>Kardon</strong> ® <strong>HKTS</strong> <strong>30SAT</strong>-2<br />
Introduction<br />
Thank you for purchasing the <strong>Harman</strong> <strong>Kardon</strong> ® <strong>HKTS</strong> <strong>30SAT</strong>-2 speaker<br />
pair, with which you’re about to begin many years of listening<br />
enjoyment. While state-of-the-art speaker components are hard at work<br />
within the <strong>HKTS</strong> <strong>30SAT</strong>-2, hookup is simple. Color-coded cables make the<br />
<strong>HKTS</strong> <strong>30SAT</strong>-2 easy to use.<br />
Included<br />
Two <strong>HKTS</strong> <strong>30SAT</strong>-2 satellite speakers<br />
To obtain maximum enjoyment from your new speaker system, we urge<br />
you to take a few minutes to read through this manual. It will help ensure<br />
that the connections you make to your receiver or amplifier are correct.<br />
If you have any questions about this product, its installation or its<br />
operation, please contact your dealer, the best local source of information.<br />
Description and Features<br />
The <strong>HKTS</strong> <strong>30SAT</strong>-2 is a pair of speakers, each of which features:<br />
• Dual 3" (75mm) video-shielded midrange drivers<br />
• One 3/4" (19mm) video-shielded dome tweeter<br />
• A sealed enclosure<br />
• A built-in, removable base<br />
• A wall-mount bracket<br />
• Color-coded connecting cables<br />
The speaker cables use a color-coding system to conform to the<br />
Consumer Electronics Association (CEA ® ) standard. This color-coding system<br />
minimizes confusion when you connect the speakers, especially when<br />
you are connecting them to a <strong>Harman</strong> <strong>Kardon</strong> receiver.<br />
Optional HTFS 3/E floor stands are available separately from your<br />
<strong>Harman</strong> <strong>Kardon</strong> dealer.<br />
Two wall-mount brackets<br />
Two metal stop plates and screws<br />
Two 10-meter (32.8-foot) speaker cables<br />
(brown and tan color bands)<br />
2
Speaker Placement<br />
Expanding a 5.1-Channel System to a 7.1-Channel<br />
System<br />
The surround back speakers should be placed against the rear wall<br />
directly behind the listeners, 3–6 feet (0.9m–1.8m) apart, 5–6 feet<br />
(1.5m–1.8m) off the floor.<br />
Mounting Options for<br />
<strong>HKTS</strong> <strong>30SAT</strong>-2 Speakers<br />
Shelf Placement<br />
You can place the <strong>HKTS</strong> <strong>30SAT</strong>-2<br />
speakers on shelves. The satellite<br />
speakers have built-in bases for shelf<br />
placement. You can also remove the<br />
bases if you desire.<br />
Apply pressure evenly<br />
to both sides of base<br />
Lift base straight<br />
off speaker<br />
Surround Back<br />
Right Speaker<br />
Surround Back<br />
Left Speaker<br />
To remove a speaker’s base, pull it<br />
straight off the speaker, as shown in<br />
the illustration. Applying even pressure<br />
to both sides of the base will allow it<br />
to slide off smoothly.<br />
3 – 6 ft<br />
(0.9m – 1.8m)<br />
Wall-Mounting<br />
5 – 6 ft<br />
(1.5m – 1.8m)<br />
IMPORTANT: Read the Speaker Connections<br />
section, on page 5, before wall-mounting<br />
the <strong>HKTS</strong> <strong>30SAT</strong>-2 speakers. You will need to<br />
insert the speaker wires through the wallmount<br />
brackets and connect the wires to<br />
the speakers during the process of<br />
installing the wall-mount brackets.<br />
Pull sections<br />
apart<br />
Front Left<br />
Speaker<br />
TV<br />
Center<br />
Speaker<br />
Front Right<br />
Speaker<br />
Subwoofer<br />
NOTE: If you are using your own speaker wire,<br />
it must be no thicker than the wire supplied<br />
with the speakers. Thicker wire will prevent<br />
the wall-mount bracket from sliding onto the<br />
speaker.<br />
1. Decide on the location for the speaker<br />
(see Speaker Placement, opposite).<br />
Surround Left<br />
Speaker<br />
Surround Back<br />
Left Speaker<br />
If original surround speakers<br />
are behind listeners, move them<br />
to a point to directly at<br />
listeners' sides<br />
Surround Back<br />
Right Speaker<br />
Surround Right<br />
Speaker<br />
NOTE: If your original surround speakers are located behind the<br />
listeners, you should move them up so they are directly to the<br />
listeners’ sides.<br />
If You’re Adding to an Existing <strong>HKTS</strong> 30 Speaker<br />
System:<br />
Your <strong>HKTS</strong> <strong>30SAT</strong>-2 speakers are designed to expand an existing<br />
<strong>HKTS</strong> 30 speaker system from 5.1 channels to 7.1 channels.<br />
You can connect the <strong>HKTS</strong> <strong>30SAT</strong>-2 speakers to your receiver’s or<br />
amplifier’s surround back left and surround back right outputs.<br />
2. Remove the speaker’s base as explained in<br />
Shelf Placement, above.<br />
3. Disassemble the wall-mount bracket by sliding the two<br />
sections apart, as shown in the illustration.<br />
4. Attach the wall portion of the wall-mount bracket onto<br />
the wall using hardware that is appropriate for the wall’s<br />
construction and materials. We recommend first anchoring<br />
the wall-mount bracket using its keyhole, then<br />
attaching it with another anchor through its top opening,<br />
as shown in the illustration. Note that the <strong>HKTS</strong> <strong>30SAT</strong>-2<br />
speakers weigh 3.3 lb (1.5kg). Be sure to use hardware<br />
that can support this weight.<br />
Top opening<br />
Keyhole opening<br />
Bottom opening<br />
If You’re Adding to an Existing <strong>HKTS</strong> 20 Speaker<br />
System:<br />
Your <strong>HKTS</strong> <strong>30SAT</strong>-2 speakers are designed to expand an existing<br />
<strong>HKTS</strong>20 speaker system from 5.1 channels to 7.1 channels<br />
by replacing the existing front left and front right speakers. You<br />
can then connect your existing <strong>HKTS</strong>20 front left and front right<br />
speakers to your receiver’s or amplifier’s surround back left and<br />
surround back right outputs.<br />
3
NOTE: If you’re running the speaker wire through the wall, you can<br />
bring it out directly behind the wall-mount bracket’s location and insert<br />
it through the bottom opening in the wall portion of the wall-mount<br />
bracket, as shown in the illustration. Inserting it will keep the wire<br />
completely hidden from view once the installation is complete.<br />
Insert wire into<br />
bottom opening<br />
Bring wire out<br />
through here<br />
8. Connect the speaker wire to the speaker terminals, as shown in<br />
the illustration:<br />
• Press down on the top of the terminal to open the connection hole.<br />
• Insert the wire’s bare end all the way into the hole.<br />
• Release the terminal to secure the wire.<br />
Insert the conductor with the colored band into the speaker’s<br />
red ( + ) terminal, and insert the other conductor into the speaker’s<br />
black ( – ) terminal.<br />
+ –<br />
5. If you’re not running the speaker wire through the wall, insert<br />
it through the wall portion of the wall-mount bracket, as<br />
shown in the illustration.<br />
Push down on cap<br />
to open hole<br />
Insert bare wire<br />
into open hole<br />
Release cap<br />
to secure wire<br />
IMPORTANT: Make sure the ( + ) and ( – ) bare wires do not touch<br />
each other or the other terminal. Touching wires can cause a short<br />
circuit that can damage your receiver or amplifier.<br />
6. Pass the speaker wire through the speaker portion of the<br />
wall-mount bracket, as shown in the illustration.<br />
9. Slide the speaker portion of the wall-mount bracket onto the speaker, as<br />
shown in the illustration. Fit the wall-mount bracket’s grooves onto the<br />
rails in the speaker, and apply even pressure on both sides of the wallmount<br />
bracket so it slides straight onto the speaker.<br />
• Push the wall-mount bracket all the way onto the speaker until it<br />
snaps into place.<br />
• Pull any slack speaker wire back through the wall-mount bracket<br />
as you slide the wall-mount bracket onto the speaker.<br />
Fit bracket grooves<br />
onto speaker rails<br />
Push down evenly on both sides of wall-mount bracket<br />
Bring wire in<br />
through here<br />
Bring wire out<br />
through here<br />
10. Slide the speaker onto the wall-mount bracket’s wall section,<br />
as shown in the illustration. Pull any slack speaker wire back<br />
through the wall-mount bracket's wall section.<br />
Slide speaker<br />
onto wall-mount<br />
bracket<br />
7. If you have not already removed the speaker’s base, do so by<br />
pulling it straight off the speaker, as shown in the illustration.<br />
Applying even pressure to both sides of the base will allow it<br />
to slide off smoothly.<br />
Apply pressure evenly<br />
to both sides of base<br />
Lift base straight<br />
off speaker<br />
11. Fit the metal stop plate into the recess on the bottom of the<br />
wall-mount bracket with the pad facing the bracket, and<br />
fasten it to the bracket using two of the supplied<br />
screws. Fastening it will prevent the speaker from detaching<br />
from the wall-mount bracket and will hold the speaker in<br />
position as you rotate it on the wall-mount bracket.<br />
CAUTION: Before making speaker connections, be sure<br />
that your receiver or amplifier is turned OFF and,<br />
preferably, its AC cord is unplugged from the AC outlet.<br />
4<br />
Stop plate<br />
Supplied screws
Speaker Connections<br />
CAUTION: Before making speaker connections, be sure that your<br />
receiver or amplifier is turned OFF and, preferably, its AC cord is<br />
unplugged from the AC power outlet.<br />
Color-Coding System<br />
The <strong>HKTS</strong>30 SAT-2 uses the channel color-coding system established<br />
by the Consumer Electronics Association (CEA) to make setting up<br />
your home theater speaker system as easy as possible. The <strong>HKTS</strong> 30<br />
systems include speaker wires with colored bands on each end.<br />
Speaker Position<br />
Surround Back Left<br />
Surround Back Right<br />
Wire Color Band<br />
Brown<br />
Tan<br />
Speakers and receivers/amplifiers have corresponding ( + ) and ( – )<br />
connection terminals. Most electronics manufacturers, including<br />
<strong>Harman</strong> <strong>Kardon</strong>, have been using red to denote the ( + ) terminal and<br />
black for the ( – ) terminal. Newer <strong>Harman</strong> <strong>Kardon</strong> receivers conform<br />
to the CEA standard and therefore use a color other than red to<br />
denote the ( + ) terminal for some speaker positions.<br />
Connecting <strong>HKTS</strong> <strong>30SAT</strong>-2 Speakers with the<br />
Supplied Wall-Mount Brackets<br />
Follow the instructions in Wall-Mounting on page 3.<br />
Connecting <strong>HKTS</strong> <strong>30SAT</strong>-2 Speakers with the<br />
Supplied Bases<br />
1. Remove the speaker’s base (see Shelf Placement, on page 3).<br />
2. Pass the speaker wire through the opening in the speaker’s<br />
base.<br />
3. Connect the speaker wire as described in Color-Coding System,<br />
opposite.<br />
4. Reattach the speaker’s base, as shown in the illustration.<br />
Each speaker wire included with your system has colored bands at<br />
both ends of the ( + ) conductor. In addition to the colored bands at<br />
each end, each speaker wire’s ( + ) terminal has ribs molded into its<br />
insulation to help you identify it, while the (–) terminal has no ribs.<br />
It is very important to connect each speaker identically: ( + )<br />
on the speaker to ( + ) on the receiver or amplifier, and ( – ) on<br />
the speaker to ( – ) on the receiver or amplifier. Miswiring one or<br />
more speakers results in thin sound, weak bass and a poor stereo<br />
image. With the advent of multichannel surround-sound systems,<br />
connecting all of the speakers in your system correctly is very important<br />
for achieving the proper ambience and directionality of the sound<br />
coming from the speakers.<br />
To connect the speaker wire to the terminals on the speakers, press<br />
down on the top of the terminal to open the connection hole, insert<br />
the wire’s bare end all the way into the hole, and release the terminal<br />
to secure the wire. Insert the conductor with the colored band into<br />
the speaker’s red ( + ) terminal, and insert the other conductor into<br />
the speaker’s black ( – ) terminal, as shown in the illustration.<br />
+ –<br />
Push down on cap<br />
to open hole<br />
Insert bare wire<br />
into open hole<br />
Release cap<br />
to secure wire<br />
IMPORTANT: Make sure the ( + ) and ( – ) bare wires do not<br />
touch each other or the other terminal. Touching wires can<br />
cause a short circuit that can damage your receiver or<br />
amplifier.<br />
5
Receiver<br />
RIGHT<br />
Surround<br />
Back<br />
+ –<br />
LEFT<br />
+ –<br />
Surround Back Left<br />
Speaker Cable<br />
(Brown Bands)<br />
Surround Back Right<br />
Speaker Cable<br />
(Tan Bands)<br />
– +<br />
– +<br />
Surround Back<br />
Left<br />
Surround Back<br />
Right<br />
6
Troubleshooting<br />
If there is no sound from any of the speakers:<br />
• Check that the receiver/amplifier is on and a disc or other source is playing.<br />
• Make sure that all wires and connections between the receiver/amplifier<br />
and the speakers are connected properly.<br />
• Make sure that none of the speaker wires is frayed, cut or punctured.<br />
• Review the proper operation of your receiver/amplifier.<br />
If there is no sound coming from one speaker:<br />
• Check that the balance control on your receiver/amplifier is not set all the<br />
way to one channel.<br />
• Check your receiver/amplifier’s speaker setup procedure to make sure that<br />
the speaker in question has been enabled and its volume level has not been<br />
turned all the way down.<br />
• Make sure that all wires and connections between the receiver/amplifier<br />
and the speaker are connected properly.<br />
• Make sure that none of the speaker wires is frayed, cut or punctured.<br />
If there is no sound coming from the surround speakers:<br />
• Check your receiver/amplifier’s speaker setup procedure to make sure that<br />
the surround speakers have been enabled and their volume levels have not<br />
been turned all the way down.<br />
• Make sure that all wires and connections between the receiver/amplifier<br />
and the surround speakers are connected properly.<br />
• Make sure that none of the speaker wires is frayed, cut or punctured.<br />
• Review proper operation of your receiver/amplifier and its surroundsound<br />
features.<br />
• Make sure that the movie or TV show you’re watching has been recorded in a<br />
surround-sound mode. If it has not, check to see if your receiver/amplifier<br />
has a different surround-sound mode that you can use.<br />
• Review the operation of your DVD player and the DVD jacket to make sure the<br />
DVD features the Dolby ® Digital or DTS ® surround-sound mode and that you<br />
have selected that mode using both the DVD player’s menu and the disc’s<br />
menu.<br />
If the system plays at low volumes but shuts off as volume is increased:<br />
• Make sure that all wires and connections between the receiver/amplifier<br />
and the speakers are connected properly.<br />
• Make sure that none of the speaker wires is frayed, cut or punctured.<br />
• If you’re using more than one pair of main speakers, check to be sure that<br />
you’re not operating the system below the receiver/amplifier’s minimum<br />
impedance requirements. If you're not sure sure how to check the<br />
impedance, ask your audio retailer.<br />
7
Specifications<br />
<strong>HKTS</strong> <strong>30SAT</strong>-2 Satellites<br />
Recommended Power<br />
10 ~ 120 watts<br />
Impedance<br />
8 ohms nominal<br />
Sensitivity<br />
86dB @ 2.83V/1 meter<br />
Tweeter<br />
One 3/4" (19mm) dome, video-shielded<br />
Midrange<br />
Dual 3" (75mm) drivers, video-shielded<br />
Dimensions – including stands (H x W x D)<br />
11-25/32" x 4-11/32" x 3-15/32"<br />
(299mm x 110mm x 88mm)<br />
Weight<br />
3.3 lb (1.5kg)<br />
© 2010 <strong>Harman</strong> International Industries, Incorporated. All rights reserved.<br />
Features, specifications and appearance are subject to change without notice.<br />
<strong>Harman</strong> <strong>Kardon</strong> is a trademark of <strong>Harman</strong> International Industries, Incorporated, registered in the United States<br />
and/or other countries. Designed to Entertain is a trademark of <strong>Harman</strong> International Industries, Incorporated.<br />
CEA is a registered trademark of the Consumer Electronics Association. Dolby is a registered trademark of Dolby Laboratories.<br />
DTS is a registered trademark of DTS, Inc.<br />
<strong>Harman</strong> Consumer, Inc.<br />
8500 Balboa Boulevard, Northridge, CA 91329 USA<br />
516.255.4545 (USA only)<br />
www.harmankardon.com<br />
Made in P.R.C.<br />
Part # 950-0289-001<br />
8


