ColorLogic & CrystaLogic 12V Quick Start - Hayward
ColorLogic & CrystaLogic 12V Quick Start - Hayward
ColorLogic & CrystaLogic 12V Quick Start - Hayward

Create successful ePaper yourself
Turn your PDF publications into a flip-book with our unique Google optimized e-Paper software.
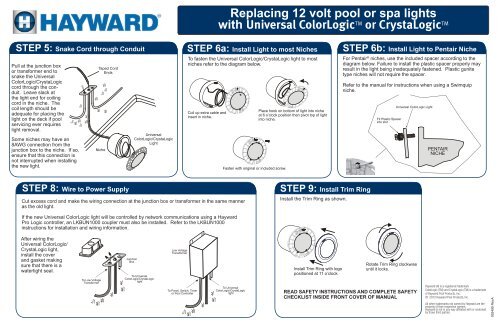
Replacing 12 volt pool or spa lights<br />
with Universal <strong>ColorLogic</strong> TM or <strong>CrystaLogic</strong> TM<br />
STEP 5: Snake Cord through Conduit<br />
Pull at the junction box<br />
or transformer end to<br />
snake the Universal<br />
<strong>ColorLogic</strong>/<strong>CrystaLogic</strong><br />
cord through the conduit.<br />
Leave slack at<br />
the light end for coiling<br />
cord in the niche. The<br />
coil length should be<br />
adequate for placing the<br />
light on the deck if pool<br />
servicing ever requires<br />
light removal.<br />
Some niches may have an<br />
8AWG connection from the<br />
junction box to the niche. If so,<br />
ensure that this connection is<br />
not interrupted when installing<br />
the new light.<br />
STEP 6a: Install Light to most Niches<br />
To fasten the Universal <strong>ColorLogic</strong>/<strong>CrystaLogic</strong> light to most<br />
niches refer to the diagram below.<br />
STEP 5: 6b: Insert Install Cell Light to Pentair Niche<br />
For Pentair ® niches, use the included spacer according to the<br />
diagram below. Failure to install the plastic spacer properly may<br />
result in the light being inadequately fastened. Plastic gunite<br />
type niches will not require the spacer.<br />
Refer to the manual for instructions when using a Swimquip<br />
niche.<br />
STEP 8: Wire to Power Supply<br />
Cut excess cord and make the wiring connection at the junction box or transformer in the same manner<br />
as the old light.<br />
STEP 9: Install Trim Ring<br />
Install the Trim Ring as shown.<br />
If the new Universal <strong>ColorLogic</strong> light will be controlled by network communications using a <strong>Hayward</strong><br />
Pro Logic controller, an LKBUN1000 coupler must also be installed. Refer to the LKBUN1000<br />
instructions for installation and wiring information.<br />
After wiring the<br />
Universal <strong>ColorLogic</strong>/<br />
<strong>CrystaLogic</strong> light,<br />
install the cover<br />
and gasket making<br />
sure that there is a<br />
watertight seal.<br />
READ SAFETY INSTRUCTIONS AND COMPLETE SAFETY<br />
CHECKLIST INSIDE FRONT COVER OF MANUAL<br />
<strong>Hayward</strong> (R) is a registered trademark<br />
<strong>ColorLogic</strong> (TM) and <strong>CrystaLogic</strong> (TM) is a trademark<br />
of <strong>Hayward</strong> Pool Products, Inc.<br />
© 2012 <strong>Hayward</strong> Pool Products, Inc.<br />
All other trademarks not owned by <strong>Hayward</strong> are the<br />
property of their respective owners.<br />
<strong>Hayward</strong> is not in any way affiliated with or endorsed<br />
by those third parties.<br />
092499 RevA