Column Radiator Instructions - Heatline
Column Radiator Instructions - Heatline
Column Radiator Instructions - Heatline

Create successful ePaper yourself
Turn your PDF publications into a flip-book with our unique Google optimized e-Paper software.
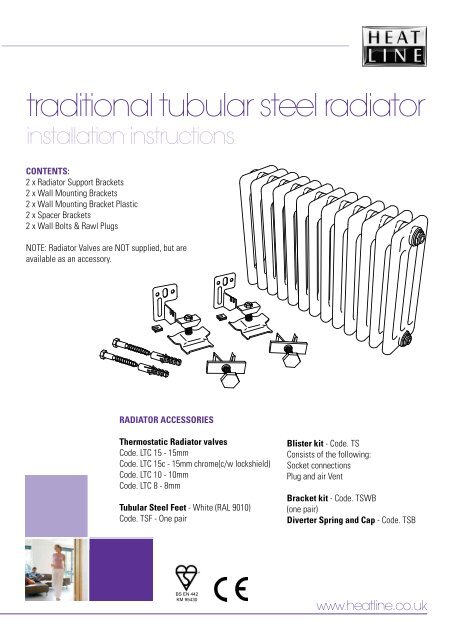
traditional tubular steel radiator<br />
installation instructions<br />
CONTENTS:<br />
2 x <strong>Radiator</strong> Support Brackets<br />
2 x Wall Mounting Brackets<br />
2 x Wall Mounting Bracket Plastic<br />
2 x Spacer Brackets<br />
2 x Wall Bolts & Rawl Plugs<br />
NOTE: <strong>Radiator</strong> Valves are NOT supplied, but are<br />
available as an accessory.<br />
RADIATOR ACCESSORIES<br />
Thermostatic <strong>Radiator</strong> valves<br />
Code. LTC 15 - 15mm<br />
Code. LTC 15c - 15mm chrome(c/w lockshield)<br />
Code. LTC 10 - 10mm<br />
Code. LTC 8 - 8mm<br />
Tubular Steel Feet - White (RAL 9010)<br />
Code. TSF - One pair<br />
Blister kit - Code. TS<br />
Consists of the following:<br />
Socket connections<br />
Plug and air Vent<br />
Bracket kit - Code. TSWB<br />
(one pair)<br />
Diverter Spring and Cap - Code. TSB<br />
BS EN 442<br />
KM 95430
installation instructions<br />
PLEASE READ THESE INSTRUCTIONS BEFORE INSTALLING YOUR RADIATOR.<br />
general information<br />
Guarantee. Thank you for purchasing our heatline product. The ten<br />
year guarantee covers manufacturing defects only. Please see website<br />
for full details<br />
Accreditation. All our products have CE certification, ensuring the<br />
highest levels of quality and reliability.<br />
Please Note. The radiator sections are painted<br />
with an epoxy powder coated in white RAL 9010.<br />
Manual Handling. With regards to the Manual Handling Operations,<br />
1992 Regulations, the following products, for the lift operation, may<br />
exceed the recommended weight for a one man lift.<br />
IMPORTANT NOTE! ENSURE THE RADIATOR IS IN THE<br />
UPRIGHT POSITION BEFORE CARRYING.<br />
The radiators are heavy and great care MUST be taken when lifting.<br />
The appropriate gloves, footwear etc. must be used. The use of<br />
mechanical lift aids wherever possible is recommended. Ensure there<br />
are an adequate number of<br />
persons available to lift and manoeuvre the<br />
radiator into position.<br />
technical information<br />
Note: Please refer to the back page<br />
for the complete specification of<br />
the assembled radiator.<br />
Note: Feet can be used for<br />
additional support, adjustable<br />
125mm - 150mm.<br />
150mm Recommended<br />
Minimum Clearances<br />
below radiator.<br />
B<br />
A<br />
Model 6/300 4/750 4/600 4/400 3/600 2/1800 2/600<br />
No of <strong>Column</strong>s 6 4 4 4 3 2 2<br />
Height (mm) 292 742 592 392 592 1792 592<br />
Depth (mm) 230 148 148 148 107 66 66<br />
Output Watts ΔT50°C 63 99 80 56 62 124 44<br />
Water Content (l) 1.35 1.62 1.38 1.06 1.03 1.65 0.69<br />
Weight (kg) 1.5 2.3 1.9 1.1 1.4 2.5 0.96<br />
A 40-55 40-55 40-55 40-55 40-55 40-55 40-55<br />
B 115 74 74 74 53 33 33
installation instructions<br />
installation instructions<br />
IMPORTANT NOTE<br />
This radiator is fitted with a water diverter to enhance water<br />
circulation.<br />
You must connect your inlet radiator valve to the socket which has<br />
the diverter fitted. This is identified by a label or by inserting a screw<br />
driver into the connection sockets.<br />
Water Diverter Spring and Cap.<br />
The spring is not fitted on all models<br />
Water Diverter Spring and Cap.<br />
The spring is not fitted on all models<br />
Water Diverter Spring and Cap.<br />
Water Diverter Spring and Cap.<br />
The spring Water is not Diverter fitted on Spring all models and Cap.<br />
The spring is not fitted on all models<br />
The socket that prohibits full insertion of the screwdriver Water Diverter due to Spring the and Cap. The spring is not fitted on all models<br />
diverter is the inlet to the radiator.<br />
The spring is not fitted on all models<br />
Step 1<br />
Fit the plastic inserts as shown in diagram.<br />
PLASTIC<br />
INSERT<br />
PLASTIC<br />
PLASTIC<br />
INSERT PLASTIC<br />
INSERT PLASTIC<br />
INSERT<br />
PLASTIC<br />
INSERT<br />
INSERT<br />
WALL<br />
MOUNTING<br />
BRACKET<br />
WALL<br />
WALL WALL<br />
MOUNTING WALL<br />
MOUNTING<br />
WALL<br />
MOUNTING<br />
BRACKET<br />
SCREW<br />
MOUNTING<br />
AND BRACKET<br />
Step 2 MOUNTING BRACKET RAWL<br />
BRACKET<br />
PLUG<br />
In order to maximise BRACKET stability, fit the radiator support brackets to the<br />
back section of the radiator, preferably at the top and between the<br />
second and third sections at each end.<br />
Step 3<br />
Fit the wall mounting brackets to the wall using the screws and<br />
rawl plugs provided to align with the centre of the radiator support<br />
brackets. It is recommended that there is 150mm clearance at the<br />
bottom of the radiator but ensure there is sufficient room at the sides<br />
for the flow and return valves.<br />
(<strong>Radiator</strong> removed for clarity)<br />
SCREW AND<br />
RAWL PLUG<br />
RADIATOR<br />
SUPPORT<br />
BRACKET<br />
SCREW AND<br />
RAWL SCREW<br />
PLUG<br />
AND<br />
SCREW AND<br />
RAWL PLUG<br />
RAWL PLUG<br />
WALL<br />
MOUNTING<br />
BRACKET<br />
RADIATOR<br />
SUPPORT<br />
BRACKET<br />
RADIATOR<br />
RADIATOR<br />
RADIATOR<br />
SUPPORT RADIATOR SUPPORT<br />
SUPPORT<br />
BRACKET SUPPORT BRACKET<br />
BRACKET<br />
BRACKET<br />
WALL<br />
MOUNTING<br />
BRACKET<br />
WALL<br />
WALL<br />
MOUNTING WALL<br />
MOUNTING WALL<br />
BRACKET MOUNTING<br />
BRACKET MOUNTING<br />
BRACKET<br />
BRACKET<br />
Step 4<br />
Insert the spacer brackets towards the bottom of the radiator between<br />
the same sections of radiator as the radiator support brackets. Adjust<br />
the plastic screws to ensure the radiator rests vertically.<br />
RADIATOR SUPPORT<br />
BRACKET<br />
RADIATOR FEET (if required)<br />
Should the wall be of insufficient strength to<br />
support the radiator then it is recommended<br />
that the feet are used and placed in line with<br />
the brackets.<br />
RADIATOR SUPPORT<br />
BRACKET<br />
RADIATOR SUPPORT<br />
RADIATOR SUPPORT<br />
BRACKET RADIATOR SUPPORT<br />
BRACKET<br />
BRACKET<br />
RADIATOR SUPPORT<br />
BRACKET<br />
FOOT<br />
ADJUSTMENT<br />
LOCKING<br />
SCREW<br />
SPACER<br />
BRACKET<br />
FOOT<br />
ADJUSTMENT<br />
LOCKING<br />
SCREW FOOT<br />
FOOT<br />
ADJUSTMENT FOOT<br />
ADJUSTMENT<br />
LOCKINGADJUSTMENT<br />
LOCKING<br />
SCREW LOCKING<br />
SCREW<br />
SCREW<br />
3<br />
Tubular steel<br />
FOOT<br />
ADJUSTMENT<br />
LOCKING<br />
SCREW<br />
SPACER<br />
BRACKET<br />
SPACER<br />
SPACER<br />
BRACKET SPACER<br />
BRACKET<br />
BRACKET<br />
SPACER<br />
BRACKET<br />
3<br />
3<br />
3 Tubular Tubular steel<br />
Tubular steel steel<br />
3<br />
Tubular steel
installation instructions<br />
Traditional Tubular Rads Article Number Net. wt. (kg) Length (mm) Depth (mm) Height (mm) Outputs Watts Outputs BTUs<br />
2 Col. Sec.<br />
10 0020085259 9.6 450 66 592 440 1501<br />
13 0020085260 12.5 585 66 592 572 1951<br />
2/600<br />
17 0020085261 16.3 765 66 592 748 2552<br />
22 0020085262 21.1 990 66 592 968 3302<br />
26 0020085263 25.0 1170 66 592 1144 3903<br />
30 0020085264 28.8 1350 66 592 1320 4503<br />
4 0020085265 10.0 180 66 1792 496 1692<br />
6 0020085266 15.1 270 66 1792 744 2539<br />
2/1800<br />
8 0020085267 20.1 360 66 1792 992 3385<br />
10 0020085268 25.1 450 66 1792 1240 4231<br />
12 0020085269 30.1 540 66 1792 1488 5077<br />
3 Col. Sec.<br />
6 0020085270 8.5 270 107 592 372 1269<br />
8 0020085271 11.4 360 107 592 496 1692<br />
10 0020085272 14.2 450 107 592 620 2115<br />
3/600<br />
14 0020085273 19.9 630 107 592 868 2961<br />
18 0020085274 25.6 810 107 592 1116 3807<br />
22 0020085275 31.2 990 107 592 1364 4653<br />
26 0020085276 36.9 1170 107 592 1612 5499<br />
30 0020085277 42.6 1350 107 592 1860 6345<br />
4 Col. Sec.<br />
10 0020085278 10.9 450 148 392 560 1911<br />
13 0020085279 14.2 585 148 392 728 2484<br />
4/400<br />
16 0020085280 17.4 720 148 392 896 3058<br />
22 0020085281 24.0 990 148 392 1232 4204<br />
26 0020085282 28.3 1170 148 392 1456 4969<br />
30 0020085283 32.7 1350 148 392 1680 5733<br />
10 0020085284 19.3 450 148 592 800 2730<br />
13 0020085285 25.1 585 148 592 1040 3549<br />
4/600<br />
17 0020085286 32.8 765 148 592 1360 4641<br />
22 0020085287 42.5 990 148 592 1760 6006<br />
26 0020085288 50.2 1170 148 592 2080 7098<br />
30 0020085289 57.9 1350 148 592 2400 8190<br />
10 0020085290 23.1 450 148 742 990 3378<br />
4/750<br />
14 0020085291 32.3 630 148 742 1386 4729<br />
18 0020085292 41.6 810 148 742 1782 6080<br />
6 Col. Sec.<br />
22 0020085293 50.8 990 148 742 2178 7432<br />
6/300<br />
13 0020085294 19.5 585 230 292 819 2795<br />
18 0020085295 27.0 810 230 292 1134 3870<br />
* C/C TAPPINGS mm – distance between pipe centre.<br />
Heat output ΔT50°C mean water temperature of 70°C and room temperature of 20°C.<br />
Product guarantee covers manufacturing or material defects only. Does not cover defects caused by faulty installation.<br />
Due to constant improvements on products we reserve the right to alter specifications and prices at any time without prior notice.<br />
Because of our constant endeavour for improvement, details may vary slightly from those shown in these instructions.<br />
<strong>Heatline</strong><br />
Nottingham Road,<br />
Belper,<br />
Derbyshire,<br />
DE56 1JT<br />
0020081873-12 Aug. 09<br />
Tel: 01773 596 099<br />
Fax: 01773 828 123<br />
Email: sales@heatline.co.uk