D311 - CITIZEN WATCH Global Network
D311 - CITIZEN WATCH Global Network
D311 - CITIZEN WATCH Global Network

Create successful ePaper yourself
Turn your PDF publications into a flip-book with our unique Google optimized e-Paper software.
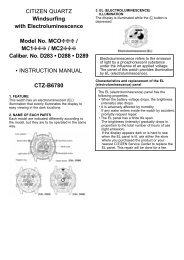
<strong>CITIZEN</strong> QUARTZ<br />
AIR DUNK<br />
Model No. ME5XXX<br />
Cal. No. <strong>D311</strong><br />
• INSTRUCTION MANUAL<br />
CTZ-B8018<br />
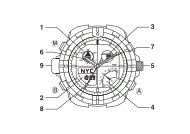
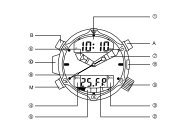
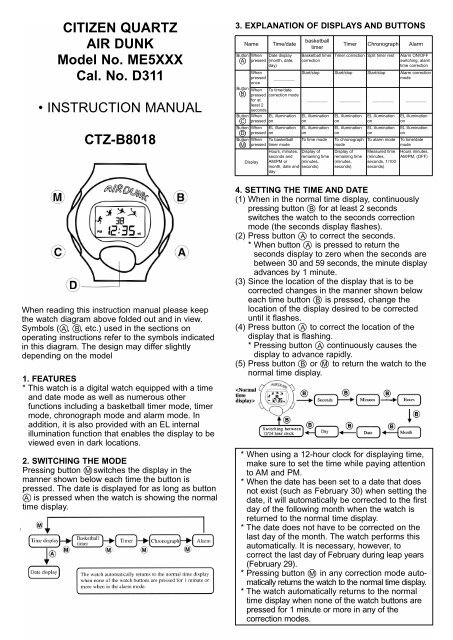
When reading this instruction manual please keep<br />
the watch diagram above folded out and in view.<br />
Symbols (A , B, etc.) used in the sections on<br />
operating instructions refer to the symbols indicated<br />
in this diagram. The design may differ slightly<br />
depending on the model<br />
1. FEATURES<br />
* This watch is a digital watch equipped with a time<br />
and date mode as well as numerous other<br />
functions including a basketball timer mode, timer<br />
mode, chronograph mode and alarm mode. In<br />
addition, it is also provided with an EL internal<br />
illumination function that enables the display to be<br />
viewed even in dark locations.<br />
2. SWITCHING THE MODE<br />
Pressing button M switches the display in the<br />
manner shown below each time the button is<br />
pressed. The date is displayed for as long as button<br />
A is pressed when the watch is showing the normal<br />
time display.<br />
3. EXPLANATION OF DISPLAYS AND BUTTONS<br />
Button<br />
A<br />
Name<br />
Time/date<br />
When Date display<br />
pressed (month, date,<br />
day)<br />
When<br />
pressed<br />
once<br />
_________<br />
Button When To time/date<br />
B pressed correction mode<br />
for at<br />
least 2<br />
seconds<br />
Button When EL illumination<br />
C pressed on<br />
Button When EL illumination<br />
D pressed on<br />
Button<br />
M<br />
When To basketball<br />
pressed timer mode<br />
Display<br />
Hours, minutes,<br />
seconds and<br />
AM/PM or<br />
month, date and<br />
day<br />
basketball<br />
timer<br />
Basketball timer<br />
correction<br />
Timer Chronograph Alarm<br />
Timer correction Split time/ rest<br />
Alarm ON/OFF<br />
switching, alarm<br />
time correction<br />
Start/stop Start/stop Start/stop Alarm correction<br />
mode<br />
_________ _________ _________ _________<br />
EL illumination<br />
on<br />
EL illumination<br />
on<br />
To time mode<br />
Display of<br />
remaining time<br />
(minutes,<br />
seconds)<br />
EL illumination<br />
on<br />
EL illumination<br />
on<br />
To chronograph<br />
mode<br />
Display of<br />
remaining time<br />
(minutes,<br />
seconds)<br />
EL illumination<br />
on<br />
EL illumination<br />
on<br />
To alarm mode<br />
Measured time<br />
(minutes,<br />
seconds, 1/100<br />
seconds)<br />
EL illumination<br />
on<br />
EL illumination<br />
on<br />
To time/date<br />
mode<br />
Hours minutes,<br />
AM/PM, (OFF)<br />
4. SETTING THE TIME AND DATE<br />
(1) When in the normal time display, continuously<br />
pressing button B for at least 2 seconds<br />
switches the watch to the seconds correction<br />
mode (the seconds display flashes).<br />
(2) Press button A to correct the seconds.<br />
* When button A is pressed to return the<br />
seconds display to zero when the seconds are<br />
between 30 and 59 seconds, the minute display<br />
advances by 1 minute.<br />
(3) Since the location of the display that is to be<br />
corrected changes in the manner shown below<br />
each time button B is pressed, change the<br />
location of the display desired to be corrected<br />
until it flashes.<br />
(4) Press button A to correct the location of the<br />
display that is flashing.<br />
* Pressing button A continuously causes the<br />
display to advance rapidly.<br />
(5) Press button B or M to return the watch to the<br />
normal time display.<br />
* When using a 12-hour clock for displaying time,<br />
make sure to set the time while paying attention<br />
to AM and PM.<br />
* When the date has been set to a date that does<br />
not exist (such as February 30) when setting the<br />
date, it will automatically be corrected to the first<br />
day of the following month when the watch is<br />
returned to the normal time display.<br />
* The date does not have to be corrected on the<br />
last day of the month. The watch performs this<br />
automatically. It is necessary, however, to<br />
correct the last day of February during leap years<br />
(February 29).<br />
* Pressing button M in any correction mode automatically<br />
returns the watch to the normal time display.<br />
* The watch automatically returns to the normal<br />
time display when none of the watch buttons are<br />
pressed for 1 minute or more in any of the<br />
correction modes.
5. USING THE BASKETBALL TIMER<br />
* The basketball timer can be set to any of the<br />
settings of 20, 15, 12, 6, 5 or 3 minutes.<br />
* A preliminary warning tone will sound every<br />
second until the set time is up when the time<br />
remaining on the timer reaches 10 seconds. In<br />
addition, a tone indicating that the time is up will<br />
sound for about 3 seconds when the set time is up.<br />
* A tone confirming operation sounds whenever a<br />
button is pressed.<br />
(Initial Timer Setting Mode)<br />
<br />
(1) When the set time is flashing in<br />
the basketball timer mode, the<br />
set time will change between<br />
20,15, 12, 6, 5 and 3 minutes<br />
each time button A is pressed.<br />
Press button A to display the<br />
time desired to be set.<br />
* Pressing button A continuously allows the set<br />
time to advance rapidly.<br />
<br />
(1) When button B is pressed, the basketball timer<br />
will start counting down from the set time.<br />
(2) The basketball timer can be stopped during<br />
timing by pressing button B , and then restarted<br />
by pressing button B again.<br />
(3) Pressing button A when the basketball timer is<br />
stopped returns the timer to the initial set time.<br />
[Initial Timer Setting Mode]<br />
<br />
(1) Pressing button A when the<br />
set time is flashing in the timer<br />
mode causes the set to be<br />
corrected backwards in 1<br />
minute increments. Press<br />
button B to display the<br />
desired set time.<br />
* Pressing button A continuously causes the<br />
display to advance rapidly.<br />
<br />
(1) The timer starts to count down from the set time<br />
when button B is pressed.<br />
(2) The timer is stopped by pressing button B during<br />
measurement. The timer is restarted by pressing<br />
button B again after the timer is stopped.<br />
(3) Pressing button A when the timer is stopped<br />
returns the watch to the initial set value after which<br />
the timer begins to count down again from the<br />
set value.<br />
An auto-return<br />
function is activated<br />
about 3 seconds<br />
after the set time is<br />
up (when a button<br />
has not been<br />
pressed).<br />
* When the watch has been switched to the timer<br />
mode after previously switching to a different<br />
mode when in the initial timer setting mode, when<br />
the timer is running or when the timer has been<br />
stopped, the watch will display each state as it<br />
was prior to switching to the mode. However, the<br />
watch will return to the initial timer setting mode<br />
following completion of timer measurement.<br />
* When the watch has been switched back to the<br />
timer mode after previously switching to a<br />
different mode when in the initial timer setting<br />
mode, when the timer is running, or when the<br />
timer has been stopped, the watch will display<br />
each state as it was prior to switching to the<br />
other mode. However, the watch will return to<br />
the initial timer setting mode following completion<br />
of timer measurement.<br />
6. USE OF THE TIMER<br />
* The timer can be set in 1 minute increments from<br />
60 minutes to 1 minute.<br />
* When measurement is completed, a tone indicating<br />
that the time is up will sound for about 3 seconds.<br />
* A tone confirming operation sounds whenever a<br />
button is pressed.<br />
7. Using the Chronograph<br />
* The chronograph is able to measure and display<br />
time in 1/100 second increments up to a maximum<br />
of 60 minutes. The chronograph returns to 00 minutes,<br />
00.00 seconds after measuring 60 minutes, after<br />
which it continue to measure time.<br />
[Chronograph Reset Mode]<br />
<br />
(1) The chronograph is started<br />
and stopped by pressing<br />
button B .<br />
1 The chronograph is started<br />
and stopped each time button B is pressed during<br />
timing.<br />
(2) The chronograph is reset by pressing button A<br />
while it is stopped.
(1) Press button B to start timing.<br />
(2) Press button A during timing to display the split<br />
time.<br />
*The letters “SPL” flash when split time is<br />
displayed.<br />
(3) Press button A again to cancel the split time<br />
and continue timing after adding the time that<br />
elapsed during display of split time.<br />
*Repeat steps (2) and (3) when desiring to<br />
repeat display of split time.<br />
(4) Pressing button B while split time is displayed<br />
ends split time measurement.<br />
(5) Next time, when button A is pressed, the time<br />
is displayed after adding the time that elapsed<br />
during display of split time.<br />
(6) Finally, press button A to reset the<br />
chronograph.<br />
8. Using the Alarm<br />
* Once the alarm has been set to on (set time is<br />
displayed), the alarm will sound at the same time<br />
each day until it is cancelled (OFF is displayed).<br />
<br />
(1) Press button B to<br />
cause the “hours”<br />
display to flash.<br />
(2) Press button A to<br />
correct the “hours”.<br />
(3) Press button B to<br />
cause the ‘‘minutes’’<br />
display to flash,<br />
and then press<br />
button A to<br />
correct the<br />
“minutes”.<br />
* Pressing button A continuously causes the<br />
display to advance rapidly.<br />
(4) Press button B after correcting the minutes to<br />
return the watch to the normal alarm display.<br />
<br />
The alarm is switched on and off each time button<br />
A is pressed during the normal alarm display.<br />
<br />
(1) Press button B to start timing.<br />
(2) When button A is pressed simultaneously to the<br />
1st place runner crossing the finish line, the time<br />
of the 1st place runner is displayed.<br />
* In this state, timing continues while the time of<br />
the 1st place runner is displayed on the watch.<br />
(3) When button B is pressed simultaneously to the<br />
2nd place runner crossing the finish line, timing<br />
stops.<br />
* In this state, the time of the 1st place runner<br />
continues to be displayed.<br />
(4) When button A is pressed again, the time of the<br />
2nd place runner is displayed.<br />
(5) Pressing button A resets the chronograph to<br />
zero.<br />
* When the watch is returned to the chronograph<br />
mode after switching to a different mode while<br />
the chronograph is measuring time, the watch<br />
will return to measurement as it was prior to<br />
switching to the other mode. However,<br />
exceptions to this are as follows:<br />
1 When the chronograph is measuring split<br />
time, the watch will return to chronograph<br />
measurement.<br />
2 When the chronograph is in the split stop<br />
mode, the watch will enter the stop mode.<br />
<br />
The alarm tone sounds for approximately 15 seconds.<br />
<br />
The alarm tone can be turned off by pressing any<br />
button.<br />
<br />
The alarm tone monitor can be sounded by pressing<br />
button A when switching the alarm ON or OFF in<br />
the normal alarm display. The alarm sounds for as<br />
long as button A is pressed.<br />
* The watch automatically returns to the normal<br />
alarm display (ON state) when none of the<br />
watch buttons are pressed for 1 minute or more<br />
when in the alarm correction mode.<br />
* In addition, the watch automatically returns to<br />
the normal time display when none of the watch<br />
buttons are pressed for 1 minute or more when<br />
in the normal alarm display.<br />
* When the time is displayed using a 12-hour<br />
clock, since the alarm time also uses a 12-hour<br />
clock, pay attention to AM and PM when setting<br />
the alarm time.<br />
9. EL Internal Illumination Function<br />
<br />
EL is the abbreviation for electroluminescence. It<br />
refers to the phenomenon in which light is emitted<br />
when a voltage is applied to a certain type of<br />
material. This watch incorporates an EL substance<br />
and uses that substance to emit light.<br />
<br />
Press button C or D to turn on the EL illumination.
10. All-Reset Procedure<br />
Perform the all-reset procedure described below<br />
after replacing the battery or when the watch does<br />
not run properly or has an abnormal display due to<br />
a strong impact (such as when there is no display<br />
showing or when the alarm sounds completely).<br />
(1) Press button A, B, C and M simultaneously.<br />
* All cells and the EL internal illumination will<br />
light during the time the buttons are pressed.<br />
* The displays of all cells will continue to be lit<br />
from the time the buttons are released until the<br />
next button is pressed or until 60 seconds have<br />
elapsed. (EL internal illumination will be turned<br />
off when the buttons are released.)<br />
(2) Following completion of the all-reset procedure,<br />
reset each of the modes before using the watch.<br />
11. Precautions<br />
CAUTION: Water-resistance performance<br />
There are several types of water-resistance<br />
watches, as shown in the following table.<br />
For correct use within the design limits of the<br />
watch, confirm the level of water-resistance<br />
of your watch, as indicated on the dial and<br />
the case, consult the table.<br />
Examples of Use<br />
* (The unit “bar” is roughly equal to 1<br />
atmosphere.)<br />
Dial<br />
Indication<br />
Case<br />
(Case back)<br />
Specifications<br />
Minor exposure to<br />
water (washing<br />
face, rain, etc.)<br />
moderate<br />
exposure to water<br />
(washing, kitchen,<br />
work swimming,<br />
etc.)<br />
Marine sports<br />
(skin diving)<br />
Scuba diving<br />
(with air tank)<br />
Saturation diving<br />
(helium enriched<br />
environment<br />
Operation of the<br />
crown with<br />
moisture visible<br />
WATER RESIST<br />
or no indication<br />
WATER<br />
RESIST(ANT)<br />
Water-resistant to<br />
3 atmospheres<br />
OK<br />
NO<br />
NO<br />
NO<br />
NO<br />
NO<br />
WR 50 or<br />
WATER RESIST<br />
50<br />
WATER<br />
RESIST(ANT) 5<br />
bar or WATER<br />
RESIST(ANT)<br />
Water-resistant to<br />
5 atmospheres<br />
OK<br />
OK<br />
NO<br />
NO<br />
NO<br />
NO<br />
WR 100/200 or<br />
WATER RESIST<br />
100/200<br />
WATER<br />
RESIST(ANT)<br />
10 bar / 20 bar or<br />
WATER<br />
RESIST(ANT)<br />
Water-resistant to<br />
10/20<br />
atmospheres<br />
* WATER RESIST(ANT) xxbar may also be<br />
indicated as W.R.xxbar<br />
Water-resistance for daily use (to 3 atmospheres):<br />
This type of watch is water-resistant to minor<br />
exposure to water. For example, you may wear the<br />
watch while washing your face; however it is not<br />
designed for use underwater.<br />
Upgraded water-resistance for daily use<br />
(to 5 atmospheres): This type of watch is waterresistant<br />
to moderate exposure to water. You may<br />
wear the watch while swimming, but it is not<br />
designed for use while skin diving.<br />
Upgraded water-resistant for daily use (to 10/20<br />
atmospheres): This type of watch may be used for<br />
skindiving; however it is not designed for scuba or<br />
saturated diving such as helium gas.<br />
OK<br />
OK<br />
OK<br />
NO<br />
CAUTION<br />
• Do NOT operate the button with wet fingers or<br />
when the watch is wet. Water may enter the watch<br />
and compromise the water-resistance.<br />
• If the watch is used in seawater, rinse with fresh<br />
water afterward and wipe with a dry cloth.<br />
• If moisture has entered the watch, or if the inside<br />
of the crystal is fogged up and does not become<br />
clear within a day, immediately take the watch to<br />
your dealer or Citizen Service Centre for repair.<br />
Leaving the watch in such a state will allow<br />
corrosion to form inside.<br />
• If seawater enters the watch, place the watch in a<br />
box or plastic bag and immediately take it in for<br />
repair. Otherwise, pressure will increase, and parts<br />
(crystal, buttons, etc) may come off.<br />
NO<br />
NO
CAUTION: Keep your watch clean.<br />
• Dust and dirt tend to be deposited in gaps in the<br />
back of the case or band. Deposited dust and dirt<br />
may cause corrosion and soil your clothing. Clean<br />
the watch occasionally.<br />
Cleaning the Watch<br />
• Use a soft cloth to wipe off dirt, perspiration and<br />
water from the case and crystal.<br />
• Use a soft, dry cloth to wipe perspiration and dirt<br />
from leather band.<br />
• To clean a metal, plastic, or rubber watchband,<br />
wash away dirt with mild soap and water. Use a<br />
soft brush to remove dust and dirt jammed in the<br />
gaps in the metal band. If your watch is not waterresistant,<br />
take it to your dealer.<br />
NOTE: Avoid using solvents (thinner, benzine, etc.),<br />
as they may mar the finish.<br />
WARNING: Handling of the battery<br />
• Keep the battery out of the reach of small children.<br />
If a child swallows the battery, contact a physician<br />
immediately.<br />
CAUTION: Replacing the battery<br />
• For replacement of the battery, take your watch to<br />
your dealer or Citizen Service Centre.<br />
• Replace the battery as soon as possible if the<br />
service life of the battery has expired. Leaving a<br />
depleted battery in the watch may result in<br />
leakage, which can damage the watch severely.<br />
CAUTION: Operating environment<br />
• Use the watch within the operating-temperature<br />
range specified in the instruction manual.<br />
Using the watch where temperatures are outside<br />
the specified range, may result in deterioration of<br />
functions or even stoppage of the watch.<br />
• Do NOT use the watch in a place where it is<br />
exposed to high temperature, such as a sauna.<br />
Doing so may result in a skin burn.<br />
• Do NOT leave the watch in a place where it is<br />
exposed to high temperature, such as the glove<br />
compartment or dash-board of a car.<br />
Doing so may result in deterioration of the watch,<br />
such as deformation of plastic parts.<br />
• Do NOT place the watch close to a magnet.<br />
Timekeeping will become inaccurate if you place<br />
the watch close to magnetic health equipment<br />
such as a magnetic necklace or a magnetic latch<br />
of a refrigerator door or handbag clasp or the<br />
earphone of a mobile phone. If this has occurred,<br />
move the watch away from the magnet and reset<br />
the time.<br />
• Do NOT place the watch close to household<br />
appliances that generate static electricity.<br />
Timekeeping may become inaccurate if the watch<br />
is exposed to strong static electricity, such as<br />
emitted from a TV screen.<br />
• Do NOT subject the watch to strong shocks such<br />
as dropping it onto a hard floor.<br />
• Avoid using the watch in an environment where it<br />
may be exposed to chemicals or corrosive gases.<br />
If solvents, such as thinner and benzine, or<br />
substances containing such solvents, come in<br />
contact with the watch, discolouration, melting,<br />
cracking, etc. may result. If the watch comes in<br />
contact with mercury used in thermometers, the<br />
case, band or other parts may become<br />
discoloured.<br />
12. Specifications<br />
1. Caliber No. <strong>D311</strong><br />
2. Type: Digital quartz watch<br />
3. Accuracy: Within 45 seconds per month on<br />
average (when worn at normal<br />
temperature of +5C/41F to<br />
+35C/95F)<br />
4. Operations Temperature Range:<br />
0C/32F to +50C/122F<br />
5. Functions:<br />
• Time: Hours, minutes, seconds, 12/24-hour clock<br />
• Date: Month, date, day<br />
• Basketball timer: Six types of time settings (20,<br />
15, 12, 6, 5 or 3 minutes)<br />
• Timer: 60 minute timer (1 minute increments)<br />
• Chronograph: 60 minute clock (1/100 second<br />
increments), split time measurements<br />
• Alarm: Hours, minutes, 12/24-hour clock<br />
6. Additional Functions: EL internal illumination<br />
function<br />
7. Battery: No.280-206, battery code: CR2016<br />
8. Battery Life: Approx. 3 years (assuming that the<br />
alarm tone is used 30 seconds per day, and the<br />
EL illumination for 3 seconds.