Table of Contents - CITIZEN WATCH Global Network
Table of Contents - CITIZEN WATCH Global Network
Table of Contents - CITIZEN WATCH Global Network

Create successful ePaper yourself
Turn your PDF publications into a flip-book with our unique Google optimized e-Paper software.
<strong>Table</strong> <strong>of</strong> <strong>Contents</strong><br />
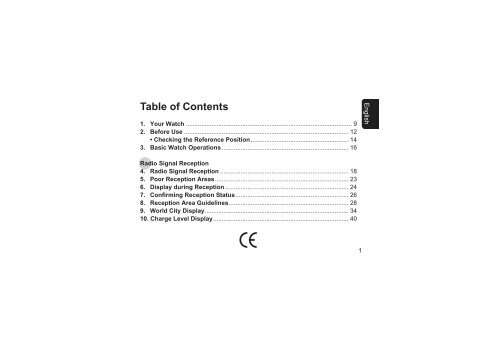
1. Your Watch ................................................................................................. 9<br />
2. Before Use ................................................................................................ 12<br />
• Checking the Reference Position ......................................................... 14<br />
3. Basic Watch Operations .......................................................................... 16<br />
English<br />
Radio Signal Reception<br />
4. Radio Signal Reception ........................................................................... 18<br />
5. Poor Reception Areas.............................................................................. 23<br />
6. Display during Reception ........................................................................ 24<br />
7. Confirming Reception Status.................................................................. 26<br />
8. Reception Area Guidelines...................................................................... 28<br />
9. World City Display.................................................................................... 34<br />
10. Charge Level Display............................................................................... 40<br />
1
Operations in Each Mode<br />
11. Changing Mode ........................................................................................ 42<br />
12. Using Home Time and World Time......................................................... 44<br />
13. Using Daylight Saving Time.................................................................... 46<br />
14. Setting the Time (TME) ............................................................................ 48<br />
15. Setting the Calendar (CAL)...................................................................... 52<br />
16. Using the Timer (TMR)............................................................................. 56<br />
17. Using the Chronograph (CHR)................................................................ 60<br />
18. Using the World Time Setting (WT-S)..................................................... 62<br />
19. Using the World Time Alarm (AL-1 and 2) ............................................. 66<br />
20. Using the Receive Setting (RX-S) ........................................................... 68<br />
21. LED Lights ................................................................................................ 72<br />
22. Resetting Your Watch.............................................................................. 72<br />
23. Adjusting the Reference Position........................................................... 74<br />
Using the Slide Rule Bezel ............................................................................ 78<br />
Solar Power<br />
24. Solar Power Function .............................................................................. 92<br />
25. Characteristics <strong>of</strong> the Solar Powered Watch......................................... 94<br />
A. Power Saving Function ....................................................................... 96<br />
B. Insufficient Charge Warning Function............................................... 98<br />
C. Overcharging Prevention Function.................................................... 99<br />
D. Guide to Charging Time .................................................................... 100<br />
E. Handling Your Solar Powered Watch............................................... 102<br />
Troubleshooting<br />
Radio Signal Reception Function ......................................................... 104<br />
Eco-Drive................................................................................................. 108<br />
Precautions................................................................................................... 110<br />
26. Specifications......................................................................................... 116<br />
2 3
Congratulations and Thank You for your selection <strong>of</strong> a <strong>CITIZEN</strong> Eco-Drive watch.<br />
To get the most out <strong>of</strong> your purchase, please be sure to read this manual and keep it<br />
on hand for reference.<br />
Once fully charged by exposure to light, your watch will give you years <strong>of</strong><br />
enjoyment and reliability.<br />
Please use this watch after it has been sufficiently<br />
charged by exposure to light.<br />
If the second hand <strong>of</strong> the watch is moving at two-second intervals, this indicates the<br />
watch is insufficiently charged. To ensure proper operation, the watch should be fully<br />
charged by placing the watch under direct sunlight for about eight (8) hours. We<br />
recommend the watch keep a high charge level to ensure optimum operation.<br />
Charge your watch as indicated in “Guide to Charging Time” (p. 100).<br />
Notice<br />
All repairs performed on this watch are to be performed at the <strong>CITIZEN</strong>.<br />
When desiring to have your watch repaired or inspected, please contact the Citizen<br />
Service Center either directly or through the store where you purchased your watch.<br />
4 5
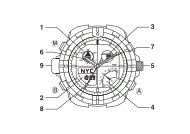
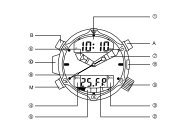
Part Names (1)<br />
Part Names (2): Digital Displays<br />
UTC hour hand<br />
UTC minute hand<br />
[Digital display 2] [Digital display 1]<br />
Charge level indicator/<br />
radio wave reception<br />
indicator<br />
Home time minute hand<br />
Button (B)<br />
Home city name<br />
World city name<br />
Home time hour hand<br />
Digital display 2<br />
(Displays the home<br />
city)<br />
Crown for turning<br />
the outside scale<br />
Home time second<br />
hand<br />
Mode hand<br />
24-hour hand<br />
Crown<br />
Button (A)<br />
Digital display 1<br />
(Displays world city/<br />
world time)<br />
Insufficient charge<br />
warning mark<br />
World city time<br />
Hour/minute/second<br />
Chronograph<br />
measurement mark<br />
Timer measurement mark<br />
Alarm setting mark<br />
Daylight saving time setting<br />
mark<br />
Morning: A<br />
Afternoon: P<br />
Note: To assist in the explanation, all parts <strong>of</strong> the digital display are shown in the illustration.<br />
• The illustrations shown in this manual may differ from the actual watch you have purchased.<br />
6 7
Part Names (3): Radio Wave Reception Display<br />
NO: Signal reception failed RX: Reception standby H, M, L: Reception level/<br />
reception status<br />
Modes where reception is<br />
possible: CAL, TME and<br />
RX-S<br />
W 1. Your Watch<br />
World Time Eco-Drive Radio Controlled Watch<br />
<br />
This watch is a radio controlled watch, which receives the standard time radio waves that are<br />
broadcast from radio wave transmitters in four regions, Japan, the USA, Europe (Germany) and<br />
China, and uses these waves to automatically correct the time and date. (p. 18)<br />
i Automatic reception: The watch will automatically receive the radio wave up to three<br />
times a day, at 2 a.m., 3 a.m. and 4 a.m., and adjust the time and date accordingly.<br />
The 4 a.m. automatic reception can be changed to any time <strong>of</strong> the day.<br />
i On demand reception: The radio wave can be received at any time <strong>of</strong> the day to adjust<br />
the time and date.<br />
In the event that a radio signal cannot be received, the watch can be manually set and will<br />
operate keeping time within +/- 15 seconds per month.<br />
JPN : JJY (Japan)<br />
USA : WWVB (USA)<br />
EUR : DCF77 (Germany)<br />
CHN: BPC (China)<br />
8 9
i UTC (Coordinated Universal Time), the time and date <strong>of</strong> 43 cities (or regions) from around<br />
the world and one city (any can be set) can be displayed and easily called up. It is<br />
convenient when traveling overseas on business or vacation.<br />
Daylight saving time can also be set. (p. 46)<br />
<br />
This is a multi-functional Eco-Drive watch, which is equipped with a solar power function for<br />
powering the watch by converting light energy into electric energy.<br />
i Charge level display function: This function displays the charge level in four grades, to<br />
give an approximate indication <strong>of</strong> how much the secondary battery is charged. (p. 40)<br />
i Power saving function: The watch is equipped with two power saving functions.<br />
If the watch face is not exposed to light for 30 minutes or longer, all the LCD display<br />
sections turn <strong>of</strong>f (Power saving 1). If the watch face is then not exposed to light for one<br />
week or longer, the hands are stopped in order to minimize the watch’s power consumption<br />
(Power saving 2). (p. 96)<br />
Important Points Regarding Radio Wave Reception<br />
There are two methods to receive radio signals during normal operation, Automatic and<br />
On Demand.<br />
The internal unidirectional antenna may be weakened by geography or building<br />
structures, which may require the user to place the watch near a window.<br />
When receiving radio waves:<br />
* Remove the watch from your wrist<br />
* Face the 9:00 position <strong>of</strong> the watch towards a window<br />
* Place the watch on a stable surface<br />
* Do not move the watch during this process. Movement <strong>of</strong> the watch may cause<br />
incomplete reception. During radio reception, the second hand <strong>of</strong> the watch moves in<br />
reception level.<br />
* When reception is complete, the watch will return to movement at one-second<br />
intervals.<br />
Reception can take from about 2 minutes to a maximum <strong>of</strong> 15 minutes.<br />
10 11
W 2. Before Use<br />
NO: Signal<br />
reception failed<br />
[Insufficient charging]<br />
Charge level<br />
indicator<br />
RX: Reception<br />
standby<br />
Crown<br />
Button (A)<br />
Mode hand<br />
Reception level/<br />
reception status<br />
H: High<br />
M: Middle<br />
L : Low<br />
[Fully charged]<br />
Check the movement <strong>of</strong><br />
the second hand.<br />
The second hand is<br />
moving at 1-second<br />
intervals.<br />
The second hand is<br />
moving at 2-second<br />
intervals or is stopped.<br />
Charge the watch<br />
sufficiently by placing it in<br />
direct sunlight as indicated<br />
in “Guide to Charging<br />
Time” (p. 100).<br />
Check the<br />
reception status.<br />
• Pull out the crown to<br />
position 1.<br />
• Turn the crown to<br />
align the mode hand<br />
with TME.<br />
• Return the crown to<br />
the normal position.<br />
• Press the lower right<br />
button (A) at the<br />
4:00 position.<br />
(p. 26)<br />
The second<br />
hand indicates<br />
a reception<br />
status <strong>of</strong> H, M<br />
or L<br />
The second<br />
hand indicates<br />
a reception<br />
status <strong>of</strong> NO<br />
Your watch is<br />
correctly receiving<br />
the standard time<br />
radio wave.<br />
It is ready to use.<br />
Refer to “On Demand<br />
Reception” (p. 20) to<br />
perform the radio wave<br />
reception.<br />
If you are unable to<br />
receive radio waves,<br />
please inquire to the<br />
Citizen Service Center.<br />
12 13
[Checking the Reference Position]<br />
Before using the watch, confirm that the hands are aligned with<br />
“0”, similar to when setting weighing scales<br />
i The reference position may become misaligned when<br />
the watch is exposed to strong magnetism, static<br />
electricity or impacts. Even if radio waves are received,<br />
the correct time will not be indicated unless the watch<br />
hands are aligned to the correct reference position.<br />
Check that the hands are properly aligned with “0”.<br />
Examples <strong>of</strong> magnetic products that can affect<br />
the watch.<br />
• Health products (for example, medical necklaces and waist<br />
bands that have magnetic fields)<br />
• Refrigerators (magnetic part <strong>of</strong> the door)<br />
• Electromagnetic cookers<br />
• Bags (with magnet fasteners)<br />
• Mobile phones (speaker part)<br />
Keep the watch away from items similar to those above.<br />
1. Pull the crown out to position 1 and turn to align<br />
the mode hand with CHR (chronograph mode).<br />
2. Pull out the crown to position 2.<br />
• The hands will move rapidly, stopping at the<br />
reference position recorded in the watch<br />
memory.<br />
Correct reference positions<br />
Charge level indicator: CHN<br />
UTC hour and minute hands: 12:00<br />
Hour, minute and second hands: 12:00:00<br />
24-hour hand: 12:00<br />
3. If the reference position is correct, the check is<br />
now complete. Press the crown back into its<br />
normal position.<br />
• If a position is incorrect, refer to step 3 and later<br />
in “Adjusting the Reference Position” and adjust<br />
it to the correct position. (p. 74)<br />
UTC hour and<br />
minute hands<br />
Hour, minute<br />
and second<br />
hands<br />
Charge level<br />
indicator<br />
Mode hand<br />
14 15<br />
24-hour<br />
hand
W 3. Basic Watch Operations<br />
* The watch receives the radio wave from the radio wave transmitter located in the<br />
home city’s region.<br />
Home time<br />
hour hand<br />
Home city<br />
(Digital display 2)<br />
Home time<br />
minute hand<br />
1.<br />
Check the<br />
charge level.<br />
(p. 40)<br />
Button (B)<br />
Button (A)<br />
Home time second hand<br />
Crown<br />
Digital display 1<br />
2.<br />
Set the home city.<br />
If the city in which you are<br />
situated is displayed in<br />
digital display 2,<br />
<br />
(1) Pull out the crown to<br />
position 1 and turn to align<br />
the mode hand with TME.<br />
(2) With the crown pulled out to<br />
position 1, press button (A)<br />
or (B) to call up the home<br />
city in digital display 1.<br />
(3) Press button (A) and button<br />
(B) at the same time to<br />
display the home city in<br />
digital display 2.<br />
3.<br />
Set the home time.<br />
If the home time is correct,<br />
(1) Set the time manually (p. 48)<br />
(2) Set the time by receiving the radio<br />
wave (p. 20)<br />
Caution:<br />
If the home city is set to a city that<br />
is outside the reception area, the<br />
radio wave cannot be received.<br />
Set the time manually.<br />
4.<br />
Set digital display 1.<br />
The world time or date can be<br />
displayed on digital display 1.<br />
Also, the mode can be switched<br />
in order to use the alarm, timer<br />
or chronograph. (p. 42)<br />
16 17
W 4. Radio Signal Reception<br />
Three types <strong>of</strong> radio signal reception are possible: automatic reception, on demand<br />
reception and recovery automatic reception.<br />
There are three modes where reception is possible: time (TME), calendar (CAL) and<br />
receive set (RX-S). The watch cannot receive signals in any other mode.<br />
Display the home city in digital display 2 when receiving the radio wave.<br />
Automatic reception<br />
• It is not necessary to operate buttons during automatic reception.<br />
• The watch will automatically receive the radio wave every day at 2<br />
a.m., 3 a.m. and 4 a.m.<br />
• The 4 a.m. reception can be changed to any time <strong>of</strong> the day. (p. 68o71)<br />
• Reception can be set to OFF. (p. 68o71)<br />
• Reception is not possible unless the crown is in the normal position.<br />
<br />
• If the home city is “UTC”, reception is not possible.<br />
1. Remove the watch from your wrist and place on<br />
• Reception is not possible during chronograph or timer measurement.<br />
a stable surface in a location, such as near a<br />
• The reception level may change depending on the surrounding environment. While<br />
window, from which radio waves can be easily<br />
referring to reception level (H, M or L), change the watch location, direction and angle<br />
received, pointing the 9:00 side (reception<br />
to try to receive the radio wave.<br />
antenna position) in the direction <strong>of</strong> the radio<br />
• When the watch is receiving the radio wave, as a general rule, all <strong>of</strong> the hands will<br />
wave transmitter.<br />
stop. To check the time, hold the lower right button (A) for 2 seconds to cancel radio<br />
2. The watch will automatically receive the radio<br />
wave reception. The hands will then return to the current time.<br />
wave every day at 2 a.m.<br />
An antenna for receiving the radio<br />
• Even while the radio wave is being received, the second hand will continue to rotate to<br />
signals is located inside the watch<br />
align the minute hand with the current time. This shortens the time it takes to set the<br />
(on the 9:00 position).<br />
correct time.<br />
18 19
On Demand Reception (Manual Reception)<br />
• Signals can be received at any time.<br />
[Mode hand position<br />
when receiving]<br />
<br />
1. Pull the crown out to position 1 and turn to align the<br />
mode hand with the CAL, TME or RX-S position.<br />
2. Return the crown to the normal position.<br />
3. Remove the watch from your wrist and place on a<br />
stable surface near a window where the radio signal<br />
can be easily received.<br />
Recovery Automatic Reception (Automatic Reception)<br />
• If the watch stops due to insufficient charging, expose the watch to<br />
sunlight to recharge it. When the watch is recharged sufficiently, it will<br />
automatically receive the radio wave once.<br />
* Regularly charge your radio controlled watch so it does not become insufficiently<br />
charged.<br />
The radio wave reception can be checked with “Confirming<br />
Reception Status”. (p. 26)<br />
4. Point the 9:00 side <strong>of</strong> the watch in the direction <strong>of</strong> the radio wave transmitter, and hold<br />
down the lower right button (A) for more than 2 seconds. Release when the<br />
confirmation tone sounds and the second hand stops at RX. The second hand will then<br />
move to H, M or L, and reception will begin.<br />
* Do not move the watch during reception.<br />
5. When the radio wave has been properly received, the second hand will automatically<br />
move from H, M or L to the time that was received, all the hands will be corrected,<br />
and the second hand will return to 1-second interval movement.<br />
* Reception can take a maximum <strong>of</strong> 15 minutes.<br />
20 21
If the watch has received insufficient light for charging or has been kept in a dark<br />
location for an extended period <strong>of</strong> time (one week or more), the Power Save Feature <strong>of</strong><br />
the watch is activated and the hands <strong>of</strong> the watch stop. Even though the watch will not<br />
show movement, the correct time is kept in memory. When the watch is in the Power<br />
Save mode, it will continue to keep the correct time internally. In some instances,<br />
“Automatic Reception” may not be successful due to a weak signal reception. When<br />
resuming use <strong>of</strong> the watch after the power save mode has been activated for an extended<br />
period <strong>of</strong> time, you can cancel the Power Save function by placing the watch in light<br />
sufficient for charging and performing the “On Demand” reception process to correctly<br />
set the time and date. (Refer to page 96 for information on the Power Save Function.)<br />
W 5. Poor Reception Areas<br />
It may not be possible to receive radio waves under environmental conditions where reception<br />
is difficult or in areas susceptible to radio noise, such as those shown in the illustrations below.<br />
While referring to the reception level display, try to find a location with better reception.<br />
j Inside reinforced concrete<br />
buildings or underground<br />
j Near high-tension electrical<br />
lines, railway overhead wires<br />
or communication facilities<br />
j Inside vehicles, including<br />
cars, trains and aero planes<br />
j Near TVs, refrigerators,<br />
computers, fax machines and other j Near cellular j Extremely hot or cold locations<br />
home electronics or appliances phones that are<br />
22<br />
in use<br />
23
W 6. Display during Reception<br />
[Second hand display]<br />
Radio wave<br />
reception<br />
indicator<br />
[Digital display]<br />
[During reception standby]<br />
j Second hand moves to RX and<br />
stops.<br />
The radio wave reception<br />
indicator points to the received<br />
transmitter.<br />
Off<br />
[Receiving signal]<br />
j The second hand moves from<br />
RX to reception level H, M or L<br />
and reception starts.<br />
Off<br />
[Reception completed]<br />
j When the reception is<br />
successful, the second hand<br />
will return to 1-second interval<br />
movement and the other hands<br />
will be automatically corrected.<br />
<br />
Reception can take from about 2 minutes to a<br />
maximum <strong>of</strong> 15 minutes, depending on factors such<br />
as the weather or noise. If the radio wave reception<br />
fails, the watch may return immediately to the<br />
normal display.<br />
[Caution] During reception, the second hand may<br />
rotate once and show the reception level<br />
again.<br />
Do not move the watch until the second<br />
hand has returned to 1-second interval<br />
movement.<br />
Repeatedly switches<br />
between on and <strong>of</strong>f<br />
j If the reception fails, RC and<br />
NO are displayed.<br />
24 25
W 7. Confirming Reception Status<br />
• The result <strong>of</strong> the radio wave reception can be confirmed.<br />
• The daylight saving time setting status <strong>of</strong> the home city can be confirmed.<br />
1. Pull the crown out to position 1 and set the mode to TME, CAL or RX-S.<br />
2. Press the crown back into its normal position and press the lower right button (A)<br />
once to confirm the reception status. The second hand will move to H, M, L or NO.<br />
• The daylight saving time setting status for the home time is displayed on digital<br />
display 2 (flashes alternately between SMT and ON or OFF).<br />
• The radio wave reception indicator points to [Digital display 2]<br />
JPN, EUR, USA or CHN.<br />
3. Press the lower right button (A) once.<br />
• The watch returns to the normal time display<br />
(1-second interval movement).<br />
• It also returns automatically to normal<br />
display if there are no operations for 10<br />
seconds.<br />
Reception<br />
level<br />
H<br />
M<br />
L<br />
NO<br />
Signal reception failed<br />
Reception status<br />
Radio wave reception environment was very<br />
good<br />
Radio wave reception environment was good<br />
Radio wave reception environment was not very<br />
good<br />
* The time display may shift slightly depending on the reception environment and<br />
internal watch processing even if radio waves are properly received.<br />
* H, M and L indicate the reception status and are not connected to the performance <strong>of</strong><br />
the watch.<br />
• If NO is indicated, find a location or direction where the reception is better and<br />
perform on demand reception again. (p. 20)<br />
26 27
W 8. Reception Area Guidelines<br />
Standard time<br />
radio signal<br />
Transmitter<br />
Frequency<br />
This watch can receive standard time radio waves broadcast from Japan (two<br />
transmitters), the USA, Europe (Germany) and China.<br />
The standard time radio wave to be received can be changed by selecting the city in<br />
another region.<br />
The maps show the approximate reception areas. However, note that the radio wave<br />
condition could change due to factors including the weather (such as lightning) and<br />
changes in the season or sunrise/sunset time.<br />
The reception area on the map is only guideline, and it may be difficult to receive the<br />
radio signal even within the areas indicated on the map.<br />
JPN<br />
USA<br />
EUR<br />
JJY<br />
Japan<br />
WWVB<br />
USA<br />
DCF77<br />
Germany<br />
Ohtakadoya-yama Standard Time Transmitter<br />
(Fukushima Transmitter)<br />
Hagane-yama Standard Time Transmitter<br />
(Kyushu Transmitter)<br />
Fort Collins Transmitter, Denver, Colorado<br />
Mainflingen Transmitter, Southeast Frankfurt<br />
40 kHz<br />
60 kHz<br />
60 kHz<br />
77.5 kHz<br />
CHN<br />
BPC<br />
China<br />
Shangqiu Transmitter, Henan<br />
68.5 kHz<br />
The standard time radio wave used by this radio controlled watch may be interrupted<br />
occasionally due to special circumstances at the radio wave transmitter.<br />
Even if reception <strong>of</strong> the standard time radio wave has failed, the watch will continue to<br />
be accurate to within ±15 seconds per month.<br />
28 29
JPN: JJY (Japan) Automatically selects one <strong>of</strong> the two transmitters<br />
Fukushima Transmitter: Radius <strong>of</strong> approximately 1,500 km from the transmitter<br />
Kyushu Transmitter: Radius <strong>of</strong> approximately 2,000 km from the transmitter<br />
CHN: BPC (China) Shangqiu, Henan: Radius <strong>of</strong> approximately 1,500 km from<br />
the transmitter<br />
30<br />
31
USA: WWVB (USA) Fort Collins: Radius <strong>of</strong> approximately 3,000 km from the<br />
transmitter<br />
EUR: DCF77 (Germany) Mainflingen: Radius <strong>of</strong> approximately 1,500 km from<br />
the transmitter<br />
32<br />
33
W 9. World City Display<br />
UTC (Coordinated Universal Time) and 43 cities (or regions) are registered in this watch<br />
in advance, and it is also possible to register one additional city. The time <strong>of</strong> each city<br />
can be called up and displayed.<br />
• Press the upper right button (B) while the crown is in position 1 during TME mode or<br />
CAL mode to display in sequence from the top left to bottom right the city names<br />
shown in “<strong>Table</strong> <strong>of</strong> UTC Time Differences” (p. 36), and press the lower right button<br />
(A) to display the city names in sequence from the bottom right to top left.<br />
34<br />
UTC: Coordinated Universal Time<br />
This is the time <strong>of</strong> an atomic clock that is used as the global standard (= international atomic time).<br />
It uses leap seconds to correct deviations in time systems that are based on the rotation <strong>of</strong> the Earth<br />
(universal time).<br />
[Cities and the standard time radio<br />
wave assignment]<br />
• The received standard time radio waves shown<br />
in “<strong>Table</strong> <strong>of</strong> UTC Time Differences” are<br />
assigned one <strong>of</strong> the following four radio wave<br />
transmitters, in accordance with the home city<br />
in digital display 2.<br />
[Standard time radio wave<br />
assignment]<br />
Radio signal transmitter JPN : JJY (Japan)<br />
USA : WWVB (USA)<br />
Digital display 2<br />
EUR : DCF77 (Germany)<br />
CHN : BPC (China)<br />
• Radio wave transmitters are assigned even for countries and regions outside the<br />
reception area.<br />
• For regions that are assigned Japan’s standard time radio wave (JJY), either the<br />
Fukushima transmitter or Kyushu transmitter is selected automatically for reception,<br />
whichever is easier to receive.<br />
35
[<strong>Table</strong> <strong>of</strong> UTC Time Differences]<br />
Set to TME mode and press the upper right button (B) repeatedly while the crown is in<br />
position 1 to display in sequence in digital display 1 the table’s city names from top to<br />
bottom, and press the lower right button (A) to display in sequence the city names from<br />
bottom to top.<br />
• Radio waves are only received from the assigned transmitters.<br />
(Example: When TYO is displayed in digital display 2, radio waves other than the<br />
Japan radio wave cannot be received.)<br />
Refer to the “Received standard time radio wave” item for the radio wave that is<br />
received in each city.<br />
“EUR” c Europe radio wave, “CHN” c China radio wave, “JPN” c Japan radio<br />
wave, “USA” c USA radio wave<br />
Display<br />
UTC<br />
LON<br />
MAD<br />
PAR<br />
ROM<br />
BER<br />
City name<br />
Coordinated<br />
universal time<br />
London<br />
Madrid<br />
Paris<br />
Rome<br />
Berlin<br />
Time<br />
difference<br />
0<br />
0<br />
+ 1<br />
+ 1<br />
+ 1<br />
+ 1<br />
Received<br />
radio wave<br />
transmitter<br />
---<br />
EUR<br />
EUR<br />
EUR<br />
EUR<br />
EUR<br />
Display<br />
CAI<br />
ATH<br />
JNB<br />
MOW<br />
RUH<br />
THR<br />
DXB<br />
City name<br />
Cairo<br />
Athens<br />
Johannesburg<br />
Moscow<br />
Riyadh<br />
Tehran<br />
Dubai<br />
Time<br />
difference<br />
+ 2<br />
+ 2<br />
+ 2<br />
+ 3<br />
+ 3<br />
+ 3.5<br />
+ 4<br />
Received<br />
radio wave<br />
transmitter<br />
EUR<br />
EUR<br />
EUR<br />
EUR<br />
EUR<br />
EUR<br />
EUR<br />
* National governments may change the period <strong>of</strong> daylight saving time, the time<br />
difference, or the names <strong>of</strong> cities.<br />
36<br />
37
Display<br />
City name<br />
Time<br />
difference<br />
Received<br />
radio wave<br />
transmitter<br />
Display<br />
City name<br />
Time<br />
difference<br />
Received<br />
radio wave<br />
transmitter<br />
Display<br />
City name<br />
Time<br />
difference<br />
Received<br />
radio wave<br />
transmitter<br />
Display<br />
City name<br />
Time<br />
difference<br />
Received<br />
radio wave<br />
transmitter<br />
KBL<br />
KHI<br />
Kabul<br />
Karachi<br />
+ 4.5<br />
+ 5<br />
EUR<br />
CHN<br />
TYO<br />
ADL<br />
Tokyo<br />
Adelaide<br />
+ 9<br />
+ 9.5<br />
JPN<br />
JPN<br />
DEN<br />
MEX<br />
Denver<br />
Mexico City<br />
- 7<br />
- 6<br />
USA<br />
USA<br />
FEN<br />
Fernando de<br />
Noronha<br />
- 2<br />
EUR<br />
DEL<br />
Delhi<br />
+ 5.5<br />
CHN<br />
SYD<br />
Sydney<br />
+ 10<br />
JPN<br />
CHI<br />
Chicago<br />
- 6<br />
USA<br />
PDL<br />
Ponta Delgada<br />
- 1<br />
EUR<br />
DAC<br />
RGN<br />
BKK<br />
Dhaka<br />
Yangon<br />
Bangkok<br />
+ 6<br />
+ 6.5<br />
+ 7<br />
CHN<br />
CHN<br />
CHN<br />
NOU<br />
AKL<br />
SUV<br />
Noumea<br />
Auckland<br />
Suva<br />
+ 11<br />
+ 12<br />
+ 12<br />
JPN<br />
JPN<br />
JPN<br />
NYC<br />
YMQ<br />
SCL<br />
New York<br />
Montreal<br />
Santiago de Chile<br />
- 5<br />
- 5<br />
- 4<br />
USA<br />
USA<br />
USA<br />
HOM<br />
Home<br />
(Time difference set<br />
by user)<br />
Any<br />
Depends<br />
on the time<br />
difference<br />
SIN<br />
Singapore<br />
+ 8<br />
CHN<br />
MDY<br />
Midway<br />
- 11<br />
USA<br />
RIO<br />
Rio de Janeiro<br />
- 3<br />
USA<br />
HKG<br />
Hong Kong<br />
+ 8<br />
CHN<br />
HNL<br />
Honolulu<br />
- 10<br />
USA<br />
BJS<br />
Beijing<br />
+ 8<br />
CHN<br />
ANC<br />
Anchorage<br />
- 9<br />
USA<br />
TPE<br />
Taipei<br />
+ 8<br />
JPN<br />
YVR<br />
Vancouver<br />
- 8<br />
USA<br />
SEL<br />
Seoul<br />
+ 9<br />
JPN<br />
LAX<br />
Los Angeles<br />
- 8<br />
USA<br />
38<br />
39
W 10. Charge Level Display<br />
• The charge level (approximate) is displayed in four grades to show how much the<br />
secondary battery is charged.<br />
• The charge level indicator points to the middle <strong>of</strong> each grade.<br />
• Use the charge level display as a guideline when wearing your watch. We recommend<br />
that you regularly check the charge level and keep it at level 2 or above.<br />
40<br />
[Checking the charge level display]<br />
Level<br />
Charge<br />
level<br />
display<br />
Remaining<br />
time<br />
(approximate)<br />
Level 0<br />
About 3 days<br />
Insufficient<br />
charging. Recharge<br />
the watch<br />
immediately.<br />
The insufficient<br />
charge warning is<br />
activated at this<br />
level.<br />
Level 1 Level 2 Level 3<br />
About 3 to<br />
20 days<br />
The charging level<br />
is rather low.<br />
Recharge the<br />
watch.<br />
About 20 to<br />
130 days<br />
The charge<br />
condition is good.<br />
The watch can be<br />
used normally at<br />
this level.<br />
About 130 to<br />
180 days<br />
The watch is<br />
sufficiently charged.<br />
The watch is fully<br />
charged and can be<br />
used normally at<br />
this level.<br />
[Caution]<br />
When the charge level indicator points at level 0, the secondary battery is very low. The second hand<br />
moves at 2-second intervals, and the mark flashes in the digital display.<br />
After about three days the battery will run out and the watch will stop. Be sure to recharge the watch<br />
before this condition is reached.<br />
41
W 11. Changing Mode<br />
This watch has eight modes: time (TME), calendar (CAL), timer (TMR), chronograph<br />
(CHR), world time set (WT-S), alarm 1 (AL-1), alarm 2 (AL-2) and receive set (RX-S).<br />
1. Pull the crown out to position 1 (mode switching position).<br />
• The home city and (M) are displayed alternately on digital display 2 to show that the<br />
mode switching status has been entered.<br />
2. Turn the crown to the right or left to align the mode hand with the desired mode.<br />
3. Return the crown to the normal position.<br />
<br />
* Crown in position 1<br />
CHR<br />
Chronograph<br />
TMR<br />
Timer<br />
WT-S<br />
World time set<br />
Turn the<br />
crown to<br />
the right<br />
Turn the<br />
crown to<br />
the left<br />
AL-1<br />
Alarm 1<br />
AL-2<br />
Alarm 2<br />
Digital<br />
display 2<br />
Mode switching<br />
position<br />
Displayed<br />
alternately<br />
CAL<br />
Calendar<br />
RX-S<br />
Receive set<br />
42<br />
Mode hand<br />
TME<br />
Time<br />
43
W 12. Using Home Time and World Time<br />
• When going to a country or region in a different time zone when on business or vacation, the<br />
destination home time can be easily displayed by switching the home time and world time.<br />
* Switching can only be performed during the time mode (TME) or calendar mode (CAL).<br />
<br />
Example: Going to New York from Los Angeles<br />
When Los Angeles time “10:09 a.m.” is displayed for the home time<br />
(hand display) and New York time “P1:09” is displayed for the world<br />
time (digital) (NYC is displayed in digital display 1, and LAX is<br />
displayed in digital display 2)<br />
1. Pull the crown out to position 1 (mode switching position).<br />
• Turn the crown to enter time mode (TME) or calendar mode (CAL).<br />
• The home city LAX and (M) are displayed alternately on digital display 2, to show that the<br />
mode switching status has been entered.<br />
2. Press button (A) and button (B) at the same time.<br />
• A confirmation tone sounds, and the Los Angeles and New York city names and times are<br />
switched.<br />
3. Turn the crown to return to the original mode.<br />
4. Return the crown to the normal position to complete the operation.<br />
44<br />
Digital<br />
display 2<br />
Example: During time mode (TME)<br />
Los Angeles Switch<br />
Button (B)<br />
[Digital display 2]<br />
Home city: LAX (Los Angeles)<br />
Home time (hand display): 10:09 a.m.<br />
[Digital display 1]<br />
World city: NYC (New York)<br />
World time (digital display): P1:09<br />
Button (A)<br />
Digital display 1<br />
Pull the crown out to<br />
position 1 and press<br />
buttons (A) and (B) at<br />
the same time.<br />
The hands also change<br />
at the same time.<br />
New York<br />
[Digital display 2]<br />
Home city: NYC (New York)<br />
Home time (hand display): 1:09 p.m.<br />
[Digital display 1]<br />
World city: LAX (Los Angeles)<br />
World time (digital display): A10:09<br />
45
W 13. Using Daylight Saving Time<br />
[What is daylight saving time?]<br />
This is a time system where the clocks are put forward an hour during the summer, when the<br />
daylight hours are longer.<br />
Whether or not the system is used and the length <strong>of</strong> use differs between countries and regions.<br />
i To change automatically to daylight saving time by receiving the radio<br />
wave<br />
• By setting the daylight saving time reception setting in RX-S mode to AU, when the<br />
radio wave is received, the time will be automatically updated with the daylight saving<br />
time information.<br />
* The home city must be a city within the reception area.<br />
* The timing for changing to daylight saving time can vary depending on the city or<br />
region. There may be cases when the time is not changed on the appropriate date.<br />
[Setting the daylight saving time]<br />
To activate the<br />
daylight saving<br />
time<br />
To deactivate<br />
the daylight<br />
saving time<br />
Change automatically with<br />
radio wave reception<br />
RX-S<br />
AU<br />
AU<br />
TME/WT-S<br />
Either ON or OF<br />
may be set.<br />
RX-S<br />
* Refer to the explanations for each mode for details on the operations.<br />
Manually set the daylight<br />
saving time<br />
mA<br />
mA<br />
TME/WT-S<br />
ON<br />
OF<br />
46<br />
47
W 14. Setting the Time (TME)<br />
(The time is corrected using the digital display)<br />
• The time can be set manually in countries or regions where the radio wave cannot be<br />
received.<br />
• To set the time, call up the city whose time you want to correct in digital display 1. The<br />
home time (hour/minute/second hands) cannot be corrected directly.<br />
• It is possible to change the daylight saving time setting in TME mode.<br />
<br />
1. Pull the crown out to position 1 and turn to align the mode hand with TME (time<br />
mode).<br />
2. Press button (A) or (B) to call up the city name whose time you want to correct.<br />
• When setting the home city time (hour, minute, second hands), switch the home city<br />
and world city before correcting the time. (Refer to “Switching between home<br />
time and world time” p. 44)<br />
3. Pull the crown out to position 2 to enter the time correction status.<br />
• The second hand will move to the 12:00 position and stop.<br />
• The home city display <strong>of</strong> digital display 2 will go <strong>of</strong>f.<br />
• The correction status for the daylight saving time setting is entered and ON or OF<br />
flashes. (There is no daylight saving time ON or OF setting for UTC.)<br />
• Press the lower right button (A) to switch between setting (ON) and canceling (OF)<br />
the daylight saving time.<br />
• When daylight saving time is set, the time moves forward by one hour.<br />
• Each time the upper right button (B) is pressed, the correction location changes. The<br />
new correction location will begin flashing.<br />
4. Press the upper right button (B) to enter the second correction status.<br />
• Press the lower right button (A) to return to 0 seconds.<br />
5. Press the upper right button (B) to enter the minute correction status.<br />
• Turn the crown to correct the time. Turn to the right to move forward and to the left<br />
to move back.<br />
• Turn the crown continuously to move quickly. To stop, turn the crown to the left or<br />
right.<br />
48<br />
49
6. Press the upper right button (B) to enter the hour correction status.<br />
• Turn the crown to correct the time. Turn to the right to move forward and to the left<br />
to move back.<br />
• Turn the crown continuously to move quickly.<br />
7. Press the upper right button (B) to enter the 12H/24H correction status.<br />
• Press the lower right button (A) to switch between the 12-hour clock and 24-hour<br />
clock.<br />
• This setting is applied even in other modes.<br />
8. Return the crown to the normal position to complete the operation.<br />
• When the home time is corrected, the analog time, which is linked to the digital<br />
time, is also corrected.<br />
Button (B)<br />
Button (A)<br />
Position 1<br />
Button (A)/(B)<br />
Select the city<br />
Position 2<br />
Daylight saving<br />
time setting<br />
Button (B)<br />
• When the time is set for one <strong>of</strong> the<br />
cities, the times for all the other cities<br />
are also corrected automatically.<br />
• Daylight saving time can be set for<br />
each city.<br />
Correct the<br />
second<br />
(B)<br />
Correct the<br />
minute<br />
(B)<br />
(B)<br />
Switch between<br />
12H and 24H<br />
(B)<br />
Correct the hour<br />
50<br />
51
W 15. Setting the Calendar (CAL)<br />
(The date is corrected using the digital display)<br />
• The date can be set manually in countries or regions where the radio wave cannot be<br />
received.<br />
• In the same way as for “Setting the Time”, to adjust the date <strong>of</strong> the home city, call up<br />
the city whose date you want to correct in digital display 1.<br />
<br />
1. Pull the crown out to position 1 and turn to<br />
align the mode hand with CAL (calendar<br />
mode).<br />
2. Press button (A) or (B) to call up the city<br />
name whose date you want to correct.<br />
3. Pull the crown out to position 2 to enter the<br />
date correction status.<br />
• The month display flashes and the home<br />
city display and day display will go <strong>of</strong>f.<br />
52<br />
[Digital display 2]<br />
Off<br />
[Digital display 1]<br />
4. Each time the upper right button (B) is pressed, the correction location changes. The<br />
new correction location will begin flashing.<br />
• The correction location changes in the following sequence: month c date c year.<br />
5. Select the correction location and turn the crown to correct the time.<br />
Turn to the right to move forward and to the left to move back.<br />
• Turn the crown continuously to move quickly.<br />
To stop, turn the crown to the left or right.<br />
• When the year, month and date are set, the day is corrected automatically.<br />
6. Press the crown back into its normal position.<br />
53
Button (B)<br />
Position 1<br />
<br />
Button (A)/(B)<br />
Select the city<br />
• When the date is set for one <strong>of</strong> the cities, the dates for all the other cities are also<br />
corrected automatically.<br />
• The year can be set between 2000 and 2099.<br />
• When the year, month and date are set, the day is corrected automatically.<br />
• If a date that does not exist is set (for example, February 30), when the watch returns to<br />
the normal display, it automatically displays the first day <strong>of</strong> the next month.<br />
Button (A)<br />
Position 2<br />
Correct the month<br />
Button (B)<br />
Correct the date<br />
(B)<br />
Correct the year<br />
(B)<br />
54<br />
55
W 16. Using the Timer (TMR)<br />
• The timer can be set from 1 minute up to 99 minutes, in 1-minute units. After the end<br />
<strong>of</strong> measurement, the time-up tone sounds for about 5 seconds and the watch returns to<br />
the timer initial setting status. (Auto return function)<br />
• Press the lower right button (A) during measurement to return to the initial set time and<br />
start measurement again. (Flyback function)<br />
• Radio waves cannot be received during timer measurement.<br />
3. Turn the crown to set the time.<br />
• Turn to the right to increase the time and turn to the left decrease the time.<br />
• Turn the crown continuously to move quickly.<br />
To stop, turn the crown to the left or right.<br />
4. After completing the settings, return the crown to the normal position.<br />
• Digital display 2 changes to RES (reset).<br />
<br />
1. Pull the crown out to position 1 and turn to<br />
align the mode hand with TMR (timer<br />
mode).<br />
2. Pull the crown out to position 2 to enter the<br />
timer setting status.<br />
• SET is displayed in digital display 2 and<br />
the minute display in digital display 1<br />
Settings<br />
complete<br />
flashes. [Digital display 2]<br />
Minute display flashes<br />
[Digital display 1]<br />
56<br />
57
1. A confirmation tone will sound each time you press the upper right button (B) to start and<br />
stop the measurement.<br />
• RUN (run) is displayed in digital display 2 during measurement, and STP (stop) is<br />
displayed when the timer is stopped. The measurement mark comes on during<br />
measurement.<br />
2. Press the lower right button (A) during measurement to return to the initial set time and start<br />
measurement again.(Flyback function)<br />
3. Press the lower right button (A) while the timer is stopped to return to the initial set time.<br />
• Digital display 2 changes to RES.<br />
4. When the time is up, END is displayed in digital display 2 and the time-up tone sounds for 5<br />
seconds.<br />
• To stop the time-up tone, press button (A) or (B).<br />
• RES is displayed on digital display 2 and the timer returns to the initial set time.<br />
* The measurement continues even if the watch is switched to a different mode during<br />
measurement.<br />
* The time-up tone does not sound unless the crown is in the normal position.<br />
Button (B)<br />
Button (B)<br />
Measurement<br />
mark<br />
[Digital display 1]<br />
58<br />
[Digital display 2]<br />
59
W 17. Using the Chronograph (CHR)<br />
• The chronograph can display times up to 23 hours 59 minutes and 59.99 seconds.<br />
• After it exceeds 24 hours, the measurement stops and the chronograph returns automatically<br />
to the reset status.<br />
• Radio waves cannot be received during chronograph<br />
measurement.<br />
Button (B)<br />
<br />
1. Pull the crown out to position 1 and turn to align the<br />
mode hand with CHR (chronograph mode).<br />
2. Return the crown to the normal position.<br />
3. A confirmation tone will sound each time you press the<br />
upper right button (B) to start and stop the measurement.<br />
4. Press the lower right button (A) during measurement to display a<br />
split time for 10 seconds. After the 10 seconds, the watch returns<br />
to the measurement status. (Auto return function)<br />
• The measurement mark is displayed during measurement and<br />
during the split display.<br />
• The SPL display flashes during the split time display.<br />
5. Press the lower right button (A) while the chronograph is stopped<br />
to return to the chronograph reset status.<br />
60<br />
Mode<br />
switching<br />
position<br />
Button (A)<br />
Measurement mark<br />
• While the chronograph is being operated, the display <strong>of</strong> digital display 2 changes as<br />
follows.<br />
Button (A)<br />
(Reset)<br />
(Measurement stopped)<br />
Button (B)<br />
(B)<br />
(B)<br />
(During measurement)<br />
*<br />
(Split display)<br />
* If there are no button (A) or (B) operations for 10 seconds, the watch returns to the<br />
measurement status.<br />
• The measurement continues even if the watch is switched to a different mode during<br />
measurement.<br />
(A)<br />
(A)<br />
61
W 18. Using the World Time Setting (WT-S)<br />
• Daylight saving time can be set for each city. (Cannot be set for UTC)<br />
• Whether show or hide each city (44 cities other than UTC) can be set.<br />
* Using this function, it is easy to call up and display the cities from each mode. (Zone set function)<br />
* If a city is set to not display, it cannot be displayed from other modes.<br />
• Any time difference in units <strong>of</strong> 15 minutes can be set for HOM (user setting city).<br />
[NOTE]<br />
Even if daylight saving time is set for each city in WT-S mode (ON or OF (<strong>of</strong>f)), if AU is set in RX-S<br />
mode, priority is given to the daylight saving time setting in RX-S mode, with ON automatically<br />
switched to OF or OF automatically switched to ON.<br />
(Users in countries or regions without a radio wave transmitter should make sure that the start date and<br />
finish date <strong>of</strong> daylight saving time are accurate.)<br />
<br />
1. Pull the crown out to position 1 and turn to align the mode hand with WT-S (world time set mode).<br />
2. Pull the crown out to position 2 to enter the world time correction status.<br />
• Digital display 2 goes <strong>of</strong>f, digital display 1 enters the daylight saving time setting status for the city<br />
that is displayed, and ON or OF flashes.<br />
• The initial settings are all OF (canceled).<br />
62<br />
3. Press the lower right button (A) to switch between daylight saving time ON (set) and OF (canceled).<br />
• When daylight saving time is set, the time will move forward by one hour.<br />
• Turn the crown to set the daylight saving time for other cities. Turn to the right to change in the<br />
direction <strong>of</strong> cities with more <strong>of</strong> a time difference, and turn to the left to change in the direction <strong>of</strong><br />
cities with less <strong>of</strong> a time difference.<br />
4. Press the upper right button (B) to switch between the show/hide setting status for the city.<br />
• SET (show) or OFF (hide) flashes.<br />
• The initial settings are all SET (show).<br />
5. Press the lower right button (A) to select SET or OFF.<br />
• Press the lower right button (A) to switch between displaying SET and OFF, and then select the<br />
desired setting.<br />
• Turn the crown to set other cities.<br />
6. Press the crown back into its normal position.<br />
Button (B)<br />
Mode switching<br />
position<br />
Correction position<br />
Button (A)<br />
City name<br />
City<br />
Display (SET)/<br />
Hide (OFF)<br />
Daylight saving time<br />
Set (ON)/<br />
Canceled (OF)<br />
[Digital display 1]<br />
63
• Any time difference can be set for HOM (user setting city), in intervals <strong>of</strong> 15 minutes from<br />
the UTC time.<br />
• The radio wave received at HOM will be from the transmitter assigned to the city that has the<br />
most similar time difference with UTC.<br />
1. Pull the crown out to position 1 and turn to align the mode hand with WT-S (world time set<br />
mode).<br />
2. Pull the crown out to position 2 to enter the world time correction status.<br />
3. Turn the crown to call up HOM for the world city.<br />
• ON or OF flashes and the watch enters the daylight saving time setting status.<br />
64<br />
[Digital display 2]<br />
Daylight saving<br />
time ON/OF flashes<br />
[Digital display 1]<br />
Turn the crown to<br />
select HOM<br />
4. Press the upper right button (B) twice to enter the<br />
time difference setting status.<br />
• Each time you press the upper right button (B), the<br />
“Daylight saving time ON/OF”, “City display<br />
SET/OFF” and “Time difference setting” correction<br />
location changes. The new correction location will<br />
begin flashing.<br />
5. Turn the crown to set the time difference.<br />
• Turn to the right to display (+) in the world time<br />
section and display time differences with UTC in<br />
15-minute units in the time display section.<br />
• Turn to the left to display (–) in the world time<br />
section and display time differences with UTC in<br />
15-minute units in the time display section.<br />
• Turn the crown continuously to change the time<br />
difference quickly. Turn crown to the right or left to<br />
stop the quick movement.<br />
6. Press the crown back into its normal position.<br />
* If the time difference is not set, the HOM city will<br />
not be displayed regardless <strong>of</strong> whether the display<br />
is set to SET or OFF.<br />
[Time difference setting status]<br />
0:00 flashes<br />
When a time difference <strong>of</strong> +5<br />
hours 45 minutes with UTC is set<br />
65
W 19. Using the World Time Alarm (AL-1 and 2)<br />
• An alarm can be set for the set city time.<br />
• Once a day, the alarm will sound for 15 seconds when it reaches the set time. To stop the<br />
alarm, press button (A) or (B).<br />
• The sound <strong>of</strong> the alarm is different for alarm 1 and alarm 2, but the setting method is the same.<br />
<br />
1. Pull the crown out to position 1 and turn to align the mode<br />
hand with AL-1 or AL-2 (alarm mode).<br />
2. Pull the crown out to position 2 to enter the alarm correction<br />
status.<br />
• The set city is called up and ON or OF flashes.<br />
3. Press the lower right button (A) to set alarm ON (set) or OF<br />
(canceled).<br />
• Press the lower right button (A) to switch between ON and<br />
OF.<br />
• The alarm mark comes on when ON is set.<br />
4. Each time the upper right button (B) is pressed, the display<br />
flashes and the correction location changes.<br />
66<br />
Alarm ON/OF<br />
Alarm<br />
mark<br />
• The correction location changes in the following sequence: Alarm ON/OF c City name c<br />
Alarm: Hours c Alarm: Minutes.<br />
• City name: Turn the crown to select the city.<br />
• Alarm hours/minutes: Turn the crown to the right to move the time forward and to the left<br />
to move the time back.<br />
Turn the crown continuously to move quickly. To stop, turn the crown to the left or right.<br />
5. Press the crown back into its normal position.<br />
<br />
Button (B)<br />
Button (A)<br />
Position 2<br />
<br />
In AL-1 or AL-2 mode, the alarm tone can be<br />
checked by pulling the crown out to position 1<br />
and pressing the lower right button (A).<br />
Select alarm ON or OF (<strong>of</strong>f)<br />
Button (A)<br />
Button (B)<br />
Select the city (turn the crown)<br />
(B)<br />
Correct the hour (turn the crown)<br />
(B)<br />
Correct the minute<br />
(turn the crown)<br />
(B)<br />
67
W 20. Using the Receive Setting (RX-S)<br />
[Daylight saving time reception setting]<br />
• Select whether to update the time with the daylight saving time from the received radio wave.<br />
Refer to “Using Daylight Saving Time” (p.46) for details on daylight saving time.<br />
AU (Auto): The time is updated with the daylight saving time from the received radio wave.<br />
* The timing for changing to daylight saving time can vary depending on the city or<br />
region. There may be cases when the time is not changed on the appropriate date.<br />
* If AU is selected, when daylight saving time data is received for the daylight saving time<br />
setting <strong>of</strong> the home city, the setting is changed to ON, and when no daylight saving time<br />
data is received, the setting is changed to OF (<strong>of</strong>f).<br />
* When the radio wave <strong>of</strong> the area is received, daylight saving time for the corresponding<br />
city is automatically updated to ON or OF (<strong>of</strong>f). Refer to the “Received radio wave<br />
transmitter” in “<strong>Table</strong> <strong>of</strong> UTC Time Differences” on page 36 for the radio wave that is<br />
received in each city.<br />
mA (Manual): The time is not updated with the daylight saving time from the received radio<br />
wave.<br />
[Automatic reception setting]<br />
• Set the operating conditions for automatic reception.<br />
MAN (Manual): The 4 a.m. automatic reception can be changed to any time <strong>of</strong> the day for the<br />
home time.<br />
* The time can be changed in 1-hour units. It cannot be set to 2 a.m. or 3 a.m.<br />
OFF (Off): Automatic reception is not performed.<br />
AUT (Auto): Automatic reception is performed according to the initial settings<br />
(at 2 a.m., 3 a.m. and 4 a.m.).<br />
68<br />
69
1. Pull the crown out to position 1 and turn to align the mode hand with RX-S (receive<br />
set mode).<br />
2. Pull the crown out to position 2 to enter the daylight saving time (SMT) reception<br />
setting status.<br />
• AU or mA flashes and the watch enters the correction status.<br />
• Each time the upper right button (B) is pressed, the display switches between the<br />
daylight saving time reception setting and the automatic reception setting.<br />
3. Press the lower right button (A) to select AU or mA.<br />
70<br />
[Daylight saving time<br />
reception setting]<br />
Button (A)<br />
Button (B)<br />
[Automatic reception setting]<br />
Button<br />
(A)<br />
Turn the crown<br />
Button<br />
(A)<br />
Button (A)<br />
4. Press the upper right button (B) to enter the automatic reception setting status.<br />
• The set automatic reception status flashes.<br />
• AUT, MAN and OFF flash and the watch enters the correction status.<br />
5. Press the lower right button (A) to set the automatic reception operating condition to<br />
MAN.<br />
• The hour <strong>of</strong> the reception time flashes.<br />
• Each time the lower right button (A) is pressed, the correction location changes in<br />
the following sequence: AUT c MAN c OFF.<br />
6. To change the reception time, turn the crown to change the time in 1-hour units.<br />
• Turn the crown to the right to move the time forward and to the left to move the time<br />
back.<br />
• Only the 4 a.m. automatic reception can be changed. (2 a.m. and 3 a.m. are not<br />
displayed.)<br />
• Only the hour can be changed, and when using the 12-hour clock, “A” indicates a.m.<br />
and “P” indicates p.m.<br />
7. Press the crown back into its normal position.<br />
* Nighttime is usually a good time for reception because radio wave noise is relatively<br />
low.<br />
71
W 21. LED Lights<br />
• Press the upper right button (B) while the crown is in the normal position to turn on the LED lights <strong>of</strong><br />
digital displays 1 and 2 for three seconds. However, note that the lights do not come on in the<br />
following cases.<br />
* During timer mode or chronograph mode<br />
* During radio wave reception<br />
* During 2-second interval movement (insufficient charge warning status)<br />
W 22. Resetting Your Watch<br />
• If the watch displays or operates abnormally due to a strong impact or the effects <strong>of</strong> static electricity,<br />
reset the watch and then correct the reference position.<br />
[Caution] After resetting, all the mode settings return to their initial settings. Perform the settings<br />
again as required.<br />
<br />
• Home city/world city: UTC • Time: 0:00:00<br />
• Date: January 1, 2008 (Tuesday) • Timer: 99 minutes 00 seconds<br />
• Chronograph: 0 hours 00 minutes 00 seconds (reset status)<br />
• World time: City displays - all SET, daylight saving time - all OF (<strong>of</strong>f)<br />
• Alarm 1/2: City - UTC, time - 12:00, set - OF (<strong>of</strong>f)<br />
• Receive set: Daylight saving time - AU, automatic reception - AUT<br />
72<br />
<br />
1. Pull the crown out to position 1 and turn to align<br />
the mode hand with CHR (chronograph mode).<br />
2. Pull out the crown to position 2.<br />
• The hands will rotate rapidly.<br />
3. After the hands stop, press buttons (A) and (B) at<br />
the same time.<br />
• When you remove your finger from the buttons,<br />
all parts <strong>of</strong> the digital displays and the lights will<br />
come on.<br />
• The confirmation tone sounds, the hands move<br />
All parts displayed<br />
[Digital display 2] [Digital display 1]<br />
clockwise and counterclockwise and the watch switches to the reference position checking<br />
status.<br />
4. If the reference position is incorrect, correct it.<br />
(Refer to “Checking the Reference Position” (p. 14) and “Adjusting the Reference Position”<br />
(p. 74).)<br />
73
W 23. Adjusting the Reference Position<br />
UTC hour<br />
and minute<br />
hands<br />
Hour, minute<br />
and second<br />
hands<br />
Charge<br />
level<br />
indicator<br />
74<br />
Digital display 2<br />
24-hour hand<br />
Button (B)<br />
Button (A)<br />
1. Pull the crown out to position 1 and<br />
turn to align the mode hand with CHR.<br />
2. Pull the crown out to position 2. The<br />
hands will move rapidly and stop at the<br />
reference position (12:00 position)<br />
recorded in the watch memory.<br />
3. When the upper right button (B) is<br />
pressed for more than 2 seconds, CHA<br />
flashes in digital display 2 and the<br />
watch enters the reference position<br />
correction status.<br />
Mode hand<br />
4. A Adjusting the charge level indicator<br />
(1) Display CHA in digital display 2.<br />
(2) Turn the crown to align the charge level indicator <strong>of</strong><br />
the watch face with the center <strong>of</strong> CHN.<br />
* Turn the crown continuously to move quickly. To stop,<br />
turn the crown to the left or right.<br />
* If no correction is required, proceed to the next step.<br />
5. Each time the upper right button (B) is pressed in the reference position correction status,<br />
digital display 2 changes in the sequence CHA c UTC c HR c MIN, and the<br />
corresponding hand moves to show the location to be corrected.<br />
1 [Charge level<br />
indicator]<br />
Press button (B).<br />
2 [UTC hand]<br />
3 [Hour hand] 4 [Minute hand]<br />
(B) (B) (B)<br />
Button (B)<br />
75
6. B Adjusting the UTC hands (hour hand and minute hand)<br />
(1) Press the upper right button (B) to display UTC in the digital display.<br />
(2) Turn the crown to align the UTC hour hand and minute hand with<br />
12:00.<br />
• If the hands overlap and are difficult to see,<br />
press the lower right button (A) to move the<br />
minute hand by -3 minutes to make the UTC<br />
hands easier to see. Press the lower right button<br />
76<br />
Press the upper<br />
right button (B).<br />
(A) again to return the minute hand to its<br />
original position.<br />
7. C Adjusting the hour hand<br />
(1) Press the upper right button (B) to display HR in digital display 2.<br />
(2) Turn the crown to align the hour hand with 12:00.<br />
• Press the lower right button (A) to move the minute hand by -3<br />
minutes to make the hour hand easier to see.<br />
Press the lower right button (A) again to return the minute hand to<br />
its original position.<br />
Press the upper<br />
right button (B).<br />
UTC hour and<br />
minute hands<br />
* The 24-hour hand moves in tandem with the hour hand, so<br />
make sure that the a.m. and p.m. setting is correct.<br />
8. D Adjusting the minute hand<br />
(1) Press the upper right button (B) to display MIN in digital display 2.<br />
(2) Turn the crown to align the minute hand with 12:00.<br />
9. When the upper right button (B) is pressed for more than 2 seconds after adjusting all the<br />
hands to their correct reference positions, (0) is displayed in digital display 2 to show that the<br />
reference position adjustment is completed.<br />
10. Put the crown in position 1, set to the mode that you usually use, and then return the crown<br />
to the normal position.<br />
77
Using the Slide Rule Bezel<br />
The following measurements and<br />
calculations are possible depending on the<br />
model.<br />
Model 1: Measurement <strong>of</strong> elapsed time,<br />
remaining time<br />
Model 2: Navigation calculations, general<br />
calculations<br />
* Depending on the model, some<br />
additional features may not be available.<br />
<br />
Align the q mark (K mark for this model) on the slide rule bezel with the minute hand.<br />
After a certain time has elapsed, you can estimate how much time has elapsed by using<br />
the slide rule bezel as a guideline.<br />
Model 1<br />
<br />
Turning the crown at the 8:00 position<br />
78<br />
Crown for<br />
turning the<br />
outer scale<br />
causes the slide rule bezel surrounding the watch face to rotate.<br />
Elapsed time: This indicates 10 minutes have elapsed since 9:10.<br />
79
You can tell how much time remains by aligning the q mark (or K mark) on the slide<br />
rule bezel with the target time.<br />
Model 2<br />
A. Navigation Calculator<br />
1. Calculation <strong>of</strong> time required<br />
Problem: How long does it take an airplane flying at 180 knots to fly a distance <strong>of</strong> 450<br />
nautical miles?<br />
Solution: Set the 18 mark on the outside scale to the SPEED INDEX (Y). At this<br />
time, the point on the inside scale that is aligned with 45 on the outside scale<br />
indicates (2:30), and the answer is 2 hours and 30 minutes.<br />
Remaining time: This indicates that 20 minutes remain until 9:25.<br />
80<br />
81
2. Speed (Ground Speed) Calculation<br />
Problem: What is the speed (ground speed) <strong>of</strong> an airplane when it takes 1 hour and 20<br />
minutes to fly a distance <strong>of</strong> 240 nautical miles?<br />
Solution: Align the 24 on the outside scale with 1:20 (80) on the inside scale. At this<br />
time, 18 is aligned with the SPEED INDEX (Y) on the inside scale, and the<br />
answer is 180 Kt.<br />
3. Flying distance calculation<br />
Problem: What is the flying distance traveled in 40 minutes at a speed <strong>of</strong> 210 knots?<br />
Solution: Align the 21 on the outside scale with the SPEED INDEX (Y) <strong>of</strong> the inside<br />
scale. The 40 <strong>of</strong> the inside scale is now pointing to 14, and the answer is 140<br />
nautical miles.<br />
82<br />
83
4. Fuel consumption rate calculation<br />
Problem: If 120 gallons <strong>of</strong> fuel are consumed in 30 minutes’ flying time, what is the<br />
fuel consumption rate?<br />
Solution: Align the 12 <strong>of</strong> the outside scale with 30 <strong>of</strong> the inside scale. The SPEED<br />
INDEX (Y) now points to 24, and the answer is 240 gallons per hour.<br />
5. Fuel consumption calculation<br />
Problem: How much fuel is consumedin 6 hours at a fuel consumption rate <strong>of</strong> 250<br />
gallons per hour?<br />
Solution: Align the 25 <strong>of</strong> the outside scale with the inside scale’s SPEED INDEX (Y)<br />
<strong>of</strong> the inside scale. The 6:00 is aligned with 15, and the answer is 1500<br />
gallons.<br />
84<br />
85
6. Maximum flying hours<br />
Problem: With a fuel consumption rate <strong>of</strong> 220 gallons per hour and a fuel supply <strong>of</strong><br />
550 gallons, what is the maximum number <strong>of</strong> flying hours?<br />
Solution: Align the 22 <strong>of</strong> the outside scale with the inside scale’s SPEED INDEX (Y)<br />
<strong>of</strong> the inside scale. The 55 <strong>of</strong> the outside scale is now aligned with 2:30, and<br />
the answer is 2 hours and 30 minutes.<br />
7. Conversion<br />
Problem: How do you convert 30 miles into nautical miles and kilometers?<br />
Answer: Align the 30 on the outside scale with the STAT (Y) mark on the inside<br />
scale. At this time, 26 nautical miles is aligned at the NAUT (Y) mark on<br />
the inside scale, while the answer <strong>of</strong> 48.2 kilometers is aligned at the<br />
kilometers on the inside scale.<br />
86<br />
87
B. General calculation functions<br />
1. Multiplication<br />
Problem: 20 M 15<br />
Solution: Align 20 on the outside scale with 10 on the inside scale, and read the<br />
outside scale at the 30 mark which is aligned with 15 <strong>of</strong> the inside scale.<br />
Figure the number <strong>of</strong> decimal places, and the answer is 300.<br />
Remember: decimal places cannot be read on this scale.<br />
2. Division<br />
Problem: 250/20<br />
Solution: Align 25 on the outside scale with 20 on the inside scale. On the outside<br />
scale read the 12.5 mark that is aligned with 10 on the inside scale. figure the<br />
number <strong>of</strong> decimal places, and the answer is 12.5.<br />
88<br />
89
3. Reading Ratios<br />
Problem: 30/20 = 60/x<br />
Solution: Align 30 on the outside scale with 20 on the inside scale. At this time, the<br />
answer <strong>of</strong> 40 can be read from the inside scale corresponding to 60 on the<br />
outside scale. In addition, the ratio <strong>of</strong> the value on the outside scale to the<br />
value on the inside scale is 30:20 at all positions on the scales.<br />
4. Determining Square Root<br />
Problem: What is the square root <strong>of</strong> 225?<br />
Solution: Rotate the scales so that the value on the inside scale corresponding to 22.5<br />
on the outside scale is equal to the value on the outside scale corresponding<br />
to 10 on the inside scale, and read <strong>of</strong>f the answer <strong>of</strong> 15 at that location.<br />
90<br />
91
W 24. Solar Power Function<br />
This watch uses a secondary battery to store electrical energy.<br />
When the watch is fully charged, it will run for about 6 months.<br />
<br />
Always store the watch in a bright location for best results.<br />
j Wearing clothes with long sleeves makes it difficult for the watch to get the<br />
necessary light, resulting in insufficient charging.<br />
We recommended that you charge the watch for a long time in direct sunlight once a<br />
month.<br />
[Caution] Do not charge on surfaces that can easily become hot, such as a car<br />
dashboard.<br />
j An effective way <strong>of</strong> charging the watch is to keep it in a<br />
bright location when you are not wearing it, such as<br />
near a window where it can receive direct sunlight.<br />
92<br />
93
W 25. Characteristics <strong>of</strong> the Solar Powered Watch<br />
i When the watch is insufficiently charged, the indication will be changed as follows:<br />
* 1. When the watch stopped due to insufficient charging<br />
• It takes at least 30 minutes to recharge sufficiently to perform recovery automatic reception, even<br />
if the watch is being exposed to light.<br />
After recovery, refer to “Guide to Charging Time” (p. 100) and sufficiently charge the watch.<br />
* 2. If the watch failed to perform recovery automatic reception<br />
• The time is incorrect even if the second hand moves at 1-second intervals, so after fully charging<br />
the watch, set the time manually or perform on demand reception.<br />
94<br />
[Normal display]<br />
The watch has been<br />
insufficiently charged<br />
because the watch face,<br />
which contains the solar<br />
cell, has not received<br />
sufficient light.<br />
2-second interval<br />
movement<br />
[Insufficient charge warning]<br />
The second hand starts to move in 2-second intervals<br />
and the mark flashes in digital display 1.<br />
The insufficient<br />
charge warning (a<br />
2-second interval<br />
movement)<br />
continues for more<br />
than 3 days.<br />
The watch will<br />
stop due to an<br />
insufficient<br />
charging.<br />
When a radio signal has been<br />
successfully received*2<br />
Sufficiently charge<br />
by exposing the<br />
watch face, which<br />
contains the solar<br />
cell to light.*1<br />
[Recovery automatic reception]<br />
When the watch is recharged<br />
sufficiently, it will receive the radio<br />
signal automatically once.<br />
95
A. Power Saving Function<br />
If the watch face is not exposed to light for a long time, the power saving function is activated<br />
to minimize the battery consumption.<br />
• Power saving 1: When power is not generated for more than 30 consecutive minutes, the<br />
digital displays go <strong>of</strong>f to save power.<br />
• Power saving 2: When the power saving 1 condition continues for 7 days or longer, to save<br />
power, the hour hand, minute hand, second hand and 24-hour hand move to<br />
the reference position, and the charge level indicator and UTC hands (hour<br />
and minute) stop in their current positions.<br />
• The correct time continues to be kept inside the watch.<br />
• The alarm tone will not sound.<br />
[Normal diaplay] [Power saving 1] [Power saving 2]<br />
Digital<br />
display areas<br />
all go <strong>of</strong>f<br />
The digital<br />
display areas<br />
all go <strong>of</strong>f and<br />
the hands stop.<br />
<br />
The power saving function will be automatically canceled when the watch face is<br />
exposed to light.<br />
• When power saving 1 is canceled, the digital display is restored.<br />
• After the power saving 2 has been canceled, the hands will rapidly move to the current<br />
time and return to 1-second interval movement.<br />
• If the watch is insufficiently charged, the second hand will begin the 2-second interval<br />
movement. Return the second hand to 1-second interval movement by sufficiently<br />
charging the watch.<br />
• Power saving is cancelled if the insufficient charge warning function activates during<br />
power saving mode.<br />
96<br />
Not exposed to light<br />
for 30 minutes or more<br />
Not exposed to light<br />
for 7 days or more<br />
97
B. Insufficient Charge Warning<br />
Function<br />
When the charge level indicator reaches level 0, the<br />
second hand’s movement changes from 1-second<br />
intervals to 2-second intervals and the mark<br />
flashes in digital display 1 to show that the watch is<br />
insufficiently charged.<br />
The watch will stop due to insufficient charging about 3<br />
days after starting the 2-second interval movement if<br />
kept in a place with no light.<br />
98<br />
2-second<br />
interval movement<br />
[Caution] During 2-second interval movement, the digital displays and watch operations<br />
change as follows.<br />
• The time cannot be adjusted manually, or by using automatic reception or on demand<br />
reception.<br />
• Push button operations are not possible.<br />
• All modes change to time mode.<br />
• The alarm tone and confirmation tone will not sound. (When the timer, chronograph or<br />
alarm is used)<br />
• The LED lights will not come on.<br />
• The chronograph and timer are forcibly reset and cannot be operated.<br />
j If the charging insufficiency occurs during radio signal reception, the operation will<br />
stop automatically, the watch will return to the time before the operation, and 2-<br />
second interval movement will begin.<br />
Regularly charge your radio controlled watch so it does not become insufficiently<br />
charged.<br />
C. Overcharging Prevention Function<br />
When the secondary battery becomes fully charged by exposing the watch face to light,<br />
the overcharging prevention function is automatically activated to prevent the battery<br />
from being charged further.<br />
No matter how much the watch is charged, it will not affect the secondary battery,<br />
timekeeping, functions or performance <strong>of</strong> the watch.<br />
99
D. Guide to Charging Time<br />
The charging time varies according to the model (including the color <strong>of</strong> the watch face).<br />
The following data should only be used as a guideline.<br />
Illuminance<br />
(lx)<br />
* If the second hand is moving in 2-second intervals, refer to “Time for full charging” and fully<br />
charge.<br />
100<br />
500 Indoor lighting<br />
1,000 60 to 70 cm beneath a 30 W fluorescent light<br />
3,000<br />
10,000<br />
100,000<br />
20 cm beneath a 30 W florescent light<br />
Cloudy sky<br />
Environment<br />
Direct summer sunlight<br />
*The charging time is based on continuous exposure.<br />
For a 1-day<br />
movement<br />
charging time<br />
4 hours<br />
2 hours<br />
40 minutes<br />
12 minutes<br />
4 minutes<br />
Charging time (approximate)<br />
Time from<br />
stopping to<br />
resuming the<br />
1-second interval<br />
movement<br />
------<br />
------<br />
5 hours<br />
2 hours<br />
40 minutes<br />
Time for full<br />
charging<br />
------<br />
------<br />
------<br />
60 hours<br />
30 hours<br />
For a 1-day movement charging time ... The charging time to run the watch for one day<br />
with normal movement.<br />
Time for full charging ... The time for full charging after the watch has stopped due to an<br />
insufficient charging.<br />
[Caution] A fully charged battery will run the watch for about 6 months without further<br />
charging. During power saving mode, the correct time continues to be kept<br />
inside the watch for approximately three and a half years.<br />
Charge the watch every day, as it will take a long time to recharge it, as is<br />
indicated in the table, when it stops due to an insufficient charging.<br />
Furthermore, it is recommended to charge your watch by exposing to direct<br />
sunlight for a long time once a month.<br />
101
E. Handling Your Solar Powered Watch<br />
WARNING Handling the secondary battery<br />
j Do not remove the secondary battery from the watch yourself, unless unavoidable.<br />
If you must remove the battery, store it out <strong>of</strong> reach <strong>of</strong> children to avoid accidental<br />
ingestion. If the secondary battery is ingested, consult a doctor immediately.<br />
j Do not throw away with regular trash.<br />
Doing so could cause a fire or environmental damage. Follow the collection<br />
procedures as specified by your local authority.<br />
Do not use anything other than the specified secondary<br />
WARNING battery<br />
j The watch will not operate if incorrect battery types are inserted.<br />
Never use a regular silver battery. The battery could overcharge during the charging<br />
process and burst, causing damage to the watch or injuries to the wearer.<br />
CAUTION Charging precautions<br />
j Do not charge the watch in a high-temperature environment (about 60°C / 140°F or<br />
more).<br />
Overheating while charging can cause the watch exterior to become discolored, the<br />
watch to deform or the movement to be damaged.<br />
Example:<br />
• Charging close to incandescent lighting, halogen lamps, or other lighting sources<br />
that easily become hot.<br />
• Charging on surfaces that can easily become hot, such as a car dashboard.<br />
j When charging with incandescent lighting, halogen lamps, or other lighting sources<br />
that easily become hot, place the watch at least 50 cm (20 in.) away from the source<br />
to avoid overheating.<br />
102<br />
103
Troubleshooting<br />
<br />
Problem<br />
Check<br />
Remedy<br />
Problem<br />
Check<br />
Remedy<br />
Radio signals<br />
cannot be<br />
received.<br />
• Is the home city (digital<br />
display 2) set to the same<br />
reception area as your<br />
current location?<br />
• Are you moving the watch<br />
while receiving a signal and<br />
the second hand is showing<br />
RX, H, M or L?<br />
• Check the map and change the setting.<br />
• Check the map. (p. 28o33)<br />
• Change the setting. (p. 44o45)<br />
• Do not move the watch until the<br />
signal has been properly received<br />
(until normal hand movement is<br />
restored).<br />
(Reception can take from about 2<br />
minutes to a maximum <strong>of</strong> 15 minutes.)<br />
Radio signals<br />
cannot be<br />
received.<br />
• Are there objects nearby that<br />
could block radio signals or<br />
generate noise?<br />
• Are you attempting to receive the<br />
radio signal in a location far from<br />
a window?<br />
• Is the second hand moving at 2-<br />
second intervals?<br />
(When the second hand moves in<br />
2-second intervals, the<br />
insufficient charge warning mark<br />
flashes in the digital display 1 and<br />
the charge level indicator points<br />
at level 0.)<br />
• Avoid objects that block radio signals<br />
or generate noise. Try to receive radio<br />
signals by pointing the 9:00 position<br />
<strong>of</strong> the watch in the direction <strong>of</strong> the<br />
radio signal transmitter.<br />
Find a location such as window that is<br />
conducive to radio signal reception<br />
and change the watch location,<br />
direction and angle. (p. 23)<br />
• Radio waves cannot be received when<br />
the charge is insufficient.<br />
Charge the watch sufficiently by<br />
placing it in direct sunlight as<br />
indicated in “Guide to Charging<br />
Time”. (p. 100)<br />
104<br />
105
Problem<br />
Check<br />
Remedy<br />
Problem<br />
Check<br />
Remedy<br />
Radio signals<br />
cannot be<br />
received.<br />
• Is the mode hand pointing to<br />
a mode other than TME,<br />
CAL or RX-S?<br />
• Is chronograph or timer<br />
measurement in progress?<br />
• Pull the crown out to position 1 and<br />
set the mode to TME, CAL or RX-S.<br />
• Stop the measurement, reset, and try<br />
to receive the radio wave again.<br />
The time is not<br />
correct.<br />
• Check the reception status.<br />
• Check whether the daylight<br />
saving time is ON or OF<br />
(<strong>of</strong>f). (p. 46)<br />
• If the reception status is NO,<br />
change your location and try to<br />
receive the radio wave again. “On<br />
Demand Reception” (p. 20)<br />
• In TME or WT-S mode, select<br />
daylight saving time ON or OF<br />
(<strong>of</strong>f).<br />
The time is not<br />
correct.<br />
• Is the reference position set<br />
correctly?<br />
Check the reference position.<br />
(p. 14)<br />
• If the reference position is not<br />
correctly set, adjust it as indicated in<br />
“Adjusting the Reference Position”.<br />
(p. 74)<br />
The watch<br />
successfully<br />
received the radio<br />
wave, but it deviates<br />
slightly from the<br />
correct time.<br />
• A slight deviance (less than 1<br />
second) may be caused by the<br />
internal processing <strong>of</strong> the watch.<br />
The second hand<br />
moved suddenly to<br />
the reception<br />
standby (RX)<br />
position.<br />
• Have you set the 4 a.m.<br />
automatic reception to a<br />
different time?<br />
• Check again the automatic<br />
reception setting <strong>of</strong> the RX-S<br />
(receive set) mode. (p. 68)<br />
106<br />
107
Problem<br />
Check<br />
Remedy<br />
Problem<br />
Check<br />
Remedy<br />
• Is the charge level indicator<br />
pointing at level 0?<br />
• Charge the watch sufficiently until the<br />
charge level indicator reaches level 3,<br />
as indicated in “Guide to Charging<br />
Time”. (p. 41)<br />
The second hand<br />
is moving in 2-<br />
second intervals.<br />
• Is the charge level indicator<br />
pointing at level 0?<br />
• Charge the watch sufficiently until the<br />
charge level indicator reaches the<br />
fully charged level. (p. 41)<br />
The watch has<br />
stopped.<br />
• Is “ERR” displayed in<br />
digital display 1?<br />
• Reset the watch (p. 72) and then<br />
correct the reference position. (p. 74)<br />
If “ERR” is displayed again, contact<br />
the store where you purchased the<br />
watch or a Citizen Service Center.<br />
The hands moved<br />
forward quickly at<br />
the moment that<br />
the watch was<br />
removed from a<br />
desk or drawer.<br />
• This is because the power saving<br />
mode was canceled when the watch<br />
was exposed to light, and the hands<br />
moved forward quickly to the current<br />
time. It is ready to use. (p. 96)<br />
The watch does<br />
not work even<br />
after charging.<br />
• Did you charge the watch<br />
sufficiently in sunlight?<br />
• Charge the watch sufficiently, as<br />
indicated in “Guide to Charging<br />
Time”. (p. 100)<br />
If the watch does not work even after<br />
charging, contact a Citizen Service<br />
Center.<br />
The hands or<br />
digital displays<br />
are abnormal.<br />
• Reset the watch. (p. 72)<br />
(The internal watch system became<br />
unstable because <strong>of</strong> strong static<br />
electricity or other external influence.)<br />
108<br />
109
Precautions<br />
WARNING: Water-resistance performance<br />
There are several types <strong>of</strong> water-resistant watches, as shown<br />
in the following table.<br />
The unit "bar" is roughly equal to 1 atmosphere.<br />
* WATER RESIST(ANT) xx bar may also be indicated as<br />
W.R. xx bar.<br />
For correct use within the design limits <strong>of</strong> the watch, confirm the level <strong>of</strong> waterresistance<br />
<strong>of</strong> your watch, as indicated on the dial and case, and consult the table.<br />
Examples <strong>of</strong> use<br />
Dial<br />
Indication<br />
Case<br />
(case back)<br />
Specifications<br />
Minor exposure to water<br />
(washing face, rain, etc.)<br />
Moderate exposure to<br />
water (washing, kitchen<br />
work, swimming, etc.)<br />
Marine sports<br />
(skin diving)<br />
Scuba diving<br />
(with air tank)<br />
Operation <strong>of</strong> the<br />
crown or button<br />
with moisture visible<br />
WATER RESIST<br />
or no indication<br />
WATER<br />
RESIST(ANT)<br />
Water-resistant to<br />
3 atmospheres<br />
OK<br />
NO NO NO NO<br />
WR 50 or WATER<br />
RESIST 50<br />
WR 100/200 or<br />
WATER RESIST<br />
100/200<br />
WATER<br />
RESIST(ANT) 5 bar or<br />
WATER RESIST(ANT)<br />
WATER RESIST(ANT)<br />
10bar/20 bar or<br />
WATER RESIST(ANT)<br />
Water-resistant to<br />
5 atmospheres<br />
Water-resistant to<br />
10/20 atmospheres<br />
OK<br />
OK<br />
OK NO NO NO<br />
OK OK NO NO<br />
110<br />
111
WARNING: Water-resistance performance<br />
• Water-resistance for daily use (to 3 atmospheres): This type <strong>of</strong> watch is water-resistant to<br />
minor exposure to water. For example, you may wear the watch while washing your face;<br />
however, it is not designed for use underwater.<br />
• Upgraded water-resistance for daily use (to 5 atmospheres): This type <strong>of</strong> watch is waterresistant<br />
to moderate exposure to water. You may wear the watch while swimming;<br />
however, it is not designed for use while skin diving.<br />
• Upgraded water-resistance for daily use (to 10/20 atmospheres): This type <strong>of</strong> watch may be<br />
used for skin diving; however, it is not designed for scuba or saturated diving using helium<br />
gas.<br />
CAUTION<br />
• Be sure to use the watch with the crown pressed in (normal position). If your watch has a<br />
screw-lock type crown, be sure to tighten the crown completely.<br />
• Do NOT operate the crown or button with wet fingers or when the watch is wet. Water may<br />
enter the watch and compromise water-resistance.<br />
• If the watch is used in seawater, rinse with fresh water afterward and wipe with a dry cloth.<br />
• If moisture has entered the watch, or if the inside <strong>of</strong> the crystal is fogged up and does not<br />
become clear within a day, immediately take the watch to your dealer or Citizen Service<br />
Center for repair. Leaving the watch in such a state will allow corrosion to form inside.<br />
• If seawater enters the watch, place the watch in a box or plastic bag and immediately take it<br />
in for repair. Otherwise, pressure inside the watch will increase, and parts (crystal, crown,<br />
buttons, etc.) may come <strong>of</strong>f.<br />
CAUTION: Keep your watch clean.<br />
• Leaving dust and dirt deposited between the case and crown may result in difficulty in<br />
pulling the crown out. Rotate the crown while in its normal position, from time to time, to<br />
loosen dust and dirt and then brush it <strong>of</strong>f.<br />
• Dust and dirt tend to be deposited in gaps in the back <strong>of</strong> the case or band.<br />
Deposited dust and dirt may cause corrosion and soil your clothing. Clean the watch<br />
occasionally.<br />
Cleaning the Watch<br />
• Use a s<strong>of</strong>t cloth to wipe <strong>of</strong>f dirt, perspiration and water from the case and crystal .<br />
• Use a s<strong>of</strong>t, dry cloth to wipe <strong>of</strong>f perspiration and dirt from the leather band.<br />
• To clean a metal, plastic, or rubber watchband, wash away dirt with mild soap and water.<br />
Use a s<strong>of</strong>t brush to remove dust and dirt jammed in the gaps in the metal band. If your<br />
watch is not water-resistant, take it to your dealer.<br />
NOTE: Avoid using solvents (thinner, benzine, etc.), as they may damage the finish.<br />
112<br />
113
CAUTION: Operating environment<br />
• Use the watch within the operating-temperature range specified in the instruction manual.<br />
Using the watch where temperatures are outside the specified range, may result in<br />
deterioration <strong>of</strong> functions or even stoppage <strong>of</strong> the watch.<br />
• Do NOT use the watch in places where it is exposed to high temperature, such as in a sauna.<br />
Doing so may result in a skin burn.<br />
• Do NOT leave the watch in a place where it is exposed to high temperature, such as the<br />
glove compartment or dash-board <strong>of</strong> a car.<br />
Doing so may result in deterioration <strong>of</strong> the watch, such as deformation <strong>of</strong> plastic parts.<br />
• Do NOT place the watch close to a magnet.<br />
Timekeeping will become inaccurate if you place the watch close to magnetic health<br />
equipment such as a magnetic necklace or a magnetic latch <strong>of</strong> a refrigerator door or handbag<br />
clasp or the earphone <strong>of</strong> a mobile phone. If this has occurred, move the watch away from the<br />
magnet and reset the time.<br />
• Do NOT place the watch close to household appliances that generate static electricity.<br />
Timekeeping may become inaccurate if the watch is exposed to strong static electricity, such<br />
as is emitted from a TV screen.<br />
• Do NOT subject the watch to a strong shock such as dropping it onto a hard floor.<br />
• Avoid using the watch in an environment where it may be exposed to chemicals or corrosive<br />
gases.<br />
If solvents, such as thinner and benzine, or substances containing such solvents come in<br />
contact with the watch, discoloration, melting, cracking, etc. may result. If the watch comes<br />
in contact with mercury used in thermometers, the case, band or other parts may become<br />
discolored.<br />
Periodical inspections<br />
Your watch needs inspection once in every two or three years for safety and long use.<br />
To keep your watch water-resistant, the packing needs to be replaced regularly.<br />
Other parts need to be inspected and replaced if necessary.<br />
Ask for Citizen geuine parts upon replacement.<br />
114<br />
115
W 26. Specifications<br />
1. Cal. No.: U68*<br />
2. Type: Combination solar powered watch<br />
3. Time accuracy: Without reception (when watch is not receiving a radio signal)<br />
Average monthly deviation: ±15 seconds<br />
when used in room temperature (+5°C to +35°C / 41°F to 95°F)<br />
4. Acceptable temperature range: 0°C to + 50°C / 32°F to 122°F<br />
5. Display functions<br />
[Analog areas]<br />
• Home city time: Hours, minutes, seconds, 24-hour<br />
• UTC time: Hours, minutes<br />
• Charge level display (fan-shaped display, 4 grades)<br />
• Radio wave reception display: Japan: JJY, USA: WWVB,<br />
Europe (Germany: DCF77), China: BPC<br />
[Digital areas]<br />
• Home city name/world city name<br />
• World city time: Hours, minutes and seconds (switch between 12-hour and 24-hour<br />
clock)<br />
116<br />
• Daylight saving time on/<strong>of</strong>f<br />
• Calendar: Month, date, day <strong>of</strong> week (perpetual calendar until December 31, 2099)<br />
6. Additional functions<br />
• Radio signal reception function (automatic reception, on demand reception, recovery<br />
automatic reception)<br />
• Radio wave transmitter automatic selection function (only when radio wave from<br />
Japan)<br />
• Reception on/<strong>of</strong>f selection function<br />
• Reception standby indication function (RX)<br />
• Reception level indication function (H, M, L)<br />
• Reception status confirmation function (H, M, L or NO)<br />
• Automatic reception time setting function<br />
• Daylight saving time on/<strong>of</strong>f selection function<br />
• World time alarm 1 and 2:Hours, minutes, AM/PM, city name, on/<strong>of</strong>f, alarm check<br />
function<br />
• Chronograph (24-hour measurement, 1/100 second units, split time measurement)<br />
• Timer (setting range: from 1 minute up to 99 minutes, in 1-minute units)<br />
Flyback function, auto return function<br />
• World time display function<br />
117
• Time difference set by user<br />
• Zone set function (city name display SET/OFF)<br />
• Home time (analog) and world time (digital) switching function<br />
• LED lights<br />
• Power saving function 1<br />
• Power saving function 2<br />
• Reference position checking/adjustment function<br />
• Solar power function<br />
• Insufficient charge warning function (2-second interval movement)<br />
• Overcharging prevention function<br />
• JIS Type-1 antimagnetic watch<br />
• Impact detection function<br />
• Hand correction function<br />
7. Operation time:<br />
• Time from a full charge until the watch stops without charging<br />
: About 3.5 years (when in the power saving mode)<br />
: About 6 months (when not in the power saving mode)<br />
(The operation time may vary depending on the conditions <strong>of</strong> use, such as how<br />
many times the radio wave is received.)<br />
• Time from insufficient charge warning to watch stopping:<br />
About 3 days<br />
8. Battery: Secondary battery 1<br />
* Specifications may change without notice.<br />
118<br />
119