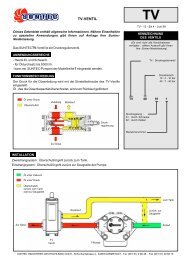
IRD 1010-e - Herrmann
IRD 1010-e - Herrmann
IRD 1010-e - Herrmann

Create successful ePaper yourself
Turn your PDF publications into a flip-book with our unique Google optimized e-Paper software.
TECHNICAL FEATURES<br />
1. Flame detection<br />
- Yellow- as well as blue-burning oil flames can be monitored.<br />
- The flame detector is suitable for operation where the<br />
ambient temperature is within the range -20° to +60° C.<br />
- The flickering detector <strong>IRD</strong> <strong>1010</strong> becomes active not<br />
before a minimum threshold-level of steady light is<br />
exceeded. That guarantees that neither electromagneticnor<br />
ignition-spark noise are affecting the <strong>IRD</strong>.<br />
- Sensitivity is adjustable.<br />
- LED 1 is a warning indicator for the pre-purge phase as<br />
well as normal operation. LED 2 indicates the actual status<br />
of the detector: On or off.<br />
- During pre-purge, LED 1 indicates possible stray light,<br />
which may be produced either by a flickering or by<br />
a steady light source, before the detector switches on<br />
(LED 2).<br />
- When the burner is operating normally, LED 1 acts as a<br />
warning indication of the flame signal current sensitivity<br />
being set too low - it begins to flicker or extinguishes<br />
before the detector switches off.<br />
- The compact dimensions of the detector allow it to be<br />
installed on any burner. The detector shaft has the same<br />
dimensions as the FZ 711 S. It therefore also fits into the<br />
FZ holder M 74.<br />
- Unlike UV tubes, the <strong>IRD</strong> <strong>1010</strong> flicker detector does not<br />
deteriorate with age.<br />
2. Installation instructions<br />
- The detector probe should be fitted so that it receives the<br />
light which pulsates most strongly. This can be achieved<br />
by positioning the detector as close as possible to the<br />
flame or by directing it at a particular zone of the flame (e.g.<br />
by using a sighting tube).<br />
- No stray light must be allowed to fall on the detector (e.g.<br />
through cracks or from a sight glass). Pulsating stray light<br />
(e.g. from fluorescent lighting or light bulbs) could cause<br />
the system to switch to lockout. Due to the very high<br />
sensitivity of the detector, it should not be exposed<br />
directly or indirectly (reflections) to the ignition spark.<br />
- The infra-red flicker detector should be fitted in such a way<br />
that the ambient temperature cannot under any<br />
circumstances rise above 60 °C. At higher temperatures,<br />
there is a risk of incorrect operation and the life expectancy<br />
of the unit could be reduced. In addition, care should be<br />
taken that the detector is not subjected to unusually harsh<br />
vibration and receives no hard knocks.<br />
COMMISSIONING AND MAINTENANCE<br />
During commissioning and after servicing, the flame<br />
monitoring system should be checked for faultless operation<br />
as follows:<br />
1. Check that the detector is connected properly. Wrong<br />
connections are a risk to safety, and could cause damage<br />
to the detector unit or burner system.<br />
2. Adjust to maximum sensitivity and start the burner: If the<br />
LED indicator is lit after the start impulse, carefully adjust<br />
the sensitivity control until LED 1 extinguishes. No LED<br />
should light up during the pre-purge phase.<br />
3. With the system set for normal operation, pull out the<br />
detector probe and cover it up to cut off light. Both LED<br />
indicators must extinguish. The control box should switch<br />
to lockout or attempt to re-start the sequence.<br />
4. Attempt to re-start with the flame detector covered.<br />
There must be no indication from the LED’s after the start<br />
impulse. The burner control box must switch to lockout<br />
at the end of the safety interval.<br />
5. Attempt to start the burner with the detector exposed to<br />
stray light e.g. from fluorescent lighting, a cigarette<br />
lighter or light bulb (not daylight or an electric torch):<br />
Depending on the type of control box, it should switch to<br />
lockout either immediately or at the end of the pre-purge,<br />
as a result of stray light.<br />
6. When the burner is operating normally, carefully turn<br />
back the sensitivity control until LED 1 begins to flicker.<br />
Increase the setting again by one or two increments until<br />
both LED’s are lit. If LED 1 does not flicker even at position<br />
1: Leave potentiometer at position 1-2. This adjustment<br />
should be carried out when the flame signal current<br />
is weakest (shortly after flame establishment or after<br />
stabilisation).<br />
The flame detection device requires no maintenance of any<br />
kind, and as it is classed as safety equipment, no attempt<br />
should be made to open the housing.<br />
Because the nature of the flame can change in time due to<br />
the accumulation of dirt, the indicators on the detector<br />
should be checked periodically.<br />
Please note:<br />
Burner operating normally = both LED’s on<br />
Burner in pre-purge phase = both LED’s off<br />
For safety reasons the sensitivity must not be set<br />
higher than necessary.<br />
<strong>IRD</strong> <strong>1010</strong><br />
2