Successful Panoramic Radiography - IneedCE.com
Successful Panoramic Radiography - IneedCE.com
Successful Panoramic Radiography - IneedCE.com

Create successful ePaper yourself
Turn your PDF publications into a flip-book with our unique Google optimized e-Paper software.
Step 1: Setting Exposure Factors<br />
Many newer panoramic machines set exposure factors automatically by measuring the amount of radiation passing through the<br />
patient’s head, or by measuring head width and adjusting exposure values accordingly. With some panoramic machines, though,<br />
exposure must be set based on the patient’s size or age. Usually, icons of small, medium, or large patients are used. Since the patient’s<br />
bone density is not always related to their physical size, a better guide is to look at the patient’s wrists or ankles. Thick wrists can<br />
imply heavier bone density; other factors to consider are age, whether the patient is edentulous, and obesity. Common exposure<br />
errors are illustrated in (Figure 9).<br />
Problem Cause How to Correct Hints<br />
Light, pale image with<br />
few dark areas<br />
Dark image with loss of<br />
details, amalgams and unex<br />
posed areas are still clear<br />
Too little exposure<br />
Too much exposure<br />
Increase mA or kVp or use next<br />
higher setting on machine<br />
Decrease machine settings<br />
Do not confuse with fogging<br />
(film), which is an<br />
overall grayness<br />
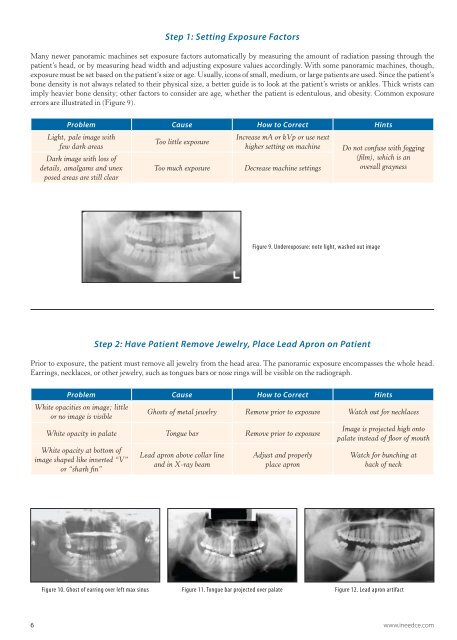
Figure 9. Underexposure: note light, washed out image<br />
Step 2: Have Patient Remove Jewelry, Place Lead Apron on Patient<br />
Prior to exposure, the patient must remove all jewelry from the head area. The panoramic exposure en<strong>com</strong>passes the whole head.<br />
Earrings, necklaces, or other jewelry, such as tongues bars or nose rings will be visible on the radiograph.<br />
Problem Cause How to Correct Hints<br />
White opacities on image; little<br />
or no image is visible<br />
Ghosts of metal jewelry Remove prior to exposure Watch out for necklaces<br />
White opacity in palate Tongue bar Remove prior to exposure<br />
White opacity at bottom of<br />
image shaped like inverted “V”<br />
or “shark fin”<br />
Lead apron above collar line<br />
and in X-ray beam<br />
Adjust and properly<br />
place apron<br />
Image is projected high onto<br />
palate instead of floor of mouth<br />
Watch for bunching at<br />
back of neck<br />
Figure 10. Ghost of earring over left max sinus Figure 11. Tongue bar projected over palate Figure 12. Lead apron artifact<br />
6 www.ineedce.<strong>com</strong>