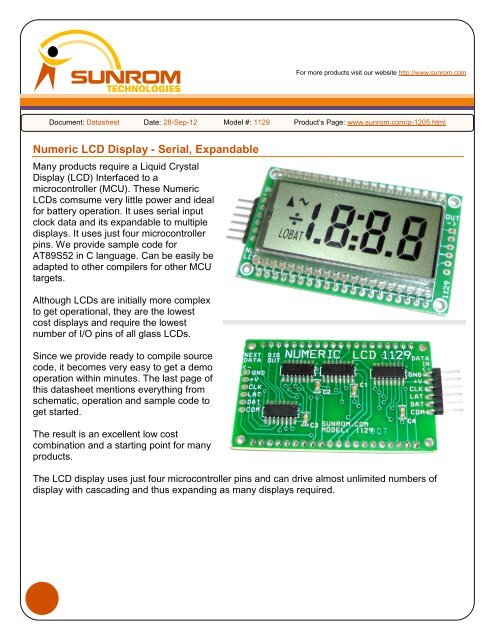
Numeric LCD Display - Serial, Expandable - Sunrom Technologies
Numeric LCD Display - Serial, Expandable - Sunrom Technologies
Numeric LCD Display - Serial, Expandable - Sunrom Technologies

You also want an ePaper? Increase the reach of your titles
YUMPU automatically turns print PDFs into web optimized ePapers that Google loves.
For more products visit our website http://www.sunrom.com<br />
Document: Datasheet Date: 28-Sep-12 Model #: 1129 Product’s Page: www.sunrom.com/p-1205.html<br />
<strong>Numeric</strong> <strong>LCD</strong> <strong>Display</strong> - <strong>Serial</strong>, <strong>Expandable</strong><br />
Many products require a Liquid Crystal<br />
<strong>Display</strong> (<strong>LCD</strong>) Interfaced to a<br />
microcontroller (MCU). These <strong>Numeric</strong><br />
<strong>LCD</strong>s comsume very little power and ideal<br />
for battery operation. It uses serial input<br />
clock data and its expandable to multiple<br />
displays. It uses just four microcontroller<br />
pins. We provide sample code for<br />
AT89S52 in C language. Can be easily be<br />
adapted to other compilers for other MCU<br />
targets.<br />
Although <strong>LCD</strong>s are initially more complex<br />
to get operational, they are the lowest<br />
cost displays and require the lowest<br />
number of I/O pins of all glass <strong>LCD</strong>s.<br />
Since we provide ready to compile source<br />
code, it becomes very easy to get a demo<br />
operation within minutes. The last page of<br />
this datasheet mentions everything from<br />
schematic, operation and sample code to<br />
get started.<br />
The result is an excellent low cost<br />
combination and a starting point for many<br />
products.<br />
The <strong>LCD</strong> display uses just four microcontroller pins and can drive almost unlimited numbers of<br />
display with cascading and thus expanding as many displays required.
Pin Configuration<br />
PIN# Name Details<br />
GND Ground Ground of Power<br />
+V + Power 3-5V Power input<br />
CLK Clock <strong>Serial</strong> Clock<br />
LAT Latch Latching of data to output<br />
DAT Data <strong>Serial</strong> data input<br />
COM <strong>LCD</strong> Common Common signal of <strong>LCD</strong> <strong>Display</strong><br />
Next <strong>Display</strong><br />
if required<br />
DISPLAY DATA<br />
FROM MCU<br />
Operation<br />
The MCU is required to drive the <strong>LCD</strong> pins with 50% square waves of 20ms time(10ms High, 10ms<br />
Low). Each segment on this <strong>LCD</strong> is connected to the COM backplane and a separate pin. When a<br />
pin is driven in phase with the COM pin, the corresponding <strong>LCD</strong> segment gets zero voltage, and is<br />
off. When a pin is driven in reverse of the COM pin, the corresponding segment gets an alternating<br />
voltage, and lights up.<br />
The 10ms interrupt routine in microcontroller is called periodically to invert all pins of the <strong>LCD</strong> to<br />
generate the 50% square wave.<br />
1 Frame = 20 MiliSecond = 50 Hz refresh rate<br />
10ms COM pin High<br />
10ms COM pin Low<br />
Segment is phase with<br />
COM pin, will become<br />
OFF<br />
Segments out of phase<br />
with COM pin will<br />
become ON<br />
Once COM pin is set, a function is called will serially outputs all status of segments. If the segment<br />
is in phase to COM pin they become OFF. And Segments which are made out of phase to COM pin<br />
becomes on.<br />
We provide a detailed commented source code to drive the <strong>LCD</strong>. See last pages of document.<br />
2<br />
<strong>Sunrom</strong> <strong>Technologies</strong> Your Source for Embedded Systems Visit us at www.sunrom.com
Register Mapping<br />
Each display has four serial addressable 8 bit registers. You can shift in data through clock pulses<br />
and make latch pulse to affect the output after all 32 bits(4x8 bits) are clocked in.<br />
Register 3,Misc<br />
Register2,DISPLAY1 Register1,DISPLAY2 Register0, DISPLAY3<br />
Bit Register3, Misc Register2, Disp# #1 Register1, Disp#2 Register0, Disp#3<br />
7 K segment(for 1) DP1<br />
DP2<br />
DP3<br />
6 X 1E<br />
2E<br />
3E<br />
5 Y 1D<br />
2D<br />
3D<br />
4 ^ 1C<br />
2C<br />
3C<br />
3 ~ 1G<br />
2G<br />
3G<br />
2 LOWBAT 1F<br />
2F<br />
3F<br />
1 COL 1A<br />
2A<br />
3A<br />
0 Not used 1B<br />
2B<br />
3B<br />
Cascading multiple display for expansion<br />
Can drive multiple displays easily. Cascading multiple display is easy, One side output goes to<br />
output of next display.<br />
No extra IO from MCU is required. Only software expansion is required,<br />
Provision is given in sample code.<br />
MCU<br />
3<br />
<strong>Sunrom</strong> <strong>Technologies</strong><br />
Your Source for Embedded Systems<br />
Visit us at www.sunrom.com
Dimensions<br />
4<br />
<strong>Sunrom</strong> <strong>Technologies</strong> Your Source for Embedded Systems Visit us at www.sunrom.com
Sample Application – AT89S52<br />
Th sample code on following page shows how to drive the display serially using AT89S52 controller.<br />
VCC<br />
C8<br />
10uF 16V<br />
R1<br />
10K<br />
+<br />
39<br />
38<br />
37<br />
36<br />
35<br />
34<br />
33<br />
32<br />
1<br />
2<br />
3<br />
4<br />
5<br />
6<br />
7<br />
8<br />
31<br />
9<br />
U2<br />
AT89S52<br />
P0.0/AD0<br />
P0.1/AD1<br />
P0.2/AD2<br />
P0.3/AD3<br />
P0.4/AD4<br />
P0.5/AD5<br />
P0.6/AD6<br />
P0.7/AD7<br />
P1.0/T2<br />
P1.1/T2EX<br />
P1.2<br />
P1.3<br />
P1.4/SS<br />
P1.5/MOSI<br />
P1.6/MISO<br />
P1.7/SCK<br />
EA/VPP<br />
RST<br />
GND<br />
20<br />
VCC<br />
VCC 40<br />
XTAL1<br />
19<br />
C1<br />
100n<br />
P2.0/A8<br />
P2.1/A9<br />
P2.2/A10<br />
P2.3/A11<br />
P2.4/A12<br />
P2.5/A13<br />
P2.6/A14<br />
P2.7/A15<br />
10<br />
P3.0/RXD<br />
P3.1/TXD 11<br />
12<br />
P3.2/INT0<br />
13<br />
P3.3/INT1<br />
14<br />
P3.4/T0<br />
15<br />
P3.5/T1<br />
16<br />
P3.6/WR<br />
17<br />
P3.7/RD<br />
XTAL2<br />
18<br />
21<br />
22<br />
23<br />
24<br />
25<br />
26<br />
27<br />
28<br />
PSEN 29<br />
ALE/PROG 30<br />
Y1<br />
VCC<br />
1<br />
2<br />
3<br />
4<br />
5<br />
6<br />
S1<br />
<strong>Sunrom</strong> <strong>Numeric</strong> <strong>LCD</strong> Model#1129<br />
GND<br />
+V<br />
CLK<br />
LAT<br />
DAT<br />
COM<br />
A<br />
A<br />
A<br />
^ ~<br />
1 2 3<br />
X K F<br />
B F<br />
B F<br />
Y<br />
LOBAT<br />
K<br />
DP1<br />
E<br />
D<br />
G<br />
C<br />
DP2<br />
COL<br />
E<br />
D<br />
G<br />
C<br />
DP3<br />
E<br />
D<br />
G<br />
C<br />
B<br />
C9<br />
33p<br />
11.0592<br />
C10<br />
33p<br />
The code is in C language and can be adapted to any microcontroller easily.<br />
The code can be compiled from below pages (Compiler is Keil C51)<br />
At power up, test function lits up all segments for 5 seconds.<br />
During run time the MCU displays a<br />
integer which increments every<br />
second and places a decimal point<br />
to 2 nd digit.<br />
5<br />
<strong>Sunrom</strong> <strong>Technologies</strong> Your Source for Embedded Systems Visit us at www.sunrom.com
*<br />
Author: <strong>Sunrom</strong> <strong>Technologies</strong> http://www.sunrom.com<br />
Date: 28th Sep 2012<br />
Hardware Model: <strong>Numeric</strong> <strong>LCD</strong> <strong>Display</strong> Model 1129<br />
Compiler: Keil C51<br />
Shows demo how to control the <strong>LCD</strong> serially<br />
*/<br />
#include <br />
#include <br />
#include <br />
// Hardware Inteface to MCU<br />
#define CLOCK P2_0<br />
#define LATCH P2_1<br />
#define SDATA P2_2<br />
#define COM P2_3<br />
#define TIMER0_COUNT 0xDC11 /* 10000h - ((11,059,200 Hz / (12 * FREQ)) - 17) */<br />
#define NUMBER_OF_REGISTERS 4<br />
unsigned char digits[NUMBER_OF_REGISTERS]; // we will seperate a integer and<br />
use this variable to store seperated digits<br />
unsigned int count; // we will create a count variable and make it go from 0 to<br />
9999<br />
unsigned char cflag;<br />
// This array has values as to which segment becomes on for a digit from 0 to 9<br />
code unsigned char SegmentMapping[12] =<br />
{<br />
119, //0<br />
17, //1<br />
107, //2<br />
59, //3<br />
29, //4<br />
62, //5<br />
126, //6<br />
19, //7<br />
127, //8<br />
63, //9<br />
0x00, //10: All OFF<br />
0x80 //11: Special mapping for only 1 segment of display<br />
};<br />
/*=-=-=-=-=-=-=-=-=-=-=-=-=-=-=-=-=-=-=-=-=-=-=-=-=-=-=-=-=-=-=-=-=-=-=-=-<br />
Delay x Milisecond<br />
=-=-=-=-=-=-=-=-=-=-=-=-=-=-=-=-=-=-=-=-=-=-=-=-=-=-=-=-=-=-=-=-=-=-=-=-*/<br />
void delay_ms(unsigned int x) // delays x msec (at fosc=11.0592MHz)<br />
{<br />
unsigned char j=0;<br />
while(x-- > 0)<br />
{<br />
for (j=0; j
void shift_data(unsigned char one_zero ){<br />
unsigned char i,j;<br />
unsigned char temp;<br />
for(j=0;j1;<br />
CLOCK=1;CLOCK=0; // Clock bit into register<br />
}<br />
}<br />
LATCH=1;<br />
LATCH=0; // latch out data in registers<br />
/*=-=-=-=-=-=-=-=-=-=-=-=-=-=-=-=-=-=-=-=-=-=-=-=-=-=-=-=-=-=-=-=-=-=-=-=-<br />
Create AC waveform by toggling COM out and cflag variable.<br />
=-=-=-=-=-=-=-=-=-=-=-=-=-=-=-=-=-=-=-=-=-=-=-=-=-=-=-=-=-=-=-=-=-=-=-=-*/<br />
void AC_shift_data(){<br />
if (cflag==1){<br />
COM=1;<br />
shift_data(1);<br />
cflag=0;<br />
}<br />
else<br />
{<br />
COM=0;<br />
shift_data(0);<br />
cflag=1;<br />
}<br />
}<br />
/*=-=-=-=-=-=-=-=-=-=-=-=-=-=-=-=-=-=-=-=-=-=-=-=-=-=-=-=-=-=-=-=-=-=-=-=void<br />
timer0_initialize (void);<br />
This function enables TIMER 0. TIMER 0 generates a synchronous interrupt<br />
once every 100Hz.<br />
=-=-=-=-=-=-=-=-=-=-=-=-=-=-=-=-=-=-=-=-=-=-=-=-=-=-=-=-=-=-=-=-=-=-=-=-*/<br />
void timer0_initialize (void)<br />
{
}<br />
EA = 0; /* disable interrupts */<br />
TR0 = 0; /* stop timer 0 */<br />
TMOD &= ~0x0F; /* clear timer 0 mode bits */<br />
TMOD |= 0x01; /* put timer 0 into 16-bit no prescale */<br />
TL0 = (TIMER0_COUNT & 0x00FF);<br />
TH0 = (TIMER0_COUNT >> 8);<br />
PT0 = 0; /* set low priority for timer 0 */<br />
ET0 = 1; /* enable timer 0 interrupt */<br />
TR0 = 1; /* start timer 0 */<br />
EA = 1; /* enable interrupts */<br />
/*=-=-=-=-=-=-=-=-=-=-=-=-=-=-=-=-=-=-=-=-=-=-=-=-=-=-=-=-=-=-=-=-=-=-=-=static<br />
void timer0_isr (void);<br />
This function is an interrupt service routine for TIMER 0. It should never<br />
be called by a C or assembly function. It will be executed automatically<br />
when TIMER 0 overflows.<br />
=-=-=-=-=-=-=-=-=-=-=-=-=-=-=-=-=-=-=-=-=-=-=-=-=-=-=-=-=-=-=-=-=-=-=-=-*/<br />
void timer0_isr (void) interrupt 1<br />
{<br />
/*=-=-=-=-=-=-=-=-=-=-=-=-=-=-=-=-=-=-=-=-=-=-=-=-=-=-=-=-=-=-=-=-=-=-=-=<br />
Stop Timer 0, adjust the timer 0 counter so that<br />
we get another interrupt in 10ms, and restart the<br />
timer.<br />
=-=-=-=-=-=-=-=-=-=-=-=-=-=-=-=-=-=-=-=-=-=-=-=-=-=-=-=-=-=-=-=-=-=-=-=-*/<br />
TR0 = 0; /* stop timer 0 */<br />
TL0 = TL0 + (TIMER0_COUNT & 0x00FF);<br />
TH0 = TH0 + (TIMER0_COUNT >> 8);<br />
TR0 = 1; /* start timer 0 for next cycles*/<br />
AC_shift_data(); // Create AC waveform<br />
}<br />
/*=-=-=-=-=-=-=-=-=-=-=-=-=-=-=-=-=-=-=-=-=-=-=-=-=-=-=-=-=-=-=-=-=-=-=-=<br />
This function breaks apart a given integer into separete digits<br />
and writes them to the display array i.e. digits[]<br />
=-=-=-=-=-=-=-=-=-=-=-=-=-=-=-=-=-=-=-=-=-=-=-=-=-=-=-=-=-=-=-=-=-=-=-=-*/<br />
void seperate_digits()<br />
{<br />
unsigned char i=0;<br />
unsigned char j;<br />
unsigned int num;<br />
num = count;<br />
while(num)<br />
{<br />
digits[i]=num%10;<br />
i++;<br />
num=num/10;<br />
}<br />
for(j=i;j
void test_display_mode()<br />
{<br />
unsigned char i;<br />
unsigned char x=250; // 20 ms per frame x 250 should give us 5 sec of display<br />
while(x>0)<br />
{<br />
/////////////////////////<br />
COM = 1;<br />
// The common pin of <strong>LCD</strong><br />
for(i=0; i