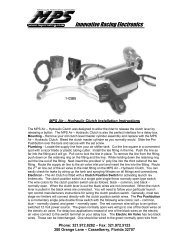
34-NC-2000 - MPS Racing
34-NC-2000 - MPS Racing
34-NC-2000 - MPS Racing

You also want an ePaper? Increase the reach of your titles
YUMPU automatically turns print PDFs into web optimized ePapers that Google loves.
SCHNITZ<br />
<strong>Racing</strong><br />
1.800.837.9730<br />
www.schnitzracing.com<br />
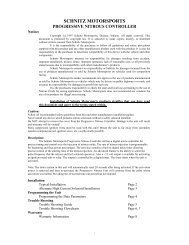
Schnitz Motorsports<br />
Performance at its Best!<br />
SCHNITZ<br />
1. .1 .01 .001<br />
<strong>NC</strong>-<strong>2000</strong><br />
ACTIVATION<br />
+12 VOLT<br />
+12 VOLT<br />
TIMER<br />
OUTPUT<br />
FU<strong>NC</strong>TION ENTER<br />
PROGRESSIVE2<br />
NITROUS CONTROLLER<br />
GROUND<br />
FUEL<br />
SOLENOID<br />
GROUND<br />
NOS<br />
SOLENOID<br />
GROUND<br />
Nitrous<br />
Power Control<br />
<strong>NC</strong>-<strong>2000</strong><br />
Installation & and User Guide<br />
1
Important Information - Must use Static Suppression Ignition Wires with this Controller.<br />
The <strong>NC</strong>-<strong>2000</strong> Nitrous Controller contains High Frequency Digital Electronics and will NOT function<br />
correctly without Suppression Wires!<br />
Caution - Do NOT submerge Controller in liquid or directly wash unit with<br />
liquid of any type!<br />
Warning - The Programming Switches are Delicate Electronic items and can<br />
be damaged by misuse and/or carelessness. If the Controller is close to your<br />
NOS Bottle be careful when installing the bottle. The weight of the bottle is<br />
enough to easily damage the switches. Switches that have been determined to<br />
be damaged due to neglect will NOT be covered under Warranty.<br />
Notice:<br />
Copyright (c) 2001 Schnitz Motorsports, Decatur, Indiana. All rights reserved. This<br />
document is protected by copyright law. It is unlawful to make copies, modify, or distribute<br />
without written consent from Schnitz Motorsports.<br />
It is the responsibility of the purchaser to follow all guidelines and safety procedures<br />
supplied with this product and any other manufactures product used with this product. It is also<br />
the responsibility of the purchaser to determine compatibility of this device with the vehicle and<br />
other components.<br />
Schnitz Motorsports assumes no responsibility for damages resulting from accident, improper<br />
installation, misuse, abuse, improper operation, lack of reasonable care, or all previously<br />
stated reasons due to incompatibility with other manufacturer’s products.<br />
Schnitz Motorsports assumes no responsibility or liability for damages incurred from<br />
the use of products manufactured or sold by Schnitz Motorsports on vehicles used for competition<br />
racing.<br />
Schnitz Motorsports neither recommends nor approves the use of products manufactured<br />
or sold by Schnitz Motorsports on vehicles which may be driven on public highways or<br />
roads, and assumes no responsibility for damages incurred from such use.<br />
It is the purchasers responsibility to check the state and local laws pertaining to the use<br />
of Nitrous Oxide for racing applications. Schnitz Motorsports does not recommend nor condone<br />
the use of its products for illegal street racing.<br />
Installation of Schnitz Motorsports products signifies that you have read this document<br />
and agree to the terms stated within.<br />
Caution:<br />
Follow all recommended safety guidelines from this and other manufactures<br />
installation guides.<br />
Never install any device which pulsates nitrous solenoids without a safety<br />
solenoid installed.<br />
Static suppression ignition wires must be used with this unit! Mount the<br />
unit as far away from secondary ignition components(coil, ignition wires, etc.) as<br />
physically possible.<br />
2<br />
SCHNITZ<br />
<strong>Racing</strong><br />
1.800.837.9730<br />
www.schnitzracing.com
3<br />
SCHNITZ<br />
<strong>Racing</strong><br />
1.800.837.9730<br />
www.schnitzracing.com<br />
<strong>NC</strong>-<strong>2000</strong>, Progressive Nitrous Controller<br />
The <strong>NC</strong>-<strong>2000</strong> Progressive Nitrous Controller was designed using the latest<br />
Digital Technology available. The result is a Controller which is extremely accurate<br />
and user friendly. A simple and functional programming interface allows the<br />
user to set important Nitrous parameters in a matter of seconds. All without the<br />
use of external programmers or computers. An Options Menu has been included<br />
to enable the User to Customize the Controller for a particular application. The<br />
Options Menu also contains a function that if selected will return the controller to<br />
its Original Factory Pre-Programmed State.<br />
Features<br />
Full Digital Circuitry, This design approach assures the best in performance<br />
and reliability. Digital Technology provides extremely accurate control that<br />
cannot be achieved with Analog Systems.<br />
Easy to Read LED Display with Touch Switch programming. This user<br />
interface is very user friendly and provides Quick and Accurate Programming of<br />
the controller.<br />
Integrated Battery Voltage Monitor, The battery voltage is displayed periodically<br />
on the LED Display.<br />
Non-Volatile Data Memory, No battery or power connection is needed to<br />
retain the controllers parameter settings. There is no need to re-program the controller<br />
after the battery is disconnected. There is NO internal battery, all Data is<br />
stored in Flash Memory and will be retained for up to 10 years with no power applied<br />
to the controller.<br />
Separate Nitrous and Fuel Solenoid Outputs, This design provides more<br />
output current capability. By using separate outputs better control of the solenoids<br />
is achieved. The response of the Nitrous System is improved and much more accurate.<br />
The Fuel Output is Programmed to Function as though the Fuel and Nitrous<br />
Solenoids were on the Same Output Terminal. The Options Menu allows the<br />
User to Program the Fuel Solenoid Output to Operate in Full Progressive Mode<br />
(i.e. - The fuel solenoid will pulse through the entire progression).<br />
+12 Volt Timer Output, A digital timer is provided that can be used to Activate<br />
an Ignition Retard Controller or a 2nd Stage of Nitrous. The output from<br />
this timer provides +12 volts at 1 amp. This timer begins counting down when the<br />
Activation Terminal is on(+12v applied). If the Activation signal is removed the<br />
+12V Timer will halt until the signal is reapplied. The +12V Timer can be programmed<br />
from 0.000 to 9.999 seconds. The Options Menu allows the User to configure<br />
the Timer Output behavior while the Controller is in the Activated State.<br />
Optionally the Output can be configured to Remain ON regardless of the Activation<br />
Input. NOTE—Setting Timer to 0.000 will disable the Timer Output.
SCHNITZ<br />
<strong>Racing</strong><br />
1.800.837.9730<br />
www.schnitzracing.com<br />
Nitrous Delay Timer, A digital timer is provided that can be used to delay<br />
the start of the Nitrous. This timer begins counting down when the Activation Terminal<br />
is on(+12v applied). If the Activation signal is removed the Delay Timer<br />
will halt until the signal is reapplied. The Delay Timer can be programmed from<br />
0.000 to 9.999 seconds.<br />
Nitrous Starting Percentage, The user can program the amount of Nitrous<br />
Power that will be applied after the Nitrous Delay Timer has elapsed(Immediately<br />
if Delay Timer is set at 0.000). This parameter is set as a percentage and can range<br />
from 10% to 100%. If the Starting Power is more than the Ending Power the Nitrous<br />
Power will decrease with time.<br />
Final Nitrous Percentage, This setting allows the user to program how<br />
much Nitrous Power is applied after the Nitrous Power Ramp has completed. This<br />
parameter is also set as a percentage and can range from 10% to 100%. By setting<br />
the Final Power Percentage less than the Starting Percentage the user can back off<br />
the Nitrous Power.<br />
The Options Menu allows the User to select a Single or Dual Ramp Nitrous<br />
Power Ramp. When the Dual Ramp Mode is selected there will be 2 Final Percents<br />
and 2 Power Ramp Times.<br />
Nitrous Power Ramp Time, The Power Ramp Time is used to determine<br />
the rate at which the Nitrous Power goes from the Start Percentage to the Final<br />
Percentage. The Nitrous Power Ramp time can be set from .200 to 9.900 seconds.<br />
The Options Menu allows the User to select a Single or Dual Ramp Nitrous<br />
Power Ramp. When the Dual Ramp Mode is selected there will be 2 Final Percents<br />
and 2 Power Ramp Times.<br />
Intelligent Nitrous Progressive Timer, The Progressive Nitrous timer system<br />
will wait at its present state if the Activation signal is removed. Nitrous progression<br />
will resume when the controller is re-activated. The entire Nitrous and<br />
+12 Volt Timer System is automatically Reset 20 seconds after activation.<br />
Optionally the Nitrous Timer System can be configured to RESET each<br />
time the Activation Signal is Applied. This method would allow the Nitrous<br />
Power to be applied with each gear change or each time the throttle is lifted and<br />
re-applied. This feature is selected with the Options Menu.<br />
An added feature has been added to the Timer System to help the User<br />
Tune the Nitrous Power Ramp. When the Timer System is Activated(+12V at the<br />
Activation Input) an Internal Timer is started which will record the Time and Percent<br />
of the Progressive Cycle when the Activation Signal is Removed. This Data<br />
can be used to determine at what point in the Progressive Cycle that the Power<br />
Ramp is to Aggressive and the driver is lifting the throttle.<br />
4
SCHNITZ<br />
<strong>Racing</strong><br />
1.800.837.9730<br />
www.schnitzracing.com<br />
Table of Contents<br />
Programming<br />
+12 Volt Timer Page 6<br />
Nitrous Delay Timer Page 6<br />
Nitrous Starting Percentage Page 7<br />
Nitrous Ending Percentage Page 7<br />
Nitrous Power Ramp Time Page 8<br />
Example Nitrous Power Setting Page 8<br />
Options Menu, Programming<br />
Viewing Run Data and Entering the Options Menu Page 9<br />
Clearing Run Data(Reset for next run) Page 9<br />
Resetting Controller to Factory Defaults Page 9<br />
Calibrating the Voltage Monitor Page 9<br />
Setting the Dual Nitrous Power Ramp ON/OFF Page 10<br />
Setting Progressive Fuel Output ON/OFF Page 10<br />
Setting Activation Wait and Hold ON/OFF Page 10<br />
Setting +12V Timer Output Hold ON/OFF Page 11<br />
Enabling Quick Data Access Page 11<br />
Setting the RESET Timeout Period Page 11<br />
Exiting the Options Menu Page 11<br />
Using the Dual Ramp Feature<br />
How the Dual Power Ramp Functions Page 12<br />
Example Dual Ramp Nitrous Power Setting Page 12<br />
Installation<br />
Items Included with <strong>NC</strong>-<strong>2000</strong> Controller Page 13<br />
Items needed that are NOT Supplied Page 13<br />
Cautions and Warnings Page 13<br />
Wiring Diagram Page 14<br />
Technical Information<br />
Electrical Specifications Page 15<br />
Trouble Shooting Page 15<br />
Warranty Page 16<br />
5
SCHNITZ<br />
<strong>Racing</strong><br />
1.800.837.9730<br />
www.schnitzracing.com<br />
Programming the +12 Volt Timer<br />
Press and Release the FU<strong>NC</strong>TION Switch until the message "+12V Timer Delay" appears<br />
on the display. After the Function Message has scrolled across the display the Current<br />
+12 Volt Timer setting will appear on the display.<br />
To adjust the +12 Volt Timer Value press the desired Digit Button and the Value of that digit<br />
will increment. The digit will Roll over to 0 and begin counting up again if the user continues to<br />
release and press the Digit Button.<br />
To Exit without saving the New Value press the FU<strong>NC</strong>TION Switch and Select another<br />
Function.<br />
To Save the New Value press and release the ENTER Switch and the display will read<br />
"SAVED" and the new setting is now saved.<br />
Range of +12 Volt Timer is 0.000 to 9.999 seconds with a .001 second resolution.<br />
This setting will determine the amount of Time in Seconds before the +12 Volt Timer<br />
Output becomes Active(goes to +12V) after Controller Activation.<br />
NOTE—Setting Timer to 0.000 will Disable the +12V Timer Output. Set to 0.001 for<br />
quick activation.<br />
Programming the Nitrous Delay Timer<br />
Press and Release the FU<strong>NC</strong>TION Switch until the message "NOS Delay Timer" appears<br />
on the display. After the Function Message has scrolled across the display the Current Nitrous<br />
Delay Time setting will appear on the display.<br />
To adjust the Nitrous Delay Timer Value press the desired Digit Button and the Value of that<br />
digit will increment. The digit will Roll over to 0 and begin counting up again if the user continues<br />
to release and press the Digit Button.<br />
To Exit without saving the New Value press the FU<strong>NC</strong>TION Switch and Select another<br />
Function.<br />
To Save the New Value press and release the ENTER Switch and the display will read<br />
"SAVED" and the new setting is now saved.<br />
Range of Nitrous Delay Timer is 0.000 to 9.999 seconds with a .001 second resolution.<br />
This setting will determine the amount of Time in Seconds before the Nitrous becomes<br />
Active(Nitrous begins at Starting Percentage) after Controller Activation.<br />
6
SCHNITZ<br />
<strong>Racing</strong><br />
1.800.837.9730<br />
www.schnitzracing.com<br />
Programming the Nitrous Starting Percentage<br />
Press and Release the FU<strong>NC</strong>TION Switch until the message "Starting Percentage" appears<br />
on the display. After the Function Message has scrolled across the display the Current<br />
Nitrous Starting Percentage setting will appear on the display.<br />
To adjust the Nitrous Starting Percentage Value press the desired Digit Button and the<br />
Value of that digit will increment. The digit will Roll over to 0 and begin counting up again if<br />
the user continues to release and press the Digit Button. If the .1 Digit Button is pressed the<br />
Starting Percentage will go to 100%, pressing again will set the Starting Percentage back to<br />
0%. The 1. Digit is ignored for this function.<br />
To Exit without saving the New Value press the FU<strong>NC</strong>TION Switch and Select another<br />
Function.<br />
To Save the New Value press and release the ENTER Switch and the display will read<br />
"SAVED" and the new setting is now saved.<br />
Range of Nitrous Starting Percentage is 10 to 100 percent in 1% increments.<br />
This setting will determine the amount of Nitrous to be applied after the Nitrous Delay<br />
Timer has elapsed.<br />
Programming the Final Nitrous Percentage<br />
Note - If the Dual Ramp Feature is Enabled from the Options Menu there will be a<br />
"Final Percent #2" in the Menu List. The Programming Method is the same as the "Final Percent<br />
#1". Please Refer to the section Options Menu and Using the Dual Ramp Feature for<br />
more information.<br />
Press and Release the FU<strong>NC</strong>TION Switch until the message "Final Percent #1" appears<br />
on the display. After the Function Message has scrolled across the display the Current<br />
Final Nitrous Percentage setting will appear on the display.<br />
To adjust the Final Nitrous Percentage Value press the desired Digit Button and the Value of<br />
that digit will increment. The digit will Roll over to 0 and begin counting up again if the user<br />
continues to release and press the Digit Button. If the .1 Digit Button is pressed the Final Percentage<br />
will go to 100%, pressing again will set the Final Percentage back to 0%. The 1. Digit<br />
is ignored for this function.<br />
To Exit without saving the New Value press the FU<strong>NC</strong>TION Switch and Select another<br />
Function.<br />
To Save the New Value press and release the ENTER Switch and the display will read<br />
"SAVED" and the new setting is now saved.<br />
Range of Final Nitrous Percentage is 10 to 100 percent in 1% increments.<br />
This setting will determine the amount of Nitrous to be applied at the end of the Nitrous<br />
Power Ramp Time.<br />
7
SCHNITZ<br />
<strong>Racing</strong><br />
1.800.837.9730<br />
www.schnitzracing.com<br />
Programming the Nitrous Power Ramp Time<br />
Note - If the Dual Ramp Feature is Enabled from the Options Menu there will be a<br />
"NOS Build Time #2" in the Menu List. The Programming Method is the same as the "Build<br />
Time #1". Please Refer to the section "Options Menu" and "Using the Dual Ramp Feature" for<br />
more information.<br />
Press and Release the FU<strong>NC</strong>TION Switch until the message "NOS Build Time #1"<br />
appears on the display. After the Function Message has scrolled across the display the Current<br />
Nitrous Power Ramp Time setting will appear on the display.<br />
To adjust the NOS Build Time press the desired Digit Button and the Value of that digit will<br />
increment. The digit will Roll over to 0 and begin counting up again if the user continues to<br />
release and press the Digit Button. The .01 and .001 Digit is ignored for this function.<br />
To Exit without saving the New Value press the FU<strong>NC</strong>TION Switch and Select another<br />
Function.<br />
To Save the New Value press and release the ENTER Switch and the display will read<br />
"SAVED" and the new setting is now saved.<br />
Range of NOS Build Time is .200 to 9.900 seconds in .1 second increments.<br />
This setting will determine the Rate at which the Nitrous Power goes from Starting to<br />
Final Percent. A short Power Ramp Time will make the Nitrous power very aggressive and a<br />
long Power Ramp Time will make the Nitrous Power less aggressive.<br />
Example Nitrous Power Setting, Dual Ramp Feature OFF<br />
PERCENT OF NITROUS<br />
100<br />
90<br />
80<br />
70<br />
60<br />
50<br />
40<br />
30<br />
20<br />
10<br />
Nitrous Delay<br />
Nitrous Starting Percentage<br />
Nitrous Power Ramp<br />
Final Nitrous Percentage<br />
0.000 1.000 2.000 3.000 4.000 5.000 6.000 7.000 8.000 9.000<br />
TIME IN SECONDS<br />
Nitrous Delay Timer = 1.000 seconds<br />
Nitrous Starting Percentage = 20%<br />
Final Nitrous Percentage = 100%<br />
Nitrous Power Ramp Time = 6.000 seconds<br />
8
SCHNITZ<br />
<strong>Racing</strong><br />
1.800.837.9730<br />
www.schnitzracing.com<br />
Viewing Run Data and Entering the Options Menu<br />
Press and Release the FU<strong>NC</strong>TION Switch until the message "Progressive 2 Nitrous<br />
Controller, <strong>NC</strong>-<strong>2000</strong>" appears on the display.<br />
Press and HOLD the ENTER Switch the display will show the Time at which the Activation<br />
Input was turned OFF for the Previous Progressive Cycle. After 5 seconds the display<br />
will show the NOS Percent at which the Activation Input was turned OFF for the Previous Progressive<br />
Cycle.<br />
The controller will only Save the 1st occurrence after Activation and Only if the Run<br />
Data has been Cleared(This procedure is outlined below).<br />
Continue to hold the ENTER Switch until the display reads "RELEASE". At this time<br />
the Controller has entered the Options Menu. Please refer to the following instructions regarding<br />
the Selections Available here.<br />
Note - You may Release the ENTER Switch before entering the Options Menu and return to the<br />
Main Menu.<br />
Clearing Run Data(Reset for next run)<br />
Enter the Options Menu, "Clear Run Data" is the first Option.<br />
Pressing ENTER will Erase the current Run Data and then return to the Main Menu.<br />
Pressing FU<strong>NC</strong>TION will select the next Option available.<br />
Resetting Controller to Factory Defaults<br />
Enter the Options Menu, Press and Release the FU<strong>NC</strong>TION Switch until the message<br />
"Reset Factory Default Settings" appears on the Display.<br />
Pressing ENTER will Restore the Controller to the Factory Default Settings and then<br />
return to the Main Menu.<br />
Pressing FU<strong>NC</strong>TION will select the next Option available.<br />
Calibrating the Voltage Monitor<br />
Enter the Options Menu, Press and Release the FU<strong>NC</strong>TION Switch until the message<br />
"Calibrate Voltage Monitor" appears on the Display.<br />
Using a Volt Meter compare the Volt Reading on the Display to the Volt Meter Reading.<br />
Press and Release the ENTER Switch to adjust the Reading until it is correct.<br />
Refer to "Exiting the Options Menu" to Return to the Main Menu.<br />
Pressing FU<strong>NC</strong>TION will select the next Option available.<br />
9
SCHNITZ<br />
<strong>Racing</strong><br />
1.800.837.9730<br />
www.schnitzracing.com<br />
Setting the Dual Nitrous Power Ramp ON/OFF<br />
Enter the Options Menu, Press and Release the FU<strong>NC</strong>TION Switch until the message<br />
"DUAL RAMP Nitrous" appears on the Display.<br />
Press and release the ENTER Switch to turn this feature ON or OFF. After pressing<br />
the ENTER Switch the Display will show the New State of the Selected Option. Refer to<br />
"Exiting the Options Menu" to Return to the Main Menu.<br />
If this Option is ON(Factory Default is OFF) two more selections will appear on the<br />
Main Menu. Please refer to the Section "Using the Dual Ramp Feature" for more information.<br />
Setting Progressive Fuel Output ON/OFF<br />
Enter the Options Menu, Press and Release the FU<strong>NC</strong>TION Switch until the message<br />
"Progressive Fuel Solenoid Driver" appears on the Display.<br />
Press and release the ENTER Switch to turn this feature ON or OFF. After pressing<br />
the ENTER Switch the Display will show the New State of the Selected Option. Refer to<br />
"Exiting the Options Menu" to Return to the Main Menu.<br />
When this Option is ON the Fuel Output will Pulsate through the Entire Nitrous Progression<br />
Cycle. If this Option is OFF(Factory Default) then the Fuel Output will Pulsate for<br />
the First 5 Pulses and then go to 100%.<br />
Setting Activation Wait and Hold ON/OFF<br />
Enter the Options Menu, Press and Release the FU<strong>NC</strong>TION Switch until the message<br />
"Reset Wait and Hold" appears on the Display.<br />
Press and release the ENTER Switch to turn this feature ON or OFF. After pressing<br />
the ENTER Switch the Display will show the New State of the Selected Option. Refer to<br />
"Exiting the Options Menu" to Return to the Main Menu.<br />
When this Option is ON(Factory Default) All Timers, including the Progressive Timers<br />
will Halt if the Activation Signal(+12V) is removed and will Resume when the Signal is<br />
Re-Applied. If this Option is OFF All Timers will be Reset each time the Activation Signal<br />
(+12V) is removed(i.e. - Each time the Activation Signal is Applied the Controller Starts at<br />
the Beginning of the Timing Cycle).<br />
10
SCHNITZ<br />
<strong>Racing</strong><br />
1.800.837.9730<br />
www.schnitzracing.com<br />
Setting +12V Timer Output Hold ON/OFF<br />
Enter the Options Menu, Press and Release the FU<strong>NC</strong>TION Switch until the message<br />
"+12V Timer Output Hold" appears on the Display.<br />
Press and release the ENTER Switch to turn this feature ON or OFF. After pressing the<br />
ENTER Switch the Display will show the New State of the Selected Option. Refer to "Exiting<br />
the Options Menu" to Return to the Main Menu.<br />
When this Option is OFF(Factory Default) the +12V Timer Output will Turn OFF each<br />
time the Activation Signal is Removed.<br />
Enabling Quick Data Access<br />
Enter the Options Menu, Press and Release the FU<strong>NC</strong>TION Switch until the message<br />
"Quick Data Access" appears on the Display.<br />
Press and release the ENTER Switch to turn this feature ON or OFF. After pressing the<br />
ENTER Switch the Display will show the New State of the Selected Option. Refer to "Exiting<br />
the Options Menu" to Return to the Main Menu.<br />
When this Option is ON(Factory Default is OFF) the Data will appear before the Text in<br />
the Main Menu. Those familiar with the Controller can Access or Check the Current Setup<br />
much more quickly.<br />
Setting the RESET Timeout Period<br />
Enter the Options Menu, Press and Release the FU<strong>NC</strong>TION Switch until the message<br />
"Timeout in Seconds" appears on the Display.<br />
Press and release the ENTER Switch to Increase the Timeout Period in 10 second increments.<br />
If the Timeout Period is more than 180 seconds the controller will default back to 20<br />
seconds. Refer to "Exiting the Options Menu" to Return to the Main Menu.<br />
Note - If the Timeout Period is 100 seconds or more the Run Data Time will be recorded in .01<br />
second resolution.<br />
Exiting the Options Menu<br />
Press and Release the FU<strong>NC</strong>TION Switch until the message "Exit Options Menu" appears<br />
on the Display.<br />
Press and Release the ENTER Switch to return to the Main Menu.<br />
Press and Release the FU<strong>NC</strong>TION Switch to return to the Top of the Options Menu.<br />
11
SCHNITZ<br />
<strong>Racing</strong><br />
1.800.837.9730<br />
www.schnitzracing.com<br />
How the Dual Power Ramp Functions<br />
The Dual Nitrous Ramp feature enables the user to have more precise control<br />
over the Nitrous Power Ramp. When the Dual Ramp feature is enabled there<br />
are two more selections added to the Main Menu. These are "Final Percent #2"<br />
and "NOS Build Time #2". Using these extra set points the user can build a<br />
Power Ramp that is non-linear(i.e. - can be small power increase for 2 seconds<br />
and then ramp to full power very rapidly). Please view the example outlined below<br />
for help in determining the proper setup for your application.<br />
Example Dual Ramp Nitrous Power Setting<br />
PERCENT OF NITROUS<br />
100<br />
90<br />
80<br />
70<br />
60<br />
50<br />
40<br />
30<br />
20<br />
10<br />
Nitrous Delay<br />
Nitrous Starting Percentag e<br />
Ramp #1<br />
Ramp #2<br />
Final Percent #1<br />
NOS Build Time #1<br />
Final Nitrous Percent #2<br />
NOS Build Time #2<br />
0.000 1.000 2.000 3.000 4.000 5.000 6.000 7.000 8.000 9.000<br />
TIME IN SECONDS<br />
NOS Delay Timer = 1.000 seconds<br />
Starting Percent = 20%<br />
Final Nitrous Percent #1 = 40%<br />
NOS Build Time #1 = 4.000 seconds<br />
Final Nitrous Percent #2 = 100%<br />
NOS Build Time #2 = 2.000 seconds<br />
12
SCHNITZ<br />
<strong>Racing</strong><br />
1.800.837.9730<br />
www.schnitzracing.com<br />
Items Included with the <strong>NC</strong>-<strong>2000</strong> Controller<br />
1 - Wiring Harness<br />
2 - Nitrous Arming Switch<br />
5 - Installation & User Manual<br />
Items needed that are NOT Supplied with Controller<br />
1 - Nitrous Kit, Use NOS Nitrous Kit for best Performance<br />
2 - Safety Solenoid<br />
3 - Activation Switches as needed, If they were not included with the<br />
Nitrous Kit.<br />
Cautions and Warnings<br />
1 - Always follow Installation Guidelines and Safety Pre-cautions when installing any other related<br />
components.<br />
2 - Remove battery connections when installing new components and/or wiring.<br />
3 - Always use proper Circuit Protection where required(Fuse).<br />
4 - Always test system operation after installation to insure proper operation.<br />
5 - Connect Ground wire Direct to Battery Negative Terminal and then to Controller.<br />
IMPORTANT - Must use Static Suppression Ignition Wires. Can NOT use any<br />
type of Metal Spiral Core and/or Metal Core Ignition Wires. Controller contains<br />
High Frequency Digital Circuitry and can NOT function properly with RFI or<br />
EMI Interference!<br />
13
SCHNITZ<br />
<strong>Racing</strong><br />
1.800.837.9730<br />
www.schnitzracing.com<br />
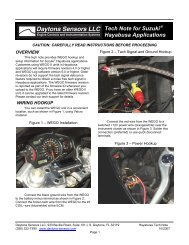
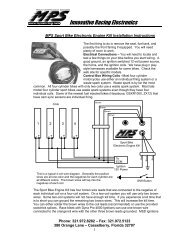
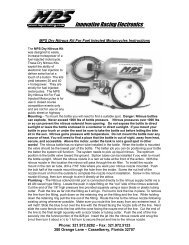
Wiring Diagram<br />
Activation, 20GA Yellow<br />
Controller +12V, 18GA Red<br />
SCHNITZ<br />
<strong>NC</strong>-<strong>2000</strong><br />
ACTIVATION<br />
3.600<br />
1. .1 .01 .001<br />
FU<strong>NC</strong>TION ENTER<br />
PROGRESSIVE2<br />
NITROUS CONTROLLER<br />
+12 VOLT<br />
+12 VOLT<br />
TIMER<br />
OUTPUT<br />
GROUND<br />
FUEL<br />
SOLENOID<br />
GROUND<br />
NOS<br />
SOLENOID<br />
GROUND<br />
To Retard Activation and/or Relay for 2nd NOS Stage<br />
2.750<br />
Safety Relay, 20GA Yellow<br />
Throttle Switch<br />
NO<br />
<strong>NC</strong><br />
85 86<br />
87A<br />
87<br />
C<br />
Launch Switch<br />
and/or<br />
Line Lock<br />
30<br />
40 Amp Relay<br />
Ground<br />
Solenoid Power Feed, 14GA Red<br />
Nitrous Arming<br />
Switch<br />
DPST<br />
Fuse, 10 Amp<br />
18GA Red<br />
14GA Red<br />
Fuse, 30 Amp<br />
Optional, 40 Amp Fuse<br />
(or Circuit Breaker)<br />
Connect to #30<br />
on Relay. Run<br />
Wire from<br />
Arming Switch<br />
to Fuel Pump<br />
14GA Red<br />
+ -<br />
Battery<br />
Controller Ground, 14GA Black<br />
Chassis/Engine<br />
Ground<br />
Nitrous Solenoid, 14GA Blue<br />
Fuel Solenoid, 16GA Orange<br />
+<br />
Solenoid +12V Supply, 14GA Red<br />
Nos Fuel Pump<br />
-<br />
Safety<br />
Solenoid<br />
Ground<br />
Nitrous<br />
Solenoid<br />
Fuel<br />
Solenoid<br />
Nitrous Feed Line<br />
Ground<br />
To Nitrous Bottle<br />
To Engine<br />
14
SCHNITZ<br />
<strong>Racing</strong><br />
1.800.837.9730<br />
www.schnitzracing.com<br />
Electrical Specifications<br />
Normal Operating Voltage<br />
10.0 to 16.0 Volts, Negative Ground<br />
Controller will Turn OFF at 6.2 Volts<br />
+12 Volt Timer Output 1 Amp Maximum<br />
Nitrous Solenoid Ground<br />
Fuel Solenoid Ground<br />
Activation Input<br />
Weight<br />
Overall Height<br />
Overall Width<br />
Overall Length<br />
45 Amps Maximum<br />
45 Amps Maximum<br />
.5mA at 12.0 Volts<br />
.8 lb.<br />
1.125 in.<br />
4.000 in.<br />
4.700 In.<br />
Caution - Do NOT submerge Controller in liquid or directly wash unit with liquid of any type!<br />
Trouble Shooting<br />
1 - Engine Running Rich while using Progressive Nitrous<br />
A - Starting Percentage to low for a given bottle pressure and solenoid combination(only<br />
fuel solenoid opening).<br />
B - Fuel pressure to high for fuel solenoid to operate correctly when pulsating.<br />
2 - Nitrous seems to Delay after Activation<br />
A - Improper Nitrous Delay Timer setting.<br />
B - Starting Percentage to low for a given bottle pressure and solenoid combination(only<br />
fuel solenoid opening).<br />
3 - Nitrous Turns OFF during operation<br />
A - To much current draw from solenoids.<br />
B - Electrical interference from Ignition System or other Electronic Device(s).<br />
15
SCHNITZ<br />
<strong>Racing</strong><br />
1.800.837.9730<br />
www.schnitzracing.com<br />
Warranty<br />
Schnitz Motorsports warrants to the original purchaser that the <strong>NC</strong>-<strong>2000</strong> Controller shall<br />
be free from defects in parts and workmanship under normal use for 6 months from the date of<br />
purchase.<br />
Schnitz Motorsports obligation under this warranty is limited to the repair or replacement<br />
of any component found to be defective when returned postpaid to Schnitz Motorsports.<br />
The Controller must be returned with evidence of place and date of purchase or warranty will<br />
be void. The warranty will not apply if the <strong>NC</strong>-<strong>2000</strong> Controller has been installed incorrectly,<br />
repaired, damaged, or tampered with by misuse, negligence or accident.<br />
Phone 1-219-728-9457<br />
16