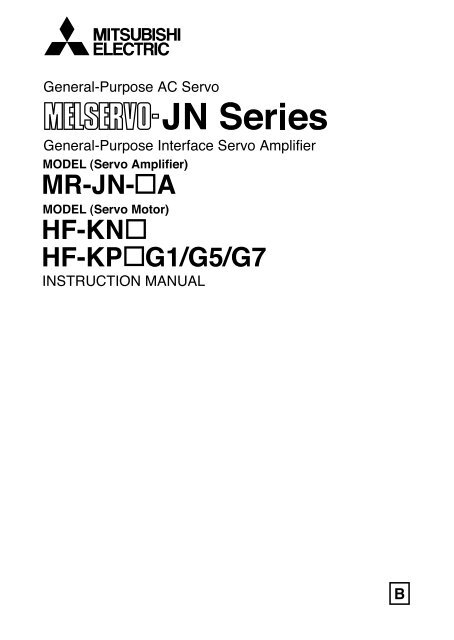
MR-JN-A/ HF-KN/ HF-KP G1/G5/G7 Instruction Manual
MR-JN-A/ HF-KN/ HF-KP G1/G5/G7 Instruction Manual
MR-JN-A/ HF-KN/ HF-KP G1/G5/G7 Instruction Manual

You also want an ePaper? Increase the reach of your titles
YUMPU automatically turns print PDFs into web optimized ePapers that Google loves.
General-Purpose AC Servo<br />
General-Purpose Interface Servo Amplifier<br />
MODEL (Servo Amplifier)<br />
<strong>MR</strong>-<strong>JN</strong>- A<br />
MODEL (Servo Motor)<br />
<strong>HF</strong>-<strong>KN</strong><br />
<strong>HF</strong>-<strong>KP</strong><br />
<strong>JN</strong> Series<br />
<strong>G1</strong>/<strong>G5</strong>/<strong>G7</strong><br />
INSTRUCTION MANUAL<br />
B
Safety <strong>Instruction</strong>s<br />
(Always read these instructions before using the equipment.)<br />
Be sure to read through this <strong>Instruction</strong> <strong>Manual</strong>, Installation guide and appended documents carefully before<br />
using the equipment. For your protection, do not install, operate, inspect or perform maintenance procedures<br />
until you have a full knowledge of the equipment and the safety information and instructions.<br />
In this <strong>Instruction</strong> <strong>Manual</strong>, the safety instruction levels are classified into "WARNING" and "CAUTION".<br />
WARNING<br />
CAUTION<br />
Indicates that incorrect handling may cause hazardous conditions,<br />
resulting in death or severe injury.<br />
Indicates that incorrect handling may cause hazardous conditions,<br />
resulting in medium or slight injury to personnel or may cause physical<br />
damage.<br />
Note that the CAUTION level may lead to a serious consequence according to conditions. Please follow<br />
the instructions of both levels because they are important to personnel safety.<br />
What must not be done and what must be done are indicated by the following diagrammatic symbols.<br />
: Indicates what must not be done. For example, "No Fire" is indicated by .<br />
: Indicates what must be done. For example, grounding is indicated by .<br />
In this <strong>Instruction</strong> <strong>Manual</strong>, instructions at a lower level than the above, instructions for other functions, and so on<br />
are classified into "POINT".<br />
After reading this installation guide, always keep it accessible to the operator.<br />
A - 1
1. To prevent electric shock, note the following<br />
WARNING<br />
Before wiring, be sure to turn off the power, wait for 15 minutes or longer, and then make sure that the<br />
charge lamp is off to prevent an electric shock. In addition, always confirm if the charge lamp is off or not<br />
from the front of the servo amplifier.<br />
Ground the servo amplifier and the servo motor securely.<br />
Only qualified personnel should attempt wiring and inspection.<br />
Wire the servo amplifier and the servo motor after installation is complete to prevent an electric shock.<br />
Do not operate the switches with wet hands as it may cause an electric shock.<br />
Do not damage, stress excessively, place heavy objects or pinch the cable to prevent an electric shock.<br />
2. To prevent fire, note the following<br />
CAUTION<br />
Install the servo amplifier, the servo motor and the regenerative option on incombustible material. Installing<br />
them directly or close to combustibles may cause a fire.<br />
Connect a magnetic contactor (MC) between the main circuit power supply, and L1 and L2 of the servo<br />
amplifier to configure a circuit that shuts off the power on the servo amplifier's power supply side. If a<br />
magnetic contactor (MC) is not connected, continuous flow of a large current may cause a fire when the<br />
servo amplifier malfunctions.<br />
When using a regenerative resistor, configure a circuit that shuts off the power if abnormality is found.<br />
Otherwise, the regenerative resistor may overheat, causing a fire due to a regenerative transistor fault.<br />
When using a regenerative option, remove the built-in regenerative resistor and its wiring from the servo<br />
amplifier.<br />
Provide an adequate protection to prevent conductive matters such as screws or metal pieces or<br />
combustible matters such as oil from entering the servo amplifier and the servo motor.<br />
Always connect a no-fuse breaker to the power supply of the servo amplifier.<br />
3. To prevent injury, note the follow<br />
CAUTION<br />
Do not apply voltage other than specified in this <strong>Instruction</strong> <strong>Manual</strong> to each terminal as it may cause burst,<br />
damage, etc.<br />
Connect the wires to correct terminals to prevent burst, damage, etc.<br />
Ensure that polarity ( ,<br />
) is correct. Otherwise, a burst, damage, etc. may occur.<br />
The servo amplifier heat sink, the regenerative option, the servo motor can be very hot during power-on<br />
and for some time after power-off, and it may result burns or damages to parts (cables, etc.) Take<br />
measures, e.g. provide covers, to prevent accidental contact of hands and parts with them.<br />
Never touch the rotating parts of the servo motor during operation as it may cause injury.<br />
A - 2
4. Additional instructions<br />
The following instructions should also be fully noted. Incorrect handling may cause a fault, injury, electric shock,<br />
etc.<br />
(1) Transportation and installation<br />
CAUTION<br />
Carry the products in a suitable way according to their weights.<br />
Do not stack the product packages exceeding the maximum number specified on the package.<br />
Do not hold the lead of the built-in regenerative resistor when carrying the servo amplifier.<br />
Do not hold the cable, the shaft or the encoder when carrying the servo motor.<br />
Install the equipment on a weight-bearing place in accordance with this <strong>Instruction</strong> <strong>Manual</strong>.<br />
Do not get on or place heavy objects on the equipment.<br />
Install the equipment in the specified direction. Improper installation causes oil leakage, leading to a fire<br />
and malfunction.<br />
Leave specified clearances between the servo amplifier and inner wall of the control box or other<br />
equipment.<br />
Do not block the intake/exhaust ports of the servo amplifier. Otherwise, a fault may occur.<br />
Do not install or operate a servo amplifier and a servo motor which are damaged or have any part missing.<br />
Do not drop or shock the servo amplifier or the servo motor as they are precision equipment.<br />
When storing the equipment, please fulfill the following environmental conditions.<br />
Item<br />
In<br />
Ambient operation<br />
temperature In<br />
storage<br />
Ambient<br />
humidity<br />
Ambience<br />
Altitude<br />
Vibration<br />
In operation<br />
In storage<br />
Servo amplifier<br />
Environmental conditions<br />
[ ] 0 to 55 (non-freezing) 0 to 40 (non-freezing)<br />
Servo motor<br />
[ ] 20 to 65 (non-freezing) 15 to 70 (non-freezing)<br />
90%RH or less (non-condensing)<br />
80%RH or less (non-condensing)<br />
90%RH or less (non-condensing)<br />
Indoors (no direct sunlight) Free from corrosive gas, flammable gas, oil mist, dust and dirt<br />
Max. 1000m (3280 ft) above sea level<br />
5.9 m/s 2 or less, 10 to 55Hz<br />
(directions of X, Y, and Z axes)<br />
Note. For the standard servo motor (without reduction gear.)<br />
<strong>HF</strong>-<strong>KN</strong> Series<br />
<strong>HF</strong>-<strong>KP</strong> Series (Note)<br />
X Y: 49m/s 2<br />
Couple the servo motor to a machine securely. Insecure coupling may cause the servo motor to come off.<br />
Be sure to measure the motor vibration level with the servo motor mounted to the machine when checking<br />
the vibration level. A great vibration may cause the early damage of a bearing, encoder, brake, and<br />
reduction gear. The great vibration may also cause the poor connector connection or bolt looseness.<br />
For the gain adjustment at the equipment startup, check the torque waveform and the speed waveform by<br />
using a measurement device, and then check that no vibration occurs. If the vibration occurs due to high<br />
gain, the vibration may cause the early damage of the servo motor.<br />
Install the servo motor with a reduction gear in the specified direction to prevent oil leakage.<br />
Take safety measures, e.g. provide covers, to prevent accidental access to the rotating parts of the servo<br />
motor during operation.<br />
Never hit the servo motor or shaft, especially when coupling the servo motor to a machine as it may<br />
damage the encoder.<br />
Do not apply load exceeding the permissible load as it may break the shaft.<br />
When the equipment has been stored for an extended period of time, contact your local sales office.<br />
When handling the servo amplifier, be careful with the edged parts such as the corners of the servo<br />
amplifier.<br />
Be sure to install the servo amplifier in a metal control box.<br />
A - 3
(2) Wiring<br />
CAUTION<br />
Before unplugging CNP1 connector from the servo amplifier, disconnect the lead of the built-in<br />
regenerative resistor from CNP1 connector first.<br />
Wire the equipment correctly and securely. Improper wiring may cause unexpected operation.<br />
Do not install a power capacitor, a surge killer or a radio noise filter (optional FR-BIF) between the servo<br />
motor and the servo amplifier.<br />
Connect the wires to the correct phase terminals (U, V, W) of the servo amplifier and the servo motor. Not<br />
doing so may cause unexpected operation.<br />
Connect the servo motor power terminals (U, V, W) of the servo amplifier to the servo motor power input<br />
terminals (U, V, W) directly. Do not install a magnetic contactor, etc. between the servo amplifier and the<br />
servo motor.<br />
Servo amplifier<br />
U<br />
V<br />
W<br />
Servo motor<br />
U<br />
V<br />
M<br />
W<br />
Servo amplifier<br />
U<br />
V<br />
W<br />
Servo motor<br />
U<br />
V<br />
M<br />
W<br />
Do not connect AC power supply directly to the servo motor. Otherwise, a fault may occur.<br />
Install a surge absorbing diode on the DC relay designed for control output signal in the specified<br />
direction. Improper installation of the surge absorbing diode may cause the servo amplifier to malfunction<br />
such that the signals are not output, and emergency stop and other safety circuits are inoperable.<br />
Servo amplifier<br />
DOCOM<br />
24VDC<br />
Servo amplifier<br />
DOCOM<br />
24VDC<br />
Control output<br />
signal<br />
DICOM<br />
RA<br />
Control output<br />
signal<br />
DICOM<br />
RA<br />
Sink output<br />
interface<br />
Source output<br />
interface<br />
(3) Test run adjustment<br />
CAUTION<br />
Check and adjust the parameter setting before operation. Improper settings may cause some machines<br />
to perform unexpected operation.<br />
Never adjust or change the parameter values extremely as it will make operation instable.<br />
A - 4
(4) Usage<br />
CAUTION<br />
Configure an external emergency stop circuit in order to stop the operation immediately and shut off the<br />
power.<br />
Do not disassemble or repair the equipment.<br />
If an alarm is reset while the operation signal is input to the servo amplifier, the equipment starts<br />
suddenly. Be sure that the operation signal is off before resetting the alarm to prevent an accident.<br />
Do not modify the equipment.<br />
Electromagnetic interference from the servo amplifier may affect the surrounding electronic equipment.<br />
Minimize the influence of the electromagnetic interference by using a noise filter, etc.<br />
Toxic gases may be generated by burning or disassembling the servo amplifier. Do not burn or<br />
disassemble the servo amplifier.<br />
Use the servo amplifier with the specified servo motor.<br />
The electromagnetic brake on the servo motor is designed to hold the motor shaft and should not be used<br />
for ordinary braking.<br />
For such reasons as service life and mechanical structure (e.g. where a ball screw and the servo motor<br />
are coupled via a timing belt), the electromagnetic brake may not hold the motor shaft. To ensure safety,<br />
install a stopper on the machine side.<br />
(5) Corrective actions<br />
CAUTION<br />
When it is assumed that a hazardous condition may take place at the occur due to a power failure or a<br />
product fault, use a servo motor with an electromagnetic brake or provide an external brake mechanism<br />
for the purpose of prevention.<br />
Configure the electromagnetic brake operation circuit which interlocks with an external emergency stop<br />
switch.<br />
Contacts must be open when the<br />
servo-on, the trouble (ALM) or the<br />
electromagnetic brake interlock<br />
(MBR) signal turns off.<br />
Circuit must be opened with the<br />
emergency stop switch.<br />
Servo motor<br />
SON<br />
RA<br />
B<br />
U<br />
24VDC<br />
Electromagnetic brake<br />
When an alarm occurs, remove its cause. Then, ensure safety and reset the alarm before restarting<br />
operation.<br />
When power is restored after an instantaneous power failure, keep away from the machine because the<br />
machine may be restarted suddenly. (Design the machine so that it is secured against hazard if<br />
restarted.)<br />
A - 5
(6) Storing of servo motor<br />
CAUTION<br />
Note the following points when storing the servo motor for an extended period of time (guideline: three or<br />
more months).<br />
Be sure to store the servo motor indoors in a clean and dry place.<br />
If it is stored in a dusty or damp place, make adequate provision, e.g. cover the whole product.<br />
If the insulation resistance of the winding decreases, reexamine the storage method.<br />
Though the servo motor is rust-proofed before shipment using paint or rust prevention oil, rust may be<br />
produced depending on the storage conditions or storage period. If the servo motor is to be stored for<br />
longer than six months, apply rust prevention oil again especially to the machined surfaces of the shaft,<br />
etc.<br />
Before using the servo motor that has been stored for an extended period of time, hand-turn the servo<br />
motor output shaft to confirm that nothing is wrong with the servo motor. (For the servo motor with an<br />
electromagnetic brake, turn ON the power supply of the electromagnetic brake, first. Then, release the<br />
electromagnetic brake before hand-turn.)<br />
When the equipment has been stored for an extended period of time, contact your local sales office.<br />
(7) Maintenance, inspection and parts replacement<br />
CAUTION<br />
With age, the electrolytic capacitor of the servo amplifier will deteriorate. To prevent a secondary accident<br />
due to a fault, it is recommended to replace the electrolytic capacitor every 10 years when used in general<br />
environment. Please contact your local sales office.<br />
(8) General instruction<br />
To illustrate details, the equipment in the diagrams of this <strong>Instruction</strong> <strong>Manual</strong> may have been drawn<br />
without covers and safety guards. When the equipment is operated, the covers and safety guards must<br />
be installed as specified. Operation must be performed in accordance with this <strong>Instruction</strong> <strong>Manual</strong>.<br />
A - 6
About processing of waste<br />
When you discard converter unit, servo amplifier, servo motor, battery (primary battery), and other option<br />
articles, please follow the law of each country (area).<br />
FOR MAXIMUM SAFETY<br />
These products have been manufactured as a general-purpose part for general industries, and have not<br />
been designed or manufactured to be incorporated in a device or system used in purposes related to<br />
human life.<br />
Before using the products for special purposes such as nuclear power, electric power, aerospace,<br />
medicine, passenger movement vehicles or under water relays, contact Mitsubishi.<br />
These products have been manufactured under strict quality control. However, when installing the product<br />
where major accidents or losses could occur if the product fails, install appropriate backup or failsafe<br />
functions in the system.<br />
EEP-ROM life<br />
The number of write times to the EEP-ROM, which stores parameter settings, etc., is limited to 100,000. If<br />
the total number of the following operations exceeds 100,000, the converter unit, servo amplifier (drive unit)<br />
and/or converter unit may fail when the EEP-ROM reaches the end of its useful life.<br />
Write to the EEP-ROM due to parameter setting changes<br />
Write to the EEP-ROM due to device changes<br />
Write to the EEP-ROM due to point table changes<br />
Write to the EEP-ROM due to program changes<br />
Write to the EEP-ROM due to data records with drive recorder<br />
Precautions for Choosing the Products<br />
Mitsubishi will not be held liable for damage caused by factors found not to be the cause of Mitsubishi;<br />
machine damage or lost profits caused by faults in the Mitsubishi products; damage, secondary damage,<br />
accident compensation caused by special factors unpredictable by Mitsubishi; damages to products other<br />
than Mitsubishi products; and to other duties.<br />
COMPLIANCE WITH EC DIRECTIVES<br />
Refer to appendix 7 for the compliance with EC directives.<br />
CONFORMANCE WITH UL/CSA STANDARD<br />
Refer to appendix 8 for the conformance with UL/CSA standard.<br />
A - 7
Relevant manuals<br />
<strong>Manual</strong> name<br />
MELSERVO-<strong>JN</strong> Series <strong>Instruction</strong>s and Cautions for Safe Use of AC Servos<br />
(Enclosed in servo amplifier.)<br />
QUICK INSTALLATION GUIDE<br />
MELSERVO Servo Motor <strong>Instruction</strong> <strong>Manual</strong> Vol.2<br />
EMC Installation Guidelines<br />
<strong>Manual</strong> No.<br />
IB(NA)0300157<br />
L(NA)03052ENG<br />
SH(NA)030041<br />
IB(NA)67310<br />
<br />
Wiring wires mentioned in this instruction manual are selected based on the ambient temperature of 40<br />
(104 ).<br />
A - 8
Introduction<br />
Introduction<br />
The Mitsubishi MELSERVO-<strong>JN</strong> series general-purpose AC servo is based on the MELSERVO-J3 series, and<br />
retains its high performance, with some limitations in functions. For details of functions, performance and<br />
specifications of the MELSERVO-<strong>JN</strong> series, refer to chapters 1 to 13 and appendices of this <strong>Instruction</strong> <strong>Manual</strong>.<br />
This section describes the how-to (startup, actual operation, and others) for users who use the MELSERVO-<strong>JN</strong><br />
series AC servo for the first time.<br />
CAUTION<br />
The lead of the built-in regenerative resistor is connected between P and C<br />
terminals on the servo amplifier power supply connectors (CNP1) of the <strong>MR</strong>-<strong>JN</strong>-<br />
20A(1)/40A. When taking the servo amplifier out from the shipping box, do not hold<br />
the lead of the built-in regenerative resistor.<br />
Unpack the product and check the rating plate to see if the servo motor and servo amplifier are as you ordered.<br />
(1) Servo amplifier<br />
Packaged product<br />
Quantity<br />
Servo amplifier 1<br />
Servo amplifier power supply connectors for CNP1 and CNP 2<br />
1 each<br />
MELSERVO-<strong>JN</strong> series<br />
<strong>Instruction</strong>s and Cautions for Safe Use of AC Servos<br />
1<br />
(2) Servo motor<br />
Packaged product<br />
Quantity<br />
Servo motor 1<br />
<strong>Instruction</strong>s and Cautions for Safe Use of AC Servos (Motor) 1<br />
- 1 -
Introduction<br />
1. Operation and setting<br />
Operation and settings of the servo amplifier are easily performed only on the display section (3-digit, 7-<br />
segment LED) and on the operation section (four pushbuttons and one-touch tuning button) located on the<br />
front panel of the servo amplifier.<br />
AUTO<br />
Executes the one-touch<br />
tuning.<br />
MODE<br />
Changes the display mode<br />
and switches the upper/lower.<br />
SET<br />
Determines the display and<br />
data, and clears data.<br />
UP/DOWN<br />
Scrolls the display and data.<br />
(1) One-touch tuning function (refer to section 6.1)<br />
Gain and filter adjustment of the servo is easily made by the AUTO button located on the front panel of the<br />
servo amplifier.<br />
(2) Status display, diagnosis, and parameter setting (refer to chapter 5)<br />
The servo amplifier status display (cumulative feedback pulses, servo motor speed, and others), diagnosis<br />
(servo operation-ready complete status, external I/O signal ON/OFF, test operation), point table settings<br />
and parameter settings can be easily performed by the MODE, SET, UP and DOWN buttons located on the<br />
front panel of the servo amplifier.<br />
- 2 -
Introduction<br />
2. Startup<br />
When switching the power on for the first time, follow the startup procedure below.<br />
Visual wiring check<br />
Surrounding environment<br />
check<br />
Power-on of the control circuit<br />
power supply<br />
I/O signal wiring check during<br />
power-on<br />
Parameter setting<br />
Power-on of the main circuit<br />
power supply<br />
Operation confirmation before<br />
actual operation<br />
One-touch tuning<br />
Refer to (1) in this section.<br />
Check the surrounding environment (cable routing and<br />
impurity such as wire offcuts or metallic dust) of the servo<br />
amplifier and the servo motor.<br />
Refer to (2) (a) in this section.<br />
Refer to (3) in this section.<br />
Refer to (4) in this section.<br />
Refer to (2) (a) in this section.<br />
Refer to (5) in this section.<br />
Refer to (6) in this section.<br />
Actual operation<br />
Stop<br />
Refer to (7) in this section.<br />
When switching the power off, follow (2) (b) in this section.<br />
- 3 -
Introduction<br />
(1) Visual wiring check<br />
Before switching on the main circuit and control circuit power supplies, check the following items.<br />
Power supply system wiring<br />
The power supplied to the power input terminals (L1, L2, +24V, 0V) of the servo amplifier should satisfy<br />
the defined specifications. (Refer to section 1.3.)<br />
Connection of servo amplifier and servo motor<br />
The servo motor power supply terminals (U, V, W) of the servo amplifier should match in phase with the<br />
power input terminals (U, V, W) of the servo motor.<br />
Servo amplifier<br />
U<br />
V<br />
W<br />
Servo motor<br />
U<br />
V<br />
M<br />
W<br />
The power supplied to the servo amplifier should not be connected to the servo motor power supply<br />
terminals (U, V, W). The connected servo amplifier and servo motor will be damaged.<br />
Servo amplifier<br />
L1<br />
L2<br />
U<br />
V<br />
W<br />
Servo motor<br />
U<br />
V<br />
M<br />
W<br />
The earth terminal of the servo motor should be connected to the PE terminal of the servo amplifier.<br />
Servo amplifier<br />
Servo motor<br />
M<br />
When regenerative option is used<br />
The built-in regenerative resistor and its wirings should be removed from the servo amplifier.<br />
The regenerative option should be connected to P and C terminals.<br />
A twisted cable should be used. (Refer to section 11.2 (4).)<br />
I/O signal wiring<br />
The power supplied to CN1 connector (DICOM and DOCOM) of the servo amplifier should satisfy the<br />
defined specifications. (Refer to section 1.3.)<br />
SD and DOCOM of CN1 connector should not be shorted.<br />
Servo amplifier<br />
CN1<br />
DOCOM<br />
SD<br />
- 4 -
(2) Power on and off procedures<br />
(a) Power-on<br />
Switch the power on in the following procedure. Always follow this procedure at power-on.<br />
1) Turn off the servo-on (SON).<br />
2) Make sure that command and start signal from the controller are not input.<br />
Introduction<br />
3) Switch on the control circuit power supply.<br />
At power-on, "888" appears instantaneously, but it is not an error.<br />
In the position control mode, data is displayed in 2[s] or later after displaying "CL" (cumulative<br />
feedback pulses in pulse unit) (initial value), or by pressing the "MODE", "UP" or "DOWN" button.<br />
Displayed contents differ depending on each control mode. Refer to section 5.3 for details.<br />
4) Switch on the main circuit power supply.<br />
(b) Power-off<br />
1) Make sure that command and start signal from the controller are not input.<br />
2) Turn off the servo-on (SON).<br />
3) Switch off the main circuit power supply.<br />
4) Switch off the control circuit power supply.<br />
(3) I/O signal wiring check during the energization<br />
Input signal wiring confirmation<br />
On/off status of the input signals of CN1 connector can be checked using the external I/O signal display.<br />
By using this function, input signal wiring can be checked. (Refer to section 5.8.)<br />
Output signal wiring confirmation<br />
Output signals of CN1 connector can be turned on/off forcibly using the DO output. By using this function,<br />
output signal wiring can be checked. (Refer to section 5.9.)<br />
(4) Parameter setting<br />
POINT<br />
Some parameters are made valid when power is switched off, then on after<br />
setting. Refer to chapter 4 for details.<br />
For the positioning mode, refer to section 13.7.<br />
Set the parameters as necessary, such as selecting the control mode and the regenerative option.<br />
In the position control mode, the servo amplifier can be used just by changing the basic setting parameters<br />
(parameter No. PA ) mainly.<br />
As necessary, set the gain/filter parameters (parameter No. PB ), the extension setting parameters<br />
(parameter No. PC ) and the I/O setting parameters (parameter No. PD ).<br />
For the internal speed control mode and the internal torque control mode, refer to chapter 4.<br />
- 5 -
Introduction<br />
The following shows the main parameters, which must be changed, among parameter No. PA .<br />
PA01 Selection of control mode (refer to section 4.1.3)<br />
Select the control mode of the servo amplifier, and whether to enable or not the one-touch tuning function.<br />
Parameter No. PA01<br />
0<br />
Selection of control mode<br />
0: Position control mode<br />
1: Position control mode and internal speed control mode<br />
2: Internal speed control mode<br />
3: Internal speed control mode and in ternal torque control mode<br />
4: Internal torque control mode<br />
5: Internal torque control mode and position control mode<br />
6: Positioning mode (point table method)<br />
7: Positioning mode (program method)<br />
One-touch tuning function selection<br />
0: Valid<br />
1: Invalid<br />
When this parameter is set to "1", the one-touch tuning is ignored.<br />
PA02 Selection of regenerative option (refer to section 4.1.4)<br />
Set this parameter when using the regenerative option.<br />
Parameter No. PA02<br />
0<br />
Selection of regenerative option<br />
00: Regenerative option is not used.<br />
For servo amplifier of 100W, regenerative resistor is not used.<br />
For servo amplifier of 200 to 400W, built-in regenerative resistor is<br />
used.<br />
02: <strong>MR</strong>-RB032<br />
03: <strong>MR</strong>-RB12<br />
PA05 Number of command input pulses per servo motor revolution (refer to section 4.1.6)<br />
Set the number of command input pulses necessary to rotate the servo motor one turn.<br />
When "100 (10000[pulse/rev])" (initial value) is set to parameter No. PA05, the servo motor rotates one turn<br />
by inputting 1000 pulses of the command pulse to the servo amplifier. When "0" is set to parameter No.<br />
PA05, the servo motor rotates one turn by inputting the command pulse of servo motor resolution to the<br />
servo amplifier.<br />
Parameter No. PA05<br />
setting<br />
Description<br />
0 Servo motor resolution [pulse/rev]<br />
100 to 500<br />
Number of command input pulses necessary to rotate the servo motor one<br />
turn [ 100 pulse/rev]<br />
Command<br />
pulses<br />
Parameter No. PA05<br />
FBP conversion<br />
(Note 1)<br />
Electronic gear<br />
CMX<br />
CDV<br />
(Note 2)<br />
Deviation<br />
counter<br />
Servo motor<br />
M<br />
Value converted to the number of<br />
command input pulses per revolution<br />
(FBP)<br />
Encoder<br />
Note 1. This process converts the number of pulses required to rotate the servo motor one turn to the value set in parameter No. PA05.<br />
2. Electric gear numerator and denominator can be set by parameters No. PA06 and PA07. (Refer to section 4.1.7.)<br />
- 6 -
Introduction<br />
PA13 Selection of command input pulse form (refer to section 4.1.11)<br />
Select the input form of the pulse train input signal. Command pulses may be input in any of three different<br />
forms, for which positive or negative logic can be chosen.<br />
Arrow or in the table indicates the timing of importing a pulse train. A- and B-phase pulse trains<br />
are imported after being multiplied by 4.<br />
Parameter No. PA13<br />
Selection of command input pulse form<br />
Setting<br />
Pulse train form Forward rotation command Reverse rotation command<br />
00<br />
Forward rotation<br />
pulse train<br />
Reverse rotation<br />
pulse train<br />
PP<br />
NP<br />
01<br />
Positive logic<br />
Signed pulse<br />
train<br />
PP<br />
NP<br />
H<br />
L<br />
02<br />
A-phase pulse<br />
train<br />
B-phase pulse<br />
train<br />
PP<br />
NP<br />
10<br />
Forward rotation<br />
pulse train<br />
Reverse rotation<br />
pulse train<br />
PP<br />
NP<br />
11<br />
Negative logic<br />
Signed pulse<br />
train<br />
PP<br />
NP<br />
L<br />
H<br />
12<br />
A-phase pulse<br />
train<br />
B-phase pulse<br />
train<br />
PP<br />
NP<br />
POINT<br />
Pulse train input filter selection<br />
Setting Command pulse frequency<br />
0 1Mpps or less<br />
1 500kpps or less<br />
2 200kpps or less<br />
The noise immunity can be enhanced by setting parameter No. PA13 to "1 "<br />
when the command pulse frequency is 500kpps or less or "2 " when<br />
200kpps or less.<br />
- 7 -
Introduction<br />
PA14 Selection of servo motor rotation direction (refer to section 4.1.12)<br />
Select servo motor rotation direction relative to the input pulse train.<br />
Parameter No. PA14<br />
Servo motor rotation direction<br />
setting When forward rotation pulse is input When reverse rotation pulse is input<br />
0 CCW CW<br />
1 CW CCW<br />
Forward rotation (CCW)<br />
Reverse rotation (CW)<br />
(5) Operation confirmation before actual operation<br />
Before starting actual operation, perform JOG operation to make sure that the machine operates properly.<br />
<strong>MR</strong>-<strong>JN</strong> can perform the JOG operation in the test operation mode on the operation section (four<br />
pushbuttons). (Refer to section 5.10.)<br />
JOG operation in the test operation<br />
mode<br />
(Servo motor alone)<br />
(a) Confirm that the servo amplifier and servo motor operate properly.<br />
With the servo motor disconnected from the machine, use the test<br />
operation mode (JOG operation) at the slowest speed and check<br />
whether the servo motor rotates correctly.<br />
Operation by commands from the<br />
controller<br />
(Servo motor and machine are<br />
connected)<br />
(b) Confirm that the servo motor rotates correctly at the slowest speed<br />
under the commands from the controller.<br />
Make sure that the servo motor rotates in the following procedure.<br />
1) Switch on the forced stop (EM1) and servo-on (SON). When the<br />
servo amplifier is in a servo-on status, the ready (RD) switches<br />
on.<br />
2) Switch on the forward rotation stroke end (LSP) and the reverse<br />
rotation stroke end (LSN).<br />
3) In the position control mode, when command pulses are input<br />
from the controller, the servo motor starts rotating. Give a low<br />
speed command at first and check the operation direction, etc.<br />
of the servo motor. If the servo motor does not rotate in the<br />
intended direction, check the input signal.<br />
4) After checking that the machine operates properly, perform the<br />
automatic operation by the program of the controller to check for<br />
any problem with the operation.<br />
- 8 -
Introduction<br />
(6) One-touch tuning<br />
Just by pressing the "AUTO" button on the front panel of the servo amplifier during operation, the gain/filter<br />
is easily adjusted.<br />
(Refer to section 6.1.)<br />
Startup of system<br />
Operation<br />
Shift to the one-touch tuning<br />
mode<br />
Selection of the response<br />
mode<br />
Execution of the one-touch<br />
tuning<br />
Rotate the servo motor by an external command device,<br />
etc.<br />
(The one-touch tuning cannot be performed if the servo<br />
motor is not operating.)<br />
Press the "AUTO" button for 3[s] or longer while the servo<br />
motor is rotating. The display changes to " ", and the<br />
mode shifts to the one-touch tuning mode.<br />
Press the "UP" or the "DOWN" button while " " is<br />
displayed to select the response mode. (Refer to (1) in<br />
section 6.1.2.)<br />
Start the one-touch tuning by pressing the "AUTO" button.<br />
The progress of the one-touch tuning is displayed in<br />
percentage.<br />
0% 100%<br />
One-touch tuning complete When the one-touch tuning is completed properly, "<br />
" is displayed and the gain/filter is automatically<br />
adjusted.<br />
POINT<br />
For the fine adjustment after the one-touch tuning, refer to section 6.4.<br />
- 9 -
Introduction<br />
(7) Stop<br />
In any of the following statuses, the servo amplifier interrupts and stops the operation of the servo motor.<br />
Refer to section 3.11 for the servo motor with an electromagnetic brake.<br />
(a) Servo-on (SON) OFF<br />
The base circuit is shut off and the servo motor coasts.<br />
(b) Alarm occurrence<br />
When an alarm occurs, the base circuit is shut off and the dynamic brake activates to stop the servo<br />
motor immediately.<br />
(c) Forced stop (EM1) OFF<br />
The base circuit is shut off and the dynamic brake activates to stop the servo motor immediately. Servo<br />
forced stop warning alarm (E6.1) occurs.<br />
(d) Forward rotation stroke end (LSP) or reverse rotation stroke end (LSN) OFF<br />
Position control mode: Droop pluses are cleared, and the servo motor shaft is locked. The servo motor<br />
can rotate in an opposite direction.<br />
Internal speed control mode: The servo motor stops immediately, and the shaft is locked. The servo<br />
motor can rotate in an opposite direction.<br />
(e) Simultaneous ON or simultaneous OFF of forward rotation start (ST1) and reverse rotation start (ST2)<br />
In internal speed control mode: The servo motor decelerates to a stop.<br />
In positioning mode: The servo motor decelerates to a stop after JOG operation.<br />
(f) Simultaneous ON or simultaneous OFF of forward rotation selection (RS1) and reverse rotation selection<br />
(RS2) (only in the internal torque control)<br />
The servo motor coasts.<br />
POINT<br />
The forward rotation stroke end (LSP) and reverse rotation stroke end (LSN)<br />
operate as follows.<br />
Assigned to the external input signals: depends on the value set in parameter<br />
No. PD01.<br />
Not assigned to the external input signals: automatically turns on regardless of<br />
the value set in parameter No. PD01.<br />
In the internal torque control mode, the forward rotation stroke end (LSP) and<br />
reverse rotation stroke end (LSN) become invalid. (Refer to section 3.5.)<br />
- 10 -
Introduction<br />
3. Troubleshooting at startup<br />
CAUTION<br />
Never adjust or change the parameter values extremely as it will make operation<br />
instable.<br />
POINT<br />
You can refer to reasons for servo motor rotation failure, etc. using <strong>MR</strong><br />
Configurator.<br />
The following faults may occur at startup. If any of such faults occurs, take the corresponding action.<br />
(1) Troubleshooting<br />
No. Step of occurrence Fault Investigation Possible cause Reference<br />
1 Power on The 3-digit, 7-segment<br />
LED is not lit.<br />
Not improved even if CN1, CN2<br />
and CN3 connectors are<br />
1. Power supply voltage fault<br />
2. Servo amplifier is faulty.<br />
The 3-digit, 7-segment<br />
LED flickers.<br />
disconnected.<br />
Improved when CN1 connector is<br />
disconnected.<br />
Power supply of CN1 cabling is<br />
shorted.<br />
Improved when CN2 connector is<br />
disconnected.<br />
1. Power supply of encoder<br />
cabling is shorted.<br />
2. Encoder is faulty.<br />
Improved when CN3 connector is<br />
disconnected.<br />
Power supply of CN3 cabling is<br />
shorted.<br />
Alarm occurs. Remove cause. Section<br />
8.2<br />
Digital output ALM<br />
occurs. The 3-digit,<br />
Check the ON/OFF status of the<br />
output signal on the external I/O<br />
Wiring mistake.<br />
The polarity of the digital output<br />
Section<br />
3.8.2<br />
7-segment LED does not<br />
display the alarm.<br />
signal display (refer to section<br />
5.8).<br />
circuit diode is not correct.<br />
2 Switch on servo-on<br />
(SON).<br />
Alarm occurs.<br />
Servo motor shaft is<br />
free.<br />
Remove cause.<br />
Check the followings.<br />
1. Check the display to see if the<br />
1. Servo-on (SON) is not input.<br />
(Wiring mistake)<br />
Section<br />
8.2<br />
Section<br />
5.8<br />
servo amplifier is ready to<br />
operate.<br />
2. Check the external I/O signal<br />
display (refer to section 5.8) to<br />
see if the servo-on (SON) is ON.<br />
2. External 24VDC power is not<br />
supplied to DICOM.<br />
3 Input command<br />
pulse.<br />
(Test operation)<br />
(In the position<br />
control mode)<br />
Servo motor does not<br />
rotate.<br />
Check the cumulative command<br />
pulses on the status display or on<br />
<strong>MR</strong> Configurator.<br />
Check if the ready (RD) is ON.<br />
Check the set value of parameter<br />
No.PA13 (command input pulse<br />
form).<br />
Check if the electromagnetic<br />
1. Wiring mistake.<br />
(a) For open collector pulse train<br />
input, 24VDC power is not<br />
supplied to OPC.<br />
(b) LSP and LSN are not on.<br />
(c) Wiring mistake.<br />
The polarity of the digital output<br />
circuit diode is not correct.<br />
Section<br />
3.8.2<br />
Section<br />
3.11<br />
Section<br />
4.1.11<br />
Section<br />
5.3<br />
brake interlock (MBR) is ON.<br />
2. No pulses are input.<br />
3. Electromagnetic brake operates.<br />
Check the ON/OFF status of the<br />
output signal on the external I/O<br />
signal display (refer to section<br />
5.8).<br />
Wiring mistake.<br />
The polarity of the digital output<br />
circuit diode is not correct.<br />
Section<br />
3.8.2<br />
- 11 -
Introduction<br />
№ Step of occurrence Fault Investigation Possible cause Reference<br />
3 Input command<br />
pulse.<br />
(Test operation)<br />
(In the position<br />
control mode)<br />
Servo motor rotates in<br />
reverse direction.<br />
Check the cumulative command<br />
pulses on the status display or on<br />
<strong>MR</strong> Configurator.<br />
Check the set value of parameter<br />
No.PA14 (rotation direction<br />
selection).<br />
4 Switch on forward<br />
rotation start (ST1)<br />
or reverse rotation<br />
start (ST2).<br />
(In the internal<br />
speed control<br />
mode)<br />
Servo motor does not<br />
rotate.<br />
5 Switch on forward Servo motor does not<br />
rotation selection rotate.<br />
(RS1) or reverse<br />
rotation selection<br />
(RS2).<br />
(In the internal<br />
torque control<br />
Check the ON/OFF status of the<br />
input signal on the external I/O<br />
signal display (refer to section<br />
5.8).<br />
Check the internal speed<br />
commands 0 to 7 (parameters No.<br />
PC05 to PC08 and PC31 to<br />
PC34).<br />
Check the forward torque limit<br />
(parameter No. PA11) or reverse<br />
torque limit (parameter No. PA12).<br />
Check the set value of parameter<br />
No.PC12 (internal torque<br />
command).<br />
Check the ON/OFF status of the<br />
input signal on the external I/O<br />
signal display (refer to section<br />
5.8).<br />
mode) Check the internal speed limits 0<br />
to 7 (parameters No. PC05 to<br />
PC08 and PC31 to PC34).<br />
Check the forward torque limit<br />
(parameter No. PA11) or reverse<br />
torque limit (parameter No. PA12).<br />
6 Switch on forward Servo motor does not Check the ON/OFF status of the<br />
rotation start (ST1) rotate.<br />
or reverse rotation<br />
start (ST2).<br />
input signal on the external I/O<br />
signal display (refer to section<br />
5.8).<br />
(In the positioning<br />
Check the values of position data<br />
mode)<br />
and servo motor speed set in the<br />
point table or program.<br />
Check the forward torque limit<br />
(parameter No. PA11) or reverse<br />
torque limit (parameter No. PA12).<br />
7 Gain adjustment Rotation ripples (speed Make gain adjustment in the<br />
(In the position fluctuations) are large at following procedure.<br />
control mode) low speed.<br />
1. Increase the auto tuning<br />
(In the internal<br />
response level.<br />
speed control<br />
2. Repeat acceleration and<br />
mode)<br />
deceleration several times to<br />
(In the positioning<br />
complete auto tuning.<br />
mode)<br />
Large load inertia If the servo motor may be run with<br />
moment causes the safety, repeat acceleration and<br />
servo motor shaft to deceleration several times to<br />
oscillate side to side. complete auto tuning.<br />
8 Cyclic operation Position shift occurs. Confirm the cumulative command<br />
(In the position<br />
pulses, the cumulative feedback<br />
control mode)<br />
pulses and the actual servo motor<br />
position.<br />
1. Mistake in wiring to controller. Section<br />
2. Mistake in setting of parameter 4.1.12<br />
No. PA14.<br />
Section<br />
5.3<br />
LSP, LSN, ST1 or ST2 is off. Section<br />
5.8<br />
Set value is 0.<br />
Section<br />
4.3.2<br />
Torque limit level is too low as Section<br />
compared to the load torque. 4.1.10<br />
Internal torque command is too Section<br />
low as compared to the load 4.3.2<br />
torque.<br />
RS1 or RS2 is off.<br />
Section<br />
5.8<br />
Set value is 0.<br />
Section<br />
4.3.2<br />
Set value is 0.<br />
Section<br />
4.1.10<br />
LSP, LSN, ST1 or ST2 is off. Section<br />
5.8<br />
Set value is 0.<br />
Chapter<br />
13<br />
Torque limit level is too low as Section<br />
compared to the load torque. 4.1.10<br />
Gain adjustment fault Chapter 6<br />
Gain adjustment fault Chapter 6<br />
Pulse counting error, etc. due to (2) in this<br />
noise.<br />
section<br />
- 12 -
Introduction<br />
(2) How to find the cause of position shift<br />
Controller<br />
(a)Output pulse<br />
counter<br />
Electronic gear (parameters No. PA06, PA07)<br />
CMX<br />
Q P FBP<br />
CDV<br />
FBP conversion<br />
(b)Cumulative command pulses<br />
Cause A<br />
Servo-on (SON),<br />
Stroke end<br />
(LSP/LSN) input<br />
C<br />
Cause C<br />
Servo amplifier<br />
(c) Cumulative feedback pulses<br />
Machine<br />
Servo motor<br />
L<br />
M<br />
(d) Machine stop position M<br />
Cause B<br />
Encoder<br />
When a position shift occurs, check (a) output pulse counter Q, (b) cumulative command pulses P, (c)<br />
cumulative feedback pulses C, and (d) machine stop position M in the above diagram.<br />
Cause A, Cause B and Cause C indicate position shift causes. For example, Cause A indicates that noise<br />
entered the wiring between the controller and servo amplifier, causing the command input pulse to be misscounted.<br />
In a normal status without position shift, there are the following relationships.<br />
1) Q P (output pulse counter cumulative command pulses)<br />
2) When using the electronic gear<br />
CMX (parameter No. PA06)<br />
P •<br />
CDV (parameter No. PA07) • Servo motor encoder resolution<br />
FBP (parameter No. PA05) (Note)<br />
C (cumulative command pulses electronic gear cumulative feedback pulses)<br />
Note. When "0" is set to the FBP (parameter No. PA05), the FBP becomes the servo motor encoder resolution.<br />
3) C • Δ M (cumulative feedback pulses travel per pulse machine position)<br />
Check for a position shift in the following sequence.<br />
1) When Q ≠ P<br />
Noise entered in the pulse train signal wiring between the controller and servo amplifier, causing<br />
command input pulses to be miss-counted. (Cause A)<br />
Make the following check or take the following measures.<br />
Check the shielding.<br />
Run wiring away from the power circuit.<br />
Install a data line filter. (Refer to section 11.9 (2) (a).)<br />
POINT<br />
The noise immunity can be enhanced by setting parameter No. PA13 to "1 "<br />
when the command pulse frequency is 500kpps or less or "2 " when<br />
200kpps or less.<br />
- 13 -
Introduction<br />
2) When P • CMX<br />
CDV • Servo motor encoder resolution<br />
FBP (parameter No. PA05) (Note) ≠ C<br />
Note. When "0" is set to the FBP (parameter No. PA05), the FBP becomes the servo motor encoder resolution.<br />
During the operation, the servo-on (SON), the forward/reverse rotation stroke end (LSP/LSN) was<br />
turned off, or the clear (CR) or the reset (RES) was turned on. (Cause C)<br />
If a malfunction may occur due to much noise, increase the input filter setting (parameter No. PD19).<br />
3) When C • Δ ≠ M<br />
Mechanical slip occurred between the servo motor and machine. (Cause B)<br />
4. Tough drive function<br />
CAUTION<br />
Since the operation status of devices may be changed by the tough drive<br />
operation, check for any problems before making this function valid.<br />
POINT<br />
For details of the tough drive function, refer to section 7.1.<br />
The tough drive function continues the operation not to stop a machine in such situations when normally an<br />
alarm is activated.<br />
Three types of tough drive function can be selected in parameter No. PA04.<br />
Parameter No. PA04<br />
Overload tough drive function selection<br />
Set the tough drive function for overload.<br />
Setting<br />
0<br />
1<br />
Overload tough drive function<br />
Invalid<br />
Valid<br />
Vibration tough drive function selection<br />
Set the function for vibration suppression.<br />
Setting<br />
0<br />
1<br />
Vibration tough drive function<br />
Invalid<br />
Valid<br />
Instantaneous power failure tough drive function selection<br />
Set tough drive function for instantaneous power failure of the main<br />
circuit power supply.<br />
Setting<br />
0<br />
1<br />
Instantaneous power failure tough drive function<br />
Invalid<br />
Valid<br />
- 14 -
(1) Overload tough drive function<br />
This function reduces the effective load ratio before an overload alarm occurs to avoid the alarm.<br />
Introduction<br />
(2) Vibration tough drive function<br />
This function suppresses the machine resonance caused by aging distortion or individual difference of the<br />
machine.<br />
(3) Instantaneous power failure tough drive function<br />
This function avoids the instantaneous power failure during operation.<br />
- 15 -
CONTENTS<br />
1. FUNCTIONS AND CONFIGURATION 1 - 1 to 1 -12<br />
1.1 Introduction............................................................................................................................................... 1 - 1<br />
1.2 Function block diagram............................................................................................................................ 1 - 3<br />
1.3 Servo amplifier standard specifications................................................................................................... 1 - 6<br />
1.4 Function list .............................................................................................................................................. 1 - 8<br />
1.5 Model code definition ..............................................................................................................................1 -10<br />
1.6 Combination with servo motor ................................................................................................................1 -10<br />
1.7 Parts identification ...................................................................................................................................1 -11<br />
1.8 Configuration including auxiliary equipment...........................................................................................1 -12<br />
2. INSTALLATION 2 - 1 to 2 - 6<br />
2.1 Installation direction and clearances ....................................................................................................... 2 - 2<br />
2.2 Keep out foreign materials ....................................................................................................................... 2 - 3<br />
2.3 Cable stress.............................................................................................................................................. 2 - 4<br />
2.4 Inspection items ....................................................................................................................................... 2 - 4<br />
2.5 Parts having service lives......................................................................................................................... 2 - 5<br />
3. SIGNALS AND WIRING 3 - 1 to 3 -48<br />
3.1 Input power supply circuit ........................................................................................................................ 3 - 2<br />
3.2 I/O signal connection example................................................................................................................. 3 - 4<br />
3.2.1 Position control mode........................................................................................................................ 3 - 4<br />
3.2.2 Internal speed control mode ............................................................................................................. 3 - 6<br />
3.2.3 Internal torque control mode ............................................................................................................. 3 - 7<br />
3.3 Explanation of power supply system ....................................................................................................... 3 - 8<br />
3.3.1 Signal explanations ........................................................................................................................... 3 - 8<br />
3.3.2 Power-on sequence .......................................................................................................................... 3 - 8<br />
3.3.3 CNP1 and CNP2 wiring method ......................................................................................................3 -10<br />
3.4 Connectors and signal arrangements ....................................................................................................3 -13<br />
3.5 Signal explanations .................................................................................................................................3 -16<br />
3.6 Detailed description of the signals..........................................................................................................3 -22<br />
3.6.1 Position control mode·······················································································································3 -22<br />
3.6.2 Internal speed control mode ············································································································3 -25<br />
3.6.3 Internal torque control mode············································································································3 -28<br />
3.6.4 Position/speed control change mode ······························································································3 -31<br />
3.6.5 Internal speed/internal torque control change mode·······································································3 -32<br />
3.6.6 Internal torque/position control change mode ·················································································3 -33<br />
3.7 Alarm occurrence timing chart················································································································3 -34<br />
3.8 Interfaces·················································································································································3 -35<br />
3.8.1 Internal connection diagram·············································································································3 -35<br />
3.8.2 Detailed description of interfaces·····································································································3 -36<br />
3.8.3 Source I/O interfaces ·······················································································································3 -39<br />
3.9 Treatment of cable shield external conductor ························································································3 -40<br />
3.10 Connection of servo amplifier and servo motor ···················································································3 -41<br />
3.10.1 Connection instructions··················································································································3 -41<br />
- 16 -
3.10.2 Power supply cable wiring diagrams ·····························································································3 -42<br />
3.11 Servo motor with an electromagnetic brake·························································································3 -43<br />
3.11.1 Safety precautions··························································································································3 -43<br />
3.11.2 Setting·············································································································································3 -43<br />
3.11.3 Timing charts··································································································································3 -44<br />
3.11.4 Wiring diagrams (<strong>HF</strong>-<strong>KN</strong> series • <strong>HF</strong>-<strong>KP</strong> <strong>G1</strong>/<strong>G5</strong>/<strong>G7</strong> series servo motor)·································3 -46<br />
3.12 Grounding··············································································································································3 -48<br />
4. PARAMETERS 4 - 1 to 4 -54<br />
4.1 Basic setting parameters (No. PA ) ··································································································· 4 - 2<br />
4.1.1 Parameter list ···································································································································· 4 - 2<br />
4.1.2 Parameter write inhibit ······················································································································ 4 - 3<br />
4.1.3 Selection of control mode·················································································································· 4 - 4<br />
4.1.4 Selection of regenerative option ······································································································· 4 - 4<br />
4.1.5 Selection of the tough drive function································································································· 4 - 5<br />
4.1.6 Number of command input pulses per servo motor revolution························································ 4 - 6<br />
4.1.7 Electronic gear··································································································································· 4 - 7<br />
4.1.8 Auto tuning········································································································································4 -11<br />
4.1.9 In-position range·······························································································································4 -12<br />
4.1.10 Torque limit·····································································································································4 -13<br />
4.1.11 Selection of command input pulse form ························································································4 -14<br />
4.1.12 Selection of servo motor rotation direction ····················································································4 -15<br />
4.1.13 Encoder output pulses ···················································································································4 -16<br />
4.2 Gain/filter parameters (No. PB ) ·······································································································4 -19<br />
4.2.1 Parameter list ···································································································································4 -19<br />
4.2.2 Detail list ···········································································································································4 -21<br />
4.2.3 Position smoothing···························································································································4 -29<br />
4.3 Extension setting parameters (No. PC )···························································································4 -30<br />
4.3.1 Parameter list ···································································································································4 -30<br />
4.3.2 List of details·····································································································································4 -32<br />
4.3.3 Alarm history clear····························································································································4 -39<br />
4.3.4 Drive recorder function·····················································································································4 -40<br />
4.4 I/O setting parameters (No. PD ) ······································································································4 -44<br />
4.4.1 Parameter list ···································································································································4 -44<br />
4.4.2 List of details·····································································································································4 -45<br />
4.4.3 Using forward/reverse rotation stroke end to change the stopping pattern ···································4 -54<br />
5. DISPLAY AND OPERATION SECTIONS 5 - 1 to 5 -30<br />
5.1 Overview··················································································································································· 5 - 1<br />
5.2 Display sequence····································································································································· 5 - 2<br />
5.3 Status display ··········································································································································· 5 - 3<br />
5.3.1 Display transition ······························································································································· 5 - 4<br />
5.3.2 Display examples ······························································································································ 5 - 5<br />
5.3.3 Status display list............................................................................................................................... 5 - 7<br />
5.4 Diagnostic mode······································································································································· 5 - 9<br />
5.5 Alarm mode ·············································································································································5 -11<br />
5.6 Point table mode ·····································································································································5 -13<br />
5.6.1 Point table transition·························································································································5 -13<br />
- 17 -
5.6.2 Point table mode setting screen sequence ·····················································································5 -14<br />
5.6.3 Operation example···························································································································5 -15<br />
5.7 Parameter mode ·····································································································································5 -17<br />
5.7.1 Parameter mode transition···············································································································5 -17<br />
5.7.2 Operation example···························································································································5 -18<br />
5.8 External I/O signal display·······················································································································5 -20<br />
5.9 Output signal (DO) forced output············································································································5 -23<br />
5.10 Test operation mode ·····························································································································5 -24<br />
5.10. 1 Mode change.................................................................................................................................5 -24<br />
5.10. 2 JOG operation ...............................................................................................................................5 -25<br />
5.10. 3 Positioning operation.....................................................................................................................5 -26<br />
5.10. 4 Motor-less operation......................................................................................................................5 -28<br />
5.10. 5 Forced tough drive operation........................................................................................................5 -29<br />
5.11 One-touch tuning···································································································································5 -29<br />
6. GENERAL GAIN ADJUSTMENT 6 - 1 to 6 -18<br />
6.1 One-touch tuning······································································································································ 6 - 1<br />
6.1.1 One-touch tuning procedure ············································································································· 6 - 2<br />
6.1.2 Display transition and operation procedure of the one-touch tuning··············································· 6 - 3<br />
6.1.3 Precautions for one-touch tuning······································································································ 6 - 7<br />
6.2 Gain adjustment methods························································································································ 6 - 8<br />
6.3 Auto tuning mode 1 ·································································································································6 -10<br />
6.3.1 Overview···········································································································································6 -10<br />
6.3.2 Auto tuning mode 1 basis ················································································································6 -11<br />
6.3.3 Adjustment procedure by auto tuning······························································································6 -12<br />
6.3.4 Response level setting in auto tuning mode 1 ················································································6 -13<br />
6.4 2-gain adjustment mode ·························································································································6 -14<br />
6.5 <strong>Manual</strong> mode···········································································································································6 -15<br />
7. SPECIAL ADJUSTMENT FUNCTIONS 7 - 1 to 7 -18<br />
7.1 Tough drive function································································································································· 7 - 1<br />
7.1.1 Overload tough drive function··········································································································· 7 - 1<br />
7.1.2 Vibration tough drive function ··········································································································· 7 - 2<br />
7.1.3 Instantaneous power failure tough drive function············································································· 7 - 4<br />
7.2 Machine resonance suppression function······························································································· 7 - 6<br />
7.2.1 Function block diagram····················································································································· 7 - 6<br />
7.2.2 Adaptive filter II·································································································································· 7 - 6<br />
7.2.3 Machine resonance suppression filter······························································································ 7 - 8<br />
7.2.4 Advanced vibration suppression control··························································································· 7 - 9<br />
7.2.5 Low-pass filter ··································································································································7 -13<br />
7.3 Gain changing function ···························································································································7 -13<br />
7.3.1 Applications ······································································································································7 -13<br />
7.3.2 Function block diagram····················································································································7 -14<br />
7.3.3 Parameters ·······································································································································7 -15<br />
7.3.4 Gain changing procedure·················································································································7 -17<br />
- 18 -
8. TROUBLESHOOTING 8 - 1 to 8 -30<br />
8.1 Alarms and warning list···························································································································· 8 - 1<br />
8.2 Remedies for alarms································································································································ 8 - 3<br />
8.3 Remedies for warnings ···························································································································8 -24<br />
9. OUTLINE DRAWINGS 9 - 1 to 9 - 4<br />
9.1 Servo amplifier·········································································································································· 9 - 1<br />
9.2 Connector················································································································································· 9 - 3<br />
10. CHARACTERISTICS 10- 1 to 10- 6<br />
10.1 Overload protection characteristics ······································································································10- 1<br />
10.2 Power supply capacity and generated loss··························································································10- 2<br />
10.3 Dynamic brake characteristics··············································································································10- 4<br />
10.3.1 Dynamic brake operation···············································································································10- 4<br />
10.3.2 The dynamic brake at the load inertia moment·············································································10- 5<br />
10.4 Cable flexing life ····································································································································10- 6<br />
10.5 Inrush currents at power-on of main circuit and control circuit ····························································10- 6<br />
11. OPTIONS AND AUXILIARY EQUIPMENT 11- 1 to 11-46<br />
11.1 Cable/connector sets ····························································································································11- 1<br />
11.1.1 Combinations of cable/connector sets ··························································································11- 2<br />
11.1.2 Encoder cable/connector sets ·······································································································11- 7<br />
11.1.3 Motor power supply cables ···········································································································11-17<br />
11.1.4 Motor brake cables························································································································11-19<br />
11.2 Regenerative options ···························································································································11-21<br />
11.3 Junction terminal block <strong>MR</strong>-TB26A ·····································································································11-25<br />
11.4 <strong>MR</strong> Configurator···································································································································11-27<br />
11.5 Selection example of wires ··················································································································11-29<br />
11.6 No-fuse breakers, fuses, magnetic contactors····················································································11-32<br />
11.7 Power factor improving AC reactor FR-HAL ·······················································································11-33<br />
11.8 Relays (recommended) ·······················································································································11-33<br />
11.9 Noise reduction techniques ·················································································································11-34<br />
11.10 Leakage current breaker····················································································································11-40<br />
11.11 Circuit protector··································································································································11-42<br />
11.12 EMC filter (recommended)·················································································································11-42<br />
11.13 Surge protector (recommended) ·······································································································11-43<br />
11.14 <strong>MR</strong>-HDP01 manual pulse generator ·································································································11-45<br />
12. SERVO MOTOR 12- 1 to 12-38<br />
12.1 Introduction············································································································································12- 1<br />
12.1.1 Rating plate ····································································································································12- 1<br />
12.1.2 Parts identification ··························································································································12- 1<br />
12.1.3 Electromagnetic brake ···················································································································12- 2<br />
12.1.4 Servo motor shaft shapes··············································································································12- 4<br />
- 19 -
12.2 Installation ·············································································································································12- 5<br />
12.2.1 Installation direction························································································································12- 6<br />
12.2.2 Precautions for load remove··········································································································12- 7<br />
12.2.3 Permissible load for the shaft·········································································································12- 8<br />
12.2.4 Protection from oil and water ·········································································································12- 8<br />
12.2.5 Cable ··············································································································································12- 9<br />
12.2.6 Inspection ·······································································································································12- 9<br />
12.2.7 Life ·················································································································································12-10<br />
12.2.8 Machine accuracies ······················································································································12-10<br />
12.3 Connectors used for servo motor wiring ·····························································································12-11<br />
12.3.1 Selection of connectors·················································································································12-11<br />
12.3.2 Wiring connectors (Connector configurations A B C) ··································································12-12<br />
12.4 Connector outline drawings ·················································································································12-13<br />
12.5 <strong>HF</strong>-<strong>KN</strong> series servo motor ···················································································································12-15<br />
12.5.1 Model definition ·····························································································································12-15<br />
12.5.2 Standard specifications·················································································································12-16<br />
12.5.3 Electromagnetic brake characteristics··························································································12-18<br />
12.5.4 Servo motors with special shafts ··································································································12-19<br />
12.5.5 Connector installation····················································································································12-20<br />
12.5.6 Outline drawings····························································································································12-21<br />
12.6 <strong>HF</strong>-<strong>KP</strong> series servo motor ···················································································································12-27<br />
12.6.1 Model definition ·····························································································································12-27<br />
12.6.2 Specifications ································································································································12-28<br />
12.6.3 Electromagnetic brake characteristics··························································································12-30<br />
12.6.4 Servo motor with a reduction gear································································································12-31<br />
12.6.5 Connector installation····················································································································12-36<br />
13. POSITIONING MODE 13- 1 to 13-94<br />
13.1 Selection method of each operation mode···························································································13- 1<br />
13.2 Signals···················································································································································13- 2<br />
13.2.1 I/O signal connection example·······································································································13- 2<br />
13.2.2 Connectors and signal arrangements ···························································································13- 3<br />
13.2.3 Signal explanations ························································································································13- 4<br />
13.2.4 Detailed description of the signals································································································13-11<br />
13.3 Automatic operation mode for point table method ··············································································13-15<br />
13.3.1 What is automatic operation mode?·····························································································13-15<br />
13.3.2 Automatic operation using point table ··························································································13-17<br />
13.4 Automatic operation mode for program method ·················································································13-28<br />
13.4.1 What is automatic operation mode for program method? ···························································13-28<br />
13.4.2 Programming language·················································································································13-29<br />
13.4.3 Basic setting of signals and parameters·······················································································13-44<br />
13.4.4 Program operation timing chart ····································································································13-45<br />
13.5 <strong>Manual</strong> operation mode ·······················································································································13-46<br />
13.5.1 JOG operation ·······························································································································13-46<br />
13.5.2 <strong>Manual</strong> pulse generator operation································································································13-47<br />
13.6 Home position return mode ·················································································································13-49<br />
13.6.1 Outline of home position return·····································································································13-49<br />
13.6.2 Selection of home position return mode·······················································································13-50<br />
- 20 -
13.6.3 Dog type home position return······································································································13-51<br />
13.6.4 Count type home position return···································································································13-54<br />
13.6.5 Data set type home position return·······························································································13-56<br />
13.6.6 Stopper type home position return ·······························································································13-57<br />
13.6.7 Home position ignorance (Servo-on position as home position)·················································13-59<br />
13.6.8 Dog type rear end reference home position return ······································································13-60<br />
13.6.9 Count type front end reference home position return ··································································13-62<br />
13.6.10 Dog cradle type home position return ························································································13-64<br />
13.6.11 Home position return automatic return function ·········································································13-66<br />
13.7 Parameters···········································································································································13-67<br />
13.7.1 Basic setting parameters (No. PA ) ························································································13-68<br />
13.7.2 Gain/filter parameters (No. PB ) ·····························································································13-73<br />
13.7.3 Extension setting parameters (No. PC )·················································································13-75<br />
13.7.4 I/O setting parameters (No. PD ) ····························································································13-78<br />
13.7.5 Positioning setting parameters (No. PE ) ···············································································13-80<br />
13.8 Point table setting method ···················································································································13-86<br />
13.9 Program setting method·······················································································································13-88<br />
13.10 Single-step feed usage in the test operation mode ··········································································13-91<br />
APPENDIX<br />
App.- 1 to App.-14<br />
App. 1 Parameter list································································································································· App.- 1<br />
App. 2 Servo motor ID codes···················································································································· App.- 6<br />
App. 3 Signal layout recording paper········································································································ App.- 6<br />
App. 4 Status display block diagram········································································································· App.- 7<br />
App. 5 Compliance with EC directives······································································································ App.- 9<br />
App. 6 Conformance with UL/CSA standard··························································································· App.-12<br />
- 21 -
MEMO<br />
- 22 -
1. FUNCTIONS AND CONFIGURATION<br />
1. FUNCTIONS AND CONFIGURATION<br />
1.1 Introduction<br />
The Mitsubishi MELSERVO-<strong>JN</strong> series general-purpose AC servo is based on the MELSERVO-J3 series, and<br />
retains its high performance, with some limitations in functions.<br />
It has position control, internal speed control, internal torque control and positioning modes. Further, it can<br />
perform operation with the control modes changed, e.g. position/internal speed control, internal speed/internal<br />
torque control and internal torque/position control. Hence, it is applicable to a wide range of fields, not only<br />
precision positioning and smooth speed control of machine tools and general industrial machines but also line<br />
control and tension control.<br />
As this new series has the USB serial communication function, a <strong>MR</strong> Configurator installed personal computer<br />
or the like can be used to perform parameter setting, test operation, status display monitoring, gain adjustment,<br />
etc.<br />
With one-touch tuning and real-time auto tuning, you can easily and automatically adjust the servo gains<br />
according to the machine.<br />
The servo amplifier has the tough drive function that continues the operation not to stop a machine in such<br />
situation when normally an alarm is activated.<br />
The MELSERVO-<strong>JN</strong> series servo motor is equipped with an incremental encoder which has the resolution of<br />
131072 pulses/rev to ensure the positioning with a high accuracy.<br />
(1) Position control mode<br />
Up to 1Mpps high-speed pulse train is used to control the speed and the direction of a servo motor and<br />
execute precision positioning of 131072 pulses/rev resolution.<br />
The position smoothing function provides a choice of two different modes appropriate for a machine, so a<br />
smoother start/stop can be made in response to a sudden position command.<br />
A torque limit is imposed on the servo amplifier by the clamp circuit to protect the power transistor in the<br />
main circuit from overcurrent due to sudden acceleration/deceleration or overload. This torque limit value<br />
can be changed to any value with the parameter.<br />
(2) Internal speed control mode<br />
A parameter-driven internal speed command (max. 8 speeds) is used to control the speed and the direction<br />
of a servo motor precisely and smoothly.<br />
There are also the acceleration/deceleration time constant setting in response to the speed command and<br />
the servo lock function at a stop time.<br />
(3) Internal torque control mode<br />
An internal torque command (0.0% to 100.0%) is used to control the torque output by the servo motor. To<br />
prevent unexpected operation under no load, the speed limit function (internal setting) is also available for<br />
application to tension control, etc.<br />
1 - 1
1. FUNCTIONS AND CONFIGURATION<br />
(4) Positioning mode<br />
The positioning mode has point table method and program method.<br />
(a) Point table method<br />
The positioning operation can be executed by setting the position data (the target position), the servo<br />
motor speed, the acceleration/deceleration time constant, etc. in the point table as if setting them in<br />
parameters. This is the most appropriate to configure a simple positioning system or to simplify a<br />
system.<br />
7 point tables can be used.<br />
(b) Program method<br />
The positioning operation is performed by creating the positioning data (the target position), the servo<br />
motor speed, the acceleration/deceleration time constant, etc. as a program and by executing the<br />
program. This is the most appropriate to configure a simple positioning system or to simplify a system.<br />
Up to 8 programs can be created. The program capacity is 120 steps as a total of all programs.<br />
1 - 2
1. FUNCTIONS AND CONFIGURATION<br />
1.2 Function block diagram<br />
The function block diagram of this servo motor is shown below.<br />
(1) Position control mode, internal speed control mode, internal torque control mode<br />
Regenerative option<br />
Servo amplifier<br />
P<br />
C<br />
Servo motor<br />
Diode<br />
stack<br />
Relay<br />
(Note 1)<br />
U<br />
U<br />
(Note 2)<br />
Main<br />
circuit<br />
power<br />
supply<br />
NFB<br />
MC<br />
L1<br />
L2<br />
Fuse<br />
CHARGE<br />
lamp<br />
Regenerative<br />
TR<br />
Current<br />
detector<br />
V<br />
W<br />
V<br />
W<br />
M<br />
(Note 2)<br />
Control<br />
circuit<br />
power<br />
supply<br />
Circuit<br />
protector<br />
0V<br />
24V<br />
Control<br />
circuit<br />
power<br />
supply<br />
Base<br />
amplifier<br />
Voltage<br />
detection<br />
Overcurrent<br />
protection<br />
Dynamic<br />
brake<br />
Current<br />
detection<br />
CN2<br />
RA<br />
24VDC<br />
B1<br />
B<br />
B2<br />
Electromagnetic<br />
brake<br />
Encoder<br />
Pulse<br />
input<br />
Model<br />
position<br />
control<br />
Model<br />
speed<br />
control<br />
Virtual<br />
motor<br />
Virtual<br />
encoder<br />
Model<br />
position<br />
Model<br />
speed<br />
Model torque<br />
Actual<br />
position<br />
control<br />
Actual<br />
speed<br />
control<br />
Current<br />
control<br />
USB<br />
CN1<br />
I/F<br />
CN3<br />
D I/O control<br />
Servo-on<br />
Command input<br />
pulses<br />
Start<br />
Failure, etc.<br />
Personal<br />
computer<br />
USB<br />
Note 1. A built-in regenerative resistor is not provided for the <strong>MR</strong>-<strong>JN</strong>-10A(1).<br />
2. For the specification of power supply, refer to section 1.3.<br />
1 - 3
Model adaptive control<br />
CN2<br />
1. FUNCTIONS AND CONFIGURATION<br />
(2) Positioning mode (Point table method)<br />
Regenerative option<br />
Servo amplifier<br />
P<br />
C<br />
Servo motor<br />
(Note 2)<br />
Main<br />
circuit<br />
power<br />
supply<br />
NFB<br />
MC<br />
L1<br />
L2<br />
Fuse<br />
Diode<br />
stack<br />
Relay<br />
(Note 1)<br />
CHARGE<br />
lamp<br />
Regenerative<br />
TR<br />
Current<br />
detector<br />
U<br />
V<br />
W<br />
U<br />
V<br />
W<br />
M<br />
(Note 2)<br />
Control<br />
circuit<br />
power<br />
supply<br />
Circuit<br />
protector<br />
0V<br />
24V<br />
Control<br />
circuit<br />
power<br />
supply<br />
Base<br />
amplifier<br />
Voltage<br />
detection<br />
Overcurrent<br />
protection<br />
Dynamic<br />
brake<br />
Current<br />
detection<br />
RA<br />
24VDC<br />
B1<br />
B<br />
B2<br />
Electromagnetic<br />
brake<br />
Encoder<br />
Current<br />
control<br />
Speed<br />
control<br />
Position<br />
control<br />
Position<br />
command<br />
creation<br />
No.<br />
Position<br />
data<br />
Servo motor<br />
speed<br />
Point table<br />
Acceleration<br />
time<br />
constant<br />
Deceleration<br />
time<br />
constant<br />
Dwell<br />
Auxiliary<br />
function<br />
1 1000 1000 80 80 0 0<br />
2 2000 2000 100 100 0 0<br />
3 4000 2000 70 60 500 1<br />
4 -500 2000 60 70 1000 1<br />
5 1000 2000 80 80 0 0<br />
6 2000 1000 80 80 0 0<br />
7 1000 1000 80 80 0 0<br />
USB<br />
I/F<br />
CN1<br />
CN3<br />
D I/O control<br />
Servo-on<br />
Start<br />
Failure, etc.<br />
Personal<br />
computer<br />
USB<br />
Note 1. A built-in regenerative resistor is not provided for the <strong>MR</strong>-<strong>JN</strong>-10A(1).<br />
2. For the specification of power supply, refer to section 1.3.<br />
1 - 4
Model adaptive control<br />
CN2<br />
1. FUNCTIONS AND CONFIGURATION<br />
(3) Positioning mode (Program method)<br />
Regenerative option<br />
Servo amplifier<br />
P<br />
C<br />
Servo motor<br />
Diode<br />
stack<br />
Relay<br />
(Note 1)<br />
U<br />
U<br />
(Note 2)<br />
Main<br />
circuit<br />
power<br />
supply<br />
NFB<br />
MC<br />
L1<br />
L2<br />
Fuse<br />
CHARGE<br />
lamp<br />
Regenerative<br />
TR<br />
Current<br />
detector<br />
V<br />
W<br />
V<br />
W<br />
M<br />
(Note 2)<br />
Control<br />
circuit<br />
power<br />
supply<br />
Circuit<br />
protector<br />
0V<br />
24V<br />
Control<br />
circuit<br />
power<br />
supply<br />
Dynamic<br />
brake<br />
RA<br />
24VDC<br />
B1<br />
B<br />
B2<br />
Electromagnetic<br />
brake<br />
Base<br />
amplifier<br />
Voltage<br />
detection<br />
Overcurrent<br />
protection<br />
Current<br />
detection<br />
Encoder<br />
Current<br />
control<br />
Speed<br />
control<br />
Position<br />
control<br />
Program<br />
SPN(1000)<br />
STA(200)<br />
STB(300)<br />
MOV(500)<br />
SPN(1000)<br />
MOVA(1000)<br />
MOVA(0)<br />
Position<br />
command<br />
creation<br />
STOP<br />
USB<br />
I/F<br />
CN1<br />
CN3<br />
D I/O control<br />
Servo-on<br />
Start<br />
Failure, etc.<br />
Personal<br />
computer<br />
USB<br />
Note 1. A built-in regenerative resistor is not provided for the <strong>MR</strong>-<strong>JN</strong>-10A(1).<br />
2. For the specification of power supply, refer to section 1.3.<br />
1 - 5
1. FUNCTIONS AND CONFIGURATION<br />
1.3 Servo amplifier standard specifications<br />
Servo amplifier<br />
<strong>MR</strong>-<strong>JN</strong>- 10A 20A 40A 10A1 20A1<br />
Item<br />
Output<br />
Rated voltage<br />
3-phase 170VAC<br />
Rated current [A] 1.1 1.6 2.8 1.1 1.6<br />
Voltage/frequency<br />
1-phase 200VAC to 230VAC, 50/60Hz<br />
1-phase 100VAC to 120VAC,<br />
50/60Hz<br />
Rated current [A] 1.5 2.4 4.5 3.0 5.0<br />
Permissible voltage<br />
Main circuit<br />
1-phase 170VAC to 253VAC<br />
1-phase 85VAC to 132VAC<br />
fluctuation<br />
power supply<br />
Permissible frequency<br />
Within 5%<br />
fluctuation<br />
Power supply capacity Refer to section 10.2<br />
Inrush current Refer to section 10.5<br />
Voltage<br />
24VDC<br />
Rated current [A] 0.5<br />
Control circuit<br />
power supply<br />
Permissible voltage<br />
Within 10%<br />
fluctuation<br />
Power consumption [W] 10<br />
Interface Voltage 24VDC 10%<br />
power supply Power supply capacity [A] 0.2 (Note)<br />
Control System<br />
Sine-wave PWM control, current control system<br />
Dynamic brake<br />
Built-in<br />
Overcurrent shut-off, regenerative overvoltage shut-off, overload shut-off (electronic thermal<br />
Protective functions<br />
relay), servo motor overheat protection, encoder error protection, regenerative error<br />
protection, undervoltage, instantaneous power failure protection, overspeed protection,<br />
excessive error protection<br />
Structure<br />
Natural-cooling, open (IP rating: IP20)<br />
Close mounting<br />
When mounting the servo amplifiers closely, operate them at the ambient temperature of 0°C<br />
to 45°C or at 75% or less of the effective load ratio.<br />
In [°C]<br />
0 to 55 (non-freezing)<br />
Ambient operation [°F]<br />
32 to 131 (non-freezing)<br />
temperature In [°C]<br />
-20 to 65 (non-freezing)<br />
storage [°F] -4 to 149 (non-freezing)<br />
Environmental Ambient In operation<br />
conditions humidity In storage<br />
90%RH or less (non-condensing)<br />
Ambience<br />
Indoors (no direct sunlight)<br />
Free from corrosive gas, flammable gas, oil mist, dust and dirt<br />
Altitude<br />
Max. 1000m (3280 ft) above sea level<br />
Vibration<br />
5.9 [m/s2] or less, 10 to 55Hz (directions of X, Y and Z axes)<br />
Mass<br />
[kg] 0.6 0.6 0.7 0.6 0.6<br />
[lb] 1.32 1.32 1.54 1.32 1.32<br />
Note. 0.2A is the value applicable when all I/O signals are used. The current capacity can be decreased by reducing the number of I/O<br />
points.<br />
1 - 6
1. FUNCTIONS AND CONFIGURATION<br />
Servo amplifier<br />
<strong>MR</strong>-<strong>JN</strong>- 10A 20A 40A 10A1 20A1<br />
Item<br />
Max. input pulse frequency<br />
1Mpps (for differential receiver), 200kpps (for open collector)<br />
Command pulse multiplying<br />
Position control factor (electronic gear)<br />
Electronic gear A/B, A: 1 to 65535, B: 1 to 65535, 1/50 A/B 500<br />
mode<br />
In-position range setting<br />
0 to 65535pulse (command pulse unit)<br />
Error excessive<br />
3 rotations<br />
Torque limit<br />
Parameter setting<br />
Speed command input<br />
Parameter setting<br />
Speed control range 1:5000<br />
Internal speed<br />
control mode<br />
0.01% or less (load fluctuation 0 to 100%)<br />
Speed fluctuation ratio<br />
0% (power fluctuation 10%)<br />
Torque limit<br />
Parameter setting<br />
Internal torque Torque command input Parameter setting<br />
control mode Speed limit Parameter setting<br />
Operating specification<br />
Positioning by specifying the point table No. (7 points)<br />
Position command input<br />
Set in point table. One-point feed length setting range: 1[μm] to 999.999[mm]<br />
Speed command input<br />
Acceleration/deceleration time constant is set in point table.<br />
S-pattern acceleration/deceleration time constant is set in parameter No. PC03.<br />
System<br />
Signed absolute value command system, Incremental value command system<br />
Operating specification<br />
Program language (programmed by <strong>MR</strong> Configurator).<br />
Program capacity: 120 steps<br />
Position command input<br />
Setting by program language.<br />
One-point feed length setting range: 1[μm] to 999.999[mm]<br />
Servo motor speed, acceleration/deceleration time constant and S-pattern<br />
Speed command input<br />
acceleration/deceleration time constant are set by program language.<br />
S-pattern acceleration/deceleration time constant is also settable by parameter No. PC03.<br />
Positioning mode<br />
Command method<br />
Operation mode<br />
Home position return mode<br />
Point<br />
table<br />
method<br />
Program method<br />
Automatic<br />
operation<br />
mode<br />
<strong>Manual</strong><br />
operation<br />
mode<br />
Dog type<br />
Other functions<br />
System<br />
Point<br />
table<br />
One-time<br />
positioning<br />
operation<br />
method Automatic<br />
continuous<br />
positioning operation<br />
Program method<br />
JOG<br />
Count type<br />
Data set type<br />
Stopper type<br />
<strong>Manual</strong> pulse generator<br />
Home position ignorance (Servo-on<br />
position as home position)<br />
Dog type rear end reference<br />
Count type front end reference<br />
Dog cradle type<br />
Signed absolute value command system, signed incremental value command system<br />
Point table number input, position data input system<br />
One-time positioning operation is performed in accordance with position and speed commands.<br />
Varied speed operation (2 to 7 speeds), Automatic continuous positioning operation<br />
(2 to 7 points)<br />
Setting by programming language<br />
JOG operation is performed in accordance with parameter-set speed command by contact<br />
input.<br />
<strong>Manual</strong> feed is made by manual pulse generator.<br />
Command pulse multiplication: 1, 10 or 100 is selected using parameter.<br />
Home position return is made starting with Z-phase pulse after passage of proximity dog.<br />
Home position return direction is selectable. Home position shift value is settable.<br />
Home position address is settable.<br />
Automatic at-dog home position return, Automatic stroke return function<br />
Home position return is made by counting encoder pulses after contact with proximity dog.<br />
Home position return direction is selectable. Home position shift value is settable.<br />
Home position address is settable.<br />
Automatic at-dog home position return, Automatic stroke return function<br />
Home position return is made without dog.<br />
Home position is settable at any position by manual operation, etc. Home position<br />
address is settable.<br />
Home position return is made by pressing machine part against stroke end.<br />
Home position return direction is selectable. Home position address is settable.<br />
Position where servo-on (SON) is switched on is defined as home position.<br />
Home position address is settable.<br />
Home position return is made with respect to the rear end of proximity dog.<br />
Home position return direction is selectable. Home position shift value is settable.<br />
Home position address is settable.<br />
Automatic at-dog home position return, Automatic stroke return function<br />
Home position return is made with respect to the front end of proximity dog.<br />
Home position return direction is selectable. Home position shift value is settable.<br />
Home position address is settable.<br />
Automatic at-dog home position return, Automatic stroke return function<br />
Home position return is made with respect to the front end of a proximity dog by the first<br />
Z-phase pulse.<br />
Home position return direction is selectable. Home position shift value is settable.<br />
Home position address is settable.<br />
Automatic at-dog home position return, Automatic stroke return function<br />
Backlash function, Overtravel prevention using external limit switch<br />
Software stroke limit<br />
1 - 7
1. FUNCTIONS AND CONFIGURATION<br />
1.4 Function list<br />
The following table lists the functions of this servo. For details of the functions, refer to the reference field.<br />
Function<br />
Description<br />
Position control mode This servo is used as position control servo. P<br />
Internal speed control mode This servo is used as internal speed control servo. S<br />
Internal torque control mode This servo is used as internal torque control servo. T<br />
Position/internal speed control<br />
change mode<br />
Internal speed/internal torque control<br />
change mode<br />
Internal torque/position control<br />
change mode<br />
Positioning mode<br />
(Point table method) (Note 2)<br />
Positioning mode<br />
(Program method) (Note 2)<br />
Home position return mode (Note 2)<br />
High-resolution encoder<br />
Gain changing function<br />
Advanced vibration suppression<br />
control<br />
Adaptive filter<br />
Low-pass filter<br />
Electronic gear<br />
One-touch tuning<br />
Auto tuning<br />
Using input device, control can be switched between position<br />
control and internal speed control.<br />
Using input device, control can be switched between internal<br />
speed control and internal torque control.<br />
Using input device, control can be switched between internal<br />
torque control and position control.<br />
Positioning operation is performed by selecting 7 point tables<br />
which are set in advance, in accordance with the set value.<br />
Select the point table using an external input signal.<br />
Positioning operation is performed by selecting a program from<br />
8 programs which are created in advance.<br />
Select the program using an external input signal.<br />
Dog type, count type, data set type, stopper type, home position<br />
ignorance, dog type rear end reference, count type front end<br />
reference, dog cradle type<br />
The servo motor is equipped with high-resolution encoder of<br />
131072 pulses/rev.<br />
Gains can be changed using an input device or gain changing<br />
conditions (servo motor speed, etc.)<br />
This function suppresses vibration of an arm end or residual<br />
vibration.<br />
This function sets the filter characteristics automatically by the<br />
one-touch tuning to suppress vibration of a mechanical system.<br />
This function is effective for suppressing high-frequency resonance<br />
which occurs as the servo system response is increased.<br />
(Note 1)<br />
Control<br />
mode<br />
Reference<br />
Section 3.2.1<br />
Section 3.6.1<br />
Section 3.2.2<br />
Section 3.6.2<br />
Section 3.2.3<br />
Section 3.6.3<br />
P/S Section 3.6.4<br />
S/T Section 3.6.5<br />
T/P Section 3.6.6<br />
CP Section 13.3<br />
CL Section 13.4<br />
CP/CL Section 13.6<br />
P, S, T<br />
CP/CL<br />
P, S<br />
CP/CL<br />
P<br />
CP/CL<br />
P, S<br />
CP/CL<br />
P, S<br />
CP/CL<br />
Section 7.3<br />
Section 7.2.4<br />
Section 7.2.2<br />
Section 7.2.5<br />
Input pulses can be multiplied by 1/50 to 500. P Section 4.1.7<br />
Position command can be multiplied by 1/131 to 1000.<br />
Electronic gear setting range can be changed by changing the<br />
number of virtual pulses per servo motor revolution.<br />
The gain of the servo amplifier can be adjusted by the push<br />
button on the front panel.<br />
This function optimizes the servo gain automatically as load<br />
applied to the servo motor shaft changes.<br />
CP/CL Section 13.7.1 (3)<br />
P, S<br />
CP/CL<br />
P, S<br />
CP/CL<br />
Section 6.1<br />
Section 6.3<br />
Position smoothing Smooth acceleration is enabled in response to input pulse. P Section 4.2.3<br />
S-pattern acceleration/<br />
deceleration time constant<br />
Regenerative option<br />
Alarm history clear<br />
Smooth acceleration and deceleration are enabled.<br />
Regenerative option is used when the built-in regenerative<br />
resistor of the servo amplifier does not have sufficient<br />
regenerative capability for the regenerative power generated.<br />
This function clears alarm history and the number of tough drive<br />
performed.<br />
S, T<br />
CP/CL<br />
P, S, T<br />
CP/CL<br />
P, S, T<br />
CP/CL<br />
Section 4.3.2<br />
Parameter<br />
No. PC03<br />
Section 13.7.3 (2)<br />
Parameter<br />
No. PC03<br />
Section 11.2<br />
Parameter<br />
No. PC11<br />
1 - 8
1. FUNCTIONS AND CONFIGURATION<br />
Function<br />
Command pulse selection<br />
Input signal selection<br />
Output signal selection<br />
Torque limit<br />
Description<br />
Command input pulse form can be selected from among three different<br />
types.<br />
Forward rotation start (ST1), reverse rotation start (ST2), servo-on<br />
(SON) and other input device can be assigned to specific pins.<br />
Ready (RD), trouble (ALM) or other output device can be assigned to<br />
specific pins.<br />
The torque generated by the servo motor can be limited by setting a<br />
parameter.<br />
Speed limit Servo motor speed can be limited by setting a parameter. T<br />
Status display<br />
External I/O signal display<br />
Output signal (DO)<br />
forced output<br />
Test operation mode<br />
<strong>MR</strong> Configurator<br />
Tough drive function<br />
Limit switch<br />
Software limit (Note2)<br />
Drive recorder function<br />
(Note2)<br />
Servo status is shown on the 3-digit, 7-segment LED display<br />
ON/OFF statuses of external I/O signals are shown on the display.<br />
Output signal can be forced on/off independently of the servo status.<br />
Use this function for output signal wiring check, etc.<br />
JOG operation, positioning operation, motor-less operation, DO forced<br />
output, forced tough drive operation, program operation, and single-step<br />
feed.<br />
Note that <strong>MR</strong> Configurator <strong>MR</strong>ZJW3-SETUP221E is necessary for the<br />
positioning operation, program operation or single-step feed.<br />
The single-step feed is supported by servo amplifier with software<br />
version B0 or later, and <strong>MR</strong> Configurator with software version C4 or<br />
later.<br />
Parameter setting, test operation, status display, etc. can be performed<br />
using a personal computer.<br />
This function continues the operation not to stop a machine in such<br />
situation when normally an alarm is activated.<br />
Three types of the tough drive function are available: overload tough<br />
drive, vibration tough drive and instantaneous power failure tough drive.<br />
However, the overload tough drive is valid only in the position control<br />
mode or positioning mode.<br />
The servo motor travel region can be limited using the forward rotation<br />
(Note 1)<br />
Control<br />
mode<br />
Reference<br />
P Section 4.1.11<br />
P, S, T<br />
CP/CL<br />
P, S, T<br />
CP/CL<br />
P, S<br />
CP/CL<br />
P, S, T<br />
CP/CL<br />
P, S, T<br />
CP/CL<br />
P, S, T<br />
CP/CL<br />
P, S, T<br />
CP/CL<br />
Parameter<br />
No. PD02 to<br />
PD14<br />
Parameter<br />
No. PD15 to<br />
PD18<br />
Section 3.6.1 (4)<br />
Section 3.6.3 (3)<br />
Parameter<br />
No. PC05 to<br />
PC08, PC31 to<br />
PC34<br />
Section 5.3<br />
Section 5.8<br />
Section 5.9<br />
Section 5.10<br />
CP/CL Section 13.10<br />
P, S, T<br />
CP/CL<br />
P, S<br />
CP/CL<br />
Section 11.4<br />
Section 13.8 to<br />
13.10<br />
Section 7.1<br />
P, S Section 3.5<br />
stroke end (LSP)/reverse rotation stroke end (LSN). CP/CL Section 13.2.3<br />
The travel region is limited using parameters in terms of address.<br />
The function similar to that of a limit switch is limited by parameter.<br />
CP/CL Section 13.7.5 (4)<br />
This function records the state transition before and after the alarm<br />
occurrence for the predetermined period of time by always monitoring<br />
P, S, T<br />
the servo status. The recorded data can be confirmed on the graph<br />
CP/CL<br />
display screen by clicking the "Drive recorder display" button on the<br />
Section 4.3.4<br />
alarm history display screen of <strong>MR</strong> Configurator.<br />
Note 1. P: Position control mode, S: Internal speed control mode, T: Internal torque control mode,<br />
P/S: Position/internal speed control change mode, S/T: Internal speed/internal torque control change mode,<br />
T/P: Internal torque/position control change mode<br />
CP: Positioning mode (Point table method), CL: Positioning mode (Program method)<br />
2. It is supported by servo amplifier with software version B0 or later.<br />
1 - 9
1. FUNCTIONS AND CONFIGURATION<br />
1.5 Model code definition<br />
(1) Rating plate<br />
MITSUBISHI AC SERVO<br />
MODEL <strong>MR</strong>-<strong>JN</strong>-10A<br />
POWER : 100W<br />
INPUT : 1.5A 1PH200-230V 50Hz<br />
1PH200-230V 60Hz<br />
0.5A DC24V<br />
OUTPUT : 170V 0-450Hz 1.1A<br />
SERIAL : A99230001<br />
TC300A566<strong>G5</strong>1<br />
PASSED<br />
MITSUBISHI ELECTRIC CORPORATION<br />
MADE IN JAPAN<br />
Model<br />
Capacity<br />
Applicable power supply<br />
Rated output current<br />
Serial number<br />
99<br />
Year and month of manufacture (Note)<br />
Note. The year and month when the servo amplifier is manufactured are written down in the serial number of the rating plate.<br />
The year and month of manufacture are indicated by the last one digit of the year and 1 to 9, X(10), Y(11), Z(12).<br />
For September 2009, the serial number is like "SERIAL: 99 ”.<br />
(2) Model<br />
The following explains the description of models. Not all the combination of symbols exists.<br />
Series<br />
Power supply<br />
Symbol Power supply<br />
None 1-phase 200 to 230VAC<br />
1 1-phase 100 to 120VAC<br />
Serial number<br />
General purpose interface<br />
Rated output<br />
Symbol Rated output [kW]<br />
10 0.1<br />
20 0.2<br />
40 0.4<br />
Rating plate<br />
1.6 Combination with servo motor<br />
The following table lists combinations of servo amplifiers and servo motors. The following combinations also<br />
apply to servo motors with an electromagnetic brake.<br />
Servo amplifier<br />
Servo motors<br />
<strong>HF</strong>-<strong>KN</strong> <strong>HF</strong>-<strong>KP</strong> <strong>G1</strong>/<strong>G5</strong>/<strong>G7</strong><br />
<strong>MR</strong>-<strong>JN</strong>-10A(1) 053 13<br />
<strong>MR</strong>-<strong>JN</strong>-20A(1) 23<br />
<strong>MR</strong>-<strong>JN</strong>-40A 43<br />
1 - 10
1. FUNCTIONS AND CONFIGURATION<br />
1.7 Parts identification<br />
Serial number<br />
Name/Application<br />
Detailed<br />
explanation<br />
Main circuit power supply connector (CNP1)<br />
Connect the input power supply/built-in regenerative<br />
resistor/regenerative option/servo motor/earth.<br />
Section 3.1<br />
Section 3.3<br />
Charge lamp<br />
Lit to indicate that the main circuit is charged. While<br />
this lamp is lit, do not reconnect the cables.<br />
Fixed part<br />
(2 places)<br />
Rating plate<br />
One-touch tuning button (AUTO)<br />
Press this button to perform the one-touch tuning.<br />
Control circuit power supply connector (CNP2)<br />
Connect the control circuit power supply.<br />
Display<br />
The 3-digit, 7-segment LED shows the servo status<br />
and alarm number<br />
Operation section<br />
Used to perform status display, diagnosis, alarm,<br />
point table and parameter setting operations.<br />
Section 1.5<br />
Section 6.1<br />
Section 3.1<br />
Section 3.3<br />
Chapter 5<br />
MODE<br />
SET<br />
Used to set data.<br />
Used to change the mode.<br />
Chapter 5<br />
Used to change the<br />
display or data in each mode.<br />
I/O signal connector (CN1)<br />
Used to connect digital I/O signals.<br />
USB communication connector (CN3)<br />
Connect the personal computer.<br />
Encoder connector (CN2)<br />
Used to connect the servo motor encoder.<br />
Section 3.2<br />
Section 3.4<br />
Section 11.4<br />
Section 3.4<br />
Section 11.1<br />
1 - 11
1. FUNCTIONS AND CONFIGURATION<br />
1.8 Configuration including auxiliary equipment<br />
POINT<br />
Equipment other than the servo amplifier and servo motor are optional or<br />
recommended products.<br />
(Note)<br />
Main circuit<br />
power supply<br />
No-fuse breaker<br />
(NFB) or fuse<br />
R S<br />
Servo amplifier<br />
Magnetic<br />
contactor<br />
(MC)<br />
Power factor<br />
improving AC<br />
reactor<br />
(FR-HAL)<br />
AUTO<br />
P<br />
C<br />
U<br />
V<br />
W<br />
Regenerative<br />
option<br />
Circuit protector<br />
24V<br />
0V<br />
Line noise filter<br />
(FR-BSF01)<br />
MODESET<br />
(Note)<br />
Control circuit<br />
power supply<br />
L1<br />
L2<br />
<strong>MR</strong> Configurator<br />
Personal<br />
computer<br />
Junction terminal<br />
block<br />
Servo motor<br />
Note. Refer to section 1.3 for the power supply specification.<br />
1 - 12
2. INSTALLATION<br />
2. INSTALLATION<br />
WARNING<br />
Be sure to ground the servo amplifier to prevent electric shocks.<br />
CAUTION<br />
Carry the products in a suitable way according to their weight.<br />
Stacking in excess of the limited number of product packages is not allowed.<br />
Do not hold the lead of the built-in regenerative resistor when transporting a servo<br />
amplifier.<br />
Install the equipment to incombustibles. Installing them directly or close to<br />
combustibles will lead to a fire.<br />
Install the equipment in a load-bearing place in accordance with this <strong>Instruction</strong><br />
<strong>Manual</strong>.<br />
Do not get on or put heavy load on the equipment to prevent injury.<br />
Use the equipment within the specified environmental condition range. (For details<br />
of the environmental condition, refer to section 1.3.)<br />
Provide an adequate protection to prevent conductive matters like screws or<br />
combustible matters like oil from entering the servo amplifier.<br />
Do not block the intake/exhaust ports of the servo amplifier. Otherwise, a fault may<br />
occur.<br />
Do not subject the servo amplifier to drop impact or shock loads as they are<br />
precision equipment.<br />
Do not install or operate a faulty servo amplifier.<br />
When the product has been stored for an extended period of time, consult<br />
Mitsubishi.<br />
When handling the servo amplifier, be careful about the edged parts such as the<br />
corners of the servo amplifier.<br />
Be sure to install the servo amplifier on a metal control panel.<br />
2 - 1
2. INSTALLATION<br />
2.1 Installation direction and clearances<br />
CAUTION<br />
The equipment must be installed in the specified direction. Otherwise, a fault may<br />
occur.<br />
Leave specified clearances between the servo amplifier and control box inside<br />
walls or other equipment.<br />
A regenerative resistor is mounted on the back of this servo amplifier. The regenerative resistor causes a<br />
temperature rise of 100 relative to the ambient temperature. Fully examine heat dissipation and<br />
installation position before installing the servo amplifier.<br />
(1) Installation of one servo amplifier<br />
Control box<br />
Control box<br />
40mm<br />
or more<br />
Servo<br />
amplifier<br />
Wiring<br />
allowance<br />
80mm<br />
Top<br />
10mm or<br />
more<br />
10mm or<br />
more<br />
40mm<br />
or more<br />
Bottom<br />
2 - 2
2. INSTALLATION<br />
(2) Installation of two or more servo amplifiers<br />
POINT<br />
<strong>MR</strong>-<strong>JN</strong> series servo amplifier with any capacity can be mounted closely<br />
together.<br />
Leave a large clearance between the top of the servo amplifier and the internal surface of the control box,<br />
and install a cooling fan to prevent the internal temperature of the control box from exceeding the<br />
environmental conditions.<br />
When installing the servo amplifiers closely, leave a clearance of 1mm between the adjacent servo<br />
amplifiers in consideration of mounting tolerances.<br />
In this case, operate the servo amplifiers at the ambient temperature of 0 to 45 or at 75% or less of the<br />
effective load ratio.<br />
Control box<br />
Control box<br />
100mm or more<br />
10mm<br />
or more<br />
1mm<br />
100mm or more<br />
1mm<br />
Top<br />
30mm<br />
or more<br />
30mm<br />
or more<br />
30mm<br />
or more<br />
30mm<br />
or more<br />
Bottom<br />
40mm or more<br />
40mm or more<br />
Leaving clearance<br />
Mounting closely<br />
(3) Others<br />
When using heat generating equipment such as the regenerative option, install them with full consideration<br />
of heat generation so that the servo amplifier is not affected.<br />
Install the servo amplifier on a perpendicular wall in the correct vertical direction.<br />
2.2 Keep out foreign materials<br />
(1) When installing the unit in a control box, prevent drill chips and wire fragments from entering the servo<br />
amplifier.<br />
(2) Prevent oil, water, metallic dust, etc. from entering the servo amplifier through openings in the control box or<br />
a cooling fan installed on the ceiling.<br />
(3) When installing the control box in a place where toxic gas, dirt and dust exist, conduct an air purge (force<br />
clean air into the control box from outside to make the internal pressure higher than the external pressure)<br />
to prevent such materials from entering the control box.<br />
2 - 3
2. INSTALLATION<br />
2.3 Cable stress<br />
(1) The way of clamping the cable must be fully examined so that flexing stress and cable's own weight stress<br />
are not applied to the cable connection.<br />
(2) For use in any application where the servo motor moves, fix the cables (encoder, power supply, brake) with<br />
having some slack from the connector connection part of the servo motor to avoid putting stress on the<br />
connector connection part. Use the optional encoder cable within the flexing life range. Use the power<br />
supply and brake wiring cables within the flexing life of the cables.<br />
(3) Avoid any probability that the cable sheath might be cut by sharp chips, rubbed by a machine corner or<br />
stamped by workers or vehicles.<br />
(4) For installation on a machine where the servo motor moves, the flexing radius should be made as large as<br />
possible. Refer to section 10.4 for the flexing life.<br />
2.4 Inspection items<br />
WARNING<br />
Before starting maintenance and/or inspection, turn off the power and wait for 15<br />
minutes or more until the charge lamp turns off. Otherwise, an electric shock may<br />
occur. In addition, always confirm from the front of the servo amplifier whether the<br />
charge lamp is off or not.<br />
Due to risk of electric shock, only qualified personnel should attempt inspection.<br />
For repair and parts replacement, contact your local sales office.<br />
POINT<br />
Do not perform insulation resistance test on the servo amplifier as damage may<br />
result.<br />
Do not disassemble and/or repair the equipment on customer side.<br />
It is recommended to make the following checks periodically.<br />
(1) Check for loose screws. Retighten any loose screws.<br />
(2) Check the cables and the wires for scratches and cracks. Perform periodic inspection according to<br />
operating conditions.<br />
2 - 4
2. INSTALLATION<br />
2.5 Parts having service lives<br />
Service lives of the following parts are listed below. However, the service life varies depending on operating<br />
methods and environmental conditions. If any fault is found in the parts, they must be replaced immediately<br />
regardless of their service lives. For parts replacement, please contact your local sales office.<br />
Part name<br />
Smoothing capacitor<br />
Relay<br />
Life guideline<br />
10 years<br />
Number of power-on and number of forced stop times:<br />
100,000 times<br />
(1) Smoothing capacitor<br />
Affected by ripple currents, etc. and deteriorates in characteristic. The life of the capacitor greatly depends<br />
on ambient temperature and operating conditions. The capacitor will reach the end of its life in 10 years of<br />
continuous operation in normal air-conditioned environment.<br />
(2) Relays<br />
Their contacts will wear due to switching currents and contact faults occur. Relays reach the end of their life<br />
when the cumulative number of power-on and forced stop times is 100,000, which depends on the power<br />
supply capacity.<br />
2 - 5
2. INSTALLATION<br />
MEMO<br />
2 - 6
3. SIGNALS AND WIRING<br />
3. SIGNALS AND WIRING<br />
WARNING<br />
Any person who is involved in wiring should be fully competent to do the work.<br />
Before wiring, turn off the power and wait for 15 minutes or more until the charge<br />
lamp turns off. Otherwise, an electric shock may occur. In addition, always confirm<br />
from the front of the servo amplifier whether the charge lamp is off or not.<br />
Ground the servo amplifier and the servo motor securely.<br />
Do not attempt to wire the servo amplifier and servo motor until they have been<br />
installed. Otherwise, you may get an electric shock.<br />
The cables should not be damaged, stressed excessively, loaded heavily, or<br />
pinched. Otherwise, you may get an electric shock.<br />
Before unplugging the CNP1 connector from the servo amplifier, disconnect the<br />
lead of the built-in regenerative resistor from the CNP1 connector.<br />
Wire the equipment correctly and securely. Otherwise, the servo motor may<br />
operate unexpected resulting in injury.<br />
Connect cables to correct terminals to prevent a burst, fault, etc.<br />
Ensure that polarity ( , ) is correct. Otherwise, a burst, damage, etc. may occur.<br />
The surge absorbing diode installed to the DC relay designed for control output<br />
should be fitted in the specified direction. Otherwise, the signal is not output due to<br />
a fault, disabling the emergency stop and other protective circuits.<br />
Servo amplifier<br />
DOCOM<br />
24VDC<br />
Servo amplifier<br />
DOCOM<br />
24VDC<br />
CAUTION<br />
Control output<br />
signal<br />
DICOM<br />
RA<br />
Control output<br />
signal<br />
DICOM<br />
RA<br />
Sink output<br />
interface<br />
Source output<br />
interface<br />
Use a noise filter, etc. to minimize the influence of electromagnetic interference,<br />
which may be given to electronic equipment used near the servo amplifier.<br />
Do not install a power capacitor, surge suppressor or radio noise filter (FR-BIF)<br />
option) with the power line of the servo motor.<br />
When using the regenerative resistor, switch power off with the alarm signal.<br />
Otherwise, a transistor fault or the like may overheat the regenerative resistor,<br />
causing a fire.<br />
Do not modify the equipment.<br />
During power-on, do not open or close the motor power line. Otherwise, an<br />
abnormal operation or malfunction may occur.<br />
3 - 1
3. SIGNALS AND WIRING<br />
3.1 Input power supply circuit<br />
CAUTION<br />
Always connect a magnetic contactor (MC) between the main circuit power supply,<br />
and L1 and L2 of the servo amplifier to configure a circuit that shuts down the<br />
power on the servo amplifier's power supply side. If a magnetic contactor (MC) is<br />
not connected, continuous flow of a large current may cause a fire when the servo<br />
amplifier malfunctions.<br />
Use the trouble (ALM) to switch power off. Otherwise, a regenerative transistor<br />
fault or the like may overheat the regenerative resistor, causing a fire.<br />
Before unplugging the CNP1 connector from the servo amplifier, disconnect the<br />
lead of the built-in regenerative resistor from the CNP1 connector. Otherwise, the<br />
lead of the built-in regenerative resistor may break.<br />
For main circuit power supply of servo amplifier, check the model of servo amplifier<br />
and input the correct voltage. If a voltage exceeding the upper limit shown in the<br />
servo amplifier input voltage specification is input, the servo amplifier malfunctions.<br />
Wire the main circuit power supply as shown below so that the servo-on (SON) turns off as soon as alarm<br />
occurrence is detected and power is shut off.<br />
A no-fuse breaker (NFB) must be used with the input cables of the main circuit power supply.<br />
Trouble<br />
RA<br />
OFF<br />
ON<br />
MC<br />
Forced stop(Note 5)<br />
MC<br />
SK<br />
Main circuit power supply<br />
1-phase 200 to 230VAC<br />
or<br />
1-phase 100 to 120VAC<br />
NFB<br />
MC (Note 6)<br />
(Note 1)<br />
Servo amplifier<br />
CNP1<br />
L1<br />
L2<br />
P<br />
C<br />
Built-in regenerative<br />
resistor U<br />
V<br />
W<br />
(Note 4)<br />
Servo motor<br />
U<br />
Motor<br />
V<br />
M<br />
W<br />
Control circuit power supply<br />
24VDC (Note 7)<br />
Circuit protector<br />
CNP2<br />
+24V<br />
0V<br />
CN2<br />
(Note 2)<br />
Encoder cable<br />
Encoder<br />
CN1 CN1 24VDC<br />
(Note 3)<br />
Forced stop (Note 5)<br />
Servo-on<br />
EM1<br />
SON<br />
DOCOM<br />
DOCOM<br />
DICOM<br />
ALM<br />
RA<br />
Trouble<br />
(Note 3)<br />
3 - 2
3. SIGNALS AND WIRING<br />
Note 1. The built-in regenerative resistor is provided for <strong>MR</strong>-<strong>JN</strong>-20A(1) and <strong>MR</strong>-<strong>JN</strong>-40A. (Factory-wired.) When using the regenerative<br />
option, refer to section 11.2.<br />
2. For encoder cable, use of the option cable is recommended. Refer to section 11.1 for selection of the cable.<br />
3. For the sink I/O interface.<br />
For the source I/O interface, refer to section 3.8.3.<br />
4. Refer to section 3.10.<br />
5. Configure the circuit to shut off the main circuit power supply by an external sequence simultaneously with the forced stop<br />
(EM1) turning OFF.<br />
6. Be sure to use a magnetic contactor (MC) with an operation delay time of 80ms or less. The operation delay time is the time<br />
interval between current being applied to the coil until closure of contacts.<br />
7. Use the enhanced insulation power supply for the control circuit power supply 24VDC. In addition, do not use a power supply<br />
with an output voltage starting time of one second or more.<br />
3 - 3
3. SIGNALS AND WIRING<br />
3.2 I/O signal connection example<br />
3.2.1 Position control mode<br />
Programmable logic<br />
controller<br />
FX3U- MT/ES (Note 13)<br />
2m max. (Note 8)<br />
PLC power<br />
supply<br />
(Note 14)<br />
(Note 15)<br />
S/S<br />
24V<br />
0V<br />
L<br />
Y000<br />
COM1<br />
Y010<br />
COM3<br />
X<br />
X<br />
N<br />
Y004<br />
COM2<br />
24VDC<br />
(Note 4, 10)<br />
(Note 7) (Note 7)<br />
CN1 CN1<br />
DICOM 1 9 ALM<br />
OPC 2<br />
DOCOM 13 12 MBR<br />
PP 23<br />
NP<br />
CR<br />
RD<br />
OP<br />
LG<br />
SD<br />
25<br />
X INP 10<br />
Servo amplifier<br />
5<br />
11<br />
21<br />
14<br />
Plate<br />
15 LA<br />
16 LAR<br />
17 LB<br />
18 LBR<br />
19 LZ<br />
20 LZR<br />
14<br />
Plate<br />
LG<br />
SD<br />
(Note 2)<br />
RA1<br />
RA2<br />
10m max.<br />
Trouble (Note 6)<br />
Electromagnetic<br />
brake interlock<br />
Encoder A-phase pulse<br />
(differential line driver)<br />
Encoder B-phase pulse<br />
(differential line driver)<br />
Encoder Z-phase pulse<br />
(differential line driver)<br />
Control common<br />
(Note 10, 12)<br />
(Note 3, 5) Forced stop<br />
(Note 7)<br />
CN1<br />
Servo-on<br />
EM1<br />
8<br />
(Note 10, 11)<br />
Reset<br />
SON<br />
4<br />
(Note 5)<br />
Forward rotation<br />
stroke end<br />
Reverse rotation<br />
stroke end<br />
RES<br />
LSP<br />
LSN<br />
3<br />
6<br />
7<br />
10m max.<br />
(Note 9)<br />
<strong>MR</strong> Configurator<br />
Personal<br />
computer<br />
USB cable<br />
(option)<br />
CN3<br />
CNP1 (Note 1)<br />
3 - 4
3. SIGNALS AND WIRING<br />
Note 1. To prevent an electric shock, always connect the protective earth (PE) terminal (terminal marked ) of the servo amplifier main<br />
circuit power supply connector (CNP1) to the protective earth (PE) of the control box.<br />
2. Connect the diode in the correct direction. If it is connected reversely, the servo amplifier will be faulty and will not output<br />
signals, disabling the emergency stop and other protective circuits.<br />
3. The forced stop switch (normally closed contact) must be installed.<br />
4. Supply 24VDC 10% 200mA current for interfaces from the outside. 200mA is the value applicable when all I/O signals are used.<br />
The current capacity can be decreased by reducing the number of I/O points. Refer to section 3.8.2 (1) that gives the current<br />
value necessary for the interface.<br />
5. When starting operation, always switch on the forced stop (EM1) or the forward/reverse rotation stroke end (LSP, LSN).<br />
(Normally closed contacts)<br />
6. Trouble (ALM) turns on in normal alarm-free condition. When this signal is switched off (at occurrence of an alarm), the output<br />
of the programmable logic controller should be stopped by the sequence program.<br />
7. The pins with the same signal name are connected in the servo amplifier.<br />
8. This length applies to the command input pulses in the open collector system. The wirings can be extended up to 10m when<br />
using positioning modules with the differential line driver system.<br />
9. Use <strong>MR</strong>ZJW3-SETUP221E (C4 or later).<br />
10. This diagram is for sink I/O interface. For source I/O interface, refer to section 3.8.3.<br />
11. The assigned signals can be changed using the settings of parameter No. PD03 to PD14.<br />
12. The assigned signals can be changed using the settings of parameter No. PD15 to PD18.<br />
13. Select the number of I/O points of the programmable logic controllers in accordance with the system.<br />
14. It is COM0 for FX3U-16MT/ES.<br />
15. It is COM4 for FX3U-16MT/ES.<br />
3 - 5
3. SIGNALS AND WIRING<br />
3.2.2 Internal speed control mode<br />
(Note 9,<br />
10, 12)<br />
(Note 8)<br />
<strong>MR</strong> Configurator<br />
(Note 3, 5) Forced stop<br />
Servo-on<br />
Reset<br />
Speed selection 1<br />
Forward rotation<br />
start<br />
Reverse rotation<br />
start<br />
Personal<br />
computer<br />
24VDC (Note 4, 9)<br />
10m max.<br />
USB cable<br />
(option)<br />
Servo amplifier<br />
(Note 7) (Note 7)<br />
CN1 CN1<br />
DICOM 1 9 ALM<br />
DOCOM 13<br />
EM1 8 10 SA<br />
SON 4 11 RD<br />
RES 3<br />
SP1<br />
ST1<br />
ST2<br />
5<br />
6<br />
7<br />
CN3<br />
12 MBR<br />
19 LZ<br />
20 LZR<br />
15 LA<br />
16 LAR<br />
17 LB<br />
18 LBR<br />
14 LG<br />
21 OP<br />
Plate SD<br />
2m max.<br />
(Note 2)<br />
RA1<br />
RA2<br />
RA3<br />
RA4<br />
10m max.<br />
Trouble (Note 6)<br />
Speed reached<br />
Ready<br />
Electromagnetic<br />
brake interlock<br />
Encoder Z-phase pulse<br />
(differential line driver)<br />
Encoder A-phase pulse<br />
(differential line driver)<br />
Encoder B-phase pulse<br />
(differential line driver)<br />
Control common<br />
Control common<br />
Encoder Z-phase pulse<br />
(open collector)<br />
(Note 9, 11)<br />
CNP1 (Note 1)<br />
Note 1. To prevent an electric shock, always connect the protective earth (PE) terminal (terminal marked ) of the servo amplifier<br />
main circuit power supply connector (CNP1) to the protective earth (PE) of the control box.<br />
2. Connect the diode in the correct direction. If it is connected reversely, the servo amplifier will be faulty and will not output<br />
signals, disabling the emergency stop and other protective circuits.<br />
3. The forced stop switch (normally closed contact) must be installed.<br />
4. Supply 24VDC 10% 200mA current for interfaces from the outside. 200mA is the value applicable when all I/O signals are used.<br />
The current capacity can be decreased by reducing the number of I/O points. Refer to section 3.8.2 (1) that gives the current<br />
value necessary for the interface.<br />
5. When starting operation, always switch on the forced stop (EM1). (Normally closed contacts)<br />
6. Trouble (ALM) turns on in normal alarm-free condition.<br />
7. The pins with the same signal name are connected in the servo amplifier.<br />
8. Use <strong>MR</strong>ZJW3-SETUP221E (C4 or later).<br />
9. This diagram is for sink I/O interface. For source I/O interface, refer to section 3.8.3.<br />
10. The assigned signals can be changed using the settings of parameter No. PD03 to PD14.<br />
11. The assigned signals can be changed using the settings of parameter No. PD15 to PD18.<br />
12. The forward rotation stroke end (LSP) and the reverse rotation stroke end (LSN) automatically switch ON if not assigned to the<br />
external input signals.<br />
3 - 6
3. SIGNALS AND WIRING<br />
3.2.3 Internal torque control mode<br />
(Note 8, 9)<br />
(Note 3) Forced stop<br />
Servo-on<br />
Reset<br />
(Note 7)<br />
<strong>MR</strong> Configurator<br />
Speed selection 1<br />
Forward rotation selection<br />
Reverse rotation selection<br />
Personal<br />
computer<br />
24VDC (Note 4, 8)<br />
10m max.<br />
USB cable<br />
(option)<br />
Servo amplifier<br />
(Note 6) (Note 6)<br />
CN1 CN1<br />
DICOM 1 9 ALM<br />
DOCOM 13<br />
EM1 8 11 RD<br />
SON 4 12 MBR<br />
RES 3<br />
SP1<br />
RS1<br />
RS2<br />
5<br />
7<br />
6<br />
CN3<br />
19 LZ<br />
20 LZR<br />
15 LA<br />
16 LAR<br />
17 LB<br />
18 LBR<br />
14 LG<br />
21 OP<br />
Plate SD<br />
2m max.<br />
(Note 2)<br />
RA1<br />
RA2<br />
RA3<br />
10m max.<br />
Trouble (Note 5)<br />
Ready<br />
Electromagnetic<br />
brake interlock<br />
Encoder Z-phase pulse<br />
(differential line driver)<br />
Encoder A-phase pulse<br />
(differential line driver)<br />
Encoder B-phase pulse<br />
(differential line driver)<br />
Control common<br />
Control common<br />
Encoder Z-phase pulse<br />
(open collector)<br />
(Note 8, 10)<br />
CNP1<br />
(Note 1)<br />
Note 1. To prevent an electric shock, always connect the protective earth (PE) terminal (terminal marked ) of the servo amplifier main<br />
circuit power supply connector (CNP1) to the protective earth (PE) of the control box.<br />
2. Connect the diode in the correct direction. If it is connected reversely, the servo amplifier will be faulty and will not output<br />
signals, disabling the emergency stop and other protective circuits.<br />
3. The forced stop switch (normally closed contact) must be installed.<br />
4. Supply 24VDC 10% 200mA current for interfaces from the outside. 200mA is the value applicable when all I/O signals are used.<br />
The current capacity can be decreased by reducing the number of I/O points. Refer to section 3.8.2 (1) that gives the current<br />
value necessary for the interface.<br />
5. Trouble (ALM) turns on in normal alarm-free condition.<br />
6. The pins with the same signal name are connected in the servo amplifier.<br />
7. Use <strong>MR</strong>ZJW3-SETUP221E (C4 or later).<br />
8. This diagram is for sink I/O interface. For source I/O interface, refer to section 3.8.3.<br />
9. The assigned signals can be changed using the settings of parameter No. PD03 to PD14.<br />
10. The assigned signals can be changed using the settings of parameter No. PD15 to PD18.<br />
3 - 7
3. SIGNALS AND WIRING<br />
3.3 Explanation of power supply system<br />
3.3.1 Signal explanations<br />
POINT<br />
For the layout of connector, refer to chapter 9 OUTLINE DRAWINGS.<br />
Abbreviation<br />
L1<br />
L2<br />
P<br />
C<br />
+24V<br />
0V<br />
U<br />
V<br />
W<br />
Connection target<br />
(application)<br />
Main circuit power<br />
supply<br />
Built-in regenerative<br />
resistor<br />
or<br />
regenerative option<br />
Control circuit power<br />
supply<br />
Servo motor power<br />
Protective earth (PE)<br />
Description<br />
Supply the following power supply.<br />
<strong>MR</strong>-<strong>JN</strong>-10A/20A/40A : 1-phase 200VAC to 230VAC, 50/60Hz<br />
<strong>MR</strong>-<strong>JN</strong>-10A1/20A1 : 1-phase 100VAC to 120VAC, 50/60Hz<br />
1) <strong>MR</strong>-<strong>JN</strong>-10A(1)<br />
When using the regenerative option, connect it to P and C. (<strong>MR</strong>-<strong>JN</strong>-10A(1)<br />
does not provide a built-in regenerative resistor.)<br />
2) <strong>MR</strong>-<strong>JN</strong>-20A(1)/40A<br />
When using the servo amplifier built-in regenerative resistor, connect the<br />
built-in regenerative resistor to P and C. (Factory-wired.)<br />
When using a regenerative option,<br />
first, disconnect the wirings to P and C,<br />
second, remove the built-in regenerative resistor from the servo<br />
amplifier,<br />
finally, connect the regenerative option to P and C.<br />
Supply 24VDC power to +24V and 0V.<br />
Connect to the servo motor power supply terminals (U, V, W). During poweron,<br />
do not open or close the motor power line. Otherwise, an abnormal<br />
operation or malfunction may occur.<br />
Connect to the earth terminal of the servo motor and to the protective earth<br />
(PE) of the control box to perform grounding.<br />
3.3.2 Power-on sequence<br />
(1) Power-on procedure<br />
1) Always wire the power supply as shown in above section 3.1 using the magnetic contactor with the main<br />
circuit power supply (single-phase: L1, L2). Configure up an external sequence to switch off the magnetic<br />
contactor as soon as an alarm occurs.<br />
2) The servo amplifier can accept the servo-on (SON) about 1 to 2s after the main circuit power supply is<br />
switched on. Therefore, when the servo-on (SON) is switched on simultaneously with the main circuit<br />
power supply, the base circuit will switch on in about 1 to 2s, and the ready (RD) will switch on in further<br />
about 5ms, making the servo amplifier ready to operate. (Refer to paragraph (2) of this section.)<br />
If the main circuit power supply is OFF while the servo-on (SON) is ON, the display on the servo<br />
amplifier shows the corresponding warning. Switching ON the main circuit power supply discards the<br />
warning and the servo amplifier operates normally.<br />
3) When the reset (RES) is switched on, the base circuit is shut off and the servo motor shaft coasts.<br />
3 - 8
3. SIGNALS AND WIRING<br />
(2) Timing chart<br />
Servo-on (SON) accepted<br />
Main circuit<br />
Control circuit<br />
Power supply<br />
Base circuit<br />
Servo-on (SON)<br />
ON<br />
OFF<br />
ON<br />
OFF<br />
ON<br />
OFF<br />
(1 to 2s)<br />
10ms<br />
95ms<br />
10ms<br />
95ms<br />
Reset (RES)<br />
Ready (RD)<br />
ON<br />
OFF<br />
ON<br />
OFF<br />
5ms<br />
10ms<br />
5ms<br />
10ms<br />
5ms<br />
10ms<br />
No (ON)<br />
Trouble (ALM)<br />
Yes (OFF)<br />
1s<br />
Power-on timing chart<br />
(3) Forced stop<br />
CAUTION<br />
Configure a circuit which interlocks with an external emergency stop switch in order<br />
to stop the operation immediately and shut off the power.<br />
Configure a circuit that shuts off the main circuit power as soon as EM1 is turned off at a forced stop. When<br />
EM1 is turned off, the dynamic brake is operated to stop the servo motor immediately. At this time, the<br />
display shows the servo forced stop warning (E6.1).<br />
During the normal operation, do not use the forced stop (EM1) to alternate stop and run. The service life of<br />
the servo amplifier may be shortened.<br />
Also, the servo motor rotates simultaneously with the reset of the forced stop if a forward rotation start<br />
(ST1) or the reverse rotation start (ST2) is ON, or if a pulse train is input during the forced stop. Be sure to<br />
shut off the operation instruction during the forced stop.<br />
Servo amplifier<br />
24VDC<br />
(Note)<br />
Forced stop<br />
DICOM<br />
EM1<br />
Note. For the sink I/O interface. For the source I/O interface, refer to section 3.8.3.<br />
3 - 9
3. SIGNALS AND WIRING<br />
3.3.3 CNP1 and CNP2 wiring method<br />
POINT<br />
Refer to section 11.5, for the wire sizes used for wiring.<br />
Use the supplied servo amplifier power supply connectors for wiring of CNP1 and CNP2.<br />
(1) Servo amplifier power supply connectors<br />
Servo amplifier<br />
Connector for CNP1<br />
FKC2,5/ 9-ST-5,08<br />
(Phoenix Contact)<br />
CNP1<br />
CNP1<br />
<br />
Wire size: 0.2 to 2.5mm 2 (AWG24 to AW<strong>G1</strong>2)<br />
Cable finish OD: to 4mm<br />
Connector for CNP2<br />
FKCT 2,5/ 2-ST-5,08<br />
(Phoenix Contact)<br />
CNP2<br />
CNP2<br />
3 - 10
3. SIGNALS AND WIRING<br />
(2) Termination of the wires<br />
(a) Solid wire<br />
The wire can be used just by stripping the sheath.<br />
Sheath<br />
Core<br />
Approx. 10mm<br />
(b) Twisted wire<br />
1) Inserting the wires directly to the terminals<br />
Use the wire after stripping the sheath and twisting the core. At this time, take care to avoid a short<br />
caused by the loose wires of the core and the adjacent pole. Do not solder the core as it may cause<br />
a contact fault.<br />
2) Putting the wires together using a ferrule<br />
Use a ferrule as follows.<br />
Cable size<br />
Ferrule type<br />
[mm 2 ] AWG For one wire For two wires<br />
1.25/1.5 16 AI 1,5-10 BK AI-TWIN 2 1,5-10 BK<br />
2/2.5 14 AI 2,5-10 BK<br />
Crimping tool<br />
CRIMPFOX ZA 3<br />
Manufacturer<br />
Phoenix Contact<br />
Cut off the exceeding wire from the tip of the ferrule, leaving 0.5mm or less.<br />
0.5mm or shorter<br />
When using the ferrule for two wires, plug the wires in a direction in which insulating sleeves do not<br />
interfere the adjacent poles.<br />
Crimp<br />
Crimp<br />
3 - 11
3. SIGNALS AND WIRING<br />
(3) Connection method<br />
(a) Inserting the wires directly to the terminals<br />
Insert the wire to the very end of the hole while pressing the button by a tool such as a small flat-blade<br />
screwdriver.<br />
Button<br />
Tools such as a small<br />
flat-blade screwdriver<br />
Twisted wire<br />
(b) Putting the wires together using a ferrule<br />
Insert the wire as the uneven side of the crimped ferrule collar faces the button side.<br />
Ferrule for one wire or<br />
solid wire<br />
Ferrule for two wires<br />
Use a ferrule for two wires when inserting two wires into one hole.<br />
3 - 12
CN2<br />
CN1<br />
CNP1<br />
3. SIGNALS AND WIRING<br />
3.4 Connectors and signal arrangements<br />
POINT<br />
For the positioning mode, refer to section 13.2.2.<br />
The pin configurations of the connectors are as viewed from the cable connector<br />
wiring section.<br />
Refer to (2) of this section for CN1 signal assignment.<br />
(1) Signal arrangement<br />
The front view shown below is that of <strong>MR</strong>-<strong>JN</strong>-20A(1) or smaller. Refer to chapter 9 OUTLINE DRAWINGS<br />
for the appearances and connector layouts of the other servo amplifiers.<br />
AUTO<br />
2 6<br />
LG 4 8<br />
1<br />
P5<br />
<strong>MR</strong>R<br />
3<br />
<strong>MR</strong><br />
CN2<br />
5<br />
CN3 (USB connector)<br />
Refer to section 11.4.<br />
MDR<br />
7<br />
MD<br />
10<br />
9<br />
MODE SET<br />
CN3<br />
CNP2<br />
The frames of the CN1 connector are<br />
connected to the PE (earth) terminal in<br />
the servo amplifier.<br />
CN1<br />
1<br />
2<br />
DICOM 15<br />
OPC<br />
3<br />
LA<br />
4<br />
RES<br />
17<br />
SON<br />
5<br />
LB<br />
6<br />
CR 19<br />
LSP<br />
7<br />
LZ<br />
8<br />
LSN<br />
21<br />
EM1<br />
9<br />
OP<br />
10<br />
ALM 23<br />
INP<br />
11<br />
PP<br />
12<br />
RD<br />
25<br />
MBR<br />
13<br />
NP<br />
14<br />
LG<br />
16<br />
LAR<br />
18<br />
LBR<br />
20<br />
LZR<br />
22<br />
PG<br />
24<br />
NG<br />
26<br />
The 3M make connector is shown.<br />
When using any other connector,<br />
refer to section 11.1.2.<br />
DOCOM<br />
Signal assignments shown above are<br />
in the case of position control mode.<br />
3 - 13
3. SIGNALS AND WIRING<br />
(2) CN1 signal assignment<br />
The signal assignment of connector changes with the control mode as indicated below;<br />
For the pins which are given parameter No. in the related parameter column, their signals can be changed<br />
using those parameters.<br />
Pin No.<br />
(Note 1)<br />
(Note 2) I/O signals in control modes<br />
I/O P P/S S S/T T T/P<br />
Related<br />
parameter No.<br />
1 DICOM DICOM DICOM DICOM DICOM DICOM<br />
2 OPC OPC/- -/OPC<br />
3 I RES RES RES RES RES RES PD03 PD04<br />
4 I SON SON SON SON SON SON PD05 PD06<br />
5 I CR CR/SP1 SP1 SP1/SP1 SP1 SP1/CR PD07 PD08<br />
6 I LSP LSP/ST1 ST1 ST1/RS2 RS2 RS2/LSP PD09 PD10<br />
7 I LSN LSN/ST2 ST2 ST2/RS1 RS1 RS1/LSN PD11 PD12<br />
8 I EM1 EM1 EM1 EM1 EM1 EM1 PD13 PD14<br />
9 O ALM ALM ALM ALM ALM ALM PD15<br />
10 O INP INP/SA SA SA/- -/INP PD16<br />
11 O RD RD RD RD RD RD PD17<br />
12 O MBR MBR MBR MBR MBR MBR PD18<br />
13 DOCOM DOCOM DOCOM DOCOM DOCOM DOCOM<br />
14 LG LG LG LG LG LG<br />
15 O LA LA LA LA LA LA<br />
16 O LAR LAR LAR LAR LAR LAR<br />
17 O LB LB LB LB LB LB<br />
18 O LBR LBR LBR LBR LBR LBR<br />
19 O LZ LZ LZ LZ LZ LZ<br />
20 O LZR LZR LZR LZR LZR LZR<br />
21 O OP OP OP OP OP OP<br />
22 I PG PG/- -/PG<br />
23 I PP PP/- -/PP<br />
24 I NG NG/- -/NG<br />
25 I NP NP/- -/NP<br />
26<br />
Note 1. I: Input signal, O: Output signal<br />
2. P: Position control mode, S: Internal speed control mode, T: Internal torque control mode,<br />
P/S: Position/internal speed control change mode, S/T: Internal speed/internal torque control change mode,<br />
T/P: Internal torque/position control change mode<br />
3 - 14
3. SIGNALS AND WIRING<br />
(3) Explanation of abbreviations<br />
Abbreviation Signal name Abbreviation Signal name<br />
SON Servo-on ALM Trouble<br />
RES Reset INP In-position<br />
PC Proportion control SA Speed reached<br />
EM1 Forced stop MBR Electromagnetic brake interlock<br />
CR Clear TLC Limiting torque<br />
ST1 Forward rotation start VLC Limiting speed<br />
ST2 Reverse rotation start WNG Warning<br />
RS1 Forward rotation selection ZSP Zero speed<br />
RS2 Reverse rotation selection MTTR During tough drive<br />
TL1 Internal torque limit selection CDPS During variable gain selection<br />
LSP Forward rotation stroke end OP Encoder Z-phase pulse (open collector)<br />
LSN Reverse rotation stroke end LZ Encoder Z-phase pulse<br />
SP1 Speed selection 1 LZR (differential line driver)<br />
SP2 Speed selection 2 LA Encoder A-phase pulse<br />
SP3 Speed selection 3 LAR (differential line driver)<br />
LOP Control change LB Encoder B-phase pulse<br />
CDP Gain changing LBR (differential line driver)<br />
PP DICOM Digital I/F power supply input<br />
NP OPC Open collector power input<br />
Forward/reverse rotation pulse train<br />
PG DOCOM Digital I/F common<br />
NG<br />
LG Control common<br />
RD Ready SD Shield<br />
3 - 15
3. SIGNALS AND WIRING<br />
3.5 Signal explanations<br />
POINT<br />
For the positioning mode, refer to section 13.2.3.<br />
For the I/O interfaces (symbols in I/O division column in the table), refer to section 3.8.2.<br />
In the control mode field of the table<br />
P : Position control mode, S: Internal speed control mode, T: Internal torque control mode<br />
: Denotes that the signal may be used in the initial setting status.<br />
: Denotes that the signal may be used by setting the corresponding parameter No. PD02 to PD18.<br />
The pin numbers in the connector pin No. column are those in the initial status.<br />
(1) I/O devices<br />
(a) Input devices<br />
Device Symbol<br />
Connector<br />
pin<br />
No.<br />
Functions/Applications<br />
Servo-on SON CN1-4 When SON is turned on, the power is supplied to the base circuit and the<br />
servo amplifier is ready to operate (servo-on).<br />
When SON is turned off, the power to the base circuit is shut off and the<br />
servo motor coasts.<br />
Set parameter No. PD01 to " 4 " to switch this signal on<br />
(keep terminals connected) automatically in the servo amplifier.<br />
Reset RES CN1-3 When RES is turned on for 50ms or longer, an alarm can be reset.<br />
Some alarms cannot be deactivated by the reset (RES). Refer to section<br />
8.1.<br />
Turning RES on in an alarm-free status shuts off the base circuit. The<br />
base circuit is not shut off when " 1 " is set in parameter No. PD20.<br />
This device is not designed to make a stop. Do not turn it ON during<br />
operation.<br />
Forward rotation LSP CN1-6 To start operation, turn LSP/LSN on. Turn it off to bring the motor to a<br />
stroke end<br />
sudden stop and make it servo-locked.<br />
Set " 1 " in parameter No. PD20 to make a slow stop.<br />
(Refer to section 4.4.2.)<br />
(Note) Input device<br />
Operation<br />
LSP LSN<br />
CCW CW<br />
direction direction<br />
1 1<br />
0 1<br />
1 0<br />
0 0<br />
Reverse rotation LSN CN1-7 Note. 0: off<br />
stroke end<br />
1: on<br />
I/O<br />
division<br />
DI-1<br />
DI-1<br />
DI-1<br />
Control<br />
mode<br />
P S T<br />
When LSP or LSN turns OFF, an external stroke limit warning (99. )<br />
occurs, and warning (WNG) turns OFF. However, when using WNG, set<br />
parameter No. PD15 to PD18 to make it usable.<br />
In the internal speed control mode, LSP and LSN turns ON automatically<br />
if they are not assigned to the external input signals.<br />
3 - 16
3. SIGNALS AND WIRING<br />
Device<br />
Internal<br />
torque limit<br />
selection<br />
Forward rotation<br />
start<br />
Reverse rotation<br />
start<br />
Forward rotation<br />
selection<br />
Reverse rotation<br />
selection<br />
Symbol<br />
TL1<br />
Connector<br />
pin<br />
No.<br />
Functions/Applications<br />
The internal torque limit 2 (parameter No. PC14) becomes valid by turning<br />
TL1 on.<br />
The forward torque limit (parameter No. PA11) and the reverse torque<br />
limit (parameter No. PA12) are always valid.<br />
The smallest torque limit among the valid forward and reverse torque<br />
limits is the actual torque limit value.<br />
(Note)<br />
Input device<br />
TL1<br />
0<br />
1<br />
Note. 0: off<br />
1: on<br />
Comparison between limit<br />
values<br />
Parameter<br />
Parameter<br />
No. PC14 > No. PA11<br />
Parameter<br />
No. PA12<br />
Parameter<br />
Parameter<br />
No. PC14 < No. PA11<br />
Parameter<br />
No. PA12<br />
Valid torque limit value<br />
Forward<br />
rotation<br />
Parameter<br />
No. PA11<br />
Parameter<br />
No. PA11<br />
Parameter<br />
No. PC14<br />
Reverse<br />
rotation<br />
Parameter<br />
No. PA12<br />
Parameter<br />
No. PA12<br />
Parameter<br />
No. PC14<br />
ST1 Used to start the servo motor in any of the following directions. DI-1<br />
(Note) Input device<br />
ST2<br />
ST1<br />
Servo motor starting direction<br />
0 0 Stop (servo lock)<br />
0 1 CCW<br />
1 0 CW<br />
ST2 1 1 Stop (servo lock)<br />
RS1<br />
RS2<br />
Note. 0: off<br />
1: on<br />
If both ST1 and ST2 are switched on or off during operation, the servo<br />
motor will be decelerated to a stop according to parameter No. PC02<br />
setting and servo-locked.<br />
When " 1 " is set in parameter No. PC23, the servo motor is not<br />
servo-locked after deceleration to a stop.<br />
Used to select any of the following servo motor torque generation<br />
directions.<br />
(Note) Input device<br />
RS2<br />
RS1<br />
Torque generation direction<br />
0 0 Torque is not generated.<br />
0 1<br />
1 0<br />
Forward rotation in driving mode /<br />
reverse rotation in regenerative<br />
mode<br />
Reverse rotation in driving mode /<br />
forward rotation in regenerative<br />
mode<br />
1 1 Torque is not generated.<br />
Note. 0: off<br />
1: on<br />
Torque is not generated if both RS1 and RS2 are switched ON or OFF<br />
during the operation.<br />
Control<br />
I/O<br />
mode<br />
division<br />
P S T<br />
DI-1<br />
DI-1<br />
3 - 17
3. SIGNALS AND WIRING<br />
Device<br />
Symbol<br />
Connector<br />
pin<br />
No.<br />
Functions/Applications<br />
Speed selection 1 SP1 <br />
Used to select the command speed for operation. (Max. 8 speeds)<br />
(Note) Input device<br />
SP3 SP2 SP1<br />
Speed command<br />
0 0 0 Internal speed command 0 (parameter No. PC05)<br />
0 0 1 Internal speed command 1 (parameter No. PC06)<br />
0 1 0 Internal speed command 2 (parameter No. PC07)<br />
0 1 1 Internal speed command 3 (parameter No. PC08)<br />
1 0 0 Internal speed command 4 (parameter No. PC31)<br />
Speed selection 2 SP2 1 0 1 Internal speed command 5 (parameter No. PC32) DI-1<br />
1 1 0 Internal speed command 6 (parameter No. PC33)<br />
1 1 1 Internal speed command 7 (parameter No. PC34)<br />
Note. 0: off<br />
1: on<br />
<br />
Used to select the limit speed for operation. (Max. 8 speeds)<br />
(Note) Input device<br />
SP3 SP2 SP1<br />
Speed limit<br />
Speed selection 3 SP3 0 0 0 Internal speed limit 0 (parameter No. PC05) DI-1<br />
0 0 1 Internal speed limit 1 (parameter No. PC06)<br />
0 1 0 Internal speed limit 2 (parameter No. PC07)<br />
0 1 1 Internal speed limit 3 (parameter No. PC08)<br />
1 0 0 Internal speed limit 4 (parameter No. PC31)<br />
1 0 1 Internal speed limit 5 (parameter No. PC32)<br />
1 1 0 Internal speed limit 6 (parameter No. PC33)<br />
1 1 1 Internal speed limit 7 (parameter No. PC34)<br />
Note. 0: off<br />
1: on<br />
Proportion control PC When PC is turned on, the type of the speed loop switches from the<br />
proportional integral type to the proportional type.<br />
If the servo motor at a stop is rotated even one pulse due to any external<br />
factor, it generates torque to compensate for a position shift. When the<br />
servo motor shaft is to be locked mechanically after positioning<br />
completion (stop), switching on the proportion control (PC) upon<br />
positioning completion will suppress the unnecessary torque generated to<br />
compensate for a position shift.<br />
In case of locking the servo motor shaft for a long time, turn on the<br />
internal torque limit selection (TL1) simultaneously with the proportion<br />
control (PC). Then, set the internal torque limit 2 (parameter No. PC14) in<br />
order to make the torque lower than the rating.<br />
Forced stop EM1 CN1-8 When EM1 is turned off (contact between commons is opened), the<br />
servo amplifier falls in a forced stop state in which the base circuit is shut<br />
off, and the dynamic brake activates.<br />
When EM1 is turned on (contact between commons is shorted) in the<br />
forced stop state, the state can be reset.<br />
Clear CR CN1-5 When CR is turned on, the droop pulses of the position control counter<br />
are cleared on its leading edge. The pulse width should be 10ms or<br />
more.<br />
The delay amount set in parameter No. PB03 (position command<br />
acceleration/deceleration time constant) is also cleared. When parameter<br />
No. PD22 is set to " 1 ", the pulses are always cleared while CR is<br />
on.<br />
Control<br />
I/O<br />
mode<br />
division<br />
P S T<br />
DI-1<br />
DI-1<br />
DI-1<br />
DI-1<br />
3 - 18
3. SIGNALS AND WIRING<br />
Device Symbol<br />
Connector<br />
pin<br />
Functions/Applications<br />
Control mode<br />
I/O<br />
division P S T<br />
No.<br />
Gain changing CDP The values of the load to motor inertia moment ratio and the gains are DI-1<br />
changed to the value set in parameter No. PB29 to PB34 by turning CDP<br />
on.<br />
Control change LOP <br />
Used to select the control mode in the position/internal speed control<br />
change mode.<br />
DI-1 Refer to<br />
Functions/A<br />
pplications.<br />
(Note) LOP Control mode<br />
0 Position<br />
1 Internal speed<br />
Note. 0: off<br />
1: on<br />
<br />
Used to select the control mode in the internal speed/internal torque<br />
control change mode.<br />
(Note) LOP Control mode<br />
0 Internal speed<br />
1 Internal torque<br />
Note. 0: off<br />
1: on<br />
<br />
Used to select the control mode in the internal torque/position control<br />
change mode.<br />
(Note) LOP Control mode<br />
0 Internal torque<br />
1 Position<br />
Note. 0: off<br />
1: on<br />
(b) Output devices<br />
Device Symbol<br />
Connector<br />
pin<br />
No.<br />
Functions/Applications<br />
Trouble ALM CN1-9 ALM turns off when power is switched off or the protective circuit is<br />
activated to shut off the base circuit.<br />
When there is no alarm, ALM turns on approximately 1s after power-on.<br />
Ready RD CN1-11 RD turns on when the servo motor is ready for the operation after turning<br />
on the servo-on (SON).<br />
In-position INP CN1-10 INP turns on when the number of droop pulses is in the preset in-position<br />
range. The in-position range can be changed using parameter No. PA10.<br />
When the in-position range is increased, may be kept connected during<br />
low-speed rotation.<br />
INP turns on when servo-on turns on.<br />
If parameter No. PA04 is set to " 1" and the overload tough drive<br />
function is enabled, the INP ON time in the overload tough drive is<br />
delayed. The delay time can be limited by parameter No. PC26.<br />
I/O<br />
division<br />
DO-1<br />
DO-1<br />
DO-1<br />
Control<br />
mode<br />
P S T<br />
3 - 19
3. SIGNALS AND WIRING<br />
Device<br />
Symbol<br />
Connector<br />
pin<br />
No.<br />
Functions/Applications<br />
Speed reached SA CN1-10 SA turns on when the servo motor speed has nearly reached the preset<br />
speed. When the preset speed is 20r/min or less, SA always turns on.<br />
SA does not turn on even when the servo-on (SON) is turned off or the<br />
servo motor speed by the external force reaches the preset speed while<br />
both the forward rotation start (ST1) and the reverse rotation start (ST2)<br />
are off.<br />
Limiting speed VLC VLC turns ON when the speed reaches the value limited by any of the<br />
internal speed limits 0 to 7 (parameter No. PC05 to PC08, and PC31 to<br />
PC34) in the internal torque control mode.<br />
VLC turns off when servo-on (SON) turns off.<br />
Limiting torque TLC TLC turns ON when the generated torque reaches the value set to the<br />
forward torque limit (parameter No. PA11), the reverse torque limit<br />
(parameter No. PA12) or the internal torque limit 2 (parameter No.<br />
PC14).<br />
Zero speed ZSP ZSP turns on when the servo motor speed is zero speed (50r/min) or<br />
less. Zero speed can be changed using parameter No. PC10.<br />
Example<br />
Zero speed is 50r/min<br />
I/O<br />
division<br />
DO-1<br />
DO-1<br />
DO-1<br />
DO-1<br />
Control<br />
mode<br />
P S T<br />
Forward<br />
rotation<br />
direction<br />
Servo motor<br />
speed<br />
Reverse<br />
rotation<br />
direction<br />
Zero speed<br />
(ZSP)<br />
OFF level<br />
70r/min<br />
ON level<br />
50r/min<br />
0r/min<br />
ON level<br />
50r/min<br />
OFF level<br />
70r/min<br />
ON<br />
OFF<br />
1)<br />
2)<br />
3)<br />
4)<br />
20r/min<br />
(Hysteresis width)<br />
Parameter<br />
No. PC10<br />
Parameter<br />
No. PC10<br />
20r/min<br />
(Hysteresis width)<br />
Electromagnetic<br />
brake interlock<br />
MBR<br />
ZSP turns on 1) when the servo motor is decelerated to 50r/min, and<br />
ZSP turns off 2) when the servo motor is accelerated to 70r/min again.<br />
ZSP turns on 3) when the servo motor is decelerated again to 50r/min,<br />
and turns off 4) when the servo motor speed has reached -70r/min.<br />
The range from the point when the servo motor speed has reached ON<br />
level, and ZSP turns on, to the point when it is accelerated again and<br />
has reached OFF level is called hysteresis width.<br />
Hysteresis width is 20r/min for the <strong>MR</strong>-<strong>JN</strong>-A servo amplifier.<br />
If parameter No. PA04 is set to " 1" and the overload tough drive<br />
function is enabled, the ZSP ON time in the overload tough drive is<br />
delayed. The delay time can be limited by parameter No. PC26.<br />
MBR turns off when the servo is switched off or an alarm occurs.<br />
At an alarm occurrence, MBR turns off regardless of the base circuit<br />
status.<br />
Warning WNG When a warning occurs, WNG turns on.<br />
DO-1<br />
When there is no warning, WNG turns off approximately 1s after poweron.<br />
During tough MTTR<br />
If the instantaneous power failure tough drive function selection is DO-1<br />
drive<br />
enabled, MTTR turns on when the instantaneous tough drive activates.<br />
If parameter No. PD20 is set to " 1 ", MTTR also turns on when the<br />
overload tough drive activates.<br />
During variable<br />
gain selection<br />
CDPS CDPS is on during gain changing. DO-1<br />
DO-1<br />
3 - 20
3. SIGNALS AND WIRING<br />
(2) Input signals<br />
Signal<br />
Forward rotation<br />
pulse train<br />
Reverse rotation<br />
pulse train<br />
Symbol<br />
PP<br />
NP<br />
PG<br />
NG<br />
Connector<br />
pin No.<br />
CN1-23<br />
CN1-25<br />
CN1-22<br />
CN1-24<br />
Functions/Applications<br />
Used to input command pulses.<br />
In the open collector system (max. input frequency 200kpps)<br />
Forward rotation pulse train across PP-DOCOM<br />
Reverse rotation pulse train across NP-DOCOM<br />
In the differential receiver system (max. input frequency 1Mpps)<br />
Forward rotation pulse train across PG-PP<br />
Reverse rotation pulse train across NG-NP<br />
The command input pulse form can be changed using parameter No. PA13.<br />
I/O<br />
division<br />
DI-2<br />
Control<br />
mode<br />
P S T<br />
(Note)<br />
interface. It cannot be used at the source interface.<br />
(3) Output signals<br />
Signal<br />
Encoder Z-phase<br />
pulse<br />
(Open collector)<br />
Encoder A-phase<br />
pulse<br />
(Differential line<br />
driver)<br />
Encoder B-phase<br />
pulse<br />
(Differential line<br />
driver)<br />
Encoder Z-phase<br />
pulse<br />
(Differential line<br />
driver)<br />
Symbol<br />
Note. For the internal speed control mode or the internal torque control mode, PP or NP cannot be assigned to the CN1-23 pin or CN1-<br />
25 pin. When assigning an input device to the CN1-23 pin or CN1-25 pin, supply OPC with 24VDC ( ) and use it at the sink<br />
Connector<br />
pin No.<br />
Functions/Applications<br />
OP CN1-21 Outputs the zero-point signal of the encoder. One pulse is output per<br />
servo motor revolution. OP turns on when the zero-point position is<br />
reached. (Negative logic)<br />
The minimum pulse width is about 400 s. For home position return using<br />
this pulse, set the creep speed to 100r/min. or less.<br />
LA<br />
LAR<br />
LB<br />
LBR<br />
LZ<br />
LZR<br />
CN1-15<br />
CN1-16<br />
CN1-17<br />
CN1-18<br />
CN1-19<br />
CN1-20<br />
Outputs pulses per servo motor revolution set in parameter No. PA15 in<br />
the differential line driver system. In CCW rotation of the servo motor, the<br />
encoder B-phase pulse lags the encoder A-phase pulse by a phase<br />
angle of /2.<br />
The relationships between rotation direction and phase difference of the<br />
A- and B-phase pulses can be changed using parameter No. PC13.<br />
The same signal as OP is output in the differential line driver system.<br />
I/O<br />
division<br />
DO-2<br />
DO-2<br />
DO-2<br />
Control<br />
mode<br />
P S T<br />
(4) Power supply<br />
Signal<br />
Digital I/F power<br />
supply input<br />
Open collector<br />
power input<br />
Digital I/F<br />
common<br />
Symbol<br />
Connector<br />
pin No.<br />
Functions/Applications<br />
DICOM CN1-1 Used to input 24VDC (200mA) for I/O interface. The power supply<br />
capacity changes depending on the number of I/O interface points to be<br />
used.<br />
For a sink interface, connect the positive terminal of the 24VDC external<br />
power supply to DICOM.<br />
For a source interface, connect the negative terminal of the 24VDC<br />
external power supply to DICOM.<br />
OPC CN1-2 When inputting a pulse train in the open collector system, supply this<br />
terminal with the positive ( ) power of 24VDC.<br />
DOCOM CN1-13 Common terminal for input signals such as SON and EM1. Pins are<br />
connected internally.<br />
Separated from LG.<br />
For a sink interface, connect the negative terminal of the 24VDC external<br />
power supply to DICOM.<br />
For a source interface, connect the positive terminal of the 24VDC<br />
external power supply to DICOM.<br />
Control common LG CN1-14 Common terminal for OP.<br />
Shield SD Plate Connect the external conductor of the shield cable.<br />
3 - 21<br />
I/O<br />
division<br />
Control<br />
mode<br />
P S T
3. SIGNALS AND WIRING<br />
3.6 Detailed description of the signals<br />
3.6.1 Position control mode<br />
POINT<br />
For the positioning mode, refer to section 13.2.4.<br />
POINT<br />
The noise immunity can be enhanced by setting parameter No. PA13 to "1<br />
" when the command pulse frequency is 500kpps or less or "2 " when<br />
200kpps or less.<br />
(Refer to section 4.1.11)<br />
(1) Pulse train input<br />
(a) Input pulse waveform selection<br />
Command pulses may be input in any of three different forms, for which positive or negative logic can<br />
be chosen. Set the command input pulse form in parameter No. PA13. Refer to section 4.1.11 for<br />
details.<br />
(b) Connections and waveforms<br />
1) Open collector system<br />
Connect as shown below.<br />
Servo amplifier<br />
24VDC<br />
OPC<br />
(Note)<br />
DOCOM<br />
PP<br />
NP<br />
Approx.<br />
1.2k<br />
Approx.<br />
1.2k<br />
SD<br />
Note. Pulse train input interface is comprised of a photo coupler.<br />
Therefore, it may be any malfunctions since the current is reduced when connect a<br />
resistance to a pulse train signal line.<br />
The explanation assumes that the input waveform has been set to the negative logic and forward and<br />
reverse rotation pulse trains (parameter No. PA13 has been set to " 10 "). Their relationships with<br />
transistor ON/OFF are as follows.<br />
Forward rotation<br />
pulse train<br />
(transistor)<br />
(ON)<br />
(OFF)<br />
(ON)<br />
(OFF) (ON)<br />
(OFF)<br />
Reverse rotation<br />
pulse train<br />
(transistor)<br />
(OFF)<br />
Forward rotation command<br />
(ON) (OFF) (ON) (OFF) (ON)<br />
Reverse rotation command<br />
3 - 22
3. SIGNALS AND WIRING<br />
2) Differential line driver system<br />
Connect as shown below.<br />
PP<br />
PG<br />
Servo amplifier<br />
Approx.<br />
100<br />
(Note)<br />
NP<br />
Approx.<br />
100<br />
NG<br />
SD<br />
Note. Pulse train input interface is comprised of a photo coupler.<br />
Therefore, it may be any malfunctions since the current is reduced when connect a<br />
resistance to a pulse train signal line.<br />
The explanation assumes that the input waveform has been set to the negative logic and forward and<br />
reverse rotation pulse trains (parameter No. PA13 has been set to " 10 ").<br />
The waveforms of PP, PG, NP and NG are based on that of the ground of the differential line driver.<br />
Forward rotation<br />
pulse train<br />
PP<br />
PG<br />
Reverse rotation<br />
pulse train<br />
NP<br />
NG<br />
Forward rotation command<br />
Reverse rotation command<br />
(2) In-position (INP)<br />
INP turns on when the number of droop pulses in the deviation counter falls within the preset in-position<br />
range (parameter No. PA10). INP turns on when low-speed operation is performed with a large value set as<br />
the in-position range.<br />
Servo-on (SON)<br />
Alarm<br />
ON<br />
OFF<br />
Yes<br />
No<br />
Droop pulses<br />
In-position range<br />
In-position (INP)<br />
ON<br />
OFF<br />
3 - 23
3. SIGNALS AND WIRING<br />
(3) Ready (RD)<br />
Servo-on (SON)<br />
ON<br />
OFF<br />
Alarm<br />
Yes<br />
No<br />
Ready (RD)<br />
ON<br />
OFF<br />
100ms or less 10ms or less<br />
10ms or less<br />
(4) Torque limit<br />
CAUTION<br />
If the torque limit is canceled during servo lock, the servo motor may suddenly<br />
rotate according to position deviation in respect to the command position.<br />
(a) Torque limit and torque<br />
By setting parameter No. PA11 (forward torque limit) or parameter No. PA12 (reverse torque limit),<br />
torque is always limited to the maximum value during operation. A relationship between the limit value<br />
and servo motor torque is shown below.<br />
Reverse rotation (CW) direction<br />
Max. torque<br />
Forward rotation (CCW) direction<br />
Torque<br />
100 0 100 [%]<br />
Torque limit value in Torque limit value in<br />
parameter No. PA12 parameter No. PA11<br />
(b) Torque limit value selection<br />
As shown below, the internal torque limit selection (TL1) can be used for selecting the torque limit<br />
between the forward torque limit (parameter No. PA11) or the reverse torque limit (parameter No. PA12)<br />
and the internal torque limit 2 (parameter No. PC14).<br />
However, if the value of parameter No. PA11 or parameter No. PA12 is lower than the limit value<br />
selected by TL1, the value of parameter No. PA11 or parameter No. PA12 is made valid.<br />
(Note) Input<br />
device<br />
Validated torque limit values<br />
Forward rotation (CCW) Reverse rotation (CW)<br />
Limit value status<br />
driving<br />
driving<br />
TL1<br />
Reverse rotation (CW) Forward rotation (CCW)<br />
regeneration<br />
regeneration<br />
0 Parameter No. PA11 Parameter No. PA12<br />
1<br />
Parameter No. PC14<br />
Parameter No. PA11<br />
Parameter No. PA12<br />
Parameter No. PA11<br />
Parameter No. PA12<br />
Parameter No. PC14<br />
Parameter No. PA11<br />
Parameter No. PA12<br />
Parameter No. PC14 Parameter No. PC14<br />
Note. 0: off<br />
1: on<br />
(c) Limiting torque (TLC)<br />
TLC turns on when the servo motor torque reaches the torque limited by the forward torque limit, the<br />
reverse torque limit or the internal torque limit 2.<br />
3 - 24
3. SIGNALS AND WIRING<br />
3.6.2 Internal speed control mode<br />
(1) Internal speed command settings<br />
(a) Speed command and speed<br />
The servo motor operates at the speed set in the parameters.<br />
Up to 8 speeds can be set to the internal speed command.<br />
The following table indicates the rotation direction according to forward rotation start (ST1) and reverse<br />
rotation start (ST2) combination.<br />
(Note 1) Input device<br />
ST2 ST1<br />
(Note 2) Rotation direction<br />
0 0<br />
Stop<br />
(Servo lock)<br />
0 1 Forward rotation (CCW)<br />
1 0 Reverse rotation (CW)<br />
1 1<br />
Stop<br />
(Servo lock)<br />
Note 1. 0: off<br />
1: on<br />
2. If the torque limit is canceled during servo lock, the servo<br />
motor may suddenly rotate according to position deviation<br />
in respect to the command position.<br />
Forward rotation (CCW)<br />
Reverse rotation (CW)<br />
Connect the wirings as follows when operating in forward or reverse rotation with the internal speed<br />
command set to the eighth speed.<br />
Servo amplifier<br />
(Note 1)<br />
ST1<br />
ST2<br />
SP1<br />
SP2<br />
SP3<br />
DOCOM<br />
(Note 2)<br />
24VDC<br />
DICOM<br />
Note 1. For the sink I/O interface. For the source I/O interface, refer to section 3.8.3.<br />
2. Set the input devices by parameter No. PD03 to PD14.<br />
3 - 25
3. SIGNALS AND WIRING<br />
POINT<br />
The servo-on (SON) can be set to turn on automatically by parameter No.<br />
PD01 (input signal automatic ON selection 1).<br />
The forward rotation stroke end (LSP) and the reverse rotation stroke end<br />
(LSN) switches as follows:<br />
Assigned to the external input signals: depends on the value set in<br />
parameter No. PD01.<br />
Not assigned to the external input signals: automatically turns on regardless<br />
of the value set in parameter No. PD01.<br />
If parameter No. PC23 (function selection C-2) is set to " 0 " (initial<br />
value), the servo motor is servo-locked regardless of the deceleration time<br />
constant when the zero speed (ZSP) turns on.<br />
(b) Speed selection 1 (SP1) and speed command value<br />
At the initial condition, the speed command values for the internal speed command 0 and 1 can be<br />
selected using the speed selection 1 (SP1).<br />
(Note) Input device<br />
SP1<br />
Note. 0: off<br />
1: on<br />
Speed command value<br />
0 Internal speed command 0 (parameter No. PC05)<br />
1 Internal speed command 1 (parameter No. PC06)<br />
By making the speed selection 2 (SP2) and the speed selection 3 (SP3) usable by setting of parameter<br />
No.PD03 to PD14, the speed command values for the internal speed commands 0 to 7 can be selected.<br />
(Note) Input device<br />
SP3 SP2 SP1<br />
Speed command value<br />
0 0 0 Internal speed command 0 (parameter No. PC05)<br />
0 0 1 Internal speed command 1 (parameter No. PC06)<br />
0 1 0 Internal speed command 2 (parameter No. PC07)<br />
0 1 1 Internal speed command 3 (parameter No. PC08)<br />
1 0 0 Internal speed command 4 (parameter No. PC31)<br />
1 0 1 Internal speed command 5 (parameter No. PC32)<br />
1 1 0 Internal speed command 6 (parameter No. PC33)<br />
1 1 1 Internal speed command 7 (parameter No. PC34)<br />
Note. 0: off<br />
1: on<br />
The speed may be changed during rotation. In this case, the values set in parameters No. PC01 and<br />
PC02 are used for acceleration/deceleration.<br />
When the speed has been specified under any internal speed command, it does not vary due to the<br />
ambient temperature.<br />
3 - 26
3. SIGNALS AND WIRING<br />
(2) Speed reached (SA)<br />
SA turns on when the servo motor speed has nearly reached the speed set to the internal speed command.<br />
Set speed selection<br />
Internal speed<br />
command 1<br />
Internal speed<br />
command 2<br />
Forward rotation/<br />
reverse rotation<br />
start (ST1/ST2)<br />
ON<br />
OFF<br />
Servo motor speed<br />
Speed reached (SA)<br />
ON<br />
OFF<br />
(3) Torque limit<br />
As in section 3.6.1 (4).<br />
3 - 27
3. SIGNALS AND WIRING<br />
3.6.3 Internal torque control mode<br />
(1) Internal torque command settings<br />
Torque is controlled by the internal torque command set in parameter No. PC12.<br />
If the internal torque command is small, the torque may vary when the actual speed reaches the speed limit<br />
value. In such case, increase the speed limit value.<br />
The following table indicates the torque generation directions determined by the forward rotation selection<br />
(RS1) and the reverse rotation selection (RS2) when the internal torque command (parameter No. PC12) is<br />
used.<br />
(Note) Input device<br />
RS2<br />
RS1<br />
Rotation direction<br />
Internal torque command (parameter No. PC12)<br />
0 0 Torque is not generated.<br />
0.1 to 100.0% 0.0%<br />
Forward rotation (CCW)<br />
0 1<br />
1 0<br />
CCW (reverse rotation in driving<br />
mode/forward rotation in<br />
regenerative mode)<br />
CW (forward rotation in driving<br />
mode/reverse rotation in<br />
regenerative mode)<br />
Torque is not<br />
generated.<br />
Reverse rotation (CW)<br />
1 1 Torque is not generated.<br />
Note. 0: off<br />
1: on<br />
Generally, make connection as shown below.<br />
Servo amplifier<br />
(Note)<br />
24VDC<br />
RS1<br />
RS2<br />
DOCOM<br />
DICOM<br />
Note. For the sink I/O interface. For the source I/O interface, refer to section 3.8.3.<br />
The following shows the effect of the low-pass filter on the internal torque command.<br />
Forward rotation/reverse<br />
ON<br />
rotation selection<br />
OFF<br />
(RS1/RS2)<br />
Torque<br />
Internal torque command (parameter No. PC12)<br />
Internal torque command after filtered<br />
Torque command time constant (parameter No. PC04)<br />
(2) Torque limit<br />
By setting parameter No. PA11 (forward torque limit) or parameter No. PA12 (reverse torque limit), torque<br />
is always limited to the maximum value during operation. A relationship between limit value and servo<br />
motor torque is as in section 3.6.1 (4).<br />
3 - 28
3. SIGNALS AND WIRING<br />
(3) Speed limit<br />
(a) Speed limit value and speed<br />
The speed is limited to the values set in parameters No. PC05 to PC08 and PC31 to PC34 (Internal<br />
speed limit 0 to 7).<br />
When the servo motor speed reaches the speed limit value, the internal torque control may become<br />
instable. Make the set value more than 100r/min greater than the desired speed limit value.<br />
The following table indicates the limit direction according to forward rotation selection (RS1) and reverse<br />
rotation selection (RS2) combination.<br />
(Note) Input device<br />
RS1<br />
RS2<br />
Speed limit direction<br />
1 0 Forward rotation (CCW)<br />
0 1 Reverse rotation (CW)<br />
Forward rotation (CCW)<br />
Note. 0: off<br />
1: on<br />
Reverse rotation (CW)<br />
Connect the wirings as follows when setting the internal speed limit to the eighth speed.<br />
Servo amplifier<br />
(Note 1)<br />
RS1<br />
RS2<br />
SP1<br />
SP2<br />
SP3<br />
DOCOM<br />
(Note 2)<br />
24VDC<br />
DICOM<br />
Note 1. For the sink I/O interface. For the source I/O interface, refer to section 3.8.3.<br />
2. Set the input devices by parameter No. PD03 to PD14.<br />
POINT<br />
The servo-on (SON), the forward rotation stroke end (LSP), and the reverse<br />
rotation stroke end (LSN) can be set to turn on automatically by parameter<br />
No. PD01 (input signal automatic ON selection 1).<br />
3 - 29
3. SIGNALS AND WIRING<br />
(b) Speed selection 1 (SP1) and speed limit values<br />
At the initial condition, the speed limit values for the internal speed limits 0 and 1 can be selected using<br />
the speed selection 1 (SP1).<br />
(Note) Input device<br />
SP1<br />
Note. 0: off<br />
1: on<br />
Speed limit value<br />
0 Internal speed limit 0 (parameter No. PC05)<br />
1 Internal speed limit 1 (parameter No. PC06)<br />
By making the speed selection 2 (SP2) and the speed selection 3 (SP3) usable by setting parameter<br />
No.PD03 to PD14, the speed limit values for the internal speed commands 0 to 7 can be selected.<br />
(Note) Input device<br />
SP3 SP2 SP1<br />
Speed limit value<br />
0 0 0 Internal speed limit 0 (parameter No. PC05)<br />
0 0 1 Internal speed limit 1 (parameter No. PC06)<br />
0 1 0 Internal speed limit 2 (parameter No. PC07)<br />
0 1 1 Internal speed limit 3 (parameter No. PC08)<br />
1 0 0 Internal speed limit 4 (parameter No. PC31)<br />
1 0 1 Internal speed limit 5 (parameter No. PC32)<br />
1 1 0 Internal speed limit 6 (parameter No. PC33)<br />
1 1 1 Internal speed limit 7 (parameter No. PC34)<br />
Note. 0: off<br />
1: on<br />
When the speed is limited by the internal speed limits 0 to 7, the speed does not vary with the ambient<br />
temperature.<br />
(c) Limiting speed (VLC)<br />
VLC turns on when the servo motor speed reaches the speed limited by the internal speed limits 0 to 7.<br />
3 - 30
3. SIGNALS AND WIRING<br />
3.6.4 Position/speed control change mode<br />
Set parameter No. PA01 to "<br />
1 " to switch to the position/internal speed control change mode.<br />
(1) Control change (LOP)<br />
By using the control change (LOP), control mode can be switched between the position control and the<br />
internal speed control modes from an external contact. Relationships between LOP and control modes are<br />
indicated below.<br />
(Note) LOP<br />
Control mode<br />
0 Position control mode<br />
1 Internal speed control mode<br />
Note. 0: off<br />
1: on<br />
The control mode may be switched in the zero speed status. To ensure safety, switch the control mode<br />
after the servo motor has stopped. When the control mode is switched to the internal speed control mode<br />
from the position control mode, droop pulses are cleared.<br />
Even if the speed is decreased to the zero speed or below after switching LOP, the control mode cannot be<br />
switched. A change timing chart is shown below.<br />
Position<br />
control mode<br />
Internal speed<br />
control mode<br />
Position<br />
control mode<br />
Servo motor speed<br />
Zero speed<br />
level<br />
Zero speed (ZSP)<br />
ON<br />
OFF<br />
Control change (LOP)<br />
ON<br />
OFF<br />
(Note)<br />
(Note)<br />
Note. When ZSP is not on, control cannot be changed if LOP is switched on-off.<br />
If ZSP switches on after that, control cannot be changed.<br />
(2) Torque limit in position control mode<br />
As in section 3.6.1 (4).<br />
(3) Speed setting in internal speed control mode<br />
As in section 3.6.2 (1).<br />
(4) Speed reached (SA)<br />
As in section 3.6.2 (2).<br />
3 - 31
3. SIGNALS AND WIRING<br />
3.6.5 Internal speed/internal torque control change mode<br />
Set No. PA01 to "<br />
3 " to switch to the internal speed/internal torque control change mode.<br />
(1) Control change (LOP)<br />
By using the control change (LOP), the control mode can be switched between the internal speed control<br />
and the internal torque control mode from an external contact. Relationships between LOP and control<br />
modes are indicated below.<br />
(Note) LOP<br />
Servo control mode<br />
0 Internal speed control mode<br />
1 Internal torque control mode<br />
Note. 0: off<br />
1: on<br />
The control mode may be changed at any time. A change timing chart is shown below.<br />
Internal speed<br />
control mode<br />
Internal torque<br />
control mode<br />
Internal speed<br />
control mode<br />
Control change (LOP)<br />
ON<br />
OFF<br />
Internal torque command<br />
(parameter No. PC12)<br />
Servo motor speed<br />
(Note)<br />
Note. When the start (ST1, ST2) is switched off as soon as the mode is changed to internal speed control,<br />
the servo motor comes to a stop according to the deceleration time constant.<br />
(2) Speed setting in internal speed control mode<br />
As in section 3.6.2 (1).<br />
(3) Torque limit in internal speed control mode<br />
As in section 3.6.1 (4).<br />
(4) Speed limit in internal torque control mode<br />
As in section 3.6.3 (3).<br />
(5) Internal torque control setting in internal torque control mode<br />
As in section 3.6.3 (1).<br />
(6) Torque limit in internal torque control mode<br />
As in section 3.6.3 (2).<br />
3 - 32
3. SIGNALS AND WIRING<br />
3.6.6 Internal torque/position control change mode<br />
Set parameter No. PA01 to "<br />
5 " to switch to the internal torque/position control change mode.<br />
(1) Control change (LOP)<br />
By using the control change (LOP), the control mode can be switched between the internal torque control<br />
and the position control modes from an external contact. Relationships between LOP and control modes<br />
are indicated below.<br />
(Note) LOP<br />
Note. 0: off<br />
1: on<br />
Servo control mode<br />
0 Internal torque control mode<br />
1 Position control mode<br />
The control mode may be switched in the zero speed status.<br />
To ensure safety, switch the control mode after the servo motor has stopped. When the control mode is<br />
switched to the internal torque control mode from the position control mode, droop pulses are cleared.<br />
Even if the speed is decreased to the zero speed or below after switching LOP, the control mode cannot be<br />
switched. A change timing chart is shown below.<br />
Position<br />
control mode<br />
Internal torque<br />
control mode<br />
Position<br />
control mode<br />
Servo motor speed<br />
Zero speed<br />
level<br />
Internal torque command<br />
(parameter No. PC12)<br />
Zero speed (ZSP)<br />
Control change (LOP)<br />
ON<br />
OFF<br />
ON<br />
OFF<br />
(2) Speed limit in internal torque control mode<br />
As in section 3.6.3 (3).<br />
(3) Internal torque control setting in internal torque control mode<br />
As in section 3.6.3 (1).<br />
(4) Torque limit in internal torque control mode<br />
As in section 3.6.3 (2).<br />
(5) Torque limit in position control mode<br />
As in section 3.6.1 (4).<br />
3 - 33
3. SIGNALS AND WIRING<br />
3.7 Alarm occurrence timing chart<br />
CAUTION<br />
When an alarm has occurred, remove its cause, make sure that the operation<br />
signal is not being input, ensure safety, and reset the alarm before restarting<br />
operation.<br />
As soon as an alarm occurs, turn off servo-on (SON) and power off.<br />
When an alarm occurs in the servo amplifier, the base circuit is shut off and the servo motor is coated to a stop.<br />
Switch off the main circuit power supply in the external sequence. To reset the alarm, switch the control circuit<br />
power supply from off to on, press the " SET " button on the current alarm screen, or turn the reset (RES) from<br />
off to on. However, the alarm cannot be reset unless its cause is removed.<br />
(Note 1)<br />
Main circuit<br />
ON<br />
OFF<br />
ON<br />
OFF<br />
Power off<br />
Power on<br />
Base circuit<br />
Dynamic brake<br />
Valid<br />
Invalid<br />
Brake operation<br />
Brake operation<br />
Servo-on<br />
(SON)<br />
Ready<br />
(RD)<br />
Trouble<br />
(ALM)<br />
Reset<br />
(RES)<br />
ON<br />
OFF<br />
ON<br />
OFF<br />
ON<br />
OFF<br />
ON<br />
OFF<br />
1s<br />
50ms or more 15 to 60ms or more (Note 2)<br />
Alarm occurs.<br />
Remove cause of trouble.<br />
Note 1. Shut off the main circuit power as soon as an alarm occurs.<br />
2. Changes depending on the operating status.<br />
(1) Overcurrent, overload 1 or overload 2<br />
If operation is repeated by switching control circuit power off, then on to reset the overcurrent (32. ),<br />
overload 1 (50. ) or overload 2 (51. ) alarm after its occurrence, without removing its cause, the<br />
servo amplifier and servo motor may become faulty due to temperature rise. Securely remove the<br />
cause of the alarm and also allow about 30 minutes for cooling before resuming operation.<br />
(2) Regenerative alarm<br />
If operation is repeated by switching control circuit power off, then on to reset the regenerative (30.<br />
) alarm after its occurrence, the regenerative resistor will generate heat, resulting in an accident.<br />
(3) Instantaneous power failure<br />
If power failure has occurred in the control circuit power supply, undervoltage (10.1) occurs when the<br />
power is recovered.<br />
(4) In-position control mode<br />
Once an alarm occurs, the servo motor command rejects the command pulse. When resuming the<br />
operation after resetting the alarm, make a home position return.<br />
3 - 34
3. SIGNALS AND WIRING<br />
3.8 Interfaces<br />
3.8.1 Internal connection diagram<br />
(Note<br />
3)<br />
(Note<br />
2, 4)<br />
24VDC<br />
USB<br />
(Note 1)<br />
Servo amplifier<br />
(Note 1)<br />
P S T CP/CL CN1<br />
Approx. 5.6k<br />
CN1 P S T CP/CL<br />
SON SON SON SON 4<br />
9 ALM ALM ALM ALM<br />
RES RES RES MD0 3<br />
EM1 EM1 EM1 EM1 8<br />
10 INP SA INP<br />
LSP ST1 RS2 ST1 6<br />
11 RD RD RD RD<br />
LSN ST2 RS1 ST2 7<br />
CR SP1 SP1 DI0 5<br />
Approx. 5.6k<br />
12 MBR MBR MBR MBR<br />
OPC OPC 2<br />
DICOM 1<br />
<br />
(Note 1)<br />
DOCOM 13<br />
CN1 P S T CP/CL<br />
Approx. 100 Approx. 1.2k<br />
PP DI1 23<br />
PG 22<br />
Approx. 100 Approx. 1.2k<br />
NP DOG 25<br />
NG 24<br />
(Note 1)<br />
P S T CP/CL CN3<br />
VBUS<br />
D-<br />
D+<br />
GND<br />
1<br />
2<br />
3<br />
5<br />
15<br />
16<br />
17<br />
18<br />
19<br />
20<br />
21<br />
14<br />
LA<br />
LAR<br />
LB<br />
LBR<br />
LZ<br />
LZR<br />
OP<br />
LG<br />
(Note 1)<br />
CN2 P S T<br />
7<br />
8<br />
3<br />
4<br />
MD<br />
MDR<br />
<strong>MR</strong><br />
<strong>MR</strong>R<br />
2<br />
LG<br />
CNP1<br />
CP/CL<br />
E<br />
RA<br />
RA<br />
M<br />
(Note<br />
3)<br />
Differential line<br />
driver output<br />
(35mA or less)<br />
Open collector<br />
output<br />
Servo motor<br />
Encoder<br />
Note 1. P: Position control mode, S: Internal speed control mode, T: Internal torque control mode<br />
CP: Positioning mode (Point table method) CL: Positioning mode (Program method)<br />
2. This diagram is for the open collector pulse train input. When inputting the differential line driver pulse train in the position<br />
control mode, make the following connection.<br />
24VDC<br />
DOC 46<br />
OPC 2<br />
DICOM<br />
DOCOM<br />
1<br />
13<br />
PP 23<br />
PG 22<br />
NP 25<br />
NG 24<br />
3. For the sink I/O interface. For the source I/O interface, refer to section 3.8.3.<br />
4. When assigning the input device to the CN1-23 pin or CN1-25 pin in the internal speed control mode, internal torque control<br />
mode, or positioning mode, use it at the sink input interface. It cannot be used at the source input interface. For the positioning<br />
mode, the input devices (DI1, DOG) are assigned to the initial values.<br />
3 - 35
3. SIGNALS AND WIRING<br />
3.8.2 Detailed description of interfaces<br />
This section provides the details of the I/O signal interfaces (refer to the I/O division in the table) given in<br />
section 3.5. Refer to this section and make connection with the external equipment.<br />
(1) Digital input interface DI-1<br />
Give a signal with a relay or open collector transistor. The following figure is for the sink input. Refer to<br />
section 3.8.3 for the source input.<br />
For transistor<br />
Approx. 5mA<br />
SON,<br />
etc.<br />
Servo amplifier<br />
Approx. 5.6k<br />
VCES 1.0V<br />
ICEO<br />
TR<br />
100 A<br />
Switch<br />
24VDC 10%<br />
200mA<br />
DICOM<br />
(2) Digital output interface DO-1<br />
A lamp, relay or photocoupler can be driven. Install a diode (D) for an inductive load, or install an inrush<br />
current suppressing resistor (R) for a lamp load. (Rated current: 40mA or less, maximum current: 50mA or<br />
less, inrush current: 100mA or less) A maximum of 2.6V voltage drop occurs in the servo amplifier.<br />
The following figure is for the sink output. Refer to section 3.8.3 for the source output.<br />
Servo amplifier<br />
ALM,<br />
etc.<br />
Load<br />
If polarity of diode is<br />
reversed, servo<br />
amplifier will fail.<br />
DOCOM<br />
(Note) 24VDC 10%<br />
200mA<br />
Note. If the voltage drop (maximum of 2.6V) interferes with the relay operation, apply high<br />
voltage (up to 26.4V) from external source.<br />
3 - 36
3. SIGNALS AND WIRING<br />
(3) Pulse train input interface DI-2<br />
Give a pulse train signal in the open collector system or differential line driver system.<br />
(a) Open collector system<br />
1) Interface<br />
Servo amplifier<br />
24VDC<br />
OPC<br />
Max. input pulse<br />
frequency 200kpps<br />
(Note)<br />
2m or less<br />
PP, NP<br />
Approx. 1.2k<br />
DOCOM<br />
SD<br />
Note. Pulse train input interface is comprised of a photo coupler.<br />
Therefore, it may be any malfunctions since the current is reduced when connect a<br />
resistance to a pulse train signal line.<br />
2) Input pulse condition<br />
PP<br />
0.9<br />
0.1<br />
tc<br />
tHL<br />
tLH=tHL2 s<br />
tF>3 s<br />
tc<br />
tLH<br />
tF<br />
NP<br />
(b) Differential line driver system<br />
1) Interface<br />
Servo amplifier<br />
10m or less<br />
PP(NP)<br />
Max. input pulse<br />
frequency 1Mpps<br />
(Note)<br />
Approx. 100<br />
PG(NG)<br />
Am26LS31 or equivalent<br />
VOH: 2.5V<br />
VOL: 0.5V<br />
SD<br />
Note. Pulse train input interface is comprised of a photo coupler.<br />
Therefore, it may be any malfunctions since the current is reduced when connect a<br />
resistance to a pulse train signal line.<br />
3 - 37
3. SIGNALS AND WIRING<br />
2) Input pulse condition<br />
PP PG<br />
0.9<br />
0.1<br />
tc<br />
tHL<br />
tLH=tHL0.35 s<br />
tF>3 s<br />
tc<br />
tLH<br />
tF<br />
NP NG<br />
(4) Encoder output pulse DO-2<br />
(a) Open collector system<br />
Interface<br />
Max. output current: 35mA<br />
5 to 24VDC<br />
Servo amplifier<br />
Servo amplifier<br />
OP<br />
LG<br />
OP<br />
LG<br />
Photocoupler<br />
SD<br />
SD<br />
(b) Differential line driver system<br />
1) Interface<br />
Max. output current: 35mA<br />
Servo amplifier<br />
Servo amplifier<br />
LA<br />
(LB, LZ)<br />
Am26LS32 or equivalent<br />
LA<br />
(LB, LZ)<br />
100<br />
150<br />
LAR<br />
(LBR, LZR)<br />
LG<br />
SD<br />
LAR<br />
(LBR, LZR)<br />
SD<br />
High-speed<br />
photocoupler<br />
3 - 38
3. SIGNALS AND WIRING<br />
2) Output pulse<br />
Servo motor CCW rotation<br />
LA<br />
LAR<br />
LB<br />
T<br />
Time cycle (T) is determined by the settings<br />
of parameter No.PA15 and PC13.<br />
LBR<br />
/2<br />
LZ<br />
LZR<br />
OP<br />
400 s or more<br />
3.8.3 Source I/O interfaces<br />
In this servo amplifier, source type I/O interfaces can be used. In this case, all DI-1 input signals and DO-1<br />
output signals are of source type. Perform wiring according to the following interfaces.<br />
(1) Digital input interface DI-1<br />
SON,<br />
etc.<br />
Servo amplifier<br />
Approx. 5.6k<br />
Switch<br />
DICOM<br />
Approx. 5mA<br />
VCES 1.0V<br />
ICEO<br />
100 A<br />
24VDC 10%<br />
200mA<br />
(2) Digital output interface DO-1<br />
A maximum of 2.6V voltage drop occurs in the servo amplifier.<br />
Servo amplifier<br />
ALM,<br />
etc.<br />
Load<br />
If polarity of diode is<br />
reversed, servo<br />
amplifier will fail.<br />
DOCOM<br />
(Note) 24VDC 10%<br />
200mA<br />
Note. If the voltage drop (maximum of 2.6V) interferes with the relay operation, apply high voltage<br />
(up to 26.4V) from external source.<br />
3 - 39
3. SIGNALS AND WIRING<br />
3.9 Treatment of cable shield external conductor<br />
In the case of the CN1 and CN2 connectors, securely connect the shielded external conductor of the cable to<br />
the ground plate as shown in this section and fix it to the connector shell.<br />
External conductor<br />
Sheath<br />
Strip the sheath.<br />
Core<br />
Sheath<br />
External conductor<br />
Pull back the external conductor to cover the sheath.<br />
(1) For CN1 connector (3M connector)<br />
Screw<br />
Cable<br />
Screw<br />
Ground plate<br />
(2) For CN2 connector (3M or Molex connector)<br />
Cable<br />
Ground plate<br />
Screw<br />
3 - 40
3. SIGNALS AND WIRING<br />
3.10 Connection of servo amplifier and servo motor<br />
CAUTION<br />
During power-on, do not open or close the motor power line. Otherwise, an<br />
abnormal operation or malfunction may occur.<br />
3.10.1 Connection instructions<br />
WARNING<br />
Insulate the connections of the power supply terminals to prevent an electric<br />
shock.<br />
Connect the wires to the correct phase terminals (U, V, W) of the servo amplifier<br />
and servo motor. Not doing so may cause unexpected operation.<br />
CAUTION<br />
Do not connect AC power supply directly to the servo motor. Otherwise, a fault<br />
may occur.<br />
Do not use the 24VDC interface and control circuit power supplies for the<br />
electromagnetic brake. Always use the power supply designed exclusively for the<br />
electromagnetic brake. Otherwise, a fault may occur.<br />
POINT<br />
Refer to section 11.1 for the selection of the encoder cable.<br />
This section indicates the connection of the servo motor power supply (U, V, W). Use of the optional cable or<br />
the connector set is recommended for connection between the servo amplifier and the servo motor. Refer to<br />
section 11.1 for details of the options.<br />
For grounding, connect the earth cable of the servo motor to the protective earth (PE) terminal of the servo<br />
amplifier and connect the ground cable of the servo amplifier to the earth via the protective earth of the control<br />
box. Do not connect them directly to the protective earth of the control panel.<br />
Control box<br />
Servo<br />
amplifier<br />
Servo motor<br />
PE terminal<br />
3 - 41
3. SIGNALS AND WIRING<br />
3.10.2 Power supply cable wiring diagrams<br />
(1) <strong>HF</strong>-<strong>KN</strong> series <strong>HF</strong>-<strong>KP</strong> <strong>G1</strong>/<strong>G5</strong>/<strong>G7</strong> series servo motor<br />
(a) When cable length is 10m or less<br />
Servo amplifier<br />
CNP1<br />
U<br />
V<br />
W<br />
10m or less<br />
<strong>MR</strong>-PWS1CBL M-A1-L<br />
<strong>MR</strong>-PWS1CBL M-A2-L<br />
<strong>MR</strong>-PWS1CBL M-A1-H<br />
<strong>MR</strong>-PWS1CBL M-A2-H<br />
AWG 19(red)<br />
AWG 19(white)<br />
AWG 19(black)<br />
AWG 19(green/yellow)<br />
Servo motor<br />
U<br />
V<br />
W<br />
M<br />
(b) When cable length exceeds 10m<br />
When the cable length exceeds 10m, fabricate an extension cable as shown below. In this case, the<br />
motor power supply cable should be within 2m long.<br />
Refer to section 11.5 for the wire used for the extension cable.<br />
Servo amplifier<br />
CNP1<br />
U<br />
V<br />
W<br />
50m or less<br />
Extension cable<br />
2m or less<br />
<strong>MR</strong>-PWS1CBL2M-A1-L<br />
<strong>MR</strong>-PWS1CBL2M-A2-L<br />
<strong>MR</strong>-PWS1CBL2M-A1-H<br />
<strong>MR</strong>-PWS1CBL2M-A2-H<br />
<strong>MR</strong>-PWS2CBL03M-A1-L<br />
<strong>MR</strong>-PWS2CBL03M-A2-L<br />
AWG 19(red)<br />
AWG 19(white)<br />
AWG 19(black)<br />
AWG 19(green/yellow)<br />
Servo motor<br />
U<br />
V<br />
W<br />
M<br />
(Note)<br />
a) Relay connector for<br />
extension cable<br />
(Note)<br />
b) Relay connector for motor<br />
power supply cable<br />
Note. Use of the following connectors is recommended when ingress protection (IP65) is necessary.<br />
Relay connector<br />
a) Relay connector for<br />
extension cable<br />
b) Relay connector for<br />
motor power supply<br />
cable<br />
Description<br />
Connector: RM15WTPZ-4P(71)<br />
Cord clamp: RM15WTP-CP(5)(71)<br />
(Hirose Electric)<br />
Numeral changes depending on the cable OD.<br />
Connector: RM15WTJA-4S(71)<br />
Cord clamp: RM15WTP-CP(8)(71)<br />
(Hirose Electric)<br />
Numeral changes depending on the cable OD.<br />
IP rating<br />
IP65<br />
IP65<br />
3 - 42
3. SIGNALS AND WIRING<br />
3.11 Servo motor with an electromagnetic brake<br />
3.11.1 Safety precautions<br />
Configure an electromagnetic brake operation circuit which interlocks with an<br />
external emergency stop switch.<br />
Contacts must be open when the<br />
servo-on, the trouble (ALM) or the<br />
electromagnetic brake interlock<br />
(MBR) signal turns off.<br />
Circuit must be opened<br />
with the emergency stop<br />
switch.<br />
Servo motor<br />
SON<br />
RA<br />
CAUTION<br />
B<br />
Electromagnetic brake<br />
24VDC<br />
The electromagnetic brake is provided for holding purpose and must not be used<br />
for ordinary braking.<br />
Before performing the operation, be sure to confirm that the electromagnetic brake<br />
operates properly.<br />
Do not use the 24VDC interface and control circuit power supplies for the<br />
electromagnetic brake. Always use the power supply designed exclusively for the<br />
electromagnetic brake. Otherwise, a fault may occur.<br />
POINT<br />
Refer to chapter 12 for specifications such as the power supply capacity and<br />
operation delay time of the electromagnetic brake.<br />
Switch off the servo-on (SON) after the servo motor has stopped.<br />
Refer to (3) in section 12.1.3 for the selection of the surge absorbers for the<br />
electromagnetic brake.<br />
Note the following when the servo motor with an electromagnetic brake is used.<br />
1) Always assign the electromagnetic brake interlock (MBR) to CN1-12 pin by parameter No. PD18.<br />
(MBR is assigned to CN1-12 pin by default.)<br />
2) The electromagnetic brake operates when the power (24VDC) turns off.<br />
3) While the reset (RES) is on, the base circuit is shut off. When using the servo motor with a vertical<br />
shaft, use the electromagnetic brake interlock (MBR).<br />
3.11.2 Setting<br />
(1) Set " 05 " to parameter No. PD18 to assign the electromagnetic brake interlock (MBR) to CN1-12 pin.<br />
(2) Using parameter No. PC09 (electromagnetic brake sequence output), set a time delay (Tb) at servo-off<br />
from electromagnetic brake operation to base circuit shut-off as in the timing chart shown in section<br />
3.11.3 (1).<br />
3 - 43
3. SIGNALS AND WIRING<br />
3.11.3 Timing charts<br />
(1) Servo-on (SON) command (from controller) ON/OFF<br />
Tb [ms] after the servo-on (SON) signal is switched off, the servo lock is released and the servo motor<br />
coasts. If the electromagnetic brake is made valid in the servo lock status, the brake life may be shorter.<br />
Therefore, when using the electromagnetic brake in a vertical lift application or the like, set Tb to about the<br />
same as the electromagnetic brake operation delay time to prevent a drop.<br />
Servo motor speed<br />
0 r/min<br />
Coasting<br />
Base circuit<br />
ON<br />
OFF<br />
Electromagnetic<br />
(Note 1) ON<br />
brake interlock<br />
(MBR)<br />
OFF<br />
(95ms)<br />
(95ms)<br />
Tb<br />
Electromagnetic brake<br />
sequence output<br />
(parameter No. PC09)<br />
Electromagnetic<br />
brake operation<br />
delay time<br />
Servo-on (SON)<br />
ON<br />
OFF<br />
(Note 3)<br />
Position command<br />
(Note 4)<br />
Electromagnetic<br />
brake<br />
0 r/min<br />
Release<br />
Activate<br />
Release delay time and external relay (Note 2)<br />
Note 1. ON: Electromagnetic brake is not activated.<br />
OFF: Electromagnetic brake is activated.<br />
2. Electromagnetic brake is released after delaying for the release delay time of electromagnetic brake and operation time of<br />
external circuit relay. For the release delay time of electromagnetic brake, refer to section 12.5.3, 12.6.3.<br />
3. Give a position command after the electromagnetic brake is released.<br />
4. For the position control mode.<br />
(2) Forced stop (EM1) ON/OFF<br />
Servo motor speed<br />
Deceleration starts after the forced stop (EM1) turns OFF. (Note 2)<br />
Dynamic brake<br />
Dynamic brake<br />
Electromagnetic brake<br />
Electromagnetic brake release<br />
Electromagnetic brake<br />
Base circuit<br />
ON<br />
OFF<br />
Electromagnetic (Note 1) ON<br />
brake interlock (MBR)<br />
OFF<br />
(10ms)<br />
Tb<br />
Electromagnetic brake sequence<br />
output (parameter No. PC09)<br />
Electromagnetic brake<br />
operation delay time<br />
(210ms)<br />
(210ms)<br />
Forced stop (EM1)<br />
Invalid (ON)<br />
Valid (OFF)<br />
Note 1. ON: Electromagnetic brake is not activated.<br />
OFF: Electromagnetic brake is activated.<br />
2. The operation differs from the timing chart of <strong>MR</strong>-J3- A servo amplifier.<br />
3 - 44
3. SIGNALS AND WIRING<br />
(3) Alarm occurrence<br />
Servo motor speed<br />
(10ms)<br />
ON<br />
Base circuit (Note 1)<br />
OFF<br />
Electromagnetic (Note 2) ON<br />
brake interlock (MBR) OFF<br />
Dynamic brake<br />
Dynamic brake<br />
Electromagnetic brake<br />
Electromagnetic brake<br />
Electromagnetic brake<br />
operation delay time<br />
Trouble (ALM)<br />
No (ON)<br />
Yes (OFF)<br />
Note 1. Electromagnetic brake sequence output (parameter No. PC09) is invalid.<br />
2. ON: Electromagnetic brake is not activated.<br />
OFF: Electromagnetic brake is activated.<br />
(4) Both main and control circuit power supplies off<br />
Servo motor speed<br />
(10ms)<br />
Dynamic brake<br />
Dynamic brake<br />
Electromagnetic brake<br />
Electromagnetic brake<br />
Base circuit<br />
(Note 1) 10 to 60ms<br />
ON<br />
OFF<br />
Electromagnetic<br />
brake interlock<br />
(MBR)<br />
Trouble (ALM)<br />
Main circuit<br />
Control circuit<br />
power<br />
supply<br />
(Note 2) ON<br />
OFF<br />
No (ON)<br />
Yes (OFF)<br />
ON<br />
OFF<br />
Electromagnetic brake<br />
operation delay time<br />
Note 1. Changes with the operating status.<br />
2. ON: Electromagnetic brake is not activated.<br />
OFF: Electromagnetic brake is activated.<br />
3 - 45
3. SIGNALS AND WIRING<br />
(5) Only main circuit power supply off (control circuit power supply remains on)<br />
Servo motor speed<br />
(10ms)<br />
Deceleration starts after the trouble (ALM) turns OFF. (Note 2)<br />
Dynamic brake<br />
Dynamic brake<br />
Electromagnetic brake<br />
Electromagnetic brake<br />
Base circuit<br />
ON<br />
OFF<br />
Electromagnetic brake sequence output<br />
(parameter No. PC09)<br />
Electromagnetic<br />
brake interlock<br />
(MBR)<br />
Trouble (ALM)<br />
Main circuit power<br />
supply<br />
(Note 1) ON<br />
OFF<br />
No (ON)<br />
Yes (OFF)<br />
ON<br />
OFF<br />
10 to 60ms<br />
Electromagnetic brake<br />
operation delay time<br />
Note 1. ON: Electromagnetic brake is not activated.<br />
OFF: Electromagnetic brake is activated.<br />
2. The operation differs from the timing chart of <strong>MR</strong>-J3- A servo amplifier.<br />
3.11.4 Wiring diagrams (<strong>HF</strong>-<strong>KN</strong> series <strong>HF</strong>-<strong>KP</strong> <strong>G1</strong>/<strong>G5</strong>/<strong>G7</strong> series servo motor)<br />
(1) When cable length is 10m or less<br />
24VDC power<br />
supply for<br />
electromagnetic<br />
brake<br />
(Note 3)<br />
Electromagnetic<br />
brake interlock<br />
(MBR)<br />
Trouble<br />
(ALM)<br />
10m or less<br />
(Note 5)<br />
RA<br />
(Note 1)<br />
<strong>MR</strong>-BKS1CBL M-A1-L<br />
<strong>MR</strong>-BKS1CBL M-A2-L<br />
<strong>MR</strong>-BKS1CBL M-A1-H<br />
<strong>MR</strong>-BKS1CBL M-A2-H<br />
U<br />
AWG20<br />
AWG20<br />
Servo motor<br />
(Note 2)<br />
B1<br />
B<br />
B2<br />
Note 1. Connect a surge absorber as close to the servo motor as possible.<br />
2. There is no polarity in electromagnetic brake terminals (B1 and B2).<br />
3. When using a servo motor with an electromagnetic brake, always assign the electromagnetic brake<br />
interlock (MBR) to CN1-12 pin by parameter No. PD18.<br />
4. Do not use the 24VDC interface power supply for the electromagnetic brake.<br />
5. Switch off the circuit interlocking with the emergency stop switch.<br />
When fabricating the motor brake cable <strong>MR</strong>-BKS1CBL M-H, refer to section 11.1.4.<br />
3 - 46
3. SIGNALS AND WIRING<br />
(2) When cable length exceeds 10m<br />
When the cable length exceeds 10m, fabricate an extension cable as shown below on the customer side. In<br />
this case, the motor brake cable should be within 2m long.<br />
Refer to section 11.5 for the wire used for the extension cable.<br />
(Note 5)<br />
24VDC power supply for<br />
electromagnetic brake<br />
50m or less<br />
Extension cable<br />
(To be fabricated)<br />
(Note 4)<br />
Electromagnetic<br />
brake interlock Trouble<br />
(MBR) (ALM)<br />
(Note 6)<br />
RA<br />
(Note 1)<br />
U<br />
2m or less<br />
<strong>MR</strong>-BKS1CBL2M-A1-L<br />
<strong>MR</strong>-BKS1CBL2M-A2-L<br />
<strong>MR</strong>-BKS1CBL2M-A1-H<br />
<strong>MR</strong>-BKS1CBL2M-A2-H<br />
<strong>MR</strong>-BKS2CBL03M-A1-L Servo motor<br />
<strong>MR</strong>-BKS2CBL03M-A2-L<br />
(Note 3)<br />
AWG20<br />
B1<br />
AWG20<br />
B<br />
B2<br />
(Note 2)<br />
a) Relay connector for<br />
extension cable<br />
(Note 2)<br />
b) Relay connector for motor<br />
brake cable<br />
Note 1. Connect a surge absorber as close to the servo motor as possible.<br />
2. Use of the following connectors is recommended when ingress protection (IP65) is necessary.<br />
Relay connector<br />
Description<br />
IP rating<br />
a) Relay connector for<br />
extension cable<br />
CM10-CR2P-<br />
(DDK)<br />
Wire size: S, M, L<br />
IP65<br />
b) Relay connector for<br />
motor brake cable<br />
CM10-SP2S-<br />
(DDK)<br />
Wire size: S, M, L<br />
IP65<br />
3. There is no polarity in electromagnetic brake terminals (B1 and B2).<br />
4. When using a servo motor with an electromagnetic brake, always assign the electromagnetic brake interlock (MBR)<br />
to CN1-12 pin by parameter No. PD18.<br />
5. Do not use the 24VDC interface power supply for the electromagnetic brake.<br />
6. Switch off the circuit interlocking with the emergency stop switch.<br />
3 - 47
3. SIGNALS AND WIRING<br />
3.12 Grounding<br />
WARNING<br />
Ground the servo amplifier and servo motor securely.<br />
To prevent an electric shock, always connect the protective earth (PE) terminal<br />
(terminal marked ) of the servo amplifier with the protective earth (PE) of the<br />
control box.<br />
The servo amplifier switches the power transistor on-off to supply power to the servo motor. Depending on the<br />
wiring and ground cable routing, the servo amplifier may be affected by the switching noise (due to di/dt and<br />
dv/dt) of the transistor. To prevent such a fault, refer to the following diagram and always ground.<br />
To conform to the EMC Directive, refer to the EMC Installation Guidelines (IB(NA)67310).<br />
Control box<br />
(Note)<br />
Main circuit<br />
power supply<br />
NFB<br />
Line filter<br />
(Note)<br />
Control<br />
circuit<br />
power<br />
supply<br />
MC<br />
Circuit<br />
protector<br />
Servo amplifier<br />
L1<br />
L2<br />
+24V U<br />
0V<br />
V<br />
W<br />
CN2<br />
Servo motor<br />
Encoder<br />
U<br />
V M<br />
W<br />
CN1<br />
Programmable<br />
logic controller<br />
Ensure to connect it to PE<br />
terminal of the servo amplifier.<br />
Do not connect it directly to<br />
the protective earth of<br />
the control panel.<br />
Protective earth (PE)<br />
Outer<br />
box<br />
Note. For the specification of power supply, refer to section 1.3.<br />
3 - 48
4. PARAMETERS<br />
4. PARAMETERS<br />
CAUTION<br />
Never adjust or change the parameter values extremely as it will make operation<br />
instable.<br />
If a fixed value is indicated in a digit of a parameter, do not change the fixed value.<br />
POINT<br />
For the positioning mode, refer to section 13.7.<br />
Positioning mode is supported by servo amplifier with software version B0 or<br />
later.<br />
In this servo amplifier, the parameters are classified into the following groups on a function basis.<br />
Parameter group<br />
Basic setting parameters<br />
(No. PA )<br />
Gain/filter parameters<br />
(No. PB )<br />
Extension setting parameters<br />
(No. PC )<br />
I/O setting parameters<br />
(No. PD )<br />
Positioning setting parameters<br />
(No. PE )<br />
Main description<br />
Make basic setting with these parameters when using this servo amplifier in the position control<br />
mode.<br />
Use these parameters when making gain adjustment manually.<br />
Use these parameters mainly when using this servo amplifier in the internal speed control mode or<br />
in the internal torque control mode.<br />
Use these parameters when changing the I/O signals of the servo amplifier.<br />
Use these parameters only for the positioning mode.<br />
(Refer to section 13.7.5.)<br />
When using this servo in the position control mode, mainly setting the basic setting parameters (No. PA )<br />
allows the setting of the basic parameters at the time of introduction.<br />
4 - 1
4. PARAMETERS<br />
4.1 Basic setting parameters (No. PA )<br />
POINT<br />
For any parameter whose symbol is preceded by *, set the parameter value and<br />
switch power off once, then switch it on again to make that parameter setting<br />
valid.<br />
Never change parameters for manufacturer setting.<br />
4.1.1 Parameter list<br />
No. Symbol Name<br />
Initial<br />
value<br />
Unit<br />
PA01 *STY Control mode 000h<br />
PA02 *REG Regenerative option 000h<br />
PA03 For manufacturer setting 000h<br />
PA04 *AOP1 Tough drive function selection 000h<br />
PA05 *FBP Number of command input pulses per revolution<br />
100 100<br />
pulse/rev<br />
PA06 CMX<br />
Electronic gear numerator<br />
(Command input pulse multiplying factor numerator)<br />
1<br />
PA07 CDV<br />
Electronic gear denominator<br />
(Command input pulse multiplying factor denominator)<br />
1<br />
PA08 ATU Auto tuning mode 001h<br />
PA09 RSP Auto tuning response 6<br />
100 Refer to<br />
PA10 INP In-position range<br />
section<br />
4.1.9.<br />
PA11 TLP Forward torque limit 100 %<br />
PA12 TLN Reverse torque limit 100 %<br />
PA13 *PLSS Command input pulse form 000h<br />
PA14 *POL Rotation direction selection 0<br />
PA15 *ENR Encoder output pulses 4000 pulse/rev<br />
PA16 *ENR2 Encoder output pulse electronic gear 0<br />
PA17 For manufacturer setting 000h<br />
PA18<br />
000h<br />
PA19 *BLK Parameter write inhibit 00Eh<br />
Control mode<br />
Position Internal Internal<br />
speed torque<br />
4 - 2
4. PARAMETERS<br />
4.1.2 Parameter write inhibit<br />
Parameter<br />
No. Symbol Name<br />
Initial<br />
value<br />
Setting<br />
range<br />
Unit<br />
Control mode<br />
Position Internal<br />
speed<br />
Internal<br />
torque<br />
PA19 *BLK Parameter write inhibit 00Eh<br />
Refer to<br />
the text.<br />
POINT<br />
This parameter is made valid when power is switched off, then on after setting.<br />
In the factory setting, this servo amplifier allows to change all the setting parameters. With the setting of<br />
parameter No. PA19, writing can be disabled to prevent accidental changes.<br />
The following table indicates the parameters which are enabled for reference and writing by the setting of<br />
parameter No. PA19. Operation can be performed for the parameters marked .<br />
Parameter No. PA19<br />
setting<br />
Setting<br />
operation<br />
Basic setting<br />
parameters<br />
No. PA<br />
Gain/Filter<br />
parameters<br />
No. PB<br />
Extension setting<br />
parameters<br />
No. PC<br />
I/O setting<br />
parameters<br />
No. PD<br />
Positioning<br />
setting<br />
parameters<br />
No. PE<br />
000h<br />
Reference<br />
Writing<br />
00Ah<br />
Reference<br />
Writing<br />
Parameter No.<br />
PA19 only<br />
Parameter No.<br />
PA19 only<br />
00Bh<br />
Reference<br />
Writing<br />
00Ch<br />
Reference<br />
Writing<br />
00Eh<br />
(initial value)<br />
Reference<br />
Writing<br />
Reference<br />
10Bh<br />
Writing<br />
Parameter No.<br />
PA19 only<br />
Reference<br />
10Ch<br />
Writing<br />
Parameter No.<br />
PA19 only<br />
Reference<br />
10Eh<br />
Writing<br />
Parameter No.<br />
PA19 only<br />
4 - 3
4. PARAMETERS<br />
4.1.3 Selection of control mode<br />
Parameter<br />
Initial<br />
No. Symbol Name<br />
value<br />
PA01 *STY Control mode 000h<br />
Setting<br />
range<br />
Refer to<br />
the text.<br />
Unit<br />
Control mode<br />
Position Internal<br />
speed<br />
Internal<br />
torque<br />
POINT<br />
This parameter is made valid when power is switched off, then on after setting.<br />
Select the control mode of the servo amplifier, and valid or invalid the one-touch tuning function.<br />
Parameter No. PA01<br />
0<br />
Selection of control mode<br />
0: Position control mode<br />
1: Position control mode and internal speed control mo de<br />
2: Internal speed control mode<br />
3: Internal speed control mode and internal torque control mode<br />
4: Internal torque control mode<br />
5: Internal torque control mode and position contr ol mode<br />
6: Positioning mode (point table method)<br />
7: Positioning mode (program method)<br />
One-touch tuning function selection<br />
0: Valid<br />
1: Invalid<br />
If "1" is set, the one-touch tuning is ignored.<br />
4.1.4 Selection of regenerative option<br />
Parameter<br />
Initial<br />
No. Symbol Name<br />
value<br />
PA02 *REG Regenerative option 000h<br />
Setting<br />
range<br />
Refer to<br />
the text.<br />
Unit<br />
Control mode<br />
Position Internal<br />
speed<br />
Internal<br />
torque<br />
POINT<br />
This parameter is made valid when power is switched off, then on after setting.<br />
Incorrect setting may cause the regenerative option to burn.<br />
If the regenerative option selected is not for use with the servo amplifier,<br />
parameter error (37.2) occurs.<br />
Set this parameter when using the regenerative option.<br />
Parameter No. PA02<br />
0<br />
Selection of regenerative option<br />
00: Regenerative option is not used<br />
For servo amplifier of 100W, regenerative resistor is not used.<br />
For servo amplifier of 200 to 400W, built-in regenerative resistor is used.<br />
02: <strong>MR</strong>-RB032<br />
03: <strong>MR</strong>-RB12<br />
4 - 4
4. PARAMETERS<br />
4.1.5 Selection of the tough drive function<br />
Parameter<br />
No. Symbol Name<br />
PA04 *AOP1 Tough drive function selection<br />
Initial<br />
value<br />
000h<br />
Setting<br />
range<br />
Refer to<br />
the text.<br />
Unit<br />
Control mode<br />
Position Internal<br />
speed<br />
Internal<br />
torque<br />
POINT<br />
This parameter is made valid when power is switched off, then on after setting.<br />
The alarm may not be avoided in the tough drive depending on the conditions of<br />
the power supply and the load change.<br />
The during tough drive (MTTR) can be assigned to the CN1-9 pin to CN1-12 pin<br />
connector using parameters No. PD15 to PD18.<br />
For details on tough drive function, refer to section 7.1.<br />
By selecting the tough drive function, the operation is continued not to stop the machine in such situation when<br />
normally an alarm is activated.<br />
Parameter No. PA04<br />
Overload tough drive function selection<br />
Set the tough drive function for overload.<br />
The overload tough drive function is valid only in the position control mode<br />
or positioning mode.<br />
Setting<br />
0<br />
1<br />
Overload tough drive function<br />
Invalid<br />
Valid<br />
The details on the overload tough drive function can be set in parameter No.<br />
PC26 (detailed setting of overload tough drive).<br />
Vibration tough drive function selection<br />
Set the function for vibration suppression.<br />
Setting<br />
0<br />
1<br />
Vibration tough drive function<br />
Invalid<br />
Valid<br />
The details on the vibration tough drive function can be set in parameter No.<br />
PC27 (detailed setting of vibration tough drive).<br />
Instantaneous power failure tough drive function selection<br />
Set the tough drive fun ction for instantaneous power failure of the main<br />
circuit power.<br />
Setting<br />
0<br />
1<br />
Instantaneous power failure tough drive function<br />
Invalid<br />
Valid<br />
The details on the instantaneous power failure tough drive function can be<br />
set in parameter No. PC28 (detailed setting of instantaneous power failure<br />
tough drive).<br />
4 - 5
4. PARAMETERS<br />
4.1.6 Number of command input pulses per servo motor revolution<br />
Parameter<br />
Initial<br />
No. Symbol Name<br />
value<br />
PA05 *FBP Number of command input pulses per revolution 100<br />
Setting<br />
range<br />
0 100<br />
to 500<br />
Unit<br />
100<br />
pulse/rev<br />
Control mode<br />
Position Internal<br />
speed<br />
Internal<br />
torque<br />
POINT<br />
This parameter is made valid when power is switched off, then on after setting.<br />
Unlike <strong>MR</strong>-J3- A servo amplifier, the electronic gear is always valid regardless<br />
of the settings of parameter No. PA05.<br />
Set the number of command input pulses necessary to rotate the servo motor one turn.<br />
When "100 (10000[pulse/rev])" (initial value) is set to parameter No. PA05, the servo motor rotates one turn by<br />
inputting 10000 pulses of the command pulse to the servo amplifier. When "0" is set to parameter No. PA05,<br />
the servo motor rotates one turn by inputting the command pulse of servo motor resolution to the servo<br />
amplifier.<br />
Parameter No. PA05 setting<br />
Description<br />
0 Servo motor resolution [pulse/rev]<br />
100 to 500<br />
Number of command input pulses necessary to rotate the servo motor one turn<br />
[ 100pulse/rev]<br />
Command<br />
input pulses<br />
Parameter No. PA05<br />
FBP conversion<br />
(Note)<br />
Parameter No. PA06 , PA07<br />
CMX<br />
CDV<br />
Deviation<br />
counter<br />
Servo motor<br />
M<br />
Value converted to the number of command<br />
input pulses per revolution (FBP)<br />
Encoder<br />
Note. This process converts the number of pulses required to rotate the servo motor one turn to the value set in parameter No. PA05.<br />
4 - 6
4. PARAMETERS<br />
4.1.7 Electronic gear<br />
Parameter<br />
No. Symbol Name<br />
PA06 CMX<br />
Electronic gear numerator<br />
(Command pulse multiplying factor numerator)<br />
PA07 CDV<br />
Electronic gear denominator<br />
(Command pulse multiplying factor denominator)<br />
Initial<br />
value<br />
1<br />
1<br />
Setting<br />
range<br />
1 to<br />
65535<br />
1 to<br />
65535<br />
Unit<br />
Control mode<br />
Position Internal<br />
speed<br />
Internal<br />
torque<br />
CAUTION<br />
Incorrect setting may cause unexpectedly fast rotation, resulting injury.<br />
POINT<br />
The electronic gear setting range is 1<br />
50 < CMX<br />
CDV < 500.<br />
If the set value is outside this range, noise may be generated during<br />
acceleration/deceleration, or operation may not be performed at the preset<br />
speed and/or acceleration/deceleration time constants.<br />
Always set the electronic gear with servo off state to prevent unexpected<br />
operation due to improper setting.<br />
(1) Concept of electronic gear<br />
The machine can be moved at any multiplication factor to input pulses.<br />
Command<br />
input pulses<br />
Parameter No. PA05<br />
FBP conversion<br />
(Note)<br />
Parameter No. PA06 , PA07<br />
CMX<br />
CDV<br />
Deviation<br />
counter<br />
Servo motor<br />
M<br />
Value converted to the number of command<br />
input pulses per revolution (FBP)<br />
Encoder<br />
Note. This process converts the number of pulses required to rotate the servo motor one turn to the value set in parameter No. PA05.<br />
CMX<br />
CDV<br />
=<br />
parameter No.PA06<br />
parameter No.PA07<br />
The following setting examples are used to explain how to calculate the electronic gear.<br />
POINT<br />
The following specification symbols are required to calculate the electronic gear<br />
Pb : Ballscrew lead [mm]<br />
1/n : Reduction ratio<br />
0 : Travel per command pulse [mm/pulse]<br />
S : Travel per servo motor revolution [mm/rev]<br />
0 : Angle per pulse [ /pulse]<br />
: Angle per revolution [ /rev]<br />
4 - 7
4. PARAMETERS<br />
(a) For motion in increments of 10μm per pulse<br />
Machine specifications<br />
Ballscrew lead Pb 10 [mm]<br />
Reduction ratio: 1/n = Z1/Z2 = 1/2<br />
Z1: Number of gear cogs on servo motor side<br />
Z2: Number of gear cogs on load side<br />
Command input pulses per revolution: 10000<br />
[pulse/rev]<br />
1/n<br />
1/n=Z1/Z2=1/2<br />
Z2<br />
Z1<br />
Pb=10[mm]<br />
Number of command input pulses<br />
per revolution of servo motor:<br />
10000 [pulse/rev]<br />
CMX<br />
CDV = Δ 0 · 10000<br />
ΔS = Δ 0 ·<br />
Hence, set 20 to CMX and 1 to CDV.<br />
(b) Conveyor setting example<br />
For rotation in increments of 0.01 per pulse<br />
10000<br />
1/n · Pb = 10 10-3 · 10000<br />
1/2 · 10 = 20<br />
1<br />
Machine specifications<br />
Table : 360 /rev<br />
Reduction ratio : 1/n=P1/P2=625/12544<br />
P1: Pulley diameter on servo motor side<br />
P2: Pulley diameter on load side<br />
Command input pulses per revolution: 36000<br />
[pulse/rev]<br />
Number of command input pulses<br />
per revolution of servo motor:<br />
36000 [pulse/rev]<br />
Timing belt: 625/12544<br />
Table<br />
CMX<br />
CDV<br />
= Δθ0 ·<br />
36000<br />
Δθ<br />
= 0.01 ·<br />
36000<br />
625/12544 · 360 = 12544<br />
625<br />
............................................ (4.1)<br />
Hence, set 12544 to CMX and 625 to CDV.<br />
POINT<br />
In the linear or rotary operation, setting the following values in the number of<br />
command input pulses per revolution (parameter No. PA05) simplifies the setting<br />
values of the electronic gear (parameter No. PA06, PA07).<br />
Linear operation: 100 (10000[pulse/rev])<br />
Rotary operation: 360 (36000[pulse/rev])<br />
4 - 8
4. PARAMETERS<br />
(2) Setting for use of QD75<br />
The QD75 also has the following electronic gear parameters. Normally, the servo amplifier side electronic<br />
gear must also be set due to the restriction on the command pulse frequency (differential 1Mpulse/s, open<br />
collector 200kpulse/s).<br />
AP: Number of pulses per motor revolution<br />
AL: Moving distance per motor revolution<br />
AM: Unit scale factor<br />
QD75<br />
Servo amplifier<br />
Command<br />
value<br />
Control<br />
unit<br />
AP<br />
AL AM<br />
Electronic gear<br />
Command<br />
pulse<br />
CMX<br />
CDV<br />
Electronic gear<br />
Deviation<br />
counter<br />
Feedback pulse<br />
Servo motor<br />
For example, if 100 (1000[pulse/rev]) is set to parameter No. PA05, the pulse command required to rotate<br />
the servo motor is as follows.<br />
Servo motor speed [r/min]<br />
Required pulse command<br />
2000 10000 2000/60 333333 [pulse/s]<br />
3000 10000 3000/60 500000 [pulse/s]<br />
Use the electronic gear of the servo amplifier to rotate the servo motor under the maximum output pulse<br />
command of the QD75.<br />
To rotate the servo motor at 3000r/min in the open collector system (200kpulse/s), set the electronic gear<br />
as follows.<br />
f · CMX<br />
CDV = N0<br />
60 · 10000<br />
f : Input pulse frequency [pulse/s]<br />
N0 : Servo motor speed [r/min]<br />
200 · 10 3 · CMX<br />
CDV = 3000<br />
60<br />
CMX<br />
CDV = 3000<br />
60<br />
·<br />
· 10000<br />
10000 3000 · 10000<br />
200 · 103 =<br />
60 · 200000 = 15<br />
6<br />
4 - 9
4. PARAMETERS<br />
The following table indicates the electronic gear setting example (ballscrew lead = 10mm) when the QD75<br />
is used in this way.<br />
Servo amplifier<br />
AD75P<br />
Rated servo motor speed 3000r/min 2000r/min<br />
Open Differential Open Differential<br />
Input system<br />
collector line driver collector line driver<br />
Max. input pulse frequency [pulse/s] 200k 1M 200k 1M<br />
Feedback pulse/revolution [pulse/rev] 10000 10000<br />
Electronic gear (CMX/CDV) 15/6 1/2 5/3 1/3<br />
Command pulse frequency [kpulse/s] (Note) 200k 1M 200k 1M<br />
Number of pulses per servo motor revolution as<br />
viewed from QD75[pulse/rev]<br />
Electronic gear<br />
Note. Command pulse frequency at rated speed<br />
Minimum command unit<br />
1pulse<br />
Minimum command unit<br />
0.1 m<br />
4000 20000 6000 30000<br />
AP 1 1 1 1<br />
AL 1 1 1 1<br />
AM 1 1 1 1<br />
AP 4000 20000 6000 30000<br />
AL 1000.0[ m] 1000.0[ m] 1000.0[ m] 1000.0[ m]<br />
AM 10 10 10 10<br />
POINT<br />
In addition to the setting method using the electronic gear given here, the<br />
number of pulses per servo motor revolution can also be set directly using<br />
parameter No. PA05. In this case, parameter No. PA05 is the "Number of pulses<br />
per servo motor revolution as viewed from QD75".<br />
4 - 10
4. PARAMETERS<br />
4.1.8 Auto tuning<br />
Parameter<br />
Initial Setting<br />
No. Symbol Name<br />
value range<br />
PA08 ATU Auto tuning mode 001h<br />
Refer to<br />
the text.<br />
PA09 RSP Auto tuning response 6 1 to 16<br />
Unit<br />
Control mode<br />
Position Internal<br />
speed<br />
Internal<br />
torque<br />
POINT<br />
When executing one-touch tuning, the setting value of parameter No. PA08 is<br />
changed to " 0", and the setting value of parameter No. PA09 is<br />
automatically set. (Refer to section 6.1.)<br />
Make gain adjustment using auto tuning. Refer to section 6.3 for details.<br />
(1) Auto tuning mode (parameter No. PA08)<br />
Select the tuning mode.<br />
Parameter No. PA08<br />
0 0<br />
Tuning mode setting<br />
Setting<br />
Tuning mode<br />
Estimated load to motor<br />
inertia moment ratio<br />
Automatically set parameter<br />
No. (Note)<br />
<strong>Manual</strong>ly set parameter<br />
No. (Note)<br />
0<br />
1<br />
2-gain adjustment<br />
mode<br />
Auto tuning mode 1<br />
Valid<br />
Valid<br />
PB06, PB08, PB09, PB10<br />
PB06, PB07, PB08, PB09,<br />
PB10<br />
PA09, PB07<br />
PA09<br />
3<br />
<strong>Manual</strong> mode<br />
Invalid<br />
PB06, PB07, PB08, PB09,<br />
PB10<br />
Note. The parameters have the following names.<br />
Parameter No.<br />
PA09<br />
PB06<br />
PB07<br />
PB08<br />
PB09<br />
PB10<br />
Name<br />
Auto tuning response<br />
Load to motor inertia moment ratio<br />
Model loop gain<br />
Position loop gain<br />
Speed loop gain<br />
Speed integral compensation<br />
4 - 11
4. PARAMETERS<br />
(2) Auto tuning response (parameter No. PA09)<br />
If the machine hunts or generates large gear sound, decrease the set value. To improve performance, e.g.<br />
shorten the settling time, increase the set value.<br />
Setting<br />
Response<br />
1 Low response<br />
2<br />
3<br />
4<br />
5<br />
6<br />
7<br />
8<br />
9<br />
10<br />
11<br />
12<br />
13<br />
14<br />
15<br />
16 High response<br />
4.1.9 In-position range<br />
Parameter<br />
No. Symbol Name<br />
Initial value Setting range Unit<br />
PA10 INP In-position range 100 0 to 65535 (Note)<br />
Control mode<br />
Position Internal<br />
speed<br />
Internal<br />
torque<br />
Set the range, where in-position (INP) is output, in the command unit before calculation of the electronic gear.<br />
When " 1" is set to the parameter No. PC24, the range can be changed to the servo motor encoder pulse<br />
unit.<br />
Servo motor droop pulse<br />
Command pulse<br />
Droop pulse<br />
Command pulse<br />
In-position range [pulse]<br />
In-position (INP)<br />
ON<br />
OFF<br />
Note. The unit varies depending on the each control mode.<br />
Control mode<br />
Parameter No. PC24 set value<br />
0 1<br />
Position, internal speed,<br />
internal torque<br />
pulse<br />
pulse<br />
Positioning μm pulse<br />
4 - 12
4. PARAMETERS<br />
4.1.10 Torque limit<br />
Parameter<br />
Initial Setting<br />
No. Symbol Name<br />
value range<br />
Unit<br />
PA11 TLP Forward torque limit 100 0 to 100 %<br />
PA12 TLN Reverse torque limit 100 0 to 100 %<br />
Control mode<br />
Position Internal<br />
speed<br />
Internal<br />
torque<br />
The torque generated by the servo motor can be limited. Refer to section 3.6.1 (4) and use these parameters.<br />
(1) Forward torque limit (parameter No. PA11)<br />
Set this parameter on the assumption that the maximum torque is 100 [%]. Set this parameter when limiting<br />
the torque of the servo motor in the CCW driving mode or CW regeneration mode. Set this parameter to "0"<br />
to generate no torque.<br />
(2) Reverse torque limit (parameter No. PA12)<br />
Set this parameter on the assumption that the maximum torque is 100 [%]. Set this parameter when limiting<br />
the torque of the servo motor in the CW driving mode or CCW regeneration mode. Set this parameter to "0"<br />
to generate no torque.<br />
4 - 13
4. PARAMETERS<br />
4.1.11 Selection of command input pulse form<br />
Parameter<br />
Initial<br />
No. Symbol Name<br />
value<br />
PA13 *PLSS Command input pulse form 000h<br />
Setting<br />
range<br />
Refer to<br />
the text.<br />
Unit<br />
Control mode<br />
Position Internal<br />
speed<br />
Internal<br />
torque<br />
POINT<br />
This parameter is made valid when power is switched off, then on after setting.<br />
The noise immunity can be enhanced by setting parameter No. PA13 to "1 "<br />
when the command pulse frequency is 500kpps or less or "2 " when<br />
200kpps or less.<br />
Select the input form of the pulse train input signal. Command pulses may be input in any of three different<br />
forms, for which positive or negative logic can be chosen.<br />
Arrow or in the table indicates the timing of importing a pulse train.<br />
A- and B-phase pulse trains are imported after being multiplied by 4.<br />
Parameter No. PA13<br />
Selection of command input pulse form<br />
Setting<br />
00<br />
Pulse train form<br />
Forward rotation<br />
pulse train<br />
Reverse rotation<br />
pulse train<br />
Forward rotation command Reverse rotation command<br />
PP<br />
NP<br />
01<br />
02<br />
Positive logic<br />
Signed pulse<br />
train<br />
A-phase pulse<br />
train<br />
B-phase pulse<br />
train<br />
PP<br />
NP<br />
PP<br />
NP<br />
H<br />
L<br />
10<br />
Forward rotation<br />
pulse train<br />
Reverse rotation<br />
pulse train<br />
PP<br />
NP<br />
11<br />
Negative logic<br />
Signed pulse<br />
train<br />
PP<br />
NP<br />
L<br />
H<br />
12<br />
A-phase pulse<br />
train<br />
B-phase pulse<br />
train<br />
PP<br />
NP<br />
Pulse train input filter selection<br />
Setting Command pulse frequency<br />
0 1Mpps or less<br />
1 500kpps or less<br />
2 200kpps or less<br />
4 - 14
4. PARAMETERS<br />
4.1.12 Selection of servo motor rotation direction<br />
Parameter<br />
Initial Setting<br />
No. Symbol Name<br />
value range<br />
PA14 *POL Rotation direction selection 0 0 1<br />
Unit<br />
Control mode<br />
Position Internal<br />
speed<br />
Internal<br />
torque<br />
POINT<br />
This parameter is made valid when power is switched off, then on after setting.<br />
Select servo motor rotation direction relative to the input pulse train.<br />
Servo motor rotation direction<br />
Parameter No. PA14<br />
When forward rotation pulse is When reverse rotation pulse is<br />
setting<br />
input<br />
input<br />
0 CCW CW<br />
1 CW CCW<br />
Forward rotation (CCW)<br />
Reverse rotation (CW)<br />
4 - 15
4. PARAMETERS<br />
4.1.13 Encoder output pulses<br />
Parameter<br />
Initial<br />
No. Symbol Name<br />
value<br />
PA15 *ENR Encoder output pulses 4000<br />
PA16 *ENR2 Encoder output pulse electronic gear 0<br />
Setting<br />
range<br />
1 to<br />
65535<br />
0 to<br />
65535<br />
Unit<br />
pulse/<br />
rev<br />
Control mode<br />
Position Internal<br />
speed<br />
Internal<br />
torque<br />
POINT<br />
This parameter is made valid when power is switched off, then on after setting.<br />
Used to set the encoder pulses (A-phase, B-phase) output by the servo amplifier.<br />
Set the value 4 times greater than the A-phase or B-phase pulses.<br />
You can use parameter No. PC13 to choose the output pulse setting or output division ratio setting.<br />
The number of A/B-phase pulses actually output is 1/4 of the preset number of pulses.<br />
The maximum output frequency is 4.6Mpps (after multiplied by 4). Use this parameter within this range.<br />
(1) For output pulse designation<br />
Set parameter No. PC13 to " 0 " (initial value).<br />
Set the number of pulses per servo motor revolution.<br />
Output pulse = set value [pulses/rev]<br />
For instance, when parameter No. PA15 is set to "5600", the A/B-phase pulses actually output are as<br />
indicated below.<br />
A-phase/B-phase output pulses = 5600<br />
4<br />
= 1400[pulse]<br />
Servo motor<br />
M<br />
Encoder<br />
Parameter No. PA15<br />
Feedback pulses FBP<br />
conversion<br />
A-phase/B-phase<br />
output pulses<br />
4 - 16
4. PARAMETERS<br />
(2) For output division ratio setting<br />
Set parameter No. PC13 to " 1 ".<br />
The number of pulses per servo motor revolution is divided by the set value.<br />
Output pulse=<br />
Resolution per servo motor revolution<br />
Setting valve<br />
[pulse/rev]<br />
For instance, when parameter No. PA15 is set to "8", the A/B-phase pulses actually output are as indicated<br />
below.<br />
A/B-phase output pulses = 131072<br />
8<br />
· 1<br />
4<br />
= 4096 [pulse]<br />
Servo motor<br />
M<br />
Set division ratio by parameter No. PA15.<br />
Encoder<br />
Feedback pulses<br />
1<br />
ENR<br />
A-phase/B-phase<br />
output pulses<br />
(3) When outputting pulse same as command pulses<br />
Set parameter No. PC13 to " 2 ". The feedback pulses from the encoder can be output after being<br />
converted to the same value as the command pulse.<br />
Command<br />
input pulses<br />
A-phase/B-phase<br />
output pulses<br />
FBP conversion<br />
Both equivalent.<br />
CMX<br />
CDV<br />
Pulse conversion<br />
Electronic gear<br />
Deviation counter<br />
Feedback pulses<br />
Servo motor<br />
M<br />
Encoder<br />
4 - 17
4. PARAMETERS<br />
(4) When multiplying A-phase/B-phase output pulses by the value of the electronic gear<br />
Set parameter No. PC13 to " 3 ".<br />
The value resulted from multiplying the number of pulses per servo motor revolution by the value of the<br />
electronic gear becomes the output pulse.<br />
(a) Set the electric gear numerator in the A-phase/B-phase output pulses to parameter No. PA15.<br />
(b) Set the electric gear denominator in the A-phase/B-phase output pulses to parameter No. PA16. Setting<br />
0 to parameter No. PA16 is recognized as 1.<br />
(Example) When using the <strong>HF</strong>-<strong>KN</strong> servo motor series<br />
When parameter No. PA15 is set to "5600" and PA16 to "4096", the A/B-phase pulses<br />
actually outputted are as follows.<br />
A-phase/B-phase output pulses =<br />
Resolution per servo motor revolution ·<br />
= 131072 · 5600<br />
4096 · 1<br />
4<br />
= 44800 [pulse]<br />
Servo motor<br />
parameter No.15<br />
parameter No.16 · 1<br />
4<br />
M<br />
Electronic gear<br />
(parameters No. PA15, PA16)<br />
Encoder<br />
Feedback pulses<br />
ENR<br />
ENR2<br />
A-phase/B-phase<br />
output pulses<br />
POINT<br />
Resolution per servo motor revolution depends on the servo motor as follows.<br />
<strong>HF</strong>-<strong>KN</strong> series servo motor: 131072pulse/rev<br />
<strong>HF</strong>-<strong>KP</strong> <strong>G1</strong>/<strong>G5</strong>/<strong>G7</strong> servo motor: 262144pulse/rev<br />
4 - 18
4. PARAMETERS<br />
4.2 Gain/filter parameters (No. PB )<br />
POINT<br />
For any parameter whose symbol is preceded by *, set the parameter value and<br />
switch power off once, then switch it on again to make that parameter setting<br />
valid.<br />
Set any parameter with [Applied] written in the name column when using an<br />
advanced function.<br />
4.2.1 Parameter list<br />
No. Symbol<br />
Name<br />
Initial<br />
value<br />
PB01 FILT Adaptive tuning mode (Adaptive filter ) 000h<br />
PB02 VRFT<br />
PB03 PST<br />
Vibration suppression control tuning mode<br />
(Advanced vibration suppression control)<br />
Position command acceleration/deceleration time constant (Position<br />
smoothing)<br />
000h<br />
Unit<br />
3 ms<br />
PB04 FFC Feed forward gain [Applied] 0 %<br />
PB05 For manufacturer setting 500<br />
PB06 GD2 Load to motor inertia moment ratio 7.0 Multiplier<br />
PB07 P<strong>G1</strong> Model loop gain 24 rad/s<br />
PB08 PG2 Position loop gain 37 rad/s<br />
PB09 VG2 Speed loop gain 823 rad/s<br />
PB10 VIC Speed integral compensation 33.7 ms<br />
PB11 VDC Speed differential compensation [Applied] 980<br />
PB12 OVA Overshoot amount compensation [Applied] 0 %<br />
PB13 NH1 Machine resonance suppression filter 1 4500 Hz<br />
PB14 NHQ1 Notch shape selection 1 000h<br />
PB15 NH2 Machine resonance suppression filter 2 4500 Hz<br />
PB16 NHQ2 Notch shape selection 2 000h<br />
PB17<br />
Automatic setting parameter<br />
PB18 LPF Low-pass filter setting [Applied] 3141 rad/s<br />
PB19 VRF1 Vibration suppression control vibration frequency setting [Applied] 100.0 Hz<br />
PB20 VRF2 Vibration suppression control resonance frequency setting [Applied] 100.0 Hz<br />
PB21 For manufacturer setting 0<br />
PB22 0<br />
PB23 VFBF Low-pass filter selection [Applied] 000h<br />
PB24 For manufacturer setting 000h<br />
PB25 *BOP1 Function selection B-1 [Applied] 000h<br />
PB26 *CDP Gain changing selection [Applied] 000h<br />
PB27 CDL Gain changing condition [Applied] 10<br />
Refer to<br />
section<br />
4.2.2.<br />
PB28 CDT Gain changing time constant [Applied] 1 ms<br />
PB29 GD2B Gain changing load to motor inertia moment ratio [Applied] 7.0 Multiplier<br />
PB30 PG2B Gain changing position loop gain [Applied] 37 rad/s<br />
PB31 VG2B Gain changing speed loop gain [Applied] 823 rad/s<br />
PB32 VICB Gain changing speed integral compensation [Applied] 33.7 ms<br />
PB33 VRF1B<br />
Gain changing vibration suppression control vibration frequency<br />
setting<br />
[Applied] 100.0 Hz<br />
Control mode<br />
Position Internal Internal<br />
speed torque<br />
4 - 19
4. PARAMETERS<br />
No. Symbol<br />
PB34 VRF2B<br />
Name<br />
Gain changing vibration suppression control resonance frequency<br />
setting<br />
Initial<br />
value<br />
Unit<br />
[Applied] 100.0 Hz<br />
PB35 For manufacturer setting 0<br />
PB36 0<br />
PB37 100<br />
PB38 NH3 Machine resonance suppression filter 3 4500 Hz<br />
PB39 NHQ3 Notch shape selection 3 000h<br />
PB40 For manufacturer setting 111h<br />
PB41 20<br />
PB42<br />
PB43<br />
PB44<br />
PB45<br />
PB46<br />
PB47<br />
PB48<br />
PB49<br />
PB50<br />
000h<br />
000h<br />
000h<br />
000h<br />
000h<br />
000h<br />
000h<br />
000h<br />
000h<br />
Control mode<br />
Position Internal Internal<br />
speed torque<br />
4 - 20
4. PARAMETERS<br />
4.2.2 Detail list<br />
No. Symbol<br />
Name and function<br />
Initial<br />
value<br />
Setting<br />
range<br />
Unit<br />
Control mode<br />
Position Internal Internal<br />
speed torque<br />
PB01 FILT Adaptive tuning mode (Adaptive filter )<br />
POINT<br />
When executing one-touch tuning, the adaptive<br />
tuning mode starts automatically.<br />
When the adaptive filter is set during the one-touch<br />
tuning, this parameter is changed to " 2"<br />
automatically.<br />
000h<br />
Refer to<br />
name<br />
and<br />
function<br />
column.<br />
Select if the adaptive tuning is used or not. Setting this parameter to "<br />
2" (manual mode) enables users to manually adjust the machine<br />
resonance suppression filter 1 (parameter No. PB13) and notch shape<br />
selection 1 (parameter No. PB14).<br />
When this parameter is set to " 0", the initial values are set for<br />
both the machine resonance suppression filter 1 and the notch shape<br />
selection 1.<br />
Response of<br />
mechanical system<br />
Machine resonance point<br />
Frequency<br />
Notch depth<br />
Notch frequency<br />
Frequency<br />
0 0<br />
Selection of adaptive tuning mode<br />
Setting Adaptive tuning mode<br />
Parameter that can be set<br />
manually<br />
0 Filter OFF (Note)<br />
2 <strong>Manual</strong> mode<br />
Parameter No. PB13<br />
Parameter No. PB14<br />
Note. Parameter No. PB13 and PB14 are fixed to the initial values.<br />
4 - 21
4. PARAMETERS<br />
No. Symbol<br />
Name and function<br />
Initial<br />
value<br />
Setting<br />
range<br />
Unit<br />
Control mode<br />
Position Internal Internal<br />
speed torque<br />
PB02 VRFT Vibration suppression control tuning mode (Advanced vibration<br />
suppression control)<br />
POINT<br />
When using the vibration suppression control<br />
tuning mode (advanced vibration suppression<br />
control) and the one-touch tuning simultaneously,<br />
refer to section 7.2.4 (3).<br />
000h<br />
Refer to<br />
name<br />
and<br />
function<br />
column.<br />
The vibration suppression is valid when parameter No. PA08 (auto<br />
tuning mode) is set to " 3". When PA08 is set to" 1", vibration<br />
suppression is always invalid.<br />
Select the setting method for vibration suppression control tuning.<br />
Setting this parameter to " 1" (vibration suppression control tuning<br />
mode) automatically changes the vibration frequency for vibration<br />
suppression control setting (parameter No. PB19) and resonance<br />
frequency for vibration suppression control (parameter No. PB20)<br />
after positioning operation is performed the predetermined number of<br />
times.<br />
Droop pulse<br />
Command<br />
Machine end<br />
position<br />
Automatic<br />
adjustment<br />
Droop pulse<br />
Command<br />
Machine end<br />
position<br />
0 0<br />
Vibration suppression control tuning mode<br />
Setting<br />
Vibration suppression Automatically set<br />
control tuning mode<br />
parameter<br />
0<br />
Vibration suppression<br />
control OFF<br />
(Note)<br />
Vibration suppression<br />
1<br />
control tuning mode Parameter No. PB19<br />
(Advanced vibration Parameter No. PB20<br />
suppression control)<br />
2 <strong>Manual</strong> mode<br />
Note. Parameter No. PB19 and PB20 are fixed to the initial values.<br />
When this parameter is set to " 1", the tuning is completed after<br />
positioning is performed the predetermined number of times for the<br />
predetermined period of time, and the setting changes to " 2".<br />
When the vibration suppression control tuning is not necessary, the<br />
setting changes to " 0". When this parameter is set to " 0",<br />
the initial values are set to the vibration suppression control vibration<br />
frequency setting and vibration suppression control resonance<br />
frequency setting. However, this does not occur when the servo off.<br />
4 - 22
4. PARAMETERS<br />
No. Symbol<br />
Name and function<br />
Initial<br />
value<br />
Setting<br />
range<br />
Unit<br />
Control mode<br />
Position Internal Internal<br />
speed torque<br />
PB03 PST<br />
Position command acceleration/deceleration time constant<br />
3 0<br />
ms<br />
(Position smoothing)<br />
to<br />
Used to set the time constant of a low-pass filter in response to the<br />
20000<br />
position command.<br />
When the one-touch tuning is executed, this parameter is automatically<br />
set. (Refer to section 6.1.)<br />
The control system of either the primary delay or the linear<br />
acceleration/deceleration can be selected by parameter No. PB25.<br />
When the linear acceleration/deceleration is selected, the setting<br />
range is 0 to 10ms. Setting of longer than 10ms is recognized as<br />
10ms.<br />
POINT<br />
When the linear acceleration/deceleration is<br />
selected, do not execute control switching. Doing<br />
so will cause the servo motor to make a sudden<br />
stop during the control switching.<br />
(Example) When a command is given from a synchronous encoder,<br />
synchronous operation can be started smoothly if started<br />
during line operation.<br />
Synchronous<br />
encoder<br />
Start<br />
Servo amplifier<br />
Servo motor<br />
Without time<br />
constant setting<br />
Servo motor<br />
speed<br />
Start<br />
ON<br />
OFF<br />
With time<br />
constant setting<br />
PB04 FFC<br />
Feed forward gain [Applied]<br />
0 0<br />
%<br />
Set the feed forward gain. When the setting is 100%, the droop pulses<br />
to<br />
during operation at constant speed are nearly zero. However, sudden<br />
100<br />
acceleration/deceleration will increase the overshoot. As a guideline,<br />
when the feed forward gain setting is 100%, set 1s or more as the<br />
acceleration/deceleration time constant up to the rated speed.<br />
PB05<br />
For manufacturer setting<br />
500<br />
Do not change this value by any means.<br />
PB06 GD2<br />
Load to motor inertia moment ratio<br />
7.0 0.0<br />
Multiplier<br />
Used to set the load to motor inertia moment ratio.<br />
to<br />
When auto tuning mode 1 and 2-gain adjustment mode are selected,<br />
300.0<br />
this parameter is automatically set. (Refer to section 6.2.) In this case,<br />
it varies between 0.0 and 100.0.<br />
4 - 23
4. PARAMETERS<br />
No. Symbol<br />
Name and function<br />
Initial<br />
value<br />
Setting<br />
range<br />
Unit<br />
Control mode<br />
Position Internal Internal<br />
speed torque<br />
PB07 P<strong>G1</strong><br />
Model loop gain<br />
Set the response gain up to the target position.<br />
As the gain is increased, the track ability in response to the command<br />
is improved.<br />
When executing the one-touch tuning, the result of the one-touch<br />
tuning is automatically set in this parameter.<br />
When auto turning mode 1 is selected, the result of auto turning is<br />
automatically set in this parameter.<br />
24 1<br />
to<br />
2000<br />
rad/s<br />
PB08 PG2<br />
Position loop gain<br />
Used to set the gain of the position loop.<br />
Set this parameter to increase the position response level to load<br />
disturbance. Higher setting increases the response level but is liable<br />
to generate vibration and/or noise.<br />
When auto tuning mode 1 and 2-gain adjustment mode are set, the<br />
result of auto tuning is automatically set in this parameter.<br />
37 1<br />
to<br />
1000<br />
rad/s<br />
PB09 VG2<br />
Speed loop gain<br />
Set the gain of the speed loop.<br />
Set this parameter when vibration occurs on machines of low rigidity<br />
or large backlash.<br />
Higher setting increases the response level but is liable to generate<br />
vibration and/or noise.<br />
When auto tuning mode 1 and 2-gain adjustment mode are set, the<br />
result of auto tuning is automatically set in this parameter.<br />
823 20<br />
to<br />
50000<br />
rad/s<br />
PB10 VIC Speed integral compensation<br />
Used to set the integral time constant of the speed loop.<br />
Lower setting increases the response level but is liable to generate<br />
vibration and/or noise.<br />
When auto tuning mode 1 and 2-gain adjustment mode are set, the<br />
result of auto tuning is automatically set in this parameter.<br />
33.7 0.1<br />
to<br />
1000.0<br />
ms<br />
PB11 VDC<br />
Speed differential compensation [Applied]<br />
Used to set the differential compensation.<br />
The set value is made valid when the proportion control (PC) is<br />
switched on.<br />
980 0<br />
to<br />
1000<br />
PB12 OVA<br />
Overshoot amount compensation [Applied]<br />
Set the suppression ratio of the overshoot suppression control.<br />
Set the suppression ratio for the friction torque in %.<br />
Executing one-touch tuning automatically changes this parameter.<br />
0 0<br />
to<br />
100<br />
%<br />
POINT<br />
This parameter can reduce the overshoot caused<br />
by a device having large friction.<br />
PB13 NH1 Machine resonance suppression filter 1<br />
Set the notch frequency of the machine resonance suppression filter 1.<br />
Executing one-touch tuning automatically changes this parameter.<br />
When parameter No. PB01 is set to " 0", the setting of this<br />
parameter is ignored.<br />
4500 30<br />
to<br />
4500<br />
Hz<br />
4 - 24
4. PARAMETERS<br />
No. Symbol<br />
Name and function<br />
Initial<br />
value<br />
Setting<br />
range<br />
Unit<br />
Control mode<br />
Position Internal Internal<br />
speed torque<br />
PB14 NHQ1 Notch shape selection 1<br />
Used to select the machine resonance suppression filter 1.<br />
0<br />
Notch depth selection<br />
Setting Depth Gain<br />
0 Deep 40dB<br />
1 14dB<br />
to<br />
2 8dB<br />
3 Shallow 4dB<br />
000h<br />
Refer to<br />
name<br />
and<br />
function<br />
column.<br />
Notch width selection<br />
Setting Width<br />
0 Standard 2<br />
1 3<br />
to<br />
2 4<br />
3 Wide 5<br />
Executing one-touch tuning automatically changes this parameter.<br />
When parameter No. PB01 is set to " 0", the setting of this<br />
parameter is ignored.<br />
PB15 NH2 Machine resonance suppression filter 2<br />
Set the notch frequency of the machine resonance suppression filter<br />
2.<br />
Set parameter No. PB16 (notch shape selection 2) to " 1" to<br />
make this parameter valid.<br />
Executing one-touch tuning automatically changes this parameter.<br />
PB16 NHQ2 Notch shape selection 2<br />
Select the shape of the machine resonance suppression filter 2.<br />
Machine resonance suppression filter 2 selection<br />
0: Invalid<br />
1: Valid<br />
Notch depth selection<br />
Setting Depth Gain<br />
0 Deep 40dB<br />
1 14dB<br />
to<br />
2 8dB<br />
3 Shallow 4dB<br />
Notch width selection<br />
Setting Width<br />
0 Standard 2<br />
1 3<br />
to<br />
2 4<br />
3 Wide 5<br />
4500 30<br />
to<br />
4500<br />
000h Refer to<br />
name<br />
and<br />
function<br />
column.<br />
Hz<br />
PB17<br />
Executing one-touch tuning automatically changes this parameter.<br />
Automatic setting parameter<br />
The value of this parameter is set according to a set value of<br />
parameter No. PB06 (load to motor inertia moment ratio).<br />
4 - 25
4. PARAMETERS<br />
No. Symbol<br />
Name and function<br />
PB18 LPF Low-pass filter setting [Applied]<br />
Set the low-pass filter.<br />
Setting parameter No. PB23 (low-pass filter selection) to " 0 "<br />
automatically changes this parameter.<br />
When parameter No. PB23 is set to " 1 ", this parameter can be<br />
set manually.<br />
PB19 VRF1 Vibration suppression control vibration frequency setting [Applied]<br />
Set the vibration frequency for vibration suppression control to<br />
suppress low-frequency machine vibration, such as enclosure<br />
vibration.<br />
Setting parameter No. PB02 (vibration suppression control tuning<br />
mode) to " 1" automatically changes this parameter. When<br />
parameter No. PB02 is set to " 2", this parameter can be set<br />
manually.<br />
PB20 VRF2 Vibration suppression control resonance frequency setting [Applied]<br />
Set the resonance frequency for vibration suppression control to<br />
suppress low-frequency machine vibration, such as enclosure<br />
vibration.<br />
Setting parameter No. PB02 (vibration suppression control tuning<br />
mode) to " 1" automatically changes this parameter. When<br />
parameter No. PB02 is set to " 2", this parameter can be set<br />
manually.<br />
PB21 For manufacturer setting 0<br />
PB22 Do not change this value by any means. 0<br />
PB23 VFBF Low-pass filter selection [Applied]<br />
Select the low-pass filter.<br />
0 0<br />
Low-pass filter selection<br />
0: Automatic setting<br />
1: <strong>Manual</strong> setting (parameter No. PB18 setting)<br />
Initial<br />
value<br />
Setting<br />
range<br />
3141 100<br />
to<br />
9000<br />
100.0 0.1<br />
to<br />
100.0<br />
100.0 0.1<br />
to<br />
100.0<br />
000h<br />
Refer to<br />
name<br />
and<br />
function<br />
column.<br />
Unit<br />
rad/s<br />
Hz<br />
Hz<br />
Control mode<br />
Position Internal Internal<br />
speed torque<br />
PB24<br />
When the automatic setting is selected, a filter with band width that is<br />
closed to the calculation result of the following formula is selected<br />
VG2 · 10<br />
1+GD2 [rad/s].<br />
For manufacturer setting<br />
Do not change this value by any means.<br />
PB25 *BOP1 Function selection B-1 [Applied]<br />
Select the control systems for position command<br />
acceleration/deceleration time constant (parameter No. PB03).<br />
0<br />
0<br />
Control of position command acceleration/<br />
deceleration time constant<br />
0: Primary delay<br />
1: Linear acceleration/deceleration<br />
When linear acceleration/deceleration is<br />
selected, do not execute control switching after<br />
instantaneous power failure. The servo motor will<br />
make a sudden stop during the control switching.<br />
000h<br />
000h<br />
Refer to<br />
name<br />
and<br />
function<br />
column.<br />
4 - 26
4. PARAMETERS<br />
No. Symbol<br />
Name and function<br />
Initial<br />
value<br />
Setting<br />
range<br />
Unit<br />
Control mode<br />
Position Internal Internal<br />
speed torque<br />
PB26 *CDP Gain changing selection [Applied]<br />
Select the gain changing condition. (Refer to section 7.3.)<br />
000h<br />
Refer to<br />
name<br />
0<br />
and<br />
function<br />
Gain changing selection<br />
Under any of the following conditions, the gains<br />
change on the basis of parameter No. PB29 to<br />
PB34 settings.<br />
0: Invalid<br />
1: Input device (gain changing (CDP))<br />
2: Command frequency (parameter No.PB27 setting)<br />
3: Droop pulse (parameter No.PB27 setting)<br />
4: Servo motor speed (parameter No.PB27 setting)<br />
column.<br />
Gain changing condition<br />
0: Valid when the input device (gain changing (CDP)) is<br />
ON, or valid when the value is equal to or larger than<br />
the value set in parameter No. PB27.<br />
1: Valid when the input device (gain changing (CDP)) is<br />
OFF, or valid when the value is equal to or smaller<br />
than the value set in parameter No. PB27.<br />
PB27 CDL<br />
PB28 CDT<br />
Gain changing condition [Applied]<br />
Used to set the value of gain changing condition (command<br />
frequency, droop pulses, servo motor speed) selected in parameter<br />
No. PB26. The set value unit varies depending on the changing<br />
condition item. (Refer to section 7.3.)<br />
Gain changing time constant [Applied]<br />
Used to set the time constant at which the gains change in response<br />
to the conditions set in parameters No. PB26 and PB27. (Refer to<br />
section 7.3.)<br />
PB29 GD2B Gain changing load to motor inertia moment ratio [Applied]<br />
Used to set the load to motor inertia moment ratio when gain<br />
changing is valid.<br />
This parameter is made valid when the auto tuning mode is invalid<br />
(parameter No. PA08: 3).<br />
PB30 PG2B Gain changing position loop gain [Applied]<br />
Set the position loop gain when the gain changing is valid.<br />
This parameter is made valid when the auto tuning mode is invalid<br />
(parameter No. PA08: 3).<br />
PB31 VG2B Gain changing speed loop gain [Applied]<br />
Set the speed loop gain when the gain changing is valid.<br />
This parameter is made valid when the auto tuning mode is invalid<br />
(parameter No. PA08: 3).<br />
PB32 VICB<br />
Gain changing speed integral compensation [Applied]<br />
Set the speed integral compensation when the gain changing is valid.<br />
This parameter is made valid when the auto tuning mode is invalid<br />
(parameter No. PA08: 3).<br />
PB33 VRF1B Gain changing vibration suppression control vibration frequency<br />
setting [Applied]<br />
Set the vibration frequency for vibration suppression control when the<br />
gain changing is valid. This parameter is made valid when parameter<br />
No. PB02 is set to " 2" and parameter No. PB26 is set to " 1".<br />
When using the vibration suppression control gain changing, always<br />
execute the changing after the servo motor has stopped.<br />
10 0<br />
to<br />
9999<br />
1 0<br />
to<br />
100<br />
7.0 0.0<br />
to<br />
300.0<br />
37 1<br />
to<br />
2000<br />
823 20<br />
to<br />
50000<br />
33.7 0.1<br />
to<br />
5000.0<br />
100.0 0.1<br />
to<br />
100.0<br />
kpps<br />
pulse<br />
r/min<br />
ms<br />
Multiplier<br />
rad/s<br />
rad/s<br />
ms<br />
Hz<br />
4 - 27
4. PARAMETERS<br />
No. Symbol<br />
Name and function<br />
PB34 VRF2B Gain changing vibration suppression control resonance frequency<br />
setting [Applied]<br />
Set the resonance frequency for vibration suppression control when<br />
the gain changing is valid. This parameter is made valid when<br />
parameter No. PB02 is set to " 2" and parameter No. PB26 is set<br />
to " 1".<br />
When using the vibration suppression control gain changing, always<br />
execute the changing after the servo motor has stopped.<br />
PB35 For manufacturer setting 0<br />
PB36 Do not change this value by any means. 0<br />
Initial<br />
value<br />
PB37 100<br />
PB38 NH3 Machine resonance suppression filter 3<br />
Set the notch frequency of the machine resonance suppression filter 3.<br />
Set parameter No. PB39 (notch shape selection 3) to " 1" to<br />
make this parameter valid.<br />
PB39 NHQ3 Notch shape selection 3<br />
Used to select the machine resonance suppression filter 3.<br />
Machine resonance suppression filter 3 selection<br />
0: Invalid<br />
1: Valid<br />
Notch depth selection<br />
Setting Depth Gain<br />
0 Deep 40dB<br />
1<br />
14dB<br />
to<br />
2<br />
8dB<br />
3 Shallow 4dB<br />
Notch width selection<br />
Setting Width<br />
0 Standard 2<br />
1 3<br />
to<br />
2 4<br />
3 Wide 5<br />
Setting<br />
range<br />
100.0 0.1<br />
to<br />
100.0<br />
4500 30<br />
to<br />
4500<br />
000h<br />
PB40 For manufacturer setting 111h<br />
PB41 Do not change this value by any means. 20<br />
PB42<br />
PB43<br />
PB44<br />
PB45<br />
PB46<br />
PB47<br />
PB48<br />
PB49<br />
PB50<br />
000h<br />
000h<br />
000h<br />
000h<br />
000h<br />
000h<br />
000h<br />
000h<br />
000h<br />
Refer to<br />
name<br />
and<br />
function<br />
column.<br />
Unit<br />
Hz<br />
Hz<br />
Control mode<br />
Position Internal Internal<br />
speed torque<br />
4 - 28
4. PARAMETERS<br />
4.2.3 Position smoothing<br />
By setting the position command acceleration/deceleration time constant (parameter No. PB03), the servo<br />
motor is operated smoothly in response to a sudden position command.<br />
The following diagrams show the operation patterns of the servo motor in response to a position command<br />
when the position command acceleration/deceleration time constant is set.<br />
Select the primary delay or linear acceleration/deceleration in parameter No. PB25 according to the machine<br />
used.<br />
(1) For step input<br />
Command<br />
: Input position command<br />
: Position command after<br />
filtering for primary delay<br />
: Position command after filtering<br />
for linear acceleration/deceleration<br />
: Position command acceleration/<br />
deceleration time constant (parameter No. PB03)<br />
(3t)<br />
Time<br />
(2) For trapezoidal input<br />
For trapezoidal input (linear acceleration/deceleration), the setting range is 0 to 10ms.<br />
(3t)<br />
: Input position command<br />
Command<br />
: Position command after<br />
filtering for primary delay<br />
: Position command after filtering<br />
for linear acceleration/deceleration<br />
: Position command acceleration/<br />
deceleration time constant<br />
(parameter No. PB03)<br />
(3t)<br />
Time<br />
4 - 29
4. PARAMETERS<br />
4.3 Extension setting parameters (No. PC )<br />
POINT<br />
For any parameter whose symbol is preceded by *, set the parameter value and<br />
switch power off once, then switch it on again to make that parameter setting<br />
valid.<br />
Set any parameter with [Applied] written in the name column when using an<br />
advanced function.<br />
4.3.1 Parameter list<br />
No. Symbol<br />
Name<br />
Initial<br />
value<br />
PC01 STA Acceleration time constant 0 ms<br />
PC02 STB Deceleration time constant 0 ms<br />
PC03 STC S-pattern acceleration/deceleration time constant 0 ms<br />
PC04 TQC Torque command time constant 0 ms<br />
PC05 SC0 Internal speed command 0 0 r/min<br />
Internal speed limit 0<br />
PC06 SC1 Internal speed command 1 100 r/min<br />
Internal speed limit 1<br />
PC07 SC2 Internal speed command 2 500 r/min<br />
Internal speed limit 2<br />
PC08 SC3 Internal speed command 3 1000 r/min<br />
Internal speed limit 3<br />
PC09 MBR Electromagnetic brake sequence output 100 ms<br />
PC10 ZSP Zero speed 50 r/min<br />
PC11 *BPS Alarm history clear 000h<br />
PC12 TC Internal torque command 0.0 %<br />
PC13 *ENRS Encoder output pulses selection 000h<br />
PC14 TL2 Internal torque limit 2 [Applied] 100 %<br />
PC15 ERZL Error excessive alarm detection level 3.0 rev<br />
PC16 For manufacturer setting 30<br />
PC17 *OSL Overspeed alarm detection level 0 r/min<br />
PC18 For manufacturer setting 1000<br />
PC19 0<br />
PC20<br />
PC21<br />
PC22 *COP1 Function selection C-1 [Applied] 000h<br />
PC23 *COP2 Function selection C-2 [Applied] 000h<br />
PC24 *COP3 Function selection C-3 [Applied] 000h<br />
PC25 *COP4 Function selection C-4 [Applied] 000h<br />
PC26 ALDT Detailed setting of overload tough drive [Applied] 200 10ms<br />
PC27 OSCL Detailed setting of vibration tough drive [Applied] 50 %<br />
PC28 CVAT Detailed setting of instantaneous power failure tough drive [Applied] 3 10ms<br />
PC29 *COP5 Function selection C-5 [Applied] 000h<br />
PC30 *COP6 Function selection C-6 [Applied] 000h<br />
PC31 SC4 Internal speed command 4 [Applied] 200 r/min<br />
Internal speed limit 4 [Applied]<br />
PC32 SC5 Internal speed command 5 [Applied] 300 r/min<br />
Internal speed limit 5 [Applied]<br />
000h<br />
001h<br />
Unit<br />
Control mode<br />
Position Internal Internal<br />
speed torque<br />
4 - 30
4. PARAMETERS<br />
No. Symbol Name<br />
Initial<br />
value<br />
PC33 SC6 Internal speed command 6 [Applied] 500 r/min<br />
Internal speed limit 6 [Applied]<br />
PC34 SC7 Internal speed command 7 [Applied] 800 r/min<br />
Internal speed limit 7 [Applied]<br />
PC35 For manufacturer setting 000h<br />
PC36 0<br />
PC37 0<br />
PC38 0<br />
PC39 0<br />
PC40 0<br />
PC41<br />
PC42 0<br />
PC43<br />
000h<br />
000h<br />
PC44 RECT Drive recorder alarm specifying 000h<br />
PC45 For manufacturer setting 000h<br />
PC46<br />
PC47<br />
PC48<br />
PC49<br />
PC50<br />
PC51<br />
PC52<br />
PC53<br />
PC54<br />
PC55<br />
PC56<br />
PC57<br />
PC58<br />
PC59<br />
PC60<br />
PC61<br />
PC62<br />
PC63<br />
PC64<br />
000h<br />
000h<br />
000h<br />
000h<br />
000h<br />
000h<br />
000h<br />
000h<br />
000h<br />
000h<br />
000h<br />
000h<br />
000h<br />
000h<br />
000h<br />
000h<br />
000h<br />
000h<br />
000h<br />
Unit<br />
Control mode<br />
Position Internal Internal<br />
speed torque<br />
4 - 31
4. PARAMETERS<br />
4.3.2 List of details<br />
No. Symbol<br />
Name and function<br />
Initial<br />
value<br />
Setting<br />
range<br />
Unit<br />
Control mode<br />
Position Internal Internal<br />
speed torque<br />
PC01 STA<br />
Acceleration time constant<br />
Used to set the acceleration time required for the servo motor to reach<br />
the rated speed from 0r/min in response to the internal speed<br />
commands 0 to 7.<br />
0 0<br />
to<br />
50000<br />
ms<br />
Speed<br />
Rated<br />
speed<br />
If the preset speed command is<br />
lower than the rated speed,<br />
acceleration/deceleration time<br />
will be shorter.<br />
0r/min<br />
Time<br />
Parameter<br />
No. PC01 setting<br />
Parameter<br />
No. PC02 setting<br />
For example for the servo motor of 3000r/min rated speed, set 3000<br />
(3s) to increase speed from 0r/min to 1000r/min in 1 second.<br />
PC02 STB<br />
Deceleration time constant<br />
Used to set the deceleration time required for the servo motor to<br />
reach 0r/min from the rated speed in response to the internal speed<br />
commands 0 to 7.<br />
0 0<br />
to<br />
50000<br />
ms<br />
4 - 32
4. PARAMETERS<br />
No. Symbol<br />
Name and function<br />
Initial<br />
value<br />
Setting<br />
range<br />
Unit<br />
Control mode<br />
Position Internal Internal<br />
speed torque<br />
PC03 STC<br />
S-pattern acceleration/deceleration time constant<br />
Used to smooth start/stop of the servo motor.<br />
Set the time of the arc part for S-pattern acceleration/deceleration.<br />
Set "0" to select the linear acceleration/deceleration.<br />
0 0<br />
to<br />
1000<br />
ms<br />
Speed command<br />
Servo motor<br />
speed<br />
0r/min<br />
STC<br />
STA<br />
STC<br />
STC<br />
STB<br />
STC<br />
Time<br />
STA: Acceleration time constant (parameter No. PC01)<br />
STB: Deceleration time constant (parameter No. PC02)<br />
STC: S-pattern acceleration/deceleration time constant<br />
(parameter No. PC03)<br />
Long setting of STA (acceleration time constant) or STB (deceleration<br />
time constant) may produce an error in the time of the arc part for the<br />
setting of the S-pattern acceleration/deceleration time constant.<br />
The upper limit for the actual time of the arc part is as follows:<br />
At acceleration: 2000000<br />
STA<br />
, At deceleration: 2000000<br />
STB<br />
(Example) Settings of STA = 20000, STB = 5000 and STC = 200 limit<br />
the actual arc part times as follows:<br />
At acceleration: 100 [ms]<br />
2000000<br />
Since =100[ms]200[ms],<br />
5000<br />
the time is as-is.<br />
PC04 TQC<br />
Torque command time constant<br />
Used to set the constant of a low-pass filter in response to the internal<br />
torque command.<br />
0 0<br />
to<br />
20000<br />
ms<br />
Internal torque command<br />
Torque<br />
After filtered<br />
TQC TQC Time<br />
TQC: Torque command time constant<br />
4 - 33
4. PARAMETERS<br />
No. Symbol<br />
PC05 SC0<br />
PC06 SC1<br />
PC07 SC2<br />
PC08 SC3<br />
PC09 MBR<br />
PC10 ZSP<br />
Name and function<br />
Internal speed command 0<br />
Used to set speed 0 of internal speed commands.<br />
Internal speed limit 0<br />
Used to set speed 0 of internal speed limits.<br />
Internal speed command 1<br />
Used to set speed 1 of internal speed commands.<br />
Internal speed limit 1<br />
Used to set speed 1 of internal speed limits.<br />
Internal speed command 2<br />
Used to set speed 2 of internal speed commands.<br />
Internal speed limit 2<br />
Used to set speed 2 of internal speed limits.<br />
Internal speed command 3<br />
Used to set speed 3 of internal speed commands.<br />
Internal speed limit 3<br />
Used to set speed 3 of internal speed limits.<br />
Electromagnetic brake sequence output<br />
Used to set the delay time (Tb) from the electromagnetic brake<br />
interlock (MBR) turns off to the base drive circuit is shut-off.<br />
Zero speed<br />
Used to set the output range of the zero speed detection (ZSP).<br />
Zero speed detection (ZSP) has hysteresis width of 20r/min (refer to<br />
section 3.5 (1) (b))<br />
PC11 *BPS Alarm history clear<br />
Used to clear the alarm history.<br />
0<br />
Alarm history clear<br />
0: Invalid<br />
1: Valid<br />
When alarm history clear is made valid, the alarm<br />
history and the number of tough drive are cleared at<br />
next power-on.<br />
After the alarm history and the number of tough drive<br />
are cleared, the setting is automatically made invalid<br />
(reset to 0).<br />
Presence or absence of drive recorder selection<br />
0: Valid (drive recorder execution)<br />
1: Invalid (drive recorder stop)<br />
<strong>MR</strong> Configurator is necessary referring to the drive<br />
recorder. (Refer to Section 4.3.4.)<br />
Initial Setting<br />
value range<br />
Unit<br />
0 0 to r/min<br />
instantaneous<br />
permissible<br />
speed<br />
100 0 to r/min<br />
instantaneous<br />
permissible<br />
speed<br />
500 0 to r/min<br />
instantaneous<br />
permissible<br />
speed<br />
1000 0 to r/min<br />
instantaneous<br />
permissible<br />
speed<br />
100 0 ms<br />
to<br />
1000<br />
50 0 r/min<br />
to<br />
10000<br />
000h Refer to<br />
the name<br />
and<br />
function<br />
field.<br />
Control mode<br />
Position Internal Internal<br />
speed torque<br />
PC12 TC Internal torque command<br />
Set the internal torque command during the internal torque control.<br />
0.0 0.0<br />
to<br />
100.0<br />
%<br />
4 - 34
4. PARAMETERS<br />
No. Symbol<br />
Name and function<br />
Initial<br />
value<br />
Setting<br />
range<br />
Unit<br />
Control mode<br />
Position Internal Internal<br />
speed torque<br />
PC13 *ENRS Encoder output pulses selection<br />
Used to select the encoder output pulse direction, the encoder output<br />
pulse setting and the encoder output pulse cycle.<br />
0<br />
000h<br />
Refer to<br />
the name<br />
and<br />
function<br />
field.<br />
Encoder pulse output phase changing<br />
Changes the phases of A, B-phase encoder<br />
pulses output.<br />
Setting<br />
Servo motor rotation direction<br />
CCW<br />
CW<br />
0<br />
A-phase<br />
B-phase<br />
A-phase<br />
B-phase<br />
1<br />
A-phase<br />
B-phase<br />
A-phase<br />
B-phase<br />
Encoder output pulse setting selection<br />
0: Output pulse setting<br />
1: Division ratio setting<br />
2: Same output pulse setting as the command pulses.<br />
3: A/B-phase pulses electronic gear setting<br />
Setting "2" makes parameter No. PA15<br />
(encoder output pulses) setting invalid.<br />
Encoder output pulse cycle setting (Note)<br />
0: 444 s cycle<br />
1: 55 s cycle<br />
Note. It is supported by servo amplifiers of the software version A1 or<br />
later.<br />
PC14 TL2 Internal torque limit 2 [Applied]<br />
100 0<br />
Set this parameter to limit servo motor torque on the assumption that<br />
to<br />
the maximum torque is 100[%].<br />
100<br />
When 0 is set, torque is not produced.<br />
The internal torque limit 2 is made valid when the internal torque limit<br />
selection (TL1) is turned on. (Refer to (4) in section 3.6.1.)<br />
PC15 ERZL Error excessive alarm detection level<br />
3.0 0.1<br />
Set the error excessive alarm detection level.<br />
to<br />
99.9<br />
PC16 For manufacturer setting<br />
30<br />
Do not change this value by any means.<br />
PC17 *OSL Overspeed alarm detection level<br />
0 0<br />
Set the overspeed alarm detection level.<br />
to<br />
When "0" or "value exceeding the maximum servo motor speed<br />
20000<br />
1.2" is set, the overspeed alarm detection level becomes "maximum<br />
motor speed 1.2".<br />
PC18 For manufacturer setting 1000<br />
PC19 Do not change this value by any means. 0<br />
PC20<br />
000h<br />
PC21<br />
001h<br />
%<br />
rev<br />
r/min<br />
4 - 35
4. PARAMETERS<br />
No. Symbol<br />
Name and function<br />
Initial<br />
value<br />
Setting<br />
range<br />
Unit<br />
Control mode<br />
Position Internal Internal<br />
speed torque<br />
PC22 *COP1 Function selection C-1 [Applied]<br />
Select the encoder cable communication system.<br />
0 0<br />
Encoder cable communication system<br />
0: Two-wire type<br />
1: Four-wire type<br />
Incorrect setting will result in an encoder transmission<br />
data error 3 (The servo amplifier not receiving) (16.3).<br />
For the encoder cable communication method, refer to<br />
section 11.1.2.<br />
000h<br />
Refer to<br />
the name<br />
and<br />
function<br />
field.<br />
PC23 *COP2 Function selection C-2 [Applied]<br />
Select the servo lock while the servo motor stops in internal speed<br />
control mode.<br />
0<br />
0<br />
000h<br />
Refer to<br />
the name<br />
and<br />
function<br />
field.<br />
Selection of servo lock while the servo motor stops in<br />
internal speed control mode.<br />
In the internal speed control mode, the servo motor<br />
shaft can be locked to prevent the shaft from being<br />
moved by the external force.<br />
0: Valid (Servo-locked)<br />
The control to maintain the stop position is<br />
performed.<br />
1: Invalid (Not servo-locked)<br />
The stop position is not maintained.<br />
The control to make the speed 0r/min is performed.<br />
PC24 *COP3 Function selection C-3 [Applied]<br />
Select the unit of the in-position range.<br />
0 0<br />
In-position range unit selection<br />
0: Command input unit<br />
1: Servo motor encoder pulse unit<br />
000h<br />
Refer to<br />
the name<br />
and<br />
function<br />
field.<br />
PC25 *COP4 Function selection C-4 [Applied]<br />
000h Refer to<br />
Select the stroke limit warning (99. ), tough drive warning (F0. )<br />
and alarm history write.<br />
the name<br />
and<br />
function<br />
field.<br />
0<br />
Stroke limit warning (99. ) selection<br />
0: Valid<br />
1: Invalid<br />
When this parameter is set to "1", the stroke<br />
limit warning (99. ) will not occur even if the<br />
forward rotation stroke end (LSP) or reverse<br />
rotation stroke end (LSN) turns OFF.<br />
Tough drive warning (F0. ) alarm history write<br />
selection<br />
0: Writing to alarm history: Yes<br />
1: Writing to alarm history: No<br />
The alarm is written to history at the tough drive<br />
warning (F0. ) occurrence when "0" is set.<br />
4 - 36
4. PARAMETERS<br />
No. Symbol<br />
Name and function<br />
Initial<br />
value<br />
Setting<br />
range<br />
Unit<br />
Control mode<br />
Position Internal Internal<br />
speed torque<br />
PC26 ALDT Detailed setting of overload tough drive [Applied]<br />
Limits the maximum value of the output time delay of the in-position<br />
(INP) and zero speed (ZSP) while the overload tough drive. Limit with<br />
the delay time permitted by the connected controller side.<br />
When parameter No. PA04 (tough drive function selection) is set to<br />
" 0" and this parameter (No. PC26) is set to "0", the output time<br />
delay of the in-position (INP) and zero speed (ZSP) are invalid.<br />
PC27 OSCL Detailed setting of vibration tough drive [Applied]<br />
Set the filter reset detection range of parameter No. PB13 (machine<br />
resonance suppression filter 1) and parameter No. PB15 (machine<br />
resonance suppression filter 2).<br />
200 0<br />
to<br />
999<br />
50 0<br />
to<br />
100<br />
10<br />
ms<br />
%<br />
(Example) When this parameter is set to "50", it is reset when the<br />
oscillation detection level reaches 50% of the rated torque.<br />
When parameter No. PA04 (tough drive function selection) is set to<br />
" 0 ", resets of the following filters are invalid: parameter No.<br />
PB13 (machine resonance suppression filter 1) and parameter No.<br />
PB15 (machine resonance suppression filter 2).<br />
PC28 CVAT Detailed setting of instantaneous power failure tough drive [Applied]<br />
Set the time between the fall of the main circuit power supply to the<br />
alarm detection level and the occurrence of the instantaneous power<br />
failure alarm.<br />
When parameter No. PA04 (tough drive function selection) is set to "0<br />
", this parameter is invalid.<br />
PC29 *COP5 Function selection C-5 [Applied]<br />
Select the detection method of the main circuit power undervoltage<br />
alarm (10.2)<br />
0<br />
0<br />
3 3<br />
to<br />
200<br />
000h Refer to<br />
the name<br />
and<br />
function<br />
field.<br />
10<br />
ms<br />
Select the detection method of the main circuit power<br />
undervoltage alarm (10.2)<br />
0: Undervoltage alarm (10.2) is detected regardless of the<br />
servo motor speed<br />
1: When the servo motor speed is 50r/min or less,<br />
main circuit power off warning (E9. ) is detected<br />
PC30 *COP6 Function selection C-6 [Applied]<br />
Select the speed command input unit.<br />
0<br />
0<br />
Selection of the speed command input unit (setting<br />
unit of internal speed command 0 to 7)<br />
0: In unit of 1r/min<br />
1: In unit of 0.1r/min<br />
000h<br />
Refer to<br />
the name<br />
and<br />
function<br />
field.<br />
PC31 SC4<br />
Internal speed command 4 [Applied]<br />
Used to set speed 4 of internal speed commands.<br />
Internal speed limit 4 [Applied]<br />
Used to set speed 4 of internal speed limits.<br />
200 0 to<br />
instantaneous<br />
permissible<br />
speed<br />
r/min<br />
4 - 37
4. PARAMETERS<br />
No. Symbol<br />
PC32 SC5<br />
PC33 SC6<br />
PC34 SC7<br />
Name and function<br />
Internal speed command 5 [Applied]<br />
Used to set speed 5 of internal speed commands.<br />
Internal speed limit 5 [Applied]<br />
Used to set speed 5 of internal speed limits.<br />
Internal speed command 6 [Applied]<br />
Used to set speed 6 of internal speed commands.<br />
Internal speed limit 6 [Applied]<br />
Used to set speed 6 of internal speed limits.<br />
Internal speed command 7 [Applied]<br />
Used to set speed 7 of internal speed commands.<br />
Internal speed limit 7 [Applied]<br />
Used to set speed 7 of internal speed limits.<br />
Initial<br />
value<br />
PC35 For manufacturer setting 000h<br />
PC36 Do not change this value by any means. 0<br />
PC37 0<br />
PC38 0<br />
PC39 0<br />
PC40 0<br />
PC41<br />
PC42 0<br />
PC43<br />
PC44 RECT Drive recorder alarm specifying<br />
Specify the alarm No. which activates the drive recorder.<br />
0<br />
Specification of alarm No.<br />
00 : No specification<br />
(The optimum item is recorded according<br />
to the alarms that have occurred earlier<br />
and operating conditions.)<br />
01 to FFh : Specification<br />
(The specified item is recorded when an<br />
alarm of the specified alarm No. occurs.)<br />
Setting<br />
range<br />
Unit<br />
300 0 to r/min<br />
instantaneous<br />
permissible<br />
speed<br />
500 0 to r/min<br />
instantaneous<br />
permissible<br />
speed<br />
800 0 to r/min<br />
instantaneous<br />
permissible<br />
speed<br />
000h<br />
000h<br />
000h<br />
Refer to<br />
the<br />
name<br />
and<br />
function<br />
field.<br />
Control mode<br />
Position Internal Internal<br />
speed torque<br />
For the data recorded with drive recorder, refer to section 4.3.4 (2).<br />
PC45 For manufacturer setting 000h<br />
PC46 Do not change this value by any means. 000h<br />
PC47<br />
000h<br />
PC48<br />
000h<br />
PC49<br />
000h<br />
PC50<br />
000h<br />
PC51<br />
000h<br />
PC52<br />
000h<br />
PC53<br />
000h<br />
PC54<br />
000h<br />
PC55<br />
000h<br />
PC56<br />
000h<br />
4 - 38
4. PARAMETERS<br />
No. Symbol<br />
Name and function<br />
Initial<br />
value<br />
Setting<br />
range<br />
Unit<br />
Control mode<br />
Position Internal Internal<br />
speed torque<br />
PC57<br />
000h<br />
PC58<br />
000h<br />
PC59 For manufacturer setting 000h<br />
PC60 Do not change this value by any means. 000h<br />
PC61<br />
000h<br />
PC62<br />
000h<br />
PC63<br />
000h<br />
PC64<br />
000h<br />
4.3.3 Alarm history clear<br />
The servo amplifier stores past 16 alarms since the power is switched on for the first time. To control alarms<br />
which will occur during the operation, clear the alarm history using parameter No. PC11 before starting the<br />
operation. This parameter is made valid by switching the power from OFF to ON after setting. The value in<br />
parameter No. PC11 automatically changes to " 0 " after the alarm history is cleared.<br />
Parameter No. PC11<br />
Alarm history clear<br />
0: Invalid (not cleared)<br />
1: Valid (cleared)<br />
4 - 39
4. PARAMETERS<br />
4.3.4 Drive recorder function<br />
POINT<br />
Records the state transition when an alarm occurs. However, the previously<br />
recorded data is discarded. If another alarm occurs while an alarm is occurring,<br />
the state transition during that another alarm is not recorded.<br />
The drive recorder does not operate in the following situation.<br />
When the number of record times reaches 255.<br />
When the number of write times to alarm history after power-on reaches 16.<br />
The number of record times can be confirmed on the display (alarm mode).<br />
(Refer to section 5.5.)<br />
The drive recorder does not operate when the following alarms occur.<br />
Undervoltage (10.1 or 10.3)<br />
Memory error 1 (RAM) (12. )<br />
Memory error 2 (EEP-ROM) (15. )<br />
Encoder initial communication error 1 (16. )<br />
Board error (17. )<br />
Memory error 3 (Flash-ROM) (19. )<br />
Motor combination error (1A. )<br />
Software combination error (1C. )<br />
Encoder initial communication error 2 (1E. )<br />
Encoder initial communication error 3 (1F. )<br />
Parameter error (37. )<br />
Watchdog (888)<br />
When the graph is displayed in <strong>MR</strong> Configurator, the drive recorder function<br />
becomes invalid. To make the drive recorder function valid again, switch the<br />
power off then on. Valid/invalid of drive recorder function can be confirmed on<br />
the display (diagnostic mode). (Refer to section 5.4.)<br />
The drive recorder function records the state transition before and after the alarm occurrence for the<br />
predetermined period of time by always monitoring the servo status. The recorded data can be confirmed on<br />
the graph display screen by clicking the "drive recorder display" button on the alarm history display screen of<br />
<strong>MR</strong> Configurator. After shifting to the graph display screen, the drive recorder function becomes invalid. The<br />
recorded data can be displayed with the analog 3CH or digital 4CH as in the graph function of <strong>MR</strong> Configurator.<br />
(1) Parameter setting<br />
Select valid/invalid of the drive recorder function in parameter No. PC11.<br />
Parameter No. PC11<br />
0<br />
Presence or absence of drive recorder selection<br />
0 : Valid (drive recorder execution)<br />
1 : Invalid (drive recorder stop)<br />
<strong>MR</strong> Configurator is required to refer to the drive recorder.<br />
4 - 40
4. PARAMETERS<br />
Specify the alarm No. in parameter No. PC44 when operating the drive recorder with the specific alarm No.<br />
Parameter No. PC44<br />
0<br />
Specification of alarm No.<br />
00 : No specification<br />
(The optimum item is recorded according to the alarms that have occurred<br />
earlier and operating conditions.)<br />
01 to FFh : Specification<br />
(The specified item is recorded when an alarm of the specified alarm No. occurs.)<br />
When a non-existent alarm No. is specified, the specified value is recognized as "00h".<br />
(2) Record data<br />
(a) When the set value of parameter No. PC44 is " 00":<br />
1) When alarms to be recorded by the drive recorder function are in the alarm history:<br />
The specified data are automatically selected and recorded based on the alarm history.<br />
a) Analog CH data<br />
Three data for 3CH are automatically selected from the data listed below.<br />
Servo motor speed [r/min] Torque [%]<br />
Bus voltage (Note)<br />
Within one-revolution position [pulse]<br />
Multi-revolution counter [rev] Current command [%]<br />
Regenerative load ratio [%] Command pulse frequency [kpps]<br />
Effective load ratio [%]<br />
Note. The bus voltage is displayed in five steps.<br />
Display value<br />
Description<br />
5 Overvoltage (About 400V or more)<br />
4 High voltage (About 375V or more)<br />
3 Normal<br />
2 Low voltage (About 200V or less)<br />
1 Undervoltage (About 160V or less)<br />
b) Digital CH (4CH) data<br />
Four data for 4CH are automatically selected from the data listed below.<br />
Trouble (ALM)<br />
Forced stop (EM1)<br />
Servo-on (SON)<br />
Electromagnetic brake interlock (MBR)<br />
Main circuit power supply OFF Ready (RD)<br />
Limiting torque (TLC)<br />
2) When alarms to be recorded by the drive recorder function are not in the alarm history:<br />
The data to be recorded are as indicated in the following table.<br />
Analog CH data<br />
Digital CH data<br />
Measuring<br />
Sampling time<br />
CH1<br />
length [ms]<br />
CH2 CH3 CH4 [ms]<br />
(trigger)<br />
(64 points)<br />
CH1 Servo motor speed [r/min]<br />
CH2 Torque [%] ALM EM1 SON RD 0.8 56.8<br />
CH3 Within one-revolution position [pulse]<br />
4 - 41
4. PARAMETERS<br />
(b) When the set value of parameter No. PC44 is other than " 00":<br />
The data to be recorded are as indicated in the following table.<br />
Setting<br />
Corresponding<br />
alarm No.<br />
10 10.2<br />
13 13.<br />
Analog CH data<br />
CH1 Servo motor speed [r/min]<br />
CH2 Torque [%]<br />
CH3 Bus voltage (Note)<br />
CH1 Servo motor speed [r/min]<br />
CH2 Torque [%]<br />
CH3 Within one-revolution position [pulse]<br />
CH1 Servo motor speed [r/min]<br />
CH1<br />
(trigger)<br />
Digital CH data<br />
CH2 CH3 CH4<br />
ALM EM1 MBR<br />
(Main<br />
circuit<br />
power<br />
supply<br />
is OFF.)<br />
Sampling<br />
time<br />
[ms]<br />
Measuring<br />
length [ms]<br />
(64 points)<br />
0.8 56.8<br />
ALM EM1 SON RD 0.8 56.8<br />
20 20. CH2 Within one-revolution position [pulse] ALM EM1 SON RD 0.8 56.8<br />
CH3 Multi-revolution counter [rev]<br />
CH1 Servo motor speed [r/min]<br />
21 21. CH2 Within one-revolution position [pulse] ALM EM1 SON RD 0.8 56.8<br />
CH3 Multi-revolution counter [rev]<br />
CH1 Servo motor speed [r/min]<br />
24 24. CH2 Torque [%] ALM EM1 SON RD 0.8 56.8<br />
CH3 Current command [%]<br />
CH1 Servo motor speed [r/min]<br />
30 30. CH2 Torque [%] ALM EM1 SON RD 56.8 3600<br />
CH3 Regenerative load ratio [%]<br />
CH1 Servo motor speed [r/min]<br />
31 31. CH2 Torque [%] ALM EM1 SON RD 0.8 56.8<br />
CH3 Command pulse frequency [kpps]<br />
CH1 Servo motor speed [r/min]<br />
32 32. CH2 Torque [%] ALM EM1 SON RD 0.8 56.8<br />
CH3 Current command [%]<br />
CH1 Servo motor speed [r/min]<br />
33 33. CH2 Torque [%] ALM EM1 SON RD 3.5 227<br />
CH3 Bus voltage (Note)<br />
CH1 Servo motor speed [r/min]<br />
35 35. CH2 Torque [%] ALM EM1 SON RD 0.8 56.8<br />
CH3 Command pulse frequency [kpps]<br />
CH1 Servo motor speed [r/min]<br />
39 39. CH2 Torque [%] ALM EM1 SON RD 0.8 56.8<br />
CH3 Within one-revolution position [pulse]<br />
CH1 Servo motor speed [r/min]<br />
45 45. CH2 Torque [%] ALM EM1 SON RD 0.8 56.8<br />
CH3 Within one-revolution position [pulse]<br />
CH1 Servo motor speed [r/min]<br />
46 46. CH2 Torque [%] ALM EM1 MBR RD 56.8 3600<br />
CH3 Effective load ratio [%]<br />
CH1 Servo motor speed [r/min]<br />
50 50. CH2 Torque [%] ALM EM1 MBR RD 56.8 3600<br />
CH3 Effective load ratio [%]<br />
CH1 Servo motor speed [r/min]<br />
51 51. CH2 Torque [%] ALM EM1 MBR RD 56.8 3600<br />
CH3 Effective load ratio [%]<br />
4 - 42
4. PARAMETERS<br />
Corresponding<br />
Setting<br />
Analog CH data<br />
CH1<br />
alarm No.<br />
(trigger)<br />
CH1 Servo motor speed [r/min]<br />
Digital CH data<br />
CH2 CH3 CH4<br />
Sampling Measuring<br />
time length [ms]<br />
[ms] (64 points)<br />
52 52. CH2 Torque [%] ALM EM1 RD TLC 3.5 227<br />
CH3 Droop pulses [pulse] (unit: 100 pulses)<br />
CH1 Servo motor speed [r/min]<br />
61 61. CH2 Torque [%] ALM EM1 SON RD 0.8 56.8<br />
CH3 Within one-revolution position [pulse]<br />
CH1 Servo motor speed [r/min]<br />
8E 8E. CH2 Torque [%] ALM EM1 SON RD 0.8 56.8<br />
CH3 Within one-revolution position [pulse]<br />
Note. The bus voltage is displayed in five steps.<br />
Display value<br />
Description<br />
5 Overvoltage (About 400V or more)<br />
4 High voltage (About 375V or more)<br />
3 Normal<br />
2 Low voltage (About 200V or less)<br />
1 Undervoltage (About 160V or less)<br />
4 - 43
4. PARAMETERS<br />
4.4 I/O setting parameters (No. PD )<br />
POINT<br />
For any parameter whose symbol is preceded by *, set the parameter value and<br />
switch power off once, then switch it on again to make that parameter setting<br />
valid.<br />
In the positioning mode, refer to section 13.7.4 (2) for the parameter No. PD20.<br />
4.4.1 Parameter list<br />
Control mode<br />
No. Symbol Name Initial value Unit Internal Internal<br />
Position<br />
speed torque<br />
PD01 *DIA1 Input signal automatic ON selection 1<br />
0000h<br />
PD02 *DI0 Input signal device selection 0 (CN1-23, CN1-25) 262Dh<br />
PD03 *DI1-1 Input signal device selection 1L (CN1-3)<br />
0303h<br />
PD04 *DI1-2 Input signal device selection 1H (CN1-3)<br />
2003h<br />
PD05 *DI2-1 Input signal device selection 2L (CN1-4)<br />
0202h<br />
PD06 *DI2-2 Input signal device selection 2H (CN1-4)<br />
0202h<br />
PD07 *DI3-1 Input signal device selection 3L (CN1-5)<br />
0D06h<br />
PD08 *DI3-2 Input signal device selection 3H (CN1-5)<br />
2C0Dh<br />
PD09 *DI4-1 Input signal device selection 4L (CN1-6)<br />
070Ah<br />
PD10 *DI4-2 Input signal device selection 4H (CN1-6)<br />
0707h<br />
PD11 *DI5-1 Input signal device selection 5L (CN1-7)<br />
080Bh<br />
PD12 *DI5-2 Input signal device selection 5H (CN1-7)<br />
0808h<br />
PD13 *DI6-1 Input signal device selection 6L (CN1-8)<br />
0505h<br />
PD14 *DI6-2 Input signal device selection 6H (CN1-8)<br />
0505h<br />
PD15 *DO1 Output signal device selection 1 (CN1-9)<br />
0003h<br />
PD16 *DO2 Output signal device selection 2 (CN1-10)<br />
0004h<br />
PD17 *DO3 Output signal device selection 3 (CN1-11)<br />
0002h<br />
PD18 *DO4 Output signal device selection 4 (CN1-12)<br />
0005h<br />
PD19 *DIF Input filter setting 0002h<br />
PD20 *DOP1 Function selection D-1<br />
0000h<br />
PD21 For manufacturer setting 0000h<br />
PD22 *DOP3 Function selection D-3<br />
0000h<br />
PD23 For manufacturer setting 0000h<br />
PD24 *DOP5 Function selection D-5<br />
0000h<br />
PD25 For manufacturer setting 0000h<br />
PD26<br />
0000h<br />
4 - 44
4. PARAMETERS<br />
4.4.2 List of details<br />
No. Symbol<br />
Name and function<br />
Initial<br />
value<br />
Setting<br />
range<br />
Unit<br />
Control mode<br />
Position Internal Internal<br />
speed torque<br />
PD01 *DIA1 Input signal automatic ON selection 1<br />
Select the input devices to be automatically turned ON.<br />
Signal name<br />
Initial value<br />
BIN HEX<br />
0000h<br />
Refer to<br />
the name<br />
and<br />
function<br />
field.<br />
Automatic/manual<br />
selection (MD0)<br />
0<br />
Servo-on (SON)<br />
0<br />
0<br />
0<br />
0<br />
Signal name<br />
Initial value<br />
BIN HEX<br />
Proportion control (PC)<br />
Forced stop (EM1)<br />
0<br />
0<br />
0<br />
0<br />
0<br />
Signal name<br />
Initial value<br />
BIN HEX<br />
0<br />
0<br />
Forward rotation<br />
stroke end (LSP)<br />
0<br />
0<br />
Reverse rotation<br />
stroke end (LSN)<br />
0<br />
Signal name<br />
Initial value<br />
BIN HEX<br />
Point table No./Program No.<br />
selection 1 (DI0)<br />
0<br />
Point table No./Program No.<br />
selection 2 (DI1)<br />
Point table No./Program No.<br />
selection 3 (DI2)<br />
0<br />
0<br />
0<br />
0<br />
BIN 0: Used as external input signal<br />
BIN 1: Automatic ON<br />
Example 1: Turn ON SON<br />
The setting is " 4".<br />
Example 2: Turn ON LSP/LSN<br />
To turn ON LSP only: The setting is " 4 ".<br />
To turn ON LSN only: The setting is " 8 ".<br />
To turn ON both LSP and LSN: The setting is " C ".<br />
POINT<br />
The input status of LSP and LSN differs depending<br />
on their assignment conditions as follows.<br />
Assigned to the external input signals:<br />
depends on the value set in parameter No. PD01.<br />
Not assigned to the external input signals:<br />
automatically turns on regardless of the value set in<br />
parameter No. PD01.<br />
4 - 45
4. PARAMETERS<br />
No. Symbol<br />
Name and function<br />
PD02 *DI0 Input signal device selection 0 (CN1-23, CN1-25)<br />
Any input device can be assigned to the CN1-23 pin and CN1-25<br />
pin (forward and reverse rotation pulse trains).<br />
For the position control mode, position/internal speed change<br />
mode or internal torque/position control change mode, CN1-23<br />
pin is fixed to PP or CN1-25 pin to NP. For the internal speed<br />
control mode or the internal torque control mode, PP or NP can<br />
not be assigned.<br />
Initial<br />
value<br />
262Dh<br />
Setting<br />
range<br />
Refer to<br />
the name<br />
and<br />
function<br />
field.<br />
Unit<br />
Control mode<br />
Position Internal Internal<br />
speed torque<br />
Input signal device of CN1-23 pin (PP) selection<br />
Input signal device of CN1-25 pin (NP) selection<br />
The devices that can be assigned in each control mode are<br />
indicated by abbreviation in the following table. If any other device<br />
is set, it is invalid.<br />
Setting<br />
Control modes (Note 1)<br />
P S T CP/CL<br />
00<br />
CN1-23 pin: PP<br />
CN1-25 pin: NP<br />
01 For manufacturer setting (Note 2)<br />
02 SON SON SON<br />
03 RES RES RES<br />
04 PC PC<br />
05<br />
(Note 4)<br />
EM1 EM1 EM1<br />
06 For manufacturer setting (Note 2)<br />
07 ST1 RS2 ST1<br />
08 ST2 RS1 ST2<br />
09 TL1 TL1<br />
0A LSP LSP<br />
0B LSN LSN<br />
0C For manufacturer setting (Note 2)<br />
0D SP1 SP1<br />
0E SP2 SP2<br />
0F CN1-23 pin: PP SP3 SP3<br />
10 CN1-25 pin: NP LOP LOP<br />
11 CDP CDP<br />
12 to 1F<br />
For manufacturer<br />
setting (Note 2)<br />
20 MD0<br />
21 to 23<br />
For manufacturer<br />
setting (Note 2)<br />
24 TSTP<br />
25<br />
For manufacturer<br />
setting (Note 2)<br />
26 DOG<br />
27 PI1(Note 3)<br />
28 to 2B<br />
For manufacturer<br />
setting (Note 2)<br />
2C<br />
DI0<br />
2D<br />
DI1<br />
2E<br />
DI2<br />
2F to 3F<br />
For manufacturer<br />
setting (Note 2)<br />
Note 1. P: Position control mode<br />
S: Internal speed control mode<br />
T: Internal torque control mode<br />
CP: Positioning mode (Point table method)<br />
CL: Positioning mode (Program method)<br />
2. For manufacturer setting. Never set this value.<br />
3. It is valid in the positioning mode (Program method)<br />
only.<br />
4. When operating temporarily without using EM1 such as<br />
at startup, etc., set the EM1 to automatic ON in<br />
parameter No.PD01.<br />
4 - 46
4. PARAMETERS<br />
No. Symbol<br />
Name and function<br />
PD03 *DI1-1 Input signal device selection 1L (CN1-3)<br />
Any input signal can be assigned to the CN1-3 pin.<br />
Note that the setting digits and the signal that can be assigned vary<br />
depending on the control mode.<br />
Initial<br />
value<br />
0303h<br />
Setting<br />
range<br />
Refer to<br />
the name<br />
and<br />
function<br />
field.<br />
Unit<br />
Control mode<br />
Position Internal Internal<br />
speed torque<br />
Position control mode<br />
Internal speed control mode<br />
Select the<br />
input device<br />
of the CN1-<br />
3 pin.<br />
The devices that can be assigned in each control mode are indicated<br />
by symbols in the following table. If any other device is set, it is invalid.<br />
Setting<br />
Control modes (Note 1)<br />
P S T CP/CL<br />
00<br />
01 For manufacturer setting (Note 2)<br />
02 SON SON SON SON<br />
03 RES RES RES RES<br />
04 PC PC PC<br />
05<br />
(Note 4)<br />
EM1 EM1 EM1 EM1<br />
06 CR<br />
07 ST1 RS2 ST1<br />
08 ST2 RS1 ST2<br />
09 TL1 TL1 TL1<br />
0A LSP LSP LSP<br />
0B LSN LSN LSN<br />
0C For manufacturer setting (Note 2)<br />
0D SP1 SP1<br />
0E SP2 SP2<br />
0F SP3 SP3<br />
10 LOP LOP LOP<br />
11 CDP CDP CDP<br />
12 to 1F For manufacturer setting (Note 2)<br />
20 MD0<br />
21 to 23<br />
For manufacturer<br />
setting (Note 2)<br />
24 TSTP<br />
25<br />
For manufacturer<br />
setting (Note 2)<br />
26 DOG<br />
27 PI1 (Note 3)<br />
28 to 2B<br />
For manufacturer<br />
setting (Note 2)<br />
2C<br />
DI0<br />
2D<br />
DI1<br />
2E<br />
DI2<br />
2F to 3F<br />
For manufacturer<br />
setting (Note 2)<br />
Note 1. P: Position control mode<br />
S: Internal speed control mode<br />
T: Internal torque control mode<br />
CP: Positioning mode (Point table method)<br />
CL: Positioning mode (Program method)<br />
2. For manufacturer setting. Never set this value.<br />
3. It is valid in the positioning mode (Program method)<br />
only.<br />
4. When operating temporarily without using EM1 such<br />
as at startup, etc., set the EM1 to automatic ON in<br />
parameter No.PD01.<br />
4 - 47
4. PARAMETERS<br />
No. Symbol<br />
Name and function<br />
Initial<br />
value<br />
Setting<br />
range<br />
Unit<br />
Control mode<br />
Position Internal Internal<br />
speed torque<br />
PD04 *DI1-2 Input signal device selection 1H (CN1-3)<br />
2003h<br />
Refer to<br />
Any input signal can be assigned to the CN1-3 pin.<br />
the name<br />
The devices that can be assigned and the setting method are the<br />
and<br />
same as in parameter No. PD03.<br />
function<br />
field.<br />
Internal torque control mode<br />
Positioning mode<br />
Select the<br />
input device<br />
of the CN1-<br />
3 pin.<br />
PD05 *DI2-1 Input signal device selection 2L (CN1-4)<br />
Any input signal can be assigned to the CN1-4 pin.<br />
The devices that can be assigned and the setting method are the<br />
same as in parameter No. PD03.<br />
0202h<br />
Refer to<br />
the name<br />
and<br />
function<br />
field.<br />
Position control mode<br />
Internal speed control mode<br />
Select the<br />
input device<br />
of the CN1-<br />
4 pin.<br />
PD06 *DI2-2 Input signal device selection 2H (CN1-4)<br />
Any input signal can be assigned to the CN1-4 pin.<br />
The devices that can be assigned and the setting method are the<br />
same as in parameter No. PD03.<br />
0202h<br />
Refer to<br />
the name<br />
and<br />
function<br />
field.<br />
Internal torque control mode<br />
Positioning mode<br />
Select the<br />
input device<br />
of the CN1-<br />
4 pin.<br />
PD07 *DI3-1 Input signal device selection 3L (CN1-5)<br />
Any input signal can be assigned to the CN1-5 pin.<br />
The devices that can be assigned and the setting method are the<br />
same as in parameter No. PD03.<br />
0D06h<br />
Refer to<br />
the name<br />
and<br />
function<br />
field.<br />
Position control mode<br />
Internal speed control mode<br />
Select the<br />
input device<br />
of the CN1-<br />
5 pin.<br />
PD08 *DI3-2 Input signal device selection 3H (CN1-5)<br />
Any input signal can be assigned to the CN1-5 pin.<br />
The devices that can be assigned and the setting method are the<br />
same as in parameter No. PD03.<br />
2C0Dh Refer to<br />
the name<br />
and<br />
function<br />
field.<br />
Internal torque control mode<br />
Positioning mode<br />
Select the<br />
input device<br />
of the CN1-<br />
5 pin.<br />
4 - 48
4. PARAMETERS<br />
No. Symbol<br />
Name and function<br />
Initial<br />
value<br />
Setting<br />
range<br />
Unit<br />
Control mode<br />
Position Internal Internal<br />
speed torque<br />
PD09 *DI4-1 Input signal device selection 4L (CN1-6)<br />
Any input signal can be assigned to the CN1-6 pin.<br />
The devices that can be assigned and the setting method are the<br />
same as in parameter No. PD03.<br />
070Ah<br />
Refer to<br />
the name<br />
and<br />
function<br />
field.<br />
Position control mode<br />
Internal speed control mode<br />
Select the<br />
input device<br />
of the CN1-<br />
6 pin.<br />
PD10 *DI4-2 Input signal device selection 4H (CN1-6)<br />
Any input signal can be assigned to the CN1-6 pin.<br />
The devices that can be assigned and the setting method are the<br />
same as in parameter No. PD03.<br />
0707h<br />
Refer to<br />
the name<br />
and<br />
function<br />
field.<br />
Internal torque control mode<br />
Positioning mode<br />
Select the<br />
input device<br />
of the CN1-<br />
6 pin.<br />
PD11 *DI5-1 Input signal device selection 5L (CN1-7)<br />
Any input signal can be assigned to the CN1-7 pin.<br />
The devices that can be assigned and the setting method are the<br />
same as in parameter No. PD03.<br />
080Bh<br />
Refer to<br />
the name<br />
and<br />
function<br />
field.<br />
Position control mode<br />
Internal speed control mode<br />
Select the<br />
input device<br />
of the CN1-<br />
7 pin.<br />
PD12 *DI5-2 Input signal device selection 5H (CN1-7)<br />
Any input signal can be assigned to the CN1-7 pin.<br />
The devices that can be assigned and the setting method are the<br />
same as in parameter No. PD03.<br />
0808h<br />
Refer to<br />
the name<br />
and<br />
function<br />
field.<br />
Internal torque control mode<br />
Positioning mode<br />
Select the<br />
input device<br />
of the CN1-<br />
7 pin.<br />
PD13 *DI6-1 Input signal device selection 6L (CN1-8)<br />
Any input signal can be assigned to the CN1-8 pin.<br />
The devices that can be assigned and the setting method are the<br />
same as in parameter No. PD03.<br />
If a value other than the initial value is set, EM1 cannot be used.<br />
0505h<br />
Refer to<br />
the name<br />
and<br />
function<br />
field.<br />
Position control mode<br />
Internal speed control mode<br />
Select the<br />
input device<br />
of the CN1-<br />
8 pin.<br />
4 - 49
4. PARAMETERS<br />
No. Symbol<br />
Name and function<br />
Initial<br />
value<br />
Setting<br />
range<br />
Unit<br />
Control mode<br />
Position Internal Internal<br />
speed torque<br />
PD14 *DI6-2 Input signal device selection 6H (CN1-8)<br />
Any input signal can be assigned to the CN1-8 pin.<br />
The devices that can be assigned and the setting method are the<br />
same as in parameter No. PD03.<br />
If a value other than the initial value is set, EM1 cannot be used.<br />
0505h<br />
Refer to<br />
the name<br />
and<br />
function<br />
field.<br />
Internal torque control mode<br />
Positioning mode<br />
Select the<br />
input device<br />
of the CN1-<br />
8 pin.<br />
4 - 50
4. PARAMETERS<br />
No. Symbol<br />
PD15 *DO1<br />
Name and function<br />
Output signal device selection 1 (CN1-9)<br />
Any output signal can be assigned to the CN1-9pin. ALM is<br />
assigned as the initial value.<br />
Note that the device that can be assigned varies depending on the<br />
control mode.<br />
0 0<br />
Initial<br />
value<br />
0003h<br />
Setting<br />
range<br />
Refer to<br />
the name<br />
and<br />
function<br />
field.<br />
Unit<br />
Control mode<br />
Position Internal Internal<br />
speed torque<br />
Select the output device of the CN1-9 pin.<br />
The devices that can be assigned in each control mode are<br />
indicated by abbreviation in the following table. If any other device<br />
is set, it is invalid.<br />
Setting<br />
Control modes (Note 1)<br />
P S T CP/CL<br />
00 Always OFF Always OFF Always OFF Always OFF<br />
01 For manufacturer setting (Note 2)<br />
02 RD RD RD RD<br />
03 ALM ALM ALM ALM<br />
04 INP SA Always OFF INP<br />
05 MBR MBR MBR MBR<br />
06 For manufacturer setting (Note 2)<br />
07 TLC TLC VLC TLC<br />
08 WNG WNG WNG WNG<br />
09 For manufacturer setting (Note 2)<br />
0A Always OFF SA Always OFF Always OFF<br />
0B Always OFF Always OFF VLC Always OFF<br />
0C ZSP ZSP ZSP ZSP<br />
0D MTTR MTTR MTTR MTTR<br />
0E For manufacturer setting (Note 2)<br />
0F CDPS Always OFF Always OFF CDPS<br />
10 to 1F For manufacturer setting (Note 2)<br />
20 Always OFF Always OFF Always OFF CP0 (Note 3)<br />
21 Always OFF Always OFF Always OFF ZP<br />
22 Always OFF Always OFF Always OFF POT<br />
23 Always OFF Always OFF Always OFF PUS<br />
24 Always OFF Always OFF Always OFF MEND<br />
25 Always OFF Always OFF Always OFF PT0 (Note 3)<br />
26 Always OFF Always OFF Always OFF PT1 (Note 3)<br />
27 Always OFF Always OFF Always OFF PT2 (Note 3)<br />
28 Always OFF Always OFF Always OFF OUT1 (Note 4)<br />
29 Always OFF Always OFF Always OFF SOUT (Note 4)<br />
2A to 3F For manufacturer setting (Note 2)<br />
Note 1. P: Position control mode<br />
S: Internal speed control mode<br />
T: Internal torque control mode<br />
CP: Positioning mode (Point table method)<br />
CL: Positioning mode (Program method)<br />
2. For manufacturer setting. Never set this value.<br />
3. For the program method, it is always OFF.<br />
4. For the point table method, it is always OFF.<br />
4 - 51
4. PARAMETERS<br />
No. Symbol<br />
Name and function<br />
Initial<br />
value<br />
Setting<br />
range<br />
Unit<br />
Control mode<br />
Position Internal Internal<br />
speed torque<br />
PD16 *DO2<br />
Output signal device selection 2 (CN1-10)<br />
Any output signal can be assigned to the CN1-10 pin. INP is<br />
assigned as the initial value.<br />
The devices that can be assigned and the setting method are the<br />
same as in parameter No. PD15.<br />
0004h<br />
Refer to<br />
the name<br />
and<br />
function<br />
field.<br />
0 0<br />
Select the output device of the CN1-10 pin.<br />
PD17 *DO3<br />
Output signal device selection 3 (CN1-11)<br />
Any output signal can be assigned to the CN1-11 pin. RD is<br />
assigned as the initial value.<br />
The devices that can be assigned and the setting method are the<br />
same as in parameter No. PD15.<br />
0002h<br />
Refer to<br />
the name<br />
and<br />
function<br />
field.<br />
0 0<br />
Select the output device of the CN1-11 pin.<br />
PD18 *DO4<br />
Output signal device selection 4 (CN1-12)<br />
Any output signal can be assigned to the CN1-12 pin. MBR is<br />
assigned as the initial value.<br />
The devices that can be assigned and the setting method are the<br />
same as in parameter No. PD15.<br />
0005h<br />
Refer to<br />
the name<br />
and<br />
function<br />
field.<br />
0 0<br />
Select the output device of the CN1-12 pin.<br />
PD19 *DIF Input filter setting<br />
Select the input filter.<br />
0<br />
Input filter<br />
If external input signal causes chattering<br />
due to noise, etc., input filter is used to<br />
suppress it.<br />
0: None<br />
1: 1.777[ms]<br />
2: 3.555[ms]<br />
3: 5.333[ms]<br />
Reset (RES) dedicated filter selection<br />
0: Invalid<br />
1: Valid (50[ms])<br />
0002h<br />
Refer to<br />
the name<br />
and<br />
function<br />
field.<br />
Clear (CR) dedicated filter selection<br />
0: Invalid<br />
1: Valid (50[ms])<br />
4 - 52
4. PARAMETERS<br />
No. Symbol<br />
Name and function<br />
Initial<br />
value<br />
Setting<br />
range<br />
PD20 *DOP1 Function selection D-1<br />
0000h Refer to<br />
Select the stop processing at forward rotation stroke end<br />
(LSP)/reverse rotation stroke end (LSN) OFF, the base circuit status<br />
at reset (RES) ON and the operation during tough drive (MTTR).<br />
the name<br />
and<br />
function<br />
field.<br />
0<br />
How to make a stop when forward rotation stroke<br />
end (LSP)/reverse rotation stroke end (LSN)<br />
is OFF. (Refer to Section 4.4.3.)<br />
0: Sudden stop<br />
1: Slow stop<br />
Selection of base circuit status at reset (RES) ON<br />
0: Base circuit switched off<br />
1: Base circuit not switched off<br />
Operation selection during tough drive (MTTR)<br />
0: MTTR turns ON during the instantaneous<br />
power failure tough drive.<br />
1: MTTR turns ON during the overload tough<br />
drive or the instantaneous power failure tough<br />
drive<br />
Unit<br />
Control mode<br />
Position Internal Internal<br />
speed torque<br />
PD21<br />
For manufacturer setting<br />
Do not change this value by any means.<br />
PD22 *DOP3 Function selection D-3<br />
Set the clear (CR).<br />
0 0 0<br />
Clear (CR) selection<br />
0: Droop pulses are cleared on the leading edge.<br />
1: While on, droop pulses are always cleared.<br />
0000h<br />
0000h<br />
Refer to<br />
the name<br />
and<br />
function<br />
field.<br />
PD23<br />
For manufacturer setting<br />
Do not change this value by any means.<br />
PD24 *DOP5 Function selection D-5<br />
Select the warning (WNG) outputs.<br />
0 0<br />
0<br />
Selection of output device at warning occurrence<br />
Select the warning (WNG) and trouble (ALM)<br />
output status at warning occurrence.<br />
Setting (Note) Device status<br />
0<br />
1<br />
Note. 0: off<br />
1: on<br />
1<br />
WNG<br />
0<br />
1<br />
ALM<br />
0<br />
Warning occurrence<br />
1<br />
WNG<br />
0<br />
1<br />
ALM<br />
0<br />
Warning occurrence<br />
0000h<br />
0000h<br />
Refer to<br />
the name<br />
and<br />
function<br />
field.<br />
4 - 53
4. PARAMETERS<br />
No. Symbol<br />
Name and function<br />
Initial<br />
value<br />
Setting<br />
range<br />
Unit<br />
Control mode<br />
Position Internal Internal<br />
speed torque<br />
PD25 For manufacturer setting 0000h<br />
PD26 Do not change this value by any means. 0000h<br />
4.4.3 Using forward/reverse rotation stroke end to change the stopping pattern<br />
In the initial value, the servo motor makes a sudden stop when the forward/reverse rotation stroke end turns<br />
OFF. A slow stop can be made by changing parameter No. PD20 setting.<br />
Parameter No. PD20 setting<br />
0<br />
(initial value)<br />
1<br />
Sudden stop<br />
Position control mode<br />
Internal speed control mode<br />
Slow stop<br />
Position control mode<br />
Internal speed control mode<br />
Stopping method<br />
: The servo motor stops by clearing the droop<br />
pulses.<br />
: The servo motor stops when the deceleration time<br />
constant is zero.<br />
: The servo motor decelerates to a stop in<br />
accordance with parameter No. PB03 setting.<br />
: The servo motor decelerates to a stop in<br />
accordance with parameter No. PC02 setting.<br />
4 - 54
5. DISPLAY AND OPERATION<br />
5. DISPLAY AND OPERATION SECTIONS<br />
POINT<br />
Positioning mode is supported by servo amplifier with software version B0 or later.<br />
5.1 Overview<br />
<strong>MR</strong>-<strong>JN</strong>-A servo amplifier has a display section (3-digit, 7-segment LED), operation section (4 pushbuttons) and<br />
a one-touch tuning button for servo amplifier status display, alarm display, parameter and point table setting,<br />
etc.<br />
The operation section and display data are described below.<br />
AUTO<br />
One-touch tuning button (refer to section 6.1) The<br />
gain/filter is easily adjusted during the operation.<br />
3-digit LED<br />
Displays data.<br />
Decimal LED<br />
Displays the decimal points, alarm presence/absence, etc.<br />
Lit to indicate the decimal point.<br />
Decimal point<br />
Lit to indicate the negative value.<br />
MODE<br />
Display mode change<br />
upper/lower switching<br />
UP Display/data scrolling<br />
DOWN Display/data scrolling<br />
SET Display/data<br />
determination<br />
Data clear<br />
Flickers to indicate alarm occurrence.<br />
Flickers to indicate the test operation mode.<br />
The symbol in the third digit indicates that the number is<br />
the upper 3 digits of the parameter or the upper 3 digits<br />
of the point table. (If there is no number in the second<br />
digit, the same symbol will be displayed in the second<br />
digit.)<br />
However, when the position data of the point table is<br />
"100000" or higher, or "-100000" or less, a number will<br />
be displayed in the third digit.<br />
Lit decimal point of the first digit indicates the<br />
lower 3 digits of the parameter or the lower 3<br />
digits of the point table.<br />
5 - 1
5. DISPLAY AND OPERATION SECTIONS<br />
5.2 Display sequence<br />
Press the "MODE" button once to shift to the next display mode. Refer to section 5.3 and later for the<br />
description of the corresponding display mode.<br />
To refer to or set the gain/filter parameters, extension setting parameters, I/O setting parameters and<br />
positioning setting parameters, make them valid with parameter No. PA19 (parameter writing inhibit).<br />
Display mode transition Initial screen Function Reference<br />
Status display<br />
Servo status display.<br />
appears at power-on. (Note)<br />
Section 5.3<br />
Diagnosis<br />
Alarm<br />
Sequence display, external signal display, forced<br />
output of signal (DO), test operation, software version<br />
display, servo motor series ID display, servo motor<br />
type ID display, servo motor encoder ID display.<br />
Current alarm display, alarm history display, the<br />
number of tough drive display, parameter error No.<br />
display.<br />
Section 5.4<br />
Section 5.5<br />
Display and setting of point table data. Section 5.6<br />
Point table<br />
button<br />
MODE<br />
Basic setting<br />
parameters<br />
Display and setting of basic setting parameters.<br />
Section 5.7<br />
Gain/filter<br />
parameters<br />
Display and setting of gain/filter parameters.<br />
Extension setting<br />
parameters<br />
Display and setting of extension setting parameters.<br />
Display and setting of I/O setting parameters.<br />
I/O setting<br />
parameters<br />
Display and setting of positioning setting parameters.<br />
Positioning setting<br />
parameters<br />
Note. When the axis name is set to the servo amplifier using <strong>MR</strong> Configurator, the axis name is displayed and the servo status is then<br />
displayed.<br />
5 - 2
5. DISPLAY AND OPERATION SECTIONS<br />
5.3 Status display<br />
The servo status during operation is shown on the 3-digit, 7-segment LED display. Press the "UP" or the<br />
"DOWN" button to change the display data as desired. When the required data is selected, the corresponding<br />
symbol appears. Press the "SET" button to display the data. At power-on, however, the data appears either<br />
after the symbol of the status display for the respective control mode (refer to the following table) has been<br />
shown for 2[s], or after pressing the "MODE", "UP" or "DOWN" button.<br />
Control mode<br />
Position<br />
Position/internal speed<br />
Internal speed<br />
Internal speed/internal torque<br />
Internal torque<br />
Internal torque/position<br />
Status display at power-on<br />
Cumulative feedback pulses by the pulse<br />
Cumulative feedback pulses by the pulse/servo motor speed in 10r/min<br />
Servo motor speed in 10r/min<br />
Servo motor speed in 10r/min/instantaneous torque<br />
Instantaneous torque<br />
Instantaneous torque/cumulative feedback pulses by the pulse<br />
Positioning Current position in 10 STM m unit<br />
The servo amplifier display shows the data of 26 items such as the motor speed in a 3-digit display.<br />
5 - 3
5. DISPLAY AND OPERATION SECTIONS<br />
5.3.1 Display transition<br />
After selecting the status display mode by the "MODE" button, pressing the "UP" or the "DOWN" button<br />
changes the display as shown below.<br />
To Step No.<br />
Cumulative feedback pulses in pulse<br />
unit<br />
Within one-revolution position<br />
in pulse unit<br />
Cumulative feedback pulses in 1000<br />
pulse unit<br />
Within one-revolution position<br />
in 1000 pulse unit<br />
Servo motor speed in 10r/min unit<br />
Load to motor inertia moment<br />
ratio<br />
Servo motor speed in r/min unit<br />
Bus voltage<br />
Droop pulses in pulse unit<br />
(Note 1)<br />
Settling time<br />
Droop pulses in 1000 pulse unit<br />
Current position in 10 STM<br />
m unit<br />
Cumulative command pulses in pulse<br />
unit<br />
Cumulative command pulses in 1000<br />
pulse unit<br />
UP<br />
DOWN<br />
Current position in 1000 10 STM m<br />
unit<br />
Command position in 10 STM m unit<br />
Command pulse frequency<br />
Command position in 1000 10 STM<br />
m unit<br />
Regenerative load ratio<br />
Command remaining distance in<br />
10 STM m unit<br />
Effective load ratio<br />
Command remaining distance in<br />
1000 10 STM m unit<br />
Peak load ratio<br />
(Note 2)<br />
Point table No./Program No.<br />
Instantaneous torque<br />
Step No.<br />
To Cumulative feedback pulses in pulse unit<br />
Note 1. It can be displayed in the positioning mode (point table method and program method).<br />
2. It can be displayed in the positioning mode (program method).<br />
5 - 4
5. DISPLAY AND OPERATION SECTIONS<br />
5.3.2 Display examples<br />
POINT<br />
The following is priority order of the status display when two or more decimal<br />
points need to be displayed.<br />
1. Alarm occurrence, test operation<br />
2. Negative values<br />
The following table lists display examples.<br />
Item<br />
Status<br />
Displayed data<br />
Servo amplifier display<br />
Forward rotation at 2500r/min<br />
Servo motor<br />
speed in 10r/min<br />
unit<br />
Reverse rotation at 3000r/min<br />
Reverse rotation is indicated by the lit decimal points in the upper two digits.<br />
Lit<br />
Forward rotation at 250r/min<br />
Servo motor<br />
speed in r/min<br />
unit<br />
Reverse rotation at 300r/min<br />
Reverse rotation is indicated by the lit decimal points in the upper two digits.<br />
Lit<br />
5 - 5
5. DISPLAY AND OPERATION SECTIONS<br />
Item<br />
Status<br />
Displayed data<br />
Servo amplifier display<br />
Pulse unit<br />
720000pulse<br />
1000 pulse unit<br />
Cumulative<br />
feedback pulses<br />
Pulse unit<br />
Lit<br />
-680000pulse<br />
Negative value is indicated by the lit decimal points in the upper two digits.<br />
1000 pulse unit<br />
Negative value is indicated by the lit decimal points in the upper two digits.<br />
Lit<br />
Load to motor<br />
inertia moment<br />
ratio<br />
15 Multiplier<br />
5 - 6
5. DISPLAY AND OPERATION SECTIONS<br />
5.3.3 Status display list<br />
POINT<br />
Refer to appendix 4 for the measurement point.<br />
The following table lists the servo statuses that may be shown.<br />
Name Symbol Unit Description<br />
Cumulative feedback<br />
pulses in pulse unit<br />
Cumulative feedback<br />
pulses in 1000 pulse unit<br />
Servo motor speed in<br />
10r/min unit<br />
5 - 7<br />
Display<br />
range<br />
Feedback pulses from the servo motor encoder are counted and<br />
CL pulse displayed.<br />
-999 to 999<br />
Press the "SET" button to reset the display value to zero.<br />
CH 1000pulse Negative values are indicated by the lit decimal points in the upper two -999 to 999<br />
digits.<br />
r 10r/min The servo motor speed is displayed in 10r/min unit. -540 to 540<br />
Servo motor speed in<br />
r/min unit<br />
r1 r/min The servo motor speed is displayed in r/min unit. -999 to 999<br />
Droop pulses in pulse unit EL pulse<br />
The number of droop pulses in the deviation counter is displayed.<br />
-999 to 999<br />
When the servo motor is rotating in the reverse direction, the decimal<br />
points in the upper two digits are lit.<br />
Droop pulses in 1000<br />
EH 1000pulse The displayed number of pulses is in the same pulse unit as the servo -999 to 999<br />
pulse unit<br />
motor encoder resolution.<br />
The position command input pulses are counted and displayed.<br />
Cumulative command<br />
PL pulse As the value displayed is not yet multiplied by the electronic gear -999 to 999<br />
pulses in pulse unit<br />
(CMX/CDV), it may not match the indication of the cumulative feedback<br />
pulses.<br />
Cumulative command<br />
Press the "SET" button to reset the display value to zero.<br />
PH 1000pulse<br />
-999 to 999<br />
pulses in 1000 pulse unit<br />
Reverse rotation is indicated by the lit decimal points in the upper two<br />
digits.<br />
The frequency of the position command input pulses is displayed.<br />
The value displayed is not multiplied by the electronic gear (CMX/CDV).<br />
Command pulse<br />
n kpps The value in excess of ±999 can be counted up to ±1500. However, the -999 to 999<br />
frequency<br />
counter shows only the lower three digits since the servo amplifier<br />
display is three digits.<br />
Regenerative load ratio L %<br />
The ratio of regenerative power to permissible regenerative power is<br />
displayed in %.<br />
0 to 100<br />
Effective load ratio J %<br />
The continuous effective load current is displayed.<br />
The effective value in the past 15[s] is displayed relative to the rated 0 to 300<br />
current of 100%.<br />
Peak load ratio b %<br />
The maximum current is displayed.<br />
The highest value in the past 15[s] is displayed relative to the rated 0 to 400<br />
current of 100%.<br />
Instantaneous torque T %<br />
Torque that occurred instantaneously is displayed.<br />
The value of the torque that occurred is displayed in real time relative to<br />
the rate torque of 100%.<br />
0 to 400<br />
Within one-revolution<br />
position in pulse unit<br />
Within one-revolution<br />
position in 1000 pulse unit<br />
Load to motor inertia<br />
moment ratio<br />
Bus voltage<br />
Cy1 pulse<br />
Position within one revolution is displayed in encoder pulses.<br />
The value returns to 0 when it exceeds the maximum number of pulses.<br />
0 to 999<br />
The value is incremented in the CCW direction of rotation.<br />
Cy2 1000pulse The value is decremented in the CW direction of rotation. 0 to 999<br />
dC<br />
Pn<br />
Multiplier<br />
( 10 1 )<br />
Settling time ST ms<br />
The estimation value of load to motor inertia moment ratio to the servo<br />
motor shaft inertia moment is displayed.<br />
Status of the bus voltage is displayed in five steps.<br />
5: Overvoltage (About 400V or more)<br />
4: High voltage (About 375V or more)<br />
3: Normal<br />
2: Low voltage (About 200V or less)<br />
1: Undervoltage (About 160V or less)<br />
Settling time is displayed.<br />
The value in excess of 999 can be counted. However, the counter<br />
shows only the lower three digits since the servo amplifier display is<br />
three digits.<br />
0 to 300<br />
Refer to the<br />
contents.<br />
0 to 999
5. DISPLAY AND OPERATION SECTIONS<br />
Name Symbol Unit Description<br />
Current position in<br />
10 STM m unit (Note 1)<br />
Current position in 1000<br />
10 STM m unit (Note 1)<br />
Command position in<br />
10 STM m unit (Note 1)<br />
Command position in<br />
1000 10 STM m unit<br />
(Note 1)<br />
Display<br />
range<br />
PSL 10 STM The current position is displayed based on the machine home position<br />
m -999 to 999<br />
being regarded as "0".<br />
1000 Negative values are indicated by the lit decimal points in the upper two<br />
PSH<br />
10 STM digits. -999 to 999<br />
m<br />
CPL 10 STM m<br />
The internal command position is displayed.<br />
-999 to 999<br />
Negative values are indicated by the lit decimal points in the upper two<br />
CPH<br />
1000<br />
10 STM m<br />
digits. -999 to 999<br />
Command remaining<br />
distance in 10 STM<br />
m unit rnL 10 STM m The remaining distance to the command position specified by the 0 to 999<br />
selected point table is displayed.<br />
(Note 1)<br />
The value in excess of 999999 can be counted. However, the counter<br />
Command remaining<br />
1000 shows only the lower or higher three digits since the servo amplifier<br />
distance in 1000 10 STM<br />
rnH<br />
10 STM display is three digits. 0 to 999<br />
m<br />
m unit (Note 1)<br />
Point table No. (Note 1) The point table No./Program No. which is being performed is displayed. 0 to 7<br />
Program No. (Note 1)<br />
During automatic operation or temporary stop<br />
Pno<br />
: Displays the No. being performed.<br />
During stop<br />
: Displays the selected No.<br />
0 to 8<br />
During manual operation : Displays 0.<br />
Step No. (Note 2) Sno<br />
The step No. of the program which is being performed is displayed.<br />
0: During stop<br />
1 to 120: Step No. of the program which is being performed.<br />
0 to 120<br />
Note 1. It can be displayed in the positioning mode (point table method and program method).<br />
2. It can be displayed in the positioning mode (program method).<br />
5 - 8
5. DISPLAY AND OPERATION SECTIONS<br />
5.4 Diagnostic mode<br />
Name Display Description<br />
Not ready.<br />
Indicates that the servo amplifier is being initialized or<br />
an alarm has occurred.<br />
Sequence<br />
External I/O signal display Refer to section 5.8.<br />
Ready.<br />
Indicates that the servo was switched on after<br />
completion of initialization and the servo amplifier is<br />
ready to operate.<br />
Indicates the ON-OFF states of the external I/O<br />
signals.<br />
The upper segments correspond to the input signals<br />
and the lower segments to the output signals.<br />
Lit: ON<br />
Extinguished: OFF<br />
Drive recorder is valid. (During operation)<br />
Drive recorder valid/invalid display<br />
Drive recorder is invalid. (During stop)<br />
Output signal (DO) forced output<br />
The digital output signal can be forced on/off.<br />
For details, refer to section 5.9.<br />
JOG operation<br />
JOG operation can be performed when there is no<br />
command from the external command device.<br />
For details, refer to section 5.10.2.<br />
Positioning operation<br />
With no command given from the external command<br />
device, positioning operation can be executed once.<br />
<strong>MR</strong> Configurator is required for positioning operation.<br />
For details, refer to section 5.10.3.<br />
Test operation<br />
mode<br />
Motor-less operation<br />
Forced tough drive<br />
operation<br />
Without connection of the servo motor, the servo<br />
amplifier provides output signals and displays the<br />
status as if the servo motor is running actually in<br />
response to the input device.<br />
For details, refer to section 5.10.4.<br />
Overload tough drive can be forced even in the normal<br />
status.<br />
For details, refer to section 5.10.5.<br />
Single-step feed<br />
Indicates the operation following the set point table<br />
No. <strong>MR</strong> Configurator is required for single-step feed.<br />
For details, refer to section 13.10.<br />
Indicates the version of the software.<br />
Software version low<br />
5 - 9
5. DISPLAY AND OPERATION SECTIONS<br />
Name Display Description<br />
Indicates the lower two digits of the system number of<br />
Software version high<br />
the software. Three digits are displayed by pressing<br />
the "SET" button.<br />
Servo motor series ID<br />
Series ID of the servo motor currently connected will<br />
be displayed by pressing the "SET" button.<br />
For details, refer to App. 2.<br />
Servo motor type ID<br />
Type ID of the servo motor currently connected will be<br />
displayed by pressing the "SET" button.<br />
For details, refer to App. 2.<br />
Servo motor Encoder ID<br />
Encoder ID of the servo motor currently connected<br />
will be displayed by pressing the "SET" button.<br />
For details, refer to App. 2.<br />
For manufacturer setting<br />
5 - 10
5. DISPLAY AND OPERATION SECTIONS<br />
5.5 Alarm mode<br />
The current alarm, the past alarm history, the number of tough drive, the number of drive recorder record times,<br />
and the parameter error No. are displayed. The lower 2 digits on the display indicate the alarm number that has<br />
occurred or the parameter number in error.<br />
Name Display Description<br />
Indicates no occurrence of an alarm.<br />
Current alarm<br />
Indicates the occurrence of alarm 33 (overvoltage: detail 1).<br />
Flickers at occurrence of the alarm.<br />
Alarm No. and detail No. are displayed alternately in 2[s] intervals.<br />
2[s] intervals<br />
Indicates the last alarm.<br />
If the last alarm is 50 (overload: detail 1), alarm No. 50 (with detail No.) is<br />
displayed while holding down the "SET" button.<br />
SET<br />
Alarm history<br />
Indicates in hexadecimal for the second to the sixteenth alarm in the past<br />
as shown on the left. The alarm No. (with detail No.) is displayed while<br />
holding down the "SET" button.<br />
The number of tough drive<br />
Indicates the number of tough drive from 0 to 99. The number of tough<br />
drive can be cleared by setting parameter No. PC11 (alarm history clear)<br />
to " 1".<br />
Indicates the number of drive recorder record times. The number of times<br />
is displayed while holding down the "SET" button.<br />
The number of drive<br />
recorder record times<br />
SET<br />
5 - 11
5. DISPLAY AND OPERATION SECTIONS<br />
Name Display Description<br />
Indicates no occurrence of alarm 37 (parameter error).<br />
Indicates the parameter error No.<br />
If an error occurs in parameter No. PA12, "A12" is displayed while<br />
holding down the "SET" button.<br />
SET<br />
Parameter error No.<br />
Indicates the point table error No.<br />
If an error occurs in acceleration time constant of the point table No.1,<br />
"1A" is displayed while holding down the "SET" button.<br />
SET<br />
The first digit in the display refers to the followings.<br />
P: Position data<br />
d: Servo motor speed<br />
A: Acceleration time constant<br />
b: Deceleration time constant<br />
n: Dwell<br />
H: Auxiliary function<br />
Functions at occurrence of an alarm<br />
(1) Any mode screen displays the current alarm.<br />
(2) Even during alarm occurrence, the other screen can be viewed by pressing the button in the operation area.<br />
At this time, the decimal point in the third digit remains flickering.<br />
(3) For any alarm, remove its cause and clear it in any of the following methods (for clearable alarms, refer to<br />
section 8.1)<br />
(a) Switch power OFF, then ON.<br />
(b) Press the "SET" button on the current alarm screen.<br />
(c) Turn on the alarm reset (RES).<br />
(4) Use parameter No. PC11 to clear the alarm history.<br />
(5) When the servo-on (SON) is off after clearing the alarm history, the display shifts to the status display<br />
screen at power-on.<br />
When the servo-on (SON) is on, the following screen is displayed on the current alarm.<br />
(6) Press the "UP" or the "DOWN" button to move to the next history.<br />
5 - 12
5. DISPLAY AND OPERATION SECTIONS<br />
5.6 Point table mode<br />
In the positioning mode (point table method), the position data, the servo motor speed, the acceleration time<br />
constant, the deceleration time constant, dwell, and the auxiliary function can be set.<br />
5.6.1 Point table transition<br />
After selecting the point table mode with the "MODE" button, pressing the "UP" or the "DOWN" button changes<br />
the display as shown below.<br />
Point table No.1<br />
Point table No.2<br />
Point table No.3<br />
Point table No.4<br />
UP<br />
DOWN<br />
Point table No.5<br />
Point table No.6<br />
Point table No.7<br />
5 - 13
5. DISPLAY AND OPERATION SECTIONS<br />
5.6.2 Point table mode setting screen sequence<br />
In the point table mode, pressing the "SET" button changes the screen as shown below.<br />
Press the "UP" or the "DOWN" button to move to the next screen.<br />
Position data<br />
Servo motor speed<br />
Acceleration time<br />
constant<br />
UP<br />
Deceleration time<br />
constant<br />
DOWN<br />
Dwell<br />
Auxiliary function<br />
5 - 14
5. DISPLAY AND OPERATION SECTIONS<br />
5.6.3 Operation example<br />
POINT<br />
When the set value of a specified point table is changed and entered, the<br />
entered set value is displayed. The set value can be cancelled by pressing<br />
the "MODE" button for 2[s] or longer immediately after entering the value.<br />
Then, the previous set value is displayed.<br />
(1) Setting of 3 or less digits<br />
The following example shows the operation procedure performed after power-on to set the auxiliary<br />
function of the point table No.1 to "1".<br />
Press MODE three times.<br />
The point table No. is displayed.<br />
Press UP or DOWN to choose the point table No.1.<br />
Press SET once.<br />
Press UP five times.<br />
Press SET twice.<br />
The set value of the specified point table No. flickers.<br />
Press UP once.<br />
During flickering, the set value can be changed.<br />
Set with UP or DOWN.<br />
Press SET to enter.<br />
To the next setting<br />
After setting (1), to shift to other items of the same point table No., press the "UP" or the "DOWN" button.<br />
To shift to the next point table No., press the "MODE" button.<br />
5 - 15
5. DISPLAY AND OPERATION SECTIONS<br />
(2) Setting of 4 or more digits<br />
The following example gives the operation procedure to change the position data of the point table No.1 to<br />
"123456".<br />
Press MODE three times.<br />
The point table No. is displayed.<br />
Press UP or DOWN to choose the point table No.1.<br />
Press SET once.<br />
Press SET once.<br />
Setting of<br />
upper 3 digits<br />
Choose the setting screen<br />
of the upper 3 digits or the<br />
lower 3 digits with MODE.<br />
Setting of lower 3 digits<br />
(The decimal point of the first<br />
digit is lit.)<br />
Press SET once.<br />
The set value of the<br />
specified point table No.<br />
flickers.<br />
Press UP or DOWN to<br />
change the setting.<br />
Press SET once.<br />
Press UP or DOWN to<br />
change the setting.<br />
Press SET once.<br />
Press SET once.<br />
Enter the setting.<br />
To the next setting<br />
To the next setting<br />
After setting (2), to shift to the setting of higher or lower 3 digits in the same point table No., press the<br />
"MODE" button.<br />
To shift to other items of the same point table No., press the "UP" or the "DOWN" button.<br />
To shift to the next point table No., press the "MODE" button after shifting to other items of the same point<br />
table No. by pressing the "UP" or "DOWN" button.<br />
5 - 16
5. DISPLAY AND OPERATION SECTIONS<br />
5.7 Parameter mode<br />
5.7.1 Parameter mode transition<br />
After choosing the corresponding parameter mode with the "MODE" button, pressing the "UP" or the "DOWN"<br />
button changes the display as shown below.<br />
To status<br />
display mode<br />
Basic setting<br />
parameters<br />
Gain/filter<br />
parameters<br />
Extension setting<br />
parameters<br />
MODE<br />
I/O setting<br />
parameters<br />
Positioning setting<br />
parameters<br />
Parameter No. PA01<br />
Parameter No. PB01<br />
Parameter No. PC01<br />
Parameter No. PD01<br />
Parameter No. PE01<br />
Parameter No. PA02<br />
Parameter No. PB02<br />
Parameter No. PC02<br />
Parameter No. PD02<br />
Parameter No. PE02<br />
UP<br />
DOWN<br />
Parameter No. PA18<br />
Parameter No. PB49<br />
Parameter No. PC63<br />
Parameter No. PD25<br />
Parameter No. PE27<br />
Parameter No. PA19<br />
Parameter No. PB50<br />
Parameter No. PC64<br />
Parameter No. PD26<br />
Parameter No. PE28<br />
5 - 17
5. DISPLAY AND OPERATION SECTIONS<br />
5.7.2 Operation example<br />
POINT<br />
When the set value of a specified parameter is changed and entered, the entered<br />
set value is displayed. The set value can be cancelled by pressing the "MODE"<br />
button for 2[s] or longer immediately after entering the value. Then, the previous<br />
set value is displayed.<br />
(1) Parameter of 3 or less digits<br />
The following example shows the operation procedure performed after power-on to change the control<br />
mode (parameter No. PA01) to the internal speed control mode. Press "MODE" to switch to the basic<br />
setting parameter screen.<br />
The parameter number is displayed.<br />
Press UP or DOWN to change the number.<br />
Press SET twice.<br />
The set value of the specified parameter number flickers.<br />
Press UP twice.<br />
During flickering, the set value can be changed.<br />
Use UP or DOWN.<br />
( 2: Internal speed control mode)<br />
Press SET to enter.<br />
To shift to the next parameter, press the "UP" or the "DOWN" button.<br />
When changing parameter No. PA01 setting, change its set value, then switch power off once and switch it<br />
on again to make the new value valid.<br />
5 - 18
5. DISPLAY AND OPERATION SECTIONS<br />
(2) Parameter of 4 or more digits<br />
The following example gives the operation procedure to change the electronic gear numerator (command<br />
pulse multiplication numerator) (parameter No. PA06) to "12345".<br />
Press MODE four times.<br />
Press UP or DOWN to choose parameter No. PA06.<br />
Press SET once.<br />
Setting of upper<br />
2 digits<br />
Press MODE once.<br />
Setting of lower 3 digits<br />
(The decimal point of the first digit is lit.)<br />
Press SET once.<br />
Press SET once.<br />
The screen flickers.<br />
Press UP or DOWN to<br />
change the setting.<br />
Press UP or DOWN to<br />
change the setting.<br />
Press SET once.<br />
Press SET once.<br />
Enter the setting.<br />
Press MODE once.<br />
Press MODE once.<br />
To the initial scre en<br />
of setting for lower 3<br />
To the initial screen<br />
of setting for upper 2<br />
To proceed to the next parameter, press the “UP” or “DOWN” button.<br />
5 - 19
5. DISPLAY AND OPERATION SECTIONS<br />
5.8 External I/O signal display<br />
The ON/OFF states of the digital I/O signals connected to the servo amplifier can be confirmed.<br />
(1) Operation<br />
Call the display screen shown after power-on. Using the "MODE" button, show the diagnostic screen.<br />
Press UP once.<br />
External I/O signal display screen<br />
(2) Display definition<br />
The 7-segment LED segments and CN1 connector pins correspond as shown below.<br />
CN1<br />
3<br />
CN1<br />
23<br />
CN1<br />
4<br />
CN1<br />
5<br />
CN1<br />
25<br />
CN1<br />
6<br />
CN1<br />
7<br />
CN1<br />
8<br />
Input signals<br />
Always lit<br />
Output signals<br />
CN1<br />
21<br />
CN1<br />
9<br />
CN1<br />
10<br />
CN1<br />
11<br />
CN1<br />
12<br />
Lit: ON<br />
Extinguished: OFF<br />
The LED segment corresponding to the pin is lit to indicate ON, and is extinguished to indicate OFF.<br />
The signals corresponding to the pins in the respective control modes are indicated below.<br />
5 - 20
5. DISPLAY AND OPERATION SECTIONS<br />
(a) Control modes and I/O signals<br />
Connector Pin No.<br />
Signal input/output<br />
(Note 2) Symbols of I/O signals in control modes<br />
Related<br />
(Note 1) I/O P P/S S S/T T T/P CP/CL parameter<br />
3 I RES RES RES RES RES RES MD0 PD03 PD04<br />
4 I SON SON SON SON SON SON SON PD05 PD06<br />
5 I CR CR/SP1 SP1 SP1/SP1 SP1 SP1/CR DI0 PD07 PD08<br />
6 I LSP LSP/ST1 ST1 ST1/RS2 RS2 RS2/LSP ST1 PD09 PD10<br />
7 I LSN LSN/ST2 ST2 ST2/RS1 RS1 RS1/LSN ST2 PD11 PD12<br />
8 I EM1 EM1 EM1 EM1 EM1 EM1 EM1 PD13 PD14<br />
CN1 9 O ALM ALM ALM ALM ALM ALM ALM PD15<br />
10 O INP INP/SA SA SA/- -/INP INP PD16<br />
11 O RD RD RD RD RD RD RD PD17<br />
12 O MBR MBR MBR MBR MBR MBR MBR PD18<br />
21 O OP OP OP OP OP OP OP<br />
23 I DI1 PD02<br />
25 I DOG PD02<br />
Note 1. I: Input signal, O: Output signal<br />
2. P: Position control mode, S: Internal speed control mode, T: Internal torque control mode,<br />
P/S: Position/internal speed control change mode, S/T: Internal speed/internal torque control change mode,<br />
T/P: Internal torque/position control change mode<br />
CP: Positioning mode (Point table method), CL: Positioning mode (Program method)<br />
(b) Symbol and signal names<br />
Symbol Signal name Symbol Signal name<br />
SON Servo-on RD Ready<br />
RES Reset ALM Trouble<br />
PC Proportion control INP In-position<br />
EM1 Forced stop SA Speed reached<br />
CR Clear MBR Electromagnetic brake interlock<br />
ST1 Forward rotation start TLC Limiting torque<br />
ST2 Reverse rotation start VLC Limiting speed<br />
RS1 Forward rotation selection WNG Warning<br />
RS2 Reverse rotation selection ZSP Zero speed<br />
TL1 Internal torque limit selection MTTR During tough drive<br />
LSP Forward rotation stroke end CDPS During variable gain selection<br />
LSN Reverse rotation stroke end ZP Home position return completion<br />
SP1 Speed selection 1 PUS Temporary stop<br />
SP2 Speed selection 2 MEND Travel completion<br />
SP3 Speed selection 3 CP0 Rough match<br />
LOP Control change POT Position range output<br />
CDP Gain changing selection PT0 Point table No. output 1<br />
DOG Proximity dog PT1 Point table No. output 2<br />
MD0 Automatic/<strong>Manual</strong> selection PT2 Point table No. output 3<br />
TSTP Temporary stop/Restart OUT1 Program output 1<br />
DI0 Point table No./Program No. selection 1 SOUT SYNC synchronous output<br />
DI1 Point table No./Program No. selection 2 OP Encoder Z-phase pulse (open collector)<br />
DI2 Point table No./Program No. selection 3<br />
PI1 Program input 1<br />
5 - 21
5. DISPLAY AND OPERATION SECTIONS<br />
(3) Display data at initial values<br />
(a) Position control mode<br />
CR(CN1-5)<br />
SON(CN1-4)<br />
RES(CN1-3)<br />
Input signals<br />
Output signals<br />
OP(CN1-21)<br />
ALM(CN1-9)<br />
LSP(CN1-6)<br />
LSN(CN1-7)<br />
EM1(CN1-8)<br />
MBR(CN1-12)<br />
RD(CN1-11)<br />
INP(CN1-10)<br />
Lit: ON<br />
Extinguished: OFF<br />
(b) Internal speed control mode<br />
SP1(CN1-5)<br />
SON(CN1-4)<br />
Not assigned (CN1-23)<br />
RES(CN1-3)<br />
Input signals<br />
Output signals<br />
OP(CN1-21)<br />
ALM(CN1-9)<br />
Not assigned (CN1-25)<br />
ST1(CN1-6)<br />
ST2(CN1-7)<br />
EM1(CN1-8)<br />
MBR(CN1-12)<br />
RD(CN1-11)<br />
SA(CN1-10)<br />
Lit: ON<br />
Extinguished: OFF<br />
(c) Internal torque control mode<br />
SP1(CN1-5)<br />
SON(CN1-4)<br />
Not assigned (CN1-23)<br />
RES(CN1-3)<br />
Input signals<br />
Output signals<br />
OP(CN1-21)<br />
ALM(CN1-9)<br />
Not assigned (CN1-25)<br />
RS2(CN1-6)<br />
RS1(CN1-7)<br />
EM1(CN1-8)<br />
MBR(CN1-12)<br />
RD(CN1-11)<br />
Lit: ON<br />
Extinguished: OFF<br />
(d) Positioning mode<br />
DI0 (CN1-5)<br />
SON (CN1-4)<br />
DI1 (CN1-23)<br />
MD0 (CN1-3)<br />
Input signals<br />
Output signals<br />
OP (CN1-21)<br />
ALM (CN1-9)<br />
DOG (CN1-25)<br />
ST1 (CN1-6)<br />
ST2 (CN1-7)<br />
EM1 (CN1-8)<br />
MBR (CN1-12)<br />
RD (CN1-11)<br />
INP (CN1-10)<br />
Lit: ON<br />
Extinguished: OFF<br />
5 - 22
5. DISPLAY AND OPERATION SECTIONS<br />
5.9 Output signal (DO) forced output<br />
POINT<br />
When the servo system is used in a vertical lift application, turning on the<br />
electromagnetic brake interlock (MBR) with DO forced output after assigning it to<br />
connector CN1 will release the electromagnetic brake, causing a drop. Take drop<br />
preventive measures on the machine side.<br />
The output signal can be forced on/off independently of the servo status. This function is used for output signal<br />
wiring check, etc. This operation must be performed in the servo off state by turning off the servo-on (SON).<br />
Operation<br />
After power-on, change the display to the diagnostic screen using the "MODE" button.<br />
Press UP twice.<br />
Press SET for 2s or more to shift to the output signal (DO)<br />
forced output screen.<br />
At this time, the decimal point in the first digit flickers.<br />
CN1-9<br />
CN1-11<br />
CN1-10<br />
CN1-12<br />
Switch on/off the signal below the lit segment.<br />
Always lit<br />
Indicates the ON/OFF of the output signal. The correspondences<br />
between segments and signals are as in the output signals of the<br />
external I/O signal display.<br />
(Lit: ON, extinguished: OFF)<br />
Press MODE once.<br />
The segment above CN1-11 pin is lit.<br />
Press UP once.<br />
CN1-11 pin is switched on.<br />
(CN1-11 pin-DOCOM conduct.)<br />
Press DOWN once.<br />
CN1-11 pin is switched off.<br />
Press SET for more than 2s.<br />
5 - 23
5. DISPLAY AND OPERATION SECTIONS<br />
5.10 Test operation mode<br />
CAUTION<br />
The test operation mode is designed to confirm servo operation. Do not use it for<br />
actual operation.<br />
If any abnormal operation has occurred, stop the operation using the forced stop<br />
(EM1) signal.<br />
POINT<br />
<strong>MR</strong> Configurator is required to perform positioning operation.<br />
Test operation cannot be performed if the servo-on (SON) is not turned OFF.<br />
When the test operation is performed in the positioning mode, turn off the power<br />
of the servo amplifier once to shift to the normal operation mode.<br />
5.10.1 Mode change<br />
After power-on, change the display to the diagnostic screen using the "MODE" button. Select JOG<br />
operation/motor-less operation/forced tough drive operation in the following procedure.<br />
Press UP three times.<br />
Press UP five times.<br />
Press SET for more<br />
than 2s.<br />
<br />
When this screen<br />
appears, JOG operation<br />
can be performed.<br />
(Refer to section 5.10.2.)<br />
Press SET for more than 2s.<br />
<br />
When this screen appears,<br />
motor-less operation can be<br />
performed.<br />
(Refer to section 5.10.4.)<br />
Press UP seven times.<br />
Press SET for more<br />
than 2s.<br />
<br />
When this screen appears,<br />
forced tough drive operation<br />
can be performed.<br />
(Refer to section 5.10.5.)<br />
5 - 24
5. DISPLAY AND OPERATION SECTIONS<br />
5.10.2 JOG operation<br />
POINT<br />
When performing JOG operation, turn ON the forced stop (EM1), the forward<br />
rotation stroke end (LSP) and the reverse rotation stroke end (LSN). The<br />
forward rotation stroke end (LSP) and the reverse rotation stroke end (LSN) can<br />
be set to automatic ON by setting parameter No. PD01 to " C ".<br />
JOG operation can be performed when there is no command from the external command device.<br />
(1) Operation<br />
The servo motor rotates while holding down the "UP" or the "DOWN" button. The servo motor stops rotating<br />
by releasing the button. The operation condition can be changed using <strong>MR</strong> Configurator. The initial setting<br />
values and setting ranges for operation are listed below.<br />
Item Initial setting Setting range<br />
Speed [r/min] 200 0 to instantaneous permissible speed<br />
Acceleration/deceleration time constant [ms] 1000 0 to 50000<br />
How to use the buttons is explained below.<br />
Button<br />
Description<br />
"UP"<br />
Press to start CCW rotation.<br />
Release to stop.<br />
"DOWN"<br />
Press to start CW rotation.<br />
Release to stop.<br />
If the communication cable is disconnected during the JOG operation using <strong>MR</strong> Configurator, the servo<br />
motor decelerates to a stop.<br />
(2) Status display<br />
Call the status display screen by pressing the "MODE" button in the JOG operation stand-by status.<br />
When the JOG operation is performed using the "UP" or the "DOWN" button, the servo status during the<br />
JOG operation appears on the display. The status display screen shifts to the next screen every time the<br />
"MODE" button is pressed. The status display screen returns to the JOG operation stand-by screen after<br />
one screen cycle. For details of the status display, refer to section 5.3. Note that the status display screen<br />
cannot be changed by the "UP" or the "DOWN" button in the JOG operation mode.<br />
(3) Termination of JOG operation<br />
To end the JOG operation, turn the power off once or press the "MODE" button to switch to the next screen,<br />
and then hold down the "SET" button for 2[s] or longer.<br />
5 - 25
5. DISPLAY AND OPERATION SECTIONS<br />
5.10.3 Positioning operation<br />
POINT<br />
<strong>MR</strong> Configurator is required to perform positioning operation.<br />
Turn ON the forced stop (EM1) when performing positioning operation.<br />
During positioning operation, the "UP" and the "DOWN" buttons are invalid.<br />
With no command given from the external command device, positioning operation can be executed once.<br />
(1) Operation<br />
a)<br />
b)<br />
c)<br />
d)<br />
e)<br />
f)<br />
h)<br />
i)<br />
j)<br />
k)<br />
l)<br />
g)<br />
m)<br />
n)<br />
a) Motor speed [r/min]<br />
Enter the servo motor speed into the "Motor speed" input field.<br />
b) Accel/decel time [ms]<br />
Enter the acceleration/deceleration time constant into the "Accel/decel time" input field.<br />
c) Move distance [pulse]<br />
Enter the moving distance into the "Move distance" input field.<br />
d) LSP/LSN automatically turned ON<br />
When setting the external stroke signal to automatic ON, click the check box to make it valid. When it<br />
is not checked, turn ON LSP/LSN externally.<br />
e) Move until the initial Z-phase signal of the move distance in the move direction is turned ON.<br />
Movement is made until the initial Z-phase signal of the move distance in the move direction is turned<br />
ON.<br />
5 - 26
5. DISPLAY AND OPERATION SECTIONS<br />
f) Pulse move distance unit selection/Command input pulse unit/Encoder pulse unit<br />
Select with the option buttons whether the moving distance set in c) is in the command pulse unit or in<br />
the encoder pulse unit.<br />
When the command input pulse unit is selected, the value, which is the set moving distance multiplied<br />
by the electronic gear ( CMX<br />
CDV<br />
), will be the command value. When the encoder pulse unit is selected,<br />
the moving distance is not multiplied by the electronic gear.<br />
g) Repeated operation<br />
Click the check box of "Make the repeated operation valid" to execute a repeated operation. The<br />
following lists the initial conditions and setting ranges for the repeated operation.<br />
Item Initial setting Setting range<br />
Repeated pattern Forward rotation (CCW) to reverse rotation (CW)<br />
Forward rotation (CCW) to reverse rotation (CW)<br />
Forward rotation (CCW) to Forward rotation (CCW)<br />
Reverse rotation (CW) to forward rotation (CCW)<br />
Reverse rotation (CW) to Reverse rotation (CW)<br />
Dwell Times 2.0 0.1 to 50.0<br />
Number of repeats<br />
(times)<br />
1 1 to 9999<br />
Click the check box of "Make the aging function valid" to execute the repeated operation with the<br />
repeated pattern and the dwell time set above.<br />
h) Forward/Reverse<br />
Click the "Forward" button to rotate the servo motor in the forward rotation direction.<br />
Click the "Reverse" button to rotate the servo motor in the reverse rotation direction.<br />
i) Pause<br />
Click the "Pause" button during servo motor rotation to temporarily stop the servo motor.<br />
This button is valid during servo motor rotation.<br />
j) Restart<br />
Click the "Restart" button during a temporary stop to restart the servo motor rotation.<br />
This button is valid during a temporary stop of the servo motor.<br />
k) Remaining move distance clear<br />
Click the "Remaining distance clear" button during a temporary stop to erase the remaining distance.<br />
This button is valid during a temporary stop of the servo motor.<br />
l) Forced stop<br />
Click the "S/W forced stop" button during servo motor rotation to make a hard stop.<br />
This button is valid during servo motor rotation.<br />
5 - 27
5. DISPLAY AND OPERATION SECTIONS<br />
m) Repeated operation status<br />
Operation status, repeated pattern, the number of repeats in the repeated operation is displayed.<br />
n) Close<br />
Click the "Close" button to cancel the positioning operation mode and close the window.<br />
(2) Status display<br />
The status display can be monitored during positioning operation.<br />
5.10.4 Motor-less operation<br />
Without a servo motor being connected, the output signals are provided and the status is displayed as if the<br />
servo motor is running in response to input device. This operation can be used to check the sequence of a<br />
host programmable logic controller or the like.<br />
(1) Operation<br />
Turn off the servo-on (SON), and then select motor-less operation. After that, perform external operation as<br />
in ordinary operation.<br />
(2) Status display<br />
The servo status can be checked in the motor-less operation.<br />
Change the display to the status display screen by pressing the "MODE" button. (Refer to section 5.2.)<br />
The status display screen can be changed by pressing the "UP" or the "Down" button. (Refer to section<br />
5.3.)<br />
(3) Termination of motor-less operation<br />
To terminate the motor-less operation, turn the power off.<br />
5 - 28
5. DISPLAY AND OPERATION SECTIONS<br />
5.10.5 Forced tough drive operation<br />
POINT<br />
Execute forced tough drive operation after ten minutes of normal operation.<br />
The tough drive can be checked in advance by forcing the overload tough drive, even if the servo motor is in<br />
the normal status.<br />
(1) Operation<br />
Press the "SET" button for 2[s] or longer in normal operation to execute the forced tough drive operation.<br />
(2) Status display<br />
Call the status display screen by pressing the "MODE" button in the forced tough drive operation stand-by<br />
status. The status display screen returns to the forced tough drive operation stand-by screen after one<br />
screen cycle. For details of the status display, refer to section 5.3. Note that the status display screen<br />
cannot be changed by the "UP" or the "DOWN" button in the forced tough drive operation mode.<br />
(3) Termination of forced tough drive operation<br />
To end the forced tough drive operation, turn the power off once, or press the "MODE" button to switch to<br />
the next screen and then hold down the "SET" button for 2[s] or longer.<br />
5.11 One-touch tuning<br />
POINT<br />
For full information of the one-touch tuning, refer to section 6.1.<br />
Press the "AUTO" button for 3[s] or longer in the position control mode, the internal speed control mode or<br />
the positioning mode, and then press it again to execute the one-touch tuning.<br />
5 - 29
5. DISPLAY AND OPERATION SECTIONS<br />
MEMO<br />
5 - 30
6. GENERAL GAIN ADJUSTMENT<br />
6. GENERAL GAIN ADJUSTMENT<br />
POINT<br />
When using in the internal torque control mode, gain adjustment is not<br />
necessary.<br />
When making gain adjustment, check that the machine is not operated at the<br />
maximum torque of the servo motor. The operation at the maximum torque or<br />
more may cause unexpected operations such as machine vibration, etc.<br />
Consider individual machine differences, and do not adjust gain too strictly. It is<br />
recommended to keep the servo motor torque to 90% or less of the maximum<br />
torque of the servo motor during the operation.<br />
6.1 One-touch tuning<br />
Just by pressing the "AUTO" button on the front panel of the servo amplifier, the gain/filter is easily adjusted.<br />
The following parameters are automatically adjusted by the one-touch tuning.<br />
Parameter No. Symbol Name<br />
PA08 ATU Auto tuning mode<br />
PA09 RSP Auto tuning response<br />
PB03<br />
PST<br />
Position command acceleration/ deceleration time constant (Position<br />
smoothing)<br />
PB07 P<strong>G1</strong> Model loop gain<br />
PB12 OVA Overshoot amount compensation<br />
PB13 NH1 Machine resonance suppression filter 1<br />
PB14 NHQ1 Notch shape selection 1<br />
PB15 NH2 Machine resonance suppression filter 2<br />
PB16 NHQ2 Notch shape selection 2<br />
6 - 1
6. GENERAL GAIN ADJUSTMENT<br />
6.1.1 One-touch tuning procedure<br />
Use the following procedure to perform the one-touch tuning.<br />
START<br />
Startup of system<br />
Operation<br />
Shift to the one-touch<br />
tuning mode<br />
Refer to "Introduction" in this manual, and start up the<br />
system.<br />
Rotate the servo motor by an external command device,<br />
etc. (The one-touch tuning cannot be performed if the<br />
servo motor is not operating.)<br />
Press the "AUTO" button for 3[s] or longer during the<br />
operation. The display changes to " ", and the mode<br />
shifts to the one-touch tuning mode.<br />
Selection of the response<br />
mode<br />
Press the "UP" or the "DOWN" button while "<br />
displayed to select the response mode.<br />
" is<br />
Execution of the one-touch<br />
tuning<br />
Start the one-touch tuning by pressing the "AUTO" button.<br />
When the one-touch tuning is completed normally, the<br />
gain/filter is automatically adjusted.<br />
END<br />
6 - 2
6. GENERAL GAIN ADJUSTMENT<br />
6.1.2 Display transition and operation procedure of the one-touch tuning<br />
(1) Selection of the response mode<br />
Select the response mode of the one-touch tuning (three types) by the "UP" and the "DOWN" buttons.<br />
Response mode selection display<br />
Low mode<br />
Response mode for machines with low rigidity such as a belt drive.<br />
UP<br />
Basic mode<br />
DOWN<br />
Response mode for standard machines.<br />
High mode<br />
Response mode for machines with high rigidity such as a ballscrew<br />
drive.<br />
Response mode<br />
Low mode Basic mode High mode<br />
Response<br />
level<br />
Low response<br />
Machine characteristic<br />
Guideline of corresponding machine<br />
Arm robot<br />
Precision<br />
working<br />
machine<br />
General machine<br />
tool conveyor<br />
Inserter<br />
Mounter<br />
Bonder<br />
High response<br />
The one-touch tuning mode will be canceled in 10[s] after shifting to the one-touch tuning mode. Then, the<br />
mode returns to the status display at power-on.<br />
6 - 3
6. GENERAL GAIN ADJUSTMENT<br />
(2) Performing the one-touch tuning<br />
Select the response mode in (1), and press the "AUTO" button to start the one-touch tuning.<br />
During the onetouch<br />
adjustment<br />
The progress of the one-touch tuning is displayed from 0 to 100%.<br />
During the one-touch tuning, the decimal point is lit, moving from right to left.<br />
Pressing the "MODE" button during the one-touch tuning calls the status display.<br />
At 100%<br />
When the progress of the one-touch tuning reaches 100%, the parameters adjusted<br />
automatically in the one-touch tuning are written into the servo amplifier.<br />
Completion display<br />
The completion display is called 1s later.<br />
At completion, "Fin" flickers regardless of the item displayed.<br />
Settling time display<br />
Pressing any button calls the settling time (status display).<br />
The settling time of the status display is displayed, and the value is displayed 2s later.<br />
The "UP" and "DOWN" buttons enable to call other status displays, and the "MODE"<br />
button enables to call the diagnostic mode.<br />
2s later<br />
Settling time (100ms)<br />
POINT<br />
The settling time can also be checked in the status display mode. (Refer to<br />
section 5.3.)<br />
6 - 4
6. GENERAL GAIN ADJUSTMENT<br />
(3) Cancelling the one-touch tuning<br />
Cancel symbol display<br />
In the one-touch tuning mode regardless of the item displayed, pressing "AUTO" button<br />
cancels the one-touch tuning mode.<br />
Error code<br />
At 2s intervals<br />
The cancel symbol display and error code "C00" (cancel during the adjustment) are<br />
displayed alternately every 2s.<br />
Pressing any button calls the status display at power-on.<br />
Status display at power-on (in the position control mode).<br />
(4) At error occurrence<br />
Cancel symbol display<br />
If some error occurs during the one-touch tuning, the one-touch tuning is canceled, and<br />
the cancel symbol display and error code "C01" to "C04" are displayed alternately every<br />
2s.<br />
Error code<br />
At 2s intervals<br />
Refer to the following table to remove the cause of the error.<br />
Display Name Description Action<br />
C00 Cancel during The "AUTO" button was<br />
the adjustment pressed again during the<br />
adjustment to cancel the<br />
adjustment. (Refer to<br />
paragraph (3) of this section.)<br />
C01<br />
C02<br />
C03<br />
C04<br />
Excessive<br />
overshoot<br />
Servo-off<br />
during the<br />
adjustment<br />
Control mode<br />
fault<br />
Time-out<br />
The overshoot is lager than the Increase the in-position range<br />
value set in the in-position range (parameter No. PA10).<br />
(parameter No. PA10).<br />
The one-touch tuning was<br />
attempted while the servo-on<br />
(SON) was turned OFF.<br />
Perform the one-touch tuning<br />
after turning on the servo-on<br />
(SON).<br />
The one-touch tuning was Select the position control mode<br />
attempted while the internal or internal speed control mode<br />
torque control mode was for the control mode, and perform<br />
selected from the control modes. the one-touch tuning.<br />
1. 1 cycle time during the<br />
operation is over 30s.<br />
2. The servo motor speed is<br />
lower than 100r/min.<br />
3. The operation interval of the<br />
continuous operation is short.<br />
Set the 1 cycle time during the<br />
operation to 30s or less.<br />
Set the servo motor speed to<br />
100r/min or higher.<br />
Set the stop time during the<br />
operation longer.<br />
Pressing any button calls the status display at power-on.<br />
Status display at power-on (in the position control mode).<br />
6 - 5
6. GENERAL GAIN ADJUSTMENT<br />
(5) At alarm occurrence<br />
During the one-touch tuning<br />
If some alarm occurs during the one-touch tuning, the one-touch tuning is canceled, and<br />
the alarm display is called.<br />
Alarm display<br />
(6) At warning occurrence<br />
During the one-touch tuning<br />
Warning<br />
Waning<br />
reset<br />
occurrence<br />
Alarm display (warning)<br />
(a) If some warning occurs during the one-touch tuning, the alarm display is called, and<br />
the warning is displayed. However, one-touch tuning continues to be performed.<br />
(b) When the warning is reset, the alarm display is shifted to the one-touch tuning.<br />
Completion display<br />
One-touch tuning complete<br />
6 - 6
6. GENERAL GAIN ADJUSTMENT<br />
(7) Clearing the one-touch tuning<br />
POINT<br />
The one-touch tuning result can be reset to the initial value by the clear (CLr)<br />
mode and to the value before the adjustment by the back (bAC) mode.<br />
One-touch tuning clear<br />
mode selection<br />
(a) Pressing the "AUTO" and "SET" buttons for 3s or longer at the same time calls the<br />
one-touch tuning clear mode.<br />
(b) The symbol of the one-touch tuning clear mode flickers.<br />
(c) Select "CLr" (the mode to return the initial value) or "bAC" (the mode to return the<br />
value before the one-touch tuning) with the "UP" and "DOWN" buttons.<br />
UP<br />
DOWN<br />
Clear the one-touch tuning with the "SET" button. (If no operation is performed in 10s, the one-touch<br />
tuning clear mode is canceled. Then, it returns to the status display at power-on.)<br />
One-touch tuning clear mode display (when returning to the initial value)<br />
The selected one-touch tuning clear mode is performed. During the operation, the<br />
symbol of the one-touch tuning clear mode is lit for 3s.<br />
When the one touch adjustment clear is completed, the status display at power-on is called.<br />
Status display at power-on (in the position control mode).<br />
6.1.3 Precautions for one-touch tuning<br />
(1) In the internal torque control mode, the "AUTO" button is invalid.<br />
(2) When an alarm or a warning occurs, the one-touch tuning is not available.<br />
(3) While performing the following test operation modes, the one-touch tuning is not available.<br />
(a) Output signal (DO) forced output<br />
(b) Motor-less operation<br />
(c) Forced tough drive operation<br />
6 - 7
6. GENERAL GAIN ADJUSTMENT<br />
6.2 Gain adjustment methods<br />
The gain adjustment in this section can be made on a single servo amplifier. For the gain adjustment, refer to<br />
(3) in this section.<br />
(1) One-touch tuning<br />
Gain adjustment method<br />
Parameter No.<br />
PA08 setting<br />
Estimation of load to<br />
motor inertia moment<br />
ratio<br />
Automatically set<br />
parameters<br />
<strong>Manual</strong>ly set parameters<br />
Operation of the one-touch<br />
tuning button (AUTO) on<br />
the front panel of the servo<br />
amplifier<br />
(Refer to section 6.1.)<br />
Automatically<br />
changes to "000",<br />
when the value<br />
before the onetouch<br />
tuning is<br />
"000" or "001".<br />
"003", when the<br />
value before the<br />
one-touch tuning<br />
is "003".<br />
(No change)<br />
Always estimated<br />
AUT (parameter No. PA08)<br />
RSP (parameter No. PA09)<br />
PST (parameter No. PB03)<br />
P<strong>G1</strong> (parameter No. PB07)<br />
OVA (parameter No. PB12)<br />
NH1 (parameter No. PB13)<br />
NHQ1 (parameter No. PB14)<br />
NH2 (parameter No. PB15)<br />
NHQ2 (parameter No. PB16)<br />
(2) Gain adjustment made by the auto tuning mode (parameter No. PA08)<br />
Gain adjustment method<br />
Estimation of load to<br />
Parameter No.<br />
Automatically set<br />
motor inertia moment<br />
PA08 setting<br />
parameters<br />
ratio<br />
Auto tuning mode 1<br />
001 Always estimated GD2 (parameter No. PB06)<br />
(initial value)<br />
P<strong>G1</strong> (parameter No. PB07)<br />
PG2 (parameter No. PB08)<br />
VG2 (parameter No. PB09)<br />
VIC (parameter No. PB10)<br />
2-gain adjustment mode 000 Always estimated GD2 (parameter No. PB06)<br />
PG2 (parameter No. PB08)<br />
VG2 (parameter No. PB09)<br />
VIC (parameter No. PB10)<br />
<strong>Manual</strong> mode 003 Fixed to parameter No.<br />
PB06 value<br />
<strong>Manual</strong>ly set parameters<br />
RSP (parameter No. PA09)<br />
P<strong>G1</strong> (parameter No. PB07)<br />
RSP (parameter No. PA09)<br />
GD2 (parameter No. PB06)<br />
P<strong>G1</strong> (parameter No. PB07)<br />
PG2 (parameter No. PB08)<br />
VG2 (parameter No. PB09)<br />
VIC (parameter No. PB10)<br />
6 - 8
6. GENERAL GAIN ADJUSTMENT<br />
(3) Adjustment sequence and mode usage<br />
Yes<br />
START<br />
Operation<br />
OK?<br />
No<br />
Usage<br />
This servo amplifier enables the<br />
auto tuning mode 1 in the initial<br />
status.<br />
(Refer to section 6.3.1.)<br />
Perform the one-touch<br />
tuning?<br />
Yes<br />
One-touch tuning<br />
No<br />
Use the one-touch tuning button<br />
(AUTO) to make the<br />
adjustment.<br />
(Refer to section 6.1.)<br />
Operation<br />
Yes<br />
Yes<br />
OK?<br />
No<br />
2-gain adjustment mode<br />
Operation<br />
OK?<br />
No<br />
After one-touch tuning,<br />
parameter No. PA08 (ATU: auto<br />
tuning mode) automatically<br />
changes to "000" (2-gain<br />
adjustment mode). (Refer to<br />
section 6.4.)<br />
<strong>Manual</strong> mode<br />
END<br />
All gains can be adjusted<br />
manually for fast setting, etc.<br />
(Refer to section 6.5.)<br />
6 - 9
6. GENERAL GAIN ADJUSTMENT<br />
6.3 Auto tuning mode 1<br />
6.3.1 Overview<br />
The servo amplifier has a real-time auto tuning function which estimates the machine characteristic (load to<br />
motor inertia moment ratio) in real time and automatically sets the optimum gains according to that value. This<br />
function permits ease of gain adjustment of the servo amplifier.<br />
The servo amplifier is factory-set to the auto tuning mode 1.<br />
In this mode, the load to motor inertia moment ratio of a machine is always estimated to set the optimum gains<br />
automatically.<br />
The following parameters are automatically adjusted in the auto tuning mode 1.<br />
Parameter No. Abbreviation Name<br />
PB06 GD2 Load to motor inertia moment ratio<br />
PB07 P<strong>G1</strong> Model loop gain<br />
PB08 PG2 Position loop gain<br />
PB09 VG2 Speed loop gain<br />
PB10 VIC Speed integral compensation<br />
POINT<br />
The auto tuning mode 1 may not be performed properly if the following<br />
conditions are not satisfied.<br />
Time to reach 2000r/min is the acceleration/deceleration time constant of 5[s]<br />
or less.<br />
Speed is 150r/min or higher.<br />
Load to motor inertia moment ratio is 100 times or less.<br />
The acceleration/deceleration torque is 10% or more of the rated torque.<br />
Under operating conditions which imposes sudden disturbance torque during<br />
acceleration/deceleration or on a machine which is extremely loose, auto tuning<br />
may not function properly, either. In such cases, use the one-touch tuning, the<br />
2-gain adjustment mode, or the manual mode to make gain adjustment.<br />
6 - 10
6. GENERAL GAIN ADJUSTMENT<br />
6.3.2 Auto tuning mode 1 basis<br />
The function block diagram of real-time auto tuning is shown below.<br />
Automatic setting<br />
Load to motor inertia<br />
moment<br />
Command<br />
Loop gains<br />
P<strong>G1</strong>,PG2,VG2<br />
VIC<br />
Current<br />
control<br />
M<br />
Encoder<br />
Current feedback<br />
Servo motor<br />
Set 0 or 1 to turn on.<br />
Real-time auto<br />
tuning section<br />
Position/speed<br />
feedback<br />
Gain<br />
table<br />
Switch<br />
Estimation section of<br />
load to motor inertia<br />
moment ratio<br />
Speed feedback<br />
Parameter No. PA08 Parameter No. PA09<br />
0 0<br />
Parameter No. PB06<br />
Estimation value of<br />
load to motor inertia<br />
moment ratio<br />
Tuning mode<br />
setting<br />
Response<br />
setting<br />
When a servo motor is accelerated/decelerated, the load to motor inertia moment ratio estimation section<br />
always estimates the load to motor inertia moment ratio from the current and the speed of the servo motor. The<br />
results of estimation are written to parameter No. PB06 (load to motor inertia moment ratio). These results can<br />
be confirmed on the status display screen of the <strong>MR</strong> Configurator section.<br />
If the value of the load to motor inertia moment ratio is already known or if the estimation cannot be made<br />
properly, select "manual mode" by setting parameter No. PA08 to "003" (the switch in the above diagram turns<br />
off) to stop the estimation of the load to motor inertia moment ratio. Then, set the load to motor inertia moment<br />
ratio manually to parameter No. PB06.<br />
From the preset load to motor inertia moment ratio (parameter No. PB06) value and response level (parameter<br />
No. PA09), the optimum loop gains are automatically set on the basis of the internal gain tale.<br />
The auto tuning results are saved in the EEP-ROM of the servo amplifier every 60 minutes since power-on. At<br />
power-on, auto tuning is performed with the value of each loop gain saved in the EEP-ROM being used as an<br />
initial value.<br />
POINT<br />
If sudden disturbance torque is imposed during the operation, the estimation<br />
of the load to motor inertia moment ratio may malfunction temporarily. In such<br />
a case, select the "manual mode" (parameter No. PA08: 003) and set the<br />
correct load to motor inertia moment ratio in parameter No. PB06.<br />
When any of the auto tuning mode 1 and 2-gain adjustment mode settings is<br />
changed to the manual mode setting, the current loop gains and load to motor<br />
inertia moment ratio estimation value are saved in the EEP-ROM.<br />
6 - 11
6. GENERAL GAIN ADJUSTMENT<br />
6.3.3 Adjustment procedure by auto tuning<br />
Since auto tuning is made valid before shipment from the factory, simply running the servo motor automatically<br />
sets the optimum gains that match the machine. Merely changing the response level setting value as required<br />
completes the adjustment. The adjustment procedure is as follows.<br />
START<br />
Acceleration/deceleration repeated<br />
Load to motor inertia<br />
moment ratio estimation<br />
value stable?<br />
No<br />
Yes<br />
Adjust the auto tuning response<br />
level (RSP: parameter No. PA09)<br />
on vibration-free level.<br />
Acceleration/deceleration repeated<br />
Requested<br />
performance satisfied?<br />
No<br />
Yes<br />
END<br />
To manual mode<br />
6 - 12
6. GENERAL GAIN ADJUSTMENT<br />
6.3.4 Response level setting in auto tuning mode 1<br />
Set the response (The first digit of parameter No. PA09) of the whole servo system. As the response level<br />
setting is increased, the track ability and settling time for a command decreases, but a too high response level<br />
will generate vibration. Hence, make setting until desired response is obtained within the vibration-free range.<br />
If the response level setting cannot be increased up to the desired response because of machine resonance<br />
beyond 100Hz, adaptive tuning mode (parameter No. PB01) or machine resonance suppression filter<br />
(parameter No. PB13 to PB16, PB38, PB39) may be used to suppress machine resonance. Suppressing<br />
machine resonance may allow the response level setting to increase.<br />
Refer to section 7.2 for adaptive tuning mode and machine resonance suppression filter.<br />
Setting of parameter No. PA09<br />
Response level setting<br />
Machine rigidity<br />
1 Low<br />
2<br />
3<br />
4<br />
5<br />
6<br />
7<br />
8<br />
Middle<br />
9<br />
10<br />
11<br />
12<br />
13<br />
14<br />
15<br />
16 High<br />
Machine characteristic<br />
Guideline of corresponding machine<br />
Arm robot<br />
Precision<br />
working<br />
machine<br />
General machine<br />
tool conveyor<br />
Inserter<br />
Mounter<br />
Bonder<br />
6 - 13
6. GENERAL GAIN ADJUSTMENT<br />
6.4 2-gain adjustment mode<br />
POINT<br />
Use this mode to improve the response level after the one-touch tuning. Use<br />
parameters No. PA09 or PB07 for fine adjustment.<br />
Use the 2-gain adjustment mode for fine adjustment of the response level setting and the model loop gain.<br />
(1) Parameters<br />
(a) Automatically adjusted parameters<br />
The following parameters are automatically adjusted by the auto tuning 1.<br />
Parameter No. Abbreviation Name<br />
PB06 GD2 Load to motor inertia moment ratio<br />
PB08 PG2 Position loop gain<br />
PB09 VG2 Speed loop gain<br />
PB10 VIC Speed integral compensation<br />
(b) <strong>Manual</strong>ly adjusted parameters<br />
The following parameters are adjustable manually.<br />
Parameter No. Abbreviation Name<br />
PA09 RSP Auto tuning response<br />
PB07 P<strong>G1</strong> Model loop gain<br />
(2) Adjustment procedure<br />
Step Operation Description<br />
1 Set to the 2-gain adjustment mode.<br />
Set parameter No. PA08 (auto tuning mode)<br />
to " 0".<br />
2<br />
During the operation, increase the response level setting (parameter No.<br />
Adjustment of the servo stability<br />
PA09), and reset the setting if vibration occurs.<br />
3<br />
During the operation, increase the model loop gain (parameter No. PB07),<br />
Adjustment of the position track ability<br />
and reset the setting if overshoot occurs.<br />
(3) Adjustment description<br />
The droop pulse value is determined by the following expression.<br />
Rotation speed (r/min)<br />
60<br />
Servo motor resolution (pulse/rev)<br />
Droop pulse value (pulse) =<br />
Model loop gain setting<br />
6 - 14
6. GENERAL GAIN ADJUSTMENT<br />
6.5 <strong>Manual</strong> mode<br />
If the adjustment made by the auto tuning mode 1 and 2-gain adjustment mode is not satisfactory, adjust the<br />
load to motor inertia moment and all gains in the manual mode.<br />
POINT<br />
Use this mode if the estimation of the load to motor inertia moment ratio is not<br />
the normal value.<br />
Use this mode to perform the vibration suppression control tuning.<br />
(1) For internal speed control<br />
(a) Parameters<br />
The following parameters are used for gain adjustment.<br />
Parameter No. Abbreviation Name<br />
PB06 GD2 Load to motor inertia moment ratio<br />
PB07 P<strong>G1</strong> Model loop gain<br />
PB09 VG2 Speed loop gain<br />
PB10 VIC Speed integral compensation<br />
(b) Adjustment procedure<br />
Step Operation Description<br />
1 Brief-adjust with auto tuning. Refer to section 6.3.3.<br />
2<br />
Change the setting of the tuning mode to the manual mode (Parameter No.<br />
PA08: 003)<br />
3<br />
Set an estimated value to load to motor inertia moment ratio. (If the estimate<br />
value with auto tuning is correct, setting change is not required.)<br />
4<br />
Set a slightly smaller value to the model loop gain.<br />
Set a slightly larger value to the speed integral compensation.<br />
5<br />
Increase the speed loop gain within the vibration- and unusual noise-free Increase the speed loop gain.<br />
range, and return slightly if vibration takes place.<br />
6<br />
Decrease the speed integral compensation within the vibration-free range, Decrease the time constant of the speed<br />
and return slightly if vibration takes place.<br />
integral compensation.<br />
7 Increase the model loop gain, and return slightly if overshooting takes place. Increase the model loop gain.<br />
If the gains cannot be increased due to mechanical system resonance or the Suppression of machine resonance.<br />
8<br />
like, and the desired response cannot be achieved, response may be (Refer to section 7.2.)<br />
increased by executing steps 3 to 7 after suppressing the resonance by the<br />
adaptive tuning mode or the machine resonance suppression filter.<br />
9 While checking the rotational status, fine-adjust the each gain. Fine adjustment<br />
6 - 15
6. GENERAL GAIN ADJUSTMENT<br />
(c) Adjustment description<br />
1) Speed loop gain (VG2: parameter No. PB09)<br />
This parameter determines the response level of the speed control loop. Increasing this value<br />
enhances response but a too high value will make the mechanical system liable to vibrate. The<br />
actual response frequency of the speed loop is as indicated in the following expression.<br />
Speed loop response<br />
frequency(Hz)<br />
=<br />
Speed loop gain setting<br />
(1 load to motor inertia moment ratio) 2<br />
2) Speed integral compensation (VIC: parameter No. PB10)<br />
To eliminate stationary deviation against a command, the speed control loop is under proportional<br />
integral control. For the speed integral compensation, set the time constant of this integral control.<br />
Increasing the setting lowers the response level. However, if the load to motor inertia moment ratio is<br />
large or the mechanical system has any vibratory element, the mechanical system is liable to vibrate<br />
unless the setting is increased to some degree. The guideline is as indicated in the following<br />
expression.<br />
Speed integral compensation<br />
setting(ms)<br />
2000 to 3000<br />
Speed loop gain setting/ (1 load to motor inertia moment ratio setting)<br />
3) Model loop gain (P<strong>G1</strong>: parameter No. PB07)<br />
This parameter determines the response level for the position command. Increasing the model loop<br />
gain improves the track ability to a position command. If the gain is too high; however, overshooting<br />
is likely to occur when settling.<br />
Model loop gain guideline<br />
Speed loop gain setting<br />
(1+ load to motor inertia moment ratio)<br />
(<br />
1 1<br />
4 to 8 )<br />
(2) For position control<br />
(a) Parameters<br />
The following parameters are used for gain adjustment.<br />
Parameter No. Abbreviation Name<br />
PB06 GD2 Load to motor inertia moment ratio<br />
PB07 P<strong>G1</strong> Model loop gain<br />
PB08 PG2 Position loop gain<br />
PB09 VG2 Speed loop gain<br />
PB10 VIC Speed integral compensation<br />
6 - 16
6. GENERAL GAIN ADJUSTMENT<br />
(b) Adjustment procedure<br />
Step Operation Description<br />
1 Brief-adjust with auto tuning. Refer to section 6.3.3.<br />
2<br />
Change the setting of the tuning mode to the manual mode (Parameter No.<br />
PA08: 003)<br />
3<br />
Set an estimated value to the load to motor inertia moment ratio. (If the<br />
estimate value with auto tuning is correct, setting change is not required.)<br />
4<br />
Set a slightly smaller value to the model loop gain and the position loop gain.<br />
Set a slightly larger value to the speed integral compensation.<br />
5<br />
Increase the speed loop gain within the vibration- and unusual noise-free Increase the speed loop gain.<br />
range, and return slightly if vibration takes place.<br />
6<br />
Decrease the speed integral compensation within the vibration-free range, Decrease the time constant of the speed<br />
and return slightly if vibration takes place.<br />
integral compensation.<br />
7 Increase the position loop gain, and return slightly if vibration takes place. Increase the position loop gain.<br />
8 Increase the model loop gain, and return slightly if overshooting takes place. Increase the model loop gain.<br />
If the gains cannot be increased due to mechanical system resonance or the Suppression of machine resonance.<br />
9<br />
like and the desired response cannot be achieved, response may be (Refer to section 7.2.)<br />
increased by suppressing resonance with adaptive tuning mode or machine<br />
resonance suppression filter and then executing steps 3 to 8.<br />
10<br />
While checking the settling characteristic and rotational status, fine-adjust Fine adjustment<br />
each gain.<br />
(c) Adjustment description<br />
1) Speed loop gain (VG2: parameter No. PB09)<br />
The same as for the internal speed control.<br />
2) Speed integral compensation (VIC: parameter No. PB10)<br />
The same as for the internal speed control.<br />
3) Position loop gain (PG2: parameter No. PB08)<br />
This parameter determines the response level to the disturbance of the position control loop.<br />
Increasing position loop gain decreases the change at external disturbance. If the gain is too high;<br />
however, overshooting is likely to occur when settling.<br />
Position loop gain<br />
guideline<br />
Speed loop gain 2 setting<br />
1<br />
(1 load to motor inertia moment ratio)<br />
( to 1 4 8 )<br />
4) Model loop gain (P<strong>G1</strong>: parameter No. PB07)<br />
This parameter determines the response level of the model loop. Increasing position loop gain 1<br />
improves track ability to a position command but a too high value will make overshooting liable to<br />
occur at the time of settling.<br />
Model loop gain<br />
guideline<br />
Speed loop gain 2 setting<br />
1<br />
(1 load to motor inertia moment ratio)<br />
( to 1 4 8 )<br />
6 - 17
6. GENERAL GAIN ADJUSTMENT<br />
MEMO<br />
6 - 18
7. SPECIAL ADJUSTMENT FUNCTIONS<br />
7. SPECIAL ADJUSTMENT FUNCTIONS<br />
7.1 Tough drive function<br />
POINT<br />
Enable or disable the tough drive function by parameter No. PA04 (tough drive<br />
function selection). (Refer to section 4.1.5.)<br />
The tough drive function continues the operation not to stop a machine in such situations when normally an<br />
alarm is activated.<br />
7.1.1 Overload tough drive function<br />
CAUTION<br />
When the overload tough drive activates, the operation pattern is changed. Check<br />
in advance if equipment problems due to the change of operation pattern do not<br />
occur. The operation pattern at the overload tough drive can be checked with the<br />
forced tough drive operation in the test operation mode. (Refer to section 5.10.5.)<br />
The overload tough drive function automatically reduces the load ratio to about 70% to avoid an alarm when<br />
the effective load ratio increases to near the overload alarm level. When the overload tough drive activates, the<br />
servo amplifier delays the time for the in-position (INP) and the zero speed (ZSP) to turn on. In the position<br />
control mode, the controller holds the next command until the in-position (INP) turns on. In the positioning<br />
mode, the controller holds the output of position command until the in-position (INP) turns on.<br />
The during tough drive (MTTR) can be output from the servo amplifier by setting parameter No. PD20 (function<br />
selection D-1) to " 1 ".<br />
POINT<br />
The overload tough drive function is available only in the position control mode or<br />
in the positioning mode.<br />
The increase in the load ratio that is caused by temporary load fluctuations can<br />
be avoided by reducing the machine tact (operating time) so that the operation<br />
can be continued. An optimum in-position (INP) delay time is calculated<br />
automatically on the servo amplifier side.<br />
The maximum delay time of the in-position (INP) can be limited by parameter No.<br />
PC26 (detailed setting of overload tough drive) so as not to cause INP timeout<br />
error on the controller side.<br />
Controller<br />
MTTR (during tough drive) is<br />
detected on the controller side.<br />
Interlock the next start<br />
command until the INP is<br />
turned on for the controller.<br />
Command start signal<br />
Servo amplifier<br />
During tough drive (MTTR)<br />
In-position (INP)<br />
Zero speed (ZSP)<br />
Command input pulses<br />
Turns on during the tough<br />
drive.<br />
*Valid/invalid can be changed<br />
in parameter No. PD20.<br />
Delay the time for " ON" only<br />
for the optimum value that<br />
can avoid alarm.<br />
7 - 1
7. SPECIAL ADJUSTMENT FUNCTIONS<br />
However, the overload tough drive function is not effective in the following cases.<br />
(1) When the effective load ratio temporarily exceeds 200%.<br />
(2) When the load increases at a stop such as a detent torque of a vertical lift.<br />
Effective<br />
load ratio<br />
Load fluctuation<br />
occurs<br />
Load ratio<br />
increase<br />
Overload tough drive start<br />
Overload alarm level<br />
Load fluctuation<br />
normal status<br />
Continuing<br />
to drive<br />
Servo motor<br />
speed<br />
In-position (INP)<br />
During tough<br />
drive (MTTR)<br />
ON<br />
OFF<br />
ON<br />
OFF<br />
Ti Ti Ti<br />
When the load ratio reduces,<br />
automatically ends the INP<br />
delay.<br />
Warning (WNG)<br />
ON<br />
OFF<br />
Trouble (ALM)<br />
ON<br />
OFF<br />
Executes the optimum adjustment of the stop time<br />
(INP delay time) Ti properly and avoids the overload1<br />
alarm (50.1) during the overload tough drive.<br />
When the overload tough drive activates, the number of tough drive in the display mode (alarm mode) is<br />
increased by one. (Refer to section 5.5.)<br />
7.1.2 Vibration tough drive function<br />
The vibration tough drive function resets the filter instantaneously and prevents vibration when a machine<br />
resonance is generated due to aging distortion or individual differences.<br />
In order to reset the machine resonance suppression filter by the vibration tough drive function, parameters No.<br />
PB13 (machine resonance suppression filter 1) and No. PB15 (machine resonance suppression filter 2) are<br />
required to be set in advance.<br />
Perform either of the following to set parameters No. PB13 and No. PB15.<br />
(1) Perform the one-touch tuning (refer to section 6.1).<br />
(2) Set the parameters manually (refer to section 4.2.2).<br />
7 - 2
7. SPECIAL ADJUSTMENT FUNCTIONS<br />
The vibration tough drive function activates when a detected machine resonance frequency is within the range<br />
of 30% in relation to the set value of parameters No. PB13 (machine resonance suppression filter 1) and No.<br />
PB15 (machine resonance suppression filter 2).<br />
The detection level of the vibration tough drive function can be set by parameter No. PC27 (detailed setting of<br />
vibration tough drive).<br />
POINT<br />
Resetting of the parameters No. PB13 or No. PB15 by the vibration tough drive<br />
function is performed constantly. However, the number of write times to the EEP-<br />
ROM is limited to once per hour.<br />
The machine resonance suppression filter 3 (parameter No. PB38) is not reset<br />
by the vibration tough drive function.<br />
The following shows the function block diagram of the vibration tough drive function.<br />
The detected machine resonance frequency is compared with the parameters No. PB13 (machine resonance<br />
suppression filter 1) and No. PB15 (machine resonance suppression filter 2), and the parameter No. which has<br />
a set value closer to the detected machine resonance frequency is reset to the value of the detected frequency.<br />
Updates the parameter whose<br />
setting is the closest to the<br />
machine resonance frequency.<br />
Vibration tough drive<br />
Load<br />
Command<br />
input pulses<br />
Command<br />
filter<br />
Parameter<br />
No. PB13<br />
Parameter<br />
No. PB15<br />
Parameter<br />
No. PB38<br />
PWM<br />
M<br />
Encoder<br />
Machine resonance<br />
suppression filter 1<br />
Machine resonance<br />
suppression filter 2<br />
Machine resonance<br />
suppression filter 3<br />
Servo motor<br />
Torque<br />
Parameter No. PC27<br />
(detailed setting of vibration tough drive)<br />
Trouble (ALM)<br />
Warning (WNG)<br />
During tough<br />
drive (MTTR)<br />
ON<br />
OFF<br />
ON<br />
OFF<br />
ON<br />
OFF<br />
5s<br />
Detects the machine resonance and reconfigures the filter automatically.<br />
During tough drive (MTTR) is not turned on in the vibration<br />
tough drive function.<br />
When the vibration tough drive function activates, the number of tough drive in the display mode (alarm mode)<br />
is increased by one. (Refer to section 5.5.)<br />
7 - 3
7. SPECIAL ADJUSTMENT FUNCTIONS<br />
7.1.3 Instantaneous power failure tough drive function<br />
CAUTION<br />
During the instantaneous power failure tough drive, the torque may be limited due<br />
to the load conditions or the set value of parameter No. PC28 (detailed setting of<br />
instantaneous power failure tough drive).<br />
The immunity to instantaneous power failures is increased by the instantaneous<br />
power failure tough drive function. However, it is not compliant with the SEMI-F47<br />
specification.<br />
The instantaneous power failure tough drive function avoids the instantaneous power failure alarm even when<br />
an instantaneous power failure occurs during operation. When the instantaneous power failure tough drive<br />
activates, the immunity to instantaneous power failures is increased by using the electrical energy charged in<br />
the main circuit capacitor during instantaneous power failures. The instantaneous power failure alarm judgment<br />
time for the main circuit power can be changed by parameter No. PC28 (detailed setting of instantaneous<br />
power failure tough drive).<br />
POINT<br />
The electromagnetic brake interlock (MBR) does not turn off during the<br />
instantaneous power failure tough drive.<br />
When the load of instantaneous power failure is heavy, the undervoltage alarm<br />
(10.2) caused by the bus voltage drop may occur regardless of the setting value<br />
of parameter No. PC28 (detailed setting of instantaneous power failure tough<br />
drive).<br />
(1) When the instantaneous main circuit power failure time is shorter than the set value of parameter No. PC28<br />
(detailed setting of instantaneous power failure tough drive)<br />
Instantaneous power failure time<br />
of the main circuit power supply<br />
Main circuit<br />
power supply<br />
Bus voltage<br />
Undervoltage<br />
level (About<br />
160V or less)<br />
Trouble (ALM)<br />
During tough<br />
drive (MTTR)<br />
Electromagnetic<br />
brake interlock<br />
(MBR)<br />
Base circuit<br />
ON<br />
OFF<br />
ON<br />
OFF<br />
ON<br />
OFF<br />
ON<br />
OFF<br />
ON<br />
OFF<br />
Parameter No. PC28<br />
Electromagnetic brake interlock (MBR)<br />
is not turned off.<br />
When the power is returned within parameter No.<br />
PC28 setting value, after disconnection of the<br />
main circuit power supply, the main circuit power<br />
supply failure (instantaneous power failure) alarm<br />
(10.3) is not generated.<br />
When the instantaneous power failure tough drive activates, the number of tough drive in the display mode<br />
(alarm mode) is increased by one. (Refer to section 5.5.)<br />
7 - 4
7. SPECIAL ADJUSTMENT FUNCTIONS<br />
(2) When an undervoltage occurs during the instantaneous main circuit power failure<br />
Instantaneous power failure time<br />
of the main circuit power supply<br />
Main circuit<br />
power supply<br />
Bus voltage<br />
ON<br />
OFF<br />
Parameter No. PC28<br />
Undervoltage<br />
level (About<br />
160V or less)<br />
Trouble (ALM)<br />
Ready (RD)<br />
During tough<br />
drive (MTTR)<br />
Electromagnetic<br />
brake interlock<br />
(MBR)<br />
Base circuit<br />
ON<br />
OFF<br />
ON<br />
OFF<br />
ON<br />
OFF<br />
ON<br />
OFF<br />
ON<br />
OFF<br />
An undervoltage al arm (10.2) is generated if the bus<br />
voltage reduces at the undervoltage level or lower.<br />
(3) When the instantaneous main circuit power failure time is longer than the set value of parameter No. PC28<br />
(detailed setting of instantaneous power failure tough drive)<br />
If the instantaneous main circuit power failure time exceeds the set value of parameter No. PC28, main<br />
circuit power supply failure (instantaneous power failure) alarm (10.3) occurs even if the instantaneous<br />
power failure tough drive function is valid.<br />
7 - 5
7. SPECIAL ADJUSTMENT FUNCTIONS<br />
7.2 Machine resonance suppression function<br />
POINT<br />
The functions given in this section are not generally required to use. Use these<br />
functions when the machine status is not satisfactory after making adjustment in<br />
the methods given in chapter 6.<br />
If a mechanical system has a natural resonance point, increasing the servo system response level may cause<br />
the mechanical system to produce resonance (vibration or unusual noise) at that resonance frequency.<br />
Using the machine resonance suppression filter and adaptive tuning can suppress the resonance of the<br />
mechanical system.<br />
7.2.1 Function block diagram<br />
Speed control<br />
0<br />
Parameter<br />
No.PB01<br />
0<br />
Parameter<br />
No.PB16<br />
0<br />
Parameter<br />
No.PB39<br />
Machine resonance<br />
suppression filter 1<br />
<strong>Manual</strong> mode<br />
2<br />
Machine<br />
resonance<br />
suppression<br />
filter 2<br />
1<br />
Machine<br />
resonance<br />
suppression<br />
filter 3<br />
1<br />
Low-pass filter<br />
Automatic setting<br />
0<br />
Parameter<br />
No.PB23<br />
Current<br />
command<br />
Servo<br />
motor<br />
M<br />
<strong>Manual</strong> setting<br />
1<br />
Encoder<br />
7.2.2 Adaptive filter<br />
(1) Function<br />
The adaptive filter (adaptive tuning) sets the filter characteristics automatically with the one-touch tuning,<br />
and suppresses vibrations of the mechanical system. Since the filter characteristics (frequency, depth) are<br />
set automatically, you need not be conscious of the resonance frequency of a mechanical system.<br />
Mechanical<br />
system<br />
response<br />
level<br />
Machine resonance point<br />
Frequency<br />
Mechanical<br />
system<br />
response<br />
level<br />
Machine resonance point<br />
Frequency<br />
Notch<br />
depth<br />
Notch<br />
depth<br />
Notch frequency<br />
Frequency<br />
Notch frequency<br />
Frequency<br />
When machine resonance is large and frequency is low<br />
When machine resonance is small and frequency is high<br />
7 - 6
7. SPECIAL ADJUSTMENT FUNCTIONS<br />
POINT<br />
When the one-touch tuning is performed, the adaptive tuning is performed, and<br />
the machine resonance suppression filter 1 (parameter No. PB13) and the notch<br />
shape selection 1 (parameter No. PB14) are set automatically.<br />
The machine resonance frequency which adaptive tuning mode can respond to<br />
is about 100 to 2.25kHz. Adaptive vibration suppression control has no effect on<br />
the resonance frequency outside this range.<br />
Adaptive vibration suppression control may provide no effect on a mechanical<br />
system which has complex resonance characteristics.<br />
(2) Parameters<br />
Select the tuning mode of adaptive tuning mode (parameter No. PB01).<br />
Parameter No. PB01<br />
0 0<br />
Selection of adaptive tuning mode<br />
Setting Adaptive tuning mode <strong>Manual</strong>ly set parameter No.<br />
0 Filter OFF (Note 1)<br />
2(Note 2) <strong>Manual</strong> mode<br />
Parameter No. PB13<br />
Parameter No. PB14<br />
Note 1. Parameter No. PB13 and PB14 are fixed to the initial values.<br />
2. When an adaptive filter is set, it is automatically updated to "2".<br />
POINT<br />
"Filter OFF" enables a return to the factory-set initial value.<br />
During adaptive tuning, a filter having the best notch depth at the set control<br />
gain is generated. To allow a filter margin against machine resonance, increase<br />
the notch depth in the manual mode.<br />
7 - 7
7. SPECIAL ADJUSTMENT FUNCTIONS<br />
7.2.3 Machine resonance suppression filter<br />
(1) Function<br />
The machine resonance suppression filter is a filter function (notch filter) which can suppress the resonance<br />
of the mechanical system by decreasing the gain of the specific frequency. You can set the gain decreasing<br />
frequency (notch frequency), gain decreasing depth and width.<br />
Mechanical<br />
system<br />
response<br />
level<br />
Machine resonance point<br />
Frequency<br />
Notch<br />
depth<br />
Notch width<br />
Notch depth<br />
Notch frequency<br />
Frequency<br />
The vibration of three resonance frequency can be suppressed by the machine resonance suppression<br />
filter 1, machine resonance suppression filter 2 and machine resonance suppression filter 3.<br />
Machine resonance point<br />
Mechanical<br />
system<br />
response<br />
level<br />
Frequency<br />
Notch<br />
depth<br />
Parameter No. PB01,<br />
PB13, PB14<br />
Frequency<br />
Parameter No. PB38, PB39<br />
Parameter No. PB15, PB16<br />
7 - 8
7. SPECIAL ADJUSTMENT FUNCTIONS<br />
(2) Parameters<br />
Set the machine resonance suppression filters by the parameters indicated in the following table.<br />
Item<br />
Machine resonance<br />
suppression filter 1<br />
Machine resonance<br />
suppression filter 2<br />
Machine resonance<br />
suppression filter 3<br />
Parameters to be set<br />
Notch frequency Notch depth and width<br />
Parameter No. PB13 Parameter No. PB14<br />
Parameter No. PB15 Parameter No. PB16<br />
Parameter No. PB38 Parameter No. PB39<br />
Note<br />
The set values are valid when "manual mode" is<br />
selected in the adaptive tuning mode<br />
(parameter No. PB01).<br />
The set values are always valid regardless of<br />
the set value of the adaptive tuning mode<br />
(parameter No. PB01).<br />
POINT<br />
The machine resonance suppression filter is a delay factor for the servo system.<br />
Hence, vibration may increase if an improper resonance frequency or an<br />
excessively deep notch is set.<br />
If the frequency of machine resonance is unknown, decrease the notch<br />
frequency from higher to lower. Set the notch frequency at the point where<br />
vibration is minimal.<br />
A deeper notch has a higher effect on machine resonance suppression but<br />
increases a phase delay and may increase vibration.<br />
A wider notch has a higher effect on machine resonance suppression but<br />
increases a phase delay and may increase vibration.<br />
7.2.4 Advanced vibration suppression control<br />
(1) Operation<br />
Vibration suppression control is used to further suppress machine end vibration, such as workpiece end<br />
vibration and base shake. The motor side operation is adjusted for positioning so that the machine does not<br />
shake.<br />
Position<br />
Motor end<br />
Machine end<br />
Position<br />
Motor end<br />
Machine end<br />
Vibration suppression control OFF<br />
(Normal control)<br />
Vibration suppression control ON<br />
When the advanced vibration suppression control (vibration suppression control tuning mode (parameter<br />
No. PB02)) is executed, the vibration frequency at machine end can be automatically estimated to suppress<br />
machine end vibration.<br />
In addition, the vibration suppression control tuning mode shifts to the manual mode after positioning is<br />
performed the predetermined number of times. The manual mode enables manual setting using the<br />
vibration suppression control vibration frequency setting (parameter No. PB19) and the vibration<br />
suppression control resonance frequency setting (parameter No. PB20).<br />
7 - 9
7. SPECIAL ADJUSTMENT FUNCTIONS<br />
(2) Parameter<br />
Select the tuning mode of the vibration suppression control tuning mode (parameter No. PB02).<br />
Parameter No. PB02<br />
0 0<br />
Vibration suppression control tuning mode<br />
Setting Vibration suppression control tuning mode Automatically set parameter<br />
0 Vibration suppression control OFF (Note)<br />
Vibration suppression control tuning mode<br />
1<br />
(Advanced vibration suppression control)<br />
2 <strong>Manual</strong> mode<br />
Parameter No. PB19<br />
Parameter No. PB20<br />
Note. Parameter No. PB19 and PB20 are fixed to the initial values.<br />
POINT<br />
When executing the vibration suppression control tuning mode (advanced<br />
vibration suppression control), follow the procedures of (3) in this section.<br />
This function is valid when the auto tuning mode (parameter No. PA08) is set to<br />
manual mode (" 3").<br />
The machine resonance frequency supported by the vibration suppression<br />
control tuning mode is 1.0Hz to 100.0Hz. The function is not effective for<br />
vibration outside this range.<br />
To prevent unexpected operations, be sure to stop the servo motor before<br />
changing the vibration suppression control-related parameters (parameter No.<br />
PB02, PB19, PB20, PB33, PB34, PB38, PB39).<br />
For positioning operation during execution of vibration suppression control<br />
tuning, provide a stop time to ensure a stop after full vibration damping.<br />
Vibration suppression control tuning may not make an estimation properly if the<br />
residual vibration at the motor end is small.<br />
Vibration suppression control tuning sets the optimum parameter with the<br />
currently set control gains. When the response setting is increased, set the<br />
vibration suppression control tuning again.<br />
7 - 10
7. SPECIAL ADJUSTMENT FUNCTIONS<br />
(3) Vibration suppression control tuning mode procedure<br />
START<br />
Operation<br />
Yes<br />
Is the target response<br />
reached?<br />
No<br />
Execute one-touch tuning<br />
Has vibration of workpiece<br />
end/device increased?<br />
No<br />
Yes<br />
Stop operation.<br />
Set the tuning mode to the manual<br />
mode (set parameter No. PA08 to<br />
" 3").<br />
Execute or re-execute vibration<br />
suppression control tuning. (Set<br />
parameter No. PB02 to " 1".)<br />
Resume operation.<br />
Tuning ends automatically after<br />
operation is performed the<br />
predetermined number of times.<br />
(Parameter No. PB02 turns to<br />
" 2" or " 0".)<br />
Has vibration of workpiece<br />
end/device been resolved?<br />
Yes<br />
No<br />
Decrease the response until vibration<br />
of workpiece end/device is resolved.<br />
Or execute the Low mode of the onetouch<br />
adjustment.<br />
Factor<br />
Estimation cannot be made as machine end vibration<br />
has not been transmitted to the motor end.<br />
The response of the model loop gain has increased to<br />
the machine end vibration frequency (vibration<br />
suppression control limit).<br />
END<br />
7 - 11
7. SPECIAL ADJUSTMENT FUNCTIONS<br />
(4) Vibration suppression control manual mode<br />
Vibration suppression control can be set manually by setting the vibration suppression control vibration<br />
frequency (parameter No. PB19) and the vibration suppression control resonance frequency (parameter No.<br />
PB20) after measuring work-end vibration and device shake using an external measuring instrument.<br />
(a) When a vibration peak can be measured using an external measuring instrument<br />
Gain characteristic<br />
Phase<br />
1Hz<br />
Vibration suppression control<br />
vibration frequency setting<br />
(Anti-resonance frequency)<br />
Parameter No. PB19<br />
100Hz<br />
Vibration suppression<br />
control resonance<br />
frequency setting<br />
Parameter No. PB20<br />
Resonance of more<br />
than 100Hz is not the<br />
target of control.<br />
-90deg.<br />
(b) When vibration can be measured using an external measuring instrument<br />
Motor end vibration<br />
(Droop pulses)<br />
External acceleration pick signal, etc.<br />
Position command frequency<br />
Vibration cycle [Hz]<br />
Vibration suppression control<br />
vibration frequency<br />
Vibration suppression control<br />
resonance frequency<br />
Set the same value.<br />
Vibration cycle [Hz]<br />
POINT<br />
When the machine-end vibration does not travel to the motor end, setting the<br />
motor-end vibration frequency does not have any effect.<br />
When vibration frequency (anti-resonance frequency) and resonance frequency<br />
can be measured using an external measuring instrument, setting different<br />
values in parameters No. PB19 and No. 20 separately improves the vibration<br />
suppression performance better rather than setting the same value.<br />
7 - 12
7. SPECIAL ADJUSTMENT FUNCTIONS<br />
7.2.5 Low-pass filter<br />
(1) Function<br />
When a ballscrew or the like is used, resonance of high frequency may occur as the response level of the<br />
servo system is increased. To prevent this, the low-pass filter for a torque command is set valid. In the initial<br />
setting, the filter frequency of the low-pass filter is automatically adjusted to the value in the following<br />
expression.<br />
Filter frequency(rad/s)<br />
VG2<br />
1 + GD2<br />
When parameter No. PB23 is set to " 1 ", manual setting can be made by parameter No. PB18.<br />
10<br />
(2) Parameter<br />
Set the low-pass filter selection (parameter No. PB23.)<br />
Parameter No. PB23<br />
0 0<br />
Low-pass filter selection<br />
0: Automatic setting (initial value)<br />
1: <strong>Manual</strong> setting (parameter No. PB18 setting)<br />
7.3 Gain changing function<br />
POINT<br />
The functions given in this section are not generally required to use. Use these<br />
functions when the machine status is not satisfactory after making adjustment in<br />
the methods given in chapter 6.<br />
This function can change the gains. Gains can be changed using an input device or gain switching conditions<br />
(servo motor speed, etc.)<br />
7.3.1 Applications<br />
This function is used when:<br />
(1) You want to increase the gains during servo lock but decrease the gains to reduce noise during rotation.<br />
(2) You want to increase the gains during settling to shorten the stop settling time.<br />
(3) You want to change the gains using an input device to ensure stability of the servo system since the load to<br />
motor inertia moment ratio varies greatly during a stop (e.g. a large load is mounted on a carrier).<br />
7 - 13
7. SPECIAL ADJUSTMENT FUNCTIONS<br />
7.3.2 Function block diagram<br />
The valid loop gains PG2, VG2, VIC, GD2, VRF1 and VRF2 of the actual loop are changed according to the<br />
conditions selected by gain changing selection CDP (parameter No. PB26) and gain changing condition CDL<br />
(parameter No. PB27).<br />
Input device<br />
CDP<br />
CDP<br />
Parameter No. PB26<br />
Command pulse<br />
frequency<br />
Droop pulses<br />
Model speed<br />
Changing<br />
CDL<br />
Parameter No. PB27<br />
Comparator<br />
GD2<br />
Parameter No. PB06<br />
GD2B<br />
Parameter No. PB29<br />
Valid<br />
GD2 value<br />
PG2<br />
Parameter No. PB08<br />
PG2B<br />
Parameter No. PB30<br />
Valid<br />
PG2 value<br />
VG2<br />
Parameter No. PB09<br />
VG2B<br />
Parameter No. PB31<br />
Valid<br />
VG2 value<br />
VIC<br />
Parameter No. PB10<br />
VICB<br />
Parameter No. PB32<br />
Valid<br />
VIC value<br />
VRF1<br />
Parameter No. PB19<br />
VRF1B<br />
Parameter No. PB33<br />
Valid<br />
VRF1 value<br />
VRF2<br />
Parameter No. PB20<br />
VRF2B<br />
Parameter No. PB34<br />
Valid<br />
VRF2 value<br />
7 - 14
7. SPECIAL ADJUSTMENT FUNCTIONS<br />
7.3.3 Parameters<br />
When using the gain changing function, always set parameter No. PA08 (auto tuning mode) to " 3" to<br />
select manual mode in the tuning mode. The gain changing function cannot be used in the auto tuning mode.<br />
Parameter No. Abbreviation<br />
PB06<br />
GD2<br />
Name Unit Description<br />
Load to motor inertia moment<br />
ratio<br />
PB07 P<strong>G1</strong> Model loop gain rad/s<br />
PB08 PG2 Position loop gain rad/s<br />
PB09 VG2 Speed loop gain rad/s<br />
PB10 VIC Speed integral compensation ms<br />
PB29<br />
GD2B<br />
Gain changing load to motor<br />
inertia moment ratio<br />
Multiplier Control parameters before changing<br />
( 1)<br />
Position and speed gains of a model used to set the<br />
response level to a command. Always valid.<br />
Multiplier Used to set load to motor inertia moment ratio after changing.<br />
( 1)<br />
PB30 PG2B Gain changing position loop gain rad/s Used to set the value of the after-changing position loop gain.<br />
PB31 VG2B Gain changing speed loop gain rad/s Used to set the value of the after-changing speed loop gain.<br />
Gain changing speed integral<br />
Used to set the value of the after-changing speed integral<br />
PB32 VICB<br />
ms<br />
compensation<br />
compensation.<br />
PB26 CDP Gain changing selection Used to select the changing condition.<br />
PB27 CDL Gain changing condition<br />
kpps<br />
pulse<br />
r/min<br />
PB28 CDT Gain changing time constant ms<br />
PB33<br />
PB34<br />
VRF1B<br />
VRF2B<br />
Gain changing vibration<br />
suppression control vibration<br />
frequency setting<br />
Gain changing vibration<br />
suppression control resonance<br />
frequency setting<br />
Hz<br />
Hz<br />
Used to set the changing condition values.<br />
Used to set the filter time constant for a gain change at<br />
changing.<br />
Used to set the value of the after-changing vibration<br />
suppression control vibration frequency setting.<br />
Used to set the value of the after-changing vibration<br />
suppression control resonance frequency setting.<br />
(1) Parameters No. PB06 to PB10<br />
These parameters are the same as in ordinary manual adjustment. Gain changing allows the values of load<br />
to motor inertia moment ratio, position loop gain, speed loop gain and speed integral compensation to be<br />
changed.<br />
(2) Gain changing load to motor inertia moment ratio (parameter No. PB29)<br />
This parameter is used to set load to motor inertia moment ratio after changing the gains. If the load to<br />
motor inertia moment ratio does not change, set the same value in this parameter as the load to motor<br />
inertia moment ratio (parameter No. PB06).<br />
(3) Gain changing position loop gain (parameter No. PB30), gain changing speed loop gain (parameter No.<br />
PB31), gain changing speed integral compensation (parameter No. PB32).<br />
This parameter is used to set the values of after-changing position loop gain, speed loop gain and speed<br />
integral compensation.<br />
7 - 15
7. SPECIAL ADJUSTMENT FUNCTIONS<br />
(4) Gain changing selection (parameter No. PB26)<br />
This parameter is used to set the gain changing condition. Select the changing condition in the first and<br />
second digits. If "1" is set in the first digit, the gain can be changed by the gain changing (CDP) input device.<br />
The gain changing (CDP) can be assigned to CN1-3 pin to CN1-8 pin using parameters No. PD03 to PD14.<br />
0<br />
Gain changing selection<br />
Under any of the following conditions, the gains<br />
change on the basis of parameter No. PB29 to<br />
PB34 settings.<br />
0: Invalid<br />
1: Input device (gain changing (CDP))<br />
2: Command frequency (parameter No.PB27 setting)<br />
3: Droop pulse (parameter No.PB27 setting)<br />
4: Servo motor speed (parameter No.PB27 setting)<br />
Gain changing condition<br />
0: Valid when the input device (gain changing (CDP)) is ON, or<br />
valid when the value is equal to or larger than the value set<br />
in parameter No. PB27.<br />
1: Valid when the input device (gain changing (CDP)) is OFF,<br />
or valid when the value is equal to or smaller than the value<br />
set in parameter No. PB27.<br />
(5) Gain changing condition (parameter No. PB27)<br />
This parameter is used to set gain changing level when "command frequency", "droop pulse" or "servo<br />
motor speed" is selected in the gain changing selection (parameter No. PB26).<br />
The setting unit is as follows.<br />
Gain changing condition<br />
Command frequency<br />
Droop pulse<br />
Servo motor speed<br />
Unit<br />
kpps<br />
pulse<br />
r/min<br />
(6) Gain changing time constant (parameter No. PB28)<br />
In this parameter, a primary delay filter can be set to each gain at gain changing. This parameter is, for<br />
example, used to prevent unexpected operation if the gain difference is large at gain changing.<br />
(7) Gain changing vibration suppression control<br />
Gain changing vibration suppression control is used only when the gain is changed by on/off of the input<br />
device (gain changing (CDP)).<br />
7 - 16
7. SPECIAL ADJUSTMENT FUNCTIONS<br />
7.3.4 Gain changing procedure<br />
The operation is explained with setting examples below:<br />
(1) When gain changing by an input device (CDP) is selected:<br />
(a) Setting<br />
Parameter No. Abbreviation Name Setting Unit<br />
PB06 GD2 Load to motor inertia moment ratio 4.0<br />
Multiplier<br />
( 1)<br />
PB07 P<strong>G1</strong> Model loop gain 100 rad/s<br />
PB08 PG2 Position loop gain 120 rad/s<br />
PB09 VG2 Speed loop gain 3000 rad/s<br />
PB10 VIC Speed integral compensation 20 ms<br />
PB19<br />
PB20<br />
VRF1<br />
VRF2<br />
Vibration suppression control vibration<br />
frequency setting<br />
Vibration suppression control resonance<br />
frequency setting<br />
50 Hz<br />
50 Hz<br />
PB29 GD2B<br />
Gain changing load to motor inertia moment<br />
Multiplier<br />
10.0<br />
ratio<br />
( 1)<br />
PB30 PG2B Gain changing position loop gain 84 rad/s<br />
PB31 VG2B Gain changing speed loop gain 4000 rad/s<br />
PB32 VICB Gain changing speed integral compensation 50 ms<br />
PB26 CDP Gain changing selection<br />
001<br />
(Changed by ON/OFF of input device)<br />
PB28 CDT Gain changing time constant 100 ms<br />
PB33<br />
PB34<br />
VRF1B<br />
VRF2B<br />
Gain changing vibration suppression control<br />
vibration frequency setting<br />
Gain changing vibration suppression control<br />
resonance frequency setting<br />
60 Hz<br />
60 Hz<br />
(b) Timing chart at changing<br />
Gain changing<br />
(CDP)<br />
OFF<br />
ON<br />
After-changing gain<br />
OFF<br />
Change of<br />
each gain<br />
Before-changing gain<br />
63.4%<br />
CDT =100ms<br />
Model loop gain 100<br />
Load to motor inertia moment<br />
ratio<br />
4.0 10.0 4.0<br />
Position loop gain 120 84 120<br />
Speed loop gain 3000 4000 3000<br />
Speed integral compensation 20 50 20<br />
Vibration suppression control<br />
vibration frequency setting<br />
50 60 50<br />
Vibration suppression control<br />
resonance frequency setting<br />
50 60 50<br />
7 - 17
7. SPECIAL ADJUSTMENT FUNCTIONS<br />
(2) When gain changing by droop pulses is selected:<br />
In this case, gain changing vibration suppression control cannot be used.<br />
(a) Setting<br />
Parameter No. Abbreviation Name Setting Unit<br />
PB06 GD2 Load to motor inertia moment ratio 4.0<br />
Multiplier<br />
( 1)<br />
PB07 P<strong>G1</strong> Model loop gain 100 rad/s<br />
PB08 PG2 Position loop gain 120 rad/s<br />
PB09 VG2 Speed loop gain 2 3000 rad/s<br />
PB10 VIC Speed integral compensation 20 ms<br />
PB29 GD2B<br />
Gain changing load to motor inertia moment<br />
Multiplier<br />
10.0<br />
ratio<br />
( 1)<br />
PB30 PG2B Gain changing position loop gain 84 rad/s<br />
PB31 VG2B Gain changing speed loop gain 4000 rad/s<br />
PB32 VICB Gain changing speed integral compensation 50 ms<br />
PB26 CDP Gain changing selection<br />
003<br />
(Changed by droop pulses)<br />
PB27 CDL Gain changing condition 50 pulse<br />
PB28 CDT Gain changing time constant 100 ms<br />
(b) Timing chart at changing<br />
Command pulse<br />
Droop pulses<br />
Droop pulses [pulses] 0<br />
CDL<br />
CDL<br />
After-changing gain<br />
Change of each gain<br />
Before-changing gain<br />
63.4%<br />
CDT = 100ms<br />
Model loop gain 100<br />
Load to motor inertia moment<br />
ratio<br />
4.0 10.0 4.0 10.0<br />
Position loop gain 120 84 120 84<br />
Speed loop gain 3000 4000 3000 4000<br />
Speed integral compensation 20 50 20 50<br />
7 - 18
8. TROUBLESHOOTING<br />
8. TROUBLESHOOTING<br />
POINT<br />
As soon as an alarm occurs, turn off servo-on (SON) and the main circuit power<br />
supply.<br />
If an alarm/warning has occurred, refer to this chapter and remove its cause.<br />
8.1 Alarms and warning list<br />
When an error occurs during the operation, the corresponding alarm or warning is displayed. If any alarm or<br />
warning has occurred, refer to section 8.2 or 8.3 and take the appropriate action. When an alarm occurs, ALM<br />
turns off.<br />
After removing the cause of the alarm, the alarm can be deactivated in any of the methods marked in the<br />
alarm deactivation column.<br />
The warning is automatically canceled after removing the cause of occurrence.<br />
Alarms<br />
3-digit,<br />
Alarm deactivation<br />
7-segment<br />
Press "SET" on Alarm<br />
No.<br />
Name<br />
Power<br />
LED<br />
current alarm reset<br />
OFF ON<br />
display<br />
screen. (RES)<br />
A.10 Undervoltage<br />
A.12 Memory error 1 (RAM)<br />
A.13 Clock error<br />
A.15 Memory error 2 (EEP-ROM)<br />
A.16 Encoder initial communication error1<br />
A.17 Board error<br />
A.19 Memory error 3 (Flash-ROM)<br />
A.1A<br />
Motor combination error<br />
A.1C<br />
Software combination error<br />
A.1E Encoder initial communication error 2<br />
A.1F Encoder initial communication error 3<br />
A.20 Encoder normal communication error 1<br />
A.21 Encoder normal communication error 2<br />
A.24 Main circuit error<br />
A.30 Regenerative error (Note 1) (Note 1) (Note 1)<br />
A.31 Overspeed<br />
A.32 Overcurrent<br />
A.33 Overvoltage<br />
A.35 Command frequency error<br />
A.37 Parameter error<br />
A.39 Program error<br />
A.45 Main circuit device overheat (Note 1) (Note 1) (Note 1)<br />
A.46 Servo motor overheat (Note 1) (Note 1) (Note 1)<br />
A.50 Overload 1 (Note 1) (Note 1) (Note 1)<br />
A.51 Overload 2 (Note 1) (Note 1) (Note 1)<br />
A.52 Error excessive<br />
A.61 Operation alarm<br />
A.8E<br />
USB communication error<br />
888 Watchdog<br />
8 - 1
8. TROUBLESHOOTING<br />
Warning<br />
3-digit,<br />
No.<br />
7-segment<br />
The servo motor stops<br />
Name<br />
LED<br />
/does not stop.<br />
display<br />
A.90 Home positioning incomplete warning Stops<br />
A.91 Servo amplifier overheat warning Does not stop<br />
A.96 Home position setting error Stops<br />
A.97 Program operation disabled Does not stop<br />
A.98 Software limit warning Stops (Note 2)<br />
A.99 Stroke limit warning Stops (Note 2)<br />
A.E0 Excessive regeneration warning Does not stop<br />
A.E1 Overload warning 1 Does not stop<br />
A.E6 Servo forced stop warning Stops<br />
A.E9 Main circuit off warning Stops<br />
A.EC Overload warning 2 Does not stop<br />
A.ED Output watt excess warning Does not stop<br />
A.F0 Tough drive warning Does not stop<br />
Note 1. Deactivate the alarm about 30 minutes of cooling time after removing the cause of occurrence.<br />
2. Operation to the direction which cancels the warning can be performed.<br />
8 - 2
8. TROUBLESHOOTING<br />
8.2 Remedies for alarms<br />
CAUTION<br />
When any alarm has occurred, eliminate its cause, ensure safety, then reset the<br />
alarm, and restart operation. Otherwise, injury may occur.<br />
As soon as an alarm occurs, turn off servo-on (SON) and the main circuit power<br />
supply. Otherwise, regenerative transistor fault or the like may overheat the<br />
regenerative resistor, causing a fire.<br />
POINT<br />
When any of the following alarms has occurred, do not deactivate the alarm and<br />
resume operation repeatedly. To do so will cause the servo amplifier/servo<br />
motor to fail. Remove the cause of occurrence, and leave a cooling time of more<br />
than 30 minutes before resuming operation.<br />
Regenerative error (30. ) Main circuit device overheat (45.1)<br />
Servo motor overheat (46.1) Overload 1 (50. )<br />
Overload 2 (51. )<br />
The alarm can be deactivated by switching the power off and then on, by<br />
pressing the "SET" button on the current alarm screen or by turning on the reset<br />
(RES). For details, refer to section 8.1.<br />
When an alarm occurs, the trouble (ALM) switches off and the dynamic brake is operated to stop the servo<br />
motor. At this time, the display indicates the alarm No.<br />
The following shows the display example of alarm 33 (overvoltage: detail1)<br />
Flicker display<br />
At 2s intervals<br />
Flicker display<br />
Remove the cause of the alarm in accordance with this section. Use <strong>MR</strong> Configurator to refer to a factor of<br />
alarm occurrence.<br />
8 - 3
8. TROUBLESHOOTING<br />
Alarm No.: A.10<br />
Detailed<br />
display<br />
Description<br />
Detailed<br />
Name<br />
10.1 Control<br />
circuit power<br />
supply<br />
voltage<br />
dropped<br />
Name: Undervoltage<br />
Control circuit power supply voltage dropped.<br />
Main circuit power supply voltage dropped.<br />
Main circuit power supply is turned off.<br />
Cause Checking method Result Action<br />
1) Control circuit power<br />
supply connector is<br />
disconnected. Contact<br />
failure.<br />
2) Control circuit power<br />
supply voltage is low.<br />
3) Instantaneous power<br />
failure of 1ms or longer<br />
occurred.<br />
Check the control<br />
circuit power supply<br />
connector.<br />
Check if the control<br />
circuit power supply<br />
voltage is 19VDC or<br />
less.<br />
Check for any problem<br />
with the power supply.<br />
The connector is<br />
disconnected or<br />
contact failure.<br />
Connect correctly.<br />
No problem. Check 2).<br />
19VDC or less.<br />
Above 19VDC. Check 3).<br />
A problem is found.<br />
Raise the control circuit<br />
power supply voltage.<br />
Check the power supply.<br />
10.2 Main circuit<br />
power supply<br />
voltage<br />
dropped<br />
1) Main circuit power supply<br />
connector is disconnected.<br />
Check the main circuit<br />
power supply<br />
connector.<br />
The connector is<br />
disconnected.<br />
No problem.<br />
Connect correctly.<br />
Check 2).<br />
2) Main circuit power supply<br />
voltage is low.<br />
Check if the main<br />
circuit power supply<br />
voltage is the following<br />
or less.<br />
<strong>MR</strong>-<strong>JN</strong>- A: 140VAC<br />
<strong>MR</strong>-<strong>JN</strong>- A1: 70VAC<br />
<strong>MR</strong>-<strong>JN</strong>- A: 140VAC<br />
or less<br />
<strong>MR</strong>-<strong>JN</strong>- A1: 70VAC<br />
or less<br />
<strong>MR</strong>-<strong>JN</strong>- A: Above<br />
140VAC<br />
<strong>MR</strong>-<strong>JN</strong>- A1: Above<br />
70VAC<br />
3) The drop occurs during<br />
acceleration.<br />
Check if the value of<br />
status display Pn (bus<br />
The value is "1"<br />
(undervoltage).<br />
voltage) is "1"<br />
(undervoltage). The value is not "1"<br />
(undervoltage).<br />
Raise the main circuit<br />
power voltage.<br />
Check 3).<br />
Increase the acceleration<br />
time constant or the power<br />
supply capacity.<br />
Check 4).<br />
4) Servo amplifier fault Check the value of<br />
status display Pn (bus<br />
The value of the<br />
status display Pn<br />
Replace the servo<br />
amplifier.<br />
voltage) when the main<br />
circuit power is on.<br />
(bus voltage) is "1"<br />
(overvoltage).<br />
10.3 Main circuit<br />
power supply<br />
failure<br />
(instantaneous<br />
power<br />
failure)<br />
1) Main circuit power supply<br />
connector/wire is<br />
disconnected.<br />
Check the main circuit<br />
power connector.<br />
The connector is<br />
disconnected or<br />
contact failure.<br />
No problem.<br />
Connect correctly.<br />
Check 2).<br />
2) Main circuit power supply<br />
voltage is low.<br />
3) Instantaneous power<br />
failure of the main circuit<br />
power supply occurred.<br />
Check if the main<br />
circuit power supply<br />
voltage is the following<br />
or less.<br />
<strong>MR</strong>-<strong>JN</strong>- A: 140VAC<br />
<strong>MR</strong>-<strong>JN</strong>- A1: 70VAC<br />
<strong>MR</strong>-<strong>JN</strong>- A: 140VAC<br />
or less<br />
<strong>MR</strong>-<strong>JN</strong>- A1: 70VAC<br />
or less<br />
<strong>MR</strong>-<strong>JN</strong>- A: Above<br />
140VAC<br />
<strong>MR</strong>-<strong>JN</strong>- A1: Above<br />
70VAC<br />
Check the main circuit power supply.<br />
Raise the main circuit<br />
power supply voltage.<br />
Check 3).<br />
8 - 4
8. TROUBLESHOOTING<br />
Alarm No.: A.12<br />
Detailed<br />
display<br />
Description<br />
Detailed<br />
Name<br />
12.1 CPU built-in<br />
RAM fault<br />
Name: Memory error 1 (RAM)<br />
Servo amplifier internal part (CPU) is faulty.<br />
Cause Checking method Result Action<br />
1) Faulty parts in the servo Remove all cables Alarm occurs. Replace the servo<br />
amplifier<br />
except for the control<br />
amplifier.<br />
circuit power supply Alarm does not Check 2).<br />
and check if the alarm occur.<br />
occurs.<br />
2) Fault in the surrounding Check if any noise An error is found. Take the appropriate<br />
environment<br />
entered the power<br />
measures according to the<br />
supply.<br />
cause.<br />
Check if any connector<br />
is shorted.<br />
Alarm No.: A.13<br />
Detailed<br />
display<br />
Description<br />
Detailed<br />
Name<br />
Name: Clock error<br />
Printed board fault<br />
CPU clock fault<br />
Cause Checking method Result Action<br />
13.1 Clock error 1) Printed board fault Remove all cables<br />
except for the control<br />
Alarm occurs. Replace the servo<br />
amplifier.<br />
2) Parts fault<br />
circuit power supply<br />
and check if the alarm<br />
occurs.<br />
Alarm does not<br />
occur.<br />
Check 3).<br />
3) Fault in the surrounding<br />
environment<br />
Check if any noise<br />
entered the power<br />
supply.<br />
Check if any connector<br />
is shorted.<br />
An error is found.<br />
Take the appropriate<br />
measures according to the<br />
cause.<br />
Alarm No.: A.15<br />
Description<br />
Detailed<br />
display<br />
Detailed<br />
Name<br />
15.1 EEP-ROM<br />
error at<br />
power-on<br />
15.2<br />
EEP-ROM<br />
error during<br />
operation<br />
Name: Memory error 2 (EEP-ROM)<br />
Servo amplifier internal part (EEP-ROM) is faulty.<br />
Cause Checking method Result Action<br />
1) EEP-ROM operation fault<br />
when the power is on.<br />
2) Fault in the surrounding<br />
environment<br />
1) EEP-ROM operation fault<br />
during the normal<br />
operation<br />
Remove all cables Alarm occurs. Replace the servo<br />
except for the control<br />
amplifier.<br />
circuit power supply<br />
and check if the alarm<br />
occurs.<br />
Check if any noise<br />
entered the power<br />
supply.<br />
Check if any connector<br />
is shorted.<br />
Check if the alarm<br />
occurs when the<br />
parameter is changed<br />
during the normal<br />
operation.<br />
Alarm does not Check 2).<br />
occur.<br />
An error is found. Take the appropriate<br />
measures according to the<br />
cause.<br />
No error.<br />
Replace the servo<br />
amplifier.<br />
Alarm occurs. Replace the servo<br />
amplifier.<br />
8 - 5
8. TROUBLESHOOTING<br />
Alarm No.: A.16 Name: Encoder initial communication error 1<br />
Detailed<br />
display<br />
Description<br />
Detailed<br />
Name<br />
Communication error occurred between the encoder and the servo amplifier.<br />
Cause Checking method Result Action<br />
16.0 Encoder 1) Encoder cable faulty Check the shield Error in the shield. Repair the cable.<br />
transmission<br />
data error<br />
status.<br />
No error in the Check 2).<br />
shield.<br />
2) Fault in the surrounding<br />
environment<br />
Check the noise, the<br />
ambient temperature,<br />
etc.<br />
An error is found. Take the appropriate<br />
measures according to the<br />
cause.<br />
No error. Check 3).<br />
3) Servo amplifier fault Check if the alarm<br />
occurs again.<br />
Alarm occurs. Replace the servo<br />
amplifier.<br />
Alarm does not<br />
occur.<br />
Execute the checking<br />
methods mentioned in the<br />
alarm display "16.3".<br />
16.1 Encoder 1) Encoder cable faulty Execute the checking methods mentioned in the alarm display "16.0".<br />
transmission<br />
data error 1<br />
(Servo<br />
2) Fault in the surrounding<br />
environment<br />
3) Servo amplifier fault<br />
amplifier<br />
receive<br />
error)<br />
16.2 Encoder 1) Encoder cable faulty Execute the checking methods mentioned in the alarm display "16.0".<br />
transmission<br />
data error 2<br />
(Frame<br />
2) Fault in the surrounding<br />
environment<br />
3) Servo amplifier fault<br />
error)<br />
16.3 Encoder 1) Encoder cable is<br />
Check if the encoder Disconnected. Connect correctly.<br />
transmission<br />
data error 3<br />
(The servo<br />
amplifier not<br />
receiving)<br />
disconnected.<br />
2) Encoder cable faulty<br />
cable is connected<br />
correctly.<br />
Check if the encoder<br />
cable is disconnected<br />
or shorted.<br />
Check the shield<br />
Connected<br />
correctly.<br />
An error is found.<br />
No error.<br />
Check 2).<br />
Repair or replace the<br />
cable.<br />
Check 3).<br />
status.<br />
3) Encoder cable type (2-<br />
wire, 4-wire) selection is<br />
Check the set value of<br />
parameter No.PC22.<br />
Incorrect set value<br />
is set.<br />
Set correctly.<br />
incorrect in the parameter 2-wire: "0 "<br />
setting.<br />
4-wire: "1 "<br />
No problem. Check 4).<br />
4) Encoder fault Check if the alarm<br />
occurs after replacing<br />
the servo motor.<br />
Alarm does not<br />
occur.<br />
Alarm occurs.<br />
Replace the servo motor.<br />
Check 5).<br />
5) Servo amplifier fault Check if the alarm Alarm does not Replace the servo<br />
occurs after replacing occur.<br />
amplifier.<br />
the servo amplifier. Alarm occurs. Check 6).<br />
6) Fault in the surrounding<br />
environment<br />
Check the noise, etc. An error is found. Take the appropriate<br />
measures according to the<br />
cause.<br />
8 - 6
8. TROUBLESHOOTING<br />
Alarm No.: A.16 Name: Encoder initial communication error 1<br />
Detailed<br />
display<br />
Description<br />
Detailed<br />
Name<br />
Communication error occurred between the encoder and the servo amplifier.<br />
Cause Checking method Result Action<br />
16.5 Encoder<br />
receive data<br />
1) Encoder cable faulty Check the shield<br />
status.<br />
error 1<br />
(Parity error)<br />
2) Fault in the surrounding<br />
environment<br />
Check the noise, etc.<br />
3) Encoder fault Check if the alarm<br />
occurs after replacing<br />
the servo motor.<br />
Error in the shield.<br />
No error in the<br />
shield.<br />
An error is found.<br />
Repair the cable.<br />
Check 2).<br />
No error. Check 3).<br />
Alarm does not<br />
occur.<br />
Take the appropriate<br />
measures according to the<br />
cause.<br />
Replace the servo motor.<br />
16.6 Encoder 1) Encoder cable faulty Execute the checking methods mentioned in the alarm display "16.5".<br />
receive data<br />
error 2<br />
(Frame<br />
error)<br />
2)<br />
3)<br />
Fault in the surrounding<br />
environment<br />
Encoder fault<br />
16.7 Encoder 1) Encoder cable faulty Execute the checking methods mentioned in the alarm display "16.5".<br />
receive data<br />
error 3<br />
(Request<br />
discrepancy)<br />
2)<br />
3)<br />
Fault in the surrounding<br />
environment<br />
Encoder fault<br />
Alarm No.: A.17<br />
Detailed<br />
display<br />
Description<br />
Detailed<br />
Name<br />
17.1 AD converter<br />
error<br />
Name: Board error<br />
Servo amplifier internal part is faulty.<br />
Cause Checking method Result Action<br />
1) Current detection circuit<br />
fault<br />
2) Fault in the surrounding<br />
environment<br />
17.2 Current<br />
feedback<br />
1) Current detection circuit<br />
fault<br />
data error 2) Fault in the surrounding<br />
environment<br />
17.3 Custom IC<br />
error<br />
17.4 Servo<br />
amplifier<br />
identification<br />
signal error<br />
1) Current detection circuit<br />
fault<br />
2) Fault in the surrounding<br />
environment<br />
1) Servo amplifier<br />
identification signal could<br />
not be read correctly.<br />
Turn off the servo-on<br />
(SON) and check if the<br />
alarm occurs.<br />
Check the noise, the<br />
ambient temperature,<br />
etc.<br />
Alarm occurs.<br />
Alarm does not<br />
occur.<br />
An error is found.<br />
Replace the servo<br />
amplifier.<br />
Check 2).<br />
Take the appropriate<br />
measures according to the<br />
cause.<br />
Execute the checking methods mentioned in the alarm display "17.1".<br />
Remove all cables<br />
except for the control<br />
circuit power supply<br />
and check if the alarm<br />
occurs.<br />
Alarm occurs.<br />
Replace the servo<br />
amplifier.<br />
8 - 7
8. TROUBLESHOOTING<br />
Alarm No.: A.19<br />
Detailed<br />
display<br />
Description<br />
Detailed<br />
Name<br />
19.1 Flash-ROM<br />
error1<br />
19.2 Flash-ROM<br />
error2<br />
Name: Memory error 3 (Flash ROM)<br />
Servo amplifier internal part (Flash-ROM) is faulty.<br />
Cause Checking method Result Action<br />
1) Flash-ROM fault Remove all cables Alarm occurs. Replace the servo<br />
except for the control<br />
amplifier.<br />
circuit power supply<br />
and check if the alarm<br />
occurs.<br />
1) Flash-ROM fault Execute the checking methods mentioned in the alarm display "19.1".<br />
Alarm No.: A.1A<br />
Detailed<br />
display<br />
Description<br />
Detailed<br />
Name<br />
1A.1 Motor<br />
combination<br />
error<br />
Name: Motor combination error<br />
Incorrect combination of servo amplifier and servo motor.<br />
Cause Checking method Result Action<br />
1) Incorrect combination of Check the model of the Incorrect<br />
Use correct combination.<br />
servo amplifier and servo servo motor and the combination.<br />
motor is connected. combination with the<br />
servo amplifier.<br />
Alarm No.: A.1C<br />
Detailed<br />
display<br />
Description<br />
Detailed<br />
Name<br />
1C.1 Software<br />
combination<br />
error<br />
Name: Software combination error<br />
Software checksum error<br />
Cause Checking method Result Action<br />
1) Flash-ROM fault Remove all cables Alarm occurs. Replace the servo<br />
except for the control<br />
amplifier.<br />
circuit power supply<br />
and check if the alarm<br />
occurs.<br />
Alarm No.: A.1E Name: Encoder initial communication error 2<br />
Description Faulty parts in the encoder<br />
Detailed<br />
display<br />
Detailed<br />
Name<br />
1E.1 Encoder<br />
fault<br />
Cause Checking method Result Action<br />
1) Encoder fault Check if the alarm Alarm does not Replace the servo motor.<br />
occurs after replacing occur.<br />
the servo motor. Alarm occurs. Check 2).<br />
2) Fault in the surrounding<br />
environment<br />
Check the noise, the<br />
ambient temperature,<br />
etc.<br />
An error is found.<br />
Take the appropriate<br />
measures according to the<br />
cause.<br />
Alarm No.: A.1F Name: Encoder initial communication error 3<br />
Description Incompatible encoder is connected.<br />
Detailed<br />
display<br />
Detailed<br />
Name<br />
1F.1 Incompatible<br />
encoder<br />
Cause Checking method Result Action<br />
1) Incompatible servo motor<br />
(encoder) is connected<br />
with the servo amplifier.<br />
Check the model of<br />
servo motor.<br />
Servo motor is<br />
incompatible.<br />
Replace the servo motor.<br />
8 - 8
8. TROUBLESHOOTING<br />
Alarm No.: A.20 Name: Encoder normal communication error 1<br />
Detailed<br />
display<br />
Description<br />
Detailed<br />
Name<br />
Communication error occurred between the encoder and the servo amplifier.<br />
Cause Checking method Result Action<br />
20.1 Encoder 1) Encoder cable is<br />
Check if the encoder Disconnected. Connect correctly.<br />
transmission disconnected.<br />
cable is connected Connected<br />
Check 2).<br />
data error<br />
(Servo<br />
amplifier<br />
receive<br />
error)<br />
2) Encoder cable faulty<br />
correctly.<br />
Check if the encoder<br />
cable is disconnected<br />
or shorted.<br />
correctly.<br />
An error is found.<br />
No error.<br />
Repair or replace the<br />
cable.<br />
Check 3).<br />
3) Encoder cable shielding is Check the shield An error is found. Repair the cable.<br />
faulty<br />
status. No error. Check 4).<br />
4) Servo amplifier fault Check if the alarm Alarm does not Replace the servo<br />
occurs after replacing occur.<br />
amplifier.<br />
the servo amplifier. Alarm occurs. Check 5).<br />
5) Fault in the surrounding<br />
environment<br />
Check the external<br />
noise, the ambient<br />
temperature, etc.<br />
An error is found. Take the appropriate<br />
measures according to the<br />
cause.<br />
20.5 Encoder 1) Encoder cable shielding is Check the shield An error is found. Repair the cable.<br />
receive data faulty<br />
status. No error. Check 2).<br />
error 1<br />
(Frame<br />
error)<br />
2) Fault in the surrounding<br />
environment<br />
Check the noise, etc. An error is found. Take the appropriate<br />
measures according to the<br />
cause.<br />
3) Encoder fault Check if the alarm<br />
occurs after replacing<br />
the servo motor.<br />
20.7 Encoder<br />
receive data<br />
1) Encoder cable shielding is<br />
faulty<br />
error2 2) Fault in the surrounding<br />
(Request environment<br />
discrepancy) 3) Encoder fault<br />
No error. Check 3).<br />
Alarm does not<br />
occur.<br />
Replace the servo motor.<br />
Execute the checking methods mentioned in the alarm display "20.5".<br />
Alarm No.: A.21 Name: Encoder normal communication error 2<br />
Detailed<br />
display<br />
Description<br />
Detailed<br />
Name<br />
21.1 Encoder<br />
data error<br />
Encoder data fault<br />
Cause Checking method Result Action<br />
1) Excessive acceleration is Check if the alarm Alarm does not Operate with the loop gain<br />
detected by oscillation, occurs after the loop occur.<br />
decreased.<br />
etc.<br />
gain is decreased. Alarm occurs. Check 2).<br />
21.2 Encoder<br />
data<br />
updating<br />
error<br />
21.3 Encoder<br />
waveform<br />
error<br />
2) Fault in the surrounding<br />
environment<br />
Check the noise, etc. An error is found. Take the appropriate<br />
measures according to the<br />
cause.<br />
No error. Check 3).<br />
3) Encoder fault Check if the alarm<br />
occurs after replacing<br />
the servo motor.<br />
Alarm does not<br />
occur.<br />
Replace the servo motor.<br />
1) Encoder fault Check if the alarm Alarm does not Replace the servo motor.<br />
occurs after replacing occur.<br />
the servo motor.<br />
1) Encoder fault Check if the alarm Alarm does not Replace the servo motor.<br />
occurs after replacing occur.<br />
the servo motor.<br />
8 - 9
8. TROUBLESHOOTING<br />
Alarm No.: A.24<br />
Detailed<br />
display<br />
Description<br />
Detailed<br />
Name<br />
Name: Main circuit error<br />
Ground fault occurred in the servo motor power cables.<br />
Ground fault occurred in the servo motor<br />
Cause Checking method Result Action<br />
24.1 Ground fault<br />
detected by<br />
the hardware<br />
detection<br />
circuit<br />
1)<br />
2)<br />
Servo amplifier fault<br />
Ground fault or short of<br />
the servo motor power<br />
cables<br />
Alarm occurs even if<br />
the power cables (U, V,<br />
W) are disconnected.<br />
Check if the power<br />
cables themselves<br />
(between U, V, W and<br />
) are shorted.<br />
Alarm occurs.<br />
Alarm does not<br />
occur.<br />
Cables are shorted.<br />
No problem.<br />
Replace the servo<br />
amplifier.<br />
Check 2).<br />
Replace the power cables.<br />
Check 3).<br />
3) Ground fault in the servo<br />
motor<br />
4) Power supply cables and<br />
servo motor power cables<br />
are shorted.<br />
5) Fault in the surrounding<br />
environment<br />
Remove the power<br />
cables from the servo<br />
motor and check if<br />
short occurs in the<br />
servo motor (between<br />
U, V, W and ).<br />
Check if there is a<br />
contact between the<br />
power supply cables<br />
and the servo motor<br />
power cables at poweroff.<br />
Servo motor is<br />
shorted.<br />
No problem. Check 4).<br />
There is a contact.<br />
Replace the servo motor.<br />
Connect correctly.<br />
No contact. Check 5).<br />
Check the noise, etc. An error is found. Take the appropriate<br />
measures according to the<br />
cause.<br />
24.2 Ground fault 1) Servo amplifier fault Execute the checking methods mentioned in the alarm display "24.1".<br />
detected by<br />
the software<br />
detection<br />
2) Ground fault or short of<br />
the servo motor power<br />
cables<br />
3) Ground fault in the servo<br />
motor<br />
4) Power supply cables and<br />
servo motor power cables<br />
are shorted.<br />
5) Fault in the surrounding<br />
environment<br />
8 - 10
8. TROUBLESHOOTING<br />
Alarm No.: A.30<br />
Detailed<br />
display<br />
Description<br />
Detailed<br />
Name<br />
30.1 Regenerative<br />
heat<br />
generation<br />
error<br />
30.2 Regenerative<br />
transistor<br />
fault<br />
30.3 Regenerative<br />
transistor<br />
feedback<br />
data error<br />
Name: Regenerative error<br />
Permissible regenerative power of the built-in regenerative resistor or the regenerative option is exceeded.<br />
Regenerative transistor faulty in the servo amplifier.<br />
Cause Checking method Result Action<br />
1) Incorrect setting of the<br />
built-in regenerative<br />
resistor (regenerative<br />
option)<br />
Check the built-in<br />
regenerative resistor<br />
(regenerative option)<br />
being used and the set<br />
value of parameter No.<br />
PA02.<br />
The set value is<br />
incorrect.<br />
The set value is<br />
correct.<br />
Set correctly.<br />
Check 2).<br />
2) Built-in regenerative<br />
resistor (regenerative<br />
option) is disconnected.<br />
Check if the built-in<br />
regenerative resistor<br />
(regenerative option) is<br />
connected correctly.<br />
Incorrect<br />
connection.<br />
Correct connection.<br />
Connect correctly.<br />
Check 3).<br />
3) Power supply voltage is<br />
high.<br />
Check the input power<br />
supply.<br />
4) The regenerative load ratio<br />
is over 100%.<br />
Call the status display<br />
or <strong>MR</strong> Configurator and<br />
check the regenerative<br />
load ratio at alarm<br />
occurrence.<br />
1) Regenerative transistor is<br />
faulty.<br />
1) Servo amplifier detection<br />
circuit is faulty<br />
Check if the built-in<br />
regenerative resistor<br />
(regenerative option) is<br />
overheated abnormally.<br />
Remove the wiring of P<br />
and C, and execute the<br />
operation.<br />
230VAC or more. Decrease the power<br />
supply voltage.<br />
Below 230VAC. Check 4).<br />
100% or more. Reduce the frequency of<br />
positioning.<br />
Increase the deceleration<br />
time constant.<br />
Reduce the load.<br />
Use the regenerative<br />
option if it is not used.<br />
Overheated<br />
abnormally.<br />
Alarm occurs.<br />
Replace the servo<br />
amplifier.<br />
Replace the servo<br />
amplifier.<br />
8 - 11
8. TROUBLESHOOTING<br />
Alarm No.: A.31<br />
Detailed<br />
display<br />
Description<br />
Detailed<br />
Name<br />
31.1 Motor speed<br />
error<br />
Name: Overspeed<br />
Servo motor speed has exceeded the instantaneous permissible speed.<br />
Cause Checking method Result Action<br />
1) Command speed is high. Check if the command The command<br />
2) Servo motor operates with<br />
the maximum torque, and<br />
speed overshoot occurs.<br />
3) Servo system is instable<br />
and oscillating.<br />
4) The overshoot of speed<br />
waveform occurs.<br />
speed is at the<br />
permissible speed or<br />
higher.<br />
Check if the<br />
acceleration torque is<br />
the maximum.<br />
Check if the servo<br />
motor is oscillating.<br />
Check if the overshoot<br />
occurs due to saturated<br />
torque caused by short<br />
acceleration time<br />
constant.<br />
5) Encoder faulty. Check if the alarm<br />
occurs when the actual<br />
speed is under the<br />
instantaneous<br />
permissible speed.<br />
speed is at the<br />
permissible speed<br />
or higher.<br />
The command<br />
speed is lower than<br />
the permissible<br />
speed.<br />
Performed with the<br />
maximum torque.<br />
Performed with the<br />
torque lower than<br />
the maximum.<br />
Servo motor is<br />
oscillating.<br />
Servo motor is not<br />
oscillating.<br />
Overshoot occurs.<br />
Overshoot does not<br />
occur.<br />
Alarm occurs.<br />
Check the operation<br />
pattern.<br />
Check 2).<br />
Increase the<br />
acceleration/deceleration<br />
time constant, or reduce<br />
the load.<br />
Check 3).<br />
Adjust the servo gain by<br />
the auto tuning 1 or the<br />
one-touch tuning.<br />
Reduce the load.<br />
Increase the acceleration<br />
time constant.<br />
Check 4).<br />
Increase the<br />
acceleration/deceleration<br />
time constant.<br />
Check 5).<br />
Replace the servo motor.<br />
Alarm No.: A.32<br />
Detailed<br />
display<br />
Description<br />
Detailed<br />
Name<br />
Name: Overcurrent<br />
The flowed current is higher than the permissible current of the servo amplifier.<br />
Cause Checking method Result Action<br />
32.1 Overcurrent<br />
was<br />
detected by<br />
the hardware<br />
1) Servo amplifier fault Check if the alarm<br />
occurs even if the<br />
power cables (U, V, W)<br />
are disconnected.<br />
detection 2) Ground fault or short of Check if the power<br />
circuit<br />
the servo motor power cables themselves are<br />
(during<br />
cables<br />
shorted.<br />
operation) 3) Servo motor fault Remove the power<br />
cables from the servo<br />
motor edge and check<br />
if short occurs<br />
(between U, V, W and<br />
).<br />
4) Fault in the surrounding<br />
environment<br />
Alarm occurs.<br />
Alarm does not<br />
occur.<br />
Cables are shorted.<br />
Replace the servo<br />
amplifier.<br />
Check 2).<br />
No problem. Check 3).<br />
Ground fault occurs<br />
in the servo motor.<br />
Ground fault does<br />
not occur in the<br />
servo motor.<br />
Replace the power cables.<br />
Replace the servo motor.<br />
Check 4).<br />
Check the noise, etc. An error is found. Take the appropriate<br />
measures according to the<br />
cause.<br />
8 - 12
8. TROUBLESHOOTING<br />
Alarm No.: A.32<br />
Detailed<br />
display<br />
Description<br />
Detailed<br />
Name<br />
Name: Overcurrent<br />
The flowed current is higher than the permissible current of the servo amplifier.<br />
Cause Checking method Result Action<br />
32.2 Overcurrent<br />
was<br />
1) High servo gain Check if the oscillation<br />
occurs.<br />
detected by<br />
the software<br />
detection 2) Servo amplifier fault Check if the alarm<br />
(during<br />
occurs even if the<br />
operation)<br />
power cables (U, V, W)<br />
are disconnected.<br />
3) Ground fault or short of<br />
the servo motor power<br />
cables<br />
Check if the power<br />
cables themselves are<br />
shorted.<br />
4) Servo motor fault Remove the power<br />
cables from the servo<br />
motor edge and check<br />
if short occurs<br />
(between U, V, W and<br />
).<br />
Oscillation occurs.<br />
Oscillation does not<br />
occur.<br />
Alarm occurs.<br />
Alarm does not<br />
occur.<br />
Cables are shorted.<br />
Decrease the speed loop<br />
gain.<br />
Check 2).<br />
Replace the servo<br />
amplifier.<br />
Check 3).<br />
No problem. Check 4).<br />
Ground fault occurs<br />
in the servo motor<br />
Ground fault does<br />
not occur in the<br />
servo motor<br />
Replace the power cables.<br />
Replace the servo motor.<br />
Check 5).<br />
5) Fault in the surrounding<br />
environment<br />
Check the noise, etc. An error is found. Take the appropriate<br />
measures according to the<br />
cause.<br />
32.3 Overcurrent 1) Servo amplifier fault Execute the checking methods mentioned in the alarm display "32.1".<br />
was<br />
detected by<br />
the hardware<br />
detection<br />
circuit<br />
(during a<br />
stop)<br />
2)<br />
3)<br />
Ground fault or short of<br />
the servo motor power<br />
cables<br />
Servo motor fault<br />
4) Fault in the surrounding<br />
environment<br />
32.4 Overcurrent 1) High servo gain Execute the checking methods mentioned in the alarm display "32.2".<br />
was<br />
2) Servo amplifier fault<br />
detected by<br />
the software<br />
detection<br />
(during a<br />
stop)<br />
3) Ground fault or short of<br />
the servo motor power<br />
cables<br />
4) Servo motor fault<br />
5) Fault in the surrounding<br />
environment<br />
8 - 13
8. TROUBLESHOOTING<br />
Alarm No.: A.33<br />
Detailed<br />
display<br />
Description<br />
Detailed<br />
Name<br />
33.1 Main circuit<br />
voltage error<br />
Name: Overvoltage<br />
The value of the status display Pn (bus voltage) is "5" (overvoltage).<br />
Cause Checking method Result Action<br />
1) The regenerative option is Check the set value of Incorrect setting. Correct the set value.<br />
used, but the set value of parameter No.PA02.<br />
the parameter is not<br />
Correct setting. Check 2).<br />
correct.<br />
2) Regenerative option is not Check the wiring and Open or<br />
Connect correctly.<br />
used.<br />
the lead of the built-in disconnected.<br />
Lead of the built-in<br />
regenerative resistor or the<br />
regenerative option is<br />
open or disconnected.<br />
3) Check the built-in<br />
regenerative resistor<br />
(regenerative option).<br />
4) Regenerative capacity is<br />
insufficient.<br />
5) Main circuit power supply<br />
voltage is high.<br />
6) Main circuit power supply<br />
voltage is high. (A servo<br />
amplifier for 1-phase<br />
100VAC input is used in<br />
the 200VAC power supply<br />
circuit.)<br />
regenerative resistor<br />
No problem. Check 3).<br />
(regenerative option).<br />
Check the resistance<br />
value.<br />
Check if alarm occurs<br />
when the deceleration<br />
time constant is<br />
increased.<br />
Check if the main<br />
circuit power supply<br />
voltage is the following<br />
or above.<br />
<strong>MR</strong>-<strong>JN</strong>- A: 253VAC<br />
<strong>MR</strong>-<strong>JN</strong>- A1: 132VAC<br />
Check the model of<br />
servo amplifier.<br />
Error in the built-in When using the built-in<br />
regenerative resistor regenerative resistor,<br />
(regenerative replace the servo<br />
option).<br />
amplifier.<br />
When using the<br />
regenerative option,<br />
replace the regenerative<br />
option.<br />
No problem. Check 4).<br />
Alarm does not Use the regenerative<br />
occur.<br />
option if it is not used.<br />
Increase the deceleration<br />
time constant.<br />
Alarm occurs. Check 5).<br />
<strong>MR</strong>-<strong>JN</strong>- A: Above Reduce the main circuit<br />
253VAC<br />
power supply voltage.<br />
<strong>MR</strong>-<strong>JN</strong>- A1: Above<br />
132VAC<br />
<strong>MR</strong>-<strong>JN</strong>- A: 253VAC Check 6).<br />
or less<br />
<strong>MR</strong>-<strong>JN</strong>- A1:<br />
132VAC or less<br />
The model of servo The servo amplifier may<br />
amplifier is "<strong>MR</strong>-<strong>JN</strong>- malfunction due to the<br />
A1".<br />
voltage input different from<br />
the power specification.<br />
Replace the servo<br />
amplifier with a "<strong>MR</strong>-<strong>JN</strong>-<br />
A" model.<br />
8 - 14
8. TROUBLESHOOTING<br />
Alarm No.: A.35<br />
Detailed<br />
display<br />
Description<br />
Detailed<br />
Name<br />
35.1 Command<br />
frequency<br />
error<br />
Name: Command frequency error<br />
Input command frequency is too high.<br />
Cause Checking method Result Action<br />
1) Command frequency is 1.5 Check the speed The set value of the Check operation pattern.<br />
times or more of the command.<br />
speed command is<br />
maximum command pulse Check the set value high.<br />
Check the set value of<br />
frequency.<br />
of parameter<br />
parameter No.PA13.<br />
No.PA13 (command<br />
input pulse form). The set value of the Check 2).<br />
"0 ":<br />
speed command is<br />
The command within the range.<br />
pulse frequency is<br />
1Mpps or less.<br />
"1 ":<br />
The command<br />
pulse frequency is<br />
500kpps or less.<br />
"2 ":<br />
The command<br />
pulse frequency is<br />
200kpps or less.<br />
2) Servo amplifier fault Check if the alarm Alarm does not Replace the servo<br />
occurs after replacing occur.<br />
amplifier.<br />
the servo motor.<br />
Alarm occurs. Check 3).<br />
3) Fault in the surrounding Check the noise, the An error is found. Take the appropriate<br />
environment<br />
ambient temperature,<br />
measures according to the<br />
etc.<br />
cause.<br />
Alarm No.: A.37<br />
Description<br />
Detailed<br />
display<br />
Detailed<br />
Name<br />
Name: Parameter error<br />
Parameter setting is incorrect.<br />
37.1 Parameter 1) Parameter is set outside<br />
setting range the setting range.<br />
error<br />
37.2 Parameter<br />
combination<br />
error<br />
Cause Checking method Result Action<br />
Check the set value<br />
according to the<br />
parameter error No.<br />
Outside the setting<br />
range.<br />
Within the setting<br />
range.<br />
2) EEP-ROM fault Write the parameter set<br />
value within the normal<br />
Abnormal value is<br />
written.<br />
range, and check if the Normal value is<br />
value is written correctly. written.<br />
3) Servo amplifier fault<br />
causes the change in the<br />
parameter setting.<br />
1) Unavailable parameter<br />
combination is set.<br />
Check if the alarm<br />
occurs after replacing<br />
the servo amplifier.<br />
Check the set value<br />
according to the<br />
parameter error No.<br />
Alarm does not<br />
occur.<br />
The set value is<br />
incorrect.<br />
Correct the value within<br />
the setting range.<br />
Check 2).<br />
Replace the servo<br />
amplifier.<br />
Check 3).<br />
Replace the servo<br />
amplifier.<br />
Correct the set value.<br />
8 - 15
8. TROUBLESHOOTING<br />
Alarm No.: A.37<br />
Detailed<br />
display<br />
Description<br />
Detailed<br />
Name<br />
37.3 Point table<br />
setting range<br />
error<br />
Name: Parameter error<br />
Parameter setting is incorrect.<br />
Cause Checking method Result Action<br />
1) Point table is set outside<br />
the setting range.<br />
Check the set value<br />
according to the point<br />
table error No.<br />
2) EEP-ROM fault Write the point table set<br />
value within the normal<br />
range, and check if the<br />
value is written<br />
correctly.<br />
3) Servo amplifier fault Check if the alarm<br />
causes the change in the occurs after replacing<br />
point table setting. the servo amplifier.<br />
Outside the setting<br />
range.<br />
Correct the value within<br />
the setting range.<br />
Within the setting Check 2).<br />
range.<br />
Abnormal value is Replace the servo<br />
written.<br />
amplifier.<br />
Normal value is Check 3).<br />
written.<br />
Alarm does not Replace the servo<br />
occur.<br />
amplifier.<br />
Alarm No.: A.39<br />
Description<br />
Detailed<br />
display<br />
Detailed<br />
Name<br />
Name: Program error<br />
The program is incorrect.<br />
Cause Checking method Result Action<br />
39.1 Program 1) A program command was Check the program. The program is<br />
error<br />
rewritten.<br />
different.<br />
The program is<br />
correct.<br />
2) EEP-ROM fault by the<br />
exceeded number of<br />
Write a correct<br />
program, and check if<br />
Incorrect program is<br />
written.<br />
program write times the program is written Correct program is<br />
correctly.<br />
written.<br />
3) Servo amplifier fault<br />
caused the program to be<br />
rewritten.<br />
Check if the alarm<br />
occurs after replacing<br />
the servo amplifier.<br />
Alarm does not<br />
occur.<br />
39.2 Command 1) An argument of program Check the command Outside the<br />
argument command is out of the argument according to argument range<br />
range error range.<br />
the step No.<br />
Within the argument<br />
(Refer to section 5.3.1.) range<br />
39.3 Incompatible<br />
command<br />
2) EEP-ROM fault by the<br />
exceeded number of<br />
program write times<br />
3) Servo amplifier fault<br />
caused the program to be<br />
rewritten.<br />
Write a correct<br />
program, and check if<br />
the program is written<br />
correctly.<br />
Check if the alarm<br />
occurs after replacing<br />
the servo amplifier.<br />
Incorrect program is<br />
written.<br />
Correct program is<br />
written.<br />
Alarm does not<br />
occur.<br />
1) A program command is<br />
incompatible.<br />
Check the command<br />
according to the step<br />
Incompatible<br />
command<br />
No.<br />
Compatible<br />
(Refer to section 5.3.1.) command<br />
2) EEP-ROM fault by the<br />
exceeded number of<br />
Write a correct<br />
program, and check if<br />
Incorrect program is<br />
written.<br />
program write times the program is written Correct program is<br />
correctly.<br />
written.<br />
3) Servo amplifier fault<br />
caused the program to be<br />
rewritten.<br />
Check if the alarm<br />
occurs after replacing<br />
the servo amplifier.<br />
Alarm does not<br />
occur.<br />
Correct the program.<br />
Check 2).<br />
Replace the servo<br />
amplifier.<br />
Check 3).<br />
Replace the servo<br />
amplifier.<br />
Correct the argument<br />
within the range.<br />
Check 2).<br />
Replace the servo<br />
amplifier.<br />
Check 3).<br />
Replace the servo<br />
amplifier.<br />
Correct the command to<br />
be compatible.<br />
Check 2).<br />
Replace the servo<br />
amplifier.<br />
Check 3).<br />
Replace the servo<br />
amplifier.<br />
8 - 16
8. TROUBLESHOOTING<br />
Alarm No.: A.45<br />
Detailed<br />
display<br />
Description<br />
Detailed<br />
Name<br />
45.1 Board<br />
temperature<br />
error<br />
Name: Main circuit device overheat<br />
Overheat in servo amplifier.<br />
Cause Checking method Result Action<br />
1) Ambient temperature is Check if the ambient Ambient<br />
Lower the ambient<br />
over 55 .<br />
temperature is 55 or temperature is over temperature.<br />
less.<br />
55 .<br />
Ambient<br />
Check 2).<br />
temperature is 55<br />
or less.<br />
2) Used beyond the<br />
specifications of close<br />
mounting.<br />
Check the<br />
specifications of close<br />
mounting.<br />
Used beyond the<br />
specifications.<br />
Satisfying the<br />
Use within the range of<br />
specifications.<br />
Check 3).<br />
specifications.<br />
3) The power was turned on<br />
and off continuously in<br />
overloaded status.<br />
Check if the overloaded<br />
status occurred<br />
repeatedly.<br />
Occurred<br />
repeatedly.<br />
Not occurred.<br />
Check operation pattern.<br />
Check 4).<br />
4) Heat sink and opening are<br />
clogged.<br />
Check if the alarm<br />
occurs after cleaning<br />
the heat sink and the<br />
Alarm does not<br />
occur.<br />
Alarm occurs.<br />
Clean periodically.<br />
Check 5).<br />
opening.<br />
5) Servo amplifier fault Check if the alarm<br />
occurs after replacing<br />
the servo amplifier.<br />
Alarm does not<br />
occur.<br />
Use the normal servo<br />
amplifier.<br />
Alarm No.: A.46<br />
Description<br />
Detailed<br />
display<br />
Detailed<br />
Name<br />
46.1 Servo motor<br />
temperature<br />
error<br />
Name: Servo motor overheat<br />
Servo motor is overheated.<br />
Cause Checking method Result Action<br />
1) Ambient temperature of Check the ambient Ambient<br />
Lower the ambient<br />
the servo motor is over temperature of the temperature is over temperature of servo<br />
40 .<br />
servo motor.<br />
40 .<br />
motor.<br />
Ambient<br />
Check 2).<br />
temperature is 40<br />
or less.<br />
2) Servo motor is<br />
Check the effective The effective load Reduce the load or take<br />
overheated.<br />
load ratio.<br />
ratio is too high. heat dissipation measures.<br />
The effective load Check 3).<br />
ratio is small<br />
3) Thermal sensor fault in the Check the temperature The temperature of Replace the servo motor.<br />
encoder.<br />
of the servo motor. the servo motor is<br />
low.<br />
8 - 17
8. TROUBLESHOOTING<br />
Alarm No.: A.50 Name: Overload 1<br />
Detailed<br />
display<br />
Description<br />
Detailed<br />
Name<br />
Load exceeded overload protection characteristic of servo amplifier.<br />
Cause Checking method Result Action<br />
50.1 Overload 1) Electromagnetic brake Check if the<br />
Operates. Check the wiring.<br />
thermal 1 operates.<br />
electromagnetic brake<br />
error during<br />
does not operate<br />
Does not operate. Check 2).<br />
operation<br />
(Continuous<br />
operation<br />
protection)<br />
2) Servo amplifier is used<br />
exceeding its continuous<br />
output current.<br />
during operation.<br />
Check the effective<br />
load ratio.<br />
Effective load ratio<br />
is too high.<br />
Reduce load.<br />
Check operation pattern.<br />
Replace the servo motor<br />
to one that provides larger<br />
output.<br />
Effective load ratio<br />
is small.<br />
Check 3).<br />
3) Servo system is instable<br />
and resonating.<br />
Check if resonance<br />
occurs.<br />
Resonance occurs.<br />
Resonance does<br />
not occur.<br />
Execute the gain<br />
adjustment.<br />
Check 4).<br />
4) After the overload alarm<br />
occurrence, the operation<br />
is restarted without the<br />
cooling time.<br />
Check if the alarm was<br />
reset after 30 minutes<br />
had past since the<br />
alarm occurrence.<br />
No.<br />
Yes.<br />
Reset the alarm after the<br />
sufficient time.<br />
Check 5).<br />
5) Servo amplifier fault Check if the alarm<br />
occurs after replacing<br />
Alarm does not<br />
occur.<br />
Replace the servo<br />
amplifier.<br />
the servo amplifier.<br />
50.2 Overload<br />
thermal 2<br />
error during<br />
1) The work collided against<br />
the structural part.<br />
Check if the work<br />
collided against the<br />
structural part.<br />
Collided.<br />
Did not collide.<br />
Check the operation<br />
pattern.<br />
Check 2).<br />
operation 2) Power cables breakage Check the power An error is found. Repair the power cables.<br />
(Short-time<br />
operation<br />
cables.<br />
No error. Check 3).<br />
protection) 3) Incorrect connection with Check the wiring of U, An error is found. Wire correctly.<br />
the servo motor<br />
V and W. No error. Check 4).<br />
4) Electromagnetic brake<br />
operates.<br />
5) Servo amplifier is used<br />
exceeding its continuous<br />
output current.<br />
6) Servo system is instable<br />
and oscillating.<br />
7) Servo amplifier fault<br />
8) Encoder faulty. Check if the alarm<br />
occurs after replacing<br />
the servo motor.<br />
Execute the checking methods mentioned in the alarm display "50.1".<br />
Alarm does not<br />
occur.<br />
Replace the servo motor.<br />
8 - 18
8. TROUBLESHOOTING<br />
Alarm No.: A.50 Name: Overload 1<br />
Detailed<br />
display<br />
Description<br />
Detailed<br />
Name<br />
Load exceeded overload protection characteristic of servo amplifier.<br />
Cause Checking method Result Action<br />
50.4 Overload 1) Electromagnetic brake Check if the<br />
Operates. Check the wiring.<br />
thermal 1 operates.<br />
electromagnetic brake<br />
error at a<br />
does not operate<br />
Does not operate. Check 2).<br />
stop<br />
(Continuous<br />
operation<br />
protection)<br />
2) Servo amplifier is used<br />
exceeding its continuous<br />
output current.<br />
during stop.<br />
Check the effective<br />
load ratio.<br />
Effective load ratio<br />
is too high.<br />
Reduce the load.<br />
Check operation pattern.<br />
Replace the servo motor<br />
to one that provides larger<br />
output.<br />
Effective load ratio<br />
is small.<br />
Check 3).<br />
3) Hunting at servo lock Check if hunting<br />
occurs.<br />
4) After the overload alarm<br />
occurs, the operation is<br />
restarted without the<br />
cooling time.<br />
Check if the alarm was<br />
reset after 30 minutes<br />
had past since the<br />
alarm occurrence.<br />
Hunting occurs.<br />
Hunting does not<br />
occur.<br />
No.<br />
Execute the gain<br />
adjustment.<br />
Check 4).<br />
Yes. Check 5).<br />
Reset the alarm after the<br />
sufficient time.<br />
5) Servo amplifier fault Check if the alarm<br />
occurs after replacing<br />
Alarm does not<br />
occur.<br />
Replace the servo<br />
amplifier.<br />
the servo amplifier.<br />
50.5 Overload<br />
thermal 2<br />
error at a<br />
1) The load is large at a stop. Check if the work<br />
collided against the<br />
structural part.<br />
Collided.<br />
Did not collide.<br />
Check the operation<br />
pattern.<br />
Check 2).<br />
stop 2) Power cables breakage Check the power An error is found. Repair the power cables.<br />
(Short-time<br />
cables. No error. Check 3).<br />
operation 3) Incorrect connection with Check the wiring of U, An error is found. Wire correctly.<br />
protection) the servo motor<br />
V and W. No error. Check 4).<br />
4) Electromagnetic brake<br />
operates.<br />
5) Servo amplifier is used<br />
exceeding its continuous<br />
output current.<br />
6) A hunting occurs at a stop.<br />
7) Servo amplifier fault<br />
8) Encoder faulty. Check if the alarm<br />
occurs after replacing<br />
the servo motor.<br />
Execute the checking methods mentioned in the alarm display "50.4".<br />
Alarm does not<br />
occur.<br />
Replace the servo motor.<br />
8 - 19
8. TROUBLESHOOTING<br />
Alarm No.: A.51 Name: Overload 2<br />
Description Machine collision or the like caused continuous flow of the maximum output current for a few seconds.<br />
Detailed Detailed<br />
display Name<br />
Cause Checking method Result Action<br />
51.1 Overload 1) Power cables breakage Check the power An error is found. Repair the power cables.<br />
thermal 3<br />
error during<br />
cables.<br />
No error. Check 2).<br />
operation 2) Incorrect connection with Check the wiring of U, An error is found. Wire correctly.<br />
the servo motor<br />
V and W. No error. Check 3).<br />
3) Incorrect connection of the<br />
encoder cable<br />
Check if the encoder An error is found. Correct the connection.<br />
cable is connected<br />
correctly. No error. Check 4).<br />
4) The work collided against<br />
the structural part.<br />
Check if the work<br />
collided against the<br />
structural part.<br />
Collided.<br />
Check the operation<br />
pattern.<br />
Did not collide. Check 5).<br />
5) Torque is saturated. Check the torque<br />
during the operation.<br />
Torque is saturated. Check the operation<br />
pattern.<br />
Torque is not Check 6).<br />
saturated.<br />
6) Servo amplifier fault Check if the alarm<br />
occurs after replacing<br />
Alarm does not<br />
occur.<br />
Replace the servo<br />
amplifier.<br />
the servo amplifier.<br />
Alarm occurs. Check 7).<br />
7) Encoder faulty. Check if the alarm Alarm does not Replace the servo motor.<br />
occurs after replacing<br />
the servo motor.<br />
occur.<br />
51.2 Overload 1) Power cables breakage Execute the checking methods mentioned in the alarm display "51.1".<br />
thermal 3<br />
error at a<br />
stop<br />
2)<br />
3)<br />
Incorrect connection with<br />
the servo motor<br />
Incorrect connection of the<br />
encoder cable<br />
4) The work collided against<br />
the structural part.<br />
5) Torque is saturated.<br />
6) Servo amplifier fault<br />
7) Encoder faulty.<br />
8 - 20
8. TROUBLESHOOTING<br />
Alarm No.: A.52 Name: Error excessive<br />
Description The droop pulse between the command position and the current position exceeds the alarm level.<br />
Detailed Detailed<br />
display Name<br />
Cause Checking method Result Action<br />
52.3 Droop<br />
pulses<br />
excessive<br />
1) Servo motor power cables<br />
are not connected.<br />
(missing phase)<br />
Check the wiring. Not connected<br />
(missing phase).<br />
No error.<br />
Correct the wiring.<br />
Check 2).<br />
2) Incorrect connection with Check the wiring of U, Incorrect connection. Correct the wiring.<br />
the servo motor<br />
V and W. Correct connection. Check 3).<br />
3) Incorrect connection of the Check if the encoder Incorrect connection. Correct the wiring.<br />
encoder cable<br />
cable is connected Correct connection. Check 4).<br />
correctly.<br />
4) Torque limit value is small. Check the torque limit<br />
value.<br />
Torque limit value is<br />
small.<br />
Normal range<br />
Increase the torque limit<br />
value.<br />
Check 5).<br />
5) The work collided against<br />
the structural part.<br />
Check if the work<br />
collided against the<br />
structural part.<br />
Collided.<br />
Did not collide.<br />
Check the operation<br />
pattern.<br />
Check 6).<br />
6) Torque shortage Check if the torque is<br />
saturated.<br />
Saturated<br />
Reduce load.<br />
Check operation pattern.<br />
Replace the servo motor<br />
to one that provides larger<br />
output.<br />
Not saturated Check 7).<br />
7) Servo motor cannot be<br />
started due to torque<br />
shortage caused by power<br />
supply voltage drop.<br />
Check the value of<br />
status display Pn (bus<br />
voltage).<br />
The value is "1"<br />
(undervoltage) or<br />
"2" (low voltage).<br />
The value is "4"<br />
Check the power supply<br />
voltage.<br />
Check 8).<br />
(high voltage) or "5"<br />
(overvoltage).<br />
8) Acceleration/deceleration<br />
time constant is short.<br />
Check if the alarm occurs<br />
after the deceleration time<br />
constant is increased.<br />
Alarm does not<br />
occur.<br />
Alarm occurs.<br />
Check operation pattern.<br />
Check 9).<br />
9) Gain adjustment is not<br />
made well.<br />
Check the load to<br />
motor inertia moment<br />
ratio.<br />
Load to motor inertia<br />
moment ratio is<br />
normal.<br />
Load to motor<br />
inertia moment ratio<br />
is not normal.<br />
Use the manual mode to<br />
make gain adjustment.<br />
Check 10).<br />
10) Estimation of the load to<br />
motor inertia moment ratio<br />
is not estimated well.<br />
11) Position loop gain value is<br />
small.<br />
12) Servo motor is rotated by<br />
external force.<br />
Check if the alarm<br />
occurs after changing<br />
the load to motor inertia<br />
moment ratio manually.<br />
Check if the alarm<br />
occurs after the position<br />
8 - 21<br />
Alarm does not Check the load to motor<br />
occur.<br />
inertia moment ratio.<br />
Alarm occurs. Check 11).<br />
Alarm does not Check the position loop<br />
occur.<br />
gain.<br />
loop gain is changed. Alarm occurs. Check 12).<br />
Measure the actual The servo motor is Check the machine.<br />
position on the servo rotated by an<br />
lock status.<br />
external force.<br />
Servo motor is not Check 13).<br />
rotated by an<br />
external force.<br />
13) Encoder faulty Check if the alarm<br />
occurs after replacing<br />
with the servo<br />
operating normally.<br />
Alarm does not<br />
occur.<br />
Replace the servo motor.
8. TROUBLESHOOTING<br />
Alarm No.: A.52<br />
Description<br />
Detailed Detailed<br />
display Name<br />
52.4 Error<br />
excessive at<br />
torque limit<br />
value zero<br />
Name: Error excessive<br />
The droop pulse between the command position and current position exceeds the alarm level.<br />
Cause Checking method Result Action<br />
1) Torque limit value is "0". Check the torque limit Torque limit value is Increase the torque limit<br />
value.<br />
"0".<br />
value.<br />
Alarm No.: A.61<br />
Description<br />
Detailed Detailed<br />
display Name<br />
61.1 Auxiliary<br />
function<br />
setting error<br />
Name: Operation alarm<br />
The point table is incorrect.<br />
Cause Checking method Result Action<br />
1) "1" or "3" is set to the Check the auxiliary "1" or "3" is set. Check the setting.<br />
auxiliary function of the function value of the<br />
last point table (No.7). last point table.<br />
Alarm No.: A.8E<br />
Detailed<br />
display<br />
Description<br />
Detailed<br />
Name<br />
Name: USB communication error<br />
USB communication error occurred between the servo amplifier and the communication device (e.g.<br />
personal computer).<br />
Cause Checking method Result Action<br />
8E.1 USB<br />
communication<br />
receive error<br />
1) Communication cable fault Check if the alarm<br />
occurs after replacing<br />
the USB cable.<br />
Alarm does not<br />
occur.<br />
Alarm occurs.<br />
Replace the USB cable.<br />
Check 2).<br />
2) Communication device Check the<br />
Incorrect setting Check the setting.<br />
(e.g. personal computer) communication setting Correct setting Check 3).<br />
setting error<br />
of the communication<br />
device.<br />
3) Fault in the surrounding<br />
environment<br />
Check the noise, etc. An error is found. Take the appropriate<br />
measures according to the<br />
cause.<br />
No error. Check 4).<br />
4) Servo amplifier fault Check if the alarm<br />
occurs after replacing<br />
Alarm does not<br />
occur.<br />
Replace the servo<br />
amplifier.<br />
the servo amplifier.<br />
8E.2 USB 1) Communication cable fault Execute the checking methods mentioned in the alarm display "8E.1".<br />
communication<br />
checksum<br />
error<br />
2) Communication device<br />
(e.g. personal computer)<br />
setting error<br />
3) Fault in the surrounding<br />
environment<br />
4) Servo amplifier fault<br />
8E.3 USB 1) Communication cable fault<br />
communication<br />
character<br />
error<br />
2) Communication device<br />
(e.g. personal computer)<br />
setting error<br />
3) Fault in the surrounding<br />
environment<br />
4) Servo amplifier fault<br />
Execute the checking methods mentioned in the alarm display "8E.1".<br />
8 - 22
8. TROUBLESHOOTING<br />
Alarm No.: A.8E<br />
Detailed<br />
display<br />
Description<br />
Detailed<br />
Name<br />
Name: USB communication error<br />
USB communication error occurred between the servo amplifier and the communication device (e.g.<br />
personal computer).<br />
8E.4 USB 1) Communication cable fault<br />
communication<br />
command<br />
error<br />
2) Communication device<br />
(e.g. personal computer)<br />
setting error<br />
Cause Checking method Result Action<br />
3) Fault in the surrounding<br />
environment<br />
4) Servo amplifier fault<br />
8E.5 USB 1) Communication cable fault<br />
communication<br />
data No.<br />
error<br />
2) Communication device<br />
(e.g. personal computer)<br />
setting error<br />
3) Fault in the surrounding<br />
environment<br />
4) Servo amplifier fault<br />
Execute the checking methods mentioned in the alarm display "8E.1".<br />
Execute the checking methods mentioned in the alarm display "8E.1".<br />
Alarm No.: 888 (Note) Name: Watchdog<br />
Description CPU or part is faulty.<br />
Detailed Detailed<br />
display Name<br />
Cause Checking method Result Action<br />
1) Fault of parts in the servo<br />
amplifier<br />
Replace the servo<br />
amplifier.<br />
Note. At power-on, "888" appears instantaneously, but it is not an error.<br />
8 - 23
8. TROUBLESHOOTING<br />
8.3 Remedies for warnings<br />
POINT<br />
When any of the following alarms has occurred, do not resume operation by<br />
switching power of the servo amplifier OFF/ON repeatedly. The servo amplifier<br />
and servo motor may become faulty. If the power of the servo amplifier is<br />
switched OFF/ON during the alarms, allow more than 30 minutes for cooling<br />
before resuming operation.<br />
Excessive regenerative warning (E0.1)<br />
Servo amplifier overheat warning (91.1)<br />
Overload warning 1 (E1. )<br />
When the warning "The servo motor stops." described in the following table occurs, the servo-off occurs and<br />
the servo motor stops. If any other warning occurs, operation can be continued but an alarm may take place or<br />
proper operation may not be performed.<br />
Remove the cause of warning according to this section. Use <strong>MR</strong> Configurator to refer to a factor of warning<br />
occurrence.<br />
Alarm No.: A.90 Name: Home positioning incomplete warning The servo motor stops.<br />
Warning contents<br />
Detailed<br />
display<br />
Detailed<br />
Name<br />
90.1 Home<br />
position<br />
return<br />
incompletion<br />
90.2 Home<br />
position<br />
return<br />
abnormal<br />
completion<br />
Home position return is not performed correctly.<br />
Cause Checking method Result Action<br />
1) Positioning operation was<br />
performed without home<br />
position return.<br />
1) Home position return<br />
speed could not be<br />
decreased to the creep<br />
speed.<br />
Check if home position<br />
return was performed.<br />
Check the home<br />
position return speed,<br />
the creep speed and<br />
the travel distance after<br />
proximity dog.<br />
Home position<br />
return was not<br />
performed.<br />
The set value is<br />
incorrect.<br />
Perform home position<br />
return.<br />
Set correctly and perform<br />
home position return.<br />
Alarm No.: A.91 Name: Servo amplifier overheat error The servo motor does not stop.<br />
Warning contents The temperature inside of the servo amplifier exceeds the warning level.<br />
Detailed Detailed<br />
display Name<br />
Cause Checking method Result Action<br />
91.1 Servo<br />
amplifier<br />
1) The temperature in the<br />
servo amplifier is high.<br />
Check the ambient<br />
temperature of the<br />
Ambient<br />
temperature is high.<br />
Lower the ambient<br />
temperature.<br />
inside<br />
servo amplifier. (over 55 )<br />
overheat<br />
Ambient<br />
Check 2).<br />
warning<br />
temperature is low.<br />
2) Used beyond the<br />
specifications of close<br />
mounting.<br />
Check the<br />
specifications of close<br />
mounting.<br />
Used beyond the<br />
specifications.<br />
Use within the range of<br />
specification.<br />
Alarm No.: A.96 Name: Home position setting error The servo motor stops.<br />
Warning contents Incorrectly finished after home position return operation.<br />
Detailed Detailed<br />
display Name<br />
Cause Checking method Result Action<br />
96.1 In-position<br />
not reached<br />
1) Droop pulses remaining<br />
are greater than the inposition<br />
range setting.<br />
Check the number of<br />
droop pulses after<br />
home position return.<br />
In-position range or<br />
more<br />
Remove the cause of<br />
droop pulse occurrence.<br />
8 - 24
8. TROUBLESHOOTING<br />
Alarm No.: A.96 Name: Home position setting error The servo motor stops.<br />
Description Incorrectly finished after home position return operation.<br />
Detailed Detailed<br />
display Name<br />
Cause Checking method Result Action<br />
96.2 Speed<br />
command<br />
not<br />
1) The speed command does<br />
not become "0" after home<br />
position return.<br />
Check the speed<br />
command value after<br />
home position return.<br />
Speed Command<br />
outputting<br />
Speed Command<br />
Set the speed command<br />
to "0".<br />
Check 2).<br />
converged<br />
not outputting<br />
2) The creep speed is too<br />
fast.<br />
Check the creep<br />
speed.<br />
The creep speed is<br />
too fast.<br />
Reduce the creep speed.<br />
Alarm No.: A.97 Name: Program operation disabled The servo motor does not stop.<br />
Warning contents The program operation was performed during program operation disabled status.<br />
Detailed Detailed<br />
display Name<br />
Cause Checking method Result Action<br />
97.1 Program<br />
operation<br />
disabled<br />
1) The program was started<br />
without switching OFF/ON<br />
the power of the servo<br />
amplifier.<br />
Check if the power of<br />
the servo amplifier is<br />
switched OFF/ON.<br />
The power of the<br />
servo amplifier is<br />
not switched<br />
OFF/ON.<br />
Switch OFF/ON the power<br />
of the servo amplifier.<br />
Alarm No.: A.98 Name: Software limit warning The servo motor stops.<br />
Description The current position reached the software stroke limit (set in the parameter No. PE16 to PE19).<br />
Detailed Detailed<br />
display Name<br />
Cause Checking method Result Action<br />
98.1 Reached the<br />
software limit<br />
at the<br />
forward<br />
rotation<br />
1)<br />
2)<br />
Software limit was set<br />
within the actual movable<br />
range.<br />
Point table/program with<br />
the position data in excess<br />
Check the set value of<br />
the parameter.<br />
1. Check the set value<br />
of the point<br />
Within the movable<br />
range<br />
Outside the<br />
movable range<br />
Within the movable<br />
range<br />
Set the parameter<br />
correctly.<br />
Check 2).<br />
Create the point table/<br />
program correctly.<br />
of the software limit at the<br />
forward rotation was<br />
executed.<br />
3) Software limit at the<br />
forward rotation side was<br />
reached during JOG<br />
operation or manual pulse<br />
generator operation.<br />
table/program.<br />
2. Check the operation<br />
method.<br />
In manual operation Check 3).<br />
Check if the software Software limit at the Perform operation within<br />
limit at the forward forward rotation side software limit range.<br />
rotation side is is reached.<br />
reached.<br />
98.2 Reached the 1) Software limit was set Check the set value of Within the movable Set the parameter<br />
software limit<br />
at the<br />
reverse<br />
rotation side 2)<br />
within the actual movable<br />
range.<br />
Point table/program with<br />
the position data in excess<br />
the parameter.<br />
1. Check the set value<br />
of the point<br />
range<br />
Outside the<br />
movable range<br />
Within the movable<br />
range<br />
correctly.<br />
Check 2).<br />
Create the point table/<br />
program correctly.<br />
of the software limit at the<br />
reverse rotation was<br />
executed.<br />
3) Software limit at the<br />
reverse rotation side was<br />
reached during JOG<br />
operation or manual pulse<br />
generator operation.<br />
table/program. In manual operation Check 3).<br />
2. Check the operation<br />
method.<br />
Check if the software Software limit at the<br />
limit at the reverse reverse rotation side<br />
rotation side is is reached.<br />
reached.<br />
Perform operation within<br />
software limit range.<br />
8 - 25
8. TROUBLESHOOTING<br />
Alarm No.: A.99 Name: Stroke limit warning The servo motor stops.<br />
Warning contents Reached to the stroke limit of the moving direction (signal off).<br />
Detailed Detailed<br />
display Name<br />
Cause Checking method Result Action<br />
99.1 Forward<br />
rotation<br />
stroke end:<br />
OFF<br />
1) The forward rotation limit<br />
switch became valid.<br />
Check if the forward<br />
rotation stroke end<br />
(LSP) is ON or OFF in<br />
the external I/O signal<br />
The forward rotation<br />
stroke end (LSP) is<br />
OFF.<br />
Reexamine the operation<br />
pattern to turn ON the<br />
forward rotation stroke end<br />
(LSP).<br />
display.<br />
99.2 Reverse<br />
rotation<br />
stroke end:<br />
OFF<br />
2) The reverse rotation limit<br />
switch became valid.<br />
Check if the reverse<br />
rotation stroke end<br />
(LSN) is ON or OFF in<br />
the external I/O signal<br />
display.<br />
The reverse rotation<br />
stroke end (LSN) is<br />
OFF.<br />
Reexamine the operation<br />
pattern to turn ON the<br />
reverse rotation stroke end<br />
(LSN).<br />
Alarm No.: A.E0 Name: Excessive regenerative warning The servo motor does not stop.<br />
There is a possibility that regenerative power may exceed the permissible regenerative power of the builtin<br />
regenerative resistor or the regenerative option.<br />
Warning contents<br />
Detailed Detailed<br />
Cause Checking method Result Action<br />
display Name<br />
E0.1 Excessive<br />
regenerative<br />
warning<br />
1) Regenerative power<br />
exceeded 85% of the<br />
permissible regenerative<br />
power of the built-in<br />
regenerative resistor or the<br />
regenerative option.<br />
Call the status display<br />
or <strong>MR</strong> Configurator and<br />
check the regenerative<br />
load ratio.<br />
85% or more. Reduce the frequency of<br />
positioning.<br />
Increase the deceleration<br />
time constant.<br />
Reduce the load.<br />
Use the regenerative<br />
option, if it is not used.<br />
Alarm No.: A.E1 Name: Overload warning 1 The servo motor does not stop.<br />
Warning contents The overload alarm (50. , 51. ) may occur.<br />
Detailed Detailed<br />
display Name<br />
Cause Checking method Result Action<br />
E1.1 The overload<br />
thermal 1<br />
warning<br />
while motor<br />
rotating<br />
E1.2 The overload<br />
thermal 2<br />
warning<br />
while motor<br />
rotating<br />
E1.3 The overload<br />
thermal 3<br />
warning<br />
while motor<br />
rotating<br />
E1.5 The overload<br />
thermal 1<br />
warning<br />
while motor<br />
not rotating<br />
1) Load exceeded 85% of the<br />
alarm level of the overload<br />
alarm (50.1).<br />
Execute the checking methods mentioned in the alarm display "50.1".<br />
1) Load exceeded 85% of the Execute the checking methods mentioned in the alarm display "50.2".<br />
alarm level of the overload<br />
alarm (50.2).<br />
1) Load increased to 85% or Execute the checking methods mentioned in the alarm display "51.1".<br />
more against the alarm<br />
level of the overload alarm<br />
(51.1).<br />
1) Load exceeded 85% of the Execute the checking methods mentioned in the alarm display "50.4".<br />
alarm level of the overload<br />
alarm (50.4).<br />
8 - 26
8. TROUBLESHOOTING<br />
Alarm No.: A.E1 Name: Overload warning 1 The servo motor does not stop.<br />
Warning contents The overload alarm (50. , 51. ) may occur.<br />
Detailed Detailed<br />
display Name<br />
Cause Checking method Result Action<br />
E1.6 The overload 1) Load exceeded 85% of the Execute the checking methods mentioned in the alarm display "50.5".<br />
thermal<br />
warning 2<br />
while motor<br />
not rotating<br />
alarm level of the overload<br />
alarm (50.5).<br />
E1.7 The overload<br />
thermal<br />
warning 3<br />
while motor<br />
not rotating<br />
1) Load exceeded 85% of the<br />
alarm level of the overload<br />
alarm (51.2).<br />
Execute the checking methods mentioned in the alarm display "51.1".<br />
Alarm No.: A.E6 Name: Servo forced stop warning The servo motor stops.<br />
Warning contents The forced stop signal is turned OFF.<br />
Detailed Detailed<br />
display Name<br />
Cause Checking method Result Action<br />
E6.1 Servo forced<br />
stop warning<br />
1) Forced stop (EM1) is<br />
turned OFF.<br />
2) The external 24VDC<br />
power supply is not input.<br />
Check the forced stop<br />
(EM1).<br />
OFF<br />
Ensure safety and turn ON<br />
the forced stop (EM1).<br />
ON Check 2).<br />
Check if the external Not input.<br />
Input 24VDC.<br />
24VDC power supply is Input. Check 3).<br />
input.<br />
3) Servo amplifier fault Check if the alarm Alarm does not Replace the servo<br />
occurs after replacing occur.<br />
amplifier.<br />
the servo amplifier.<br />
8 - 27
8. TROUBLESHOOTING<br />
Alarm No.: A.E9 Name: Main circuit off warning The servo motor stops.<br />
Warning contents<br />
Servo-on (SON) was switched on when the main circuit power is off.<br />
The bus voltage decreased while the servo motor speed operates at 50r/min or slower.<br />
Detailed Detailed<br />
display Name<br />
Cause Checking method Result Action<br />
E9.1 Servo-on<br />
(SON) ON<br />
when the<br />
1) Main circuit power supply<br />
is off.<br />
Check if the main<br />
circuit power supply is<br />
input.<br />
Not input.<br />
Input.<br />
Switch on the main circuit<br />
power.<br />
Check 2).<br />
main circuit<br />
is OFF.<br />
E9.2 Bus voltage<br />
drop at lowspeed<br />
rotation<br />
2) Main circuit power supply<br />
connector is disconnected.<br />
Check the main circuit<br />
power supply<br />
connector.<br />
The connector is<br />
disconnected.<br />
No problem.<br />
Connect properly.<br />
Check 3).<br />
3) Main circuit power supply<br />
voltage is low.<br />
Check if the main<br />
circuit power supply<br />
voltage is the following<br />
or less.<br />
<strong>MR</strong>-<strong>JN</strong>- A:140VAC<br />
<strong>MR</strong>-<strong>JN</strong>- A1:70VAC<br />
<strong>MR</strong>-<strong>JN</strong>- A:140VAC<br />
or less<br />
<strong>MR</strong>-<strong>JN</strong>- A1:70VAC<br />
or less<br />
<strong>MR</strong>-<strong>JN</strong>- A:Above<br />
140VAC<br />
<strong>MR</strong>-<strong>JN</strong>- A1:Above<br />
70VAC<br />
Raise the main circuit<br />
power supply voltage.<br />
Check 4).<br />
4) Servo amplifier for 1-<br />
phase 200VAC input is<br />
used for 100VAC power<br />
supply circuit.<br />
Check the model of<br />
servo amplifier.<br />
The model of servo<br />
amplifier is "<strong>MR</strong>-<strong>JN</strong>-<br />
A".<br />
The model of servo<br />
Replace the servo<br />
amplifier whose model is<br />
"<strong>MR</strong>-<strong>JN</strong>- A1".<br />
Check 5).<br />
amplifier is "<strong>MR</strong>-<strong>JN</strong>-<br />
A1".<br />
5) Faulty servo amplifier for<br />
1-phase 100VAC input is<br />
Check if the charge<br />
lamp is turned on.<br />
The charge lamp is<br />
not turned on.<br />
Replace the servo<br />
amplifier.<br />
used.<br />
6) Bus voltage dropped. Check the value of<br />
status display Pn (bus<br />
voltage).<br />
The value of the<br />
status display Pn<br />
(bus voltage) is "1"<br />
(overvoltage) or "2"<br />
(low voltage).<br />
Revise the wiring.<br />
Check the power supply<br />
capacity.<br />
1) When the set value of Check the value of The value is "1" Check the power supply<br />
parameter No. PC29 status display Pn (bus (undervoltage). capacity.<br />
(function selection C-5) is voltage).<br />
Increase the acceleration<br />
" 1 ", the bus voltage<br />
time constant.<br />
decreased while the servo<br />
motor operates at 50r/min<br />
or slower.<br />
8 - 28
8. TROUBLESHOOTING<br />
Alarm No.: A.E9 Name: Main circuit off warning The servo motor stops.<br />
Warning contents<br />
Servo-on (SON) was switched on when the main circuit power is off.<br />
The bus voltage decreased while the servo motor speed operates at 50r/min or slower.<br />
Detailed Detailed<br />
display Name<br />
Cause Checking method Result Action<br />
E9.3 Main circuit<br />
power supply<br />
failure<br />
1) When the set value of<br />
parameter No. PC29<br />
(function selection C-5) is<br />
Check if the main<br />
circuit power supply is<br />
input.<br />
Not input.<br />
Switch on the main circuit<br />
power.<br />
" 1 ", the main circuit<br />
Input. Check 2).<br />
power supply turned OFF<br />
while the servo motor<br />
operates at 50r/min or<br />
slower.<br />
2) When the set value of<br />
parameter No. PC29<br />
(function selection C-5) is<br />
Check the main circuit<br />
power supply<br />
connector.<br />
The connector is<br />
disconnected.<br />
No problem.<br />
Connect properly.<br />
Check 3).<br />
" 1 ", the connector of<br />
the main circuit power<br />
supply came off when the<br />
servo motor operates at<br />
50r/min or slower.<br />
3) When the set value of<br />
parameter No. PC29<br />
(function selection C-5) is<br />
Check the main circuit power.<br />
" 1 ", the<br />
instantaneous power<br />
failure occurred while the<br />
servo motor operates at<br />
50r/min or slower.<br />
Alarm No.: A.EC Name: Overload warning 2 The servo motor does not stop.<br />
Operation, in which a current exceeding the rating flowed intensively in any of the U, V and W phases of<br />
Warning contents<br />
the servo motor, was repeated.<br />
Detailed Detailed<br />
Cause Checking method Result Action<br />
display Name<br />
EC.1<br />
Overload<br />
warning 2<br />
1) Current flowed intensively<br />
in specific phases of the<br />
servo motor during a stop.<br />
Check if the alarm<br />
occurs after changing<br />
the stop position.<br />
Also, this situation was<br />
continued.<br />
2) The load is large, or the<br />
capacity is insufficient.<br />
Measure the effective<br />
load ratio during a stop.<br />
Alarm does not<br />
occur.<br />
Alarm occurs. Check 2).<br />
Effective load ratio<br />
is too high.<br />
Reduce the frequency of<br />
positioning.<br />
Reduce the load.<br />
Replace the servo<br />
amplifier and servo motor<br />
with the ones with larger<br />
capacity.<br />
Alarm No.: A.ED Name: Output watt excess warning The servo motor does not stop.<br />
The status, in which the output wattage (speed torque) of the servo motor exceeded the rated output,<br />
Warning contents<br />
continued steadily.<br />
Detailed<br />
display<br />
ED.1<br />
Detailed<br />
Cause Checking method Result Action<br />
Name<br />
Output<br />
wattage over<br />
1) Output wattage of the<br />
servo motor (speed<br />
torque) exceeded 120% of<br />
the rated output.<br />
Call the status display The output wattage<br />
or <strong>MR</strong> Configurator and is 120% or more of<br />
check the servo motor the rate.<br />
speed and torque.<br />
Reduce the servo motor<br />
speed.<br />
Reduce the load.<br />
8 - 29
8. TROUBLESHOOTING<br />
Alarm No.: A.F0 Name: Tough drive warning The servo motor does not stop.<br />
Warning contents Switched to "during tough drive" status.<br />
Detailed Detailed<br />
display Name<br />
Cause Checking method Result Action<br />
F0.1 Instantaneous<br />
power failure<br />
tough drive<br />
warning<br />
F0.2 Overload<br />
tough drive<br />
warning<br />
F0.3 Vibration<br />
tough drive<br />
warning<br />
1) An instantaneous power<br />
failure in the main circuit<br />
power supply was<br />
detected.<br />
Check the main circuit power supply.<br />
1) Effective load ratio<br />
exceeded 90% the alarm<br />
level of the overload<br />
alarm.<br />
Measure the effective<br />
load ratio in the<br />
continuous operation.<br />
1) The reconfiguration of Check the alarm<br />
machine resonance history.<br />
suppression filter 1 or<br />
machine resonance<br />
suppression filter 2<br />
occurred due to the<br />
machine resonance.<br />
The effective load is Reduce the load.<br />
over the overload<br />
warning level.<br />
Vibration tough<br />
drive warning (F0.3)<br />
occurs<br />
consecutively.<br />
Adjust the servo gain by<br />
the auto tuning 1 or the<br />
one-touch tuning.<br />
Lower the response.<br />
8 - 30
9. OUTLINE DRAWINGS<br />
9. OUTLINE DRAWINGS<br />
9.1 Servo amplifier<br />
(1) <strong>MR</strong>-<strong>JN</strong>-10A <strong>MR</strong>-<strong>JN</strong>-20A<br />
<strong>MR</strong>-<strong>JN</strong>-10A1 <strong>MR</strong>-<strong>JN</strong>-20A1<br />
[Unit: mm]<br />
5<br />
2- 6<br />
mounting hole<br />
The build-in regenerative resistor<br />
(lead) is mounted only in <strong>MR</strong>-<strong>JN</strong>-20A(1).<br />
40 Approx.80<br />
135<br />
CNP1<br />
130<br />
120<br />
CNP2<br />
5<br />
6<br />
5.5<br />
Mass: 0.6[kg] (1.32[lb])<br />
Terminal layout<br />
CNP1 CNP2<br />
24V<br />
0V<br />
Approx.<br />
40<br />
L1<br />
L2<br />
P<br />
C<br />
U<br />
V<br />
W<br />
Approx.130<br />
120 0.5<br />
Approx.<br />
5<br />
Approx.5.5<br />
2-M5 screw<br />
Mounting hole process drawing<br />
Mounting screw<br />
Screw size: M5<br />
Tightening torque: 3.24[N m] (28.7[lb in])<br />
9 - 1
9. OUTLINE DRAWINGS<br />
(2) <strong>MR</strong>-<strong>JN</strong>-40A<br />
[Unit: mm]<br />
5<br />
2- 6<br />
mounting hole<br />
50<br />
Approx.80<br />
135<br />
CNP1<br />
130<br />
120<br />
CNP2<br />
5<br />
6<br />
6<br />
Mass: 0.7[kg] (1.54[lb])<br />
Terminal layout<br />
CNP1<br />
CNP2<br />
24V<br />
0V<br />
Approx.<br />
50<br />
L1<br />
L2<br />
P<br />
C<br />
U<br />
Approx.130<br />
120 0.5<br />
2-M5 screw<br />
V<br />
W<br />
Approx.<br />
5<br />
Approx.6<br />
Mounting hole process drawing<br />
Mounting screw<br />
Screw size: M5<br />
Tightening torque: 3.24[N m] (28.7[lb in])<br />
9 - 2
9. OUTLINE DRAWINGS<br />
9.2 Connector<br />
(1) Miniature delta ribbon (MDR) system (3M)<br />
(a) One-touch lock type<br />
[Unit: mm]<br />
E<br />
A<br />
C<br />
Logo etc, are indicated here.<br />
23.8<br />
39.0<br />
D<br />
B<br />
12.7<br />
Each type of dimension<br />
Connector<br />
Shell kit<br />
A B C D E<br />
10126-3000PE 10326-52F0-008 25.8 37.2 14.0 10.0 12.0<br />
(b) Jack screw M2.6 type<br />
This is not available as option.<br />
[Unit: mm]<br />
E<br />
A<br />
C<br />
Logo etc, are indicated here.<br />
23.8<br />
39.0<br />
5.2<br />
D<br />
F<br />
B<br />
12.7<br />
Each type of dimension<br />
Connector<br />
Shell kit<br />
A B C D E F<br />
10126-3000PE 10326-52A0-008 25.8 37.2 14.0 10.0 12.0 27.4<br />
9 - 3
9. OUTLINE DRAWINGS<br />
(2) SCR connector system (3M)<br />
Receptacle : 36210-0100PL<br />
Shell kit : 36310-3200-008<br />
[Unit: mm]<br />
39.5<br />
34.8<br />
22.4 11.0<br />
9 - 4
10. CHARACTERISTICS<br />
10. CHARACTERISTICS<br />
10.1 Overload protection characteristics<br />
An electronic thermal relay is built in the servo amplifier to protect the servo motor, servo amplifier and servo<br />
motor power lines from overloads.<br />
Overload 1 alarm (50. ) occurs if overload operation that exceeds the electronic thermal relay protection curve<br />
shown in Figs 10.1. is performed. Overload 2 alarm (51. ) occurs if the maximum current flows continuously<br />
for several seconds due to machine collision, etc. Keep the load ratio within the area in the left side of the solid<br />
line or the dotted line.<br />
It is recommended to use the machine which generates unbalanced torque, e.g. a vertical lift application, so<br />
that the unbalanced torque is not more than 70% of the rated torque. When closely mounting the servo<br />
amplifiers, operate them at the ambient temperature of 0 to 45 (32 to 113 ) or at 75% or smaller<br />
effective load ratio.<br />
The servo motor overload protective function is built in <strong>MR</strong>-<strong>JN</strong> series servo amplifiers. (115% of the servo<br />
amplifier rated current is set as standard (full load current).)<br />
1000<br />
1000<br />
100<br />
During operation<br />
100<br />
During operation<br />
Operation time[s]<br />
10<br />
1<br />
During servo lock<br />
Operation time[s]<br />
10<br />
1<br />
During servo lock<br />
0.1<br />
0 50 100 150 200 250 300<br />
(Note) Load ratio [%]<br />
0.1<br />
0 50 100 150 200 250 300<br />
(Note) Load ratio [%]<br />
<strong>MR</strong>-<strong>JN</strong>-10A (1)<br />
<strong>MR</strong>-<strong>JN</strong>-20A (1), <strong>MR</strong>-<strong>JN</strong>-40A<br />
Note. If operation that generates torque equal to or higher than the rating is performed with an abnormally high frequency under servo<br />
motor stop status (servo lock status) or in low-speed operation at 30r/min or less, the servo amplifier may malfunction even when<br />
the servo system is used within the electric thermal protection area.<br />
Fig 10.1 Electronic thermal relay protection characteristics<br />
10 - 1
10. CHARACTERISTICS<br />
10.2 Power supply capacity and generated loss<br />
(1) Amount of heat generated by the servo amplifier<br />
Table 10.1 indicates servo amplifiers' power supply capacities and losses generated under rated load. For<br />
thermal design of an enclosure, use the values in Table 10.1 in consideration for the worst operating<br />
conditions. The actual amount of generated heat will be intermediate between values at rated torque and<br />
servo off according to the duty used during operation. When the servo motor is operated at less than the<br />
maximum speed, the power supply capacity will be smaller than the value in the table, but the servo<br />
amplifier's generated heat will not change.<br />
Servo amplifier<br />
<strong>MR</strong>-<strong>JN</strong>-10A (1)<br />
<strong>MR</strong>-<strong>JN</strong>-20A (1)<br />
<strong>MR</strong>-<strong>JN</strong>-40A<br />
Table 10.1 Power supply capacity and generated heat per servo amplifier at rated output<br />
Servo motor<br />
<strong>HF</strong>-<strong>KN</strong>053 13<br />
<strong>HF</strong>-<strong>KP</strong>053<strong>G1</strong>/<strong>G5</strong>/<strong>G7</strong><br />
<strong>HF</strong>-<strong>KP</strong>13<strong>G1</strong>/<strong>G5</strong>/<strong>G7</strong><br />
<strong>HF</strong>-<strong>KN</strong>23<br />
<strong>HF</strong>-<strong>KP</strong>23<strong>G1</strong>/<strong>G5</strong>/<strong>G7</strong><br />
<strong>HF</strong>-<strong>KN</strong>43<br />
<strong>HF</strong>-<strong>KN</strong>43<strong>G1</strong>/<strong>G5</strong>/<strong>G7</strong><br />
(Note 1)<br />
Power supply<br />
(Note 2)<br />
Servo amplifier-generated heat[W]<br />
capacity[kVA] At rated torque With servo off<br />
Area required for<br />
heat dissipation<br />
[m 2 ]<br />
0.3 20 10 0.5<br />
0.5 20 10 0.5<br />
0.9 30 10 0.5<br />
Note 1. Note that the power supply capacity will vary according to the power supply impedance. This value is applicable when the power<br />
factor improving reactor is not used.<br />
2. Heat generated during regeneration is not included in the servo amplifier-generated heat. To calculate heat generated by the<br />
regenerative option, refer to section 11.2.<br />
(2) Heat dissipation area for enclosed servo amplifier<br />
The enclosed control box (hereafter called the control box) which will contain the servo amplifier should be<br />
designed to ensure that its temperature rise is within 10 at the ambient temperature of 40 . (With a 5<br />
(41 ) safety margin, the system should operate within a maximum 55 (131 ) limit.) The necessary<br />
enclosure heat dissipation area can be calculated by Equation 10.1.<br />
A =<br />
P<br />
K T<br />
............................................................................................................................................ (10.1)<br />
A : Heat dissipation area [m 2 ]<br />
P : Loss generated in the control box [W]<br />
T : Difference between internal and ambient temperatures [ ]<br />
K : Heat dissipation coefficient [5 to 6]<br />
When calculating the heat dissipation area with Equation 10.1, assume that P is the sum of all losses<br />
generated in the enclosure. Refer to Table 10.1 for heat generated by the servo amplifier. "A" indicates the<br />
effective area for heat dissipation, but if the enclosure is directly installed on an insulated wall, that extra<br />
amount must be added to the enclosure's surface area. The required heat dissipation area will vary wit the<br />
conditions in the enclosure. Therefore, arrangement of the equipment in the enclosure and the use of a<br />
cooling fan should be considered. Table 10.1 lists the enclosure dissipation area for each servo amplifier<br />
when the servo amplifier is operated at the ambient temperature of 40 (104 ) under rated load.<br />
10 - 2
10. CHARACTERISTICS<br />
(Outside)<br />
(Inside)<br />
Air flow<br />
Fig. 10.2 Temperature distribution in enclosure<br />
When air flows along the outer wall of the enclosure, effective heat exchange will be possible, because the<br />
temperature slope inside and outside the enclosure will be steeper.<br />
10 - 3
10. CHARACTERISTICS<br />
10.3 Dynamic brake characteristics<br />
POINT<br />
The dynamic brake is operated when an alarm occurs, a servo forced stop<br />
warning occurs, or the power turns off. The dynamic break is a function for<br />
emergency stops. Do not use this function for normal stops.<br />
The criteria for the number of times the dynamic break is used is 1000 times,<br />
in the condition that the machine with recommended load to motor inertia<br />
moment ratio or less, stops from the rated speed in a frequency of once per<br />
10 minutes.<br />
When using the forced stop (EM1) frequently for other than emergencies, be<br />
sure to turn off the forced stop (EM1) after the servo motor stops.<br />
10.3.1 Dynamic brake operation<br />
(1) Calculation of coasting distance<br />
Fig. 10.3 shows the pattern in which the servo motor comes to a stop when the dynamic brake is operated.<br />
Use Equation 10.2 to calculate an approximate coasting distance to a stop. The dynamic brake time<br />
constant varies with the servo motor and machine operation speeds. (Refer to paragraph (2) of this<br />
section.)<br />
ON<br />
Forced stop (EM1)<br />
OFF<br />
Machine speed<br />
V0<br />
Dynamic brake time constant<br />
te<br />
Time<br />
Fig. 10.3 Dynamic brake operation diagram<br />
Lmax = V0<br />
60 ⎩ ⎨⎧ 1+ JL<br />
⎭ ⎬⎫ JM<br />
te+ ⎝<br />
⎛<br />
⎞<br />
⎠<br />
................................................................................................................... (10.2)<br />
Lmax : Maximum coasting distance.....................................................................................[mm][in]<br />
V0 : Machine rapid feed rate.............................................................................. [mm/min][in/min]<br />
JM : Servo motor inertial moment ...................................................................[kg cm 2 ][oz cm 2 ]<br />
JL : Load inertia moment converted into equivalent value on servo motor shaft<br />
.................................................................................................................[kg cm 2 ][oz cm 2 ]<br />
: Dynamic brake time constant............................................................................................[s]<br />
te : Delay time of control section .............................................................................................[s]<br />
There is internal relay delay of about 10ms.<br />
10 - 4
10. CHARACTERISTICS<br />
(2) Dynamic brake time constant<br />
The following shows necessary dynamic brake time constant for the equations (10.2).<br />
25<br />
25<br />
Time constant [ms]<br />
20<br />
23<br />
15<br />
43<br />
10<br />
053<br />
5<br />
13<br />
0 0 1000 2000 3000 40004500<br />
Speed [r/min]<br />
Time constant [ms]<br />
20<br />
15<br />
10<br />
5<br />
13<br />
053<br />
0 0 1000 2000<br />
Speed [r/min]<br />
23<br />
43<br />
3000 4000<br />
4500<br />
<strong>HF</strong>-<strong>KN</strong> series<br />
<strong>HF</strong>-<strong>KP</strong> series<br />
10.3.2 The dynamic brake at the load inertia moment<br />
Use the dynamic brake under the load to motor inertia moment ratio indicated in the following table. If the load<br />
to motor inertia moment is higher than this value, the dynamic brake may burn. If there is a possibility that the<br />
load to motor inertia moment may exceed the value, contact your local sales office.<br />
The values of the load to motor inertia moment ratio in the table are the values at the maximum rotation speed<br />
of the servo motor.<br />
Servo amplifier<br />
Servo motor<br />
<strong>MR</strong>-<strong>JN</strong>-10A (1) 30<br />
<strong>MR</strong>-<strong>JN</strong>-20A (1) 30<br />
<strong>MR</strong>-<strong>JN</strong>-40A 30<br />
<strong>HF</strong>-<strong>KN</strong> <strong>HF</strong>-<strong>KP</strong> <strong>G1</strong>/<strong>G5</strong>/<strong>G7</strong><br />
10 - 5
1 10 3 4 7 10 20 40 70 100 200<br />
10. CHARACTERISTICS<br />
10.4 Cable flexing life<br />
The flexing life of the cables is shown below. This graph calculated values. Since they are not guaranteed<br />
values, provide a little allowance for these values.<br />
1 10 8<br />
5 10 7<br />
a<br />
Flexing life [times]<br />
1 10 7<br />
5 10 6<br />
1 10 6<br />
5 10 5<br />
1 10 5<br />
5 10 4<br />
a : Long flex life encoder cable<br />
Long flex life motor power cable<br />
Long flex life motor brake cable<br />
b : Standard encoder cable<br />
Standard motor power cable<br />
Standard motor brake cable<br />
1 10 4<br />
5 10 3<br />
b<br />
Flexing radius [mm]<br />
10.5 Inrush currents at power-on of main circuit and control circuit<br />
The following table indicates the inrush currents (reference data) that flow when the maximum permissible<br />
voltage (main circuit power supply: 253VAC, control circuit power supply: 26.4VDC) is applied at the power<br />
supply capacity of 2500kVA and the wiring length of 1m.<br />
Servo amplifier<br />
Inrush currents (A0-P)<br />
Main circuit power supply (L1 L2) Control circuit power supply (+24V 0V)<br />
<strong>MR</strong>-<strong>JN</strong>-10A1/20A1 55A (Attenuated to approx. 15A in 10ms) 25A (Attenuated to approx. 0A in 4 to 6ms)<br />
<strong>MR</strong>-<strong>JN</strong>-10A to 40A 130A (Attenuated to approx. 5A in 5ms) 25A (Attenuated to approx. 0A in 4 to 6ms)<br />
Since large inrush currents flow in the main circuit power supply, always use no-fuse breakers and magnetic<br />
contactors. (Refer to section 11.6.)<br />
When a circuit protector is used for the main circuit power supply, it is recommended to use the inertia delay<br />
type that will not be tripped by an inrush current.<br />
Always use a circuit protector for the control circuit power supply. (Refer to section 11.11.)<br />
10 - 6
11. OPTIONS AND AUXILIARY EQUIPMENT<br />
11. OPTIONS AND AUXILIARY EQUIPMENT<br />
WARNING<br />
CAUTION<br />
Before connecting options and peripheral equipment, turn off the power and wait<br />
for 15 minutes or more until the charge lamp turns off. Otherwise, an electric shock<br />
may occur. In addition, always confirm from the front of the servo amplifier whether<br />
the charge lamp is off or not.<br />
Use the specified auxiliary equipment and options. Unspecified ones may lead to a<br />
fault or fire.<br />
11.1 Cable/connector sets<br />
POINT<br />
The IP rating indicated for cables and connecters is for a cable or connector<br />
alone. When the cables and connectors are used to connect the servo amplifier<br />
and servo motor, and if the IP rating of the servo amplifier and servo motor are<br />
lower than that of the cable and connector, specifications of the servo amplifier<br />
and servo motor apply.<br />
As the cables and connectors used with this servo, purchase the options indicated in this section.<br />
11 - 1
11. OPTIONS AND AUXILIARY EQUIPMENT<br />
11.1.1 Combinations of cable/connector sets<br />
5)<br />
Servo amplifier<br />
CNP1<br />
1)<br />
Operation<br />
panel<br />
3)<br />
Controller<br />
4)<br />
CN3<br />
CNP2<br />
CN1<br />
2)<br />
6)<br />
Personal<br />
computer<br />
CN2<br />
Direct connection type (cable length 10m or less, IP65)<br />
19)20)21)22)<br />
Junction type (cable length more than 10m, IP20)<br />
25)26)<br />
23)24)<br />
27)<br />
Junction type (cable length more than 10m, IP65)<br />
30)31)<br />
28)29)<br />
To 24VDC power<br />
supply for<br />
electromagnetic<br />
brake<br />
32)<br />
17)18)<br />
13)14)15)16)<br />
11)12)<br />
7)8)9)10)<br />
Servo motor<br />
<strong>HF</strong>-<strong>KN</strong> series<br />
<strong>HF</strong>-<strong>KP</strong> <strong>G1</strong>/<strong>G5</strong>/<strong>G7</strong><br />
Power<br />
supply<br />
connector<br />
Brake<br />
connector<br />
Encoder<br />
connector<br />
11 - 2
11. OPTIONS AND AUXILIARY EQUIPMENT<br />
No. Product Model Description Application<br />
1) Servo amplifier<br />
main circuit<br />
power supply<br />
connector<br />
Supplied<br />
with servo<br />
amplifiers.<br />
CNP1<br />
Connector: FKC 2,5/9-ST-5,08<br />
(Phoenix Contact)<br />
<br />
Wire size: 0.2 to 2.5mm 2 (AWG24 to AW<strong>G1</strong>2)<br />
Cable finish OD: to<br />
4mm<br />
2) Servo amplifier<br />
control circuit<br />
power supply<br />
connector<br />
CNP2<br />
Connector: FKCT 2,5/ 2-ST-5,08<br />
(Phoenix Contact)<br />
<br />
Wire size: 0.2 to 2.5mm 2 (AWG24 to AW<strong>G1</strong>2)<br />
Cable finish OD: to 4mm<br />
Supplied<br />
with servo<br />
amplifiers.<br />
3) Junction terminal<br />
block cable<br />
<strong>MR</strong>-TBNATBL M<br />
Cable length: 0.5 1m<br />
(Refer to section 11.3)<br />
For junction terminal block<br />
connector<br />
Connector: 10126-6000EL<br />
Shell kit: 10326-3210-000<br />
(3M or equivalent)<br />
For servo amplifier connector<br />
Connector: 10126-6000EL<br />
Shell kit: 10326-3210-000<br />
(3M or equivalent)<br />
For junction<br />
terminal<br />
block<br />
connection<br />
4) CN1 connector<br />
set<br />
5) Junction terminal<br />
block<br />
<strong>MR</strong>-J2CMP2<br />
6) USB cable <strong>MR</strong>-J3USBCBL3M<br />
Cable length: 3m<br />
7) Motor power<br />
supply cable<br />
8) Motor power<br />
supply cable<br />
9) Motor power<br />
supply cable<br />
10) Motor power<br />
supply cable<br />
Connector: 10126-3000PE<br />
Shell kit: 10326-52F0-008<br />
(3M or equivalent)<br />
<strong>MR</strong>-TB26A Refer to section 11.3.<br />
<strong>MR</strong>-PWS1CBL M-A1-L<br />
Cable length: 2 5 10m<br />
<strong>MR</strong>-PWS1CBL M-A1-H<br />
Cable length: 2 5 10m<br />
<strong>MR</strong>-PWS1CBL M-A2-L<br />
Cable length: 2 5 10m<br />
<strong>MR</strong>-PWS1CBL M-A2-H<br />
Cable length: 2 5 10m<br />
For CN3 connector<br />
minB connector (5 pins)<br />
Refer to section 11.1.3 for details.<br />
Refer to section 11.1.3 for details.<br />
For personal computer<br />
connector<br />
A connector<br />
Power supply connector<br />
<strong>HF</strong>-<strong>KN</strong> series<br />
<strong>HF</strong>-<strong>KP</strong> <strong>G1</strong>/<strong>G5</strong>/<strong>G7</strong><br />
Power supply connector<br />
<strong>HF</strong>-<strong>KN</strong> series<br />
<strong>HF</strong>-<strong>KP</strong> <strong>G1</strong>/<strong>G5</strong>/<strong>G7</strong><br />
For<br />
connection<br />
with PC-AT<br />
compatible<br />
personal<br />
computer<br />
IP65<br />
Load side<br />
lead<br />
IP65<br />
Load side<br />
lead<br />
Long flex<br />
life<br />
IP65<br />
Oppositeto-load<br />
side<br />
lead<br />
IP65<br />
Oppositeto-load<br />
side<br />
lead<br />
Long flex<br />
life<br />
11 - 3
11. OPTIONS AND AUXILIARY EQUIPMENT<br />
No. Product Model Description Application<br />
11) Motor power<br />
supply cable<br />
<strong>MR</strong>-PWS2CBL03M-A1-L<br />
Cable length: 0.3m<br />
Power supply connector<br />
<strong>HF</strong>-<strong>KN</strong> series<br />
<strong>HF</strong>-<strong>KP</strong> <strong>G1</strong>/<strong>G5</strong>/<strong>G7</strong><br />
IP55<br />
Load side<br />
lead<br />
Refer to section 11.1.3 for details.<br />
12) Motor power<br />
supply cable<br />
<strong>MR</strong>-PWS2CBL03M-A2-L<br />
Cable length: 0.3m<br />
Power supply connector<br />
<strong>HF</strong>-<strong>KN</strong> series<br />
<strong>HF</strong>-<strong>KP</strong> <strong>G1</strong>/<strong>G5</strong>/<strong>G7</strong><br />
IP55<br />
Oppositeto-load<br />
side lead<br />
Refer to section 11.1.3 for details.<br />
13) Motor brake<br />
cable<br />
14) Motor brake<br />
cable<br />
<strong>MR</strong>-BKS1CBL M-A1-L<br />
Cable length: 2 5 10m<br />
<strong>MR</strong>-BKS1CBL M-A1-H<br />
Cable length: 2 5 10m<br />
Refer to section 11.1.4 for details.<br />
Brake connector<br />
<strong>HF</strong>-<strong>KN</strong> series<br />
<strong>HF</strong>-<strong>KP</strong> <strong>G1</strong>/<strong>G5</strong>/<strong>G7</strong><br />
IP65<br />
Load side<br />
lead<br />
IP65<br />
Load side<br />
lead<br />
Long flex<br />
life<br />
15) Motor brake<br />
cable<br />
16) Motor brake<br />
cable<br />
<strong>MR</strong>-BKS1CBL M-A2-L<br />
Cable length: 2 5 10m<br />
<strong>MR</strong>-BKS1CBL M-A2-H<br />
Cable length: 2 5 10m<br />
Refer to section 11.1.4 for details.<br />
Brake connector<br />
<strong>HF</strong>-<strong>KN</strong> series<br />
<strong>HF</strong>-<strong>KP</strong> <strong>G1</strong>/<strong>G5</strong>/<strong>G7</strong><br />
IP65<br />
Oppositeto-load<br />
side lead<br />
IP65<br />
Oppositeto-load<br />
side lead<br />
Long flex<br />
life<br />
17) Motor brake<br />
cable<br />
<strong>MR</strong>-BKS2CBL03M-A1-L<br />
Cable length: 0.3m<br />
Brake connector<br />
<strong>HF</strong>-<strong>KN</strong> series<br />
<strong>HF</strong>-<strong>KP</strong> <strong>G1</strong>/<strong>G5</strong>/<strong>G7</strong><br />
IP55<br />
Load side<br />
lead<br />
Refer to section 11.1.4 for details.<br />
18) Motor brake<br />
cable<br />
<strong>MR</strong>-BKS2CBL03M-A2-L<br />
Cable length: 0.3m<br />
Brake connector<br />
<strong>HF</strong>-<strong>KN</strong> series<br />
<strong>HF</strong>-<strong>KP</strong> <strong>G1</strong>/<strong>G5</strong>/<strong>G7</strong><br />
IP55<br />
Oppositeto-load<br />
side lead<br />
Refer to section 11.1.4 for details.<br />
19) Encoder cable <strong>MR</strong>-J3ENCBL M-A1-L<br />
Cable length: 2 5 10m<br />
20) Encoder cable <strong>MR</strong>-J3ENCBL M-A1-H<br />
Cable length: 2 5 10m<br />
Refer to section 11.1.2 (1) for details.<br />
Encoder connector<br />
<strong>HF</strong>-<strong>KN</strong> series<br />
<strong>HF</strong>-<strong>KP</strong> <strong>G1</strong>/<strong>G5</strong>/<strong>G7</strong><br />
IP65<br />
Load side<br />
lead<br />
IP65<br />
Load side<br />
lead<br />
Long flex<br />
life<br />
11 - 4
11. OPTIONS AND AUXILIARY EQUIPMENT<br />
No. Product Model Description Application<br />
21) Encoder cable <strong>MR</strong>-J3ENCBL M-A2-L<br />
Cable length: 2 5 10m<br />
22) Encoder cable <strong>MR</strong>-J3ENCBL M-A2-H<br />
Cable length: 2 5 10m<br />
23) Encoder cable <strong>MR</strong>-J3JCBL03M-A1-L<br />
Cable length: 0.3m<br />
24) Encoder cable <strong>MR</strong>-J3JCBL03M-A2-L<br />
Cable length: 0.3m<br />
25) Encoder cable <strong>MR</strong>-EKCBL M-L<br />
Cable length: 20 30m<br />
26) Encoder cable <strong>MR</strong>-EKCBL M-H<br />
Cable length:<br />
20 30 40 50m<br />
27) Encoder <strong>MR</strong>-ECNM<br />
connector set<br />
28) Encoder cable <strong>MR</strong>-J3JSCBL03M-A1-L<br />
Cable length: 0.3m<br />
29) Encoder cable <strong>MR</strong>-J3JSCBL03M-A2-L<br />
Cable length: 0.3m<br />
Refer to section 11.1.2 (1) for details.<br />
Refer to section 11.1.2 (3) for details.<br />
Encoder connector<br />
Encoder connector<br />
<strong>HF</strong>-<strong>KN</strong> series<br />
<strong>HF</strong>-<strong>KP</strong> <strong>G1</strong>/<strong>G5</strong>/<strong>G7</strong><br />
Encoder connector<br />
Refer to section 11.1.2 (3) for details.<br />
For <strong>HF</strong>-<strong>KN</strong> series <strong>HF</strong>-<strong>KP</strong> <strong>G1</strong>/<strong>G5</strong>/<strong>G7</strong><br />
Refer to section 11.1.2 (2) for details.<br />
For <strong>HF</strong>-<strong>KN</strong> series <strong>HF</strong>-<strong>KP</strong> <strong>G1</strong>/<strong>G5</strong>/<strong>G7</strong><br />
Refer to section 11.1.2 (2) for details.<br />
Refer to section 11.1.2 (5) for details.<br />
<strong>HF</strong>-<strong>KN</strong> series<br />
<strong>HF</strong>-<strong>KP</strong> <strong>G1</strong>/<strong>G5</strong>/<strong>G7</strong><br />
<strong>HF</strong>-<strong>KN</strong> series<br />
<strong>HF</strong>-<strong>KP</strong> <strong>G1</strong>/<strong>G5</strong>/<strong>G7</strong><br />
Encoder connector<br />
<strong>HF</strong>-<strong>KN</strong> series<br />
<strong>HF</strong>-<strong>KP</strong> <strong>G1</strong>/<strong>G5</strong>/<strong>G7</strong><br />
Encoder connector<br />
Refer to section 11.1.2 (5) for details.<br />
<strong>HF</strong>-<strong>KN</strong> series<br />
<strong>HF</strong>-<strong>KP</strong> <strong>G1</strong>/<strong>G5</strong>/<strong>G7</strong><br />
IP65<br />
Oppositeto-load<br />
side lead<br />
IP65<br />
Oppositeto-load<br />
side lead<br />
Long flex<br />
life<br />
IP20<br />
Load side<br />
lead<br />
IP20<br />
Oppositeto-load<br />
side lead<br />
IP20<br />
IP20<br />
Long flex<br />
life<br />
IP20<br />
IP65<br />
Load side<br />
lead<br />
IP65<br />
Oppositeto-load<br />
side lead<br />
11 - 5
11. OPTIONS AND AUXILIARY EQUIPMENT<br />
No. Product Model Description Application<br />
30) Encoder cable <strong>MR</strong>-J3ENSCBL M-L<br />
Cable length:<br />
2 5 10 20 30m<br />
31) Encoder cable <strong>MR</strong>-J3ENSCBL M-H<br />
Cable length:<br />
2 5 10 20 30 40<br />
50m<br />
32) Encoder <strong>MR</strong>-J3SCNS<br />
connector set<br />
For <strong>HF</strong>-<strong>KN</strong> series <strong>HF</strong>-<strong>KP</strong> <strong>G1</strong>/<strong>G5</strong>/<strong>G7</strong><br />
Refer to section 11.1.2 (4) for details.<br />
For <strong>HF</strong>-<strong>KN</strong> series <strong>HF</strong>-<strong>KP</strong> <strong>G1</strong>/<strong>G5</strong>/<strong>G7</strong><br />
Refer to section 11.1.2 (4) for details.<br />
IP67<br />
Standard<br />
flex life<br />
IP67<br />
Long flex<br />
life<br />
IP67<br />
11 - 6
11. OPTIONS AND AUXILIARY EQUIPMENT<br />
11.1.2 Encoder cable/connector sets<br />
(1) <strong>MR</strong>-J3ENCBL M-A1-L/H <strong>MR</strong>-J3ENCBL M-A2-L/H<br />
These are encoder cables for the <strong>HF</strong>-<strong>KN</strong> series <strong>HF</strong>-<strong>KP</strong> <strong>G1</strong>/<strong>G5</strong>/<strong>G7</strong> servo motors. The numerals in the<br />
Cable Length field of the table are the symbols entered in the part of the cable model. The cables of the<br />
lengths with the symbols are available.<br />
Cable length<br />
Cable model<br />
IP rating Flex life Application<br />
2m 5m 10m 20m 30m 40m 50m<br />
<strong>MR</strong>-J3ENCBL M-A1-L 2 5 10 IP65 Standard <strong>HF</strong>-<strong>KN</strong> series <strong>HF</strong>-<strong>KP</strong><br />
Long flex <strong>G1</strong>/<strong>G5</strong>/<strong>G7</strong> servo motor<br />
<strong>MR</strong>-J3ENCBL M-A1-H 2 5 10 IP65<br />
life Load side lead<br />
<strong>MR</strong>-J3ENCBL M-A2-L 2 5 10 IP65 Standard <strong>HF</strong>-<strong>KN</strong> series <strong>HF</strong>-<strong>KP</strong><br />
Long flex <strong>G1</strong>/<strong>G5</strong>/<strong>G7</strong> servo motor<br />
<strong>MR</strong>-J3ENCBL M-A2-H 2 5 10 IP65<br />
life Opposite-to-load side lead<br />
(a) Connection of servo amplifier and servo motor<br />
Servo amplifier<br />
<strong>MR</strong>-J3ENCBL M-A1-L<br />
<strong>MR</strong>-J3ENCBL M-A1-H<br />
2)<br />
1)<br />
or<br />
Servo motor<br />
<strong>HF</strong>-<strong>KN</strong> series<br />
<strong>HF</strong>-<strong>KP</strong> <strong>G1</strong>/<strong>G5</strong>/<strong>G7</strong><br />
CN2<br />
1)<br />
<strong>MR</strong>-J3ENCBL M-A2-L<br />
<strong>MR</strong>-J3ENCBL M-A2-H<br />
2)<br />
Servo motor<br />
<strong>HF</strong>-<strong>KN</strong> series<br />
<strong>HF</strong>-<strong>KP</strong> <strong>G1</strong>/<strong>G5</strong>/<strong>G7</strong><br />
Cable model 1) For CN2 connector 2) For encoder connector<br />
<strong>MR</strong>-J3ENCBL M-A1-L Receptacle: 36210-0100PL Connector set: 54599-1019(Molex) Connector: 1674320-1<br />
Shell kit: 36310-3200-008<br />
(3M)<br />
Crimping tool for ground clip:<br />
1596970-1<br />
(Note) Signal layout<br />
(Note) Signal layout Crimping tool for receptacle<br />
contact: 1596847-1<br />
<strong>MR</strong>-J3ENCBL M-A1-H 2 6 10<br />
LG<br />
2 4 6 8 10<br />
4 8<br />
(Tyco Electronics)<br />
LG <strong>MR</strong>R<br />
<strong>MR</strong>R<br />
or<br />
(Note) Signal layout<br />
1 5 9<br />
P5<br />
1 3 5 7 9<br />
3 7<br />
P5 <strong>MR</strong><br />
<strong>MR</strong><br />
9 SHD<br />
<strong>MR</strong>-J3ENCBL M-A2-L<br />
7 8<br />
View seen from wiring side.<br />
View seen from wiring side.<br />
5 <strong>MR</strong> 6 LG<br />
<strong>MR</strong>-J3ENCBL<br />
M-A2-H<br />
Note. Keep open the pins shown with . Especially, pin 10 is provided<br />
for manufacturer adjustment. If it is connected with any other pin,<br />
the servo amplifier cannot operate normally.<br />
3 P5<br />
1<br />
4 <strong>MR</strong>R<br />
View seen from wiring side.<br />
Note. Keep open the pins<br />
shown with .<br />
2<br />
11 - 7
11. OPTIONS AND AUXILIARY EQUIPMENT<br />
(b) Cable internal wiring diagram<br />
<strong>MR</strong>-J3ENCBL2M-L/H<br />
<strong>MR</strong>-J3ENCBL5M-L/H<br />
<strong>MR</strong>-J3ENCBL10M-L/H<br />
Servo amplifier<br />
side connector<br />
Encoder side<br />
connector<br />
P5<br />
LG<br />
<strong>MR</strong><br />
<strong>MR</strong>R<br />
SD<br />
1<br />
2<br />
3<br />
4<br />
9<br />
Plate<br />
3<br />
6<br />
5<br />
4<br />
2<br />
9<br />
P5<br />
LG<br />
<strong>MR</strong><br />
<strong>MR</strong>R<br />
SHD<br />
(2) <strong>MR</strong>-EKCBL M-L/H<br />
POINT<br />
The following encoder cables are of four-wire type. When using any of these<br />
encoder cables, set parameter No. PC22 to "1 " to select the four-wire type.<br />
<strong>MR</strong>-EKCBL30M-L<br />
<strong>MR</strong>-EKCBL30M-H<br />
<strong>MR</strong>-EKCBL40M-H<br />
<strong>MR</strong>-EKCBL50M-H<br />
The servo amplifier and servo motor cannot be connected with these cables only. The servo motor side<br />
encoder cable (<strong>MR</strong>-J3JCBL03M-A1-L or <strong>MR</strong>-J3JCBL03M-A2-L) is required.<br />
The numerals in the Cable Length field of the table are the symbols entered in the part of the cable model.<br />
The cables of the lengths with the symbols are available.<br />
Cable model<br />
Cable length<br />
2m 5m 10m 20m 30m 40m 50m<br />
<strong>MR</strong>-EKCBL M-L 20<br />
(Note)<br />
30<br />
<strong>MR</strong>-EKCBL M-H 20<br />
(Note) (Note) (Note)<br />
30 40 50<br />
Note. Four-wire type cable.<br />
IP rating Flex life Application<br />
<strong>HF</strong>-<strong>KN</strong> series <strong>HF</strong>-<strong>KP</strong><br />
IP20 Standard <strong>G1</strong>/<strong>G5</strong>/<strong>G7</strong> servo motor<br />
Use in combination with<br />
IP20<br />
Long flex <strong>MR</strong>-J3JCBL03M-A1-L or<br />
life <strong>MR</strong>-J3JCBL03M-A2-L.<br />
11 - 8
11. OPTIONS AND AUXILIARY EQUIPMENT<br />
(a) Connection of servo amplifier and servo motor<br />
Servo amplifier<br />
CN2<br />
1)<br />
<strong>MR</strong>-EKCBL M-L<br />
<strong>MR</strong>-EKCBL M-H<br />
2)<br />
<strong>MR</strong>-J3JCBL03M-A2-L<br />
Cable length: 0.3m<br />
Servo motor<br />
<strong>HF</strong>-<strong>KN</strong> series<br />
<strong>HF</strong>-<strong>KP</strong> <strong>G1</strong>/<strong>G5</strong>/<strong>G7</strong><br />
Cable model 1) CN2 connector 2) Junction connector<br />
<strong>MR</strong>-EKCBL<br />
<strong>MR</strong>-EKCBL<br />
M-L<br />
M-H<br />
Receptacle: 36210-0100PL<br />
Shell kit: 36310-3200-008<br />
(3M)<br />
2 6<br />
LG 4 8<br />
1<br />
P5<br />
(Note) Signal layout<br />
<strong>MR</strong>R<br />
3<br />
<strong>MR</strong><br />
5<br />
MDR<br />
7<br />
MD<br />
10<br />
View seen from wiring side.<br />
9<br />
or<br />
Connector set: 54599-1019(Molex)<br />
(Note) Signal layout<br />
2<br />
LG<br />
1<br />
P5<br />
4<br />
<strong>MR</strong>R<br />
3<br />
<strong>MR</strong><br />
6 8 10<br />
5<br />
MDR<br />
7 9<br />
MD<br />
View seen from wiring side.<br />
Note. Keep open the pins shown with . Especially, pin 10 is provided for<br />
manufacturer adjustment. If it is connected with any other pin, the<br />
servo amplifier cannot operate normally.<br />
Housing: 1-172161-9<br />
Connector pin: 170359-1<br />
(Tyco Electronics or equivalent)<br />
Cable clamp: MTI-0002<br />
(Toa Electric Industries)<br />
(Note) Signal layout<br />
1 2 3<br />
<strong>MR</strong> <strong>MR</strong>R<br />
4 5 6<br />
MD MDR CONT<br />
7 8 9<br />
P5 LG SHD<br />
View seen from wiring side.<br />
Note. Keep open the pin shown<br />
with an .<br />
11 - 9
11. OPTIONS AND AUXILIARY EQUIPMENT<br />
(b) Internal wiring diagram<br />
Servo amplifier<br />
side connector<br />
<strong>MR</strong>-EKCBL20M-L<br />
Encoder side<br />
connector<br />
Servo amplifier<br />
side connector<br />
<strong>MR</strong>-EKCBL30M-L<br />
Encoder side<br />
connector<br />
P5<br />
LG<br />
1<br />
2<br />
7<br />
8<br />
P5<br />
LG<br />
P5<br />
LG<br />
1<br />
2<br />
7<br />
8<br />
P5<br />
LG<br />
<strong>MR</strong><br />
<strong>MR</strong>R<br />
3<br />
4<br />
1<br />
2<br />
<strong>MR</strong><br />
<strong>MR</strong>R<br />
<strong>MR</strong><br />
<strong>MR</strong>R<br />
3<br />
4<br />
1<br />
2<br />
<strong>MR</strong><br />
<strong>MR</strong>R<br />
SD<br />
9<br />
Plate<br />
(Note)<br />
3<br />
9<br />
SHD<br />
MD 7<br />
4<br />
MDR 8 5<br />
9<br />
3<br />
MD<br />
MDR<br />
SD<br />
Plate<br />
(Note)<br />
6 CONT<br />
9 SHD<br />
Servo amplifier<br />
side connector<br />
<strong>MR</strong>-EKCBL20M-H<br />
Encoder side<br />
connector<br />
Servo amplifier<br />
side connector<br />
<strong>MR</strong>-EKCBL30M-H<br />
<strong>MR</strong>-EKCBL40M-H<br />
<strong>MR</strong>-EKCBL50M-H<br />
Encoder side<br />
connector<br />
P5<br />
LG<br />
1<br />
2<br />
7<br />
8<br />
P5<br />
LG<br />
P5<br />
LG<br />
1<br />
2<br />
7<br />
8<br />
P5<br />
LG<br />
<strong>MR</strong><br />
<strong>MR</strong>R<br />
3<br />
4<br />
1<br />
2<br />
<strong>MR</strong><br />
<strong>MR</strong>R<br />
<strong>MR</strong><br />
<strong>MR</strong>R<br />
3<br />
4<br />
1<br />
2<br />
<strong>MR</strong><br />
<strong>MR</strong>R<br />
SD<br />
9<br />
Plate<br />
(Note)<br />
3<br />
9<br />
SHD<br />
MD 7<br />
4<br />
MDR 8 5<br />
9<br />
3<br />
MD<br />
MDR<br />
SD<br />
Plate<br />
(Note)<br />
6 CONT<br />
9 SHD<br />
Note. When fabricating the cable, this wiring is not necessary.<br />
When fabricating the cable, use the wiring diagram corresponding to the length indicated below.<br />
Cable flex life<br />
Applicable wiring diagram<br />
Less than 30m<br />
30m to 50m<br />
Standard<br />
<strong>MR</strong>-EKCBL20M-L<br />
Long flex life <strong>MR</strong>-EKCBL20M-H <strong>MR</strong>-EKCBL30M-H<br />
<strong>MR</strong>-EKCBL40M-H<br />
<strong>MR</strong>-EKCBL50M-H<br />
11 - 10
11. OPTIONS AND AUXILIARY EQUIPMENT<br />
(c) When fabricating the encoder cable<br />
When fabricating the cable, prepare the following parts and tool, and fabricate it according to the wiring<br />
diagram in (b). Refer to section 11.5 for the specifications of the used cable.<br />
Parts/Tool<br />
Description<br />
Connector set<br />
<strong>MR</strong>-ECNM (Option)<br />
Servo amplifier side connector<br />
Receptacle: 36210-0100PL<br />
Shell kit: 36310-3200-008<br />
(3M)<br />
Or<br />
Connector set: 54599-1019 (Molex)<br />
Encoder side connector<br />
Housing: 1-172161-9<br />
Connector pin: 170359-1<br />
(Tyco Electronics or equivalent)<br />
Cable clamp: MTI-0002<br />
(Toa Electric Industries)<br />
(3) <strong>MR</strong>-J3JCBL03M-A1-L <strong>MR</strong>-J3JCBL03M-A2-L<br />
The servo amplifier and servo motor cannot be connected with these cables only. The servo motor side<br />
encoder cable (<strong>MR</strong>-EKCBL M-L/H) is required.<br />
Cable model<br />
<strong>MR</strong>-J3JCBL03M-A1-L<br />
<strong>MR</strong>-J3JCBL03M-A2-L<br />
Cable<br />
length<br />
IP rating Flex life Application<br />
<strong>HF</strong>-<strong>KN</strong> series <strong>HF</strong>-<strong>KP</strong> <strong>G1</strong>/<strong>G5</strong>/<strong>G7</strong><br />
servo motor<br />
Load side lead<br />
Use in combination with <strong>MR</strong>-EKCBL<br />
0.3m IP20 Standard<br />
M-L/H.<br />
<strong>HF</strong>-<strong>KN</strong> series <strong>HF</strong>-<strong>KP</strong> <strong>G1</strong>/<strong>G5</strong>/<strong>G7</strong><br />
servo motor<br />
Opposite-to-load side lead<br />
Use in combination with <strong>MR</strong>-EKCBL<br />
M-L/H.<br />
11 - 11
11. OPTIONS AND AUXILIARY EQUIPMENT<br />
(a) Connection of servo amplifier and servo motor<br />
Servo amplifier<br />
<strong>MR</strong>-J3JCBL03M-A1-L<br />
2)<br />
Servo motor<br />
<strong>HF</strong>-<strong>KN</strong> series<br />
1)<br />
<strong>HF</strong>-<strong>KP</strong> <strong>G1</strong>/<strong>G5</strong>/<strong>G7</strong><br />
<strong>MR</strong>-EKCBL M-L/H<br />
or<br />
CN2<br />
<strong>MR</strong>-J3JCBL03M-A2-L<br />
2)<br />
Servo motor<br />
<strong>HF</strong>-<strong>KN</strong> series<br />
<strong>HF</strong>-<strong>KP</strong> <strong>G1</strong>/<strong>G5</strong>/<strong>G7</strong><br />
1)<br />
Cable model 1) Junction connector 2) For encoder connector<br />
<strong>MR</strong>-J3JCBL03M-A1-L<br />
<strong>MR</strong>-J3JCBL03M-A2-L<br />
Housing: 1-172169-9<br />
Contact: 1473226-1<br />
Cable clamp: 316454-1<br />
Crimping tool: 91529-1<br />
(Tyco Electronics)<br />
(Note) Signal layout<br />
3 2<br />
<strong>MR</strong>R<br />
6 5<br />
CONT MDR<br />
9 8<br />
SHD LG<br />
1<br />
<strong>MR</strong><br />
4<br />
MD<br />
7<br />
P5<br />
View seen from wiring side.<br />
Connector: 1674320-1<br />
Crimping tool for ground clip: 1596970-1<br />
Crimping tool for receptacle contact: 1596847-1<br />
(Tyco Electronics)<br />
(Note) Signal layout<br />
9SHD<br />
7 MDR 8 MD<br />
5 <strong>MR</strong><br />
3 P5<br />
1 CONT 2<br />
6 LG<br />
4 <strong>MR</strong>R<br />
View seen from wiring side.<br />
Note. Keep open the pins shown with .<br />
Note. Keep open the pins shown with .<br />
(b) Internal wiring diagram<br />
P5<br />
LG<br />
<strong>MR</strong><br />
<strong>MR</strong>R<br />
Junction<br />
connector<br />
7<br />
8<br />
1<br />
2<br />
<strong>MR</strong>-J3JCBL03M-A1-L<br />
<strong>MR</strong>-J3JCBL03M-A2-L<br />
Encoder side<br />
connector<br />
6 LG<br />
5 <strong>MR</strong><br />
4 <strong>MR</strong>R<br />
MD 4 8 MD<br />
MDR 5 7 MDR<br />
3 2<br />
CONT 6<br />
1 CONT<br />
3<br />
P5<br />
SHD<br />
9<br />
9<br />
SHD<br />
11 - 12
11. OPTIONS AND AUXILIARY EQUIPMENT<br />
(4) <strong>MR</strong>-J3ENSCBL M-L <strong>MR</strong>-J3ENSCBL M-H<br />
The servo amplifier and servo motor cannot be connected with these cables only. The servo motor side<br />
encoder cable (<strong>MR</strong>-J3JSCBL03M-A1-L or <strong>MR</strong>-J3JSCBL03M-A2-L) is required. The number in the cable<br />
length column of the table indicates the symbol filling the square in the cable model. Cable lengths<br />
corresponding to the specified symbols are prepared.<br />
Cable model<br />
Cable length<br />
2m 5m 10m 20m 30m 40m 50m<br />
<strong>MR</strong>-J3ENSCBL M-L 2 5 10 20 30 IP67 Standard<br />
<strong>MR</strong>-J3ENSCBL M-H 2 5 10 20 30 40 50 IP67<br />
IP rating Flex life Application<br />
Long flex<br />
life<br />
<strong>HF</strong>-<strong>KN</strong> series <strong>HF</strong>-<strong>KP</strong><br />
<strong>G1</strong>/<strong>G5</strong>/<strong>G7</strong><br />
servo motor<br />
Use in combination with<br />
<strong>MR</strong>-J3JSCBL03M-A1-L or<br />
<strong>MR</strong>-J3JSCBL03M-A2-L.<br />
(a) Connection of servo amplifier and servo motor<br />
Servo amplifier<br />
CN2<br />
1)<br />
<strong>MR</strong>-J3ENSCBL □M-L<br />
<strong>MR</strong>-J3ENSCBL □M-H<br />
2)<br />
<strong>MR</strong>-J3JSCBL03M-A2-L<br />
Cable length: 0.3m<br />
Servo motor<br />
<strong>HF</strong>-<strong>KN</strong> series<br />
<strong>HF</strong>-<strong>KP</strong> □<strong>G1</strong>/<strong>G5</strong>/<strong>G7</strong><br />
11 - 13
11. OPTIONS AND AUXILIARY EQUIPMENT<br />
Cable model 1) For CN2 connector 2) Junction connector<br />
<strong>MR</strong>-J3ENSCBL Receptacle: 36210-0100PL<br />
Connector set: 54599-1019 In case of 10m or shorter cables<br />
M-L<br />
Shell kit: 36310-3200-008<br />
(Molex)<br />
Straight plug: CM10-SP10S-M(D6)<br />
Socket contact: CM10-#22SC(C1)<br />
(3M)<br />
(D8)-100<br />
(Note) Signal layout<br />
(Note) Signal layout<br />
Crimping tool: 357J-50446<br />
(DDK)<br />
10<br />
6 8 10 Applicable cable AWG20 to 22<br />
<strong>MR</strong>-J3ENSCBL<br />
M-H<br />
2 6<br />
LG 4<br />
<strong>MR</strong>R<br />
8<br />
1 5<br />
P5 3 7<br />
<strong>MR</strong><br />
View seen from wiring side.<br />
9<br />
or<br />
2<br />
LG<br />
1<br />
P5<br />
4<br />
<strong>MR</strong>R<br />
3<br />
<strong>MR</strong><br />
5<br />
7 9<br />
View seen from wiring side.<br />
Note. Keep open the pins shown with . Especially, pin 10 is provided for<br />
manufacturer adjustment. If it is connected with any other pin, the<br />
servo amplifier cannot operate normally.<br />
In case of 20m or longer cables<br />
Straight plug: CM10-SP10S-M(D6)<br />
Socket contact: CM10-#22SC(C2)<br />
(D8)-100<br />
Crimping tool: 357J-50447<br />
(DDK)<br />
Applicable cable AWG23 to 28<br />
(Note) Signal layout<br />
3<br />
2<br />
<strong>MR</strong>R<br />
1<br />
<strong>MR</strong><br />
7 6<br />
5<br />
LG<br />
4<br />
10 9 8<br />
SHD<br />
P5<br />
View seen from wiring side.<br />
Note. Keep open the pins shown<br />
with .<br />
(b) Internal wiring diagram<br />
<strong>MR</strong>-J3ENSCBL2M-L/H<br />
<strong>MR</strong>-J3ENSCBL5M-L/H<br />
<strong>MR</strong>-J3ENSCBL10M-L/H<br />
<strong>MR</strong>-J3ENSCBL20M-L<br />
<strong>MR</strong>-J3ENSCBL30M-L<br />
<strong>MR</strong>-J3ENSCBL20M-H<br />
<strong>MR</strong>-J3ENSCBL30M-H<br />
<strong>MR</strong>-J3ENSCBL40M-H<br />
<strong>MR</strong>-J3ENSCBL50M-H<br />
Servo amplifier<br />
side connector<br />
Encoder side<br />
connector<br />
Servo amplifier<br />
side connector<br />
Encoder side<br />
connector<br />
Servo amplifier<br />
side connector<br />
Encoder side<br />
connector<br />
P5<br />
LG<br />
<strong>MR</strong><br />
<strong>MR</strong>R<br />
SD<br />
1<br />
2<br />
3<br />
4<br />
9<br />
Plate<br />
(Note)<br />
8<br />
5<br />
1<br />
2<br />
4<br />
10<br />
P5<br />
LG<br />
<strong>MR</strong><br />
<strong>MR</strong>R<br />
SHD<br />
P5<br />
LG<br />
<strong>MR</strong><br />
<strong>MR</strong>R<br />
SD<br />
1<br />
2<br />
3<br />
4<br />
9<br />
Plate<br />
(Note)<br />
8<br />
5<br />
1<br />
2<br />
4<br />
10<br />
P5<br />
LG<br />
<strong>MR</strong><br />
<strong>MR</strong>R<br />
SHD<br />
P5<br />
LG<br />
<strong>MR</strong><br />
<strong>MR</strong>R<br />
SD<br />
1<br />
2<br />
3<br />
4<br />
9<br />
Plate<br />
(Note)<br />
8<br />
5<br />
1<br />
2<br />
4<br />
10<br />
P5<br />
LG<br />
<strong>MR</strong><br />
<strong>MR</strong>R<br />
SHD<br />
Note. When fabricating, this wiring is not necessary.<br />
11 - 14
11. OPTIONS AND AUXILIARY EQUIPMENT<br />
(c) When fabricating the encoder cable<br />
When fabricating the cable, prepare the following parts and tool, and fabricate it according to the wiring<br />
diagram in (b). Refer to section 11.5 for the specifications of the used cable.<br />
Parts/Tool<br />
(Connector set)<br />
<strong>MR</strong>-J3SCNS<br />
(Option)<br />
Description<br />
Servo amplifier side connector<br />
Receptacle: 36210-0100PL<br />
Shell kit: 36310-3200-008<br />
(3M)<br />
Or<br />
Connector set: 54599-1019<br />
(Molex)<br />
Encoder side connector<br />
Straight plug: CM10-SP10S-M(D6)<br />
Socket contact:<br />
CM10-#22SC(S1)(D8)-100<br />
Applicable wire size: AWG20 or less<br />
(DDK)<br />
(5) <strong>MR</strong>-J3JSCBL03M-A1-L <strong>MR</strong>-J3JSCBL03M-A2-L<br />
The servo amplifier and servo motor cannot be connected with these cables only. The servo motor side<br />
encoder cable (<strong>MR</strong>-J3ENSCBL M-L/H) is required.<br />
Cable model<br />
<strong>MR</strong>-J3JSCBL03M-A1-L<br />
<strong>MR</strong>-J3JSCBL03M-A2-L<br />
Cable<br />
length<br />
IP rating Flex life Application<br />
<strong>HF</strong>-<strong>KN</strong> series <strong>HF</strong>-<strong>KP</strong> <strong>G1</strong>/<strong>G5</strong>/<strong>G7</strong><br />
servo motor<br />
Load side lead<br />
Use in combination with <strong>MR</strong>-J3ENSCBL<br />
0.3m IP65 Standard<br />
M-L/H.<br />
<strong>HF</strong>-<strong>KN</strong> series <strong>HF</strong>-<strong>KP</strong> <strong>G1</strong>/<strong>G5</strong>/<strong>G7</strong><br />
servo motor<br />
Opposite-to-load side lead<br />
Use in combination with <strong>MR</strong>-J3ENSCBL<br />
M-L/H.<br />
11 - 15
11. OPTIONS AND AUXILIARY EQUIPMENT<br />
(a) Connection of servo amplifier and servo motor<br />
Servo amplifier<br />
<strong>MR</strong>-J3JSCBL03M-A<br />
2)<br />
Servo motor<br />
<strong>HF</strong>-<strong>KN</strong> series<br />
1)<br />
<strong>HF</strong>-<strong>KP</strong> <strong>G1</strong>/<strong>G5</strong>/<strong>G7</strong><br />
<strong>MR</strong>-J3ENSCBL M-L/H<br />
or<br />
CN2<br />
<strong>MR</strong>-J3JSCBL03M-A<br />
2)<br />
Servo motor<br />
<strong>HF</strong>-<strong>KN</strong> series<br />
<strong>HF</strong>-<strong>KP</strong> <strong>G1</strong>/<strong>G5</strong>/<strong>G7</strong><br />
1)<br />
Cable model 1) Junction connector 2) For encoder connector<br />
<strong>MR</strong>-J3JSCBL03M-<br />
A1-L<br />
Receptacle: CM10-CR10P-M<br />
(DDK)<br />
Connector: 1674320-1<br />
Crimping tool for ground clip: 1596970-1<br />
Applicable cable AWG 20 or less<br />
Crimping tool for receptacle contact: 1596847-1<br />
(Note) Signal layout<br />
(Tyco Electronics)<br />
Note) Signal layout<br />
<strong>MR</strong>-J3JSCBL03M-<br />
A2-L<br />
3<br />
CONT<br />
7 6<br />
2<br />
<strong>MR</strong>R<br />
5<br />
LG<br />
1<br />
<strong>MR</strong><br />
10 9 8<br />
SHD<br />
P5<br />
4<br />
9 SHD<br />
7<br />
5 <strong>MR</strong><br />
8<br />
6 LG<br />
3 P5 4<strong>MR</strong>R<br />
1 CONT 2<br />
View seen from wiring side.<br />
View seen from wiring side.<br />
Note. Keep open the pins shown with .<br />
Note. Keep open the pins shown with .<br />
(b) Internal wiring diagram<br />
<strong>MR</strong>-J3JSCBL03M-A1-L<br />
<strong>MR</strong>-J3JSCBL03M-A2-L<br />
Junction<br />
connector<br />
Encoder side<br />
connector<br />
P5<br />
LG<br />
<strong>MR</strong><br />
<strong>MR</strong>R<br />
CONT<br />
8<br />
3<br />
5<br />
6<br />
1<br />
5<br />
2<br />
4<br />
6 8<br />
7 7<br />
4 2<br />
3<br />
1<br />
P5<br />
LG<br />
<strong>MR</strong><br />
<strong>MR</strong>R<br />
CONT<br />
SHD<br />
10<br />
9<br />
SHD<br />
11 - 16
11. OPTIONS AND AUXILIARY EQUIPMENT<br />
11.1.3 Motor power supply cables<br />
These are motor power supply cables for the <strong>HF</strong>-<strong>KN</strong> series <strong>HF</strong>-<strong>KP</strong> <strong>G1</strong>/<strong>G5</strong>/<strong>G7</strong> servo motors.<br />
The numerals in the Cable Length field of the table are the symbols entered in the part of the cable model.<br />
The cables of the lengths with the symbols are available.<br />
Refer to section 3.10.2 when wiring.<br />
Cable model<br />
Cable length<br />
0.3m 2m 5m 10m<br />
<strong>MR</strong>-PWS1CBL M-A1-L 2 5 10 IP65 Standard<br />
<strong>MR</strong>-PWS1CBL M-A2-L 2 5 10 IP65 Standard<br />
<strong>MR</strong>-PWS1CBL M-A1-H 2 5 10 IP65<br />
<strong>MR</strong>-PWS1CBL M-A2-H 2 5 10 IP65<br />
IP rating Flex life Application<br />
Long flex<br />
life<br />
Long flex<br />
life<br />
<strong>MR</strong>-PWS2CBL M-A1-L 03 IP55 Standard<br />
<strong>MR</strong>-PWS2CBL M-A2-L 03 IP55 Standard<br />
<strong>HF</strong>-<strong>KN</strong> series <strong>HF</strong>-<strong>KP</strong> <strong>G1</strong>/<strong>G5</strong>/<strong>G7</strong><br />
servo motor<br />
Load side lead<br />
<strong>HF</strong>-<strong>KN</strong> series <strong>HF</strong>-<strong>KP</strong> <strong>G1</strong>/<strong>G5</strong>/<strong>G7</strong><br />
servo motor<br />
Opposite-to-load side lead<br />
<strong>HF</strong>-<strong>KN</strong> series <strong>HF</strong>-<strong>KP</strong> <strong>G1</strong>/<strong>G5</strong>/<strong>G7</strong><br />
servo motor<br />
Load side lead<br />
<strong>HF</strong>-<strong>KN</strong> series <strong>HF</strong>-<strong>KP</strong> <strong>G1</strong>/<strong>G5</strong>/<strong>G7</strong><br />
servo motor<br />
Opposite-to-load side lead<br />
11 - 17
11. OPTIONS AND AUXILIARY EQUIPMENT<br />
(1) Connection of servo amplifier and servo motor<br />
Servo amplifier<br />
CNP1<br />
<strong>MR</strong>-PWS1CBL M-A1-L<br />
<strong>MR</strong>-PWS1CBL M-A1-H<br />
<strong>MR</strong>-PWS2CBL03M-A1-L<br />
1)<br />
or<br />
Servo motor<br />
<strong>HF</strong>-<strong>KN</strong> series<br />
<strong>HF</strong>-<strong>KP</strong> <strong>G1</strong>/<strong>G5</strong>/<strong>G7</strong><br />
CNP1 connector<br />
supplied with servo<br />
amplifier<br />
<strong>MR</strong>-PWS1CBL M-A2-L<br />
<strong>MR</strong>-PWS1CBL M-A2-H<br />
<strong>MR</strong>-PWS2CBL03M-A2-L<br />
1)<br />
Servo motor<br />
<strong>HF</strong>-<strong>KN</strong> series<br />
<strong>HF</strong>-<strong>KP</strong> <strong>G1</strong>/<strong>G5</strong>/<strong>G7</strong><br />
Cable model<br />
<strong>MR</strong>-PWS1CBL M-A1-L<br />
<strong>MR</strong>-PWS1CBL M-A2-L<br />
<strong>MR</strong>-PWS1CBL M-A1-H<br />
<strong>MR</strong>-PWS1CBL M-A2-H<br />
<strong>MR</strong>-PWS2CBL03M-A1-L<br />
<strong>MR</strong>-PWS2CBL03M-A2-L<br />
1) For motor power supply connector<br />
Connector: <strong>JN</strong>4FT04SJ1-R<br />
Hood, socket insulator<br />
Signal layout<br />
Bushing, ground nut<br />
Contact: ST-TMH-S-C1B-100-(A534G)<br />
1<br />
Crimping tool: CT160-3-TMH5B<br />
2 U<br />
(Japan Aviation Electronics Industry)<br />
3 V<br />
Connector: <strong>JN</strong>4FT04SJ2-R<br />
Hood, socket insulator<br />
4 W<br />
Bushing, ground nut<br />
Contact: ST-TMH-S-C1B-100-(A534G) View seen from wiring side.<br />
Crimping tool: CT160-3-TMH5B<br />
(Japan Aviation Electronics Industry)<br />
(2) Internal wiring diagram<br />
<strong>MR</strong>-PWS1CBL M-A1-H <strong>MR</strong>-PWS1CBL M-A2-H<br />
<strong>MR</strong>-PWS2CBL03M-A1-L <strong>MR</strong>-PWS2CBL03M-A2-L<br />
AWG 19 (Red) (Note)<br />
AWG 19 (White)<br />
AWG 19 (Black)<br />
AWG 19 (Green/yellow)<br />
U<br />
V<br />
W<br />
Note. These are not shielded cables.<br />
11 - 18
11. OPTIONS AND AUXILIARY EQUIPMENT<br />
11.1.4 Motor brake cables<br />
These are motor brake cables for the <strong>HF</strong>-<strong>KN</strong> series <strong>HF</strong>-<strong>KP</strong> <strong>G1</strong>/<strong>G5</strong>/<strong>G7</strong> servo motors. The numerals in the<br />
Cable Length field of the table are the symbols entered in the part of the cable model. The cables of the<br />
lengths with the symbols are available.<br />
Refer to section 3.11.4 when wiring.<br />
Cable model<br />
Cable length<br />
0.3m 2m 5m 10m IP rating Flex life Application<br />
<strong>MR</strong>-BKS1CBL M-A1-L 2 5 10 IP65 Standard<br />
<strong>MR</strong>-BKS1CBL M-A2-L 2 5 10 IP65 Standard<br />
<strong>MR</strong>-BKS1CBL M-A1-H 2 5 10 IP65<br />
<strong>MR</strong>-BKS1CBL M-A2-H 2 5 10 IP65<br />
Long flex<br />
life<br />
Long flex<br />
life<br />
<strong>MR</strong>-BKS2CBL M-A1-L 03 IP55 Standard<br />
<strong>MR</strong>-BKS2CBL M-A2-L 03 IP55 Standard<br />
<strong>HF</strong>-<strong>KN</strong> series <strong>HF</strong>-<strong>KP</strong> <strong>G1</strong>/<strong>G5</strong>/<strong>G7</strong> servo motor<br />
Load side lead<br />
<strong>HF</strong>-<strong>KN</strong> series <strong>HF</strong>-<strong>KP</strong> <strong>G1</strong>/<strong>G5</strong>/<strong>G7</strong> servo motor<br />
Opposite-to-load side lead<br />
<strong>HF</strong>-<strong>KN</strong> series <strong>HF</strong>-<strong>KP</strong> <strong>G1</strong>/<strong>G5</strong>/<strong>G7</strong> servo motor<br />
Load side lead<br />
<strong>HF</strong>-<strong>KN</strong> series <strong>HF</strong>-<strong>KP</strong> <strong>G1</strong>/<strong>G5</strong>/<strong>G7</strong> servo motor<br />
Opposite-to-load side lead<br />
11 - 19
11. OPTIONS AND AUXILIARY EQUIPMENT<br />
(1) Connection of power supply for electromagnetic brake and servo motor<br />
<strong>MR</strong>-BKS1CBL M-A1-L<br />
<strong>MR</strong>-BKS1CBL M-A1-H<br />
<strong>MR</strong>-BKS2CBL03M-A1-L<br />
1)<br />
24VDC power<br />
supply for<br />
electromagnetic<br />
brake<br />
or<br />
Servo motor<br />
<strong>HF</strong>-<strong>KN</strong> series<br />
<strong>HF</strong>-<strong>KP</strong> <strong>G1</strong>/<strong>G5</strong>/<strong>G7</strong><br />
<strong>MR</strong>-BKS1CBL M-A2-L<br />
<strong>MR</strong>-BKS1CBL M-A2-H<br />
<strong>MR</strong>-BKS2CBL03M-A2-L<br />
1)<br />
Servo motor<br />
<strong>HF</strong>-<strong>KN</strong> series<br />
<strong>HF</strong>-<strong>KP</strong> <strong>G1</strong>/<strong>G5</strong>/<strong>G7</strong><br />
Cable model<br />
<strong>MR</strong>-BKS1CBL M-A1-L<br />
<strong>MR</strong>-BKS1CBL M-A2-L<br />
<strong>MR</strong>-BKS1CBL M-A1-H<br />
<strong>MR</strong>-BKS1CBL M-A2-H<br />
<strong>MR</strong>-BKS2CBL03M-A1-L<br />
<strong>MR</strong>-BKS2CBL03M-A2-L<br />
1) For motor brake connector<br />
Connector: <strong>JN</strong>4FT02SJ1-R<br />
Hood, socket insulator<br />
Signal layout<br />
Bushing, ground nut<br />
Contact: ST-TMH-S-C1B-100-(A534G)<br />
1 B1<br />
Crimping tool: CT160-3-TMH5B<br />
2 B2<br />
(Japan Aviation Electronics Industry)<br />
Connector: <strong>JN</strong>4FT02SJ2-R<br />
View seen from wiring side.<br />
Hood, socket insulator<br />
Bushing, ground nut<br />
Contact: ST-TMH-S-C1B-100-(A534G)<br />
Crimping tool: CT160-3-TMH5B<br />
(Japan Aviation Electronics Industry)<br />
(2) Internal wiring diagram<br />
<strong>MR</strong>-BKS1CBL M-A1-H <strong>MR</strong>-BKS1CBL M-A2-H<br />
<strong>MR</strong>-BKS2CBL03M-A1-L <strong>MR</strong>-BKS2CBL03M-A2-L<br />
AWG 20<br />
AWG 20<br />
(Note)<br />
B1<br />
B2<br />
Note. These are not shielded cables.<br />
11 - 20
11. OPTIONS AND AUXILIARY EQUIPMENT<br />
11.2 Regenerative options<br />
CAUTION<br />
The specified combinations of regenerative options and servo amplifiers may only<br />
be used. Otherwise, a fire may occur.<br />
(1) Combination and regenerative power<br />
The power values in the table are resistor-generated powers and not rated powers.<br />
Regenerative power[W]<br />
Servo amplifier Built-in regenerative<br />
resistor<br />
<strong>MR</strong>-RB032<br />
[40 ]<br />
<strong>MR</strong>-RB12<br />
[40 ]<br />
<strong>MR</strong>-<strong>JN</strong>-10A(1) 30<br />
<strong>MR</strong>-<strong>JN</strong>-20A(1) 10 30 100<br />
<strong>MR</strong>-<strong>JN</strong>-40A 10 30 100<br />
(2) Selection of the regenerative option<br />
Use the following method when regeneration occurs continuously in vertical motion applications or when it<br />
is desired to make an in-depth selection of the regenerative option.<br />
(a) Regenerative energy calculation<br />
M<br />
Friction<br />
torque<br />
TF<br />
TU<br />
Unbalance torque<br />
Servo motor speed<br />
( )<br />
Generated torque<br />
( )<br />
tf(1 cycle)<br />
Up No<br />
Down Time<br />
t1 t2 t3 t4<br />
Tpsa1 Tpsd1 Tpsa2 Tpsd2<br />
1)<br />
(Driving) 5)<br />
2) 4)<br />
6)<br />
3)<br />
(Regenerative)<br />
8)<br />
7)<br />
Formulas for calculating torque and energy in operation<br />
Regenerative power Torque applied to servo motor [N٠m] Energy [J]<br />
1) T1 =<br />
(JL JM) N0<br />
9.55 x 10 4 1<br />
Tpsa1<br />
TU TF E1 = 0.1047<br />
2<br />
N0 T1 Tpsa1<br />
2) T2 = TU + TF E2 = 0.1047 N0 T2 t1<br />
(JL JM) N0 1<br />
3) T3 =<br />
9.55 x 10 4 TU TF E3 = 0.1047 N0 T3 Tpsd1<br />
Tpsa1<br />
2<br />
4), 8) T4 = TU E4 0(No regeneration)<br />
5) T5 =<br />
(JL JM) N0<br />
9.55 x 10 4 1<br />
Tpsa2<br />
TU TF E5 = 0.1047<br />
2<br />
N0 T5 Tpsa2<br />
6) T6 = TU TF E6 = 0.1047 N0 T6 t3<br />
(JL JM) N0 1<br />
7) T7 =<br />
9.55 x 10 4 TU TF E7 = 0.1047 N0 T7 Tpsd2<br />
Tpsa2<br />
2<br />
From the calculation results in 1) to 8), find the absolute value (Es) of the sum total of negative energies.<br />
11 - 21
11. OPTIONS AND AUXILIARY EQUIPMENT<br />
(b) Losses of servo motor and servo amplifier in regenerative mode<br />
The following table lists the efficiencies and other data of the servo motor and servo amplifier in the<br />
regenerative mode.<br />
Servo amplifier Inverse efficiency[%] Capacitor charging[J]<br />
<strong>MR</strong>-<strong>JN</strong>-10A 55 9<br />
<strong>MR</strong>-<strong>JN</strong>-10A1 55 4<br />
<strong>MR</strong>-<strong>JN</strong>-20A 70 9<br />
<strong>MR</strong>-<strong>JN</strong>-20A1 70 4<br />
<strong>MR</strong>-<strong>JN</strong>-40A 85 11<br />
Inverse efficiency ( )<br />
Capacitor charging (Ec)<br />
:Efficiency including some efficiencies of the servo motor and servo amplifier<br />
when rated (regenerative) torque is generated at rated speed. Since the<br />
efficiency varies with the speed and generated torque, allow for about 10%.<br />
:Energy charged into the electrolytic capacitor in the servo amplifier.<br />
Subtract the capacitor charging from the result of multiplying the sum total of regenerative energies by the<br />
inverse efficiency to calculate the energy consumed by the regenerative option.<br />
ER [J] Es Ec<br />
Calculate the power consumption of the regenerative option on the basis of single-cycle operation period tf [s]<br />
to select the necessary regenerative option.<br />
PR [W]<br />
ER/tf<br />
(3) Parameter setting<br />
Set parameter No. PA02 according to the regenerative option to be used.<br />
Parameter No. PA02<br />
0<br />
Selection of regenerative option<br />
00: Regenerative option is not used<br />
For servo amplifier of 100W, regenerative resistor is not used.<br />
For servo amplifier of 200 to 400W, built-in regenerative resistor is used.<br />
02: <strong>MR</strong>-RB032<br />
03: <strong>MR</strong>-RB12<br />
11 - 22
11. OPTIONS AND AUXILIARY EQUIPMENT<br />
(4) Connection of the regenerative option<br />
POINT<br />
When using a regenerative option, remove the built-in regenerative resistor<br />
and its wirings from the servo amplifier.<br />
For the sizes of wires used for wiring, refer to section 11.5.<br />
Avoid installing and removing the built-in regenerative resistor frequently, as<br />
much as possible.<br />
When reinstalling the removed built-in regenerative resistor, check if there is<br />
no damage on the lead of the built-in regenerative resistor.<br />
The regenerative option causes a temperature rise of 100 relative to the ambient temperature. Fully<br />
examine heat dissipation, installation position and used wires, etc. before installing the option. For wiring,<br />
use flame-resistant wire and keep them clear of the regenerative option body. Always use twisted cables of<br />
max. 5m length for connection with the servo amplifier.<br />
When using a regenerative option for <strong>MR</strong>-<strong>JN</strong>-20A(1) <strong>MR</strong>-<strong>JN</strong>-40A, disconnect the wiring to P and C,<br />
remove the built-in regenerative resistor from the servo amplifier, and then connect the regenerative option<br />
to P and C. G3 and G4 are thermal sensor output terminals. G3-G4 is disconnected when the regenerative<br />
option overheats abnormally.<br />
Servo amplifier<br />
Always remove wiring (across P-C) of servo<br />
amplifier built-in regenerative resistor.<br />
Regenerative option<br />
P<br />
C<br />
(Note 1)<br />
(Note 2)<br />
5m or less<br />
P<br />
C<br />
G3<br />
G4<br />
Note 1. A built-in regenerative resistor is not provided for the <strong>MR</strong>-<strong>JN</strong>-10A(1).<br />
2. Make up a sequence which will switch off the magnetic contactor (MC) when abnormal heating occurs.<br />
G3-G4 contact specifications<br />
Maximum voltage: 120V AC/DC<br />
Maximum current: 0.5A/4.8VDC<br />
Maximum capacity: 2.4VA<br />
Remove the built-in regenerative resistor in the procedures of 1) to 3), referring to the following diagram.<br />
1) Disconnect the wires of the built-in regenerative resistor from the main circuit power supply connector<br />
(CNP1). (Refer to (3) in section 3.3.3)<br />
2) Remove the wires of the built-in regenerative resistor from the servo amplifier, starting from the<br />
closest to the main circuit power supply connector (CNP1). At this time, be careful so as not to break<br />
the wires.<br />
11 - 23
11. OPTIONS AND AUXILIARY EQUIPMENT<br />
3) Remove the screw which fixes the built-in regenerative resistor, and then remove the built-in<br />
regenerative resistor.<br />
1)<br />
2)<br />
(Note)<br />
3)<br />
Note. Screw size: M3<br />
Tightening torque: 0.72 [N m]<br />
(5) Outline dimension drawings<br />
(a) <strong>MR</strong>-RB12<br />
TE1<br />
36<br />
15<br />
6 mounting hole<br />
Approx.6<br />
156<br />
168<br />
144<br />
5<br />
TE1 terminal block<br />
G3<br />
G4<br />
P<br />
C<br />
[Unit: mm]<br />
Applicable wire size: 0.2 to 2.5 [mm 2 ]<br />
(AWG24 to AW<strong>G1</strong>2)<br />
Tightening torque: 0.5 to 0.6 [N m]<br />
(4 to 5 [lb in])<br />
Mounting screw<br />
Screw: M5<br />
Tightening torque: 3.24 [N m] (28.7 [lb in])<br />
Mass: 1.1[kg] (2.4[lb])<br />
6<br />
12<br />
6<br />
Approx.20<br />
149<br />
169<br />
2<br />
11 - 24
11. OPTIONS AND AUXILIARY EQUIPMENT<br />
(b) <strong>MR</strong>-RB032<br />
[Unit: mm]<br />
15<br />
30<br />
6 mounting hole<br />
Approx.6<br />
Approx.12<br />
TE1 terminal block<br />
G3<br />
G4<br />
P<br />
C<br />
TE1<br />
144<br />
12<br />
156<br />
168<br />
5<br />
Applicable wire size: 0.2 to 2.5 [mm 2 ]<br />
(AWG24 to AW<strong>G1</strong>2)<br />
Tightening torque: 0.5 to 0.6 [N m]<br />
(4 to 5 [lb in])<br />
Mounting screw<br />
Screw: M5<br />
Tightening torque: 3.24 [N m] (28.7 [lb in])<br />
Mass: 0.5[kg] (1.1[lb])<br />
6<br />
6<br />
Approx.20 99<br />
119<br />
1.6<br />
11.3 Junction terminal block <strong>MR</strong>-TB26A<br />
(1) How to use the junction terminal block<br />
Always use the junction terminal block (<strong>MR</strong>-TB26A) with the junction terminal block cable (<strong>MR</strong>-TBNATBL<br />
M) as a set.<br />
Use the junction terminal block by mounting it onto the DIN rail.<br />
<strong>MR</strong>-TBNATBL M<br />
Cable length:<br />
05: 0.5m<br />
1 : 1m<br />
The terminal numbers described on the junction terminal block match the pin numbers of the servo<br />
amplifier's CN1 connector. S in the terminal number means a shield.<br />
Servo amplifier<br />
CN1<br />
Junction terminal block<br />
<strong>MR</strong>-TB26A<br />
Junction terminal block cable<br />
(<strong>MR</strong>-TBNATBL M)<br />
Ground the junction terminal block cable using the S terminal on the junction terminal block.<br />
11 - 25
11. OPTIONS AND AUXILIARY EQUIPMENT<br />
(2) Specifications<br />
Junction terminal block<br />
Item<br />
<strong>MR</strong>-TB26A<br />
Rating 32VAC/DC 0.5A<br />
Twisted wire<br />
0.08 to 1.5mm 2 (AWG28 to AW<strong>G1</strong>4)<br />
Single wire<br />
0.32 to 1.2mm<br />
applicable wires<br />
Outside diameter of<br />
Wires with 3.4 mm or less<br />
the cable coating<br />
Operation tools<br />
Equivalent to 210-619 (manufactured by WAGO JAPAN)<br />
Equivalent to 210-119SB (manufactured by WAGO JAPAN)<br />
Length of the removed coating<br />
5 to 6 mm<br />
(3) Outline drawing<br />
[Unit: mm]<br />
1<br />
14<br />
Approx.<br />
35 (Note)<br />
26<br />
55<br />
1<br />
14<br />
Approx.<br />
7.5 (Note)<br />
Approx.31.1 (Note)<br />
26.6<br />
23.6<br />
27<br />
57<br />
Note. The measure in ( ) is applicable when a DIN 35mm rail is installed.<br />
11 - 26
11. OPTIONS AND AUXILIARY EQUIPMENT<br />
11.4 <strong>MR</strong> Configurator<br />
POINT<br />
For the positioning mode, refer to section 13.8 to 13.10.<br />
<strong>MR</strong> Configurator (<strong>MR</strong>ZJW3-SETUP221E) performs parameter setting changes, graph display, test operation,<br />
etc. on a personal computer using the communication function of the servo amplifier.<br />
(1) Specifications<br />
Item<br />
Compatibility with a<br />
servo amplifier<br />
Monitor<br />
Alarm<br />
Diagnostic<br />
Parameters<br />
Description<br />
The <strong>MR</strong> Configurator software version compatible with the servo amplifier is C3 or later.<br />
However, when using a servo amplifier compatible with the positioning mode, use <strong>MR</strong> Configurator with<br />
software version C4 or later.<br />
Display, Input/Output I/F display, high speed monitor, graph display<br />
(Minimum resolution changes with the processing speed of the personal computer.)<br />
Display, history, amplifier data<br />
No motor rotation, system information display, tuning data, Axis name setting.<br />
Parameter list, turning, change list, detailed information<br />
Test operation<br />
JOG operation, positioning operation, motor-less operation, DO forced output, program operation,<br />
single-step feed.<br />
Point data Point table (Refer to section 13.8.)<br />
Program data Program creation (Refer to section 13.9.)<br />
File operation Data read, save, delete, print<br />
Others Help display<br />
11 - 27
11. OPTIONS AND AUXILIARY EQUIPMENT<br />
(2) System configuration<br />
(a) Components<br />
To use this software, the following components are required in addition to the servo amplifier and servo<br />
motor.<br />
Equipment<br />
(Note 1) Description<br />
IBM PC/AT compatible where the English version of Windows R 98, Windows R Me,<br />
Windows R 2000 Professional, Windows R XP Professional, Windows R XP Home Edition,<br />
(Note 2, 3)<br />
Personal computer<br />
Browser<br />
Display<br />
Keyboard<br />
Mouse<br />
Printer<br />
USB cable<br />
OS<br />
Processor<br />
Memory<br />
Hard Disk<br />
Windows Vista R Home Basic, Windows Vista R Home Premium, Windows Vista R Business,<br />
Windows Vista R Ultimate, Windows Vista R Enterprise, Windows R 7 Starter, Windows R 7<br />
Home Premium, Windows R 7 Professional, Windows R Ultimate, Windows R Enterprise<br />
operates<br />
Pentium R 133MHz or more (Windows R 98, Windows R 2000 Professional)<br />
Pentium R 150MHz or more (Windows R Me)<br />
Pentium R 300MHz or more (Windows R XP Professional, Windows R XP Home Edition)<br />
32-bit (x86) processor of 1GHz or higher (Windows Vista R<br />
Home Basic, Windows Vista R<br />
Home Premium, Windows Vista R Business, Windows Vista R Ultimate, Windows Vista R<br />
Enterprise, Windows R 7 Starter, Windows R 7 Home Premium, Windows R 7 Professional,<br />
Windows R Ultimate, Windows R Enterprise)<br />
24MB or more (Windows R 98)<br />
32MB or more (Windows R Me, Windows R 2000 Professional)<br />
128MB or more (Windows R XP Professional, Windows R XP Home Edition)<br />
512MB or more (Windows Vista R<br />
Home Basic)<br />
1GB or more (Windows Vista R Home Premium, Windows Vista R Business, Windows Vista R<br />
Ultimate, Windows Vista R Enterprise, Windows R 7 Starter, Windows R 7 Home Premium,<br />
Windows R 7 Professional, Windows R Ultimate, Windows R Enterprise)<br />
130MB or more of free space<br />
Internet Explorer 4.0 or more<br />
One whose resolution is 1024 768 or more and that can provide a high color (16 bit) display.<br />
Connectable with the above personal computer.<br />
Connectable with the above personal computer.<br />
Connectable with the above personal computer.<br />
Connectable with the above personal computer.<br />
<strong>MR</strong>-J3USBCBL3M<br />
Note 1. Windows and Windows Vista are the registered trademarks of Microsoft Corporation in the United States and other countries.<br />
Pentium is the registered trademarks of Intel Corporation.<br />
2. On some personal computers, <strong>MR</strong> Configurator may not run properly.<br />
3. 64-bit Windows XP and 64-bit Windows Vista are not supported.<br />
(b) Connection with servo amplifier<br />
Personal computer<br />
Servo amplifier<br />
USB cable<br />
<strong>MR</strong>-J3USBCBL3M<br />
(Option)<br />
To USB<br />
connector<br />
CN3<br />
11 - 28
11. OPTIONS AND AUXILIARY EQUIPMENT<br />
11.5 Selection example of wires<br />
POINT<br />
Wires indicated in this section are separated wires. When using a cable for<br />
power line (U, V, and W) between the servo amplifier and servo motor, use a<br />
600V grade EP rubber insulated chloroprene sheath cab-tire cable (2PNCT).<br />
When complying with the UL/CSA standard, use the wires shown in App. 8 for<br />
wiring. To comply with other standards, use a wire that is complied with each<br />
standard.<br />
Selection condition of wire size is as follows.<br />
Construction condition: One wire is constructed in the air<br />
Wire length: 30m or less<br />
(1) Wires for power supply wiring<br />
The following diagram shows the wires used for wiring. Use the wires given in this section or equivalent.<br />
Power supply<br />
1) Main circuit power supply lead<br />
Servo amplifier<br />
3) Motor power supply lead<br />
Servo motor<br />
L1<br />
U<br />
U<br />
L2<br />
V<br />
W<br />
V<br />
W<br />
Motor<br />
2) Control power supply lead<br />
24V<br />
0V<br />
5) Electromagnetic<br />
brake lead<br />
B1<br />
B2<br />
Electromagnetic<br />
brake<br />
Regenerative option<br />
4) Regenerative option lead<br />
P<br />
C<br />
Encoder cable<br />
Encoder<br />
11 - 29
11. OPTIONS AND AUXILIARY EQUIPMENT<br />
(a) When using the 600V Polyvinyl chloride insulated wire (IV wire)<br />
Selection example of wire size when using IV wires is indicated below.<br />
Servo amplifier<br />
<strong>MR</strong>-<strong>JN</strong>-10A(1)<br />
<strong>MR</strong>-<strong>JN</strong>-20A(1)<br />
<strong>MR</strong>-<strong>JN</strong>-40A<br />
Table 11.1 Wire size selection example 1 (IV wire)<br />
Wires [mm 2 ] (Note)<br />
1) L 1 L 2 2) 24V 0V 3) U V W 4) P C 5) B1 B2<br />
2(AW<strong>G1</strong>4) 2(AW<strong>G1</strong>4) 2(AW<strong>G1</strong>4) 2(AW<strong>G1</strong>4) 1.25(AW<strong>G1</strong>6)<br />
Note. Wires are selected based on the highest rated current among combining servo motors.<br />
(b) When using the 600V Grade heat-resistant polyvinyl chloride insulated wire (HIV wire)<br />
Selection example of wire size when using HIV wires is indicated below.<br />
Servo amplifier<br />
<strong>MR</strong>-<strong>JN</strong>-10A(1)<br />
<strong>MR</strong>-<strong>JN</strong>-20A(1)<br />
<strong>MR</strong>-<strong>JN</strong>-40A<br />
Table 11.2 Wire size selection example 2 (HIV wire)<br />
Wires [mm 2 ] (Note)<br />
1) L 1 L 2 2) 24V 0V 3) U V W 4) P C 5) B1 B2<br />
2(AW<strong>G1</strong>4) 2(AW<strong>G1</strong>4) 2(AW<strong>G1</strong>4) 2(AW<strong>G1</strong>4) 1.25(AW<strong>G1</strong>6)<br />
Note. Wires are selected based on the highest rated current among combining servo motors.<br />
11 - 30
11. OPTIONS AND AUXILIARY EQUIPMENT<br />
(2) Wires for cables<br />
When fabricating a cable, use the wire models given in the following table or equivalent.<br />
Type<br />
Model<br />
<strong>MR</strong>-J3ENCBL M-A1-L<br />
<strong>MR</strong>-J3ENCBL M-A2-L<br />
<strong>MR</strong>-J3ENCBL M-A1-H<br />
<strong>MR</strong>-J3ENCBL M-A2-H<br />
Length<br />
[m]<br />
Table 11.3 Wires for option cables<br />
Core size<br />
2 to 10 AWG22<br />
2 to 10 AWG22<br />
Number<br />
of Cores<br />
6<br />
(3 pairs)<br />
6<br />
(3 pairs)<br />
Characteristics of one core<br />
Structure<br />
[Wires/mm]<br />
7/0.26<br />
70/0.08<br />
Conductor<br />
resistance<br />
[ /km]<br />
53<br />
or less<br />
56<br />
or less<br />
Insulation<br />
coating<br />
OD d [mm]<br />
(Note 1)<br />
(Note 2)<br />
Finishing<br />
OD [mm]<br />
1.2 7.1 0.3<br />
1.2 7.1 0.3<br />
Wire model<br />
(Note 3)<br />
VSVP 7/0.26 (AWG#22 or<br />
equivalent)-3P<br />
Ban-gi-shi-16823<br />
(Note 3)<br />
ETFE SVP 70/0.08 (AWG#22<br />
or equivalent)-3P<br />
Ban-gi-shi-16824<br />
<strong>MR</strong>-J3JCBL03M-A1-L<br />
<strong>MR</strong>-J3JCBL03M-A2-L<br />
0.3 AWG26<br />
8<br />
(4 pairs)<br />
30/0.08<br />
233<br />
or less<br />
1.2 7.1 0.3<br />
(Note 5)<br />
T/2464-1061/ A-SB 4P<br />
26AWG<br />
Encoder<br />
cable<br />
Motor<br />
power<br />
supply<br />
cable<br />
<strong>MR</strong>-EKCBL<br />
<strong>MR</strong>-EKCBL<br />
M-L<br />
M-H<br />
<strong>MR</strong>-J3JSCBL03M-A1-L<br />
<strong>MR</strong>-J3JSCBL03M-A2-L<br />
<strong>MR</strong>-J3ENSCBL<br />
<strong>MR</strong>-J3ENSCBL<br />
M-L<br />
M-H<br />
<strong>MR</strong>-PWS1CBL M-A1-L 2 to 10<br />
<strong>MR</strong>-PWS1CBL M-A2-L 2 to 10<br />
<strong>MR</strong>-PWS1CBL M-A1-H 2 to 10<br />
<strong>MR</strong>-PWS1CBL M-A2-H 2 to 10<br />
<strong>MR</strong>-PWS2CBL03M-A1-L 0.3<br />
<strong>MR</strong>-PWS2CBL03M-A2-L 0.3<br />
0.3mm 2 4<br />
(2 pairs)<br />
2 to 10<br />
0.08mm 2 4<br />
(2 pairs)<br />
20 30 0.3mm 2 12<br />
(6 pairs)<br />
20 0.2mm 2 12<br />
(6 pairs)<br />
30 to 50 0.2mm 2 14<br />
(7 pairs)<br />
0.3 AWG26<br />
2 to 10 AWG22<br />
20 30 AWG23<br />
2 to 10 AWG22<br />
20 to 50 AWG24<br />
8<br />
(4 pairs)<br />
6<br />
(3 pairs)<br />
12<br />
(6 pairs)<br />
6<br />
(3 pairs)<br />
12<br />
(6 pairs)<br />
12/0.18<br />
7/0.127<br />
12/0.18<br />
40/0.08<br />
40/0.08<br />
7/0.16<br />
7/0.26<br />
12/0.18<br />
70/0.08<br />
40/0.08<br />
AW<strong>G1</strong>8 4 34/0.18<br />
(Note 6)<br />
AW<strong>G1</strong>9<br />
(0.75mm 2 )<br />
4 150/0.08<br />
AW<strong>G1</strong>9 4 30/0.18<br />
65.7<br />
or less<br />
234<br />
or less<br />
63.6<br />
or less<br />
105<br />
or less<br />
105<br />
or less<br />
146<br />
or less<br />
53<br />
or less<br />
63.3<br />
or less<br />
56<br />
or less<br />
105<br />
or less<br />
21.8<br />
or less<br />
29.1<br />
or less<br />
25.8<br />
or less<br />
1.3<br />
0.67<br />
7.3<br />
1.2 8.2<br />
(Note 3)<br />
20276 composite 4-pair<br />
shielded cable (A-TYPE)<br />
UL 20276 AWG#23<br />
6pair(BLACK)<br />
0.88 7.2 (Note 3)A14B2343 6P<br />
0.88 8.0 (Note 3)J14B0238(0.2*7P)<br />
1.0 7.1 0.3<br />
1.2 7.1 0.3<br />
1.2 8.2 0.3<br />
1.2 7.1 0.3<br />
0.88 7.2<br />
1.71 6.2 0.3<br />
1.63 5.7 0.5<br />
1.64<br />
(Note 3)<br />
VSVP 7/0.16(AWG#26 or<br />
equivalent)-4P<br />
Ban-gi-shi-16822<br />
(Note 3)<br />
VSVP 7/0.26(AWG#22 or<br />
equivalent)-3P<br />
Ban-gi-shi-16823<br />
(Note 3)<br />
20276 VSVCAWG#23×6P<br />
Ban-gi-shi-15038<br />
(Note 3)<br />
ETFE SVP 70/0.08(AWG#22<br />
or equivalent)-3P Ban-gi-shi-<br />
16824<br />
(Note 3)<br />
ETFE SVP 40/0.08mm 6P<br />
Ban-gi-shi-15266<br />
HRZFEV-A(CL3) AW<strong>G1</strong>8<br />
4 cores<br />
(Note 4)<br />
RMFES-A(CL3X) AW<strong>G1</strong>9<br />
4 cores<br />
(Note 3, 7)<br />
J11B2330 UL 10125<br />
11 - 31
11. OPTIONS AND AUXILIARY EQUIPMENT<br />
Type<br />
Motor<br />
brake<br />
cable<br />
Model<br />
Length<br />
[m]<br />
<strong>MR</strong>-BKS1CBL M-A1-L 2 to 10<br />
<strong>MR</strong>-BKS1CBL M-A2-L 2 to 10<br />
<strong>MR</strong>-BKS1CBL M-A1-H 2 to 10<br />
<strong>MR</strong>-BKS1CBL M-A2-H 2 to 10<br />
Core size<br />
Number<br />
of Cores<br />
Characteristics of one core<br />
Structure<br />
[Wires/mm]<br />
AWG20 2 21/0.18<br />
(Note 6)<br />
AWG20<br />
2 110/0.08<br />
Conductor<br />
resistance<br />
[ /km]<br />
34.6<br />
or less<br />
39.0<br />
or less<br />
Insulation<br />
coating<br />
OD d [mm]<br />
(Note 1)<br />
(Note 2)<br />
Finishing<br />
OD [mm]<br />
1.35 4.7 0.1<br />
1.37 4.5 0.3<br />
Wire model<br />
HRZFEV-A(CL3) AWG20<br />
2 cores<br />
(Note 4)<br />
RMFES-A(CL3X) AWG20<br />
2 cores<br />
<strong>MR</strong>-BKS2CBL03M-A1-L 0.3<br />
<strong>MR</strong>-BKS2CBL03M-A2-L 0.3<br />
AWG20 2 19/0.203<br />
32.0<br />
or less<br />
1.42<br />
(Note 3, 7)<br />
J11B331 UL 10125<br />
Note 1. d is as shown below.<br />
d<br />
Conductor<br />
Insulation sheath<br />
2. Standard OD. Max. OD is about 10% greater.<br />
3. Purchase from Toa Electric Industry<br />
4. Purchase from Taisei<br />
5. Taiyo Electric Wire and Cable<br />
6. These wire sizes assume that the UL-compliant wires are used at the wiring length of 10m.<br />
7. This model is for a single wire. The color must be specified separately.<br />
11.6 No-fuse breakers, fuses, magnetic contactors<br />
Always use one no-fuse breaker and one magnetic contactor with one servo amplifier. When using a fuse<br />
instead of the no-fuse breaker, use the one having the specifications given in this section.<br />
No-fuse breaker<br />
Current [A]<br />
(Note 2)<br />
Servo amplifier Not using power<br />
Voltage (Note 1)<br />
Voltage Magnetic<br />
Using power factor<br />
Current [A]<br />
factor improving<br />
AC [V] Class<br />
AC [V] contactor<br />
improving reactor<br />
reactor<br />
<strong>MR</strong>-<strong>JN</strong>-10A 30A frame 5A 30A frame 5A 10A<br />
<strong>MR</strong>-<strong>JN</strong>-20A/10A1 30A frame 10A 30A frame 10A 240V T 15A 300V S-N10<br />
<strong>MR</strong>-<strong>JN</strong>-40A/20A1 30A frame 15A 30A frame 10A 20A<br />
Note 1. When not using the servo amplifier as a UL/CSA Standard compliant product, K5 class fuse can be used.<br />
2. Be sure to use a magnetic contactor (MC) with an operation delay time of 80ms or less. The operation delay time is the time<br />
interval between current being applied to the coil until closure of contacts.<br />
Fuse<br />
11 - 32
11. OPTIONS AND AUXILIARY EQUIPMENT<br />
11.7 Power factor improving AC reactor FR-HAL<br />
The power factor improving AC reactor FR-HAL increases the form factor of the servo amplifier's input current<br />
to improve the power factor. It can reduce the power capacity. The input power factor is improved to be about<br />
88%.<br />
It is also effective to reduce the input side harmonics.<br />
When using the power factor improving AC reactors FR-HAL for two or more servo amplifiers, be sure to<br />
connect a power factor improving AC reactor FR-HAL to each servo amplifier. If using one power factor<br />
improving AC reactor FR-HAL for multiple servo amplifiers, enough improvement effect of phase factor cannot<br />
be obtained unless all servo amplifiers are operated.<br />
W1<br />
D2 0<br />
Terminal layout<br />
R X S Y TZ<br />
Mounting hole for 4-d (front right side,<br />
varnish removal) (Note1)<br />
MAX D<br />
1-phase<br />
200 to 230VAC<br />
or<br />
1-phase<br />
100 to 120VAC<br />
NFB<br />
MC<br />
Servo amplifier<br />
<strong>MR</strong>-<strong>JN</strong>- A(1)<br />
FR-HAL<br />
R X<br />
S Y<br />
T Z<br />
L1<br />
L2<br />
H 5<br />
MAX W (Note3) D1 2<br />
Servo amplifier<br />
Power factor improving<br />
AC reactor (FR-HAL) W W1 H<br />
Dimensions [mm]<br />
D<br />
(Note 2)<br />
D1 D2 d<br />
Terminal<br />
screw size<br />
Crimping<br />
terminal<br />
Mass<br />
[kg (lb)]<br />
<strong>MR</strong>-<strong>JN</strong>-10A/20A/10A1 FR-HAL-0.75K 104 84 99 74 56 44 M5 M4 2-4 0.8 (1.76)<br />
<strong>MR</strong>-<strong>JN</strong>-40A/20A1 FR-HAL-1.5K 104 84 99 77 61 50 M5 M4 2-4 1.1 (2.43)<br />
Note 1. Use any of the mounting holes for grounding.<br />
2. Maximum dimension (The dimension varies depending on the bending degree of the I/O line.)<br />
3. W 2<br />
11.8 Relays (recommended)<br />
The following relays should be used with the interfaces.<br />
Interface<br />
Digital input signal (interface DI-1)<br />
Relay used for open/close signals<br />
Digital output signal (interface DO-1)<br />
Relay used for signals<br />
Selection example<br />
To prevent defective contacts use a relay for small signal<br />
(twin contacts).<br />
(Ex.) Omron : type G2A , MY<br />
Small relay with 12VDC or 24VDC of rated current 40mA or<br />
less<br />
(Ex.) Omron : type MY<br />
11 - 33
11. OPTIONS AND AUXILIARY EQUIPMENT<br />
11.9 Noise reduction techniques<br />
Noises are classified into external noises which enter the servo amplifier to cause it to malfunction and those<br />
radiated by the servo amplifier to cause peripheral devices to malfunction. Since the servo amplifier is an<br />
electronic device which handles small signals, the following general noise reduction techniques are required.<br />
Also, the servo amplifier can be a source of noise as its outputs are chopped by high carrier frequencies. If<br />
peripheral devices malfunction due to noises produced by the servo amplifier, noise suppression measures<br />
must be taken. The measures will vary slightly with the routes of noise transmission.<br />
(1) Noise reduction techniques<br />
(a) General reduction techniques<br />
Avoid laying power lines (input and output cables) and signal cables side by side or do not bundle<br />
them together. Separate power lines from signal cables.<br />
Use shielded, twisted pair cables for connection with the encoder and for control signal transmission,<br />
and connect the shield to the SD terminal.<br />
Ground the servo amplifier, servo motor, etc. together at one point (refer to section 3.12).<br />
(b) Reduction techniques for external noises that cause the servo amplifier to malfunction<br />
If there are noise sources (such as a magnetic contactor, an electromagnetic brake, and many relays<br />
which make a large amount of noise) near the servo amplifier and the servo amplifier may malfunction,<br />
the following countermeasures are required.<br />
Provide surge absorbers on the noise sources to suppress noises.<br />
Attach data line filters to the signal cables.<br />
Ground the shields of the encoder connecting cable and the control signal cables with cable clamp<br />
fittings.<br />
Although a surge absorber is built into the servo amplifier, to protect the servo amplifier and other<br />
equipment against large exogenous noise and lightning surge, attaching a varistor to the power input<br />
section of the equipment is recommended.<br />
(c) Techniques for noises radiated by the servo amplifier that cause peripheral devices to malfunction<br />
Noises produced by the servo amplifier are classified into those radiated from the cables connected to<br />
the servo amplifier and its main circuits (input and output circuits), those induced electromagnetically or<br />
statically by the signal cables of the peripheral devices located near the main circuit cables, and those<br />
transmitted through the power supply cables.<br />
Noises produced<br />
by servo amplifier<br />
Noises transmitted<br />
in the air<br />
Noise radiated directly from servo amplifier<br />
Route 1)<br />
Noise radiated from the power supply cable<br />
Route 2)<br />
Magnetic induction<br />
noise<br />
Noise radiated from servo motor cable<br />
Route 4) and 5)<br />
Route 3)<br />
Static induction<br />
noise<br />
Route 6)<br />
Noises transmitted<br />
through electric<br />
channels<br />
Noise transmitted through power supply cable<br />
Noise sneaking from grounding cable due<br />
to leakage current<br />
Route 7)<br />
Route 8)<br />
11 - 34
11. OPTIONS AND AUXILIARY EQUIPMENT<br />
5)<br />
7)<br />
7)<br />
7)<br />
Instrument<br />
Receiver<br />
3)<br />
2)<br />
1)<br />
Servo<br />
amplifier<br />
6)<br />
2)<br />
Sensor<br />
power supply<br />
Sensor<br />
8)<br />
4)<br />
3)<br />
Servo motor<br />
M<br />
Noise transmission<br />
route<br />
1) 2) 3)<br />
4) 5) 6)<br />
7)<br />
8)<br />
Suppression techniques<br />
When measuring instruments, receivers, sensors, etc. which handle weak signals and may<br />
malfunction due to noise and/or their signal cables are contained in a control box together with the<br />
servo amplifier or run near the servo amplifier, such devices may malfunction due to noises<br />
transmitted through the air. The following techniques are required.<br />
1. Provide maximum clearance between easily affected devices and the servo amplifier.<br />
2. Provide maximum clearance between easily affected signal cables and the I/O cables of the servo<br />
amplifier.<br />
3. Avoid laying the power lines (Input cables of the servo amplifier) and signal cables side by side or<br />
bundling them together.<br />
4. Insert a line noise filter to the I/O cables or a radio noise filter on the input line.<br />
5. Use shielded wires for signal and power cables or put cables in separate metal conduits.<br />
When the power lines and the signal cables are laid side by side or bundled together, magnetic<br />
induction noise and static induction noise will be transmitted through the signal cables and malfunction<br />
may occur. The following techniques are required.<br />
1. Provide maximum clearance between easily affected devices and the servo amplifier.<br />
2. Provide maximum clearance between easily affected signal cables and the I/O cables of the servo<br />
amplifier.<br />
3. Avoid laying the power lines (I/O cables of the servo amplifier) and signal cables side by side or<br />
bundling them together.<br />
4. Use shielded wires for signal and power cables or put the cables in separate metal conduits.<br />
When the power supply of peripheral devices is connected to the power supply of the servo amplifier<br />
system, noises produced by the servo amplifier may be transmitted back through the power supply<br />
cable and the devices may malfunction. The following techniques are required.<br />
1. Insert the radio noise filter (FR-BIF) on the power cables (Input cables) of the servo amplifier.<br />
2. Insert the line noise filter (FR-BSF01) on the power cables of the servo amplifier.<br />
When the cables of peripheral devices are connected to the servo amplifier to make a closed loop<br />
circuit, leakage current may flow to malfunction the peripheral devices. If so, malfunction may be<br />
prevented by disconnecting the grounding cable of the peripheral device.<br />
11 - 35
11. OPTIONS AND AUXILIARY EQUIPMENT<br />
(2) Noise reduction products<br />
(a) Data line filter (Recommended)<br />
Noise can be prevented by installing a data line filter onto the encoder cable, etc.<br />
For example, the ZCAT3035-1330 of TDK and the ESD-SR-250 of NEC TOKIN make are available as<br />
data line filters.<br />
As a reference example, the impedance specifications of the ZCAT3035-1330 (TDK) are indicated<br />
below.<br />
These impedances are reference values and not guaranteed values.<br />
Impedance [ ]<br />
10 to 100MHz 100 to 500MHz<br />
80 150<br />
39 1<br />
34 1<br />
Loop for fixing the<br />
cable band<br />
[Unit: mm]<br />
13 1<br />
TDK<br />
30 1<br />
Product name<br />
Lot number<br />
Outline drawing (ZCAT3035-1330)<br />
(b) Surge suppressor (Recommended)<br />
The recommended surge suppressor for installation to an AC relay, AC valve or the like near the servo<br />
amplifier is shown below. Use this product or equivalent.<br />
ON<br />
OFF<br />
MC<br />
MC<br />
Surge suppressor<br />
SK<br />
Relay<br />
Surge suppressor<br />
This distance should be short<br />
(within 20cm).<br />
(Ex.)972A-2003 50411<br />
(Matsuo Electric Co.,Ltd.)<br />
Rated voltage AC[V] C[ F] R[ ] Test voltage AC[V] Outline drawing [Unit: mm]<br />
Across<br />
Vinyl sheath<br />
200 0.5 50(1W)<br />
T-C 1000 (1 to 5s) Blue vinyl cord Red vinyl cord<br />
6<br />
18 1.5<br />
10 3<br />
10 or less 10 or less<br />
15 1<br />
48 1.5<br />
200<br />
or more<br />
200<br />
or more<br />
10 3<br />
4<br />
31.5 1<br />
Note that a diode should be installed to a DC relay, DC valve or the like.<br />
Maximum voltage: Not less than 4 times the drive voltage<br />
of the relay or the like<br />
Maximum current: Not less than twice the drive current of<br />
the relay or the like<br />
Diode<br />
11 - 36
11. OPTIONS AND AUXILIARY EQUIPMENT<br />
(c) Cable clamp fitting (AERSBAN- SET)<br />
Generally, the earth of the shielded cable may only be connected to the connector's SD terminal.<br />
However, the effect can be increased by directly connecting the cable to an earth plate as shown below.<br />
Install the earth plate near the servo amplifier for the encoder cable. Peel part of the cable sheath to<br />
expose the external conductor, and press that part against the earth plate with the cable clamp. If the<br />
cable is thin, clamp several cables in a bunch.<br />
The clamp comes as a set with the earth plate.<br />
Cable clamp<br />
(A, B)<br />
Cable<br />
Earth plate<br />
Strip the cable sheath of<br />
the clamped area.<br />
cutter<br />
40<br />
cable<br />
External conductor<br />
Clamp section diagram<br />
Outline drawing<br />
Earth plate<br />
2- 5 hole 17.5<br />
installation hole<br />
[Unit: mm]<br />
Cable clamp<br />
30<br />
7 B 0.3<br />
(Note)M4 screw<br />
11 3 6<br />
24 0 0.2<br />
35 C<br />
A<br />
6 22<br />
35<br />
L or less 10<br />
24 0.3<br />
0<br />
Note. Screw hole for grounding. Connect it to the earth plate of the control box.<br />
Type A B C Accessory fittings Cable clamp L<br />
AERSBAN-DSET 100 86 30 Cable clamp A: 2pcs. A 70<br />
AERSBAN-ESET 70 56 Cable clamp B: 1pc. B 45<br />
11 - 37
11. OPTIONS AND AUXILIARY EQUIPMENT<br />
(d) Line noise filter (FR-BSF01)<br />
This filter is effective in suppressing noises radiated from the power supply side and output side of the<br />
servo amplifier and also in suppressing high-frequency leakage current (zero-phase current) especially<br />
within 0.5MHz to 5MHz band.<br />
Connection diagram<br />
Use the line noise filters for wires of the main power supply (L1 L2)<br />
and of the motor power supply (U V W). Pass each of wires<br />
through the line noise filter an equal number of times in the same<br />
direction. For the main power supply, the effect of the filter rises<br />
as the number of passes increases, but generally four passes<br />
would be appropriate. For the motor power supply, passes must<br />
be four times or less. Do not pass the grounding (earth) wire<br />
through the filter, or the effect of the filter will drop.<br />
Wind the wires by passing through the filter to satisfy the required<br />
number of passes as shown in Example 1. If the wires are too<br />
thick to wind, use two or more filters to have the required number<br />
of passes as shown in Example 2.<br />
Place the line noise filters as close to the servo amplifier as<br />
possible for their best performance.<br />
Outline drawing [Unit: mm]<br />
FR-BSF01 (for wire size 3.5mm 2 (AW<strong>G1</strong>2) or less)<br />
Approx.110<br />
95 0.5<br />
2- 5<br />
(22.5)<br />
Approx.65<br />
33<br />
4.5 11.25 0.5<br />
Approx.65<br />
Example 1<br />
NFB<br />
Power<br />
supply<br />
MC<br />
Line noise<br />
filter<br />
Servo amplifier<br />
L1<br />
L2<br />
Example 2<br />
NFB MC<br />
Power<br />
supply<br />
Line noise<br />
filter<br />
(Number of turns: 4)<br />
Servo amplifier<br />
L1<br />
L2<br />
Two filters are used<br />
(Total number of turns: 4)<br />
11 - 38
11. OPTIONS AND AUXILIARY EQUIPMENT<br />
(e) Radio noise filter (FR-BIF)<br />
This filter is effective in suppressing noises radiated from the power supply side of the servo amplifier<br />
especially in 10MHz and lower radio frequency bands. The FR-BIF is designed for the input only.<br />
Connection diagram<br />
Make the connection wires as short as possible.<br />
Grounding is always required.<br />
Make sure to insulate the wires that are not used for wiring.<br />
Power<br />
supply<br />
NFB<br />
MC<br />
Terminal<br />
block<br />
Servo<br />
amplifier<br />
L1<br />
L2<br />
Approx.300<br />
Outline drawing (Unit: mm)<br />
RedWhiteBlue Green<br />
29<br />
42<br />
Leakage current: 4mA<br />
5 hole<br />
4<br />
Radio noise<br />
filter<br />
58<br />
29<br />
44<br />
7<br />
(f) Varistors for input power supply (Recommended)<br />
Varistors are effective to prevent exogenous noise and lightning surge from entering the servo amplifier.<br />
When using a varistor, connect it between each phase of the input power supply of the equipment. For<br />
varistors, the TND20V-431K and TND20V-471K, manufactured by NIPPON CHEMI-CON, are<br />
recommended. For detailed specification and usage of the varistors, refer to the manufacturer catalog.<br />
Power<br />
supply<br />
voltage<br />
100V<br />
class<br />
200V<br />
class<br />
Maximum rating<br />
Static<br />
Varistor voltage rating<br />
Rated Maximum capacity<br />
Permissible circuit Surge current Energy<br />
(range)<br />
Varistor<br />
pulse limit voltage (reference<br />
voltage immunity immunity<br />
V1mA<br />
power<br />
value)<br />
AC[Vrms] DC[V] 8/20 s[A] 2ms[J] [W] [A] [V] [pF] [V]<br />
TND20V-431K 275 350 195 710 1300 430(387 to 473)<br />
10000/1 time<br />
1.0 100<br />
TND20V-471K 300 385 7000/2 time 215<br />
775 1200 470(423 to 517)<br />
D<br />
T<br />
H<br />
[Unit: mm]<br />
D H T E (Note)L d W<br />
Model<br />
Max. Max. Max. 1.0 min. 0.05 1.0<br />
TND20V-431K 6.4 3.3<br />
21.5 24.5<br />
20 0.8 10.0<br />
TND20V-471K<br />
6.6 3.5<br />
Note. For special purpose items for lead length (L), contact the manufacturer.<br />
W<br />
d<br />
E<br />
L<br />
11 - 39
11. OPTIONS AND AUXILIARY EQUIPMENT<br />
11.10 Leakage current breaker<br />
(1) Selection method<br />
High-frequency chopper currents controlled by pulse width modulation flow in the AC servo circuits.<br />
Leakage currents containing harmonic contents are larger than those of the motor which is run with a<br />
commercial power supply.<br />
Select a leakage current breaker according to the following formula, and ground the servo amplifier, servo<br />
motor, etc. securely.<br />
Make the input and output cables as short as possible, and also make the grounding cable as long as<br />
possible (about 30cm) to minimize leakage currents.<br />
Rated sensitivity current 10 {Igl Ign Iga K (Ig2 Igm)} [mA]...................(11.1)<br />
Cable<br />
NV Noise filter<br />
Servo<br />
amplifier<br />
Cable<br />
M<br />
Ig1 Ign Iga Ig2 Igm<br />
Leakage current breaker<br />
Type<br />
Models provided with<br />
harmonic and surge<br />
reduction techniques<br />
General models<br />
Mitsubishi<br />
products<br />
NV-SP<br />
NV-SW<br />
NV-CP<br />
NV-CW<br />
NV-HW<br />
BV-C1<br />
NFB<br />
NV-L<br />
K<br />
1<br />
3<br />
Ig1: Leakage current on the electric channel from the leakage current breaker to the input terminals of the<br />
servo amplifier (Found from Fig. 11.1.)<br />
Ig2: Leakage current on the electric channel from the output terminals of the servo amplifier to the servo<br />
motor (Found from Fig. 11.1.)<br />
Ign: Leakage current when a filter is connected to the input side (4.4mA per one FR-BIF)<br />
Iga: Leakage current of the servo amplifier (Found from Fig. 11.5.)<br />
Igm: Leakage current of the servo motor (Found from Fig. 11.4.)<br />
120<br />
100<br />
80<br />
60<br />
40<br />
[mA] 20<br />
0<br />
Leakage current<br />
2 5.5 14 38100<br />
3.5 8 22 60 150<br />
30 80<br />
Cable size[mm 2 ]<br />
Fig. 11.1 Leakage current example (Ig1, Ig2) for CV cable run in metal conduit<br />
11 - 40
11. OPTIONS AND AUXILIARY EQUIPMENT<br />
Table 11.4 Servo motor’s leakage current example (Igm)<br />
Servo motor power [kW]<br />
Leakage current [mA]<br />
0.05 to 0.4 0.1<br />
Table 11.5 Servo amplifier's leakage current example (Iga)<br />
Servo amplifier capacity [kW] Leakage current [mA]<br />
0.1 to 0.4 0.1<br />
Table 11.6 Leakage circuit breaker selection example<br />
Servo amplifier<br />
Rated sensitivity current of<br />
leakage circuit breaker [mA]<br />
<strong>MR</strong>-<strong>JN</strong>-10A(1)/20A(1)/40A 15<br />
(2) Selection example<br />
Indicated below is an example of selecting a leakage current breaker under the following conditions.<br />
2mm 2 5m<br />
2mm 2 5m<br />
NV<br />
Servo amplifier<br />
<strong>MR</strong>-<strong>JN</strong>-40A<br />
M<br />
Servo motor<br />
<strong>HF</strong>-<strong>KN</strong>43<br />
Ig1 Iga Ig2 Igm<br />
Use a leakage current breaker generally available.<br />
Find the terms of Equation (11.1) from the diagram.<br />
Ig1 20<br />
Ig2 20<br />
5<br />
1000<br />
5<br />
1000<br />
0.1 [mA]<br />
0.1 [mA]<br />
Ign<br />
Iga<br />
Igm<br />
0 (not used)<br />
0.1 [mA]<br />
0.1 [mA]<br />
Insert these values in Equation (11.1).<br />
Ig 10 {0.1 0 0.1 1 (0.1 0.1)}<br />
4.0 [mA]<br />
According to the result of calculation, use a leakage current breaker having the rated sensitivity current (Ig)<br />
of 4.0[mA] or more. A leakage current breaker having Ig of 15[mA] is used with the NV-SP/SW/CP/CW/HW<br />
series.<br />
11 - 41
11. OPTIONS AND AUXILIARY EQUIPMENT<br />
11.11 Circuit protector<br />
Use the circuit protector for the control circuit power supply (+24V, 0V).<br />
Servo amplifier<br />
<strong>MR</strong>-<strong>JN</strong>-10A(1)<br />
<strong>MR</strong>-<strong>JN</strong>-20A(1)<br />
<strong>MR</strong>-<strong>JN</strong>-40A<br />
Circuit protector<br />
CP30-BA2P1M3A<br />
11.12 EMC filter (recommended)<br />
For compliance with the EMC directive of the EN Standard, it is recommended to use the following filter. Some<br />
EMC filters are large in leakage current.<br />
(1) Combination with the servo amplifier<br />
<strong>MR</strong>-<strong>JN</strong>-10A(1)<br />
Servo amplifier<br />
Recommended filter (Soshin Electric)<br />
Model<br />
Leakage current [mA]<br />
Mass [kg]([lb])<br />
<strong>MR</strong>-<strong>JN</strong>-20A(1) (Note) <strong>HF</strong>3010A-UN 5 3 (6.61)<br />
<strong>MR</strong>-<strong>JN</strong>-40A<br />
Note. A surge protector is separately required to use any of these EMC filters. (Refer to section 11.13.)<br />
(2) Connection example<br />
EMC filter<br />
Servo amplifier<br />
(Note 1)<br />
Main circuit<br />
power supply<br />
NFB<br />
1<br />
2<br />
4<br />
5<br />
MC<br />
L1<br />
L2<br />
3<br />
6<br />
E<br />
1 2 3<br />
1 (Note 2)<br />
Surge protector 1<br />
2<br />
(RAV-781BYZ-2)<br />
3 (OKAYA Electric<br />
Industries Co., Ltd.)<br />
(Note 2)<br />
Surge protector 2<br />
(RAV-781BXZ-4)<br />
(OKAYA Electric<br />
Industries Co., Ltd.)<br />
Note 1. Refer to section 1.3 for the power supply specification.<br />
2. The example is when a surge protector is connected.<br />
11 - 42
11. OPTIONS AND AUXILIARY EQUIPMENT<br />
(3) Outline drawing<br />
<strong>HF</strong>3010A-UN<br />
[Unit: mm]<br />
3-M4<br />
4-5.5 7<br />
3-M4<br />
M4<br />
32 2<br />
85 2<br />
110 4<br />
IN<br />
258 4<br />
273 2<br />
65 4<br />
Approx.41<br />
288 4<br />
300 5<br />
11.13 Surge protector (recommended)<br />
To avoid damages caused by surges (such as lightning and sparking) applied on AC power line, connecting<br />
the following surge protectors to the main circuit power (L1 L2) is recommended.<br />
(1) Specifications<br />
Maximum<br />
Surge protector Circuit voltage<br />
Surge immunity Surge compression Static Operating<br />
permissible circuit Clamp voltage<br />
model 50/60Hz<br />
8/20μs<br />
1.2/50μs capacity temperature<br />
voltage<br />
RAV-781BYZ-2 3AC 250V 300V 783V±10% 2500A 20kV 75pF 20 to 70<br />
RAV-781BXZ-4 3AC 250V 300V 1700V±10% 2500A 2kV 75pF 20 to 70<br />
11 - 43
11. OPTIONS AND AUXILIARY EQUIPMENT<br />
(2) Outline drawing<br />
RAV-781BYZ-2<br />
[Unit: mm]<br />
4.2 0.2<br />
5.5 1<br />
11 1<br />
1) 2) 3)<br />
Black Black Black<br />
200<br />
28.5 1.0<br />
30<br />
0<br />
UL-1015AW<strong>G1</strong>6<br />
1 2 3<br />
28 1.0<br />
4.5 0.5<br />
41 1.0<br />
RAV-781BXZ-4<br />
[Unit: mm]<br />
4.2 0.2<br />
5.5 1<br />
11 1<br />
1) 2) 3) 4)<br />
200 30<br />
28.5 1.0<br />
0<br />
UL-1015AW<strong>G1</strong>6<br />
1 2 3<br />
28 1.0<br />
4.5 0.5<br />
41 1.0<br />
11 - 44
11. OPTIONS AND AUXILIARY EQUIPMENT<br />
11.14 <strong>MR</strong>-HDP01 manual pulse generator<br />
POINT<br />
For the positioning mode, PP and NP are not assigned in the initial status.<br />
Assign PP or NP in parameter No. PD02. (Refer to section 4.4.2.)<br />
In the positioning mode, <strong>MR</strong>-HDP01 manual pulse generator can be used to operate the servo motor. The<br />
manual pulse generator input multiplication can be set in parameter No. PE02.<br />
(1) Specifications<br />
Item<br />
Specifications<br />
Voltage 4.5VDC to 13.2VDC<br />
Power Current<br />
consumption<br />
60mA or lower<br />
Interface<br />
Output current max. 20mA for open collector output<br />
Pulse signal form A-phase, B-phase, 2 signals of 90 phase difference<br />
Pulse resolution 100 pulse/rev<br />
Max. speed 600r/min moment, 200r/min normally<br />
Operating temperature range -10 to 60 (14 to 140 )<br />
Storage temperature range -30 to 80 (-22 to 176 )<br />
(2) Connection example<br />
Servo amplifier<br />
CN1<br />
24VDC<br />
OPC<br />
DICOM<br />
2<br />
1<br />
<strong>Manual</strong> pulse generator<br />
<strong>MR</strong>-HDP01<br />
5 to<br />
12V<br />
A<br />
0V<br />
5VDC power supply<br />
DOCOM<br />
PP<br />
13<br />
23<br />
B<br />
NP<br />
25<br />
SD<br />
Plate<br />
11 - 45
11. OPTIONS AND AUXILIARY EQUIPMENT<br />
MEMO<br />
11 - 46
12. SERVO MOTOR<br />
12. SERVO MOTOR<br />
12.1 Introduction<br />
12.1.1 Rating plate<br />
Model<br />
Input power supply<br />
Rated output<br />
Rated speed, IP rating,<br />
Insulation class, Mass<br />
Serial number<br />
12.1.2. Parts identification<br />
Refer to section 11.1 for details of the cables and connectors.<br />
Power cable (Note 1,2)<br />
Power lead (U, V, W)<br />
Earth lead<br />
Encoder cable (Note 1)<br />
Encoder<br />
Servo motor shaft<br />
Note 1. The encoder cable and the power supply cable are options.<br />
2. An electromagnetic brake cable is separately required for the servo motor with an<br />
electromagnetic brake.<br />
12 - 1
12. SERVO MOTOR<br />
12.1.3 Electromagnetic brake<br />
The electromagnetic brake is provided for preventing a drop at power failure or at<br />
servo alarm occurrence during vertical drive, or for holding a shaft at stop. Do not<br />
use it for normal braking (including braking at servo lock).<br />
CAUTION<br />
The brake has a time lag. Use the brake so that servo motor control is started after<br />
the brake has completely opened.<br />
Configure the electromagnetic brake operation circuit which interlocks with an<br />
external emergency stop switch.<br />
Refer to section 3.11 for details of the circuit configuration and the timing chart.<br />
The servo motor with an electromagnetic brake can be used to prevent a drop in vertical lift applications or to<br />
ensure double safety at an emergency stop, for example. When performing servo motor operation, supply<br />
power to the electromagnetic brake to release the brake. Switching power off makes the brake effective.<br />
(1) Electromagnetic brake power supply<br />
Prepare the following power supply exclusively used for the electromagnetic brake. The electromagnetic<br />
brake terminals (B1, B2) do not have polarity.<br />
24VDC power<br />
supply for<br />
electromagnetic<br />
brake<br />
Switch<br />
VAR<br />
U<br />
B1<br />
B2<br />
B<br />
Electromagnetic brake<br />
or<br />
24VDC power<br />
supply for<br />
electromagnetic<br />
brake<br />
Switch<br />
VAR<br />
U<br />
B1<br />
B2<br />
B<br />
Electromagnetic brake<br />
A surge absorber (VAR) must be installed between B1 and B2. Refer to (3) in this section for the selection<br />
method of surge absorber, and to "Electromagnetic brake characteristics" in section of each servo motor<br />
series for selecting surge absorbers.<br />
(2) Noise generation<br />
Though the brake lining may rattle during operation in the low-speed area, it poses no functional problem.<br />
If braking noise occurs, it may be improved by setting the machine resonance suppression filter or adaptive<br />
vibration suppression control in the servo amplifier parameters. Refer to section 7.2 for details.<br />
(3) Selection of surge absorbers for electromagnetic brake circuit<br />
(a) Selection condition<br />
Item<br />
Electromagnetic brake<br />
specification<br />
Conditions<br />
R[ ] : Resistance<br />
L[H] : Inductance<br />
Vb[V] : Power supply voltage<br />
Relay<br />
24VDC<br />
U<br />
Varistor<br />
Brake coil<br />
Desired suppressed<br />
voltage<br />
Vs[V] or less<br />
Durable surge<br />
application time<br />
N times<br />
12 - 2
12. SERVO MOTOR<br />
(b) Tentative selection and verification of surge absorber<br />
1) Maximum permissible circuit voltage of varistor<br />
Tentatively select a varistor whose maximum allowable voltage is larger than Vb [V].<br />
2) Brake current (Ib)<br />
Ib = Vb<br />
R [A]<br />
3) Energy (E) generated in the brake coil<br />
E = L<br />
Ib2<br />
2<br />
[J]<br />
4) Varistor limit voltage (Vi)<br />
From the energy (E) generated in the brake coil and the varistor characteristic diagram, calculate the<br />
varistor limit voltage (Vi) when the brake current (Ib) flows into the tentatively selected varistor during<br />
opening of the circuit.<br />
Vi is favorable when the varistor limit voltage (Vi)[V] is smaller than the desired suppressed voltage<br />
(Vs)[V].<br />
If Vi is not smaller than Vs, reselect a varistor or improve the withstand voltage of devices.<br />
5) Surge current width ( )<br />
Given that the varistor absorbs all energies, the surge current width ( ) is as follows.<br />
=<br />
E<br />
Vi Ib [s]<br />
6) Inspection of surge life of varistor<br />
From the varistor characteristic diagram, calculate the guaranteed current value (Ip) in which the<br />
number of the surge application life is N at the surge current width ( ). Calculate the ratio (Ip/Ib) of the<br />
guaranteed current value (Ip) to the brake current (Ib).<br />
If an enough margin is ensured for Ip/Ib, the number of the surge application life N [Time] can be<br />
considered as favorable.<br />
(4) Others<br />
A leakage magnetic flux occurs at the shaft end of the servo motor with an electromagnetic brake. Note that<br />
chips, screws and other magnetic substances are attracted.<br />
12 - 3
12. SERVO MOTOR<br />
12.1.4 Servo motor shaft shapes<br />
In addition to the straight shaft, keyway shaft and D cut shaft are available as the servo motor shafts.<br />
The keyway shaft and the D cut shaft cannot be used in frequent start/stop applications. Since we cannot<br />
warrant the servo motor against fracture and similar accidents attributable to a loose key, use a friction<br />
coupling, etc. when coupling the shaft with a machine.<br />
The shaft shape of the standard servo motor varies depending on the capacity. Refer to sections 12.5.4 and<br />
12.6.4.<br />
The keyway shaft (with single pointed key) is available only with the <strong>HF</strong>-<strong>KP</strong> <strong>G7</strong> servo motor.<br />
Shaft<br />
section<br />
view<br />
Shaft<br />
section<br />
view<br />
Keyway shaft (with key)<br />
Keyway shaft (without key)<br />
Shaft<br />
section<br />
view<br />
D cut shaft<br />
Straight shaft<br />
Shaft<br />
section<br />
view<br />
Keyway shaft (with single pointed key)<br />
12 - 4
12. SERVO MOTOR<br />
12.2 Installation<br />
WARNING<br />
Be sure to ground the servo motor to prevent an electric shock.<br />
CAUTION<br />
Do not stack the product packages exceeding the maximum number specified on<br />
the package.<br />
Install the equipment to incombustibles. Installing it directly or close to<br />
combustibles may cause a fire.<br />
Install the equipment on a weight-bearing place in accordance with this <strong>Instruction</strong><br />
<strong>Manual</strong>.<br />
Do not get on or place heavy objects on the equipment as it may cause injury.<br />
Use the equipment within the specified environmental condition range. Refer to<br />
sections 12.5.2 (1) and 12.6.2 (1).<br />
Do not drop or shock the servo motor as it is precision equipment.<br />
Do not install or operate a servo motor which is damaged or has any part missing.<br />
Do not hold the cable, the shaft or the encoder when carrying the servo motor as it<br />
may cause malfunction or injury.<br />
Install the servo motor with a reduction gear in the specified direction. Improper<br />
installation causes oil leakage, leading to a fire and malfunction.<br />
Couple the servo motor to a machine securely. Insecure coupling may cause the<br />
servo motor to come off, resulting in injury.<br />
Be sure to measure the motor vibration level with the servo motor mounted to the<br />
machine when checking the vibration level. A great vibration may cause the early<br />
damage of a bearing, encoder, brake, and reduction gear. The great vibration may<br />
also cause the poor connector connection or bolt looseness.<br />
For the gain adjustment at the equipment startup, check the torque waveform and<br />
the speed waveform by using a measurement device, and then check that no<br />
vibration occurs. If the vibration occurs due to high gain, the vibration may cause<br />
the early damage of the servo motor.<br />
Never hit the shaft end of the servo motor, especially when coupling the servo<br />
motor to a machine as it may damage the encoder.<br />
When coupling a load to the servo motor, do not use a rigid coupling as it may<br />
break the shaft.<br />
Balance the load to the extent possible. Failure to do so can cause vibration during<br />
servo motor operation or damage the bearings and the encoder.<br />
Take safety measures, e.g. provide covers, to prevent accidental access to the<br />
rotating parts of the servo motor during operation.<br />
Do not apply load exceeding the permissible load as it may break the shaft,<br />
causing injury.<br />
When the equipment has been stored for an extended period of time, consult your<br />
local sales office.<br />
When handling the servo motor, be careful with the edged parts such as the<br />
corners of the servo motor.<br />
12 - 5
12. SERVO MOTOR<br />
12.2.1 Installation direction<br />
(1) Standard servo motor<br />
The following table indicates the installation direction of the standard servo motor.<br />
Servo motor series Installation direction Remarks<br />
<strong>HF</strong>-<strong>KN</strong><br />
Any directions<br />
For installation in the horizontal direction, it is<br />
recommended to set the connector section downward.<br />
When installing the servo motor in horizontal direction, it is recommended to set the connector section<br />
downward. When installing it vertically or obliquely, provide a cable trap for the cable.<br />
Cable<br />
trap<br />
(2) Servo motor with an electromagnetic brake<br />
The servo motor with an electromagnetic brake can also be installed in the same direction as the standard<br />
servo motor. When the servo motor with an electromagnetic brake is installed with the shaft upward, the<br />
brake plate may generate a sliding sound, but it is not a fault.<br />
(3) Servo motor with a reduction gear (<strong>HF</strong>-<strong>KP</strong> <strong>G1</strong>/<strong>G5</strong>/<strong>G7</strong>)<br />
Installation direction of the servo motor with a reduction gear varies depending on the reduction gear type.<br />
Be sure to install it in the specified direction. Refer to section 12.6.4 for details.<br />
12 - 6
12. SERVO MOTOR<br />
12.2.2 Precautions for load remove<br />
POINT<br />
During assembling, never hit the shaft end of the servo motor by a hammer,<br />
etc. It may damage the encoder.<br />
(1) When mounting a pulley to the servo motor shaft with a keyway, use the screw hole on the shaft end. To fit<br />
the pulley, first insert a double-end stud into the screw hole on the shaft, put a washer against the end face<br />
of the coupling, and insert and tighten a nut to force the pulley in.<br />
Servo motor<br />
Double-end stud<br />
Nut<br />
Pulley<br />
Washer<br />
(2) For the shaft without a keyway, use a friction coupling or the like.<br />
(3) When removing the pulley, use a pulley remover to protect the shaft from hard load or impact.<br />
(4) To ensure safety, fit a protective cover or the like on the rotating part, such as the pulley, mounted to the<br />
shaft.<br />
(5) When a threaded shaft end part is needed to mount a pulley on the shaft, please contact your local sales<br />
office.<br />
(6) The direction of the encoder on the servo motor cannot be changed.<br />
(7) For installation of the servo motor, use spring washers, etc. and fully tighten the bolts so that they do not<br />
become loose due to vibration.<br />
12 - 7
12. SERVO MOTOR<br />
12.2.3 Permissible load for the shaft<br />
POINT<br />
Do not use a rigid coupling as it may apply excessive bending load to the<br />
shaft, leading to shaft breakage.<br />
For the permissible shaft load specific to the servo motor, refer to sections 12.5.2 (1), 12.6.4 (1) (c), 12.6.4 (2)<br />
(c).<br />
(1) Use a flexible coupling and make sure that the misalignment of the shaft is less than the permissible radial<br />
load.<br />
(2) When using a pulley, sprocket or timing belt, select a diameter that will fit into the permissible radial load.<br />
(3) Excess of the permissible load can shorten the bearing life and damage the shaft.<br />
(4) The load indicated in this section is static load in a single direction and does not include eccentric load.<br />
Make eccentric load as small as possible. Not doing so may damage the servo motor.<br />
12.2.4 Protection from oil and water<br />
Provide adequate protection to prevent foreign matter such as oil from entering the servo motor shaft. When<br />
installing the servo motor, consider the following in this section.<br />
(1) Do not use the servo motor with its cable soaked in oil or water.<br />
Cover<br />
Servo<br />
motor<br />
Oil/water pool<br />
Capillary phenomenon<br />
(2) When the servo motor is installed with the shaft upward, provide measures to prevent the servo motor<br />
being exposed to oil or water from a machine side, gear box, etc.<br />
Gear<br />
Lubricating oil<br />
Servo motor<br />
12 - 8
12. SERVO MOTOR<br />
(3) If the servo motor is exposed to oil such as coolant, the sealant, packing, cable and others may be affected<br />
depending on the oil type.<br />
(4) In the environment where the servo motor is exposed to oil mist, oil, water and/or grease, a standard<br />
specification servo motor may not be usable. Contact your local sales office for more details.<br />
12.2.5 Cable<br />
The power supply and encoder cables routed from the servo motor should be fixed to the servo motor to keep<br />
them unmovable. Otherwise, the cables may break. In addition, do not modify the connectors on the cable<br />
ends.<br />
12.2.6 Inspection<br />
WARNING<br />
Before wiring, be sure to turn off the power, wait for 15 minutes or longer, and then<br />
make sure that the charge lamp is off to prevent an electric shock. In addition,<br />
always confirm if the charge lamp is off or not from the front of the servo amplifier.<br />
Due to a risk of an electric shock, only qualified personnel should attempt<br />
inspection. For repair and parts replacement, contact your local sales office.<br />
POINT<br />
Do not disassemble and/or repair the equipment.<br />
It is recommended to make the following checks periodically.<br />
(a) Check the bearings, the brake section, etc. for unusual noise.<br />
(b) Check the cables and the like for scratches and cracks. Especially when the junction cable is movable,<br />
perform periodic inspection according to operating conditions.<br />
(c) Check the servo motor shaft and coupling for misalignment.<br />
(d) Check the power supply connector, brake connector, and encoder connector tightening screws for<br />
looseness.<br />
12 - 9
12. SERVO MOTOR<br />
12.2.7 Life<br />
Service lives of the following parts are listed below. However, the service lives vary depending on operating<br />
methods and environmental conditions. If any fault is found in the parts, they must be replaced immediately<br />
regardless of their service live. For parts replacement, please contact your local sales office.<br />
Part name Life guideline Remarks<br />
Bearing<br />
Encoder<br />
20,000 to 30,000 hours<br />
20,000 to 30,000 hours<br />
The Life guideline field gives the reference time.<br />
If any fault is found before this time is reached,<br />
the part must be changed.<br />
When the servo motor is operated at the rated speed under the rated load, replace the bearings in 20,000 to<br />
30,000 hours as a guideline. However, this service life varies depending on the operating conditions. The<br />
bearings must be replaced if unusual noise or vibration is found during inspection.<br />
12.2.8 Machine accuracies<br />
The following table indicates the machine accuracies of the servo motor around the output shaft and mounting<br />
(except the special purpose products).<br />
Accuracy [mm]<br />
Runout of flange surface about output<br />
shaft<br />
Runout of fitting outer diameter of flange<br />
surface<br />
Measuring position<br />
Flange size<br />
Less than 100<br />
a) 0.05<br />
b) 0.04<br />
Runout of output shaft end c) 0.02<br />
Reference diagram<br />
b) c)<br />
a)<br />
12 - 10
12. SERVO MOTOR<br />
12.3 Connectors used for servo motor wiring<br />
POINT<br />
The IP rating indicated for connectors indicates the dust and water proofing<br />
levels when the connectors are installed to a servo amplifier or servo motor. If<br />
the IP rating of the connector and the servo amplifier/servo motor differs, the<br />
overall IP rating depends on the lowest of all.<br />
12.3.1 Selection of connectors<br />
Use the connector configuration products given in the table as the connectors for connection with the servo<br />
motor. Refer to section 12.3.2 for the compatible connector configuration products.<br />
<strong>HF</strong>-<strong>KN</strong> series<br />
<strong>HF</strong>-<strong>KP</strong> <strong>G1</strong>/<strong>G5</strong>/<strong>G7</strong><br />
Encoder connector Brake connector Power supply connector<br />
<strong>HF</strong>-<strong>KN</strong>(B)<br />
Servo motor<br />
<strong>HF</strong>-<strong>KP</strong>(B)<strong>G1</strong>/<strong>G5</strong>/<strong>G7</strong><br />
Wiring connector<br />
For encoder For power supply For brake<br />
Connector<br />
Connector<br />
Connector<br />
configuration A configuration B configuration C<br />
12 - 11
12. SERVO MOTOR<br />
12.3.2 Wiring connectors (Connector configurations A B C)<br />
These connectors comply with the EN and UL/CSA standards.<br />
Connector<br />
Configuration product<br />
configuration Connector (IP rating: IP65) Crimping tool<br />
A<br />
For Ground clip: 1596970-1<br />
Connector: 1674320-1<br />
For REC. contact: 1596847<br />
(Tyco Electronics)<br />
(Tyco Electronics)<br />
Servo motor encoder<br />
connector<br />
1674339-1<br />
(Tyco Electronics)<br />
Connector<br />
Configuration product<br />
configuration Connector (IP rating: IP65) Crimping tool<br />
Connector: <strong>JN</strong>4FT04SJ1-R<br />
B<br />
Hood, socket insulator, bushing,<br />
CT160-3-TMH5B<br />
ground nut<br />
(JAE)<br />
Contact: ST-TMH-S-C1B-100-(A534G)<br />
(JAE)<br />
Servo motor power<br />
supply connector<br />
<strong>JN</strong>4AT04NJ1<br />
(JAE)<br />
Connector<br />
Configuration product<br />
configuration Connector (IP rating: IP65) Crimping tool<br />
Connector: <strong>JN</strong>4FT02SJ1-R<br />
C<br />
Hood, socket insulator, bushing,<br />
CT160-3-TMH5B<br />
ground nut<br />
(JAE)<br />
Contact: ST-TMH-S-C1B-100-(A534G)<br />
(JAE)<br />
Servo motor brake<br />
connector<br />
<strong>JN</strong>4AT02PJ1<br />
(JAE)<br />
12 - 12
12. SERVO MOTOR<br />
12.4 Connector outline drawings<br />
The connector outline drawings for wiring the servo motor are shown below.<br />
(1) Tyco Electronics<br />
1674320-1<br />
[Unit: mm]<br />
23<br />
15<br />
30<br />
10<br />
18<br />
14.2<br />
6.2<br />
6<br />
13<br />
Crimping tool: 1596970-1 (For ground clip)<br />
1596847 (For receptacle contact)<br />
13.6<br />
(2) JAE<br />
<strong>JN</strong>4FT02SJ1-R<br />
[Unit: mm]<br />
26.6<br />
17<br />
12.3<br />
19<br />
14.3<br />
12.5<br />
12.7<br />
R6<br />
R4<br />
11.8<br />
11.6<br />
Note<br />
2.5<br />
Note. The recommended screw tightening torque is 0.2N m.<br />
Crimping tool: CT160-3-TMH5B<br />
12 - 13
12. SERVO MOTOR<br />
<strong>JN</strong>4FT04SJ1-R<br />
[Unit: mm]<br />
4-R2<br />
27<br />
16<br />
11.7<br />
24.5<br />
20.1<br />
18.9<br />
7<br />
12.7<br />
Note<br />
R6<br />
12.7<br />
13.7<br />
R0.5<br />
13.1<br />
2.5<br />
Note. The recommended screw tightening torque is 0.2N m.<br />
Crimping tool: CT160-3-TMH5B<br />
12 - 14
12. SERVO MOTOR<br />
12.5 <strong>HF</strong>-<strong>KN</strong> series servo motor<br />
This section provides information on the servo motor specifications and characteristics. When using the <strong>HF</strong>-<strong>KN</strong><br />
series servo motor, always read the Safety <strong>Instruction</strong>s in the beginning of this manual and sections 12.1 to<br />
12.4, in addition to this section.<br />
12.5.1 Model definition<br />
The following describes what each block of a model name indicates. Note that not all the combinations of the<br />
symbols exist.<br />
H F - K N 3 Appearance<br />
Series name<br />
Shaft type<br />
Symbol<br />
None<br />
K<br />
D<br />
Shaft shape<br />
Standard<br />
(Straight shaft)<br />
With keyway<br />
(With key)<br />
D cut shaft<br />
<strong>HF</strong>-<strong>KN</strong><br />
053 to 43<br />
23 43<br />
053 13<br />
Electromagnetic brake<br />
Symbol Electromagnetic brake<br />
None<br />
B<br />
Rated speed<br />
3000 [r/min]<br />
Rated output<br />
Symbol<br />
05 50<br />
None<br />
With<br />
Rated output [W]<br />
1 100<br />
2 200<br />
4 400<br />
12 - 15
12. SERVO MOTOR<br />
12.5.2 Standard specifications<br />
(1) Standard specifications<br />
Servo motor<br />
<strong>HF</strong>-<strong>KN</strong> series (Low inertia, small capacity)<br />
Item 053 13 23 43<br />
Applicable <strong>MR</strong>-<strong>JN</strong>- A 10 20 40<br />
servo amplifier <strong>MR</strong>-<strong>JN</strong>- A1 10 20<br />
Continuous<br />
running duty<br />
(Note 1)<br />
Rated output [kW] 0.05 0.1 0.2 0.4<br />
Rated torque<br />
[N m] 0.16 0.32 0.64 1.3<br />
[oz in] 22.7 45.3 90.6 184<br />
Rated speed (Note 1) [r/min] 3000<br />
Maximum speed [r/min] 4500<br />
Instantaneous permissible speed [r/min] 5175<br />
Maximum torque<br />
Power rate at continuous<br />
rated torque<br />
Inertia moment (Note 3)<br />
Recommended load to motor inertia moment<br />
ratio (Note 2)<br />
[N m] 0.48 0.95 1.9 3.8<br />
[oz in] 68.0 135 269 538<br />
[kW/s] 4.87 11.5 16.9 38.6<br />
J [ 10 -4 kg m 2 ] 0.052 0.088 0.24 0.42<br />
WK 2 [oz in 2 ] 0.284 0.481 1.31 2.30<br />
15 times or less 24 times or less 22 times or less<br />
Power supply capacity Refer to section 10.2.<br />
Rated current [A] 0.9 0.8 1.4 2.7<br />
Maximum current [A] 2.7 2.4 4.2 8.1<br />
Speed/position encoder<br />
Accessory<br />
Insulation class<br />
Incremental 17 bits encoder<br />
(Resolution per servo motor 1 rotation: 131072pulse/rev)<br />
Class B<br />
Structure Totally-enclosed, self-cooled (IP rating: IP65 (Note 4))<br />
Environmental<br />
conditions<br />
(Note 5)<br />
Ambient In operation 0 to +40 (32 to 104 ) (non-freezing)<br />
temperature In storage -15 to +70 (5 to 158 ) (non-freezing)<br />
Ambient In operation<br />
80%RH or less (non-condensing)<br />
humidity In storage 90%RH or less (non-condensing)<br />
Ambience<br />
Altitude<br />
Indoors (no direct sunlight)<br />
Free from corrosive gas, flammable gas, oil mist, dust and dirt<br />
Max. 1000m above sea level<br />
Vibration (Note 6) X, Y : 49m/s 2<br />
Vibration rank (Note 7) V-10<br />
Permissible<br />
load to the<br />
shaft<br />
(Note 8)<br />
Mass (Note 3)<br />
L [mm] 25 30<br />
Radial<br />
Thrust<br />
[N] 88 245<br />
[lb] 19.8 55.1<br />
[N] 59 98<br />
[lb] 13.3 22.0<br />
[kg] 0.4 0.5 1.0 1.4<br />
[lb] 0.88 1.10 2.21 3.09<br />
Note 1. When the power supply voltage drops, the output and the rated speed cannot be guaranteed.<br />
2. If the load to motor inertia moment ratio exceeds the indicated value, please contact your local sales office.<br />
3. Refer to the outline drawings for the servo motors with an electromagnetic brake.<br />
4. Except for the shaft-through portion.<br />
5. In the environment where the servo motor is exposed to oil mist, oil and/or water, a standard specification servo motor may not<br />
be usable. Contact your local sales office.<br />
12 - 16
Torque [N m]<br />
Torque [N m]<br />
12. SERVO MOTOR<br />
6. The vibration direction is as shown in the figure. The value is the one at the part that indicates the maximum value (normally the<br />
opposite-to-load side bracket). When the servo motor stops, fretting is likely to occur at the bearing. Therefore, suppress the<br />
vibration to about half of the permissible value.<br />
Servo motor<br />
X Y<br />
Vibration<br />
Vibration amplitude<br />
(both amplitudes) [ m]<br />
1000<br />
100<br />
10<br />
0 1000 2000 3000 4000 5000 6000 7000<br />
Speed [r/min]<br />
7. V-10 indicates that the amplitude of a single servo motor is 10 m or less. The following figure shows the servo motor installation<br />
position for measurement and the measuring position.<br />
Servo motor<br />
Top<br />
Measuring<br />
position<br />
Bottom<br />
8. For the symbols in the table, refer to the following diagram. Do not subject the shaft to load greater than these values in the<br />
table. These values are applicable when the loads are applied independently.<br />
L<br />
Radial load<br />
Thrust load<br />
L : Distance from flange mounting surface to load center<br />
(2) Torque characteristics<br />
POINT<br />
It is recommended to use the machine which generates unbalanced torque,<br />
e.g. a vertical lift application, so that the unbalanced torque is not more than<br />
70% of the rated torque.<br />
When the input power supply specifications of the servo amplifier are 1-phase 230VAC, the torque<br />
characteristics are indicated by heavy lines. Part of the torque characteristics are indicated by broken lines for<br />
the 1-phase 100VAC power supply and by thin lines for the 1-phase 200VAC power supply.<br />
[<strong>HF</strong>-<strong>KN</strong>053]<br />
[<strong>HF</strong>-<strong>KN</strong>13]<br />
[<strong>HF</strong>-<strong>KN</strong>23]<br />
[<strong>HF</strong>-<strong>KN</strong>43]<br />
0.6<br />
1.2<br />
2.5<br />
4.5<br />
0.5<br />
1<br />
2<br />
4<br />
3.5<br />
Torque [N m]<br />
0.4<br />
0.3<br />
0.2<br />
Short-duration<br />
running region<br />
0.8<br />
0.6<br />
0.4<br />
Short-duration<br />
running region<br />
1.5<br />
1<br />
Short-duration<br />
running region<br />
Torque [N m]<br />
3<br />
2.5<br />
2<br />
1.5<br />
Short-duration<br />
running region<br />
0.1<br />
0<br />
0<br />
Continuous<br />
running region<br />
1000 2000 3000 4000 4500<br />
Speed [r/min]<br />
0.2<br />
Continuous<br />
running region<br />
0<br />
0 1000 2000 3000 4000 4500<br />
Speed [r/min]<br />
0.5<br />
0<br />
0<br />
Continuous<br />
running region<br />
1000 2000 3000 4000 4500<br />
Speed [r/min]<br />
1<br />
0.5<br />
0<br />
0<br />
Continuous<br />
running region<br />
1000 2000 3000 4000 4500<br />
Speed [r/min]<br />
12 - 17
12. SERVO MOTOR<br />
12.5.3 Electromagnetic brake characteristics<br />
CAUTION<br />
The electromagnetic brake is provided for preventing a drop at power failure or at<br />
servo alarm occurrence during vertical drive, or for holding a shaft at stop. Do not<br />
use it for normal braking (including braking at servo lock).<br />
Before performing the operation, be sure to confirm that the electromagnetic brake<br />
operates properly.<br />
The characteristics of the electromagnetic brake provided for the servo motor with an electromagnetic brake<br />
are indicated below.<br />
Servo motor<br />
<strong>HF</strong>-<strong>KN</strong> series<br />
Item 053B 13B 23B 43B<br />
Type (Note 1)<br />
Spring-loaded safety brake<br />
Rated voltage (Note 4) 24VDC 0 -10%<br />
Power consumption [W]at20 6.3 7.9<br />
Coil resistance (Note 6) [ ] 91.0 73.0<br />
Inductance (Note 6) [H] 0.088 0.10<br />
Brake static friction torque<br />
[N m] 0.32 1.3<br />
[oz in] 45.3 184<br />
Release delay time (Note 2) [s] 0.03 0.03<br />
Braking delay time (Note 2) [s] DC off 0.01 0.02<br />
Permissible braking work<br />
Per braking [J] 5.6 22<br />
Per hour [J] 56 220<br />
Brake looseness at servo motor shaft (Note 5) [degrees] 2.5 1.2<br />
Brake life (Note 3)<br />
Selection example of surge<br />
absorbers to be used (Note 7, 8)<br />
Number of<br />
braking cycles<br />
Work per<br />
braking<br />
For the suppressed<br />
voltage 125V<br />
For the suppressed<br />
voltage 350V<br />
[times] 20000 20000<br />
[J] 5.6 22<br />
TND20V-680KB<br />
TND10V-221KB<br />
Note 1. There is no manual release mechanism. Use a 24VDC power supply to release the brake electrically.<br />
2. The value for initial ON gap at 20 (68 ).<br />
3. Brake gap increases as the brake lining wears, but the gap is not adjustable. Therefore, the brake life is indicated as<br />
the number of braking cycles available before the gap adjustment is required.<br />
4. Always prepare the power supply exclusively used for the electromagnetic brake.<br />
5. The above values are typical initial values and not guaranteed values.<br />
6. These values are measured values and not guaranteed values.<br />
7. Select the electromagnetic brake control relay properly, considering the characteristics of the electromagnetic brake<br />
and surge absorber.<br />
8. Manufactured by Nippon Chemi-Con Corporation.<br />
12 - 18
120.5<br />
12. SERVO MOTOR<br />
12.5.4 Servo motors with special shafts<br />
The servo motors with special shafts indicated by the symbols (K and D) in the table are available. K and D are<br />
the symbols attached to the servo motor model names.<br />
Servo motor<br />
Shaft shape<br />
Keyway shaft (with key)<br />
D cut shaft<br />
<strong>HF</strong>-<strong>KN</strong>053 13 D<br />
<strong>HF</strong>-<strong>KN</strong>23 43 K<br />
(1) Keyway shaft (with key)<br />
R<br />
Variable dimension table<br />
[Unit: mm]<br />
Q<br />
Servo motor<br />
Variable dimensions<br />
S R Q W QK QL U T Y<br />
QK<br />
A<br />
QL<br />
U<br />
<strong>HF</strong>-<strong>KN</strong>23K 43K 14h6 30 27 5 20 3 3 5<br />
M4<br />
Depth<br />
S<br />
15<br />
W<br />
A<br />
T<br />
Y<br />
Section<br />
A-A<br />
(2) D cut shaft<br />
[Unit: mm]<br />
25<br />
21.5<br />
8h6<br />
12 - 19
12. SERVO MOTOR<br />
12.5.5 Connector installation<br />
If the connector is not fixed securely, it may come off or may not produce a splash-proof effect during operation.<br />
To achieve the IP rating of IP65, pay attention to the following points and install the connectors.<br />
(1) When screwing the connector, hold the connector still and gradually tighten the screws in a crisscross<br />
pattern.<br />
1)<br />
4)<br />
3)<br />
2)<br />
Tightening<br />
sequence<br />
1) 2) 3) 4)<br />
1)<br />
2) Tightening<br />
sequence<br />
1) 2)<br />
For power supply and encoder connectors<br />
For brake connector<br />
(2) Tighten the screws evenly. Tightening torques are as indicated below.<br />
For encoder connector<br />
Screw size: M2<br />
Tightening torque: 0.1 N m<br />
For brake connector<br />
Screw size: M2<br />
Tightening torque: 0.2 N m<br />
For power supply connector<br />
Screw size: M2<br />
Tightening torque: 0.2 N m<br />
(3) The servo motor fitting part of each connector is provided with a splash-proof seal (O ring). When installing<br />
the connector, take care to prevent the seal (O ring) from dropping and being pinched. If the seal (O ring)<br />
has dropped or is pinched, a splash-proof effect is not produced.<br />
12 - 20
1<br />
4<br />
12. SERVO MOTOR<br />
12.5.6 Outline drawings<br />
The actual dimensions may be 1 to 3mm larger than the drawing dimensions. Design the machine side with<br />
allowances.<br />
When running the cables to the load side, take care to avoid interference with the machine. The dimensions in<br />
the drawings without tolerances are the reference dimensions.<br />
The inertia moments in the table are the value calculated by converting the total value of inertia moment for<br />
servo motor and electromagnetic brake to the servo motor shaft.<br />
(1) Standard (without an electromagnetic brake)<br />
Model Output [W]<br />
Inertia moment<br />
J [×10 -4 kg m 2 ] (WK 2 [oz in 2 ])<br />
<strong>HF</strong>-<strong>KN</strong>053 50 0.052 (0.284)<br />
Mass<br />
[kg] ([lb])<br />
0.4<br />
(0.882)<br />
[Unit: mm]<br />
20.5<br />
20.7<br />
72<br />
25<br />
40<br />
Caution plate<br />
Motor plate<br />
(Opposite side)<br />
Caution plate<br />
5<br />
2.5<br />
21.5<br />
2- 4.5 mounting hole<br />
Use the hexagon<br />
socket head cap screw.<br />
45<br />
Motor plate<br />
Caution plate<br />
20.7<br />
Bottom<br />
Bottom<br />
30h7<br />
46<br />
Bottom<br />
21<br />
Top<br />
Top<br />
36<br />
Top<br />
8h6<br />
37.1<br />
13.7<br />
4.9<br />
Encoder connector<br />
10.1<br />
11.7<br />
9.9<br />
Power supply connector<br />
11.7 19.2<br />
13.9<br />
6.4<br />
27.4<br />
21.5<br />
25.4<br />
27.5<br />
Power supply connector pin configurations<br />
7<br />
1<br />
2<br />
3<br />
4<br />
2 3<br />
Pin No.<br />
1<br />
2<br />
3<br />
4<br />
Signal name<br />
(Earth)<br />
U<br />
V<br />
W<br />
9<br />
Encoder connector<br />
11.7 11.7 19.2 9.9<br />
21.5<br />
Opposite-to-load side<br />
Power supply<br />
connector<br />
BC36750A<br />
12 - 21
1<br />
4<br />
12. SERVO MOTOR<br />
Model Output [W]<br />
Inertia moment<br />
J [×10 -4 kg m 2 ] (WK 2 [oz in 2 ])<br />
Mass<br />
[kg] ([lb])<br />
<strong>HF</strong>-<strong>KN</strong>13 100 0.088 (0.481) 0.5 (1.10)<br />
[Unit: mm]<br />
20.5<br />
20.7<br />
87<br />
25<br />
40<br />
Caution plate<br />
Motor plate<br />
(Opposite side)<br />
Caution plate<br />
5<br />
2.5<br />
21.5<br />
2- 4.5 mounting hole<br />
Use the hexagon<br />
socket head cap screw.<br />
45<br />
Motor plate<br />
Caution plate<br />
20.7<br />
Bottom<br />
Bottom<br />
30h7<br />
46<br />
Bottom<br />
21<br />
Top<br />
Top<br />
36<br />
Top<br />
8h6<br />
37.1<br />
13.7<br />
4.9<br />
Encoder connector<br />
10.1<br />
11.7<br />
9.9<br />
Power supply<br />
connector<br />
11.7 19.2<br />
13.9<br />
6.4<br />
27.4<br />
21.5<br />
40.4<br />
27.5<br />
Power supply connector pin configurations<br />
7<br />
1<br />
2<br />
3<br />
4<br />
2 3<br />
Pin No.<br />
1<br />
2<br />
3<br />
4<br />
Signal name<br />
(Earth)<br />
U<br />
V<br />
W<br />
9<br />
Encoder connector<br />
11.7 11.7 19.2 9.9<br />
21.5<br />
Opposite-to-load side<br />
Power supply<br />
connector<br />
BC36751B<br />
Model Output [W]<br />
Inertia moment<br />
J [×10 -4 kg m 2 ] (WK 2 [oz in 2 ])<br />
Mass<br />
[kg] ([lb])<br />
<strong>HF</strong>-<strong>KN</strong>23 200 0.24 (1.31) 1.0 (2.21)<br />
[Unit: mm]<br />
88.2 30<br />
Motor plate Caution plate<br />
7 3<br />
(Opposite side)<br />
4- 5.8 mounting hole<br />
Use the hexagon<br />
socket head cap screw.<br />
45<br />
60<br />
Motor plate<br />
Bottom<br />
Top<br />
Caution plate<br />
Caution plate<br />
Bottom<br />
Bottom<br />
Top<br />
Top<br />
14h6<br />
50h7<br />
70<br />
46<br />
47.1<br />
13.7 10<br />
28.4<br />
Encoder connector<br />
9.5<br />
10.1 19.2<br />
11.8 11.7<br />
40<br />
Power supply connector<br />
13.9 5.9<br />
27.8<br />
21.5<br />
1<br />
2<br />
3<br />
4<br />
Power supply connector pin configurations<br />
1 2 3 4<br />
Pin No.<br />
1<br />
2<br />
3<br />
4<br />
Signal name<br />
(Earth)<br />
U<br />
V<br />
W<br />
9<br />
7<br />
Encoder connector<br />
Power supply<br />
connector<br />
19.2 9.5<br />
11.8 11.7<br />
21.5<br />
Opposite-to-load side<br />
BC36752A<br />
12 - 22
2<br />
1<br />
4<br />
12. SERVO MOTOR<br />
Model<br />
Output [W]<br />
Inertia moment<br />
J [×10 -4 kg m 2 ] (WK 2 [oz in 2 ])<br />
Mass<br />
[kg] ([lb])<br />
<strong>HF</strong>-<strong>KN</strong>43 400 0.42 (2.30) 1.4 (3.09)<br />
[Unit: mm]<br />
110.2 30<br />
Motor plate Caution plate<br />
7 3<br />
(Opposite side)<br />
4- 5.8 mounting hole<br />
Use the hexagon<br />
socket head cap screw.<br />
45<br />
60<br />
Motor plate<br />
Bottom<br />
Top<br />
Caution plate<br />
Caution plate<br />
Bottom<br />
Bottom<br />
Top<br />
Top<br />
14h6<br />
50h7<br />
70<br />
46<br />
47.1<br />
13.7 10<br />
28.4<br />
Encoder connector<br />
9.5 Power supply<br />
connector<br />
10.1 19.2<br />
11.8 11.7<br />
62<br />
21.5<br />
13.9 5.9<br />
27.8<br />
Power supply connector pin configurations<br />
1<br />
2<br />
3<br />
4<br />
1 2 3 4<br />
Pin No.<br />
1<br />
2<br />
3<br />
4<br />
Signal name<br />
(Earth)<br />
U<br />
V<br />
W<br />
9<br />
7<br />
Encoder connector<br />
Power supply<br />
connector<br />
19.2 9.5<br />
11.8 11.7<br />
21.5<br />
Opposite-to-load side<br />
BC36753A<br />
(2) With an electromagnetic brake<br />
Model Output [W] Brake static friction torque [N m]<br />
Inertia moment<br />
J [×10 -4 kg m 2 ] (WK 2 [oz in 2 ])<br />
Mass<br />
[kg] ([lb])<br />
<strong>HF</strong>-<strong>KN</strong>053B 50 0.32 0.054 (0.295) 0.6 (1.32)<br />
[Unit: mm]<br />
20.5<br />
20.7<br />
Caution<br />
plate<br />
108.9<br />
Motor plate<br />
(Opposite side)<br />
Caution plate<br />
5<br />
25<br />
2.5<br />
21.5<br />
2- 4.5 mounting hole<br />
Use the hexagon<br />
socket head cap screw.<br />
45<br />
40<br />
Motor plate<br />
Caution plate<br />
Bottom<br />
20.7<br />
21<br />
Bottom<br />
Bottom<br />
Top<br />
Top<br />
30h7<br />
46<br />
38.8<br />
36<br />
Top<br />
8h6<br />
37.1<br />
13.7<br />
27.4<br />
4.9<br />
Brake connector pin configurations<br />
1<br />
2<br />
Pin No.<br />
1<br />
2<br />
1<br />
Signal name<br />
B1<br />
B2<br />
Encoder<br />
connector<br />
10.1<br />
11.7<br />
9.9<br />
Power supply connector<br />
11.7 19.2<br />
13.9<br />
6.4<br />
21.5<br />
25.4<br />
27.5<br />
58.8 18.4 Brake connector<br />
Power supply connector pin configurations<br />
9<br />
1<br />
2<br />
7<br />
13<br />
1<br />
2<br />
3<br />
4<br />
2 3<br />
Pin No.<br />
1<br />
2<br />
3<br />
4<br />
Signal name<br />
(Earth)<br />
U<br />
V<br />
W<br />
12 - 23<br />
Encoder connector<br />
11.7 11.7<br />
18.4 19.2 9.9<br />
58.8<br />
Brake connector<br />
21.5<br />
Opposite-to-load side<br />
Power supply<br />
connector<br />
BC36754A
2<br />
1<br />
4<br />
12. SERVO MOTOR<br />
Brake static friction torque<br />
Inertia moment<br />
Model Output [W]<br />
[N m] ([oz in]) J [×10 -4 kg m 2 ] (WK 2 [oz in 2 ])<br />
<strong>HF</strong>-<strong>KN</strong>13B 100 0.32 (45.3) 0.09 (0.492)<br />
Mass<br />
[kg] ([lb])<br />
0.7<br />
(1.54)<br />
[Unit: mm]<br />
Motor plate<br />
20.5<br />
20.7<br />
Caution<br />
plate<br />
123.9<br />
Motor plate<br />
(Opposite side)<br />
Caution plate<br />
5<br />
25<br />
2.5<br />
21.5<br />
2- 4.5 mounting hole<br />
Use the hexagon<br />
socket head cap screw.<br />
45<br />
40<br />
Caution plate<br />
20.7<br />
Bottom<br />
Bottom<br />
30h7<br />
46<br />
Bottom<br />
21<br />
Top<br />
Top<br />
38.8<br />
36<br />
Top<br />
8h6<br />
37.1<br />
1<br />
2<br />
13.7<br />
27.4<br />
4.9<br />
Brake connector pin configurations<br />
Pin No.<br />
1<br />
2<br />
1<br />
Signal name<br />
B1<br />
B2<br />
Encoder<br />
connector<br />
10.1<br />
11.7<br />
9.9 Power supply connector<br />
11.7 19.2<br />
13.9<br />
6.4<br />
21.5<br />
40.4<br />
27.5<br />
58.8 18.4 Brake connector<br />
Power supply connector pin configurations<br />
9<br />
1<br />
2<br />
7<br />
13<br />
1<br />
2<br />
3<br />
4<br />
2 3<br />
Pin No.<br />
1<br />
2<br />
3<br />
4<br />
Signal name<br />
(Earth)<br />
U<br />
V<br />
W<br />
Encoder connector<br />
11.7 11.7<br />
18.4 19.2 9.9<br />
58.8<br />
Brake connector<br />
21.5<br />
Opposite-to-load side<br />
Power supply<br />
connector<br />
BC36755A<br />
12 - 24
2<br />
12. SERVO MOTOR<br />
Brake static friction torque<br />
Inertia moment<br />
Model Output [W]<br />
[N m] ([oz in]) J [×10 -4 kg m 2 ] (WK 2 [oz in 2 ])<br />
<strong>HF</strong>-<strong>KN</strong>23B 200 1.3 (184) 0.31 (1.70)<br />
Mass<br />
[kg] ([lb])<br />
1.4<br />
(3.09)<br />
[Unit: mm]<br />
116.8 30<br />
4- 5.8 mounting hole<br />
Use the hexagon<br />
socket head cap screw.<br />
60<br />
Motor plate Caution plate<br />
(Opposite side)<br />
7 3<br />
45<br />
Motor plate<br />
47.1<br />
Bottom<br />
Top<br />
Caution plate<br />
Caution plate<br />
Bottom<br />
Bottom<br />
Top<br />
Top<br />
14h6<br />
50h7<br />
47.1<br />
70<br />
Encoder connector<br />
9.5<br />
13.7 10<br />
10.1 19.2<br />
28.4<br />
11.8 11.7<br />
40<br />
21.5<br />
Brake connector<br />
Brake connector pin configurations<br />
57.8<br />
1<br />
2<br />
Pin No.<br />
1<br />
2<br />
1<br />
Signal name<br />
B1<br />
B2<br />
9<br />
13.5<br />
7<br />
Power supply connector<br />
1<br />
2<br />
3<br />
4<br />
Pin No.<br />
1<br />
2<br />
3<br />
4<br />
13.9 5.9<br />
27.8<br />
Power supply connector pin configurations<br />
1 2 3 4<br />
Signal name<br />
(Earth)<br />
U<br />
V<br />
W<br />
Encoder connector<br />
11.8 11.7<br />
18.3<br />
57.8<br />
21.5<br />
Opposite-to-load side<br />
Power supply<br />
connector<br />
9.5<br />
Brake connector<br />
BC36756B<br />
12 - 25
2<br />
12. SERVO MOTOR<br />
Brake static friction torque<br />
Inertia moment<br />
Model Output [W]<br />
[N m] ([oz in]) J [×10 -4 kg m 2 ] (WK 2 [oz in 2 ])<br />
<strong>HF</strong>-<strong>KN</strong>43B 400 1.3 (184) 0.50 (2.73)<br />
Mass<br />
[kg] ([lb])<br />
1.8<br />
(3.97)<br />
[Unit: mm]<br />
Motor plate<br />
(Opposite side)<br />
4- 5.8 mounting hole<br />
Use the hexagon<br />
socket head cap screw.<br />
138.8 30<br />
Caution plate<br />
7 3<br />
45<br />
60<br />
Motor plate<br />
47.1<br />
Bottom<br />
Top<br />
Caution plate<br />
Caution plate<br />
Bottom<br />
Bottom<br />
Top<br />
Top<br />
14h6<br />
50h7<br />
47.1<br />
70<br />
Encoder connector<br />
9.5 Power supply<br />
13.7 10<br />
10.1 19.2<br />
connector<br />
28.4<br />
11.8 11.7<br />
62<br />
21.5<br />
Brake connector<br />
Brake connector pin configurations<br />
57.8<br />
1<br />
2<br />
Pin No.<br />
1<br />
2<br />
1<br />
Signal name<br />
B1<br />
B2<br />
9<br />
13.5<br />
7<br />
1<br />
2<br />
3<br />
4<br />
13.9 5.9<br />
27.8<br />
Power supply connector pin configurations<br />
1 2 3 4<br />
Pin No.<br />
1<br />
2<br />
3<br />
4<br />
Signal name<br />
(Earth)<br />
U<br />
V<br />
W<br />
Encoder connector<br />
11.8 11.7<br />
18.3<br />
57.8<br />
21.5<br />
Opposite-to-load side<br />
Power supply<br />
connector<br />
9.5<br />
Brake connector<br />
BC36757B<br />
12 - 26
12. SERVO MOTOR<br />
12.6 <strong>HF</strong>-<strong>KP</strong> series servo motor<br />
POINT<br />
For the outline drawings of the <strong>HF</strong>-<strong>KP</strong> <strong>G1</strong>/<strong>G5</strong>/<strong>G7</strong>servo motor, refer to<br />
sections 6.8.3 to 6.8.8 in the Servo Motor INSTRUCTION MANUAL (Vol.2).<br />
This section provides information on the servo motor specifications and characteristics. When using the <strong>HF</strong>-<strong>KP</strong><br />
series servo motor, always read the Safety <strong>Instruction</strong>s in the beginning of this manual and sections 12.1 to<br />
12.4, in addition to this section.<br />
12.6.1 Model definition<br />
The following describes what each block of a model name indicates. Note that not all the combinations of the<br />
symbols exist.<br />
H F - K P 3 Appearance<br />
Series name<br />
Shaft type<br />
Symbol<br />
None<br />
K<br />
Shaft shape<br />
Standard<br />
(Straight shaft)<br />
With keyway<br />
(With key)<br />
<strong>HF</strong>-<strong>KP</strong><br />
053 to 43<br />
23 43<br />
Reduction gear<br />
Symbol<br />
<strong>G1</strong><br />
<strong>G5</strong><br />
<strong>G7</strong><br />
Electromagnetic brake<br />
Symbol<br />
None<br />
B<br />
Rated speed<br />
3000 [r/min]<br />
Rated output<br />
Symbol<br />
Electromagnetic brake<br />
05 50<br />
None<br />
With<br />
Rated output [W]<br />
1 100<br />
2 200<br />
4 400<br />
Reduction gear<br />
For general industrial machine<br />
Flange-mounting flange output type for precision application<br />
Flange-mounting shaft output type for precision application<br />
12 - 27
12. SERVO MOTOR<br />
12.6.2 Specifications<br />
(1) Specifications list<br />
Servo motor<br />
<strong>HF</strong>-<strong>KP</strong> series (Low inertia, small capacity)<br />
Item 053<strong>G1</strong>/<strong>G5</strong>/<strong>G7</strong> 13<strong>G1</strong>/<strong>G5</strong>/<strong>G7</strong> 23<strong>G1</strong>/<strong>G5</strong>/<strong>G7</strong> 43<strong>G1</strong>/<strong>G5</strong>/<strong>G7</strong><br />
Applicable servo <strong>MR</strong>-<strong>JN</strong>- A 10 20 40<br />
amplifier <strong>MR</strong>-<strong>JN</strong>- A1 10 20<br />
Continuous<br />
running duty<br />
(Note 1)<br />
Rated output [kW] 0.05 0.1 0.2 0.4<br />
Rated torque [N m] 0.16 0.32 0.64 1.3<br />
(Note 10) [oz in] 22.7 45.3 90.6 184<br />
Rated speed (Note 1, 3) [r/min] 3000<br />
Maximum speed (Note 3) [r/min] 4500 (Note 9)<br />
Instantaneous permissible speed [r/min] Refer to section 12.6.4.<br />
Maximum torque (Note 10)<br />
Power rate at continuous rated torque<br />
(Note 10)<br />
J [×10 -4 kg m 2 ]<br />
Inertia moment<br />
WK 2 [oz in 2 ]<br />
Recommended load to motor inertia moment<br />
ratio (Note 2)<br />
[N m] 0.48 0.95 1.9 3.8<br />
[oz in] 68.0 135 269 538<br />
[kW/s] 4.87 11.5 16.9 38.6<br />
Refer to sections 6.8.3 to 6.8.8 in the Servo Motor INSTRUCTION MANUAL<br />
(Vol.2).<br />
15 times or less 24 times or less 22 times or less<br />
Power supply capacity Refer to section 10.2.<br />
Rated current [A] 0.9 0.8 1.4 2.7<br />
Maximum current [A] 2.7 2.4 4.2 8.1<br />
Speed/position encoder<br />
Accessory<br />
Insulation class<br />
18 bits encoder common to absolute position and incremental<br />
(Resolution per servo motor 1 rotation: 262144pulse/rev) (Note 8)<br />
Class B<br />
Structure Totally-enclosed, self-cooled (IP rating: IP44 (Note 4))<br />
Environmental<br />
conditions<br />
(Note 5)<br />
Ambient In operation 0 to +40 (32 to 104 ) (non-freezing)<br />
temperature In storage -15 to +70 (5 to 158 ) (non-freezing)<br />
Ambient In operation<br />
80%RH or less (non-condensing)<br />
humidity In storage 90%RH or less (non-condensing)<br />
Ambient<br />
Altitude<br />
Indoors (no direct sunlight)<br />
Free from corrosive gas, flammable gas, oil mist, dust and dirt<br />
Max. 1000m above sea level<br />
Vibration (Note 6) X, Y : 49m/s 2<br />
Vibration rank (Note 7) V-10<br />
Permissible load for the shaft Refer to section 12.6.4.<br />
Refer to sections 6.8.3 to 6.8.8 in the Servo Motor INSTRUCTION MANUAL<br />
Mass<br />
[kg] ([lb])<br />
(Vol.2).<br />
Note 1. When the power supply voltage drops, the output and the rated speed cannot be guaranteed.<br />
2. If the load to motor inertia moment ratio exceeds the indicated value, please contact your local sales office.<br />
3. The above values are in the reduction gear input shaft.<br />
4. Except for the shaft-through portion.<br />
5. In the environment where the servo motor is exposed to oil mist, oil and/or water, a standard specification servo motor may not<br />
be usable. Contact your local sales office.<br />
12 - 28
Torque [N m]<br />
Torque [N m]<br />
12. SERVO MOTOR<br />
6. For the single servo motor. The vibration direction is as shown in the figure. The value is the one at the part that indicates the<br />
maximum value (normally the opposite-to-load side bracket). When the servo motor stops, fretting is likely to occur at the<br />
bearing. Therefore, suppress the vibration to about half of the permissible value. Note that this does not apply to the servo<br />
motor with a reduction gear.<br />
Servo motor<br />
X Y<br />
Vibration<br />
Vibration amplitude<br />
(both amplitudes) [ m]<br />
1000<br />
100<br />
10<br />
0 1000 2000 3000 4000 5000 6000 7000<br />
Speed [r/min]<br />
7. V-10 indicates that the amplitude of a single servo motor is 10 m or less. The following figure shows the servo motor installation<br />
position for measurement and the measuring position.<br />
Servo motor<br />
Top<br />
Measuring<br />
position<br />
Bottom<br />
8. When combined with the <strong>MR</strong>-<strong>JN</strong> series servo amplifier, the resolution performance becomes equivalent to an incremental 17<br />
bits encoder.<br />
9. When combining with the <strong>MR</strong>-<strong>JN</strong> series servo amplifier.<br />
10. For the single servo motor.<br />
(2) Torque characteristics<br />
POINT<br />
It is recommended to use the machine which generates unbalanced torque,<br />
e.g. a vertical lift application, so that the unbalanced torque is not more than<br />
70% of the rated torque.<br />
The torque characteristics shown in the following graph are for the servo motor itself. When the input power<br />
supply specifications of the servo amplifier are 1-phase 230VAC, the torque characteristics are indicated by<br />
heavy lines. Part of the torque characteristics are indicated by broken lines for the 1-phase 100VAC power<br />
supply and by thin lines for the 1-phase 200VAC power supply.<br />
[<strong>HF</strong>-<strong>KP</strong>053<strong>G1</strong>/<strong>G5</strong>/<strong>G7</strong>]<br />
[<strong>HF</strong>-<strong>KP</strong>13<strong>G1</strong>/<strong>G5</strong>/<strong>G7</strong>]<br />
[<strong>HF</strong>-<strong>KP</strong>23<strong>G1</strong>/<strong>G5</strong>/<strong>G7</strong>]<br />
[<strong>HF</strong>-<strong>KP</strong>43<strong>G1</strong>/<strong>G5</strong>/<strong>G7</strong>]<br />
0.6<br />
1.2<br />
2.5<br />
4.5<br />
0.5<br />
1<br />
2<br />
4<br />
3.5<br />
Torque [N m]<br />
0.4<br />
0.3<br />
0.2<br />
Short-duration<br />
running region<br />
0.8<br />
0.6<br />
0.4<br />
Short-duration<br />
running region<br />
1.5<br />
1<br />
Short-duration<br />
running region<br />
Torque [N m]<br />
3<br />
2.5<br />
2<br />
1.5<br />
Short-duration<br />
running region<br />
0.1<br />
0<br />
0<br />
Continuous<br />
running region<br />
1000 2000 3000 4000 4500<br />
Speed [r/min]<br />
0.2<br />
Continuous<br />
running region<br />
0<br />
0 1000 2000 3000 4000 4500<br />
Speed [r/min]<br />
0.5<br />
0<br />
0<br />
Continuous<br />
running region<br />
1000 2000 3000 4000 4500<br />
Speed [r/min]<br />
1<br />
0.5<br />
0<br />
0<br />
Continuous<br />
running region<br />
1000 2000 3000 4000 4500<br />
Speed [r/min]<br />
12 - 29
12. SERVO MOTOR<br />
12.6.3 Electromagnetic brake characteristics<br />
CAUTION<br />
The electromagnetic brake is provided for preventing a drop at power failure or at<br />
servo alarm occurrence during vertical drive, or for holding a shaft at stop. Do not<br />
use it for normal braking (including braking at servo lock).<br />
Before performing the operation, be sure to confirm that the electromagnetic brake<br />
operates properly.<br />
The characteristics of the electromagnetic brake provided for the servo motor with an electromagnetic brake<br />
are indicated below.<br />
Servo motor<br />
<strong>HF</strong>-<strong>KP</strong> series<br />
Item 053B 13B 23B 43B<br />
Type (Note 1)<br />
Spring-loaded safety brake<br />
Rated voltage (Note 4) 24VDC 0 -10%<br />
Power consumption [W]at20 6.3 7.9<br />
Coil resistance (Note 6) [ ] 91.0 73.0<br />
Inductance (Note 6) [H] 0.088 0.10<br />
Brake static friction torque<br />
[N m] 0.32 1.3<br />
[oz in] 45.3 184<br />
Release delay time (Note 2) [s] 0.03 0.03<br />
Braking delay time (Note 2) [s] DC off 0.01 0.02<br />
Permissible braking work<br />
Per braking [J] 5.6 22<br />
Per hour [J] 56 220<br />
Brake looseness at servo motor shaft (Note 5) [degrees] 2.5 1.2<br />
Brake life (Note 3)<br />
Selection example of surge<br />
absorbers to be used (Note 7, 8)<br />
Number of<br />
braking cycles<br />
[times] 20000 20000<br />
Work per braking [J] 5.6 22<br />
For the suppressed<br />
voltage 125V<br />
TND20V-680KB<br />
For the suppressed<br />
voltage 350V<br />
TND10V-221KB<br />
Note 1. There is no manual release mechanism. Use a 24VDC power supply to release the brake electrically.<br />
2. The value for initial ON gap at 20 (68 ).<br />
3. Brake gap increases as the brake lining wears, but the gap is not adjustable. Therefore, the brake life is indicated<br />
as the number of braking cycles available before the gap adjustment is required.<br />
4. Always prepare the power supply exclusively used for the electromagnetic brake.<br />
5. The above values are typical initial values and not guaranteed values.<br />
6. These values are measured values and not guaranteed values.<br />
7. Select the electromagnetic brake control relay properly, considering the characteristics of the electromagnetic brake<br />
and surge absorber.<br />
8. Manufactured by Nippon Chemi-Con Corporation.<br />
12 - 30
12. SERVO MOTOR<br />
12.6.4 Servo motor with a reduction gear<br />
CAUTION<br />
The servo motor with a reduction gear must be installed in the specified direction.<br />
Otherwise, it can leak oil, leading to a fire or fault.<br />
Install the servo motor with a reduction gear in the specified direction. Improper<br />
installation causes oil leakage, leading to a fire and malfunction.<br />
Servo motors are available with a reduction gear designed for general industrial machines compliant and<br />
precision applications compliant.<br />
Servo motors with an electromagnetic brake are also available.<br />
(1) For general industrial machines compliant (<strong>G1</strong>)<br />
(a) Manufacturing range<br />
The following table indicates the reduction ratios and actual reduction ratios of the servo motors with a<br />
reduction gear for general industrial machines compliant. The servo motors with a reduction gear of the<br />
following reduction ratios are available.<br />
Servo motor<br />
Nominal Actual<br />
reduction ratio reduction ratio<br />
1/5 9/44<br />
<strong>HF</strong>-<strong>KP</strong>053<strong>G1</strong> 1/12 49/576<br />
1/20 25/484<br />
1/5 9/44<br />
<strong>HF</strong>-<strong>KP</strong>13<strong>G1</strong> 1/12 49/576<br />
1/20 25/484<br />
1/5 19/96<br />
<strong>HF</strong>-<strong>KP</strong>23<strong>G1</strong> 1/12 25/288<br />
1/20 253/5000<br />
1/5 19/96<br />
<strong>HF</strong>-<strong>KP</strong>43<strong>G1</strong> 1/12 25/288<br />
1/20 253/5000<br />
12 - 31
12. SERVO MOTOR<br />
(b) Specifications<br />
Item<br />
Description<br />
Servo motor <strong>HF</strong>-<strong>KP</strong> <strong>G1</strong><br />
Mounting method<br />
Flange mounting<br />
Mounting direction<br />
In any directions<br />
Grease lubrication (Already packed) (Note 1)<br />
200W 400W 200W 400W<br />
50 100W<br />
1/12 1/20<br />
1/5<br />
Lubrication Packed<br />
Mobilplex 46<br />
Molynoc AP2 Mobil Grease SP<br />
method<br />
with<br />
Exxon Mobil<br />
Nippon Oil<br />
Exxon Mobil<br />
Corporation<br />
Corporation<br />
Corporation<br />
Output shaft rotating<br />
direction<br />
Same as the servo motor output shaft direction.<br />
With an electromagnetic<br />
brake<br />
Available<br />
Backlash<br />
60 minutes or less at reduction gear output shaft<br />
Permissible load to motor<br />
inertia moment ratio<br />
For 50W, 100W: 5 times or less<br />
(converting into the servo<br />
For 200W, 400W: 7 times or less<br />
motor shaft)<br />
(Note 2)<br />
Permissible speed<br />
(servo motor shaft)<br />
4500 r/min<br />
IP rating<br />
(reduction gear area)<br />
IP44 equivalent<br />
Reduction gear efficiency<br />
(Note 3)<br />
45 to 75%<br />
Note 1. Already packed with the grease.<br />
2. If the above indicated value is exceeded, please contact your local sales office.<br />
3. The reduction gear efficiency differs depending on the reduction ratio. Also, it varies<br />
depending on the use conditions such as the output torque, speed, temperature, etc. The<br />
numerical value in the table is a typical value in the rated torque, rated speed and typical<br />
temperature, and not a guaranteed value.<br />
12 - 32
12. SERVO MOTOR<br />
(c) Permissible loads of servo motor shaft<br />
The permissible radial load in the table is the value measured at the center of the reduction gear output<br />
shaft.<br />
Q<br />
Q/2<br />
Q: Length of axis<br />
(Refer to section 6.8.3, 6.8.4 in the Servo Motor<br />
INSTRUCTION MANUAL (Vol.2).)<br />
Permissible load (Note)<br />
Servo motor<br />
Reduction ratio<br />
Permissible radial Permissible thrust<br />
load<br />
load<br />
[N] [Ib] [N] [Ib]<br />
1/5 150 33.7 200 45.0<br />
<strong>HF</strong>-<strong>KP</strong>053<strong>G1</strong> 1/12 240 54.0 320 71.9<br />
1/20 370 83.2 450 101<br />
1/5 150 33.7 200 45.0<br />
<strong>HF</strong>-<strong>KP</strong>13<strong>G1</strong> 1/12 240 54.0 320 71.9<br />
1/20 370 83.2 450 101<br />
1/5 330 74.2 350 78.7<br />
<strong>HF</strong>-<strong>KP</strong>23<strong>G1</strong> 1/12 710 160 720 162<br />
1/20 780 175 780 175<br />
1/5 330 74.2 350 78.7<br />
<strong>HF</strong>-<strong>KP</strong>43<strong>G1</strong> 1/12 710 160 720 162<br />
1/20 760 171 760 171<br />
Note. Do not subject the shaft to load greater than this value.<br />
The values in the table are applicable when the loads are applied independently.<br />
12 - 33
12. SERVO MOTOR<br />
(2) For precision applications compliant (<strong>G5</strong>, <strong>G7</strong>)<br />
(a) Manufacturing range<br />
The symbols (14A, 20A, 32A) in the following table indicate the model numbers of the reduction gears<br />
assembled to the servo motors. Servo motors with a reduction gear having the indicated reduction gear<br />
model numbers are available. The reduction gear model number indicates of the reduction<br />
number model name HPG- -05...<br />
Servo motor<br />
<strong>HF</strong>-<strong>KP</strong>053<strong>G5</strong>, <strong>HF</strong>-<strong>KP</strong>053<strong>G7</strong><br />
<strong>HF</strong>-<strong>KP</strong>13<strong>G5</strong>, <strong>HF</strong>-<strong>KP</strong>13<strong>G7</strong> 14A<br />
Reduction ratio<br />
1/5 1/11 1/21 1/33 1/45<br />
<strong>HF</strong>-<strong>KP</strong>23<strong>G5</strong>, <strong>HF</strong>-<strong>KP</strong>23<strong>G7</strong> 20A<br />
<strong>HF</strong>-<strong>KP</strong>43<strong>G5</strong>, <strong>HF</strong>-<strong>KP</strong>43<strong>G7</strong> 32A<br />
(b) Specifications<br />
Item<br />
Description<br />
Servo motor <strong>HF</strong>-<strong>KP</strong> <strong>G5</strong>, <strong>HF</strong>-<strong>KP</strong> <strong>G7</strong><br />
Mounting method<br />
Flange mounting<br />
Mounting direction<br />
In any directions<br />
Grease lubrication (Already packed) (Note 1)<br />
Lubrication<br />
Packed<br />
Harmonic grease SK-2<br />
method<br />
with<br />
(Harmonic Drive Systems)<br />
Output shaft rotating<br />
direction<br />
Same as the servo motor output shaft direction.<br />
With an electromagnetic<br />
brake<br />
Available<br />
Backlash<br />
3 minutes or less at reduction gear output shaft<br />
Permissible load to motor<br />
inertia moment ratio<br />
For 50W, 100W: 10 times or less<br />
(converting into the servo<br />
For 200W, 400W: 14 times or less<br />
motor shaft)<br />
(Note 2)<br />
Permissible speed<br />
(servo motor shaft)<br />
4500 r/min (Note 5)<br />
IP rating<br />
(reduction gear area)<br />
IP44 (Note 6)<br />
Reduction gear efficiency<br />
(Note 3)<br />
58 to 87 % (Note 4)<br />
Note 1. Already packed with the grease.<br />
2. If the above indicated value is exceeded, please contact your local sales office.<br />
3. The reduction gear efficiency differs depending on the reduction ratio. Also, it varies<br />
depending on the use conditions such as the output torque, speed, temperature, etc. The<br />
numerical value in the table is a typical value in the rated torque, rated speed and typical<br />
temperature, and not a guaranteed value.<br />
4. The reduction gear efficiency of the <strong>HF</strong>-<strong>KP</strong>053 is 22 to 41%.<br />
5. When combining with the <strong>MR</strong>-<strong>JN</strong> series servo amplifier.<br />
6. Except for the shaft-through portion.<br />
12 - 34
12. SERVO MOTOR<br />
(c) Permissible loads to servo motor shaft<br />
The radial load point of a precision reduction gear is as shown below.<br />
L<br />
Q/2<br />
L: Distance between reduction<br />
gear end face and load center<br />
Q<br />
Q: Length of axis<br />
(Refer to section 6.8.7, 6.8.8 in the Servo Motor<br />
INSTRUCTION MANUAL (Vol.2).)<br />
Flange-mounting flange output type for precision<br />
application compliant (<strong>G5</strong>)<br />
Flange-mounting shaft output type for precision<br />
application compliant (<strong>G7</strong>)<br />
Servo motor<br />
Reduction ratio<br />
Permissible load (Note)<br />
Radial load point Permissible radial Permissible thrust<br />
L [mm]<br />
load<br />
load<br />
[N] [Ib] [N] [Ib]<br />
1/5 23 177 39.8 706 159<br />
1/11 23 224 50.4 895 201<br />
<strong>HF</strong>-<strong>KP</strong>053<strong>G5</strong>, <strong>HF</strong>-<strong>KP</strong>053<strong>G7</strong> 1/21 23 272 61.1 1087 224<br />
1/33 23 311 69.9 1244 280<br />
1/45 23 342 76.9 1366 307<br />
1/5 23 177 39.8 706 159<br />
1/11 23 224 50.4 895 201<br />
<strong>HF</strong>-<strong>KP</strong>13<strong>G5</strong>, <strong>HF</strong>-<strong>KP</strong>13<strong>G7</strong> 1/21 23 272 61.1 1087 224<br />
1/33 32 733 165 2581 570<br />
1/45 32 804 181 2833 637<br />
1/5 23 177 39.8 706 159<br />
1/11 23 224 50.4 895 201<br />
<strong>HF</strong>-<strong>KP</strong>23<strong>G5</strong>, <strong>HF</strong>-<strong>KP</strong>23<strong>G7</strong> 1/21 32 640 144 2254 507<br />
1/33 32 733 165 2581 570<br />
1/45 32 804 181 2833 637<br />
1/5 23 177 39.8 706 159<br />
1/11 32 527 118 1856 4170<br />
<strong>HF</strong>-<strong>KP</strong>43<strong>G5</strong>, <strong>HF</strong>-<strong>KP</strong>43<strong>G7</strong> 1/21 32 640 309 2254 1230<br />
1/33 57 1252 281 4992 1120<br />
1/45 57 1374 309 5478 1230<br />
Note. Do not subject the shaft to load greater than this value.<br />
The values in the table assume that the loads are applied independently.<br />
12 - 35
12. SERVO MOTOR<br />
(d) Special shaft servo motors<br />
Servo motors with a special shaft having keyway (with single pointed keys) are available for the flange<br />
mounting shaft output type for precision applications compliant (<strong>G7</strong>).<br />
Servo motor<br />
<strong>HF</strong>-<strong>KP</strong><br />
<strong>G7</strong>K<br />
[Unit: mm]<br />
Reduction gear<br />
model number<br />
Q S W T QK U Y<br />
14A 28 16h7 5 5 25 3 M4 Depth 8<br />
20A 42 25h7 8 7 36 4 M6 Depth 12<br />
32A 82 40h7 12 8 70 5 M10 Depth 20<br />
(Q)<br />
QK<br />
U<br />
Y<br />
TW<br />
S<br />
12.6.5 Connector installation<br />
If the connector is not fixed securely, it may come off or may not produce a splash-proof effect during operation.<br />
To achieve the IP rating of IP65, pay attention to the following points and install the connectors.<br />
(1) When screwing the connector, hold the connector still and gradually tighten the screws in a crisscross<br />
pattern.<br />
1)<br />
4)<br />
3)<br />
2)<br />
Tightening<br />
sequence<br />
1) 2) 3) 4)<br />
1)<br />
2) Tightening<br />
sequence<br />
1) 2)<br />
For power supply and encoder connectors<br />
For brake connector<br />
12 - 36
12. SERVO MOTOR<br />
(2) Tighten the screws evenly. Tightening torques are as indicated below.<br />
For encoder connector<br />
Screw size: M2<br />
Tightening torque: 0.1 N m<br />
For brake connector<br />
Screw size: M2<br />
Tightening torque: 0.2 N m<br />
For power supply connector<br />
Screw size: M2<br />
Tightening torque: 0.2 N m<br />
(3) The servo motor fitting part of each connector is provided with a splash-proof seal (O ring). When installing<br />
the connector, take care to prevent the seal (O ring) from dropping and being pinched. If the seal (O ring)<br />
has dropped or is pinched, a splash-proof effect is not produced.<br />
12 - 37
12. SERVO MOTOR<br />
MEMO<br />
12 - 38
13. POSITIONING MODE<br />
13. POSITIONING MODE<br />
13.1 Selection method of each operation mode<br />
This section provides the selection method of each operation mode.<br />
(1) Point table method<br />
Operation mode<br />
Automatic operation mode<br />
for point table method<br />
<strong>Manual</strong> operation mode<br />
Home position return mode<br />
Selection item of operation mode<br />
Parameter<br />
No. PA01 setting<br />
Input device setting<br />
(Note)<br />
MD0<br />
DI0 to DI2<br />
Refer to<br />
One-time positioning operation Section 13.3.2 (1)<br />
Automatic Varied speed operation<br />
Section 13.3.2 (2) (b)<br />
ON Option<br />
continuous Automatic continuous<br />
Section 13.3.2 (2) (c)<br />
operation positioning operation<br />
JOG operation Section 13.5.1<br />
OFF<br />
<strong>Manual</strong> pulse generator operation<br />
Section 13.5.2<br />
Dog type Section 13.6.3<br />
Count type 6<br />
Section 13.6.4<br />
Data set type Section 13.6.5<br />
Stopper type Section 13.6.6<br />
Home position ignorance (Servo-on<br />
position as home position)<br />
ON<br />
All OFF<br />
Section 13.6.7<br />
Dog type rear end reference Section 13.6.8<br />
Count type front end reference Section 13.6.9<br />
Dog cradle type<br />
Note. MD0: Automatic/manual selection<br />
DI0 to DI2: Point table No./Program No. selection 1 to 3<br />
(2) Program method<br />
Operation mode<br />
Selection item of operation mode<br />
Parameter<br />
No. PA01 setting<br />
Input device setting<br />
(Note 1)<br />
MD0<br />
DI0 to DI2<br />
Section 13.6.10<br />
Automatic operation mode for program method ON Option Section 13.4<br />
<strong>Manual</strong> operation mode<br />
Home position return mode<br />
Refer to<br />
JOG operation Section 13.5.1<br />
OFF<br />
<strong>Manual</strong> pulse generator operation<br />
Section 13.5.2<br />
Dog type Section 13.6.3<br />
Count type Section 13.6.4<br />
Data set type Section 13.6.5<br />
7<br />
Stopper type Section 13.6.6<br />
(Note 2)<br />
Home position ignorance (Servo-on<br />
ON<br />
Option Section 13.6.7<br />
position as home position)<br />
Dog type rear end reference Section 13.6.8<br />
Count type front end reference Section 13.6.9<br />
Dog cradle type<br />
Note 1. MD0: Automatic/manual selection<br />
DI0 to DI2: Point table No./Program No. selection 1 to 3<br />
2. Select a program that has the home position return "ZRT" command.<br />
Section 13.6.10<br />
13 - 1
13. POSITIONING MODE<br />
13.2 Signals<br />
13.2.1 I/O signal connection example<br />
(Note 9,<br />
10, 12)<br />
(Note 3, 5) Forced stop<br />
Servo-on<br />
Automatic/manual selection<br />
(Note 8)<br />
<strong>MR</strong> Configurator<br />
Proximity dog<br />
Point table No./Program No.<br />
selection 1<br />
Point table No./Program No.<br />
selection 2<br />
Forward rotation start<br />
Reverse rotation start<br />
+<br />
Personal<br />
computer<br />
24VDC (Note 4, 9)<br />
10m max.<br />
USB cable<br />
(option)<br />
Servo amplifier<br />
(Note 7) (Note 7)<br />
CN1 CN1<br />
OPC 2 9 ALM<br />
DICOM 1<br />
DOCOM 13 10 MEND<br />
EM1 8 11 RD<br />
SON 4<br />
MD0 3 12 MBR<br />
DOG 25<br />
DI0<br />
DI1<br />
ST1<br />
ST2<br />
5<br />
23<br />
6<br />
7<br />
CN3<br />
19 LZ<br />
20 LZR<br />
15 LA<br />
16 LAR<br />
17 LB<br />
18 LBR<br />
14 LG<br />
21 OP<br />
Plate SD<br />
2m max.<br />
CNP1 (Note 1)<br />
(Note 2)<br />
RA1<br />
RA2<br />
RA3<br />
RA4<br />
10m max.<br />
Trouble (Note 6)<br />
Travel completion<br />
(Note 13)<br />
Ready<br />
Electromagnetic<br />
brake interlock<br />
Encoder Z-phase pulse<br />
(differential line driver)<br />
Encoder A-phase pulse<br />
(differential line driver)<br />
Encoder B-phase pulse<br />
(differential line driver)<br />
Control common<br />
Control common<br />
Encoder Z-phase pulse<br />
(open collector)<br />
(Note 9, 11)<br />
Note 1. To prevent an electric shock, always connect the protective earth (PE) terminal of the (terminal marked ) servo amplifier to<br />
the protective earth (PE) of the control box.<br />
2. Connect the diode in the correct direction. If it is connected reversely, the servo amplifier will be faulty and will not output<br />
signals, disabling the emergency stop and other protective circuits.<br />
3. The forced stop switch (normally closed contact) must be installed.<br />
4. Supply 24VDC±10% 200mA current for interfaces from the outside. 200mA is the value applicable when all I/O signals are<br />
used. The current capacity can be decreased by reducing the number of I/O points. Refer to section 3.8.2 (1) that gives the<br />
current value necessary for the interface.<br />
5. When starting operation, always turn on the forced stop (EM1). (Normally closed contacts)<br />
6. Trouble (ALM) turns on in normal alarm-free condition.<br />
7. The pins with the same signal name are connected in the servo amplifier.<br />
8. Use <strong>MR</strong>ZJW3-SETUP221E (version C4 or later).<br />
9. For the sink I/O interface. For the source I/O interface, refer to section 3.8.3. However, pin 23 and pin 25 cannot be used at the<br />
source interface.<br />
10. The assigned signals can be changed using parameter No. PD02, PD04, PD06, PD08, PD10, PD12, or PD14.<br />
11. The assigned signals can be changed using parameter No.PD15 to PD18.<br />
12. The forward rotation stroke end (LSP) and the reverse rotation stroke end (LSN) automatically switch ON if not assigned to the<br />
external input signals.<br />
13. Set " 24 " in parameter No. PD16 to assign travel completion (MEND).<br />
13 - 2
CN2<br />
CN1<br />
CNP1<br />
13. POSITIONING MODE<br />
13.2.2 Connectors and signal arrangements<br />
POINT<br />
The pin configurations of the connectors are as viewed from the cable<br />
connector wiring section.<br />
The front view shown below is that of <strong>MR</strong>-<strong>JN</strong>-20A(1) or smaller. Refer to chapter 9 OUTLINE DRAWINGS for<br />
the appearances and connector layouts of the other servo amplifiers.<br />
AUTO<br />
CN2<br />
2 6 10<br />
LG 4<br />
<strong>MR</strong>R<br />
8<br />
MDR<br />
1 5 9<br />
P5 3<br />
<strong>MR</strong><br />
7<br />
MD<br />
CN3 (USB connector)<br />
Refer to section 11.4.<br />
MODE SET<br />
CN3<br />
CNP2<br />
The frames of the CN1 connectors<br />
are connected to the PE (earth)<br />
terminal in the amplifier.<br />
CN1<br />
2<br />
OPC<br />
1<br />
DICOM<br />
3<br />
15<br />
LA<br />
4<br />
MD0<br />
17<br />
SON<br />
5<br />
LB<br />
6<br />
DI0<br />
19<br />
ST1<br />
7<br />
LZ<br />
8<br />
ST2<br />
21<br />
EM1<br />
9<br />
OP<br />
10<br />
ALM 23<br />
(Note)<br />
MEND DI1<br />
11<br />
12<br />
RD<br />
25<br />
MBR<br />
13<br />
DOG<br />
14<br />
LG<br />
16<br />
LAR<br />
18<br />
LBR<br />
20<br />
LZR<br />
22<br />
PG<br />
24<br />
NG<br />
26<br />
The 3M make connector is shown.<br />
When using any other connector,<br />
refer to section 11.1.2.<br />
DOCOM<br />
Note. Set "<br />
24 " in parameter No. PD16 to assign travel completion (MEND).<br />
13 - 3
13. POSITIONING MODE<br />
13.2.3 Signal explanations<br />
For the I/O interfaces (symbols in I/O division column in the table), refer to section 3.8.2. In the positioning<br />
mode field of the table<br />
CP : Point table method CL: Program method<br />
: Denotes that the signal may be used in the initial setting status.<br />
: Denotes that the signal may be used by setting parameter No. PD02, PD04, PD06, PD08, PD10, PD12,<br />
and PD14 to PD18.<br />
The pin No.s in the connector pin No. column are those in the initial status.<br />
(1) I/O devices<br />
(a) Input devices<br />
Device Symbol<br />
Connector<br />
pin No.<br />
Functions/Applications<br />
Forced stop EM1 CN1-8 When EMG is turned off (contact between commons is opened), the<br />
servo amplifier falls in a forced stop state in which the base circuit is<br />
shut off, and the dynamic brake activates.<br />
When EM1 is turned on (contact between commons is shorted) in the<br />
forced stop state, the state can be reset.<br />
Proximity dog DOG CN1-25 When DOG is turned OFF, the proximity dog is detected. The polarity<br />
of dog detection can be changed using parameter No. PE03.<br />
Parameter No. PE03<br />
Proximity dog (DOG)<br />
detection polarity<br />
0 (initial value) OFF<br />
1 ON<br />
I/O<br />
division<br />
DI-1<br />
DI-1<br />
Positioning<br />
mode<br />
CP CL<br />
Forward<br />
rotation stroke<br />
end<br />
LSP<br />
To start operation, turn LSP/LSN on. Turn it off to bring the motor to a<br />
sudden stop and make it servo-locked.<br />
(Note) Device<br />
Operation<br />
DI-1<br />
LSP LSN CCW direction CW direction<br />
1 1<br />
0 1<br />
1 0<br />
0 0<br />
Note. 0: off<br />
1: on<br />
Reverse<br />
rotation stroke<br />
end<br />
LSN<br />
A stopping method can be changed by parameter No. PD20.<br />
Set parameter No. PD01 as indicated below to switch on the signals<br />
(keep terminals shorted) automatically in the servo amplifier.<br />
DI-1<br />
Parameter No. PD01<br />
LSP<br />
Status<br />
LSN<br />
4 Automatic ON<br />
8 Automatic ON<br />
C Automatic ON Automatic ON<br />
If LSP and LSN are not assigned to the external input signals, they<br />
turn ON automatically regardless of the value set in parameter No.<br />
PD01.<br />
When LSP or LSN turns OFF, an external stroke limit warning (99. )<br />
occurs, and warning (WNG) turns OFF. However, when using WNG,<br />
set parameter No. PD15 to PD18 to make it usable.<br />
13 - 4
13. POSITIONING MODE<br />
Device Symbol<br />
Connector<br />
pin No.<br />
Functions/Applications<br />
Servo-on SON CN1-4 When SON is turned on, the power is supplied to the base circuit and<br />
the servo amplifier is ready to operate (servo-on).<br />
When SON is turned off, the power to the base circuit is shut off and<br />
the servo motor coasts.<br />
Set parameter No. PD01 to " 4 " to switch this signal on (keep<br />
terminals connected) automatically in the servo amplifier.<br />
Reset RES When RES is turned on for 50ms or longer, an alarm can be<br />
deactivated.<br />
Some alarms cannot be deactivated by the reset (RES). Refer to<br />
section 8.1.<br />
Turning RES on in an alarm-free status shuts off the base circuit. The<br />
base circuit is not shut off when " 1 " is set in parameter No.<br />
PD20.<br />
This device is not designed to make a stop. Do not turn it ON during<br />
operation.<br />
Automatic MD0 CN1-3 Turning MD0 ON selects the automatic operation mode, and turning<br />
/manual<br />
it OFF selects the manual operation mode.<br />
selection<br />
Internal TL1<br />
The internal torque limit 2 (parameter No. PC14) becomes valid by<br />
torque limit<br />
turning TL1 on.<br />
selection<br />
The forward torque limit (parameter No. PA11) and the reverse<br />
torque limit (parameter No. PA12) are always valid.<br />
The smallest torque limit among the valid forward and reverse torque<br />
limits is the actual torque limit value.<br />
I/O<br />
division<br />
DI-1<br />
DI-1<br />
DI-1<br />
DI-1<br />
Positioning<br />
mode<br />
CP CL<br />
(Note)<br />
Input<br />
Comparison between limit<br />
device<br />
values<br />
TL1<br />
0<br />
Parameter<br />
Parameter No. PA11<br />
><br />
No. PC14 Parameter<br />
No. PA12<br />
1<br />
Parameter<br />
Parameter No. PA11<br />
<<br />
No. PC14 Parameter<br />
No. PA12<br />
Note. 0: off<br />
1: on<br />
Valid torque limit value<br />
Forward Reverse<br />
rotation rotation<br />
Parameter Parameter<br />
No. PA11 No. PA12<br />
Parameter Parameter<br />
No. PA11 No. PA12<br />
Parameter Parameter<br />
No. PC14 No. PC14<br />
Refer to section 3.6.1(4).<br />
Temporary<br />
stop/Restart<br />
TSTP<br />
Turning TSTP ON during automatic operation makes a temporary<br />
stop.<br />
Turning TSTP ON again makes a restart.<br />
Forward rotation start (ST1) or Reverse rotation start (ST2) is ignored<br />
if it is turned ON during a temporary stop.<br />
When the automatic operation mode is changed to the manual<br />
operation mode during a temporary stop, the movement remaining<br />
distance is erased.<br />
During a home position return or during JOG operation, Temporary<br />
stop/ Restart input is ignored.<br />
13 - 5<br />
DI-1
13. POSITIONING MODE<br />
Device Symbol<br />
Connector<br />
pin No.<br />
Functions/Applications<br />
Proportion PC<br />
When PC is turned on, the type of the speed loop switches from the<br />
control<br />
proportional integral type to the proportional type.<br />
If the servo motor at a stop is rotated even one pulse due to any<br />
external factor, it generates torque to compensate for a position shift.<br />
When the servo motor shaft is to be locked mechanically after travel<br />
completion (MEND), switching on the proportion control (PC) upon<br />
travel completion (MEND) will suppress the unnecessary torque<br />
generated to compensate for a position shift.<br />
In case of locking the servo motor shaft for a long time, turn on the<br />
internal torque limit selection (TL1) simultaneously with the proportion<br />
control (PC). Then, set the internal torque limit 2 (parameter No.<br />
PC14) in order to make the torque lower than the rating.<br />
Forward ST1 CN1-6 1. In absolute value command system<br />
rotation start<br />
Turning ST1 ON for automatic operation executes positioning once<br />
on the basis of the position data set to the point table.<br />
Turning ST1 ON for a home position return immediately starts a<br />
home position return.<br />
Keeping ST1 ON for JOG operation performs rotation in the<br />
forward rotation direction.<br />
Forward rotation indicates the address increasing direction.<br />
2. In incremental value command system<br />
Turning ST1 ON for automatic operation executes positioning once<br />
in the forward rotation direction on the basis of the position data<br />
set to the point table.<br />
Turning ST1 ON for a home position return immediately starts a<br />
home position return.<br />
Keeping ST1 ON for JOG operation performs rotation in the<br />
forward rotation direction.<br />
Forward rotation indicates the address increasing direction.<br />
Reverse ST2 CN1-7 Use this device in the incremental value command system.<br />
rotation start<br />
Turning ST2 ON for automatic operation executes positioning once in<br />
the reverse rotation direction on the basis of the position data set to<br />
the point table.<br />
Keeping ST2 ON for JOG operation performs rotation in the reverse<br />
rotation direction.<br />
Reverse rotation indicates the address decreasing direction.<br />
Forward ST1 CN1-6 1. For automatic operation mode<br />
rotation start<br />
Turning ST1 ON executes the program operation selected in DI0<br />
to DI2.<br />
2. For JOG operation in manual operation mode<br />
Keeping ST1 ON performs rotation in the forward rotation<br />
direction. Forward rotation indicates the address increasing<br />
direction.<br />
Reverse ST2 CN1-7 Keeping ST2 ON in JOG operation in manual operation mode<br />
rotation start<br />
performs rotation in the reverse rotation direction. Reverse rotation<br />
indicates the address decreasing direction.<br />
ST2 is invalid in other operation modes.<br />
Gain changing CDP The values of the load to motor inertia moment ratio and the gains<br />
are changed to the value set in parameter No. PB29 to PB34 by<br />
turning CDP on.<br />
I/O<br />
division<br />
DI-1<br />
DI-1<br />
DI-1<br />
DI-1<br />
DI-1<br />
DI-1<br />
Positioning<br />
mode<br />
CP CL<br />
13 - 6
13. POSITIONING MODE<br />
Device<br />
Symbol<br />
Connector<br />
pin No.<br />
Functions/Applications<br />
I/O<br />
division<br />
Positioning<br />
mode<br />
CP CL<br />
Point table No.<br />
/Program No.<br />
selection 1<br />
DI0 CN1-5 <br />
The point table No. and the home position return mode are selected<br />
by DI0 to DI2.<br />
<br />
The program No. is selected by DI0 to DI2.<br />
DI-1<br />
Point table No.<br />
/Program No.<br />
selection 2<br />
Point table No.<br />
/Program No.<br />
selection 3<br />
(Note) Device<br />
Selection description<br />
DI1 CN1-23 DI2 DI1 DI0 Point table method Program method DI-1<br />
0 0 0 Home position return mode Program No. 1<br />
0 0 1 Point table No. 1 Program No. 2<br />
0 1 0 Point table No. 2 Program No. 3<br />
0 1 1 Point table No. 3 Program No. 4<br />
1 0 0 Point table No. 4 Program No. 5<br />
DI2 1 0 1 Point table No. 5 Program No. 6 DI-1<br />
1 1 0 Point table No. 6 Program No. 7<br />
1 1 1 Point table No. 7 Program No. 8<br />
Note. 0: off<br />
1: on<br />
Program<br />
input 1<br />
PI1<br />
Turn PI1 on to resume the step stopped by the SYNC (1) command<br />
in the program.<br />
DI-1<br />
(b) Output devices<br />
Device Symbol<br />
Connector<br />
pin No.<br />
Functions/Applications<br />
Trouble ALM CN1-9 ALM turns off when power is switched off or the protective circuit is<br />
activated to shut off the base circuit.<br />
When there is no alarm, ALM turns on approximately 1s after poweron.<br />
Ready RD CN1-11 RD turns on when the servo motor is ready for the operation after<br />
turning on the servo-on (SON).<br />
In-position INP CN1-10 INP turns on when the number of droop pulses is in the preset inposition<br />
range. The in-position range can be changed using<br />
parameter No. PA10.<br />
When the in-position range is increased, may be kept connected<br />
during low-speed rotation.<br />
INP turns on when servo-on turns on.<br />
If parameter No. PA04 is set to " 1 " and the overload tough drive<br />
function is enabled, the INP ON time during the overload tough drive<br />
is delayed. The delay time can be limited by parameter No. PC26.<br />
Electromagnetic MBR CN1-12 MBR turns off when the servo is switched off or an alarm occurs.<br />
brake interlock<br />
At an alarm occurrence, MBR turns off regardless of the base circuit<br />
status.<br />
Home position ZP<br />
ZP turns ON when operation is ready to start, but turns OFF in any of<br />
return<br />
the following cases.<br />
completion<br />
1) Home position return has not been made.<br />
2) While a home position return is being made.<br />
When any of 1) or 2) has not occurred and a home position return is<br />
already completed at least once, Home position return completion<br />
(ZP) turns to the same output status as Ready (RD).<br />
I/O<br />
division<br />
DO-1<br />
DO-1<br />
DO-1<br />
DO-1<br />
DO-1<br />
Positioning<br />
mode<br />
CP CL<br />
13 - 7
13. POSITIONING MODE<br />
Device Symbol<br />
Connector<br />
pin No.<br />
Functions/Applications<br />
Temporary PUS<br />
PUS turns ON when deceleration is started to make a stop by<br />
stop<br />
Temporary stop/Restart (TSTP). When Temporary stop/Restart<br />
(TSTP) is made valid again to resume operation, PUS turns OFF.<br />
Travel MEND<br />
MEND turns ON when In-position (INP) turns ON and the command<br />
completion<br />
remaining distance is "0".<br />
MEND turns ON when servo-on turns ON.<br />
If parameter No. PA04 is set to " 1 " and the overload tough drive<br />
function is enabled, the INP ON time during the overload tough drive<br />
is delayed. ON time of MEND is also delayed interlocked with this.<br />
Rough match CPO CP0 turns ON when the command remaining distance becomes less<br />
than the rough match output range set in the parameter. CP0 is not<br />
output while the base circuit is off.<br />
CP0 turns ON at servo-on.<br />
Zero speed ZSP ZSP turns on when the servo motor speed is zero speed (50r/min) or<br />
less. Zero speed can be changed using parameter No. PC10.<br />
Example Zero speed is 50r/min<br />
I/O<br />
division<br />
DO-1<br />
DO-1<br />
DO-1<br />
DO-1<br />
Positioning<br />
mode<br />
CP CL<br />
Forward<br />
rotation<br />
direction<br />
Servo motor<br />
speed<br />
Reverse<br />
rotation<br />
direction<br />
Zero speed<br />
(ZSP)<br />
OFF level<br />
70r/min<br />
ON level<br />
50r/min<br />
0r/min<br />
ON level<br />
50r/min<br />
OFF level<br />
70r/min<br />
ON<br />
OFF<br />
1)<br />
2)<br />
3)<br />
4)<br />
20r/min<br />
(Hysteresis width)<br />
Parameter<br />
No. PC10<br />
Parameter<br />
No. PC10<br />
20r/min<br />
(Hysteresis width)<br />
ZSP turns on 1) when the servo motor is decelerated to 50r/min, and<br />
ZSP turns off 2) when the servo motor is accelerated to 70r/min again.<br />
ZSP turns on 3) when the servo motor is decelerated again to 50r/min,<br />
and turns off 4) when the servo motor speed has reached -70r/min.<br />
The range from the point when the servo motor speed has reached<br />
ON level, and ZSP turns on, to the point when it is accelerated again<br />
and has reached OFF level is called hysteresis width.<br />
Hysteresis width is 20r/min for <strong>MR</strong>-<strong>JN</strong>-A servo amplifier.<br />
If parameter No. PA04 is set to " 1 " and the overload tough drive<br />
function is enabled, the ZSP ON time during the overload tough drive<br />
is delayed. The delay time can be limited by parameter No. PC26.<br />
Limiting torque TLC TLC turns ON when the generated torque reaches the value set to the<br />
forward torque limit (parameter No. PA11), the reverse torque limit<br />
(parameter No. PA12) or the internal torque limit 2 (parameter No.<br />
PC14). (Refer to section 3.6.1(4).)<br />
Warning WNG When a warning occurs, WNG turns on. When there is no warning,<br />
WNG turns off approximately 1s after power-on.<br />
During CDPS<br />
variable gain<br />
CDPS is on during gain changing.<br />
selection<br />
DO-1<br />
DO-1<br />
DO-1<br />
13 - 8
13. POSITIONING MODE<br />
Device Symbol<br />
Connector<br />
pin No.<br />
Functions/Applications<br />
During tough MTTR<br />
If the instantaneous power failure tough drive function selection is<br />
drive<br />
enabled, MTTR turns on when the instantaneous tough drive<br />
activates.<br />
If parameter No.PD20 is set to " 1 ", MTTR also turns on when<br />
the overload tough drive activates.<br />
Position range POT POT turns ON when the actual current position falls within the range<br />
set in the parameter.<br />
It is OFF when a home position return is not yet completed or while<br />
the base circuit is shut off.<br />
Point table No. PT0<br />
As soon as travel completion (MEND) turns ON, the point table No. is<br />
output 1<br />
output in 3-bit code.<br />
I/O<br />
division<br />
DO-1<br />
DO-1<br />
DO-1<br />
Positioning<br />
mode<br />
CP CL<br />
(Note) Device<br />
PT2 PT1 PT0<br />
Description<br />
Point table No. PT1 0 0 1 Point table No. 1 DO-1<br />
output 2 0 1 0 Point table No. 2<br />
0 1 1 Point table No. 3<br />
1 0 0 Point table No. 4<br />
Point table No. PT2 1 0 1 Point table No. 5 DO-1<br />
output 3 1 1 0 Point table No. 6<br />
1 1 1 Point table No. 7<br />
Program<br />
output 1<br />
SYNC<br />
synchronous<br />
output<br />
OUT1<br />
OUT1 turns on when the OUTON (1) command in the program is<br />
given. OUT1 turns off when the OUTOF command is given.<br />
By setting parameter No. PE14, the time to turn it off can be set.<br />
DO-1<br />
SOUT Waiting for input of program SYNC (1). DO-1<br />
(c) Input signals<br />
Signal<br />
Symbol<br />
Connector<br />
pin No.<br />
Functions/Applications<br />
I/O<br />
division<br />
Positioning<br />
mode<br />
CP CL<br />
Forward<br />
rotation pulse<br />
train<br />
Reverse<br />
rotation pulse<br />
train<br />
PP<br />
NP<br />
Used to connect the manual pulse generator (<strong>MR</strong>-HDP01). (Refer to<br />
sections 11.14 and 13.5.2.)<br />
When using PP or NP, set parameter No. PD02 to make it usable.<br />
This function is not enabled only with the input of PG or NG.<br />
DI-2<br />
PG<br />
CN1-22<br />
NG<br />
CN1-24<br />
13 - 9
13. POSITIONING MODE<br />
(3) Output signals<br />
Signal<br />
Symbol<br />
Connector<br />
pin No.<br />
Functions/Applications<br />
I/O<br />
division<br />
Positioning<br />
mode<br />
CP CL<br />
Encoder<br />
Z-phase pulse<br />
(Open<br />
collector)<br />
OP CN1-21 Outputs the zero-point signal of the encoder. One pulse is output per<br />
servo motor revolution. OP turns on when the zero-point position is<br />
reached. (Negative logic)<br />
The minimum pulse width is about 400μs. For home position return<br />
using this pulse, set the creep speed to 100r/min. or less.<br />
DO-2<br />
Encoder<br />
A-phase pulse<br />
(Differential<br />
line driver)<br />
Encoder<br />
B-phase pulse<br />
(Differential<br />
line driver)<br />
LA<br />
LAR<br />
LB<br />
LBR<br />
CN1-15<br />
CN1-16<br />
CN1-17<br />
CN1-18<br />
Outputs pulses per servo motor revolution set in parameter No. PA15<br />
in the differential line driver system.<br />
In CCW rotation of the servo motor, the encoder B-phase pulse lags<br />
the encoder A-phase pulse by a phase angle of /2.<br />
The relationships between rotation direction and phase difference of<br />
the A- and B-phase pulses can be changed using parameter No.<br />
PC13.<br />
DO-2<br />
Encoder<br />
Z-phase pulse<br />
(Differential<br />
line driver)<br />
LZ<br />
LZR<br />
CN1-19<br />
CN1-20<br />
The same signal as OP is output in the differential line driver system.<br />
DO-2<br />
(4) Power supply<br />
Signal Symbol<br />
Connector<br />
pin No.<br />
Functions/Applications<br />
Digital I/F DICOM CN1-1 Used to input 24VDC (24VDC±10% 200mA) for I/O interface.<br />
power supply<br />
The power supply capacity changes depending on the number of I/O<br />
input<br />
interface points to be used.<br />
For a sink interface, connect the positive terminal of the 24VDC<br />
external power supply to DICOM.<br />
For a source interface, connect the negative terminal of the 24VDC<br />
external power supply to DICOM.<br />
Open collector OPC CN1-2 When inputting a pulse train in the open-collector system, supply this<br />
power input<br />
terminal with the positive (+) power of 24VDC.<br />
Digital I/F DOCOM CN1-13 Common terminal for input signals such as SON and EM1. Separated<br />
common<br />
from LG.<br />
For a sink interface, connect the negative terminal of the 24VDC<br />
external power supply to DOCOM.<br />
For a source interface, connect the positive terminal of the 24VDC<br />
external power supply to DOCOM.<br />
Control<br />
LG CN1-14 Common terminal for OP.<br />
common<br />
Shield SD Plate Connect the external conductor of the shielded wire.<br />
I/O<br />
division<br />
Positioning<br />
mode<br />
CP CL<br />
13 - 10
13. POSITIONING MODE<br />
13.2.4 Detailed description of the signals<br />
(1) Forward rotation start, reverse rotation start, temporary stop/restart<br />
(a) A forward rotation start (ST1) or a reverse rotation start (ST2) should make the sequence which can be<br />
used after the main circuit has been established. These signals are invalid if it is switched on before the<br />
main circuit is established. Normally, it is interlocked with the ready (RD).<br />
(b) A start in the servo amplifier is made when a forward rotation start (ST1) or a reverse rotation start (ST2)<br />
changes from OFF to ON. The delay time of the servo amplifier's internal processing is max. 3ms. The<br />
delay time of other devices is max. 10ms.<br />
Servo motor<br />
speed<br />
Forward<br />
rotation<br />
0r/min<br />
Forward rotation start<br />
(ST1) or reverse<br />
rotation start (ST2)<br />
Temporary stop/restart<br />
(TSTP)<br />
3ms or less<br />
6ms or more<br />
10ms<br />
or less<br />
3ms or less<br />
(c) When a programmable controller is used, the ON time of a forward rotation start (ST1), a reverse<br />
rotation start (ST2) or temporary start/stop (TSTP) signal should be 6ms or longer to prevent a<br />
malfunction.<br />
(d) During operation, the forward rotation start (ST1) or reverse rotation start (ST2) is not accepted. The<br />
next operation should always be started after the rough match (CPO) is output with the rough match<br />
output range set to "0" or after the travel completion (MEND) is output.<br />
13 - 11
13. POSITIONING MODE<br />
(2) Travel completion, rough match, in-position<br />
POINT<br />
If an alarm cause, etc. are removed and servo-on occurs after a stop is made by<br />
servo-off, alarm occurrence or forced stop (EM1) ON during automatic<br />
operation, travel completion (MEND), rough-match, (CPO) and in-position (INP)<br />
are turned on. To resume operation, confirm the current position and the<br />
selected point table No. and program No. for preventing unexpected operation.<br />
(a) Travel completion<br />
The following timing charts show the output timing relationships between the position command<br />
generated in the servo amplifier and the travel completion (MEND). This timing can be changed using<br />
parameter No. PA10 (in-position range). MEND turns ON in the servo-on status. MEND does not turn<br />
ON during automatic operation.<br />
Forward rotation start<br />
(ST1) or reverse<br />
rotation start (ST2)<br />
Position command<br />
and<br />
servo motor speed<br />
Travel completion<br />
(MEND)<br />
ON<br />
Forward<br />
rotation<br />
0r/min<br />
OFF<br />
3ms or less<br />
ON<br />
OFF<br />
Position<br />
command<br />
Servo motor<br />
speed<br />
In-position<br />
range<br />
When parameter No. PA10 is small<br />
Forward rotation start<br />
(ST1) or reverse<br />
rotation start (ST2)<br />
Position command<br />
and<br />
servo motor speed<br />
Travel completion<br />
(MEND)<br />
ON<br />
OFF<br />
3ms or less<br />
Forward<br />
rotation<br />
0r/min<br />
ON<br />
OFF<br />
Position<br />
command<br />
Servo motor<br />
speed<br />
In-position<br />
range<br />
When parameter No. PA10 is large<br />
13 - 12
13. POSITIONING MODE<br />
(b) Rough match<br />
The following timing charts show the relationships between the signal and the position command<br />
generated in the servo amplifier. This timing can be changed using parameter No. PE12 (rough match<br />
output range). CPO turns ON in the servo-on status. CPO does not turn ON during automatic operation.<br />
Forward rotation start<br />
(ST1) or reverse<br />
rotation start (ST2)<br />
Position<br />
command<br />
ON<br />
OFF<br />
Forward<br />
rotation<br />
0r/min<br />
3ms or less<br />
Rough match (CPO)<br />
ON<br />
OFF<br />
When parameter No. PE12 is set to "0"<br />
Forward rotation start<br />
(ST1) or reverse<br />
rotation start (ST2)<br />
Position<br />
command<br />
ON<br />
Forward<br />
rotation<br />
0r/min<br />
OFF<br />
3ms or less<br />
Rough match output range<br />
Rough match (CPO)<br />
ON<br />
OFF<br />
When parameter No. PE12 is set to more than "0"<br />
13 - 13
13. POSITIONING MODE<br />
(3) In-position<br />
The following timing charts show the relationships between the signal and the feedback pulse of the servo<br />
motor. This timing can be changed using parameter No.PA10 (in-position range). INP turns ON in the<br />
servo-on status.<br />
Forward rotation start<br />
(ST1) or reverse<br />
rotation start (ST2)<br />
ON<br />
OFF<br />
3ms or less<br />
In-position range<br />
Servo motor<br />
speed<br />
In-position (INP)<br />
Forward<br />
rotation<br />
0r/min<br />
ON<br />
OFF<br />
When positioning operation is performed once<br />
Forward rotation start<br />
(ST1) or reverse<br />
rotation start (ST2)<br />
Servo motor<br />
speed<br />
ON<br />
OFF<br />
Forward<br />
rotation<br />
0r/min<br />
Reverse<br />
rotation<br />
3ms or less<br />
In-position range<br />
In-position (INP)<br />
ON<br />
OFF<br />
When servo motor reverses rotation direction during automatic continuous operation<br />
13 - 14
13. POSITIONING MODE<br />
13.3 Automatic operation mode for point table method<br />
13.3.1 What is automatic operation mode?<br />
(1) Concept of automatic operation<br />
Automatic operation is a positioning function to automatically start and stop at a target position with onetime<br />
start signal. The data required for positioning is set in the point table.<br />
Servo motor<br />
speed<br />
Forward<br />
rotation<br />
0r/min<br />
Start (Note)<br />
Positioning<br />
Note. For the start, use the forward rotation start (ST1) or reverse rotation start (ST2).<br />
(2) Automatic operation types<br />
With this servo, the following automatic operations are available.<br />
Automatic operation using point table<br />
(Refer to section 13.3.2)<br />
One positioning operation<br />
Automatic continuous<br />
operation<br />
Varied speed operation<br />
Automatic continuous<br />
positioning operation<br />
There are two types of command systems; the absolute value command system which requires specifying<br />
the positioning addresses to move to for each automatic operation and the incremental value command<br />
system which requires specifying the travel distance from the current position to the target position.<br />
13 - 15
13. POSITIONING MODE<br />
(3) Command system<br />
Make selection with the input signals from among the point tables that have been set in advance, and<br />
perform operation with Forward rotation start (ST1) or Reverse rotation start (ST2). Automatic operation<br />
has the absolute value command system and incremental value command system.<br />
(a) Absolute value command system<br />
As position data, set the target address to be reached.<br />
Setting range: -999999 to 999999 [×10 STM μm] (STM = feed length multiplication parameter No. PE02)<br />
-999999 999999<br />
Position data setting range<br />
[ 10 STM m]<br />
(b) Incremental value command system<br />
As position data, set the travel distance from the current address to the target address.<br />
Setting range: 0 to 999999 ×10 STM μm] (STM = feed length multiplication parameter No. PE02)<br />
Current address<br />
Target address<br />
Position data = |target address - current address|<br />
13 - 16
13. POSITIONING MODE<br />
13.3.2 Automatic operation using point table<br />
(1) One-time positioning operation<br />
(a) Absolute value command system<br />
1) Point table<br />
Set the point table values by using <strong>MR</strong> Configurator or the operation section.<br />
Set the position data, servo motor speed, acceleration time constant, deceleration time constant,<br />
dwell and auxiliary function in the point table.<br />
Setting "0" or "1" in the auxiliary function sets the point table to the absolute value command system.<br />
Setting "2" or "3" in the auxiliary function sets the point table to the incremental value command<br />
system.<br />
Item Setting range Unit Description<br />
Position data -999999 to 999999 ×10 STM μm<br />
Servo motor<br />
speed<br />
Acceleration time<br />
constant<br />
Deceleration time<br />
constant<br />
0 to permissible<br />
speed<br />
r/min<br />
(1) When using this point table as absolute value command system,<br />
set the target address (absolute value).<br />
(2) When using this point table as incremental value command system,<br />
set the travel distance. A "-" sign indicates a reverse rotation command.<br />
Set the command speed of the servo motor for execution of positioning.<br />
The setting should be equal to or less than the instantaneous permissible<br />
speed of the servo motor.<br />
0 to 20000 ms Set the time until the servo motor reaches to the rated speed.<br />
0 to 20000 ms Set the time until the servo motor stops from the rated speed.<br />
Dwell 0 to 20000 ms<br />
Auxiliary function 0 to 3<br />
When dwell is set and the set dwell has passed after the position command of<br />
the selected point table is completed, the position command of the next point<br />
table is started.<br />
Set "0" in the auxiliary function to make the dwell invalid.<br />
Set "1" in the auxiliary function and 0 in the dwell to perform varied speed<br />
operation.<br />
(1) When using this point table in the absolute value command system<br />
0: Automatic operation is performed in accordance with a single point table<br />
chosen.<br />
1: Operation is performed in accordance with consecutive point tables<br />
without a stop.<br />
(2) When using this point table in the incremental value command system<br />
2: Automatic operation is performed in accordance with a single point table<br />
chosen.<br />
3: Operation is performed in accordance with consecutive point tables<br />
without a stop.<br />
When a different rotation direction is set, smoothing zero (command output) is<br />
confirmed and the rotation direction is then reversed.<br />
Setting "1" in point table No. 7 results in an error.<br />
(Refer to paragraph (2) of this section.)<br />
13 - 17
13. POSITIONING MODE<br />
2) Parameter setting<br />
Set the following parameters to perform automatic operation.<br />
Select the absolute value command system with parameter No. PE01 (Command mode selection).<br />
Parameter No. PE01<br />
0<br />
Absolute value command system (initial value)<br />
By using parameter No. PA14 (Rotation direction selection), select servo motor rotation direction at<br />
the time when the forward rotation start (ST1) turns ON.<br />
Parameter No. PA14 setting<br />
0<br />
1<br />
Servo motor rotation direction when<br />
forward rotation start (ST1) turns on<br />
CCW rotation with + position data<br />
CW rotation with - position data<br />
CW rotation with + position data<br />
CCW rotation with - position data<br />
CCW<br />
CW<br />
Set the feed length multiplication (STM) of position data in parameter No. PE02 (Feeding function<br />
selection).<br />
Parameter No. PE02 setting<br />
Feed unit Position data input range<br />
[μm]<br />
[mm]<br />
0 1 -999.999 to +999.999<br />
1 10 -9999.99 to +9999.99<br />
2 100 -99999.9 to +99999.9<br />
3 1000 -999999 to +999999<br />
3) Operation<br />
Choosing the point table using DI0 to DI2 and turning ST1 ON starts positioning to the position data<br />
at the preset speed, acceleration time constant and deceleration time constant. At this time, reverse<br />
rotation start (ST2) is invalid.<br />
Item Device/Parameter used Description<br />
Automatic operation mode selection Automatic/manual selection (MD0) Turn MD0 ON.<br />
Point table selection<br />
Point table No./Program No. selection 1 (DI0)<br />
Point table No./Program No. selection 2 (DI1)<br />
Point table No./Program No. selection 3 (DI2)<br />
Refer to the text.<br />
Start Forward rotation start (ST1) Turn ST1 ON to start.<br />
13 - 18
13. POSITIONING MODE<br />
Select a point table using the point table No./program No. selection 1 (DI0) to point table No./program<br />
No. selection 3 (DI2) as shown in the following table.<br />
Input device<br />
DI2 DI1 DI0<br />
Selected point table No.<br />
0 0 1 1<br />
0 1 0 2<br />
0 1 1 3<br />
1 0 0 4<br />
1 0 1 5<br />
1 1 0 6<br />
1 1 1 7<br />
(b) Incremental value command system<br />
1) Point table<br />
Set the point table values by using <strong>MR</strong> Configurator or the operation section.<br />
Set the position data, servo motor speed, acceleration time constant, deceleration time constant,<br />
dwell and auxiliary function in the point table.<br />
Item Setting range Unit Description<br />
Position data 0 to 999999 ×10 STM μm<br />
Servo motor<br />
speed<br />
Acceleration time<br />
constant<br />
Deceleration time<br />
constant<br />
0 to permissible<br />
speed<br />
r/min<br />
Set the travel distance.<br />
The unit can be changed using feed length multiplication selection of<br />
parameter No. PE02.<br />
Set the command speed of the servo motor for execution of positioning.<br />
The setting should be equal to or less than the instantaneous permissible<br />
speed of the servo motor.<br />
0 to 20000 ms Set the time until the servo motor reaches to the rated speed.<br />
0 to 20000 ms Set the time until stops from the rated speed.<br />
Dwell 0 to 20000 ms<br />
Auxiliary function 0, 1<br />
When dwell is set and the set dwell has passed after the position command of<br />
the selected point table is completed, the position command of the next point<br />
table is started.<br />
Set "0" in the auxiliary function to make the dwell invalid.<br />
Set "1" in the auxiliary function and 0 in the dwell to perform varied speed<br />
operation.<br />
0: Automatic operation is performed in accordance with a single point table<br />
chosen.<br />
1: Operation is performed in accordance with consecutive point tables without<br />
a stop.<br />
When a different rotation direction is set, smoothing zero (command output) is<br />
confirmed and the rotation direction is then reversed.<br />
Setting "1" in point table No. 7 results in an error.<br />
(Refer to (2) in this section.)<br />
13 - 19
13. POSITIONING MODE<br />
2) Parameter setting<br />
Set the following parameters to perform automatic operation.<br />
Select the incremental value command system with parameter No. PE01 (command mode selection)<br />
as shown below.<br />
Parameter No. PE01<br />
1<br />
Incremental value command system<br />
By using parameter No. PA14 (Rotation direction selection), select servo motor rotation direction at<br />
the time when the forward rotation start (ST1) or reverse rotation start (ST2) is turns ON.<br />
Parameter No. PA14 setting<br />
0<br />
1<br />
Servo motor rotation direction<br />
Forward rotation start (ST1) ON Reverse rotation start (ST2) ON<br />
CCW rotation<br />
CW rotation<br />
(address incremented) (address decremented)<br />
CW rotation<br />
CCW rotation<br />
(address incremented) (address decremented)<br />
ST1: ON<br />
CCW<br />
ST2: ON<br />
CCW<br />
CW<br />
ST2: ON<br />
CW<br />
ST1: ON<br />
Parameter No. PA14: 0 Parameter No. PA14: 1<br />
Set the feed length multiplication (STM) of position data with parameter No. PE02 (Feeding function<br />
selection).<br />
Parameter No. PE02 setting<br />
Feed unit Position data input range<br />
[μm]<br />
[mm]<br />
0 1 0 to +999.999<br />
1 10 0 to +9999.99<br />
2 100 0 to +99999.9<br />
3 1000 0 to +999999<br />
13 - 20
13. POSITIONING MODE<br />
3) Operation<br />
Choosing the point table using DI0 to DI2 and turning ST1 ON starts a motion in the forward rotation<br />
direction over the travel distance of the position data at the preset speed and acceleration time<br />
constant.<br />
Turning ST2 ON starts a motion in the reverse rotation direction according to the values set to the<br />
selected point table.<br />
Item Device/Parameter used Description<br />
Automatic operation mode selection Automatic/manual selection (MD0) Turn MD0 ON.<br />
Point table selection<br />
Start<br />
Point table No./Program No. selection 1 (DI0)<br />
Point table No./Program No. selection 2 (DI1)<br />
Point table No./Program No. selection 3 (DI2)<br />
Forward rotation start (ST1)<br />
Reverse rotation start (ST2)<br />
Refer to (1) (a) 3) in this section.<br />
Turn ST1 ON to start motion in<br />
forward rotation direction.<br />
Turn ST2 ON to start motion in<br />
reverse rotation direction.<br />
(c) Automatic operation timing chart<br />
The timing chart is shown below.<br />
Automatic/manual<br />
selection (MD0)<br />
Servo-on (SON)<br />
ON<br />
OFF<br />
ON<br />
OFF<br />
Point table No. 1<br />
2<br />
Forward rotation start<br />
(ST1)<br />
Reverse rotation start<br />
(ST2) (Note1)<br />
ON<br />
OFF<br />
ON<br />
OFF<br />
6ms or more (Note 2)<br />
6ms or more<br />
3ms or less<br />
6ms or more (Note 2)<br />
6ms or more<br />
Servo motor<br />
speed<br />
Forward<br />
rotation<br />
0r/min<br />
Reverse<br />
rotation<br />
Point table<br />
No. 1<br />
Point table<br />
No. 2<br />
In-position (INP)<br />
Rough match (CPO)<br />
(Note 3)<br />
Travel completion<br />
(MEND)<br />
Point table No. output<br />
(PT0 to PT2)<br />
Ready (RD)<br />
Trouble (ALM)<br />
ON<br />
OFF<br />
ON<br />
OFF<br />
ON<br />
OFF<br />
ON<br />
OFF<br />
ON<br />
OFF<br />
1 2<br />
Note 1. Reverse rotation start (ST2) is invalid in the absolute value command system.<br />
2. External input signal detection delays by the input filter setting time of parameter No. PD19. Additionally, make up a<br />
sequence that changes the point table selection ahead of time by considering delays in output signal sequence from the<br />
controller and variations of a signal change due to hardware.<br />
3. If the over load tough drive function is enabled by setting parameter No. PA04 to " 1", INP turn-on delays during the<br />
overload tough drive. MEND turn-on also delays together with INP.<br />
13 - 21
13. POSITIONING MODE<br />
(2) Automatic continuous operation<br />
(a) What is Automatic continuous operation?<br />
By merely choosing one point table and turning ON the forward rotation start (ST1) or the reverse<br />
rotation start (ST2), operation can be performed in accordance with the point tables having consecutive<br />
numbers.<br />
Automatic continuous operation is available in two types: varied speed operation and automatic<br />
continuous positioning operation.<br />
Either type may be selected as follows.<br />
1) In absolute value command system<br />
Automatic<br />
continuous<br />
operation<br />
Varied speed operation<br />
Automatic continuous<br />
positioning operation<br />
Point table setting<br />
Auxiliary function<br />
Dwell When position data is in<br />
absolute value<br />
When position data is in<br />
incremental value<br />
0 1 3<br />
1 or more 1 3<br />
2) In incremental value command system<br />
Automatic<br />
continuous<br />
operation<br />
Varied speed operation<br />
Automatic continuous<br />
positioning operation<br />
Point table setting<br />
Dwell<br />
Auxiliary function<br />
0 1<br />
1 or more 1<br />
(b) Varied speed operation<br />
When "1" or "3" is set to the auxiliary function in the point tables up to No.6, varied speed operation can<br />
be performed at a maximum of 7 speeds. Set "0" to the auxiliary function in the last point table.<br />
When performing varied speed operation, always set "0" to the dwell. If "1" or more is set, automatic<br />
continuous positioning operation is made valid.<br />
The following table gives a setting example.<br />
Point table No.<br />
Dwell<br />
[ms] (Note 1)<br />
Auxiliary function<br />
1 0 1<br />
2 0 1<br />
3 0 0 (Note 2)<br />
4 0 1<br />
5 0 1<br />
6 0 1<br />
7 0 0 (Note 2)<br />
Variable speed operation<br />
Consecutive point table data<br />
Consecutive point table data<br />
Note 1. Always set "0".<br />
2. Always set "0" or "2" to the auxiliary function in the last point table among the<br />
consecutive point tables.<br />
13 - 22
13. POSITIONING MODE<br />
1) Absolute value command system<br />
This system is an auxiliary function for point tables to perform automatic continuous operation by<br />
specifying the absolute value command or incremental value command.<br />
Positioning in single direction<br />
The operation pattern given below assumes that the setting values are as indicated in the following<br />
table. Here, the point table No.1 uses the absolute value command system, the point table No.2 the<br />
incremental value command system, the point table No.3 the absolute value command system, and<br />
the point table No.4 the incremental value command system.<br />
Point table No.<br />
Acceleration time Deceleration (Note 1)<br />
Position data Servo motor<br />
Auxiliary<br />
constant time constant Dwell<br />
[×10 STM μm] speed [r/min]<br />
function<br />
[ms]<br />
[ms]<br />
[ms]<br />
1 5.00 3000 100 150 0 1<br />
2 3.00 2000 Invalid Invalid 0 3<br />
3 10.00 1000 Invalid Invalid 0 1<br />
4 6.00 500 Invalid Invalid 0 2 (Note 2)<br />
Note 1. Always set "0".<br />
2. Always set "0" or "2" to the auxiliary function in the last point table among the consecutive point tables.<br />
0: When point table is used in absolute value command system<br />
2: When point table is used in incremental value command system<br />
Acceleration time constant<br />
in the point table No.1 (100)<br />
Deceleration time<br />
constant in the point<br />
table No.1 (150)<br />
Servo motor<br />
speed<br />
Forward<br />
rotation<br />
0r/min<br />
Speed<br />
(3000) Speed<br />
(2000)<br />
Speed<br />
(1000)<br />
Speed<br />
(500)<br />
Position address<br />
3.00 6.00<br />
0 5.00 8.00 10.00<br />
16.00<br />
Selected point<br />
table No.<br />
1<br />
Forward rotation<br />
start (ST1)<br />
ON<br />
OFF<br />
Point table No. output<br />
(PT0 to PT2)<br />
1<br />
In-position (INP)<br />
Travel completion<br />
(MEND)<br />
ON<br />
OFF<br />
ON<br />
OFF<br />
13 - 23
13. POSITIONING MODE<br />
Positioning that reverses the direction midway<br />
The operation pattern given below assumes that the setting values are as indicated in the following<br />
table. Here, the point table No.1 uses the absolute value command system, the point table No.2 the<br />
incremental value command system, and the point table No.3 the absolute value system.<br />
Point table No.<br />
Acceleration Deceleration (Note 1)<br />
Position data Servo motor<br />
Auxiliary<br />
time constant time constant Dwell<br />
[×10 STM μm] speed [r/min]<br />
function<br />
[ms]<br />
[ms]<br />
[ms]<br />
1 5.00 3000 100 150 0 1<br />
2 7.00 2000 Invalid Invalid 0 3<br />
3 8.00 1000 Invalid Invalid 0 0 (Note 2)<br />
Note 1. Always set "0".<br />
2. Always set "0" or "2" to the auxiliary function in the last point table among the consecutive point tables.<br />
0: When point table is used in absolute value command system<br />
2: When point table is used in incremental value command system<br />
Acceleration time constant in<br />
the point table No.1 (100)<br />
Deceleration time<br />
constant in the point<br />
table No.1 (150)<br />
Servo motor<br />
speed<br />
Forward<br />
rotation<br />
0r/min<br />
Reverse<br />
rotation<br />
Speed<br />
(3000) Speed<br />
(2000)<br />
Acceleration time constant in<br />
the point table No.1 (100)<br />
Speed<br />
(1000)<br />
Position address<br />
7.00<br />
0 5.00 12.00<br />
8.00<br />
Selected point<br />
table No.<br />
1<br />
Forward rotation<br />
start (ST1)<br />
ON<br />
OFF<br />
Point table No. output<br />
(PT0 to PT2)<br />
1<br />
In-position (INP)<br />
Travel completion<br />
(MEND)<br />
ON<br />
OFF<br />
ON<br />
OFF<br />
13 - 24
13. POSITIONING MODE<br />
2) Incremental value command system<br />
The position data of the incremental value command system is the sum of the position data of the<br />
consecutive point tables.<br />
The operation pattern given below assumes that the setting values are as indicated in the following<br />
table.<br />
Point table No.<br />
Acceleration Deceleration (Note 1)<br />
Position data Servo motor<br />
Auxiliary<br />
time constant time constant Dwell<br />
[×10 STM μm] speed [r/min]<br />
function<br />
[ms]<br />
[ms]<br />
[ms]<br />
1 5.00 3000 100 150 0 1<br />
2 6.00 2000 Invalid Invalid 0 1<br />
3 3.00 1000 Invalid Invalid 0 0 (Note 2)<br />
Note 1. Always set "0".<br />
2. Always set "0" to the auxiliary function in the last point table among the consecutive point tables.<br />
Acceleration time constant in<br />
the point table No.1 (100)<br />
Deceleration time<br />
constant in the point<br />
table No.1 (150)<br />
Servo motor<br />
speed<br />
Forward<br />
rotation<br />
0r/min<br />
Speed<br />
(3000) Speed<br />
(2000) Speed<br />
(1000)<br />
Position address<br />
0<br />
5.00 6.00 3.00<br />
5.00 11.00 14.00<br />
Selected point<br />
table No.<br />
1<br />
Forward rotation start<br />
(ST1) (Note)<br />
ON<br />
OFF<br />
Point table No. output<br />
(PT0 to PT2)<br />
1<br />
In-position (INP)<br />
Travel completion<br />
(MEND)<br />
ON<br />
OFF<br />
ON<br />
OFF<br />
Note. Turning on reverse rotation start (ST2) starts positioning in the reverse rotation direction.<br />
13 - 25
13. POSITIONING MODE<br />
(c) Automatic continuous positioning operation<br />
When "1" or "3" is set to the auxiliary function in the point table, positioning of the next point table No. is<br />
executed continuously.<br />
When "1" or "3" is set to the auxiliary function in the point tables up to No.6, a maximum of 7 points of<br />
automatic continuous positionings are possible. Set "0" to the auxiliary function in the last point table.<br />
As an example, the operation in the absolute value command system is shown using the set values in<br />
the following table. Here, the point table No.1 uses the absolute value command system, the point table<br />
No.2 the incremental value command system, and the point table No.3 the absolute value command<br />
system.<br />
Point table No.<br />
Acceleration Deceleration<br />
Position data Servo motor<br />
Dwell Auxiliary<br />
time constant time constant<br />
[×10 STM μm] speed [r/min]<br />
[ms] function<br />
[ms]<br />
[ms]<br />
1 5.00 3000 100 150 100 1<br />
2 -6.00 2000 100 100 0 3<br />
3 3.00 3000 50 50 0 0 (Note)<br />
Note. Always set "0" or "2" to the auxiliary function in the last point table among the consecutive point tables.<br />
0: When point table is used in absolute value command system<br />
2: When point table is used in incremental value command system<br />
Automatic/manual<br />
selection (MD0)<br />
Servo-on (SON)<br />
Forward rotation start<br />
(ST1)<br />
ON<br />
OFF<br />
ON<br />
OFF<br />
ON<br />
OFF<br />
(Note 1)<br />
6ms or<br />
more<br />
6ms or more<br />
Point table No.<br />
Servo motor<br />
speed<br />
Forward<br />
rotation<br />
0r/min<br />
Reverse<br />
rotation<br />
3ms or less<br />
1<br />
Point table<br />
No.1<br />
Point table<br />
No.2<br />
Point table<br />
No.3<br />
In-position (INP)<br />
Rough match (CPO)<br />
(Note 2)<br />
Travel completion<br />
(MEND)<br />
Point table No. output<br />
(PT0 to PT2)<br />
Ready (RD)<br />
Trouble (ALM)<br />
ON<br />
OFF<br />
ON<br />
OFF<br />
ON<br />
OFF<br />
ON<br />
OFF<br />
ON<br />
OFF<br />
1<br />
Note 1. External input signal detection delays by the input filter setting time of parameter No. PD19. Additionally, make up a<br />
sequence that changes the point table selection ahead of time by considering delays in output signal sequence from the<br />
controller and variations of a signal change due to hardware.<br />
2. If the over load tough drive function is enabled by setting parameter No. PA04 to " 1", INP turn-on delays during the<br />
overload tough drive. MEND turn-on also delays together with INP. However, MEND does not turn ON during automatic<br />
continuous positioning operation.<br />
13 - 26
13. POSITIONING MODE<br />
(3) Temporary stop/restart during automatic operation<br />
When TSTP is turned ON during automatic operation, the motor is decelerated to a temporary stop at the<br />
deceleration time constant in the point table being executed. When TSTP is turned ON again, the<br />
remaining distance is executed.<br />
Forward rotation start (ST1) or reverse rotation start (ST2) is ignored if it is turned ON during a temporary<br />
stop.<br />
The remaining moving distance is cleared when the operation mode is changed from the automatic mode<br />
to the manual mode during a temporary stop.<br />
The temporary stop/restart input is ignored during a home position return or during JOG operation.<br />
(a) When the servo motor is rotating<br />
Acceleration time constant<br />
in the point table No. n<br />
Deceleration time constant<br />
in the point table No. n<br />
Servo motor<br />
speed<br />
Forward<br />
rotation<br />
0r/min<br />
Remaining<br />
distance<br />
Point table<br />
Forward rotation start<br />
(ST1) or reverse<br />
rotation start (ST2)<br />
Temporary stop/restart<br />
(TSTP)<br />
Temporary stop (PUS)<br />
Rough match (CPO)<br />
In-position (INP)<br />
Travel completion<br />
(MEND)<br />
Point table No. output<br />
(PT0 to PT2)<br />
ON<br />
OFF<br />
ON<br />
OFF<br />
ON<br />
OFF<br />
ON<br />
OFF<br />
ON<br />
OFF<br />
ON<br />
OFF<br />
No. n<br />
No. n<br />
(b) During dwell<br />
Point table No. n<br />
Point table No. n + 1<br />
Servo motor<br />
speed<br />
Forward<br />
rotation<br />
0r/min<br />
Dwell = ta + tbs<br />
ta<br />
tb<br />
Point table<br />
Forward rotation start<br />
(ST1) or reverse<br />
rotation start (ST2)<br />
Temporary stop/restart<br />
(TSTP)<br />
Temporary stop (PUS)<br />
Rough match (CPO)<br />
In-position (INP)<br />
Travel completion (MEND)<br />
Point table No. output<br />
(PT0 to PT2)<br />
ON<br />
OFF<br />
ON<br />
OFF<br />
ON<br />
OFF<br />
ON<br />
OFF<br />
ON<br />
OFF<br />
ON<br />
OFF<br />
No. n<br />
No. n<br />
13 - 27
13. POSITIONING MODE<br />
13.4 Automatic operation mode for program method<br />
13.4.1 What is automatic operation mode for program method?<br />
Make selection with the input signals from among the programs that have been created in advance using <strong>MR</strong><br />
Configurator, and perform operation with Forward rotation start (ST1).<br />
This servo amplifier is factory-set to the absolute value command system.<br />
As the position data, the absolute move command ("MOV" command) used to specify the target address or the<br />
incremental move command ("MOVI" command) used to specify the travel distance can be set. Note that the<br />
movable range is -999999 to 999999 [×10 STM μm]. Positioning is enabled within this range.<br />
Setting range: -999999 to 999999 [×10 STM μm] (STM = feed length multiplication parameter No. PE02)<br />
-999999 999999<br />
Position data setting range<br />
[ 10 STM m]<br />
13 - 28
13. POSITIONING MODE<br />
13.4.2 Programming language<br />
The maximum number of program steps is 120. Though up to 8 programs can be created, the total number of<br />
each program steps is up to 120.<br />
The set program can be selected using point table No./program No. selection 1 (DI0) to point table<br />
No./program No. selection 3 (DI2).<br />
(1) Command list<br />
Command Name Setting Setting range Unit<br />
SPN<br />
SPN Speed (Motor<br />
(Setting<br />
(Note 2) speed)<br />
value)<br />
STA<br />
STA Acceleration<br />
(Setting<br />
(Note 2) time constant<br />
value)<br />
STB<br />
STB Deceleration<br />
(Setting<br />
(Note 2) time constant<br />
value)<br />
Acceleration/ STC<br />
STC<br />
deceleration (Setting<br />
(Note 2)<br />
time constant value)<br />
S-pattern<br />
STD<br />
STD<br />
acceleration/de<br />
(Note<br />
(Setting<br />
celeration time<br />
2, 5)<br />
value)<br />
constant<br />
MOV<br />
MOV<br />
Absolute move<br />
(Setting<br />
command<br />
value)<br />
MOVA<br />
Absolute<br />
MOVA<br />
continuous<br />
(Setting<br />
move<br />
value)<br />
command<br />
Incremental MOVI<br />
MOVI move<br />
(Setting<br />
command value)<br />
MOVIA<br />
Incremental<br />
MOVIA<br />
continuous<br />
(Setting<br />
move<br />
value)<br />
command<br />
0 to<br />
instantaneous<br />
permissible<br />
r/min<br />
speed<br />
0 to 20000 ms<br />
0 to 20000 ms<br />
0 to 20000 ms<br />
0 to 100 ms<br />
-999999 to<br />
999999<br />
-999999 to<br />
999999<br />
-999999 to<br />
999999<br />
-999999 to<br />
999999<br />
×10 STM μm<br />
×10 STM μm<br />
×10 STM μm<br />
×10 STM μm<br />
Indirect<br />
Description<br />
addressing<br />
Used to set the command speed of the servo motor for<br />
positioning.<br />
The set value should be equal to or less than the<br />
instantaneous permissible speed of the servo motor.<br />
Used to set the acceleration time constant.<br />
The set value is the time in which the servo motor<br />
reaches the rated speed from a stop.<br />
It cannot be changed during command output.<br />
Used to set the deceleration time constant.<br />
The set value is the time in which the servo motor stops<br />
from the rated speed.<br />
It cannot be changed during command output.<br />
Used to set the acceleration/deceleration time<br />
constants.<br />
The set value is the time in which the servo motor<br />
reaches the rated speed from a stop or stops from the<br />
rated speed.<br />
When this command is used, the acceleration time<br />
constant and deceleration time constant are equal.<br />
"STA" and "STB" commands can set the acceleration<br />
time constant and deceleration time constant<br />
individually.<br />
It cannot be changed during command output.<br />
Used to set the S-pattern acceleration/deceleration time<br />
constant.<br />
Set this command when inserting an S-pattern<br />
acceleration/deceleration time constant for the<br />
acceleration/deceleration time constant of the program.<br />
The set value is regarded as an absolute value for<br />
movement.<br />
The set value is regarded as an absolute value for<br />
continuous movement. Always use this command with<br />
the "MOV" command.<br />
The set value is regarded as an incremental value for<br />
movement.<br />
The set value is regarded as an incremental value for<br />
movement. Always use this command with the "MOVI"<br />
command.<br />
13 - 29
13. POSITIONING MODE<br />
Indirect<br />
Command Name Setting Setting range Unit<br />
Description<br />
addressing<br />
Waiting SYNC<br />
SYNC<br />
external signal (Setting<br />
(Note 1)<br />
to switch on value)<br />
OUTON<br />
OUTON<br />
External signal<br />
(Note<br />
(Setting<br />
ON output<br />
1, 3)<br />
value)<br />
OUTOF<br />
OUTOF External signal<br />
(Setting<br />
(Note 1) OFF output<br />
value)<br />
TRIP<br />
TRIP Absolute trip<br />
(Setting<br />
(Note 1) point<br />
value)<br />
TRIPI<br />
TRIPI Incremental<br />
(Setting<br />
(Note 1) trip point<br />
value)<br />
ITP Interrupt ITP<br />
(Note positioning (Setting<br />
1, 4) command value)<br />
COUNT<br />
COUNT External pulse<br />
(Setting<br />
(Note 1) counter<br />
value)<br />
FOR<br />
FOR Step repeat (Setting<br />
NEXT command value)<br />
NEXT<br />
TIM<br />
TIM<br />
Dwell<br />
(Setting<br />
command time<br />
value)<br />
Stops the next step until program input 1 (PI1) turns ON<br />
1<br />
after the output of SYNC synchronous output (SOUT).<br />
Turns ON program output 1 (OUT1).<br />
1<br />
By setting the ON time with parameter No. PE14, the<br />
signal can also be turned OFF in the preset time.<br />
Turns OFF program output 1 (OUT1) to that has been<br />
1<br />
turned ON by the "OUTON" command.<br />
When the trip point is reached, the next step will be<br />
-999999 to<br />
×10 STM μm<br />
executed.<br />
999999<br />
Executes the next step when the travel distance set to<br />
the "TRIPI" command is traveled from when "MOVI"<br />
-999999 to<br />
and "MOVIA" started during the movement executed by<br />
×10 STM μm<br />
999999<br />
the "MOV" and "MOVIA" commands. The command<br />
should be programmed after "MOVI" and "MOVIA"<br />
command, otherwise program error occurs.<br />
Makes a stop using the interrupt signal when the preset<br />
travel distance is reached. Use this command in<br />
0 to 999999 ×10 STM μm<br />
combination with the "SYNC" command, and describe it<br />
after "SYNC". An error will occur if this command is<br />
described after any other command.<br />
Executes the next step when the pulse counter value<br />
-999999 to<br />
becomes greater than the count value set to the<br />
pulse<br />
999999<br />
"COUNT" command. "COUNT (0)" clears the pulse<br />
counter.<br />
Repeats the steps located between the "FOR (setting<br />
0, 1 to 10000 times<br />
value)" command and "NEXT" command by the preset<br />
number of times.<br />
Set "0" to select endless repetition.<br />
Holds the next step until the preset time elapses.<br />
1 to 20000 ms<br />
ZRT Zeroing ZRT Executes a home position return.<br />
TIMES<br />
Program<br />
repeat<br />
command<br />
TIMES<br />
(Setting<br />
value)<br />
0, 1 to 10000 times<br />
Place the "TIMES (setting value)" command at the<br />
beginning of the program and set the number of<br />
program execution times. When executing the program<br />
only once, this setting is not required. Set "0" to select<br />
endless repetition.<br />
STOP Program end STOP<br />
Stops the executing program.<br />
Always describe this command on the last line.<br />
Note 1. "SYNC", "OUTON", "OUTOF", "TRIP", "TRIPI", "COUNT" and "ITP" commands are available to be validated during command<br />
outputting.<br />
2. The "SPN" command is valid when the "MOV", "MOVA", "MOVI" or "MOVIA" command is executed. The "STA", "STB", "STC"<br />
and "STD" commands are valid when the "MOV" or "MOVI" command is executed.<br />
3. When the ON time has been set in parameter No. PE14, the next command is executed after the preset time has elapsed.<br />
4. The remaining moving distance by "ITP" command is lower than setting value, the command would be ignored and skip to the<br />
next program command.<br />
5. S-pattern acceleration/deceleration time constant of this command is valid during the time from this command start to the<br />
program end. For other than that, S-pattern acceleration/deceleration time constant of parameter No. PC03 is valid.<br />
13 - 30
13. POSITIONING MODE<br />
(2) Detailed description of commands<br />
(a) Positioning conditions (SPN, STA, STB, STC, STD)<br />
The "SPN", "STA", "STB", "STC" and "STD" commands are valid when the "MOV" and "MOVA"<br />
commands are executed. The set values remain valid until they are reset.<br />
1) Program example 1<br />
When operation is to be performed in two patterns that have the same servo motor speed,<br />
acceleration time constant and deceleration time constant but different move commands.<br />
Program<br />
Description<br />
SPN(1000)<br />
STA(200)<br />
STB(300)<br />
MOV(1000)<br />
TIM(100)<br />
MOV(2000)<br />
STOP<br />
Speed (Motor speed)<br />
Acceleration time constant<br />
Deceleration time constant<br />
Absolute move command<br />
Dwell command time<br />
Absolute move command<br />
Program end<br />
1000[r/min]<br />
200[ms]<br />
300[ms]<br />
1000[×10 STM μm]<br />
100[ms]<br />
2000[×10 STM μm]<br />
a)<br />
b)<br />
c)<br />
d)<br />
e)<br />
f)<br />
b) Acceleration<br />
time constant<br />
(200ms)<br />
c) Deceleration<br />
time constant<br />
(300ms)<br />
b) Acceleration<br />
time constant<br />
(200ms)<br />
c) Deceleration<br />
time constant<br />
(300ms)<br />
Forward<br />
rotation<br />
a) Servo motor<br />
speed<br />
(1000r/min)<br />
a) Servo motor<br />
speed<br />
(1000r/min)<br />
Servo motor<br />
speed<br />
0r/min<br />
d) Absolute<br />
move command<br />
(1000 10 STM m)<br />
e) Dwell command<br />
time (100ms)<br />
f) Absolute<br />
move command<br />
(2000 10 STM m)<br />
2) Program example 2<br />
When operation is to be performed in two patterns that have different servo motor speeds,<br />
acceleration time constants, deceleration time constants and move commands.<br />
Program<br />
Description<br />
SPN(1000)<br />
STA(200)<br />
STB(300)<br />
MOV(1000)<br />
TIM(100)<br />
SPN(500)<br />
STC(200)<br />
MOV(1500)<br />
STOP<br />
Speed (Motor speed)<br />
Acceleration time constant<br />
Deceleration time constant<br />
Absolute move command<br />
Dwell command time<br />
Speed (Motor Speed)<br />
Acceleration/deceleration time constant<br />
Absolute move command<br />
Program end<br />
1000[r/min]<br />
200[ms]<br />
300[ms]<br />
1000[×10 STM μm]<br />
100[ms]<br />
500[r/min]<br />
200[ms]<br />
1500[×10 STM μm]<br />
a)<br />
b)<br />
c)<br />
d)<br />
e)<br />
f)<br />
g)<br />
h)<br />
Servo motor<br />
speed<br />
Forward<br />
rotation<br />
0r/min<br />
b) Acceleration<br />
time constant<br />
(200ms)<br />
a) Servo motor<br />
speed<br />
(1000r/min)<br />
d) Absolute<br />
move command<br />
(1000 10 STM m)<br />
c) Deceleration<br />
time constant<br />
(300ms)<br />
e) Dwell command<br />
time (100ms)<br />
g) Acceleration<br />
time constant<br />
(200ms)<br />
f) Servo motor<br />
speed (500r/min)<br />
h) Absolute move<br />
command<br />
(1500 10 STM m)<br />
13 - 31
13. POSITIONING MODE<br />
3) Program example 3<br />
Use of an S-pattern acceleration/deceleration time constant allows sudden operation to be eased at<br />
the time of acceleration/deceleration. When the "STD" command is used, parameter No. PC03 (Spattern<br />
acceleration/deceleration time constant) is ignored.<br />
Program<br />
Description<br />
SPN(1000)<br />
STC(100)<br />
STD(10)<br />
MOV(2000)<br />
STOP<br />
Speed (Motor speed)<br />
Acceleration/deceleration time constant<br />
S-pattern acceleration/deceleration time constant<br />
Absolute move command<br />
Program end<br />
1000[r/min]<br />
1000[ms]<br />
10[ms]<br />
2000[×10 STM μm]<br />
a)<br />
b)<br />
c)<br />
d)<br />
c) c)<br />
b) Acceleration/deceleration<br />
time constant<br />
(1000ms)<br />
Forward<br />
rotation<br />
a) Servo motor speed<br />
(1000r/min)<br />
b) Acceleration/deceleration<br />
time constant<br />
(1000ms)<br />
d) Absolute move<br />
command<br />
(2000 10 STM m)<br />
Servo motor<br />
speed<br />
0r/min<br />
c) S-pattern acceleration/<br />
deceleration time constant<br />
c)<br />
(b) Continuous move command (MOVA, MOVIA)<br />
POINT<br />
"MOV" cannot be used with "MOVIA", and "MOVI" cannot be used with<br />
"MOVA".<br />
The "MOVA" command is a continuous move command for the "MOV" command. After execution of the<br />
movement by the "MOV" command, the movement of the "MOVA" command can be executed<br />
continuously without a stop.<br />
The speed changing point of the "MOVA" command is the deceleration starting position of the operation<br />
performed by the preceding "MOV" and "MOVA" commands.<br />
The acceleration/deceleration time constant of the "MOVA" command is the value at execution of the<br />
preceding "MOV" command.<br />
The "MOVIA" command is a continuous move command for the "MOVI" command. After execution of<br />
the movement by the "MOVI" command, the movement of the "MOVIA" command can be executed<br />
continuously without a stop.<br />
The speed changing point of the "MOVIA" command is the deceleration starting position of the<br />
operation performed by the preceding "MOVI" and "MOVIA" commands.<br />
The acceleration/deceleration time constant of the "MOVIA" command is the value at execution of the<br />
preceding "MOVI" command.<br />
Command Name Setting Unit Description<br />
MOV Absolute move command MOV (Setting value) ×10 STM μm Absolute move command<br />
MOVA Absolute continuous move command MOVA (Setting value) ×10 STM μm Absolute continuous move command<br />
MOVI Incremental move command MOVI (Setting value) ×10 STM μm Incremental move command<br />
Incremental continuous move<br />
MOVIA<br />
MOVIA (Setting value) ×10 STM μm<br />
command<br />
Incremental continuous move<br />
command<br />
13 - 32
13. POSITIONING MODE<br />
1) Program example 1<br />
For the absolute move command in the absolute value command system<br />
Program<br />
Description<br />
SPN(500)<br />
STA(200)<br />
STB(300)<br />
MOV(500)<br />
SPN(1000)<br />
MOVA(1000)<br />
MOVA(0)<br />
STOP<br />
Speed (Motor speed)<br />
Acceleration time constant<br />
Deceleration time constant<br />
Absolute move command<br />
Speed (Motor speed)<br />
Absolute continuous move command<br />
Absolute continuous move command<br />
Program end<br />
500[r/min]<br />
200[ms]<br />
300[ms]<br />
500[×10 STM μm]<br />
1000[r/min]<br />
1000[×10 STM μm]<br />
0[×10 STM μm]<br />
a)<br />
b)<br />
c)<br />
d)<br />
e)<br />
f)<br />
g)<br />
Servo motor<br />
speed<br />
Forward<br />
rotation<br />
Reverse<br />
rotation<br />
0r/min<br />
b) Acceleration<br />
time constant<br />
(200ms)<br />
a) Servo motor<br />
speed (500r/min)<br />
d) Absolute move<br />
command<br />
(500 10 STM m)<br />
e) Servo motor<br />
speed<br />
(1000r/min)<br />
f) Absolute continuous<br />
move command<br />
(1000 10 STM m)<br />
b) Acceleration time<br />
constant<br />
c) Deceleration<br />
time constant<br />
(300ms)<br />
e) Servo motor<br />
speed<br />
(1000r/min)<br />
g) Absolute<br />
continuous<br />
move command<br />
(0 10 STM m)<br />
2) Program example 2 (Wrong usage)<br />
In continuous operation, the acceleration or deceleration time constant cannot be changed at each speed<br />
change. Hence, the "STA", "STB" or "STD" command is ignored if it is inserted for a speed change.<br />
Program<br />
Description<br />
SPN(500)<br />
STA(200)<br />
STB(300)<br />
MOV(500)<br />
SPN(1000)<br />
STC(500)<br />
MOVA(1000)<br />
SPN(1500)<br />
STC(100)<br />
MOVA(0)<br />
STOP<br />
Speed (Motor speed)<br />
Acceleration time constant<br />
Deceleration time constant<br />
Absolute move command<br />
Speed (Motor speed)<br />
Acceleration/deceleration time constant<br />
Absolute continuous move command<br />
Speed (Motor speed)<br />
Acceleration/deceleration time constant<br />
Absolute continuous move command<br />
Program end<br />
500[r/min]<br />
200[ms]<br />
300[ms]<br />
500[×10 STM μm]<br />
1000[r/min]<br />
500[ms]<br />
1000[×10 STM μm]<br />
1500[r/min]<br />
100[ms]<br />
0[×10 STM μm]<br />
a)<br />
b)<br />
c)<br />
d)<br />
e)<br />
f)<br />
g)<br />
h)<br />
i)<br />
j)<br />
Ignored.<br />
Ignored.<br />
Servo motor<br />
speed<br />
Forward<br />
rotation<br />
Reverse<br />
rotation<br />
0r/min<br />
b) Acceleration<br />
time constant<br />
(200ms)<br />
a) Servo motor<br />
speed (500r/min)<br />
d) Absolute move<br />
command<br />
(500 10 STM m)<br />
e) Servo motor<br />
speed<br />
(1000r/min)<br />
g) Absolute continuous<br />
move command<br />
(1000 10 STM m)<br />
c) Deceleration<br />
time constant<br />
(300ms)<br />
h) Servo motor<br />
speed<br />
(1500r/min)<br />
j) Absolute<br />
continuous<br />
move command<br />
13 - 33
13. POSITIONING MODE<br />
(c) Input/output command (OUTON, OUTOF), trip point command (TRIP, TRIPI)<br />
1) Program example 1<br />
As soon as the program is executed, program output 1 (OUT1) is turned ON. When the program<br />
ends, program output 1 (OUT1) turns OFF.<br />
Program<br />
Description<br />
SPN(1000)<br />
STA(200)<br />
STB(300)<br />
MOV(500)<br />
OUTON(1)<br />
TIM(100)<br />
MOV(250)<br />
TIM(50)<br />
STOP<br />
Speed (Motor speed)<br />
Acceleration time constant<br />
Deceleration time constant<br />
Absolute move command<br />
Program output 1 (OUT 1) is turned ON.<br />
Dwell command time<br />
Absolute move command<br />
Dwell command time<br />
Program end<br />
1000[r/min]<br />
200[ms]<br />
300[ms]<br />
500[×10 STM μm]<br />
100[ms]<br />
250[×10 STM μm]<br />
50[ms]<br />
a)<br />
b)<br />
Forward<br />
rotation<br />
Servo motor<br />
speed<br />
Program output 1<br />
(OUT1)<br />
0r/min<br />
ON<br />
OFF<br />
Dwell command time<br />
(100ms)<br />
Dwell<br />
command<br />
time<br />
(50ms)<br />
a) b)<br />
2) Program example 2<br />
Using parameter No. PE14, program output 1 (OUT1) can be turned off automatically.<br />
Parameter No. Name Setting Description<br />
PE14<br />
OUT1 output time<br />
selection<br />
200 OUT1 is turned off in 200 [ms]. a)<br />
Program<br />
SPN(500)<br />
STA(200)<br />
STB(300)<br />
MOV(1000)<br />
OUTON(1)<br />
STOP<br />
Speed (Motor speed)<br />
Acceleration time constant<br />
Deceleration time constant<br />
Absolute move command<br />
Program output 1 (OUT 1) is turned ON.<br />
Program end<br />
Description<br />
500[r/min]<br />
200[ms]<br />
300[ms]<br />
1000[×10 STM μm]<br />
Forward<br />
rotation<br />
Servo motor<br />
speed<br />
0r/min<br />
Program output 1<br />
(OUT1)<br />
ON<br />
OFF<br />
a) 200ms<br />
13 - 34
13. POSITIONING MODE<br />
3) Program example 3<br />
When the "TRIP" and "TRIPI" commands are used to set the position addresses where the "OUTON"<br />
and "OUTOF" commands will be executed.<br />
Program<br />
Description<br />
SPN(1000)<br />
STA(200)<br />
STB(300)<br />
MOV(500)<br />
TRIP(250)<br />
OUTON(1)<br />
TRIP(400)<br />
OUTOF(1)<br />
TIM(100)<br />
MOVI(500)<br />
TRIPI(300)<br />
OUTON(1)<br />
STOP<br />
Speed (Motor speed)<br />
Acceleration time constant<br />
Deceleration time constant<br />
Absolute move command<br />
Absolute trip point<br />
Program output 1 (OUT 1) is turned ON.<br />
Absolute trip point<br />
Program output 1 (OUT 1) is turned OFF.<br />
Dwell command time<br />
Incremental move command<br />
Incremental trip point<br />
Program output 1 (OUT 1) is turned ON.<br />
Program end<br />
1000[r/min]<br />
200[ms]<br />
300[ms]<br />
500[×10 STM μm]<br />
250[×10 STM μm]<br />
400[×10 STM μm]<br />
100[ms]<br />
500[×10 STM μm]<br />
300[×10 STM μm]<br />
a)<br />
b)<br />
c)<br />
d)<br />
e)<br />
f)<br />
g)<br />
a) 250 10 STM m c) 400 10 STM m e) 300 10 STM m<br />
Forward<br />
rotation<br />
Servo motor<br />
speed<br />
0r/min<br />
100ms<br />
Program output 1<br />
(OUT1)<br />
ON<br />
OFF<br />
b) d)<br />
f) g)<br />
13 - 35
13. POSITIONING MODE<br />
4) Program example 4<br />
POINT<br />
"MOV" cannot be used with "TRIPI".<br />
Note that the "TRIP" and "TRIPI" commands do not execute the next step unless the axis passes the<br />
preset address or travels the preset travel distance.<br />
Program<br />
Description<br />
SPN(500)<br />
STA(200)<br />
STB(300)<br />
MOVI(600)<br />
TRIPI(300)<br />
OUTON(1)<br />
SPN(700)<br />
MOVIA(700)<br />
TRIPI(300)<br />
OUTOF(1)<br />
STOP<br />
Speed (Motor speed)<br />
Acceleration time constant<br />
Deceleration time constant<br />
Incremental move command<br />
Incremental trip point<br />
Program output 1 (OUT 1) is turned ON.<br />
Speed (Motor speed)<br />
Incremental continuous move command<br />
Incremental trip point<br />
Program output 1 (OUT 1) is turned OFF.<br />
Program end<br />
500[r/min]<br />
200[ms]<br />
300[ms]<br />
600[×10 STM μm]<br />
300[×10 STM μm]<br />
700[r/min]<br />
700[×10 STM μm]<br />
300[×10 STM μm]<br />
a)<br />
b)<br />
c)<br />
d)<br />
e)<br />
f)<br />
Servo motor<br />
speed<br />
a) Incremental move<br />
command<br />
(600 10 STM m)<br />
Forward<br />
rotation<br />
0r/min<br />
b) 300 10 STM m<br />
900 10 STM m<br />
(a) MOVI (600) +e) TRIPI (300))<br />
d) Incremental<br />
continuous move<br />
command<br />
(700 10 STM m)<br />
Program output 1<br />
(OUT1)<br />
ON<br />
OFF<br />
c) f)<br />
13 - 36
13. POSITIONING MODE<br />
(d) Dwell (TIM)<br />
To the "TIM (setting value)" command, set the time from when the command remaining distance is "0"<br />
until the next step is executed.<br />
For reference, the following examples show the operations performed when this command is used with<br />
the other commands.<br />
1) Program example 1<br />
Program<br />
Description<br />
TIM(200)<br />
SPN(1000)<br />
STC(20)<br />
MOV(1000)<br />
STOP<br />
Dwell command time<br />
Speed (Motor speed)<br />
Acceleration/deceleration time constant<br />
Absolute move command<br />
Program end<br />
200[ms]<br />
1000[r/min]<br />
20[ms]<br />
1000[×10 STM μm]<br />
a)<br />
Servo motor<br />
speed<br />
Forward<br />
rotation<br />
0r/min<br />
a) 200ms<br />
ON<br />
Forward rotation start<br />
(ST1)<br />
OFF<br />
2) Program example 2<br />
Program<br />
Description<br />
SPN(1000)<br />
STC(20)<br />
MOVI(1000)<br />
TIM(200)<br />
OUTON(1)<br />
MOVI(500)<br />
STOP<br />
Speed (Motor speed)<br />
Acceleration/deceleration time constant<br />
Incremental move command<br />
Dwell command time<br />
Program output 1 (OUT 1) is turned ON.<br />
Incremental move command<br />
Program end<br />
1000[r/min]<br />
20[ms]<br />
1000[×10 STM μm]<br />
200[ms]<br />
500[×10 STM μm]<br />
a)<br />
b)<br />
Servo motor<br />
speed<br />
Forward<br />
rotation<br />
0r/min<br />
a) 200ms<br />
Program output 1<br />
(OUT1)<br />
ON<br />
OFF<br />
b)<br />
13 - 37
13. POSITIONING MODE<br />
3) Program example 3<br />
Program<br />
Description<br />
SPN(1000)<br />
STC(20)<br />
MOVI(1000)<br />
OUTON(1)<br />
TIM(200)<br />
MOVI(500)<br />
STOP<br />
Speed (Motor speed)<br />
Acceleration/deceleration time constant<br />
Incremental move command<br />
Program output 1 (OUT 1) is turned ON.<br />
Dwell command time<br />
Incremental move command<br />
Program end<br />
1000[r/min]<br />
20[ms]<br />
1000[×10 STM μm]<br />
200[ms]<br />
500[×10 STM μm]<br />
a)<br />
b)<br />
Servo motor<br />
speed<br />
Forward<br />
rotation<br />
0r/min<br />
b) 200ms<br />
Program output 1<br />
(OUT1)<br />
ON<br />
OFF<br />
a)<br />
4) Program example 4<br />
Program<br />
Description<br />
SPN(1000)<br />
STC(20)<br />
MOVI(1000)<br />
TIM(200)<br />
OUTON(1)<br />
TIM(300)<br />
MOVI(500)<br />
STOP<br />
Speed (Motor speed)<br />
Acceleration/deceleration time constant<br />
Incremental move command<br />
Dwell command time<br />
Program output 1 (OUT 1) is turned ON.<br />
Dwell command time<br />
Incremental move command<br />
Program end<br />
1000[r/min]<br />
20[ms]<br />
1000[×10 STM μm]<br />
200[ms]<br />
300[ms]<br />
500[×10 STM μm]<br />
a)<br />
b)<br />
c)<br />
Servo motor<br />
speed<br />
Forward<br />
rotation<br />
0r/min<br />
a) 200ms c) 300ms<br />
Program output 1<br />
(OUT1)<br />
ON<br />
OFF<br />
b)<br />
13 - 38
13. POSITIONING MODE<br />
5) Program example 5<br />
Program<br />
SPN(1000)<br />
STC(20)<br />
MOVI(1000)<br />
TIM(200)<br />
SYNC(1)<br />
MOVI(500)<br />
STOP<br />
Description<br />
Speed (Motor speed)<br />
1000[r/min]<br />
Acceleration/deceleration time constant 20[ms]<br />
Incremental move command<br />
1000[×10 STM μm]<br />
Dwell command time<br />
200[ms] a)<br />
Step is suspended until program input (PI1) turns ON.<br />
Incremental move command<br />
500[×10 STM μm]<br />
Program end<br />
Forward<br />
rotation<br />
Servo motor<br />
speed<br />
0r/min<br />
Program input 1<br />
(PI1)<br />
ON<br />
OFF<br />
a) PI1 is accepted in 200ms or later.<br />
6) Program example 6<br />
Program<br />
SPN(1000)<br />
STC(20)<br />
MOVI(1000)<br />
SYNC(1)<br />
TIM(200)<br />
MOVI(500)<br />
STOP<br />
Description<br />
Speed (Motor speed)<br />
1000[r/min]<br />
Acceleration/deceleration time constant 20[ms]<br />
Incremental move command<br />
1000[×10 STM μm]<br />
Step is suspended until program input (PI1) turns ON.<br />
Dwell command time<br />
200[ms]<br />
Incremental move command<br />
500[×10 STM μm]<br />
Program end<br />
a)<br />
Servo motor<br />
speed<br />
Forward<br />
rotation<br />
0r/min<br />
a) 200ms<br />
Program input 1<br />
(PI1)<br />
ON<br />
OFF<br />
13 - 39
13. POSITIONING MODE<br />
(e) Interrupt positioning command (ITP)<br />
POINT<br />
When interrupt positioning command (ITP) is used for positioning, a stop<br />
position differs depending on the servo motor speed provided when the "ITP"<br />
command is enabled.<br />
When the "ITP" command is used in a program, the axis stops at the position by the set value farther<br />
from the position where any of program input 1 (PI1) turned ON.<br />
If the move command set with the "MOV", "MOVI", "MOVA" or "MOVIA" command is less than the<br />
setting value of the "ITP (setting value)" command, the program proceeds to the next step without<br />
executing the "ITP (setting value)" command.<br />
When using the "ITP" command, always place the "SYNC" command immediately before the "ITP"<br />
command.<br />
1) Program example 1<br />
Program<br />
SPN(500)<br />
STA(200)<br />
STB(300)<br />
MOV(600)<br />
SPN(100)<br />
MOVA(600)<br />
SYNC(1)<br />
ITP(200)<br />
STOP<br />
Description<br />
Speed (Motor speed)<br />
500[r/min]<br />
Acceleration time constant<br />
200[ms]<br />
Deceleration time constant<br />
300[ms]<br />
Absolute move command<br />
600[×10 STM μm]<br />
Speed (Motor speed)<br />
100[r/min]<br />
Continuous move command<br />
600[×10 STM μm]<br />
Step is suspended until program input (PI1) turns ON.<br />
Interrupt positioning command<br />
200[×10 STM μm]<br />
Program end<br />
a)<br />
b)<br />
Forward<br />
rotation<br />
P1<br />
Servo motor<br />
speed<br />
0r/min<br />
P1 + b) (200 10 STM m)<br />
Program input 1<br />
(PI1)<br />
ON<br />
OFF<br />
Waiting for PI1 to be turned<br />
ON by SYNC (1) (a))<br />
13 - 40
13. POSITIONING MODE<br />
2) Program example 2<br />
If the travel distance of the "ITP" command is less than the travel distance necessary for deceleration,<br />
the actual deceleration time constant becomes less than the set value of the "STB" command.<br />
Program<br />
SPN(500)<br />
STA(200)<br />
STB(300)<br />
MOV(1000)<br />
SYNC(1)<br />
ITP(50)<br />
STOP<br />
Description<br />
Speed (Motor speed)<br />
500[r/min]<br />
Acceleration time constant<br />
200[ms]<br />
Deceleration time constant<br />
300[ms]<br />
Absolute move command<br />
1000[×10 STM μm]<br />
Step is suspended until program input (PI1) turns ON.<br />
Interrupt positioning command<br />
50[×10 STM μm]<br />
Program end<br />
a)<br />
b)<br />
P1<br />
Forward<br />
rotation<br />
Servo motor<br />
speed<br />
0r/min<br />
P1 + b) (50 10 STM m)<br />
Program input 1<br />
(PI1)<br />
ON<br />
OFF<br />
Waiting for PI1 to be turned<br />
ON by SYNC (1) (a)).<br />
(f) External pulse counter (COUNT)<br />
When the number of input pulses of the manual pulse generator becomes greater than the value set<br />
with the "COUNT" command, the next step is started. Set "0" to erase the accumulated input pulses.<br />
Program<br />
Description<br />
COUNT(500) The next step is held until the number of input pulses of the manual pulse generator reaches 500 [pulses]. a)<br />
SPN(500)<br />
STA(200)<br />
STB(300)<br />
MOV(1000)<br />
TRIP(500)<br />
COUNT(0)<br />
STOP<br />
Speed (Motor speed)<br />
Acceleration time constant<br />
Deceleration time constant<br />
Absolute move command<br />
Trip point<br />
Cumulative input pulses are cleared.<br />
Program end<br />
500[r/min]<br />
200[ms]<br />
300[ms]<br />
1000[×10 STM μm]<br />
500[×10 STM μm] b)<br />
c)<br />
b) 500[ 10 STM m]<br />
0r/min<br />
ON<br />
<strong>Manual</strong> pulse generator<br />
Cumulative input pulses OFF<br />
a) 500[pulse]<br />
c) Accumulated input pulses are erased.<br />
13 - 41
13. POSITIONING MODE<br />
(g) Step repeat command (FOR ... NEXT)<br />
POINT<br />
"FOR ... NEXT" cannot be placed within "FOR ... NEXT".<br />
The steps located between the "FOR (setting value)" command and "NEXT" command is repeated by<br />
the preset number of times.<br />
Program<br />
Description<br />
SPN(1000)<br />
STC(20)<br />
MOV(1000)<br />
TIM(100)<br />
FOR(3)<br />
MOVI(100)<br />
TIM(100)<br />
NEXT<br />
FOR(2)<br />
MOVI(200)<br />
TIM(100)<br />
NEXT<br />
STOP<br />
Speed (Motor speed)<br />
Acceleration/deceleration time constant<br />
Absolute move command<br />
Dwell command time<br />
Step repeat command start<br />
Incremental move command<br />
Dwell command time<br />
Step repeat command end<br />
Step repeat command start<br />
Incremental move command<br />
Dwell command time<br />
Step repeat command end<br />
Program end<br />
1000[r/min]<br />
20[ms]<br />
1000[×10 STM μm]<br />
100[ms]<br />
3 [times]<br />
100[×10 STM μm]<br />
100[ms]<br />
2 [times]<br />
200[×10 STM μm]<br />
100[ms]<br />
a)<br />
b)<br />
c)<br />
d)<br />
e)<br />
f)<br />
b) Incremental move command<br />
(100 10 STM m)<br />
d) Incremental move command<br />
(200 10 STM m)<br />
Forward<br />
rotation<br />
Servo motor<br />
speed<br />
0r/min<br />
1000<br />
1100 1200 1300<br />
1500 1700<br />
a) c)<br />
e) f)<br />
13 - 42
13. POSITIONING MODE<br />
(h) Program repeat command (TIMES)<br />
By setting the number of times to the "TIMES (setting value)" command placed at the beginning of a<br />
program, the program can be executed repeatedly. When the program is to be executed once, the<br />
"TIMES (setting value)" command is not necessary. Set "0" to select endless repetition.<br />
Program<br />
Description<br />
TIMES(2)<br />
SPN(1000)<br />
STC(20)<br />
MOVI(1000)<br />
TIM(100)<br />
STOP<br />
Program repeat command<br />
Speed (Motor speed)<br />
Acceleration/deceleration time constant<br />
Incremental move command<br />
Dwell command time<br />
Program end<br />
2 [times]<br />
1000[r/min]<br />
20[ms]<br />
1000[×10 STM μm]<br />
100[ms]<br />
a)<br />
b)<br />
b) Incremental move command<br />
(100 10 STM m)<br />
Forward<br />
rotation<br />
Servo motor<br />
speed<br />
0r/min<br />
1000<br />
2000<br />
a)<br />
13 - 43
13. POSITIONING MODE<br />
13.4.3 Basic setting of signals and parameters<br />
Create programs in advance using <strong>MR</strong> Configurator. (Refer to sections 13.4.2, and 13.9.)<br />
(1) Parameter<br />
(a) Command mode selection (parameter No. PE01)<br />
Make sure that the absolute value command system has been selected as shown below.<br />
Parameter No. PE01<br />
0<br />
Absolute value command system (initial value)<br />
(b) ST1 coordinate system selection (parameter No. PA14)<br />
Select the servo motor rotation direction at the time when the forward rotation start (ST1) turns ON.<br />
Parameter No. PA14 setting<br />
0<br />
(initial value)<br />
1<br />
Servo motor rotation direction when forward<br />
rotation start (ST1) is turned on<br />
CCW rotation with + position data<br />
CW rotation with - position data<br />
CW rotation with + position data<br />
CCW rotation with - position data<br />
CCW<br />
CW<br />
(c) Feed length multiplication (parameter No. PE02)<br />
Set the feed length multiplication (STM) of position data.<br />
Parameter No. PE02 setting<br />
0 (initial value) -999.999 to +999.999<br />
1 -9999.99 to +9999.99<br />
2 -99999.9 to +99999.9<br />
3 -999999 to +999999<br />
Position data input range [mm]<br />
(2) Signals<br />
Choosing the program using DI0 to DI2 and turning ON ST1 performs positioning operation according to<br />
the set program. At this time, reverse rotation start (ST2) is invalid.<br />
Item Setting method Description<br />
Selection of program operation mode Automatic/manual selection (MD0) Turn MD0 ON.<br />
Program selection<br />
Start<br />
Point table No./Program No. selection 1 (DI0)<br />
Point table No./Program No. selection 2 (DI1)<br />
Point table No./Program No. selection 3 (DI2)<br />
Forward rotation start (ST1)<br />
Refer to section 13.2.3.(1).<br />
Turn ON ST1 to start the program<br />
operation<br />
13 - 44
13. POSITIONING MODE<br />
13.4.4 Program operation timing chart<br />
(1) Operation conditions<br />
The timing chart shown below assumes that the following program is executed in the absolute value<br />
command system where a home position return is completed.<br />
Program No. 1<br />
SPN(1000)<br />
STC(100)<br />
MOV(5000)<br />
SYNC(1)<br />
STC(50)<br />
MOV(7500)<br />
STOP<br />
Description<br />
Speed (Motor speed)<br />
1000[r/min]<br />
Acceleration/deceleration time constant 100[ms]<br />
Absolute move command<br />
5000[×10 STM μm] Move command 1<br />
Step is suspended until program input (PI1) turns ON.<br />
Acceleration/deceleration time constant 50[ms]<br />
Absolute move command<br />
7500[×10 STM μm] Move command 2<br />
Program end<br />
Program No. 2<br />
SPN(1000)<br />
STC(100)<br />
MOV(2500)<br />
SYNC(1)<br />
STC(50)<br />
MOV(5000)<br />
STOP<br />
Description<br />
Speed (Motor speed)<br />
1000[r/min]<br />
Acceleration/deceleration time constant 100[ms]<br />
Absolute move command<br />
2500[×10 STM μm] Move command 3<br />
Step is suspended until program input (PI1) turns ON.<br />
Acceleration/deceleration time constant 50[ms]<br />
Absolute move command<br />
5000[×10 STM μm] Move command 4<br />
Program end<br />
(2) Timing chart<br />
Automatic/manual<br />
selection (MD0)<br />
Servo-on (SON)<br />
Forward rotation<br />
start (ST1)<br />
Program input 1<br />
(PI1)<br />
Program No.<br />
ON<br />
OFF<br />
ON<br />
OFF<br />
ON<br />
OFF<br />
ON<br />
OFF<br />
(Note 1)<br />
6ms or<br />
more<br />
6ms or more<br />
1<br />
6ms or more<br />
(Note 1)<br />
6ms or<br />
more<br />
6ms or more<br />
2<br />
6ms or more<br />
3ms or less<br />
3ms or less<br />
3ms or less<br />
3ms or less<br />
Servo motor<br />
speed<br />
Forward<br />
rotation<br />
0r/min<br />
Reverse<br />
rotation<br />
Move<br />
command 1<br />
Move<br />
command 2<br />
Move<br />
command<br />
3<br />
Move<br />
command 4<br />
In-position (INP)<br />
(Note 2)<br />
Travel completion<br />
(MEND)<br />
Ready (RD)<br />
Trouble (ALM)<br />
ON<br />
OFF<br />
ON<br />
OFF<br />
ON<br />
OFF<br />
ON<br />
OFF<br />
Note 1. External input signal detection delays by the input filter setting time of parameter No. PD19. Additionally, make up a<br />
sequence that changes the program selection ahead of time by considering delays in output signal sequence from the<br />
controller and variations of a signal change due to hardware.<br />
2. If the over load tough drive function is enabled by setting parameter No. PA04 to " 1", INP turn-on delays during the<br />
overload tough drive. MEND turn-on also delays together with INP.<br />
13 - 45
13. POSITIONING MODE<br />
13.5 <strong>Manual</strong> operation mode<br />
For machine adjustment, home position matching, etc., JOG operation or a manual pulse generator may be<br />
used to make a motion to any position.<br />
13.5.1 JOG operation<br />
(1) Setting<br />
Set the input device and parameters as follows according to the purpose of use. In this case, the point table<br />
No./program No. selection 1 to 3 (DI0 to DI2) are invalid.<br />
Item Device/Parameter used Description<br />
<strong>Manual</strong> operation mode selection Automatic/manual selection (MD0) Turn MD0 OFF.<br />
Servo motor rotation direction Parameter No. PA14 Refer to (2) in this section.<br />
JOG speed Parameter No. PE13 Set the speed of the servo motor.<br />
Acceleration/deceleration time<br />
constant<br />
S-pattern acceleration/deceleration<br />
time constant<br />
Parameter No. PE07<br />
Parameter No. PC03<br />
Set the acceleration/deceleration time constants.<br />
Set the S-pattern acceleration/deceleration time<br />
constant.<br />
(2) Servo motor rotation direction<br />
Parameter No. PA14 setting<br />
Servo motor rotation direction<br />
Forward rotation start (ST1) ON Reverse rotation start (ST2) ON<br />
0 CCW rotation CW rotation<br />
1 CW rotation CCW rotation<br />
ST1: ON<br />
CCW<br />
ST2: ON<br />
CCW<br />
CW<br />
ST2: ON<br />
CW<br />
ST1: ON<br />
Parameter No. PA14: 0 Parameter No. PA14: 1<br />
(3) Operation<br />
By turning ST1 ON, operation is performed under the conditions of the JOG speed set in the parameter and<br />
the acceleration and deceleration time constants in set parameter No. PE07. For the rotation direction, refer<br />
to (2) in this section. By turning ST2 ON, the servo motor rotates in the reverse direction to forward rotation<br />
start (ST1).<br />
13 - 46
13. POSITIONING MODE<br />
(4) Timing chart<br />
Automatic/manual selection<br />
(MD0)<br />
Servo-on (SON)<br />
Forward rotation start<br />
(ST1)<br />
Reverse rotation start<br />
(ST2)<br />
Servo motor speed<br />
(Note)<br />
Rough match (CPO)<br />
Travel completion (MEND)<br />
Ready (RD)<br />
Trouble (ALM)<br />
Forward<br />
rotation<br />
ON<br />
OFF<br />
ON<br />
OFF<br />
ON<br />
OFF<br />
ON<br />
OFF<br />
0r/min<br />
Reverse<br />
rotation<br />
ON<br />
OFF<br />
ON<br />
OFF<br />
ON<br />
OFF<br />
ON<br />
OFF<br />
100ms<br />
Forward<br />
rotation JOG<br />
Reverse<br />
rotation JOG<br />
Note. For the point table method. For the program method, it is always OFF.<br />
13.5.2 <strong>Manual</strong> pulse generator operation<br />
POINT<br />
For the positioning mode, PP or NP is not assigned in the initial status. When<br />
using the manual pulse generator, assign PP to CN1-23 pin and NP to CN1-<br />
25 pin by parameter No. PD02. (Refer to sections 4.4.2 and 11.14.)<br />
When the manual pulse generator is used during JOG operation, pulses of the<br />
manual pulse generator are added.<br />
(1) Setting<br />
Set the input device and parameters as follows according to the purpose of use. In this case, the point table<br />
No./program No. selection 1 to 3 (DI0 to DI2) are invalid.<br />
Item Device/Parameter used Description<br />
<strong>Manual</strong> operation mode selection Automatic/manual selection (MD0) Turn MD0 OFF.<br />
<strong>Manual</strong> pulse generator multiplication Parameter No. PE02<br />
Set the multiplication ratio for generated pulses<br />
of the manual pulse generator.<br />
For more information, refer to (3) in this section.<br />
Servo motor rotation direction Parameter No. PA14 Refer to (2) in this section.<br />
13 - 47
13. POSITIONING MODE<br />
(2) Servo motor rotation direction<br />
Parameter No. PA14 setting<br />
Servo motor rotation direction<br />
<strong>Manual</strong> pulse generator: forward rotation <strong>Manual</strong> pulse generator: reverse rotation<br />
0 CCW rotation CW rotation<br />
1 CW rotation CCW rotation<br />
CCW<br />
Forward<br />
rotation<br />
CW<br />
(3) <strong>Manual</strong> pulse generator multiplication<br />
Use parameter No.PA05 to set the multiplication ratio of the servo motor rotation to the manual pulse<br />
generator rotation.<br />
Parameter No. PA05 setting<br />
Multiplication ratio of servo motor rotation to<br />
manual pulse generator rotation<br />
Travel distance<br />
0 1 time 1[μm]<br />
1 10 times 10[μm]<br />
2 100 times 100[μm]<br />
(4) Operation<br />
Turn the manual pulse generator to rotate the servo motor. For the rotation direction of servo motor, refer to<br />
(2) in this section.<br />
13 - 48
13. POSITIONING MODE<br />
13.6 Home position return mode<br />
13.6.1 Outline of home position return<br />
Home position return is performed to match the command coordinates with the machine coordinates. In the<br />
incremental system, home position return is required every time input power is switched on.<br />
This servo amplifier has the home position return methods given in this section. Choose the most appropriate<br />
method for your machine structure and application.<br />
This servo amplifier has the home position return automatic return function which executes home position<br />
return by making an automatic return to a proper position if the machine has stopped beyond or on the<br />
proximity dog. <strong>Manual</strong> motion by JOG operation or the like is not required.<br />
(1) Home position return types<br />
Choose the optimum home position return according to the machine type, etc.<br />
Dog type<br />
Count type<br />
Data set type<br />
Stopper type<br />
Type Home position return method Features<br />
With deceleration started at the front end of a General home position return method using a<br />
proximity dog, the position where the first Z- proximity dog.<br />
phase signal is given past the rear end of the Repeatability of home position return is excellent.<br />
dog or a motion has been made over the home The machine is less burdened.<br />
position shift distance starting from the Z- Used when the width of the proximity dog can be set<br />
phase signal is defined as a home position. greater than the deceleration distance of the servo<br />
(Note)<br />
motor.<br />
Home position ignorance<br />
(Servo-on position as<br />
home position)<br />
Dog type rear end<br />
reference<br />
Count type front end<br />
reference<br />
Dog cradle type<br />
With deceleration started at the front end of a<br />
proximity dog, the position where the first Z-<br />
phase signal is given after advancement over<br />
the preset moving distance after the proximity<br />
dog or a motion has been made over the home<br />
position shift distance starting from the Z-<br />
phase signal is defined as a home position.<br />
An arbitrary position is defined as a home<br />
position.<br />
The position where the machine stops when its<br />
part is pressed against a machine stopper is<br />
defined as a home position.<br />
The position where servo is switched on is<br />
defined as a home position.<br />
The position where the axis, which had started<br />
decelerating at the front end of a proximity dog,<br />
has moved the after-proximity dog moving<br />
distance and home position shift distance after<br />
it passed the rear end is defined as a home<br />
position.<br />
The position where the axis, which had started<br />
decelerating at the front end of a proximity dog,<br />
has moved the after-proximity dog moving<br />
distance and home position shift distance is<br />
defined as a home position.<br />
The position where the first Z-phase signal is<br />
issued after detection of the proximity dog front<br />
end is defined as a home position.<br />
Home position return method using a proximity dog.<br />
Used when it is desired to minimize the length of the<br />
proximity dog.<br />
No proximity dog required.<br />
Since the machine part collides with the machine be<br />
fully lowered.<br />
The machine and stopper strength must be<br />
increased.<br />
The Z-phase signal is not needed.<br />
The Z-phase signal is not needed.<br />
Note. The Z-phase signal is a signal recognized in the servo amplifier once per servo motor revolution. It cannot be used as an output<br />
signal.<br />
13 - 49
13. POSITIONING MODE<br />
(2) Home position return parameter<br />
When performing home position return, set parameter No. PE03 (home position return type) as follows.<br />
Parameter No. PE03<br />
0<br />
Home position return type .......................(a)<br />
0: Dog type<br />
1: Count type<br />
2: Data set type<br />
3: Stopper type<br />
4: Home position ignorance<br />
(Servo-on position as home position)<br />
5: Dog type rear end reference<br />
6: Count type front end reference<br />
7: Dog cradle type<br />
Home position return direction ..................................(b)<br />
0: Address increasing direction<br />
1: Address decreasing direction<br />
Proximity dog input polarity ..................................(c)<br />
0: OFF indicates detection of the dog<br />
1: ON indicates detection of the dog<br />
(a) Choose the home position return type.<br />
(b) Choose the starting direction of home position return. Set "0" to start home position return in the<br />
direction in which the address is incremented from the current position, or "1" to start home position<br />
return in the direction in which the address is decremented.<br />
(c) Choose the polarity at which the proximity dog is detected. Set "0" to detect the dog when the proximity<br />
dog device (DOG) is OFF, or "1" to detect the dog when the device is ON.<br />
(3) <strong>Instruction</strong>s<br />
(a) Before starting home position return, always make sure that the limit switch operates.<br />
(b) Confirm the home position return direction. Incorrect setting will cause the machine to run reversely.<br />
(c) Confirm the proximity dog input polarity. Not doing so may cause unexpected operation.<br />
13.6.2 Selection of home position return mode<br />
Set the input device as shown in the following table to select the home position return mode.<br />
Input device<br />
Point table method<br />
Device setting<br />
Program method<br />
Automatic/manual selection (MD0) OFF OFF<br />
Point table No./Program No. selection 1 (DI0)<br />
Point table No./Program No. selection 2 (DI1)<br />
Point table No./Program No. selection 3 (DI2)<br />
All OFF<br />
(The home position return mode is<br />
selected.)<br />
Select a program that has the home<br />
position return "ZRT" command.<br />
The explanations in the following sections apply when the home position return mode is selected by MD0, MI0,<br />
DI1, and DI2.<br />
13 - 50
13. POSITIONING MODE<br />
13.6.3 Dog type home position return<br />
This is a home position return method using the proximity dog. With deceleration started at the front end of the<br />
proximity dog, the position where the first Z-phase signal is given past the rear end of the dog or a motion has<br />
been made over the home position shift distance starting from the Z-phase signal is defined as a home position.<br />
(1) Devices and parameters<br />
Set the input devices and parameters as follows.<br />
Item Device/Parameter used Description<br />
Automatic/manual selection<br />
(MD0)<br />
Turn MD0 ON.<br />
Home position return mode<br />
Point table method: Select the home position return mode<br />
Point table No./Program No.<br />
selection<br />
by turning OFF DI0, DI1 and DI2.<br />
selection 1 to 3<br />
Program method: Select a program that has the home<br />
(DI0 to DI2)<br />
position return "ZRT" command.<br />
Dog type home position return Parameter No. PE03 0: Dog type home position return is selected.<br />
Home position return direction Parameter No. PE03<br />
Refer to section 13.6.1 (2) and select the home position<br />
return direction.<br />
Dog input polarity<br />
Parameter No. PE03<br />
Refer to section 13.6.1 (2) and select the proximity dog<br />
input polarity.<br />
Home position return speed Parameter No. PE04 Set the speed till the dog is detected.<br />
Creep speed Parameter No. PE05 Set the speed after the dog is detected.<br />
Home position shift distance Parameter No. PE06<br />
Set when shifting the home position starting at the first Z-<br />
phase signal after passage of proximity dog rear end.<br />
Home position return acceleration<br />
Set the acceleration/deceleration time constants during a<br />
Parameter No. PE07<br />
/deceleration time constants<br />
home position return.<br />
Home position return position data Parameter No. PE08 Set the current position at home position return completion.<br />
(2) Length of proximity dog<br />
To ensure that the Z-phase signal of the servo motor is generated during detection of the proximity dog<br />
(DOG), the proximity dog should have the length which satisfies formulas (13.1) and (13.2).<br />
L1<br />
V<br />
60<br />
td • • • • • • • • • • • • • • • • • • • • • • • • • • • • • • • • • • • • • • • • • (13.1)<br />
2<br />
L1 : Proximity dog length [mm]<br />
V : Home position return speed [mm/min]<br />
Td : Deceleration time [s]<br />
L2 2 ΔS• • • • • • • • • • • • • • • • • • • • • • • • • • • • • • • • • • • • • • • • • • • (13.2)<br />
L2 : Proximity dog length [mm]<br />
ΔS : Travel distance per servo motor revolution [mm]<br />
13 - 51
13. POSITIONING MODE<br />
(3) Timing chart<br />
Automatic/manual<br />
selection (MD0)<br />
ON<br />
OFF<br />
DI0, DI1, and DI2<br />
Forward rotation start<br />
(ST1)<br />
Reverse rotation start<br />
(ST2)<br />
Servo motor<br />
speed<br />
ON<br />
OFF<br />
ON<br />
OFF<br />
Forward<br />
rotation<br />
0r/min<br />
(Note 1)<br />
6ms or more<br />
Acceleration time constant<br />
parameter No. PE07<br />
6ms or more<br />
3ms or less<br />
Home position return<br />
speed parameter No.<br />
PE04<br />
Deceleration time constant<br />
parameter No. PE07 Home position shift distance<br />
Creep speed parameter No. PE06<br />
parameter No. PE05<br />
Home position<br />
td<br />
(Note 2)<br />
Proximity dog<br />
Home position address<br />
parameter No. PE08<br />
Z-phase<br />
Proximity dog (DOG)<br />
Rough match (CPO)<br />
Travel completion<br />
(MEND)<br />
Home position return<br />
completion (ZP)<br />
ON<br />
OFF<br />
ON<br />
OFF<br />
ON<br />
OFF<br />
ON<br />
OFF<br />
ON<br />
OFF<br />
Note 1. External input signal detection delays by the input filter setting time of parameter No. PD19. Additionally, make up a<br />
sequence that changes DI0, DI1 and DI2 ahead of time by considering delays in output signal sequence from the controller<br />
and variations of a signal change due to hardware.<br />
2. Point table method: Select the home position return mode by turning OFF DI0, DI1 and DI2.<br />
Program method: Select a program that has the home position return "ZRT" command.<br />
The set value in parameter No. PE08 (home position return position data) is applied as position address at<br />
the time of the home position return being completed.<br />
13 - 52
13. POSITIONING MODE<br />
(4) Adjustment<br />
In dog type home position return, adjust to ensure that the Z-phase signal is generated during dog detection.<br />
Locate the rear end of the proximity dog (DOG) at approximately the center of two consecutive Z-phase<br />
signals.<br />
The position where the Z-phase signal is generated can be monitored in "Within one-revolution position" of<br />
"Status display" of <strong>MR</strong> Configurator.<br />
0 65536 (Note) 0<br />
Servo motor Z-phase<br />
Proximity<br />
dog<br />
Proximity dog<br />
(DOG)<br />
ON<br />
OFF<br />
Note. When using the <strong>HF</strong>-<strong>KN</strong> servo motor series<br />
13 - 53
13. POSITIONING MODE<br />
13.6.4 Count type home position return<br />
In count type home position return, a motion is made over the distance set in parameter No. PE09 (moving<br />
distance after proximity dog) after detection of the proximity dog front end. The position where the first Z-phase<br />
signal is given after that is defined as a home position. Hence, if the proximity dog (DOG) is 10ms or longer,<br />
there is no restriction on the dog length. This home position return method is used when the required proximity<br />
dog length cannot be reserved to use dog type home position return or when the proximity dog (DOG) is<br />
entered electrically from a controller or the like.<br />
(1) Devices and parameters<br />
Set the input devices and parameters as follows.<br />
Item Device/Parameter used Description<br />
Automatic/manual selection (MD0)<br />
Turn MD0 ON.<br />
Point table method: Select the home position return<br />
<strong>Manual</strong> home position return<br />
mode by turning OFF DI0, DI1 and<br />
Point table No./Program No.<br />
mode selection<br />
DI2.<br />
selection 1 to 3 (DI0 to DI2)<br />
Program method: Select a program that has the home<br />
position return "ZRT" command.<br />
Count type home position return Parameter No. PE03 1: Count type home position return is selected.<br />
Home position return direction<br />
Parameter No. PE03<br />
Refer to section 13.6.1 (2) and select the home position<br />
return direction.<br />
Dog input polarity<br />
Parameter No. PE03<br />
Refer to section 13.6.1 (2) and select the dog input<br />
polarity.<br />
Home position return speed Parameter No. PE04 Set the speed till the dog is detected.<br />
Creep speed Parameter No. PE05 Set the speed after the dog is detected.<br />
Home position shift distance<br />
Travel distance after proximity<br />
dog<br />
Home position return<br />
acceleration/deceleration time<br />
constants<br />
Home position return position<br />
data<br />
Parameter No. PE06<br />
Parameter No. PE09<br />
Parameter No. PE07<br />
Parameter No. PE08<br />
Set when shifting the home position, starting at the first<br />
Z-phase signal given after passage of the proximity dog<br />
front end and movement over the travel distance.<br />
Set the travel distance after passage of proximity dog<br />
front end.<br />
Set the acceleration/deceleration time constants during<br />
a home position return.<br />
Set the current position at home position return<br />
completion.<br />
13 - 54
13. POSITIONING MODE<br />
(2) Timing chart<br />
Automatic/manual<br />
selection (MD0)<br />
ON<br />
OFF<br />
DI0, DI1, and DI2<br />
Forward rotation start<br />
(ST1)<br />
Reverse rotation start<br />
(ST2)<br />
Servo motor<br />
speed<br />
Forward<br />
rotation<br />
0r/min<br />
(Note 1)<br />
ON 6ms or more<br />
OFF<br />
ON<br />
OFF<br />
Acceleration time constant<br />
parameter No. PE07<br />
6ms or more<br />
3ms or less<br />
Home position return<br />
speed parameter No.<br />
PE04<br />
Travel distance after<br />
proximity dog parameter<br />
No. PE09<br />
(Note 2)<br />
Deceleration time constant<br />
parameter No. PE07 Home position shift distance<br />
Creep speed parameter No. PE06<br />
parameter No. PE05<br />
Home position<br />
Proximity dog<br />
Home position address<br />
parameter No. PE08<br />
Z-phase<br />
Proximity dog (DOG)<br />
Rough match (CPO)<br />
Travel completion<br />
(MEND)<br />
Home position return<br />
completion (ZP)<br />
ON<br />
OFF<br />
ON<br />
OFF<br />
ON<br />
OFF<br />
ON<br />
OFF<br />
ON<br />
OFF<br />
Note 1. External input signal detection delays by the input filter setting time of parameter No. PD19. Additionally, make up a<br />
sequence that changes DI0, DI1 and DI2 ahead of time by considering delays in output signal sequence from the controller<br />
and variations of a signal change due to hardware.<br />
2. Point table method: Select the home position return mode by turning OFF DI0, DI1 and DI2.<br />
Program method: Select a program that has the home position return "ZRT" command.<br />
The set value in parameter No. PE08 (home position return position data) is applied as position address at the<br />
time of the home position return being completed.<br />
13 - 55
13. POSITIONING MODE<br />
13.6.5 Data set type home position return<br />
Data set type home position return is used when it is desired to determine any position as a home position.<br />
JOG operation can be used for movement.<br />
(1) Devices and parameters<br />
Set the input devices and parameters as follows.<br />
Item Device/Parameter used Description<br />
<strong>Manual</strong> home position return<br />
mode selection<br />
Data set type home position<br />
return<br />
Home position return position<br />
data<br />
Automatic/manual selection (MD0)<br />
Point table No./Program No.<br />
selection 1 to 3 (DI0 to DI2)<br />
Parameter No. PE03<br />
Parameter No. PE08<br />
Turn MD0 ON.<br />
Point table method: Select the home position return<br />
mode by turning OFF DI0, DI1 and<br />
DI2.<br />
Program method: Select a program that has the home<br />
position return "ZRT" command.<br />
2: Data set type home position return is selected.<br />
Set the current position at home position return<br />
completion.<br />
(2) Timing chart<br />
Automatic/manual<br />
selection (MD0)<br />
ON<br />
OFF<br />
DI0, DI1, and DI2<br />
Forward rotation start<br />
(ST1)<br />
Reverse rotation start<br />
(ST2)<br />
Servo motor<br />
speed<br />
ON<br />
OFF<br />
ON<br />
OFF<br />
Forward<br />
rotation<br />
0r/min<br />
3ms or less<br />
(Note 1)<br />
6ms or<br />
more<br />
(Note 2)<br />
6ms or more<br />
Home position<br />
address parameter<br />
No. PE08<br />
Rough match<br />
(CPO)<br />
Travel completion<br />
(MEND)<br />
Home position return<br />
completion (ZP)<br />
ON<br />
OFF<br />
ON<br />
OFF<br />
ON<br />
OFF<br />
Movement to the home position<br />
Execution of data set type home<br />
position return<br />
Note 1. External input signal detection delays by the input filter setting time of parameter No. PD19. Additionally, make up a<br />
sequence that changes DI0, DI1 and DI2 ahead of time by considering delays in output signal sequence from the controller<br />
and variations of a signal change due to hardware.<br />
2. Point table method: Select the home position return mode by turning OFF DI0, DI1 and DI2.<br />
Program method: Select a program that has the home position return "ZRT" command.<br />
The set value in parameter No. PE08 (home position return position data) is applied as position address at<br />
the time of the home position return being completed.<br />
13 - 56
13. POSITIONING MODE<br />
13.6.6 Stopper type home position return<br />
In stopper type home position return, a machine part is pressed against a stopper or the like by JOG operation<br />
to make a home position return and that position is defined as a home position.<br />
(1) Devices and parameters<br />
Set the input devices and parameters as follows.<br />
Item Device/Parameter used Description<br />
<strong>Manual</strong> home position return<br />
mode selection<br />
Stopper type home position<br />
return<br />
Automatic/manual selection (MD0)<br />
Point table No./Program No.<br />
selection 1 to 3 (DI0 to DI2)<br />
Parameter No. PE03<br />
Turn MD0 ON.<br />
Point table method: Select the home position return<br />
mode by turning OFF DI0, DI1 and<br />
DI2.<br />
Program method: Select a program that has the home<br />
position return "ZRT" command.<br />
3: Stopper type home position return is selected.<br />
Home position return direction Parameter No. PE03<br />
Refer to section 13.6.1 (2) and select the home position<br />
return direction.<br />
Home position return speed Parameter No. PE04 Set the speed till contact with the stopper.<br />
Stopper time<br />
Stopper type home position<br />
return torque limit value<br />
Home position return<br />
acceleration time constant<br />
Home position return position<br />
data<br />
Parameter No. PE10<br />
Parameter No. PE11<br />
Parameter No. PE07<br />
Parameter No. PE08<br />
Time from when the part makes contact with the stopper<br />
to when home position return data is obtained to output<br />
home position return completion (ZP).<br />
Set the servo motor torque limit value for execution of<br />
stopper type home position return.<br />
Set the acceleration time constant during a home<br />
position return.<br />
Set the current position at home position return<br />
completion.<br />
13 - 57
13. POSITIONING MODE<br />
(2) Timing chart<br />
Automatic/manual<br />
selection (MD0)<br />
ON<br />
OFF<br />
DI0, DI1, and DI2<br />
(Note 4)<br />
Forward rotation start<br />
(ST1)<br />
ON<br />
OFF<br />
(Note 1)<br />
6ms or more<br />
6ms or more<br />
Reverse rotation start<br />
(ST2)<br />
ON<br />
OFF<br />
Torque limit value<br />
Parameter No. PC14 (Note 3) Parameter No. PE 11 Parameter No. PC14<br />
Servo motor<br />
speed<br />
Forward<br />
rotation<br />
0r/min<br />
Acceleration time<br />
constant parameter<br />
No. PE07<br />
Home position return<br />
speed parameter No. PE04<br />
3ms or less<br />
Home position<br />
address parameter<br />
No. PE08<br />
Stopper time<br />
parameter No. PE10<br />
Stopper<br />
Limiting torque (TLC)<br />
Rough match (CPO)<br />
Travel completion<br />
(MEND)<br />
Home position return<br />
completion (ZP)<br />
ON<br />
OFF<br />
ON<br />
OFF<br />
ON<br />
OFF<br />
ON<br />
OFF<br />
(Note 2)<br />
Note 1. External input signal detection delays by the input filter setting time of parameter No. PD19. Additionally, make up a<br />
sequence that changes DI0, DI1 and DI2 ahead of time by considering delays in output signal sequence from the<br />
controller and variations of a signal change due to hardware.<br />
2. TLC turns ON when the torque reaches the value set in forward torque limit (parameter No. PA11), reverse torque limit<br />
(parameter No. PA12) or internal torque limit (parameter No. PC14).<br />
3. The torque limit that is enabled at this point is as follows.<br />
(Note)<br />
Input device<br />
Limit value status<br />
Validated torque limit values<br />
TL1<br />
0 Parameter No. PE11<br />
Parameter No. PC14 > Parameter No. PE11 Parameter No. PE11<br />
1<br />
Parameter No. PC14 < Parameter No. PE11 Parameter No. PC14<br />
Note. 0: off<br />
1: on<br />
4. Point table method: Select the home position return mode by turning OFF DI0, DI1 and DI2.<br />
Program method: Select the program that has the home position return "ZRT" command.<br />
The set value in parameter No. PE08 (home position return position data) is applied as position address at<br />
the time of the home position return being completed.<br />
13 - 58
13. POSITIONING MODE<br />
13.6.7 Home position ignorance (Servo-on position as home position)<br />
The position where servo is switched on is defined as a home position.<br />
(1) Devices and parameters<br />
Set the input devices and parameters as follows.<br />
Item Device/Parameter used Description<br />
Automatic/manual selection (MD0)<br />
Turn MD0 ON.<br />
Point table method: Select the home position return<br />
<strong>Manual</strong> home position return<br />
mode by turning OFF DI0, DI1 and<br />
Point table No./Program No.<br />
mode selection<br />
DI2.<br />
selection 1 to 3 (DI0 to DI2)<br />
Program method: Select a program that has the home<br />
position return "ZRT" command.<br />
Home position ignorance Parameter No. PE03 4: Home position ignorance is selected.<br />
Home position return position<br />
Set the current position at home position return<br />
Parameter No. PE08<br />
data<br />
completion.<br />
(2) Timing chart<br />
Automatic/manual<br />
selection (MD0)<br />
Servo-on (SON)<br />
ON<br />
OFF<br />
ON<br />
OFF<br />
Servo motor<br />
speed<br />
Rough match (CPO)<br />
Travel completion<br />
(MEND)<br />
Home position return<br />
completion (ZP)<br />
Ready (RD)<br />
0r/min<br />
ON<br />
OFF<br />
ON<br />
OFF<br />
ON<br />
OFF<br />
ON<br />
OFF<br />
Home position address<br />
parameter No. PE08<br />
The set value in parameter No. PE08 (home position return position data) is applied as position address at<br />
the time of the home position return being completed.<br />
13 - 59
13. POSITIONING MODE<br />
13.6.8 Dog type rear end reference home position return<br />
POINT<br />
This home position return method depends on the timing of reading proximity<br />
dog (DOG) that has detected the rear end of a proximity dog. Hence, if a<br />
home position return is made at the creep speed of 100r/min, an error of<br />
400 pulses will occur in the home position. The error of the home position is<br />
larger as the creep speed is higher.<br />
The position where the axis, which had started decelerating at the front end of a proximity dog, has moved the<br />
after-proximity dog moving distance and home position shift distance after it passed the rear end is defined as<br />
a home position. A home position return that does not depend on the Z-phase signal can be made.<br />
(1) Devices and parameters<br />
Set the input devices and parameters as follows.<br />
Item Device/Parameter used Description<br />
<strong>Manual</strong> home position return<br />
mode selection<br />
Dog type rear end reference<br />
home position return<br />
Home position return direction<br />
Automatic/manual selection (MD0)<br />
Point table No./Program No.<br />
selection 1 to 3 (DI0 to DI2)<br />
Parameter No. PE03<br />
Parameter No. PE03<br />
Turn MD0 ON.<br />
Point table method: Select the home position return<br />
mode by turning OFF DI0, DI1 and<br />
DI2.<br />
Program method: Select a program that has the home<br />
position return "ZRT" command.<br />
5: Select the dog type rear end reference.<br />
Refer to section 13.6.1 (2) and select the home position<br />
return direction.<br />
Dog input polarity<br />
Parameter No. PE03<br />
Refer to section 13.6.1 (2) and select the dog input<br />
polarity.<br />
Home position return speed Parameter No. PE04 Set the speed till the dog is detected.<br />
Creep speed Parameter No. PE05 Set the speed after the dog is detected.<br />
Home position shift distance<br />
Travel distance after proximity<br />
dog<br />
Home position return<br />
acceleration/deceleration time<br />
constants<br />
Home position return position<br />
data<br />
Parameter No. PE06<br />
Parameter No. PE09<br />
Parameter No. PE07<br />
Parameter No. PE08<br />
Set when the home position is moved from where the<br />
axis has passed the proximity dog front end.<br />
Set the acceleration/deceleration time constants during<br />
a home position return.<br />
Set the current position at home position return<br />
completion.<br />
13 - 60
13. POSITIONING MODE<br />
(2) Timing chart<br />
Automatic/manual<br />
selection (MD0)<br />
ON<br />
OFF<br />
DI0, DI1, and DI2<br />
Forward rotation start<br />
(ST1)<br />
Reverse rotation start<br />
(ST2)<br />
Servo motor<br />
speed<br />
ON<br />
OFF<br />
ON<br />
OFF<br />
Forward<br />
rotation<br />
0r/min<br />
(Note 1)<br />
6ms or<br />
more<br />
Acceleration time constant<br />
parameter No. PE07<br />
6ms or more<br />
3ms or less<br />
Home position return<br />
speed parameter No.<br />
PE04<br />
(Note 2)<br />
Deceleration time<br />
constant parameter<br />
No. PE07<br />
Creep speed<br />
parameter No. PE05<br />
Proximity dog<br />
Travel distance after proximity<br />
dog parameter No. PE09<br />
+<br />
Home position shift distance<br />
parameter No. PE06<br />
Home position address<br />
parameter No. PE08<br />
Proximity dog (DOG)<br />
Rough match (CPO)<br />
Travel completion<br />
(MEND)<br />
Home position return<br />
completion (ZP)<br />
ON<br />
OFF<br />
ON<br />
OFF<br />
ON<br />
OFF<br />
ON<br />
OFF<br />
Note 1. External input signal detection delays by the input filter setting time of parameter No. PD19. Additionally, make up a<br />
sequence that changes DI0, DI1 and DI2 ahead of time by considering delays in output signal sequence from the<br />
controller and variations of a signal change due to hardware.<br />
2. Point table method: Select the home position return mode by turning OFF DI0, DI1 and DI2.<br />
Program method: Select a program that has the home position return "ZRT" command.<br />
The set value in parameter No. PE08 (home position return position data) is applied as position address at<br />
the time of the home position return being completed.<br />
13 - 61
13. POSITIONING MODE<br />
13.6.9 Count type front end reference home position return<br />
POINT<br />
This home position return method depends on the timing of reading the<br />
proximity dog (DOG) that has detected the front end of a proximity dog.<br />
Hence, if a home position return is made at the home position return speed of<br />
100r/min, an error of 400 pulses will occur in the home position. The error of<br />
the home position is larger as the home position return speed is higher.<br />
The position where the axis, which had started decelerating at the front end of a proximity dog, has moved the<br />
after-proximity dog travel distance and home position shift distance is defined as a home position. A home<br />
position return that does not depend on the Z-phase signal can be made. The home position may change if the<br />
home position return speed varies.<br />
(1) Devices and parameters<br />
Set the input devices and parameters as indicated below.<br />
Item Device/Parameter used Description<br />
<strong>Manual</strong> home position return<br />
mode selection<br />
Count type dog front end<br />
reference home position return<br />
Home position return direction<br />
Automatic/manual selection (MD0)<br />
Point table No./Program No.<br />
selection 1 to 3 (DI0 to DI2)<br />
Parameter No. PE03<br />
Parameter No. PE03<br />
Turn MD0 ON.<br />
Point table method: Select the home position return<br />
mode by turning OFF DI0, DI1 and<br />
DI2.<br />
Program method: Select a program that has the home<br />
position return "ZRT" command.<br />
6: Select the count type dog front end reference.<br />
Refer to section 13.6.1 (2) and select the home position<br />
return direction.<br />
Dog input polarity<br />
Parameter No. PE03<br />
Refer to section 13.6.1 (2) and select the dog input<br />
polarity.<br />
Home position return speed Parameter No. PE04 Set the speed till the dog is detected.<br />
Creep speed Parameter No. PE05 Set the speed after the dog is detected.<br />
Home position shift distance<br />
Travel distance after proximity<br />
dog<br />
Home position return<br />
acceleration/deceleration time<br />
constants<br />
Home position return position<br />
data<br />
Parameter No. PE06<br />
Parameter No. PE09<br />
Parameter No. PE07<br />
Parameter No. PE08<br />
Set when the home position is moved from where the<br />
axis has passed the proximity dog front end.<br />
Set the acceleration/deceleration time constants during<br />
a home position return.<br />
Set the current position at home position return<br />
completion.<br />
13 - 62
13. POSITIONING MODE<br />
(2) Timing chart<br />
Automatic/manual<br />
selection (MD0)<br />
ON<br />
OFF<br />
DI0, DI1, and DI2<br />
Forward rotation start<br />
(ST1)<br />
Reverse rotation start<br />
(ST2)<br />
Servo motor<br />
speed<br />
ON<br />
OFF<br />
ON<br />
OFF<br />
Forward<br />
rotation<br />
0r/min<br />
(Note 1)<br />
6ms or<br />
more<br />
6ms or more<br />
Acceleration time constant<br />
parameter No. PE07<br />
3ms or less<br />
Home position return<br />
speed parameter<br />
No. PE04<br />
(Note 2)<br />
Deceleration time<br />
constant parameter<br />
No. PE07<br />
Creep speed<br />
parameter No. PE05<br />
Proximity dog<br />
Travel distance after proximity<br />
dog parameter No. PE09<br />
+<br />
Home position shift distance<br />
parameter No. PE06<br />
Home position address<br />
parameter No. PE08<br />
Proximity dog (DOG)<br />
Rough match (CPO)<br />
Travel completion<br />
(MEND)<br />
Home position return<br />
completion (ZP)<br />
ON<br />
OFF<br />
ON<br />
OFF<br />
ON<br />
OFF<br />
ON<br />
OFF<br />
Note 1. External input signal detection delays by the input filter setting time of parameter No. PD19. Additionally, make up a<br />
sequence that changes DI0, DI1 and DI2 ahead of time by considering delays in output signal sequence from the controller<br />
and variations of a signal change due to hardware.<br />
2. Point table method: Select the home position return mode by turning OFF DI0, DI1 and DI2.<br />
Program method: Select a program that has the home position return "ZRT" command.<br />
The set value in parameter No. PE08 (home position return position data) is applied as position address at<br />
the time of the home position return being completed.<br />
13 - 63
13. POSITIONING MODE<br />
13.6.10 Dog cradle type home position return<br />
The position where the first Z-phase signal is issued after detection of the proximity dog front end can be<br />
defined as a home position.<br />
(1) Devices and parameters<br />
Set the input devices and parameters as indicated below.<br />
Item Device/Parameter used Description<br />
<strong>Manual</strong> home position return<br />
mode selection<br />
Dog cradle type home position<br />
return<br />
Home position return direction<br />
Automatic/manual selection (MD0)<br />
Point table No./Program No.<br />
selection 1 to 3 (DI0 to DI2)<br />
Parameter No. PE03<br />
Parameter No. PE03<br />
Turn MD0 ON.<br />
Point table method: Select the home position return<br />
mode by turning OFF DI0, DI1 and<br />
DI2.<br />
Program method: Select a program that has the home<br />
position return "ZRT" command.<br />
7: Select the dog cradle type.<br />
Refer to section 13.6.1 (2) and select the home position<br />
return direction.<br />
Dog input polarity<br />
Parameter No. PE03<br />
Refer to section 13.6.1 (2) and select the dog input<br />
polarity.<br />
Home position return speed Parameter No. PE04 Set the speed till the dog is detected.<br />
Creep speed Parameter No. PE05 Set the speed after the dog is detected.<br />
Home position shift distance<br />
Home position return<br />
acceleration/deceleration time<br />
constants<br />
Home position return position<br />
data<br />
Parameter No. PE06<br />
Parameter No. PE07<br />
Parameter No. PE08<br />
Set when the home position is moved from the Z-phase<br />
signal position.<br />
Set the acceleration/deceleration time constants during<br />
a home position return.<br />
Set the current position at home position return<br />
completion.<br />
13 - 64
13. POSITIONING MODE<br />
(2) Timing chart<br />
Automatic/manual<br />
selection (MD0)<br />
ON<br />
OFF<br />
DI0, DI1, and DI2<br />
Forward rotation start<br />
(ST1)<br />
Reverse rotation start<br />
(ST2)<br />
Servo motor<br />
speed<br />
(Note 1)<br />
6ms or<br />
ON more<br />
OFF<br />
ON<br />
OFF<br />
Forward<br />
rotation<br />
0r/min<br />
Reverse<br />
rotation<br />
6ms or more<br />
Acceleration time constant<br />
parameter No. PE07<br />
3ms or less<br />
Home position return<br />
speed parameter<br />
No. PE04<br />
Creep speed<br />
(Note 2)<br />
Deceleration time<br />
constant parameter<br />
No. PE07 Home position shift distance<br />
parameter No. PE06<br />
Home position address<br />
parameter No. PE08<br />
Proximity dog<br />
Z-phase<br />
Proximity dog (DOG)<br />
Rough match (CPO)<br />
Travel completion<br />
(MEND)<br />
Home position return<br />
completion (ZP)<br />
ON<br />
OFF<br />
ON<br />
OFF<br />
ON<br />
OFF<br />
ON<br />
OFF<br />
ON<br />
OFF<br />
Note 1. External input signal detection delays by the input filter setting time of parameter No. PD19. Additionally, make up a<br />
sequence that changes DI0, DI1 and DI2 ahead of time by considering delays in output signal sequence from the controller<br />
and variations of a signal change due to hardware.<br />
2. Point table method: Select the home position return mode by turning OFF DI0, DI1 and DI2.<br />
Program method: Select a program that has the home position return "ZRT" command.<br />
The set value in parameter No. PE08 (home position return position data) is applied as position address at<br />
the time of the home position return being completed.<br />
13 - 65
13. POSITIONING MODE<br />
13.6.11 Home position return automatic return function<br />
If the current position is on or beyond the proximity dog in the home position return using the proximity dog, this<br />
function starts home position return after making a return to the position where the home position return can be<br />
made.<br />
(1) When the current position is on the proximity dog<br />
When the current position is on the proximity dog, an automatic return is made before home position return.<br />
Home position return direction<br />
Proximity dog<br />
Servo motor<br />
speed<br />
0r/min<br />
Reverse<br />
rotation<br />
Makes an automatic return to a<br />
position before the proximity dog,<br />
then executes home position return<br />
from this position.<br />
Home position<br />
return start position<br />
(2) When the current position is beyond the proximity dog<br />
The current position moves in the home return direction at a start. When the stroke end (LSP or LSN) is<br />
detected, the position moves in the opposite direction. The motion stops when the position passes the front<br />
end of the proximity dog. Then, a home position return is resumed from this position. If the proximity dog is<br />
not detected, the motion stops where the opposite side of the stroke end is detected, and home position<br />
return incomplete warning (90.2) occurs.<br />
Home position return direction<br />
Proximity dog<br />
Stroke end<br />
(LSP or LSN)<br />
Servo motor<br />
speed<br />
Forward<br />
rotation<br />
0r/min<br />
Reverse<br />
rotation<br />
Makes an automatic return to a position<br />
before the proximity dog, then executes<br />
home position return from this position.<br />
Home position<br />
return start position<br />
Software limit cannot be used with these functions.<br />
13 - 66
13. POSITIONING MODE<br />
13.7 Parameters<br />
CAUTION<br />
Never adjust or change the parameter values extremely as it will make operation<br />
instable.<br />
If a fixed value is indicated in a digit of a parameter, do not change the fixed value.<br />
POINT<br />
This chapter describes the parameters exclusively used for positioning mode.<br />
Refer to chapter 4 for other parameters.<br />
In this servo amplifier, the parameters are classified into the following groups on a function basis.<br />
Parameter group<br />
Basic setting parameters<br />
(No. PA )<br />
Gain/Filter parameters<br />
(No. PB )<br />
Extension setting parameters<br />
(No. PC )<br />
I/O setting parameters<br />
(No. PD )<br />
Positioning setting parameters<br />
(No. PE )<br />
Main description<br />
Make basic setting with these parameters when using this servo amplifier<br />
in the position control mode.<br />
Use these parameters when making gain adjustment manually.<br />
Use these parameters mainly when using this servo amplifier in the<br />
internal speed control mode or in the internal torque control mode.<br />
Use these parameters when changing the I/O signals of the servo<br />
amplifier.<br />
Use these parameters only for the positioning mode.<br />
13 - 67
13. POSITIONING MODE<br />
13.7.1 Basic setting parameters (No. PA )<br />
POINT<br />
For any parameter whose symbol is preceded by *, set the parameter value<br />
and switch power off once, then switch it on again to make that parameter<br />
setting valid.<br />
Never change parameters for manufacturer setting.<br />
(1) Parameter list<br />
No. Symbol Name Initial value Unit Reference<br />
PA01 *STY Control mode 000h Section 4.1.3<br />
PA02 *REG Regenerative option 000h Section 4.1.4<br />
PA03 For manufacturer setting 000h<br />
PA04 *AOP1 Tough drive function selection 000h Section 4.1.5<br />
PA05 *FBP Number of virtual pulses per revolution 100 ×100<br />
pulse/rev<br />
PA06 *CMX Electronic gear numerator (Virtual pulse multiplying factor<br />
numerator)<br />
PA07 *CDV Electronic gear denominator (Virtual pulse multiplying factor<br />
denominator)<br />
1<br />
1<br />
(2) in this section<br />
(3) in this section<br />
PA08 ATU Auto tuning mode 001h Section 4.1.8<br />
PA09 RSP Auto tuning response 6 Section 4.1.8<br />
PA10 INP In-position range 100 μm (Note) Section 4.1.9<br />
PA11 TLP Forward torque limit 100 % Section 4.1.10<br />
PA12 TLN Reverse torque limit 100 % Section 4.1.10<br />
PA13 This parameter is not used. Do not change this value by any means. 000h<br />
PA14 *POL Rotation direction selection 0 (4) in this section<br />
PA15 *ENR Encoder output pulses 4000 pulse/rev Section 4.1.13<br />
PA16 *ENR2 Encoder output pulse electronic gear 0 Section 4.1.13<br />
PA17 For manufacturer setting 000h<br />
PA18<br />
PA19 *BLK Parameter writing inhibit 00Eh Section 4.1.2<br />
000h<br />
Note. The setting range is the same although the unit differs from that of the position control mode.<br />
13 - 68
13. POSITIONING MODE<br />
(2) Number of virtual pulses per servo motor revolution<br />
Parameter<br />
Initial value Setting range Unit<br />
No. Symbol Name<br />
PA05 *FBP Number of virtual pulses per revolution 100 0, 100 to 500 × 100 pulse/rev<br />
CAUTION<br />
When this parameter is changed, turn off and on the power before starting the<br />
operation. Otherwise, the set value will not be validated, causing an unexpected<br />
operation.<br />
POINT<br />
This parameter is made valid when power is switched off, then on after<br />
setting.<br />
Set the number of virtual pulses necessary to rotate the servo motor one turn.<br />
When parameter No. PA05 is set to "100 (10000[pulse/rev])" (initial value), the number of pulses necessary<br />
to rotate the servo motor one turn is 10000 pulses. When parameter No. PA05 is set to "0", the number of<br />
pulses necessary to rotate the servo motor one turn equals to the encoder resolution of the servo motor.<br />
Parameter No. PA05 setting<br />
Description<br />
0 Servo motor encoder resolution [pulse/rev]<br />
100 to 500 Number of virtual pulses necessary to rotate the servo motor one turn [× 100 pulse/rev]<br />
Travel distance<br />
Parameter No. PA05<br />
FBP conversion<br />
(Note)<br />
Parameter No. PA06 and PA07<br />
CMX +<br />
Deviation counter<br />
CDV -<br />
Servo motor<br />
M<br />
Value converted to the number of<br />
virtual pulses (FBP) per revolution<br />
Encoder<br />
Note. This process converts the number of the virtual pulses required to rotate the servo motor one turn to the value<br />
set in parameter No. PA05.<br />
13 - 69
13. POSITIONING MODE<br />
(3) Electronic gear<br />
Parameter<br />
Initial<br />
No. Symbol Name<br />
value<br />
Setting range<br />
PA06 *CMX Electronic gear numerator (Virtual pulse multiplying factor numerator) 1 1 to 65535<br />
PA07 *CDV Electronic gear denominator (Virtual pulse multiplying factor<br />
1 1 to 65535<br />
denominator)<br />
Unit<br />
CAUTION<br />
Incorrect setting may cause unexpectedly fast rotation, resulting injury.<br />
POINT<br />
In the positioning mode, this parameter is made valid when power is switched<br />
off, then on after setting.<br />
The setting range of the electronic gear is as follows. If you set any value<br />
outside this range, a parameter error (37.1) occurs.<br />
Setting range of the electronic gear: Min. value < CMX<br />
CDV<br />
< Max. value<br />
Parameter No. PA05 Min. value Max. value<br />
100 (10000[pulse/rev]) 1/131 76<br />
200 (20000[pulse/rev]) 1/65 152<br />
300 (30000[pulse/rev]) 1/43 228<br />
360 (36000[pulse/rev]) 1/36 274<br />
400 (40000[pulse/rev]) 1/32 305<br />
500 (50000[pulse/rev]) 1/26 381<br />
0 (servo motor encoder resolution) 1/10 1000<br />
13 - 70
13. POSITIONING MODE<br />
(a) Concept of electronic gear<br />
Adjust the electronic gear (parameters No. PA06 and PA07) to make the servo amplifier setting match<br />
the travel distance of the machine. Also, by changing the electronic gear value, the machine can be<br />
moved at any multiplication ratio to the travel distance set in the servo amplifier.<br />
Travel distance<br />
Parameter No. PA06 and PA07<br />
Parameter No. PA05<br />
CMX +<br />
FBP conversion<br />
Deviation counter<br />
CDV -<br />
(Note)<br />
Servo motor<br />
M<br />
Value converted to the number of virtual<br />
pulses (FBP) per revolution<br />
Encoder<br />
Note. This process converts the number of the virtual pulses required to rotate the servo motor one turn to the value<br />
set in parameter No. PA05.<br />
CMX Parameter No.PA06<br />
=<br />
CDV Parameter No. PA07<br />
The following setting examples are used to explain how to calculate the electronic gear.<br />
POINT<br />
The following specification symbols are required to calculate the electronic<br />
gear<br />
Pb : Ballscrew lead [mm]<br />
1/n : Reduction ratio<br />
S : Travel distance per servo motor revolution [μm/rev]<br />
: Angle per revolution [0.001 /rev]<br />
(b) Setting example<br />
1) Ballscrew setting example<br />
Machine specifications<br />
Ballscrew lead Pb = 10 [mm]<br />
Reduction ratio: 1/n = Z1/Z2 = 1/2<br />
Z1: Number of gear cogs on servo motor side<br />
Z2: Number of gear cogs on load side<br />
Number of virtual pulses per revolution: 10000 [pulse/rev]<br />
CMX 10000 10000 10000 2<br />
= =<br />
=<br />
=<br />
CDV ΔS<br />
1/n ⋅ Pb ⋅1000<br />
1/2 ⋅10<br />
⋅1000<br />
1<br />
1/n<br />
1/n=Z1/Z2=1/2<br />
Z2<br />
Z1<br />
Number of virtual pulses per<br />
revolution of servo motor<br />
10000[pulse/rev]<br />
Pb=10[mm]<br />
Hence, set 2 to CMX and 1 to CDV.<br />
13 - 71
13. POSITIONING MODE<br />
2) Conveyor setting example<br />
0.001 is set to be 1 μm.<br />
Machine specifications<br />
Table : 360 /rev<br />
Reduction ratio : 1/n=P1/P2=625/12544<br />
P1: Pulley diameter on servo motor side<br />
P2: Pulley diameter on load side<br />
Number of virtual pulses per revolution: 36000 [pulse/rev]<br />
CMX =<br />
36000 36000<br />
=<br />
CDV Δθ<br />
625/12544 ⋅ 360 ⋅1000<br />
6272<br />
=<br />
3125<br />
Number of virtual pulses per<br />
revolution of servo motor<br />
36000[pulse/rev]<br />
Table<br />
Timing belt: 625/12544<br />
POINT<br />
In the linear or rotary operation, setting the following values in the number of<br />
virtual pulses per revolution (parameter No. PA05) simplifies the setting<br />
values of the electronic gear (parameter No. PA06, PA07).<br />
Liner operation: 100 (10000[pulse/rev])<br />
Rotary operation: 360 (36000[pulse/rev])<br />
(4) Selection of servo motor rotation direction<br />
Parameter<br />
Initial value Setting range Unit<br />
No. Symbol Name<br />
PA14 *POL Rotation direction selection 0 0, 1<br />
POINT<br />
This parameter is made valid when power is switched off, then on after<br />
setting.<br />
In program method, ST2 can be used only for JOG operation in the test mode.<br />
Select the servo motor rotation direction when the forward rotation start (ST1) or reverse rotation direction<br />
(ST2) is turned ON.<br />
Parameter No. PA14 setting<br />
0<br />
1<br />
Forward rotation start (ST1) ON<br />
CCW rotation<br />
(address incremented)<br />
CW rotation<br />
(address incremented.)<br />
Servo motor rotation direction<br />
Reverse rotation start (ST2) ON<br />
CW rotation<br />
(address decremented)<br />
CCW rotation<br />
(address decremented)<br />
ST1: ON<br />
CCW<br />
ST2: ON<br />
CCW<br />
CW<br />
ST2: ON<br />
CW<br />
ST1: ON<br />
Parameter No. PA14: 0 Parameter No. PA14: 1<br />
13 - 72
13. POSITIONING MODE<br />
13.7.2 Gain/filter parameters (No. PB )<br />
POINT<br />
For any parameter whose symbol is preceded by *, set the parameter value<br />
and switch power off once, then switch it on again to make that parameter<br />
setting valid.<br />
Set any parameter with [Applied] written in the name column when using an<br />
advanced function.<br />
Never change parameters for manufacturer setting.<br />
No. Symbol<br />
Name<br />
Initial<br />
value<br />
Unit Reference<br />
PB01 FILT Adaptive tuning mode (Adaptive filter ) 000h<br />
Section 4.2.2<br />
PB02 VRFT Vibration suppression control tuning mode (Advanced vibration<br />
000h<br />
suppression control)<br />
PB03 This parameter is not used. Do not change this value by any means.<br />
PB04 FFC Feed forward gain [Applied] 0 % Section 4.2.2<br />
PB05 For manufacturer setting 500<br />
PB06 GD2 Load to motor inertia moment ratio 7.0 Multiplier Section 4.2.2<br />
PB07 P<strong>G1</strong> Model loop gain 24 rad/s<br />
PB08 PG2 Position loop gain 37 rad/s<br />
PB09 VG2 Speed loop gain 823 rad/s<br />
PB10 VIC Speed integral compensation 33.7 ms<br />
PB11 VDC Speed differential compensation [Applied] 980<br />
PB12 OVA Overshoot amount compensation [Applied] 0 %<br />
PB13 NH1 Machine resonance suppression filter 1 4500 Hz<br />
PB14 NHQ1 Notch shape selection 1<br />
000h<br />
PB15 NH2 Machine resonance suppression filter 2 4500 Hz<br />
PB16 NHQ2 Notch shape selection 2<br />
000h<br />
PB17 Automatic setting parameter<br />
PB18 LPF Low-pass filter setting [Applied] 3141 rad/s Section 4.2.2<br />
PB19 VRF1 Vibration suppression control vibration frequency setting [Applied] 100.0 Hz<br />
PB20 VRF2 Vibration suppression control resonance frequency setting [Applied] 100.0 Hz<br />
PB21 For manufacturer setting 0<br />
PB22 0<br />
PB23 VFBF Low-pass filter selection [Applied] 000h Section 4.2.2<br />
PB24 For manufacturer setting 000h<br />
PB25 *BOP1 Function selection B-1 [Applied] 000h<br />
Section 4.2.2<br />
PB26 *CDP Gain changing selection [Applied] 000h<br />
PB27 CDL Gain changing condition [Applied] 10<br />
PB28 CDT Gain changing time constant [Applied] 1 ms<br />
PB29 GD2B Gain changing load to motor inertia moment ratio [Applied] 7.0 Multiplier<br />
PB30 PG2B Gain changing position loop gain [Applied] 37 rad/s<br />
PB31 VG2B Gain changing speed loop gain [Applied] 823 rad/s<br />
PB32 VICB Gain changing speed integral compensation [Applied] 33.7 ms<br />
PB33 VRF1B Gain changing vibration suppression control vibration frequency setting [Applied] 100.0 Hz<br />
PB34 VRF2B Gain changing vibration suppression control resonance frequency setting [Applied] 100.0 Hz<br />
PB35 For manufacturer setting 0<br />
PB36 0<br />
PB37 100<br />
PB38 NH3 Machine resonance suppression filter 3 4500 Hz Section 4.2.2<br />
PB39 NHQ3 Notch shape selection 3<br />
000h<br />
13 - 73
13. POSITIONING MODE<br />
No. Symbol<br />
Name<br />
Initial<br />
value<br />
PB40 For manufacturer setting 111h<br />
PB41 20<br />
PB42<br />
000h<br />
PB43<br />
000h<br />
PB44<br />
000h<br />
PB45<br />
000h<br />
PB46<br />
000h<br />
PB47<br />
000h<br />
PB48<br />
000h<br />
PB49<br />
000h<br />
PB50<br />
000h<br />
Unit<br />
Reference<br />
13 - 74
13. POSITIONING MODE<br />
13.7.3 Extension setting parameters (No. PC )<br />
POINT<br />
For any parameter whose symbol is preceded by *, set the parameter value<br />
and switch power off once, then switch it on again to make that parameter<br />
setting valid.<br />
Set any parameter with [Applied] written in the name column when using an<br />
advanced function.<br />
Never change parameters for manufacturer setting.<br />
(1) Parameter list<br />
No. Symbol<br />
Name<br />
Initial<br />
value<br />
Unit Reference<br />
PC01 This parameter is not used. Do not change this value by any means. 0<br />
PC02 0<br />
PC03 STC S-pattern acceleration/deceleration time constant 0 ms (2) in this section<br />
PC04 This parameter is not used. Do not change this value by any means. 0<br />
PC05 0<br />
PC06 100<br />
PC07 500<br />
PC08 1000<br />
PC09 MBR Electromagnetic brake sequence output 100 ms Section 4.3.2<br />
PC10 ZSP Zero speed 50 r/min<br />
PC11 *BPS Alarm history clear<br />
000h<br />
PC12 This parameter is not used. Do not change this value by any means. 0<br />
PC13 *ENRS Encoder output pulses selection 000h Section 4.3.2<br />
PC14 TL2 Internal torque limit 2 [Applied] 100 %<br />
PC15 ERZL Error excessive alarm detection level 3.0 rev<br />
PC16 For manufacturer setting 30<br />
PC17 *OSL Overspeed alarm detection level 0 r/min Section 4.3.2<br />
PC18 For manufacturer setting 1000<br />
PC19 0<br />
PC20<br />
000h<br />
PC21<br />
001h<br />
PC22 *COP1 Function selection C-1 [Applied] 000h Section 4.3.2<br />
PC23 This parameter is not used. Do not change this value by any means. 000h<br />
PC24 *COP3 Function selection C-3 [Applied] 000h<br />
PC25 *COP4 Function selection C-4 [Applied] 000h Section 4.3.2<br />
PC26 ALDT Detailed setting of overload tough drive [Applied] 200 ×10ms<br />
PC27 OSCL Detailed setting of vibration tough drive [Applied] 50 %<br />
PC28 CVAT Detailed setting of instantaneous power failure tough drive [Applied] 3 ×10ms<br />
PC29 *COP5 Function selection C-5 [Applied] 000h<br />
PC30 This parameter is not used. Do not change this value by any means. 000h<br />
PC31 200<br />
PC32 300<br />
PC33 500<br />
PC34 800<br />
13 - 75
13. POSITIONING MODE<br />
No. Symbol<br />
Name<br />
Initial<br />
value<br />
Unit Reference<br />
PC35 For manufacturer setting 000h<br />
PC36 0<br />
PC37 0<br />
PC38 0<br />
PC39 0<br />
PC40 0<br />
PC41<br />
000h<br />
PC42 0<br />
PC43<br />
000h<br />
PC44 RECT Drive recorder alarm specifying 000h Section 4.3.2<br />
PC45 For manufacturer setting 000h<br />
PC46<br />
000h<br />
PC47<br />
000h<br />
PC48<br />
000h<br />
PC49<br />
000h<br />
PC50<br />
000h<br />
PC51<br />
000h<br />
PC52<br />
000h<br />
PC53<br />
000h<br />
PC54<br />
000h<br />
PC55<br />
000h<br />
PC56<br />
000h<br />
PC57<br />
000h<br />
PC58<br />
000h<br />
PC59<br />
000h<br />
PC60<br />
000h<br />
PC61<br />
000h<br />
PC62<br />
000h<br />
PC63<br />
000h<br />
PC64<br />
000h<br />
13 - 76
13. POSITIONING MODE<br />
(2) List of details<br />
No. Symbol Name and functon<br />
Initial<br />
value<br />
Setting<br />
range<br />
PC03 STC S-pattern acceleration/deceleration time constant<br />
In servo operation, linear acceleration/deceleration is usually made. By<br />
setting the S-pattern acceleration/deceleration time constant (parameter<br />
0 0<br />
to<br />
100<br />
No.PC03), a smooth start/stop can be made. When the S-pattern time<br />
101<br />
constant is set, smooth positioning is executed as shown below. Note that<br />
to<br />
the time equivalent to the S-pattern time constant setting increases until the<br />
1000<br />
travel completion (MEND).<br />
Unit<br />
ms<br />
Rated speed<br />
Acceleration time<br />
constant<br />
Deceleration time<br />
constant<br />
Preset speed<br />
Servo motor<br />
speed<br />
0 [r/min]<br />
Ta<br />
Ta+Ts<br />
Tb+Ts<br />
Tb<br />
Ta: Time until preset speed is reached<br />
Tb: Time until stop<br />
Ts: S-pattern acceleration/deceleration time constant (parameter No. PC03)<br />
Setting range 0 to 100ms (S-pattern acceleration/deceleration time constant<br />
at setting value 101 to 1000 is 100ms)<br />
In the program method, S-pattern acceleration/deceleration time constant of<br />
STD command is valid during the time from the STD command start to the<br />
program end. For other than that, S-pattern acceleration/deceleration time<br />
constant of parameter No. PC03 is valid.<br />
13 - 77
13. POSITIONING MODE<br />
13.7.4 I/O setting parameters (No. PD )<br />
POINT<br />
For any parameter whose symbol is preceded by *, set the parameter value<br />
and switch power off once, then switch it on again to make that parameter<br />
setting valid.<br />
Never change parameters for manufacturer setting.<br />
(1) Parameter list<br />
No. Symbol<br />
Name<br />
Initial<br />
value<br />
Unit Reference<br />
PD01 *DIA1 Input signal automatic ON selection 1 0000h Section 4.4.2<br />
PD02 *DI0 Input signal device selection 0 (CN1-23, CN1-25) 262Dh<br />
PD03 *DI1-1 Input signal device selection 1L (CN1-3)<br />
0303h<br />
PD04 *DI1-2 Input signal device selection 1H (CN1-3)<br />
2003h<br />
PD05 *DI2-1 Input signal device selection 2L (CN1-4)<br />
0202h<br />
PD06 *DI2-2 Input signal device selection 2H (CN1-4)<br />
0202h<br />
PD07 *DI3-1 Input signal device selection 3L (CN1-5)<br />
0D06h<br />
PD08 *DI3-2 Input signal device selection 3H (CN1-5)<br />
2C0Dh<br />
PD09 *DI4-1 Input signal device selection 4L (CN1-6)<br />
070Ah<br />
PD10 *DI4-2 Input signal device selection 4H (CN1-6)<br />
0707h<br />
PD11 *DI5-1 Input signal device selection 5L (CN1-7)<br />
080Bh<br />
PD12 *DI5-2 Input signal device selection 5H (CN1-7)<br />
0808h<br />
PD13 *DI6-1 Input signal device selection 6L (CN1-8)<br />
0505h<br />
PD14 *DI6-2 Input signal device selection 6H (CN1-8)<br />
0505h<br />
PD15 *DO1 Output signal device selection 1 (CN1-9)<br />
0003h<br />
PD16 *DO2 Output signal device selection 2 (CN1-10)<br />
0004h<br />
PD17 *DO3 Output signal device selection 3 (CN1-11)<br />
0002h<br />
PD18 *DO4 Output signal device selection 4 (CN1-12)<br />
0005h<br />
PD19 *DIF Input filter setting 0002h<br />
PD20 *DOP1 Function selection D-1 0000h (2) in this section<br />
PD21 For manufacturer setting 0000h<br />
PD22 *DOP3 Function selection D-3 0000h Section 4.4.2<br />
PD23 For manufacturer setting 0000h<br />
PD24 *DOP5 Function selection D-5 0000h Section 4.4.2<br />
PD25 For manufacturer setting 0000h<br />
PD26<br />
0000h<br />
13 - 78
13. POSITIONING MODE<br />
(2) List of details<br />
No. Symbol Name and function<br />
Initial<br />
value<br />
Setting<br />
range<br />
Unit<br />
PD20 *DOP1 Function selection D-1<br />
Select the stop processing at LSP/LSN OFF or when the software limit is<br />
detected, the base circuit status at reset (RES) ON and the operation during<br />
tough drive (MTTR).<br />
0<br />
0000h<br />
Refer to<br />
the name<br />
and<br />
function<br />
filed.<br />
Stop processing at LSP/LSN OFF or when the<br />
software limit is detected<br />
0: Sudden stop (Home position is not erased.)<br />
1: Slow stop (Home position is not erased.)<br />
Selection of base circuit status at reset (RES) ON<br />
0: Base circuit switched off<br />
1: Base circuit not switched off<br />
Operation selection during tough drive (MTTR)<br />
0: MTTR turns ON during the instantaneous<br />
power failure tough drive<br />
1: MTTR turns ON during the overload tough drive<br />
or the instantaneous power failure tough drive<br />
13 - 79
13. POSITIONING MODE<br />
13.7.5 Positioning setting parameters (No. PE )<br />
POINT<br />
For any parameter whose symbol is preceded by *, set the parameter value<br />
and switch power off once, then switch it on again to make that parameter<br />
setting valid.<br />
Never change parameters for manufacturer setting.<br />
(1) Parameter list<br />
No. Symbol<br />
Name<br />
Initial<br />
value<br />
Unit Reference<br />
PE01 *CTY Command mode selection 0000h (2) in this section<br />
PE02 *FTY Feeding function selection 0000h<br />
PE03 *ZTY Home position return type 0010h<br />
PE04 ZRF Home position return speed 500 r/min<br />
PE05 CRF Creep speed 10 r/min<br />
PE06 ZST Home position shift distance 0 μm<br />
PE07 FTS Home position return/JOG operation acceleration/deceleration time constants 100 ms<br />
PE08 *ZPS Home position return position data 0 ×10 STM μm<br />
PE09 DCT Travel distance after proximity dog 1000 ×10 STM μm<br />
PE10 ZTM Stopper type home position return stopper time 100 ms<br />
PE11 ZTT Stopper type home position return torque limit value 15 %<br />
PE12 CRP Rough match output range 0 ×10 STM μm<br />
PE13 JOG JOG speed 100 r/min<br />
PE14 OUT1 OUT1 output time selection<br />
0 ms<br />
This parameter is used only for the program method. This is not used in the<br />
point table method.<br />
PE15 *BKC Backlash compensation 0 pulse<br />
PE16 *LMPL Software limit + 0 ×10 STM μm<br />
PE17 *LMPH 0<br />
PE18 *LMNL Software limit - 0 ×10 STM μm<br />
PE19 *LMNH 0<br />
PE20 *LPPL Position range output address + 0 ×10 STM μm<br />
PE21 *LPPH 0<br />
PE22 *LNPL Position range output address - 0 ×10 STM μm<br />
PE23 *LNPH 0<br />
PE24 *EOP1 Function selection E-1<br />
0000h<br />
PE25 For manufacturer setting 10<br />
PE26 100<br />
PE27<br />
0000h<br />
PE28<br />
0000h<br />
13 - 80
13. POSITIONING MODE<br />
(2) List of details<br />
No. Symbol Name and function<br />
Initial<br />
value<br />
Setting<br />
range<br />
Unit<br />
PE01 *CTY Command mode selection<br />
Select the command system.<br />
0 0 0<br />
0000h<br />
Refer to<br />
the name<br />
and<br />
function<br />
filed.<br />
Selection of command system<br />
(Refer to section 13.3 and 13.4)<br />
0: Absolute value command system<br />
1: Incremental value command system<br />
PE02 *FTY Feeding function selection<br />
Select the feed length multiplication and the manual pulse generator input<br />
multiplication.<br />
0 0<br />
0000h<br />
Refer to<br />
the name<br />
and<br />
function<br />
filed.<br />
Set<br />
value<br />
Feed<br />
length<br />
multiplication<br />
(STM)<br />
[Multiplier]<br />
Feed<br />
unit<br />
[ m]<br />
Position data input range [mm]<br />
Absolute value<br />
command system<br />
Incremental value<br />
command system<br />
0<br />
1<br />
2<br />
3<br />
1 1<br />
10 10<br />
100 100<br />
1000 1000<br />
-999.999 to +999.999 0 to +999.999<br />
-9999.99 to +9999.99 0 to +9999.99<br />
-99999.9 to +99999.9 0 to +99999.9<br />
-999999 to +999999 0 to +999999<br />
<strong>Manual</strong> pulse generator multiplication<br />
0: 1 time<br />
1: 10 times<br />
2: 100 times<br />
PE03 *ZTY Home position return type<br />
Select the home position return type, home position return direction and<br />
proximity dog input polarity. (Refer to section 13.6.)<br />
0<br />
0010h<br />
Refer to<br />
the name<br />
and<br />
function<br />
filed.<br />
Home position return type<br />
0: Dog type<br />
1: Count type<br />
2: Data set type<br />
3: Stopper type<br />
4: Home position ignorance<br />
(Servo-on position as home position)<br />
5: Dog type rear end reference<br />
6: Count type front end reference<br />
7: Dog cradle type<br />
Home position return direction<br />
0: Address increasing direction<br />
1: Address decreasing direction<br />
Proximity dog input polarity<br />
0: OFF indicates detection of the dog<br />
1: ON indicates detection of the dog<br />
PE04 ZRF Home position return speed<br />
Used to set the servo motor speed for home position return. (Refer to<br />
section 13.6.)<br />
500 0 to<br />
permissible<br />
speed<br />
r/min<br />
13 - 81
13. POSITIONING MODE<br />
No. Symbol Name and function<br />
PE05 CRF Creep speed<br />
Used to set the creep speed after proximity dog detection. (Refer to section<br />
13.6.)<br />
PE06 ZST Home position shift distance<br />
Used to set the travel distance from the home position. (Refer to section<br />
13.6.)<br />
PE07 FTS Home position return/JOG operation acceleration/deceleration time<br />
constants<br />
Used to set the acceleration/deceleration time constants during a home<br />
position return or JOG operation.<br />
PE08 *ZPS Home position return position data<br />
Used to set the current position on completion of home position return.<br />
(Refer to section 13.6.)<br />
PE09 DCT Travel distance after proximity dog<br />
Used to set the travel distance after proximity dog detection. (Refer to<br />
section 13.6.)<br />
Initial<br />
value<br />
Setting<br />
range<br />
10 0 to<br />
permissible<br />
speed<br />
0 0<br />
to<br />
65535<br />
100 0<br />
to<br />
20000<br />
0 -32768<br />
to<br />
32767<br />
1000 0<br />
to<br />
65535<br />
PE10 ZTM Stopper type home position return stopper time<br />
100 0 to 4<br />
In stopper type home position return, used to set the time from when the<br />
machine part is pressed against the stopper and the torque limit set in<br />
parameter No. PE11 is reached to when the home position is set. (Refer to<br />
section 13.6.6.)<br />
However, the stopper type home position return stopper time for the setting<br />
value 0 to 4 is 5ms.<br />
5<br />
to<br />
1000<br />
PE11 ZTT Stopper type home position return torque limit value<br />
15 0<br />
Used to set the torque limit value relative to the max. torque in [%] in stopper<br />
type home position return. (Refer to section 13.6.6.)<br />
However, the stopper type home position return torque limit value for the<br />
setting value 0 is 1%.<br />
PE12 CRP Rough match output range<br />
Used to set the command remaining distance range where the rough match<br />
(CPO) is output.<br />
PE13 JOG JOG speed<br />
Used to set the JOG speed command.<br />
PE14 OUT1 OUT1 output time selection<br />
This parameter is used only for the program method. It is not used in the<br />
point table method.<br />
Used to set the output time of OUT1. The OUT1 is turned on by OUTON<br />
program command.<br />
If "0" is set, it keeps ON.<br />
PE15 *BKC Backlash compensation<br />
Used to set the backlash compensation made when the command direction<br />
is reversed.<br />
This function compensates for the number of backlash pulses in the<br />
opposite direction to the home position return direction.<br />
For the home position ignorance (servo-on position as home position), this<br />
function compensates for the number of backlash pulses in the opposite<br />
direction to the first rotating direction after establishing the home position by<br />
switching ON the servo-on (SON).<br />
1<br />
to<br />
100<br />
0 0<br />
to<br />
65535<br />
100 0 to<br />
permissible<br />
speed<br />
0 0<br />
to<br />
20000<br />
0 0<br />
to<br />
32000<br />
Unit<br />
r/min<br />
μm<br />
ms<br />
×10 STM μm<br />
×10 STM μm<br />
ms<br />
%<br />
×10 STM μm<br />
r/min<br />
ms<br />
pulse<br />
13 - 82
13. POSITIONING MODE<br />
No. Symbol Name and function<br />
Initial<br />
value<br />
Setting<br />
range<br />
PE16 LMPL Software limit +<br />
Used to set the address increment side software stroke limit. The software<br />
limit is made invalid if this value is the same as in "software limit -". (Refer to<br />
0 -999999<br />
to<br />
999999<br />
(4) in this section.)<br />
Set the same sign to parameters No. PE16 and No. PE17. Setting of<br />
different signs will result in a parameter error.<br />
Unit<br />
×10 STM μm<br />
PE17<br />
LMPH<br />
Set address:<br />
Upper three digits<br />
Lower three digits<br />
Parameter No. PE16<br />
Parameter No. PE17<br />
PE18<br />
LMNL<br />
The software limit + is a set of upper digits and lower digits. To change the<br />
value, set in the order of lower digits to upper digits.<br />
Software limit -<br />
Used to set the address decrement side software stroke limit. The software<br />
limit is made invalid if this value is the same as in "software limit +". (Refer<br />
to (4) in this section.)<br />
Set the same sign to parameters No. PE18 and No. PE19. Setting of<br />
different signs will result in a parameter error.<br />
0 -999999<br />
to<br />
999999<br />
×10 STM μm<br />
PE19<br />
LMNH<br />
Set address:<br />
Upper three digits<br />
Lower three digits<br />
Parameter No. PE18<br />
Parameter No. PE19<br />
PE20<br />
*LPPL<br />
The software limit - is a set of upper digits and lower digits. To change the<br />
value, set in the order of lower digits to upper digits.<br />
Position range output address +<br />
Used to set the address increment side position range output address.<br />
Set the same sign to parameters No. PE20 and No. PE21. Setting of<br />
different signs will result in a parameter error.<br />
In parameters No. PE20 to PE23, set the range where position range (POT)<br />
turns on.<br />
0 -999999<br />
to<br />
999999<br />
×10 STM μm<br />
PE21<br />
*LPPH<br />
Set address:<br />
Upper three digits<br />
Lower three digits<br />
Parameter No. PE20<br />
Parameter No. PE21<br />
Position range output address + is a set of upper digits and lower digits. To<br />
change the value, set in the order of lower digits to upper digits.<br />
13 - 83
13. POSITIONING MODE<br />
No. Symbol Name and function<br />
PE22 *LNPL Position range output address -<br />
Used to set the address decrement side position range output address.<br />
Set the same sign to parameters No. PE22 and No. PE23. Setting of<br />
different signs will result in a parameter error.<br />
Set address:<br />
Initial<br />
value<br />
Setting<br />
range<br />
0 -999999<br />
to<br />
999999<br />
Unit<br />
×10 STM μm<br />
PE23<br />
*LNPH<br />
Upper three digits<br />
Lower three digits<br />
Parameter No. PE22<br />
Parameter No. PE23<br />
Position range output address - is a set of upper digits and lower digits. To<br />
change the value, set in the order of lower digits to upper digits.<br />
PE24 *EOP1 Function selection E-1<br />
Used to permit/inhibit editing the point table/program or to select the polarity<br />
of program input 1 (PI1).<br />
0<br />
0<br />
Point table/program edit<br />
0: Permit<br />
1: Inhibit<br />
Polarity selection of program input 1 (PI1)<br />
This setting is used only for the program method.<br />
It is not used in the point table method.<br />
0: Positive logic<br />
1: Negative logic<br />
0000h<br />
Refer to<br />
the name<br />
and<br />
function<br />
filed.<br />
PE25 For manufacturer setting 10<br />
PE26 Do not change this value by any means. 4100<br />
PE27<br />
0000h<br />
PE28<br />
0000h<br />
(3) Rough match output<br />
Rough match (CPO) is output when the command remaining distance reaches the value set in parameter<br />
No. PE12 (rough match output range). The setting range is 0 to 65535 [×10 STM μm].<br />
Command remaining distance<br />
( 10 STM m) set in parameter No. PE12<br />
Servo motor<br />
speed<br />
Rough match<br />
(CPO)<br />
Travel completion<br />
(MEND)<br />
Forward<br />
rotation<br />
0r/min<br />
ON<br />
OFF<br />
ON<br />
OFF<br />
Travel<br />
distance<br />
Actual servo motor speed<br />
13 - 84
13. POSITIONING MODE<br />
(4) Software limit<br />
A limit stop using a software limit (parameter No. PE16 to PE19) is made as in stroke end operation. When<br />
a motion goes beyond the setting range, the motor is stopped and servo-locked. This function is made valid<br />
at power-on but made invalid during home position return. This function is made invalid when the software<br />
limit + setting is the same as the software limit - setting. A parameter error (37.1) will occur if the software<br />
limit + setting is less than the software limit - setting.<br />
Inhibited area<br />
Unmovable<br />
Movable area<br />
Movable<br />
Current position<br />
Software limit<br />
13 - 85
13. POSITIONING MODE<br />
13.8 Point table setting method<br />
This section provides the method for setting the point table by using <strong>MR</strong> Configurator.<br />
POINT<br />
Positioning mode is supported by <strong>MR</strong> Configurator with software version C4<br />
or later.<br />
The value of the parameter No. PE02 set on the parameter setting screen is<br />
not interlocked with the STM (feed length multiplication) value on the point<br />
table list screen. Set the STM (feed length multiplication) value to the same<br />
as set in the parameter No. PE02 on the point table list screen.<br />
Click "Positioning-data" on the menu bar, and click "Point table" on the menu.<br />
When the above choices are made, the following window appears.<br />
g)<br />
f)<br />
e)<br />
c) a) b) d)<br />
h)<br />
(1) Writing point table data ( a) )<br />
Click the point table data changed, and click the "Write" button to write the new point table data to the<br />
servo amplifier.<br />
(2) Verifying point table data ( b) )<br />
Click the "Verify" button to verify all data being displayed and the data of the servo amplifier.<br />
(3) Batch-reading point table data ( c) )<br />
Click the "Read All" button to read and display all point table data from the servo amplifier.<br />
(4) Batch-writing point table data ( d) )<br />
Click the "Write All" button to write all point table data to the servo amplifier.<br />
13 - 86
13. POSITIONING MODE<br />
(5) Inserting point table data ( e) )<br />
Click the "Insert" button to insert one row just above the selected point table No. The rows of the selected<br />
table No. and below are shifted down.<br />
(6) Deleting point table data ( f) )<br />
Click the "Delete" button to delete all data in the selected point table No. The rows below the selected<br />
table No. are shifted up.<br />
(7) Changing point table data ( g) )<br />
Click the data to be changed, enter a new value into the input field, and press the enter key.<br />
(8) Reading point table data<br />
Point table data in a file can be read and displayed. Click "Project" on the menu bar to read the point table<br />
data.<br />
(9) Saving point table data<br />
All displayed point table data on the window can be saved. Click "Project" on the menu bar to save the<br />
point table data.<br />
(10) Printing point table data<br />
All displayed point table data on the window can be printed. Click "Project" on the menu bar to print the<br />
point table data.<br />
(11) Closing point table data ( h) )<br />
Click the "Close" button to close the window.<br />
13 - 87
13. POSITIONING MODE<br />
13.9 Program setting method<br />
This section provides the method for setting programs using <strong>MR</strong> Configurator.<br />
POINT<br />
Positioning mode is supported by <strong>MR</strong> Configurator with software version C4<br />
or later.<br />
(1) How to open the setting screen<br />
Click "Positioning-data" on the menu bar, and click "Program" on the menu.<br />
(2) Explanation of Program window<br />
a)<br />
b)<br />
d)<br />
c)<br />
e)<br />
f)<br />
g)<br />
(a) Reading the program ( a) )<br />
Click the "Read All" button to read the program stored in the servo amplifier.<br />
(b) Writing the program ( b) )<br />
Click the "Write All" button to write the program, whose setting has been changed, to the servo amplifier.<br />
(c) Verifying the programs ( c) )<br />
Click the "Verify" button to verify the program contents on the personal computer and the program<br />
contents of the servo amplifier.<br />
(d) Selecting the program No. ( d) )<br />
Used to select the program No. to be edited.<br />
(e) Editing the program ( e) )<br />
Used to edit the program selected in d). Click the "Edit" button to open the Program Edit window. Refer<br />
to (3) in this section for the edit screen.<br />
(f) Reading and saving the program file<br />
A program can be saved/read as a file. Click "Project" on the menu bar to save or read the project.<br />
13 - 88
13. POSITIONING MODE<br />
(g) Printing the program<br />
The read and edited program can be printed. Click "Project" on the menu bar to print the program.<br />
(h) Referring to the number of steps ( f) )<br />
The numbers of steps used and remaining steps in all programs are displayed.<br />
(i) Closing the Program Data window ( g) )<br />
Click the "Close" button to close the window.<br />
(3) Explanation of Program Edit window<br />
Create a program in the Program Edit window.<br />
b)<br />
c)<br />
d)<br />
e)<br />
a)<br />
f)<br />
g)<br />
(a) Editing the program ( a) )<br />
Enter commands into the program edit area ( a) ) in a text format.<br />
(b) Copying the text ( b) )<br />
Select the text of the program edit area and click the "Copy" button to store the selected text into the<br />
clipboard.<br />
(c) Pasting the text ( c) )<br />
Click the "Paste" button to paste the text stored in the clipboard to the specified position of the program<br />
edit area.<br />
(d) Deleting the text ( d) )<br />
Select the text of the program edit area and click the "Cut" button to delete the selected text.<br />
(e) Closing the Program Data window ( e) )<br />
Click the "OK" button to execute the edit check. If the check is completed without any problem, editing<br />
will be terminated and Program Data window will close. If any problem is found, an error will be<br />
displayed.<br />
13 - 89
13. POSITIONING MODE<br />
(f) Canceling the Program Edit window ( f) )<br />
Click the "Cancel" button to discard the program being edited and close the Program Edit window.<br />
(g) Error display ( g) )<br />
If a problem is found when the edit check is executed in (e), the line number and content of the error will<br />
be displayed. Click the error content to move the cursor to the corresponding line in the program.<br />
13 - 90
13. POSITIONING MODE<br />
13.10 Single-step feed usage in the test operation mode<br />
This section provides the usage of single-step feed using <strong>MR</strong> Configurator.<br />
POINT<br />
The single-step feed is supported by servo amplifier with software version B0<br />
or later, and <strong>MR</strong> Configurator with software version C4 or later.<br />
The servo motor will not operate if the forced stop (EM1), forward rotation<br />
stroke end (LSP) and reverse rotation stroke end (LSN) are off. Make<br />
automatic ON setting to turn on these devices or turn on between DOCOM.<br />
(Refer to section 4.4.2.)<br />
Operation is performed in accordance with the preset point table No./program No.<br />
Click "Test" on the menu bar and click "Single-step Feed" on the menu.<br />
Clicking displays the confirmation window for switching to the test operation mode.<br />
13 - 91
13. POSITIONING MODE<br />
Click the "OK" button to display the setting screen of the single-step feed.<br />
During the servo-on, the following window is displayed to confirm that the operation is in a stop status.<br />
After confirming that the operation is in the stop status, click the "OK" button.<br />
a)<br />
c)<br />
b)<br />
c)<br />
d)<br />
d)<br />
e)<br />
f)<br />
e)<br />
f)<br />
g)<br />
g)<br />
h)<br />
h)<br />
<br />
<br />
(a) Point table No. setting ( a) )<br />
Enter the point table No. into the "Point table No." input field and press the enter key.<br />
(b) Program No. setting ( b) )<br />
Enter the program No. into the "Program No." input field and press the enter key.<br />
(c) Servo motor start ( c) )<br />
Click the "Start" button to rotate the servo motor.<br />
(d) Temporary stop of servo motor ( d) )<br />
Click the "Pause" button to stop the servo motor temporarily.<br />
(e) Servo motor stop ( e) )<br />
Click the "Pause" button again during a temporary stop of the servo motor to clear the remaining moving<br />
distance.<br />
(f) Servo motor restart ( f) )<br />
Click the "Restart" button during the temporary stop to restart the rotations for the remaining move<br />
distance.<br />
(g) Travel distance clear ( g) )<br />
Click the "Remaining distance clear" during the temporary stop to clear the remaining travel distance.<br />
13 - 92
13. POSITIONING MODE<br />
(h) Servo motor software forced stop ( h) )<br />
Click the "Software forced stop" button to stop the servo motor rotation immediately. When the<br />
"Software forced stop" button is enabled, the "Start" button cannot be used. Click the "Software forced<br />
stop" button again to make the "Start" button enabled.<br />
(i) Single-step feed window closing ( i) )<br />
Click the "Close" button to cancel the single-step feed mode and close the window.<br />
(j) Switching to normal operation mode<br />
To switch from the test operation mode to the normal operation mode, turn OFF the power of the servo<br />
amplifier.<br />
13 - 93
13. POSITIONING MODE<br />
MEMO<br />
13 - 94
APPENDIX<br />
App. 1 Parameter list<br />
POINT<br />
For any parameter whose symbol is preceded by *, set the parameter value<br />
and switch power off once, then switch it on again to make that parameter<br />
setting valid.<br />
Never change parameters for manufacturer setting.<br />
(1) Position control mode, internal speed control mode, internal torque control mode<br />
Basic setting parameters (PA ) Gain/filter parameters (PB )<br />
No. Symbol<br />
Name<br />
Control<br />
Control<br />
No. Symbol Name<br />
mode<br />
mode<br />
PA01 *STY Control mode P, S, T PB01 FILT Adaptive tuning mode (Adaptive filter ) P, S<br />
PA02 *REG Regenerative option P, S, T PB02 VRFT<br />
Vibration suppression control filter tuning mode<br />
(Advanced vibration suppression control)<br />
P<br />
PA03 For manufacturer setting<br />
Position command acceleration/<br />
PB03 PST<br />
PA04 *AOP1 Tough drive function selection P, S<br />
deceleration time constant (Position smoothing)<br />
P<br />
PA05 *FBP<br />
Number of command input pulses<br />
PB04 FFC Feed forward gain P<br />
P<br />
per revolution<br />
PB05 For manufacturer setting<br />
PA06 CMX Electronic gear numerator<br />
P<br />
(Command input pulse multiplying<br />
PB06 GD2 Load to motor inertia moment ratio P, S<br />
factor numerator) PB07 P<strong>G1</strong> Model loop gain P, S<br />
PA07 CDV Electronic gear denominator P PB08 PG2 Position loop gain P<br />
(Command input pulse multiplying<br />
PB09 VG2 Speed loop gain P, S<br />
factor denominator) PB10 VIC Speed integral compensation P, S<br />
PA08 ATU Auto tuning mode P, S PB11 VDC Speed differential compensation P, S<br />
PA09 RSP Auto tuning response P, S PB12 OVA Overshoot amount compensation P<br />
PA10 INP In-position range P<br />
PB13 NH1 Machine resonance suppression filter 1 P, S<br />
PB14 NHQ1 Notch shape selection 1 P, S<br />
PA11 TLP Forward torque limit P, S, T PB15 NH2 Machine resonance suppression filter 2 P, S<br />
PA12 TLN Reverse torque limit P, S, T PB16 NHQ2 Notch shape selection 2 P, S<br />
PA13 *PLSS Command input pulse form<br />
P<br />
PB17 Automatic setting parameter<br />
PB18 LPF Low-pass filter setting P, S<br />
PA14 *POL Rotation direction selection<br />
P<br />
Vibration suppression control vibration frequency<br />
PB19 VRF1<br />
setting<br />
PA15 *ENR Encoder output pulses<br />
P, S, T<br />
P<br />
Vibration suppression control resonance<br />
PB20 VRF2<br />
PA16 *ENR2 Encoder output pulse electronic gear P, S, T<br />
frequency setting<br />
P<br />
PA17<br />
PB21<br />
For manufacturer setting<br />
PA18<br />
PB22<br />
For manufacturer setting<br />
PA19 *BLK Parameter writing inhibit P, S, T PB23 VFBF Low-pass filter selection P, S<br />
PB24 For manufacturer setting<br />
PB25 *BOP1 Function selection B-1<br />
P<br />
PB26 *CDP Gain changing selection P, S<br />
PB27 CDL Gain changing condition P, S<br />
PB28 CDT Gain changing time constant P, S<br />
PB29 GD2B Gain changing load to motor inertia moment ratio P, S<br />
PB30 PG2B Gain changing position loop gain P<br />
PB31 VG2B Gain changing speed loop gain P, S<br />
PB32 VICB Gain changing speed integral compensation P, S<br />
Gain changing vibration suppression control<br />
PB33 VRF1B<br />
vibration frequency setting<br />
P<br />
Gain changing vibration suppression control<br />
PB34 VRF2B<br />
resonance frequency setting<br />
P<br />
PB35 For manufacturer setting<br />
to<br />
PB37<br />
PB38 NH3 Machine resonance suppression filter 3 P, S<br />
PB39 NHQ3 Notch shape selection 3 P, S<br />
PB40<br />
to<br />
PB50<br />
For manufacturer setting<br />
App. - 1
APPENDIX<br />
Extension setting parameters (PC ) I/O setting parameters (PD )<br />
Control<br />
Control<br />
No. Symbol<br />
Name<br />
No. Symbol Name<br />
mode<br />
mode<br />
PC01 STA Acceleration time constant S, T PD01 *DIA1 Input signal automatic ON selection 1 P, S, T<br />
PC02 STB Deceleration time constant S, T PD02 *DIO Input signal device selection 0 (CN1-23, CN1-25) S, T<br />
PC03<br />
STC<br />
S-pattern acceleration/deceleration<br />
time constant<br />
S, T<br />
PD03 *DI1-1 Input signal device selection 1L (CN1-3)<br />
PD04 *DI1-2 Input signal device selection 1H (CN1-3)<br />
App. - 2<br />
P, S, T<br />
P, S, T<br />
PC04 TQC Torque command time constant T PD05 *DI2-1 Input signal device selection 2L (CN1-4) P, S, T<br />
PC05 SC0 Internal speed command 0 S PD06 *DI2-2 Input signal device selection 2H (CN1-4) P, S, T<br />
Internal speed limit 0 T PD07 *DI3-1 Input signal device selection 3L (CN1-5) P, S, T<br />
PC06 SC1 Internal speed command 1 S PD08 *DI3-2 Input signal device selection 3H (CN1-5) P, S, T<br />
Internal speed limit 1 T PD09 *DI4-1 Input signal device selection 4L (CN1-6) P, S, T<br />
PC07 SC2 Internal speed command 2 S PD10 *DI4-2 Input signal device selection 4H (CN1-6) P, S, T<br />
Internal speed limit 2 T PD11 *DI5-1 Input signal device selection 5L (CN1-7) P, S, T<br />
PC08 SC3 Internal speed command 3 S PD12 *DI5-2 Input signal device selection 5H (CN1-7) P, S, T<br />
PC09 MBR<br />
Internal speed limit 3 T PD13 *DI6-1 Input signal device selection 6L (CN1-8) P, S, T<br />
Electromagnetic brake sequence<br />
output<br />
P, S, T<br />
PD14 *DI6-2 Input signal device selection 6H (CN1-8)<br />
P, S, T<br />
PD15 *DO1 Output signal device selection 1 (CN1-9) P, S, T<br />
PC10 ZSP Zero speed P, S, T PD16 *DO2 Output signal device selection 2 (CN1-10) P, S, T<br />
PC11 *BPS Alarm history clear P, S, T PD17 *DO3 Output signal device selection 3 (CN1-11) P, S, T<br />
PC12 TC Internal torque command T PD18 *DO4 Output signal device selection 4 (CN1-12) P, S, T<br />
PC13 *ENRS Encoder output pulses selection P, S, T PD19 *DIF Input filter setting P, S, T<br />
PC14 TL2 Internal torque limit 2 P, S, T PD20 *DOP1 Function selection D-1 P, S, T<br />
PC15 ERZL Error excessive alarm detection level P, S, T PD21 For manufacturer setting<br />
PC16 For manufacturer setting PD22 *DOP3 Function selection D-3 P<br />
PC17 *OSL Overspeed alarm detection level P, S, T PD23 For manufacturer setting<br />
PC18 For manufacturer setting PD24 *DOP5 Function selection D-5 P, S, T<br />
PC19 PD25 For manufacturer setting<br />
PC20 PD26<br />
PC21<br />
PC22 *COP1 Function selection C-1 P, S, T<br />
PC23 *COP2 Function selection C-2<br />
S<br />
PC24 *COP3 Function selection C-3<br />
PC25 *COP4 Function selection C-4 P, S<br />
PC26 ALDT Detailed setting of overload tough drive<br />
PC27 OSCL Detailed setting of vibration tough drive P, S<br />
PC28 CVAT Detailed setting of instantaneous<br />
power failure tough drive<br />
S<br />
P<br />
P, S<br />
PC29 *COP5 Function selection C-5 P, S, T<br />
PC30 *COP6 Function selection C-6<br />
PC31 SC4 Internal speed command 4 S<br />
Internal speed limit 4<br />
PC32 SC5 Internal speed command 5 S<br />
Internal speed limit 5<br />
PC33 SC6 Internal speed command 6 S<br />
Internal speed limit 6<br />
PC34 SC7 Internal speed command 7 S<br />
PC35<br />
to<br />
PC43<br />
Internal speed limit 7<br />
For manufacturer setting<br />
PC44 RECT Drive recorder alarm specifying P, S, T<br />
PC45<br />
to<br />
PC64<br />
For manufacturer setting<br />
S<br />
T<br />
T<br />
T<br />
T
APPENDIX<br />
(2) Positioning mode<br />
Basic setting parameters (PA ) Gain/filter parameters (PB )<br />
No. Symbol Name No. Symbol Name<br />
PA01 *STY Control mode PB01 FILT Adaptive tuning mode (Adaptive filter II)<br />
PA02 *REG Regenerative option PB02 VRFT Vibration suppression control filter tuning mode<br />
(Advanced vibration suppression control)<br />
PA03 For manufacturer setting PB03 This parameter is not used.<br />
PA04 *AOP1 Tough drive function selection PB04 FFC Feed forward gain<br />
PA05 *FBP Number of virtual pulses per revolution PB05 For manufacturer setting<br />
PA06 *CMX Electronic gear numerator<br />
PB06 GD2 Load to motor inertia moment ratio<br />
(Virtual pulse multiplying factor numerator) PB07 P<strong>G1</strong> Model loop gain<br />
PA07 *CDV Electronic gear denominator<br />
PB08 PG2 Position loop gain<br />
(Virtual pulse multiplying factor denominator) PB09 VG2 Speed loop gain<br />
PA08 ATU Auto tuning mode PB10 VIC Speed integral compensation<br />
PA09 RSP Auto tuning response PB11 VDC Speed differential compensation<br />
PA10 INP In-position range PB12 OVA Overshoot amount compensation<br />
PA11 TLP Forward torque limit PB13 NH1 Machine resonance suppression filter 1<br />
PA12 TLN Reverse torque limit PB14 NHQ1 Notch shape selection 1<br />
PA13 This parameter is not used. PB15 NH2 Machine resonance suppression filter 2<br />
PA14 *POL Rotation direction selection PB16 NHQ2 Notch shape selection 2<br />
PA15 *ENR Encoder output pulses PB17 Automatic setting parameter<br />
PA16 *ENR2 Encoder output pulse electronic gear PB18 LPF Low-pass filter setting<br />
PA17 For manufacturer setting PB19 VRF1 Vibration suppression control vibration frequency setting<br />
PA18<br />
PA19 *BLK Parameter writing inhibit<br />
PB20 VRF2 Vibration suppression control resonance frequency<br />
setting<br />
PB21<br />
For manufacturer setting<br />
PB22<br />
PB23 VFBF Low-pass filter selection<br />
PB24 For manufacturer setting<br />
PB25 *BOP1 Function selection B-1<br />
PB26 *CDP Gain changing selection<br />
PB27 CDL Gain changing condition<br />
PB28 CDT Gain changing time constant<br />
PB29<br />
PB30<br />
PB31<br />
GD2B Gain changing load to motor inertia moment ratio<br />
PG2B Gain changing position loop gain<br />
VG2B Gain changing speed loop gain<br />
PB32 VICB Gain changing speed integral compensation<br />
PB33 VRF1B Gain changing vibration suppression control vibration<br />
frequency setting<br />
PB34 VRF2B Gain changing vibration suppression control resonance<br />
frequency setting<br />
PB35<br />
to<br />
PB37<br />
For manufacturer setting<br />
PB38 NH3 Machine resonance suppression filter 3<br />
PB39 NHQ3 Notch shape selection 3<br />
PB40<br />
to<br />
PB50<br />
For manufacturer setting<br />
App. - 3
APPENDIX<br />
Extension setting parameters (PC ) I/O setting parameters (PD )<br />
No. Symbol Name No. Symbol Name<br />
PC01 This parameter is not used. PD01 *DIA1 Input signal automatic ON selection 1<br />
PC02 PD02 *DI0 Input signal device selection 0 (CN1-23, CN1-25)<br />
PC03<br />
STC S-pattern acceleration/deceleration time PD03 *DI1-1 Input signal device selection 1L (CN1-3)<br />
constant PD04 *DI1-2 Input signal device selection 1H (CN1-3)<br />
PC04 This parameter is not used. PD05 *DI2-1 Input signal device selection 2L (CN1-4)<br />
to PD06 *DI2-2 Input signal device selection 2H (CN1-4)<br />
PC08 PD07 *DI3-1 Input signal device selection 3L (CN1-5)<br />
PC09 MBR Electromagnetic brake sequence output PD08 *DI3-2 Input signal device selection 3H (CN1-5)<br />
PC10 ZSP Zero speed PD09 *DI4-1 Input signal device selection 4L (CN1-6)<br />
PC11 *BPS Alarm history clear PD10 *DI4-2 Input signal device selection 4H (CN1-6)<br />
PC12 This parameter is not used. PD11 *DI5-1 Input signal device selection 5L (CN1-7)<br />
PC13 *ENRS Encoder output pulses selection PD12 *DI5-2 Input signal device selection 5H (CN1-7)<br />
PC14 TL2 Internal torque limit 2 PD13 *DI6-1 Input signal device selection 6L (CN1-8)<br />
PC15 ERZL Error excessive alarm detection level PD14 *DI6-2 Input signal device selection 6H (CN1-8)<br />
PC16 For manufacturer setting PD15 *DO1 Output signal device selection 1 (CN1-9)<br />
PC17 *OSL Overspeed alarm detection level PD16 *DO2 Output signal device selection 2 (CN1-10)<br />
PC18 For manufacturer setting PD17 *DO3 Output signal device selection 3 (CN1-11)<br />
PC19 PD18 *DO4 Output signal device selection 4 (CN1-12)<br />
PC20 PD19 *DIF Input filter setting<br />
PC21 PD20 *DOP1 Function selection D-1<br />
PC22 *COP1 Function selection C-1 PD21 For manufacturer setting<br />
PC23 This parameter is not used. PD22 *DOP3 Function selection D-3<br />
PC24 *COP3 Function selection C-3 PD23 For manufacturer setting<br />
PC25 *COP4 Function selection C-4 PD24 *DOP5 Function selection D-5<br />
PC26 ALDT Detailed setting of overload tough drive PD25 For manufacturer setting<br />
PC27 OSCL Detailed setting of vibration tough drive PD26<br />
PC28 CVAT Detailed setting of instantaneous power<br />
failure tough drive<br />
PC29 *COP5 Function selection C-5<br />
PC30<br />
to<br />
PC34<br />
PC35<br />
to<br />
PC43<br />
This parameter is not used.<br />
For manufacturer setting<br />
PC44 RECT Drive recorder alarm designation<br />
PC45<br />
to<br />
PC64<br />
For manufacturer setting<br />
App. - 4
APPENDIX<br />
Positioning setting parameters (PE )<br />
No. Symbol Name<br />
PE01 *CTY Command mode selection<br />
PE02 *FTY Feeding function selection<br />
PE03 *ZTY Home position return type<br />
PE04 ZRF Home position return speed<br />
PE05 CRF Creep speed<br />
PE06 ZST Home position shift distance<br />
PE07 FTS Home position return/JOG operation<br />
acceleration/deceleration time constant<br />
PE08 *ZPS Home position return position data<br />
PE09 DCT Travel distance after proximity dog<br />
PE10 ZTM Stopper type home position return stopper time<br />
PE11 ZTT Stopper type home position return torque limit value<br />
PE12 CRP Rough match output range<br />
PE13 JOG JOG speed<br />
PE14 OUT1 OUT1 output time selection<br />
This parameter is used only for the program method.<br />
It is not used in the point table method.<br />
PE15 *BKC Backlash compensation<br />
PE16 *LMPL Software limit +<br />
PE17 *LMPH<br />
PE18 *LMNL Software limit -<br />
PE19 *LMNH<br />
PE20 *LPPL Position range output address +<br />
PE21 *LPPH<br />
PE22 *LNPL Position range output address -<br />
PE23 *LNPH<br />
PE24 *EOP1 Function selection E-1<br />
PE25<br />
to<br />
For manufacturer setting<br />
PE28<br />
App. - 5
APPENDIX<br />
App. 2 Servo motor ID codes<br />
Servo motor series ID Servo motor type ID Servo motor encoder ID Servo motor<br />
F053<br />
<strong>HF</strong>-<strong>KN</strong>053<br />
0F<br />
FF13<br />
FF23<br />
0049<br />
<strong>HF</strong>-<strong>KN</strong>13<br />
<strong>HF</strong>-<strong>KN</strong>23<br />
FF43<br />
<strong>HF</strong>-<strong>KN</strong>43<br />
F053<br />
<strong>HF</strong>-<strong>KP</strong>053<strong>G1</strong>/<strong>G5</strong>/<strong>G7</strong><br />
16<br />
FF13<br />
FF23<br />
0044<br />
<strong>HF</strong>-<strong>KP</strong>13<strong>G1</strong>/<strong>G5</strong>/<strong>G7</strong><br />
<strong>HF</strong>-<strong>KP</strong>23<strong>G1</strong>/<strong>G5</strong>/<strong>G7</strong><br />
FF43<br />
<strong>HF</strong>-<strong>KP</strong>43<strong>G1</strong>/<strong>G5</strong>/<strong>G7</strong><br />
App. 3 Signal layout recording paper<br />
Position control mode<br />
CN1<br />
Internal speed control mode<br />
Internal torque control mode<br />
Positioning mode<br />
CN1<br />
1<br />
14<br />
1<br />
14<br />
2<br />
DICOM 15<br />
LG<br />
2<br />
DICOM 15<br />
LG<br />
OPC<br />
3<br />
LA<br />
16<br />
OPC<br />
3<br />
LA<br />
16<br />
4<br />
17<br />
LAR<br />
4<br />
17<br />
LAR<br />
5<br />
LB<br />
18<br />
5<br />
LB<br />
18<br />
6<br />
19<br />
LBR<br />
6<br />
19<br />
LBR<br />
7<br />
LZ<br />
20<br />
7<br />
LZ<br />
20<br />
8<br />
21<br />
LZR<br />
8<br />
21<br />
LZR<br />
9<br />
OP<br />
22<br />
9<br />
OP<br />
22<br />
10<br />
23<br />
PG<br />
10<br />
23<br />
11<br />
PP<br />
24<br />
11<br />
24<br />
12<br />
25<br />
NG<br />
12<br />
25<br />
13<br />
NP<br />
26<br />
13<br />
26<br />
DOCOM<br />
DOCOM<br />
App. - 6
APPENDIX<br />
App. 4 Status display block diagram<br />
(1) Position control mode, internal speed control mode, internal torque control mode<br />
Command<br />
pulse<br />
Command<br />
pulse frequency<br />
PP, NP<br />
Cumulative<br />
command pulses<br />
Electronic gear<br />
CMX<br />
CDV<br />
Cumulative<br />
feedback pulse<br />
Droop pulse<br />
Position<br />
control<br />
Auto<br />
tuning section<br />
Load to motor inertia<br />
moment ratio<br />
Instantaneous<br />
torque<br />
Servo<br />
motor speed<br />
Speed<br />
control<br />
Current<br />
control<br />
Speed<br />
feedback<br />
Differential<br />
Current<br />
position<br />
calculation<br />
Within onerevolution<br />
position low<br />
high<br />
Effective<br />
load ratio<br />
Peak<br />
load ratio<br />
Effective<br />
value calculation<br />
Peak hold<br />
Bus voltage<br />
PWM M<br />
Servo<br />
motor<br />
Encoder<br />
App. - 7
Target<br />
position<br />
Speed<br />
command<br />
<strong>Manual</strong><br />
pulse<br />
generator<br />
Current position<br />
Command<br />
remaining distance<br />
PP, NP<br />
Travel<br />
distance<br />
creation<br />
CDV<br />
CMX<br />
Multiplication<br />
factor<br />
Command<br />
position<br />
Home<br />
position<br />
Electronic gear<br />
CMX<br />
CDV<br />
Cumulative<br />
feedback pulse<br />
Droop pulse<br />
Position<br />
control<br />
Auto<br />
tuning section<br />
Load to motor inertia<br />
moment ratio<br />
Servo<br />
motor speed<br />
Differential<br />
Speed<br />
feedback<br />
Speed<br />
control<br />
Current<br />
position<br />
calculation<br />
Instantaneous<br />
torque<br />
Within onerevolution<br />
position<br />
Current<br />
control<br />
low<br />
high<br />
Effective<br />
load ratio<br />
Effective<br />
value calculation<br />
Peak<br />
load ratio<br />
Peak hold<br />
Bus voltage<br />
PWM M<br />
Servo motor<br />
Encoder<br />
APPENDIX<br />
(2) Positioning mode<br />
Electronic gear -1<br />
App. - 8
APPENDIX<br />
App.5 Compliance with EC directives<br />
App.5.1 What are EC directives?<br />
The EC directives were issued to standardize the regulations of the EU countries and ensure smooth<br />
distribution of safety-guaranteed products. In the EU countries, the machinery directive (effective in January,<br />
1995), EMC directive (effective in January, 1996) and low voltage directive (effective in January, 1997) of the<br />
EC directives require that products to be sold should meet their fundamental safety requirements and carry the<br />
CE marks (CE marking). CE marking applies to machines and equipment into which servo have been installed.<br />
(1) EMC directive<br />
The EMC directive applies also to the servo amplifiers. Hence, they are designed to comply with the EMC<br />
directive. Additionally, the EMC directive applies to servo-incorporated machines and equipment. This<br />
requires the EMC filters to be used with the servo-incorporated machines and equipment to comply with the<br />
EMC directive. For specific EMC directive conforming methods, refer to the EMC Installation Guidelines<br />
(IB(NA)67310).<br />
(2) Low voltage directive<br />
The low voltage directive applies also to the servo amplifiers. Hence, they are designed to comply with the<br />
low voltage directive.<br />
(3) Machine directive<br />
The servo amplifiers are the main component in a machine configuration.<br />
Do not allow using the machine until the machine in which the servo amplifiers are mounted is declared to<br />
comply with the machinery directive.<br />
App.5.2 Precautions for compliance<br />
Be sure to perform an appearance inspection of every unit before installation. In addition, have a final<br />
performance inspection on the entire machine/system, and keep the inspection record.<br />
(1) Servo amplifiers and servo motors used<br />
Use the servo amplifiers and servo motors which comply with the standard model.<br />
Servo amplifier<br />
<strong>HF</strong>-<strong>KN</strong><br />
Servo motor<br />
<strong>MR</strong>-<strong>JN</strong>-10A(1) 053 13<br />
<strong>MR</strong>-<strong>JN</strong>-20A(1) 23<br />
<strong>MR</strong>-<strong>JN</strong>-40A 43<br />
<strong>HF</strong>-<strong>KP</strong> <strong>G1</strong>/<strong>G5</strong>/<strong>G7</strong><br />
App. - 9
APPENDIX<br />
(2) Configuration<br />
The control circuit provides safe separation to the main circuit in the servo amplifier.<br />
Control panel<br />
Enhanced<br />
insulating type<br />
No-fuse<br />
breaker<br />
NFB<br />
Magnetic<br />
contactor<br />
MC<br />
24VDC<br />
power<br />
supply<br />
Servo<br />
amplifier<br />
Servo motor<br />
M<br />
(3) Environment<br />
(a) Operate the servo amplifier at the contamination level 2 or 1 set forth in IEC/EN 61800-5-1. For this<br />
purpose, install the servo amplifier in a control box which is protected against water, oil, carbon, dust,<br />
dirt, etc. (IP54).<br />
(b) Use the servo motor under the following environmental conditions.<br />
(Note 1) Ambient temperature<br />
Ambient humidity<br />
Altitude<br />
Item<br />
Environmental conditions<br />
(Note 2) 0 to<br />
In operation<br />
55 (32°F to 131°F)<br />
Under preservation or under transportation -20 to 65 (-4°F to 149°F)<br />
In operation, under preservation or under<br />
transportation<br />
In operation or under preservation<br />
Under transportation<br />
90%RH or less<br />
1000m or lower<br />
10000m or lower<br />
Note 1. The ambient temperature here represents the temperature within the control panel.<br />
2. Close mounting of servo amplifiers is possible. In case of mounting servo amplifiers closely, bring the ambient<br />
temperature within 0 to 45 , or use it at 75% or lower effective load ratio.<br />
(4) Power supply<br />
(a) This servo amplifier can be supplied from star-connected supply with earthed neutral point of<br />
overvoltage category III set forth in IEC/EN 61800-5-1. However, when using the neutral point of 400V<br />
class for single-phase supply, a reinforced insulating transformer is required in the power input section.<br />
(b) When supplying interface power from external, use a 24VDC power supply which has been insulation<br />
reinforced in I/O.<br />
(5) Grounding<br />
(a) To prevent an electric shock, always connect the protective earth (PE) terminals (marked<br />
servo amplifier to the protective earth (PE) of the control box.<br />
) of the<br />
App. - 10
APPENDIX<br />
(b) Do not connect two ground cables to the same protective earth (PE) terminal. Always connect the<br />
cables to the terminals one-to-one.<br />
PE<br />
terminal<br />
PE<br />
terminal<br />
(c) If a leakage current breaker is used to prevent an electric shock, the protective earth (PE) terminals of<br />
the servo amplifier must be connected to the corresponding earth terminals.<br />
(6) Wiring and installation<br />
(a) When wiring the CNP1 and CNP2 connectors with the twisted wire, strip its sheath and twist its core. At<br />
this time, take care to avoid a short caused by the loose wires of the core and the adjacent pole. Do not<br />
solder the core as it may cause a contact fault.<br />
(b) Be sure to install the servo amplifier on a metallic control panel.<br />
(7) Auxiliary equipment and options<br />
(a) The no-fuse breaker and magnetic contactor used should be the EN or IEC standard-compliant<br />
products of the models described in <strong>MR</strong>-<strong>JN</strong>- A SERVO AMPLIFIER INSTRUCTION MANUAL. Use a<br />
type B leakage current breaker (RCD). When it is not used, provide insulation between the servo<br />
amplifier and other device by double insulation or reinforced insulation, or install a transformer between<br />
the main circuit power supply and servo amplifier.<br />
(b) The sizes of the cables described in <strong>MR</strong>-<strong>JN</strong>- A SERVO AMPLIFIER INSTRUCTION MANUAL meet<br />
the following requirements. To meet the other requirements, follow Table 5 and Appendix C in<br />
IEC/EN60204-1.<br />
Ambient temperature: 40(104) [°C(°F)]<br />
Sheath: PVC (polyvinyl chloride)<br />
Installed on wall surface or open table tray<br />
(c) Use the EMC filter for noise reduction.<br />
(8) Performing EMC tests<br />
When EMC tests are run on a machine/device into which the servo amplifier has been installed, it must<br />
conform to the electromagnetic compatibility (immunity/emission) standards after it has satisfied the<br />
operating environment/electrical equipment specifications.<br />
For the other EMC directive guidelines on the converter unit and servo amplifier (drive unit), refer to the<br />
EMC Installation Guidelines (IB(NA)67310).<br />
App. - 11
APPENDIX<br />
App.6 Conformance with UL/CSA standard<br />
This servo amplifier is designed to comply with the UL 508C and CSA C22.2 No. 14 standards.<br />
(1) Servo amplifiers and servo motors used<br />
Use the servo amplifiers and servo motors which comply with the standard model.<br />
Servo amplifier<br />
<strong>HF</strong>-<strong>KN</strong><br />
Servo motor<br />
<strong>MR</strong>-<strong>JN</strong>-10A(1) 053 13<br />
<strong>MR</strong>-<strong>JN</strong>-20A(1) 23<br />
<strong>MR</strong>-<strong>JN</strong>-40A 43<br />
<strong>HF</strong>-<strong>KP</strong> <strong>G1</strong>/<strong>G5</strong>/<strong>G7</strong><br />
(2) Installation<br />
<strong>MR</strong>-<strong>JN</strong> series products cannot be installed on any other place than within control panels. Design the control<br />
panel as follows.<br />
The volume of the control panel is more than 150% of the total volume of each module.<br />
The temperature within the control panel is kept at 55 or lower.<br />
Be sure to install the servo amplifier on a metallic control panel.<br />
(3) Short circuit rating: SCCR (Short Circuit Current Rating)<br />
This servo amplifier conforms to the circuit whose peak current is limited to 100kA or less, 500Volts<br />
Maximum. Having been subjected to the short-circuit tests of the UL in the alternating-current circuit, the<br />
servo amplifier conforms to the above circuit.<br />
(4) Flanges<br />
Install the servo motor to the flanges, whose sizes are shown below. Otherwise, install the servo motor to<br />
flanges providing equivalent or superior heat dissipation effects than the following ones.<br />
Flange<br />
size [mm]<br />
Servo motor<br />
<strong>HF</strong>-<strong>KN</strong><br />
250×250×6 053 13 23<br />
250×250×12 43<br />
(5) Capacitor discharge time<br />
The capacitor discharge time is as listed below. To ensure safety, do not touch the charging section for 15<br />
minutes after power-off.<br />
Servo amplifier<br />
Discharge time [min]<br />
<strong>MR</strong>-<strong>JN</strong>-10A/20A/40A 2<br />
<strong>MR</strong>-<strong>JN</strong>-10A1/20A1 2<br />
App. - 12
APPENDIX<br />
(6) Overload protection characteristics<br />
An electronic thermal relay is built in the servo amplifier to protect the servo motor, servo amplifier and<br />
servo motor power lines from overloads. The operation characteristics of the electronic thermal relay are<br />
shown below. It is recommended to use the machine which generates unbalanced torque, e.g. a vertical lift<br />
application, so that the unbalanced torque is not more than 70% of the rated torque. When you carry out<br />
adhesion mounting of the servo amplifier, make circumference temperature into 0 to 45 or use it with 75%<br />
or less of effective load torque.<br />
<strong>MR</strong>-<strong>JN</strong> servo amplifier series has solid-state servo motor overload protection. (115% of the servo amplifier<br />
rated current is set as standard (full load current).)<br />
1000<br />
During operation<br />
100<br />
During operation<br />
Operation time [s]<br />
During servo lock<br />
Operation time [s]<br />
10<br />
1<br />
During servo lock<br />
0.1<br />
0 100 200 300<br />
Load ratio [%]<br />
<strong>MR</strong>-<strong>JN</strong>-10A(1)<br />
Load ratio [%]<br />
<strong>MR</strong>-<strong>JN</strong>-20A(1), <strong>MR</strong>-<strong>JN</strong>-40A<br />
(7) Selection example of wires<br />
To comply with the UL/CSA Standard, use UL-approved copper wires rated at 60/75 for wiring.<br />
The following table shows the wire sizes [AWG] rated at 60 . The sizes and the symbols rated at 75 are<br />
shown in the brackets.<br />
Servo amplifier<br />
Wire [AWG]<br />
L1 L2 24V 0V U V W P C B1 B2<br />
<strong>MR</strong>-<strong>JN</strong>-10A(1)/20A(1)/40A 14(14) 14(14) (Note) 14(14) 14(14) 16(16)<br />
Note. To wire the servo amplifier and a servo motor, use the <strong>MR</strong>-PWS1CBL (option). To extend the wiring, use the AW<strong>G1</strong>4 wire<br />
size.<br />
(8) About wiring protection<br />
For installation in United States, branch circuit protection must be provided, in accordance with the National<br />
Electrical Code and any applicable local codes.<br />
For installation in Canada, branch circuit protection must be provided, in accordance with the Canada<br />
Electrical Code and any applicable provincial codes.<br />
App. - 13
APPENDIX<br />
(9) Options, peripheral devices<br />
Use the UL/CSA Standard-compliant products.<br />
Use the no-fuse breaker (UL489 Listed MCCB) or a Class T fuse indicated in the table below.<br />
Servo amplifier<br />
No-fuse breaker (Note)<br />
Fuse<br />
Current Voltage AC Current Voltage AC<br />
<strong>MR</strong>-<strong>JN</strong>-10A 30A frame 5A 10A<br />
<strong>MR</strong>-<strong>JN</strong>-20A/10A1 30A frame 10A 240V 15A 300V<br />
<strong>MR</strong>-<strong>JN</strong>-40A/20A1 30A frame 15A 20A<br />
Note. Listed no-fuse breakers are for when the power factor improving reactor is not used.<br />
(10) Configuration diagram<br />
Representative configuration example to conform to the UL/C-UL standard is shown below. The earth<br />
wiring is excluded from the figure configuration.<br />
Power<br />
supply<br />
Fuse or<br />
no-fuse breaker<br />
CNP1<br />
L1, L2<br />
Servo amplifier<br />
AC/AD<br />
converter<br />
CNP2<br />
24V, 0V<br />
Servo motor<br />
CNP1<br />
U, V, W<br />
CN3<br />
CN1<br />
CN2<br />
Encoder<br />
Command device<br />
Encoder cable<br />
Control panel side<br />
Machine side<br />
App. - 14
REVISIONS<br />
*The manual number is given on the bottom left of the back cover.<br />
Print Data *<strong>Manual</strong> Number Revision<br />
Sept., 2010 SH(NA)030086-A First edition<br />
Feb., 2011 SH(NA)030086-B 1-phase 100VAC to 120VAC input is added.<br />
Positioning mode is added.<br />
"Protective structure" is changed to "IP rating".<br />
"Control power supply" is changed to "control circuit power supply".<br />
Safety <strong>Instruction</strong>s Partially changed.<br />
2. To prevent fire, note the following Partially added.<br />
4. Additional instructions<br />
About processing of waste<br />
EEP-ROM life<br />
About the manuals<br />
Introduction<br />
Introduction 1.(2)<br />
Introduction 2.<br />
Introduction 2.(1)<br />
Introduction 2.(2)(a)3)<br />
Introduction 2.(3)<br />
Introduction 2.(4)<br />
Introduction 2.(5)<br />
Introduction 2.(7)<br />
Introduction 3.(1)<br />
Introduction 3.(2)<br />
Introduction 4.<br />
Section 1.1<br />
Section 1.1 (4)<br />
Section 1.2 (2)<br />
Section 1.2 (3)<br />
Section 1.3<br />
Section 1.4<br />
Partially added and changed.<br />
Partially changed.<br />
Partially added.<br />
Partially changed.<br />
Caution is partially changed.<br />
Partially added.<br />
Partially changed.<br />
Diagram is partially changed.<br />
Partially changed.<br />
Partially changed.<br />
POINT is partially added.<br />
"6" and "7" are added to the set value in the first digit<br />
of PA01.<br />
PA05 is partially changed.<br />
PA13 POINT is partially changed.<br />
Partially changed.<br />
Partially added and changed.<br />
Partially added and changed.<br />
Partially changed.<br />
Caution is added.<br />
Partially changed.<br />
Partially added and changed.<br />
The overview of "Positioning mode" is added.<br />
Function block diagram of "Positioning mode (Point<br />
table method)" is added.<br />
Function block diagram of "Positioning mode<br />
(Program method)" is added.<br />
Contents of <strong>MR</strong>-<strong>JN</strong>-10A1/20A1 are added.<br />
Output is added.<br />
Rated current is added to main circuit power supply.<br />
Rated current is added to control circuit power<br />
supply.<br />
"Input" is changed to "power consumption".<br />
Power supply capacity for the interface power supply<br />
"200mA" is changed to "0.2A".<br />
Items of the positioning mode are added.<br />
Following functions are added.<br />
Positioning mode (point table method)<br />
Positioning mode (program method)<br />
Home position return mode<br />
Limit switch<br />
Software limit<br />
Drive recorder function
Print Data *<strong>Manual</strong> Number Revision<br />
Feb., 2011 SH(NA)030086-B Section 1.4<br />
Section 1.5 (1)<br />
Section 1.5 (2)<br />
Section 1.6<br />
Section 1.7<br />
Section 2.3<br />
Section 2.4<br />
Chapter 3<br />
Section 3.1<br />
Section 3.2.1<br />
Section 3.2.2<br />
Section 3.2.3<br />
Section 3.3.1<br />
Section 3.3.2 (1)<br />
Section 3.3.2 (3)<br />
Section 3.3.3 (1)<br />
Section 3.3.3 (2) (b) 2)<br />
Section 3.3.3 (3) (b)<br />
Section 3.4<br />
Section 3.4 (1)<br />
Section 3.5<br />
Section 3.5 (1) (a)<br />
Section 3.5 (1) (b)<br />
Section 3.5 (2)<br />
Section 3.6<br />
Section 3.6.1<br />
Section 3.6.1 (1) (b) 1)<br />
Section 3.6.1 (1) (b) 2)<br />
Section 3.6.1 (2)<br />
Section 3.6.2 (1) (a)<br />
Section 3.6.3 (1)<br />
Section 3.7<br />
Contents of the following items are partially added<br />
and changed.<br />
Gain changing function<br />
Electronic gear<br />
Input signal selection<br />
Output signal selection<br />
Test operation mode<br />
Tough drive function<br />
Explanation of serial number is added.<br />
Power supply symbol is added.<br />
Partially changed.<br />
Partially added.<br />
Partially changed.<br />
Partially changed.<br />
Caution is partially changed.<br />
Caution is partially added.<br />
Diagram is partially changed.<br />
Note 1 is partially changed.<br />
Note 6 is partially changed.<br />
Diagram is all changed.<br />
Note 1 is partially changed.<br />
Note 2 is partially changed.<br />
Diagram is partially changed.<br />
Note 1 is partially changed.<br />
Note 2 is partially changed.<br />
Diagram is partially changed.<br />
Note 1 is partially changed.<br />
Note 2 is partially changed.<br />
Partially changed.<br />
Partially changed.<br />
Partially changed.<br />
Partially changed.<br />
Partially changed.<br />
Partially changed.<br />
POINT is partially added.<br />
Partially changed.<br />
POINT is partially added.<br />
Partially changed.<br />
Partially changed.<br />
Partially changed.<br />
Note is added.<br />
POINT is newly added.<br />
POINT is partially added.<br />
Note is partially changed.<br />
Note is partially changed.<br />
Partially changed.<br />
POINT is partially changed.<br />
Partially changed.<br />
Partially changed.
Print Data *<strong>Manual</strong> Number Revision<br />
Feb., 2011 SH(NA)030086-B Section 3.8.1<br />
Section 3.8.2 (1)<br />
Section 3.8.2 (2)<br />
Section 3.8.2 (3) (a) 1)<br />
Section 3.8.2 (3) (b) 1)<br />
Section 3.8.3 (2)<br />
Section 3.10<br />
Section 3.10.1<br />
Section 3.11.1<br />
Section 3.11.2<br />
Section 3.11.3 (1) to (5)<br />
Section 3.11.4 (1)<br />
Section 3.11.4 (2)<br />
Chapter 4<br />
Section 4.1<br />
Section 4.1.1<br />
Section 4.1.2<br />
Section 4.1.3<br />
Section 4.1.5<br />
Section 4.1.6<br />
Section 4.1.7 (1)<br />
Section 4.1.7 (1) (b)<br />
Section 4.1.7 (2)<br />
Section 4.1.8 (1)<br />
Section 4.1.9<br />
Section 4.1.11<br />
Section 4.1.13<br />
Section 4.1.13 (3)<br />
Section 4.1.13 (4)<br />
Section 4.2.1<br />
Diagram is partially changed.<br />
Note 1 is partially changed.<br />
Note 2 is partially changed.<br />
Note 4 is added.<br />
Partially added.<br />
Partially added.<br />
Note is partially changed.<br />
Note is partially changed.<br />
Partially changed.<br />
Caution is partially changed.<br />
Caution is partially changed.<br />
Caution is partially changed.<br />
Partially changed.<br />
Partially changed.<br />
Partially changed.<br />
Note 3 is partially changed.<br />
Note 4 and Note 5 are added.<br />
Note 4 is partially changed.<br />
Note 5 and Note 6 are added.<br />
Caution is partially added and changed.<br />
POINT is newly added.<br />
Positioning parameters (No. PE ) is added.<br />
POINT is partially added.<br />
Partially changed.<br />
Reference and writing for positioning parameters<br />
(No. PE ) are added.<br />
"00Ch" and "10Eh" are added to setting.<br />
"6" and "7" are added to the set value in the first digit.<br />
POINT is partially changed.<br />
Setting item name of each digit is changed.<br />
Note is partially changed.<br />
Note is partially changed.<br />
Partially changed.<br />
Partially changed.<br />
Partially added and changed.<br />
Unit of each control mode is added as Note.<br />
Partially changed.<br />
POINT is partially changed.<br />
Initial value of PA16 is changed from "1" to "0".<br />
Setting range of PA16 is changed from "1 to 65535"<br />
to "0 to 65535".<br />
Partially changed.<br />
Partially changed.<br />
Initial values and units of the following parameters<br />
are changed.<br />
PB06<br />
Initial value "70" to "7.0"<br />
Unit " 0.1" to "Multiplier"<br />
PB10<br />
Initial value "337" to "33.7"<br />
Unit " 0.1ms" to "ms"
Print Data *<strong>Manual</strong> Number Revision<br />
Feb., 2011 SH(NA)030086-B Section 4.2.1<br />
PB19<br />
Initial value "1000" to "100.0"<br />
Unit " 0.1Hz" to "Hz"<br />
PB20<br />
Initial value "1000" to "100.0"<br />
Unit " 0.1Hz" to "Hz"<br />
PB27<br />
Unit is changed to "Refer to section 4.2.2.".<br />
PB29<br />
Initial value "70" to "7.0"<br />
Unit " 0.1" to "multiplier"<br />
PB32<br />
Initial value "337" to "33.7"<br />
Unit " 0.1ms" to "ms"<br />
PB33<br />
Initial value "1000" to "100.0"<br />
Unit " 0.1Hz" to "Hz"<br />
PB34<br />
Initial value "1000" to "100.0"<br />
Unit " 0.1Hz" to "Hz"<br />
Section 4.2.2<br />
PB02 Partially changed.<br />
PB06 is changed as follows.<br />
Initial value "70" to "7.0"<br />
Setting range "0 to 3000" to "0.0 to 300.0"<br />
Unit " 0.1" to "multiplier"<br />
PB10 is changed as follows.<br />
Initial value "337" to "33.7"<br />
Setting range "1 to 10000" to "1.0 to 1000.0"<br />
Unit " 0.1ms" to "ms"<br />
PB12 The following sentence is added to the end.<br />
"Executing one-touch tuning automatically<br />
changes this parameter."<br />
PB15 The following sentence is added to the end.<br />
"Executing one-touch tuning automatically<br />
changes this parameter."<br />
PB16 The following sentence is added to the end.<br />
"Executing one-touch tuning automatically<br />
changes this parameter."<br />
PB19 is changed as follows.<br />
Initial value "1000" to "100.0"<br />
Setting range "1 to 1000" to "1.0 to 100.0"<br />
Unit " 0.1Hz" to "Hz"<br />
PB20 is changed as follows.<br />
Initial value "1000" to "100.0"<br />
Setting range "1 to 1000" to "1.0 to 100.0"<br />
Unit " 0.1Hz" to "Hz"<br />
PB29 is changed as follows.<br />
Initial value "70" to "7.0"<br />
Setting range "0 to 3000" to "0.0 to 300.0"<br />
Unit " 0.1" to "multiplier"
Print Data *<strong>Manual</strong> Number Revision<br />
Feb., 2011 SH(NA)030086-B Section 4.2.2<br />
Section 4.2.3<br />
Section 4.3.1<br />
Section 4.3.2<br />
Section 4.3.3<br />
Section 4.3.4<br />
Section 4.4<br />
Section 4.4.1<br />
PB32 is changed as follows.<br />
Initial value "337" to "33.7"<br />
Setting range "1 to 50000" to "1.0 to 5000.0"<br />
Unit " 0.1ms" to "ms"<br />
PB33 is changed as follows.<br />
Initial value "1000" to "100.0"<br />
Setting range "1 to 1000" to "1.0 to 100.0"<br />
Unit " 0.1Hz" to "Hz"<br />
PB34 is changed as follows.<br />
Initial value "1000" to "100.0"<br />
Setting range "1 to 1000" to "1.0 to 100.0"<br />
Unit " 0.1Hz" to "Hz"<br />
Partially changed.<br />
Initial values and units of the following parameters<br />
are changed.<br />
PC12<br />
Initial value "0" to "0.0"<br />
Unit " 0.1%" to "%"<br />
PC15<br />
Initial value "30" to "3.0"<br />
Unit " 0.1rev" to "rev"<br />
PC44 "Drive recorder alarm specifying" is newly<br />
added.<br />
PC11 is partially changed.<br />
PC12 is changed as follows.<br />
Initial value "0" to "0.0"<br />
Setting range "0 to 1000" to "0.0 to 100.0"<br />
Unit " 0.1%" to "%"<br />
PC13 "Encoder output pulse cycle setting" is added<br />
to the third digit.<br />
PC15 is changed as follows.<br />
Initial value "30" to "3.0"<br />
Setting range "1 to 999" to "0.1 to 99.9"<br />
Unit " 0.1rev" to "rev"<br />
PC22 is partially changed.<br />
PC25 is partially changed.<br />
PC26 is partially changed.<br />
PC27 is partially changed.<br />
PC28 is partially changed.<br />
PC29 is partially changed.<br />
PC44 "Drive recorder alarm specifying" is newly<br />
added.<br />
Partially changed.<br />
"Drive recorder function" is newly added.<br />
POINT is partially added.<br />
PD02 "Input signal device selection 0 (CN1-23, CN1-<br />
25)" is newly added.
Print Data *<strong>Manual</strong> Number Revision<br />
Feb., 2011 SH(NA)030086-B Section 4.4.2<br />
Section 4.4.3<br />
Chapter 5<br />
Section 5.1<br />
Section 5.2<br />
Section 5.3<br />
Section 5.3.1<br />
PD01 0 bit "Automatic/manual selection (MD0)" in the<br />
first digit is added.<br />
0 bit "Point table No./Program No. selection 1<br />
(DI0)" in the third digit is newly added.<br />
1 bit "Point table No./Program No. selection 2<br />
(DI1)" in the third digit is newly added.<br />
2 bit "Point table No./Program No. selection 3<br />
(DI2)" in the third digit is newly added.<br />
POINT is partially changed.<br />
PD02 "Input signal device selection 0 (CN1-23, CN1-<br />
25)" is newly added.<br />
PD03 Control mode "CP/CL" is added.<br />
Note 3 and Note 4 are added.<br />
PD04 "Positioning mode" is added to the upper two<br />
digits.<br />
PD06 "Positioning mode" is added to the upper two<br />
digits.<br />
PD08 "Positioning mode" is added to the upper two<br />
digits.<br />
PD10 "Positioning mode" is added to the upper two<br />
digits.<br />
PD12 "Positioning mode" is added to the upper two<br />
digits.<br />
PD13 The following sentence is added to the end.<br />
"If a value other than the initial value is set,<br />
EM1 cannot be used."<br />
PD14 "Positioning mode" is added to the upper two<br />
digits.<br />
The following sentence is added to the end.<br />
"If a value other than the initial value is set,<br />
EM1 cannot be used."<br />
PD15 Control mode "CP/CL" is added.<br />
Note 3 and Note 4 are added.<br />
PD20 Partially changed.<br />
Partially changed.<br />
POINT is newly added.<br />
Partially added and changed.<br />
"Point table" and "Positioning setting parameters" are<br />
added to the display mode transition.<br />
Partially added and changed.<br />
Following contents are added as a status display for<br />
the positioning mode.<br />
Current position<br />
Command position<br />
Command remaining distance<br />
Point table No./Program No.<br />
Step No.<br />
Note 1 and Note 2 are added.
Print Data *<strong>Manual</strong> Number Revision<br />
Feb., 2011 SH(NA)030086-B Section 5.3.3<br />
Section 5.4<br />
Section 5.5<br />
Section 5.6<br />
Section 5.6.1<br />
Section 5.6.2<br />
Section 5.6.3<br />
Section 5.6 to 5.10<br />
Section 5.7<br />
Section 5.7.1<br />
Section 5.8 (2)<br />
Section 5.8 (2) (a)<br />
Section 5.8 (2) (b)<br />
Section 5.8 (3) (b)<br />
Section 5.8 (3) (c)<br />
Section 5.8 (3) (d)<br />
Section 5.9<br />
Section 5.10<br />
Section 5.10.1<br />
Following contents are added as a status display for<br />
the positioning mode.<br />
Current position<br />
Command position<br />
Command remaining distance<br />
Point table No./Program No.<br />
Step No.<br />
Note 1 and Note 2 are added.<br />
"Drive recorder valid/invalid display" is added.<br />
"Single-step feed" is added to the test operation<br />
mode.<br />
Partially added and changed.<br />
"The number of drive recorder record times" is added.<br />
"Point table error" is added to the parameter errors.<br />
Partially added and changed.<br />
"Point table mode" is newly added.<br />
"Point table transition" is newly added.<br />
"Point table mode setting screen sequence" is newly<br />
added.<br />
"Operation example" of point table is newly added.<br />
Changed to section 5.7 to 5.11.<br />
POINT is deleted.<br />
"Positioning setting parameters" is added.<br />
"CN1-23" and "CN1-25" are added to the display<br />
definition.<br />
Control mode "CP/CL" is added.<br />
Pin No. 23 and 25 are added.<br />
The followings are added.<br />
Proximity dog (DOG)<br />
Automatic/manual selection (MD0)<br />
Temporary stop/restart (TSTP)<br />
Point table No./Program No. selection 1 (DI0)<br />
Point table No./Program No. selection 2 (DI1)<br />
Point table No./Program No. selection 3 (DI2)<br />
Program input 1 (PI1)<br />
Home position return completion (ZP)<br />
Temporary stop (PUS)<br />
Travel completion (MEND)<br />
Rough match (CPO)<br />
Position range output (POT)<br />
Point table No. output 1 (PT0)<br />
Point table No. output 2 (PT1)<br />
Point table No. output 3 (PT2)<br />
Program output 1 (OUT1)<br />
SYNC synchronous output (SOUT)<br />
Partially added.<br />
Partially added.<br />
"Positioning mode" is newly added.<br />
Partially changed.<br />
Caution is partially changed.<br />
POINT is partially added.<br />
Partially changed.
Print Data *<strong>Manual</strong> Number Revision<br />
Feb., 2011 SH(NA)030086-B Section 5.10.2 (2)<br />
Section 5.10.3 (1) (d)<br />
Section 5.10.4 (2)<br />
Section 5.10.5<br />
Section 5.11<br />
Chapter 6<br />
Section 6.1<br />
Section 6.1.1<br />
Section 6.1.2<br />
Section 6.2<br />
Section 6.3<br />
Section 6.3.1<br />
Section 6.3.2<br />
Section 6.5<br />
Section 7.1<br />
Section 7.1.1<br />
Section 7.1.2<br />
Section 7.1.3<br />
Section 7.2.2 (2)<br />
Section 7.2.3 (1)<br />
Section 7.2.3 (2)<br />
Section 7.2.4<br />
Section 7.2.5<br />
Section 7.3<br />
Section 7.3.2<br />
Section 7.3.3<br />
Section 7.3.4<br />
Section 8.1<br />
Partially changed.<br />
Partially changed.<br />
Partially changed.<br />
Partially changed.<br />
Partially changed.<br />
POINT is partially added.<br />
Partially changed.<br />
Partially changed.<br />
Partially changed.<br />
"(1) Gain adjustment made by the auto tuning mode<br />
(parameter No. PA08)" is changed to "(1) One-touch<br />
tuning".<br />
"(2) One-touch tuning" is changed to "(2) Gain<br />
adjustment made by the auto tuning mode<br />
(parameter No. PA08)".<br />
Title is changed.<br />
"Auto tuning" is changed to "Auto tuning mode 1".<br />
Title is changed.<br />
"Auto tuning mode 1" is changed to "Overview".<br />
POINT is partially changed.<br />
Title is changed.<br />
"Auto tuning mode 1 operation" is changed to "Auto<br />
tuning mode 1 basis".<br />
Diagram is partially changed.<br />
POINT is partially changed.<br />
Partially changed.<br />
POINT is added.<br />
Partially changed.<br />
Caution is added.<br />
Partially added and changed.<br />
Partially changed.<br />
Caution is added.<br />
Partially changed.<br />
Partially changed.<br />
Partially changed.<br />
Changed to a table format.<br />
Partially changed.<br />
Partially changed.<br />
POINT is added.<br />
Partially changed.<br />
Partially changed.<br />
Partially changed.<br />
Title is changed.<br />
"Gain changing operation" is changed to "Gain<br />
changing procedure".<br />
Partially changed.<br />
Partially changed.<br />
"LED display" is changed to "3-digit, 7-segment<br />
LED".<br />
Following alarms and warnings are added.<br />
A.39 Program error<br />
A.61 Operation alarm
Print Data *<strong>Manual</strong> Number Revision<br />
Feb., 2011 SH(NA)030086-B Section 8.1<br />
Section 8.2<br />
Section 8.3<br />
Section 9.1 (1)<br />
Section 9.1 (2)<br />
Section 10.1<br />
Section 10.2<br />
Section 10.3<br />
Section 10.3.1<br />
Section 10.3.2<br />
Section 10.5<br />
Section 11.1.1<br />
Section 11.1.2<br />
Section 11.2<br />
Section 11.2 (5)<br />
Section 11.3<br />
Section 11.4<br />
Section 11.5 (1)<br />
Section 11.5 (2)<br />
Section 11.6<br />
Section 11.7<br />
A.90 Home position return incomplete warning<br />
A.96 Home position setting warning<br />
A.97 Program operation disabled<br />
A.98 Software limit warning<br />
Warning list is partially changed.<br />
Partially changed.<br />
Following alarm contents are added.<br />
Detailed display 32.1 Overcurrent was detected by<br />
the hardware detection circuit (during operation)<br />
Detailed display 37.3 Point table setting range error<br />
Detailed display 39.1 Program error<br />
Detailed display 39.2 Command argument range<br />
error<br />
Detailed display 39.3 Incompatible command<br />
Detailed display 61.1 Auxiliary function setting error<br />
Partially changed.<br />
Following warning contents are added.<br />
Detailed display 90.1 Home position return<br />
incompletion<br />
Detailed display 90.2 Home position return<br />
abnormal completion<br />
Detailed display 96.1 In-position not reached<br />
Detailed display 96.2 Speed command not<br />
converged<br />
Detailed display 97.1 Program operation disabled<br />
Detailed display 98.1 Reached the software limit<br />
at the forward rotation<br />
Detailed display 98.2 Reached the software limit<br />
at the reverse rotation side<br />
<strong>MR</strong>-<strong>JN</strong>-10A1 and <strong>MR</strong>-<strong>JN</strong>-20A1 are added.<br />
Partially changed.<br />
<strong>MR</strong>-<strong>JN</strong>-10A1 and <strong>MR</strong>-<strong>JN</strong>-20A1 are added.<br />
Partially changed.<br />
<strong>MR</strong>-<strong>JN</strong>-10A1 and <strong>MR</strong>-<strong>JN</strong>-20A1 are added.<br />
Partially changed.<br />
POINT is partially changed.<br />
Partially changed.<br />
<strong>MR</strong>-<strong>JN</strong>-10A1 and <strong>MR</strong>-<strong>JN</strong>-20A1 are added.<br />
Partially changed.<br />
Inrush current of <strong>MR</strong>-<strong>JN</strong>-10A1/20A1 is added.<br />
Partially changed.<br />
Partially changed.<br />
<strong>MR</strong>-<strong>JN</strong>-10A1 and <strong>MR</strong>-<strong>JN</strong>-20A1 are added.<br />
Outline dimension drawings of <strong>MR</strong>-RB12 and <strong>MR</strong>-<br />
RB032 are changed.<br />
Partially changed.<br />
POINT is added.<br />
Partially added and changed.<br />
<strong>MR</strong>-<strong>JN</strong>-10A1 and <strong>MR</strong>-<strong>JN</strong>-20A1 are added.<br />
Partially changed.<br />
Note 2 is partially changed.<br />
<strong>MR</strong>-<strong>JN</strong>-10A1 and <strong>MR</strong>-<strong>JN</strong>-20A1 are added.
Print Data *<strong>Manual</strong> Number Revision<br />
Feb., 2011 SH(NA)030086-B Section 11.9 (2) (a)<br />
Section 11.9 (2) (d)<br />
Section 11.9 (2) (e)<br />
Section 11.9 (2) (f)<br />
Section 11.10 (1)<br />
Table 11.6<br />
Section 11.11<br />
Section 11.12 (1)<br />
Section 11.14<br />
Section 12.1.1<br />
Section 12.1.3<br />
Section 12.1.3 (1)<br />
Section 12.1.4<br />
Section 12.2<br />
Section 12.2.2<br />
Section 12.2.5<br />
Section 12.2.6<br />
Section 12.3.2<br />
Section 12.5.1<br />
Section 12.5.2 (1)<br />
Section 12.5.2 (2)<br />
Section 12.5.3<br />
Section 12.6<br />
Section 12.6.1<br />
Section 12.6.2 (1)<br />
Section 12.6.2 (2)<br />
Section 12.6.3<br />
Section 12.6.3 (1) (b)<br />
Section 12.6.3 (2) (b)<br />
Chapter 13<br />
App. 1<br />
App. 3<br />
App. 4<br />
App. 5<br />
App. 6<br />
App. 7<br />
App. 8<br />
Partially changed.<br />
Partially changed.<br />
Partially changed.<br />
Partially changed.<br />
<strong>MR</strong>-<strong>JN</strong>-10A1 and <strong>MR</strong>-<strong>JN</strong>-20A1 are added.<br />
<strong>MR</strong>-<strong>JN</strong>-10A1 and <strong>MR</strong>-<strong>JN</strong>-20A1 are added.<br />
<strong>MR</strong>-<strong>JN</strong>-10A1 and <strong>MR</strong>-<strong>JN</strong>-20A1 are added.<br />
"<strong>MR</strong>-HDP01 manual pulse generator" is newly added.<br />
Partially changed.<br />
Title is changed.<br />
"Electromagnetic brake" is changed to<br />
"Electromagnetic brake characteristics".<br />
Caution is partially changed.<br />
Partially added and changed.<br />
Partially changed.<br />
Caution is partially added.<br />
Partially changed.<br />
Partially changed.<br />
Partially changed.<br />
Partially changed.<br />
Note is deleted.<br />
<strong>MR</strong>-<strong>JN</strong>-10A1 and <strong>MR</strong>-<strong>JN</strong>-20A1 are added.<br />
Torque characteristics for <strong>MR</strong>-<strong>JN</strong>-10A1 and <strong>MR</strong>-<strong>JN</strong>-<br />
20A1 are added.<br />
Caution is partially changed.<br />
Partially changed.<br />
Partially changed.<br />
"Positioning mode" is newly added.<br />
POINT is partially added.<br />
Parameter list in the positioning mode is added.<br />
Partially changed.<br />
Status display block diagram in the positioning mode<br />
is added.<br />
Partially changed.<br />
Partially added and changed.<br />
<strong>MR</strong>-<strong>JN</strong>-10A1 and <strong>MR</strong>-<strong>JN</strong>-20A1 are added.<br />
Partially added and changed.<br />
<strong>MR</strong>-<strong>JN</strong>-10A1 and <strong>MR</strong>-<strong>JN</strong>-20A1 are added.<br />
Partially added and changed.<br />
This manual confers no industrial property rights or any rights of any other kind, nor does it confer any<br />
patent licenses. Mitsubishi Electric Corporation cannot be held responsible for any problems involving<br />
industrial property rights which may occur as a result of using the contents noted in this manual.<br />
© 2011 MITSUBISHI ELECTRIC CORPORATION
Country/Region<br />
Sales office<br />
Tel/Fax<br />
U.S.A. Mitsubishi Electric Automation, Inc.<br />
Tel : 1-847-478-2100<br />
500 Corporate Woods Parkway, Vernon Hills, IL 60061, U.S.A. Fax : 1-847-478-2253<br />
Germany<br />
Taiwan<br />
Korea<br />
Singapore<br />
Mitsubishi Electric Europe B.V. - German Branch<br />
Gothaer Strasse 8, D-40880 Ratingen, Germany<br />
Setsuyo Enterprise Co., Ltd.<br />
6F No.105 Wu kung 3rd RD, Wu-Ku Hsiang, Taipei Hsien, 248,<br />
Taiwan, R.O.C.<br />
Mitsubishi Electric Automation Korea Co., Ltd. (Service)<br />
B1F, 2F, 1480-6, Gayang-Dong, Gangseo-Gu, Seoul,<br />
157-200, Korea<br />
Mitsubishi Electric Asia Pte, Ltd. ASEAN Factory Automation Centre<br />
307 Alexandra Road #05-01/02,<br />
Mitsubishi Electric Building, Singapore<br />
Tel : 49-2102-486-0<br />
Fax : 49-2102-486-1120<br />
Tel : 886-2-2299-2499<br />
Fax : 886-2-2299-2509<br />
Tel : 82-2-3660-9630<br />
Fax : 82-2-3663-0475<br />
Tel : 65-6470-2460<br />
Fax : 65-6476-7439<br />
India<br />
Mitsubishi Electric India Pvt. Ltd. India Factory Automation Centre<br />
2nd Floor, DLF Building No.9B, DLF Cyber City Phase III,<br />
Gurgaon 122002, Haryana, India<br />
Tel :<br />
Fax :<br />
91-124-4630300<br />
91-124-4630399<br />
Thailand<br />
Mitsubishi Electric Automation (Thailand) Co., Ltd.<br />
Bang-Chan Industrial Estate No.111, Soi Serithai 54, T.Kannayao,<br />
A.Kannayao, Bangkok 10230, Thailand<br />
Tel :<br />
Fax :<br />
66-2906-3238<br />
66-2906-3239<br />
Australia<br />
Mitsubishi Electric Australia Pty. Ltd.<br />
348 Victoria Road PO BOX11, Rydalmere, N.S.W. 2116 Australia<br />
Tel :<br />
Fax :<br />
61-2-9684-7777<br />
61-2-9684-7245
Warranty<br />
1. Warranty period and coverage<br />
We will repair any failure or defect hereinafter referred to as "failure" in our FA equipment hereinafter referred to as the "Product" arisen<br />
during warranty period at no charge due to causes for which we are responsible through the distributor from which you purchased the<br />
Product or our service provider. However, we will charge the actual cost of dispatching our engineer for an on-site repair work on<br />
request by customer in Japan or overseas countries. We are not responsible for any on-site readjustment and/or trial run that may be<br />
required after a defective unit are repaired or replaced.<br />
[Term]<br />
The term of warranty for Product is twelve (12) months after your purchase or delivery of the Product to a place designated by you or<br />
eighteen (18) months from the date of manufacture whichever comes first (“Warranty Period”). Warranty period for repaired Product<br />
cannot exceed beyond the original warranty period before any repair work.<br />
[Limitations]<br />
(1) You are requested to conduct an initial failure diagnosis by yourself, as a general rule.<br />
It can also be carried out by us or our service company upon your request and the actual cost will be charged. However, it will not be<br />
charged if we are responsible for the cause of the failure.<br />
(2) This limited warranty applies only when the condition, method, environment, etc. of use are in compliance with the terms and<br />
conditions and instructions that are set forth in the instruction manual and user manual for the Product and the caution label affixed to<br />
the Product.<br />
(3) Even during the term of warranty, the repair cost will be charged on you in the following cases;<br />
(i) a failure caused by your improper storing or handling, carelessness or negligence, etc., and a failure caused by your hardware<br />
or software problem<br />
(ii) a failure caused by any alteration, etc. to the Product made on your side without our approval<br />
(iii)<br />
(iv)<br />
(v)<br />
a failure which may be regarded as avoidable, if your equipment in which the Product is incorporated is equipped with a safety<br />
device required by applicable laws and has any function or structure considered to be indispensable according to a common<br />
sense in the industry<br />
a failure which may be regarded as avoidable if consumable parts designated in the instruction manual, etc. are duly<br />
maintained and replaced<br />
any replacement of consumable parts (battery, fan, smoothing capacitor, etc.)<br />
(vi) a failure caused by external factors such as inevitable accidents, including without limitation fire and abnormal fluctuation of<br />
voltage, and acts of God, including without limitation earthquake, lightning and natural disasters<br />
(vii) a failure generated by an unforeseeable cause with a scientific technology that was not available at the time of the shipment of<br />
the Product from our company<br />
(viii) any other failures which we are not responsible for or which you acknowledge we are not responsible for<br />
2. Term of warranty after the stop of production<br />
(1) We may accept the repair at charge for another seven (7) years after the production of the product is discontinued. The<br />
announcement of the stop of production for each model can be seen in our Sales and Service, etc.<br />
(2) Please note that the Product (including its spare parts) cannot be ordered after its stop of production.<br />
3. Service in overseas countries<br />
Our regional FA Center in overseas countries will accept the repair work of the Product. However, the terms and conditions of the<br />
repair work may differ depending on each FA Center. Please ask your local FA center for details.<br />
4. Exclusion of responsibility for compensation against loss of opportunity, secondary loss, etc.<br />
Whether under or after the term of warranty, we assume no responsibility for any damages arisen from causes for which we are not<br />
responsible, any losses of opportunity and/or profit incurred by you due to a failure of the Product, any damages, secondary damages<br />
or compensation for accidents arisen under a specific circumstance that are foreseen or unforeseen by our company, any damages to<br />
products other than the Product, and also compensation for any replacement work, readjustment, start-up test run of local machines<br />
and the Product and any other operations conducted by you.<br />
5. Change of Product specifications<br />
Specifications listed in our catalogs, manuals or technical documents may be changed without notice.<br />
6. Application and use of the Product<br />
(1) For the use of our General-Purpose AC Servo, its applications should be those that may not result in a serious damage even if any<br />
failure or malfunction occurs in General-Purpose AC Servo, and a backup or fail-safe function should operate on an external system<br />
to General-Purpose AC Servo when any failure or malfunction occurs.<br />
(2) Our General-Purpose AC Servo is designed and manufactured as a general purpose product for use at general industries.<br />
Therefore, applications substantially influential on the public interest for such as atomic power plants and other power plants of<br />
electric power companies, and also which require a special quality assurance system, including applications for railway companies<br />
and government or public offices are not recommended, and we assume no responsibility for any failure caused by these applications<br />
when used<br />
In addition, applications which may be substantially influential to human lives or properties for such as airlines, medical treatments,<br />
railway service, incineration and fuel systems, man-operated material handling equipment, entertainment machines, safety machines,<br />
etc. are not recommended, and we assume no responsibility for any failure caused by these applications when used.<br />
We will review the acceptability of the abovementioned applications, if you agree not to require a specific quality for a specific<br />
application. Please contact us for consultation.<br />
SH(NA)030086-B
MODEL<br />
MODEL<br />
CODE<br />
HEAD OFFICE : TOKYO BLDG MARUNOUCHI TOKYO 100-8310<br />
This <strong>Instruction</strong> <strong>Manual</strong> uses recycled paper.<br />
SH (NA) 030086-B (1102) MEE Printed in Japan Specifications subject to change without notice.