Troubleshooting - Primex Wireless
Troubleshooting - Primex Wireless
Troubleshooting - Primex Wireless

Create successful ePaper yourself
Turn your PDF publications into a flip-book with our unique Google optimized e-Paper software.
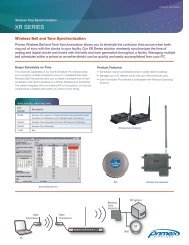
The GPS <strong>Wireless</strong> Clock System<br />
<strong>Troubleshooting</strong><br />
Transmitter Problems<br />
The first step in troubleshooting the Transmitter is to reset the unit. If the Transmitter fails to receive a<br />
GPS signal and is set to time within 15 minutes, please reset the Transmitter.<br />
Note: The Transmitter does not have an ON/OFF switch. To reset the unit, unplug the power supply and<br />
then plug the unit back in.<br />
Power glitches, line spikes, power interruptions, static discharge or other voltage fluctuations can cause<br />
loss of communication with the GPS Unit if the disruption occurs during the initial setup communication<br />
between the Transmitter and the GPS.<br />
Note: The time of day, view of the sky, weather, solar flares and local interference also influence signal<br />
reception and can cause temporary loss of the GPS signal. If reception problems persist, see<br />
Signal Reception Problems.<br />
Display Does Not Light Up<br />
If the display does not light up, check the power supply connection to the Transmitter and to the 120 VAC<br />
outlets. Also verify that the AC outlet has power. If this does not correct the problem, either the power<br />
supply or the Transmitter is defective. Call <strong>Primex</strong> Technical Support at 1-800-404-8112.<br />
Display Lights Up, But Is Blank or Very Faint<br />
Call <strong>Primex</strong> Technical Support at 1-800-404-8112. The Transmitter will probably need to be replaced.<br />
Signal Reception Problems<br />
1. Verify that the GPS Unit is properly connected to the Transmitter.<br />
2. Verify that the GPS Unit is properly mounted on a Low-E glass window or on a rooftop or pole outside<br />
with a clear view of the sky.<br />
3. Check to assure that the GPS Communication indicator is showing on the display (looks like a "Y"<br />
with a line over it). If this symbol is displayed, then the Transmitter is communicating with the GPS<br />
Unit.<br />
a. If the GPS Communication indicator is not being displayed, then the Transmitter, GPS Unit, or<br />
the connection between Transmitter and GPS Unit is defective. Check GPS cable connections.<br />
Note: The use of unshielded or standard shielded cables to extend the distance between the GPS Unit<br />
and the Transmitter beyond 50 feet can cause this failure mode. A special shielded cable with low<br />
resistance on the voltage supply line is required for distances over 50 feet. If cable connections are<br />
good, replace the GPS Unit.<br />
b. If the GPS Communication indicator is displayed but the parentheses are not flashing, then the<br />
problem is with the GPS Unit or with its signal reception.<br />
i. Check to make sure that the GPS Unit has a clear view of the sky and that its view is not<br />
obstructed.<br />
Note: Double pane Low-E glass windows are coated with a transparent metal layer that reflects infrared<br />
heat rays; this will also reflect the GPS signal. The GPS Unit will not receive the signal through<br />
Low-E windows.
The GPS <strong>Wireless</strong> Clock System<br />
ii. Local interference can affect GPS reception. Try moving the location of the GPS receiver to<br />
improve reception.<br />
iii. Weather conditions, solar flares, time of day, and exact satellite position may also effect signal<br />
reception; however, these conditions are normally of a short duration.<br />
Displayed Time/Date is Incorrect<br />
1. If the minutes and seconds are correct, but the hours are off or the day is off by one, then switches<br />
#2, #3, or Rotary Switch B are in the wrong position. Correct switch settings. See Switch Settings<br />
for proper settings.<br />
2. Other than for the above reason, or the loss of the GPS signal, the Transmitter, whose time is controlled<br />
by a GPS signal, should never display the wrong time or date. If such an event occurs,<br />
please contact <strong>Primex</strong> <strong>Wireless</strong> Technical Support at 1-800-404-8112.<br />
Extremely Weak Transmitter Power (About 100 Feet or Less)<br />
1. Unplug the Transmitter and ground yourself to eliminate static electricity.<br />
2. Check to make sure that the antenna is not cross-threaded. The base of the antenna must be flat<br />
on the Transmitter case.<br />
3. Check to make sure that the antenna rod is secure in the antenna base (hand tighten only).<br />
4. Check to make sure that the base of the antenna is tightly mounted on the Transmitter case.<br />
5. Check to make sure that the antenna is not touching anything.<br />
6. Plug in the Transmitter. If the Transmitter power is still extremely weak, the output stage of the<br />
Transmitter may have failed. Contact <strong>Primex</strong> <strong>Wireless</strong> at 1-800-404-8112.<br />
Weak Signal (Limited Coverage Area)<br />
The coverage area is determined by many factors. One of the primary factors is the transmitted signal<br />
compared to the background noise. For the clocks to receive a clear signal from the Transmitter, the<br />
signal must be several times stronger than the background noise. Therefore, Transmitters located in<br />
areas with generally higher background interference will have reduced coverage. The Transmitter has<br />
16 selectable channels. By selecting the channel with the lowest level of background noise, the maximum<br />
range for the particular area may be achieved.<br />
Warning: Changing the channel from the one specified on the FCC application will require that<br />
you again file an application for the new channel.<br />
Red LED is Flashing<br />
The Red LED flashes when the unit has not received an updated time signal for 48 hours. It will also flash<br />
during initial setup.<br />
1. Check the GPS Unit and its cable for proper connection to the Transmitter and possible damage to<br />
the cable. Check the mounting of the GPS Unit to ensure that the mounting did not slip or change<br />
and that it has an unobstructed view of the sky.
The GPS <strong>Wireless</strong> Clock System<br />
2. Check the display panel for the GPS Communication indicator. If the symbol is there, re-check the<br />
location of the GPS Unit and its view of the sky and resolve any obstructions. Then disconnect<br />
power from the Transmitter, wait five seconds and reconnect power to the Transmitter.<br />
3. Check the display panel for the GPS Communication indicator. If the symbol is not there, disconnect<br />
power from the Transmitter, disconnect the GPS Unit from the Transmitter, and check the<br />
GPS cable and connections. Then reconnect the GPS Unit to the Transmitter and reconnect power<br />
to the Transmitter. If the GPS Communication symbol still does not appear in the display, replace<br />
the GPS Unit.<br />
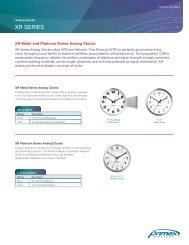
System Analog Clock Problems<br />
Mechanical Failure<br />
Clock Hands Do Not Move or Clock Loses Time<br />
Check for the following possible causes:<br />
1. Low Battery Voltage: Remove and check batteries to make sure that batteries are good (1.3 Volt<br />
minimum). Replace the batteries, if needed, and reset the clock. See System Clock Battery<br />
Replacement.<br />
2. Back Cover Loose: Look at the back of the clock and check the clock movement cover to make<br />
sure that the cover is down securely over the locking tabs.<br />
3. Clock Hands Obstructed: Look at the clock hands to make sure that the clock hands do not interfere<br />
with each other or scrape against the dial or lens.<br />
4. Battery Voltage Interrupted: If the unit is severely jarred, the batteries can momentarily become<br />
disengaged and cause the unit to reset. If this has occurred, the clock will run but it will not correct<br />
itself. To determine if an accidental reset has occurred, press the red button. The clock should<br />
beep three times and stop. If it does not, then an accidental reset has occurred and the clock will<br />
need to be reset. See System Clock Battery Replacement.<br />
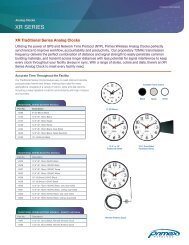
Problems with Setting the System Analog Clock Accurately<br />
There are several ways to set the System Analog Clock, but all methods should contain the following<br />
three steps:<br />
1. The clock must be initially set to within +/-29 minutes of the correct local time. (This effectively sets<br />
the time zone and determines the position of the hour hand.)<br />
2. The red button should first be pressed and released when the second hand is at the "12" position.<br />
(This identifies the position of the second hand.)<br />
3. Then the red button should be pressed and released just after the second hand crosses the minute<br />
hand. (This identifies the position of the minute hand.)<br />
In addition to the above three basic steps, a precision setting also requires the following steps:<br />
1. The final adjustment (last 15 minutes) of the minute hand must be set in the forward (clockwise)<br />
direction.<br />
2. The position of the minute hand with respect to the second hand must be carefully set.
The GPS <strong>Wireless</strong> Clock System<br />
Precision Setting Procedure for System Analog Clock<br />
This method of setting avoids the uncertainty and setting inaccuracies that can result if the second hand<br />
does not fall exactly on the minute marks or the minute hand is not precisely aligned with the second<br />
hand.<br />
1. Insert batteries and watch the second hand. When the second hand gets to the "11" position,<br />
remove the battery. Putting the second hand at the “11” position places the second hand in the<br />
ideal position for aligning the second hand with the minute hand, and clears any stored data in the<br />
electronics.<br />
2. Set the clock precisely to the nearest hour. For example, if it is 2:45, set the clock to 3:00; if it is<br />
3:20 set the clock to 3:00). Setting the clock to the nearest hour sets the time zone and determines<br />
the hour hand position. The clock can be set in either direction, but the last 15 minutes of adjustment<br />
of the minute hand must be turned in the clockwise direction. Setting the clock in the clockwise<br />
direction sets the backlash spring and eliminates gear play.<br />
3. Press the red button to identify hand position.<br />
Note: This step takes only six seconds. Please read and understand this step before inserting the<br />
battery.<br />
a. Insert the battery and watch the second hand. When the second hand reaches the "12" position,<br />
press and release the red button. You should hear two beeps. This tells the electronics<br />
that the second hand is at the "12" position.<br />
b. After the second hand makes its next one-second step, again press and release the red button.<br />
You should hear another two beeps. Pressing the red button tells the electronics that the<br />
minute hand is also at the 12:00 position.<br />
c. The clock is now set and will double step until it receives a valid time signal. In 1 to 45 seconds,<br />
the clock will begin to set to the precise time by going at eight times normal speed or at<br />
half speed until the clock displays the correct time.