Assembling Tutorial: VoomPC-2 - CarTFT.com
Assembling Tutorial: VoomPC-2 - CarTFT.com
Assembling Tutorial: VoomPC-2 - CarTFT.com

You also want an ePaper? Increase the reach of your titles
YUMPU automatically turns print PDFs into web optimized ePapers that Google loves.
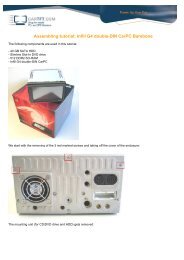
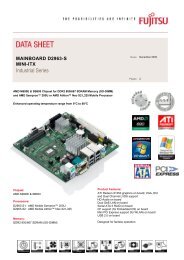
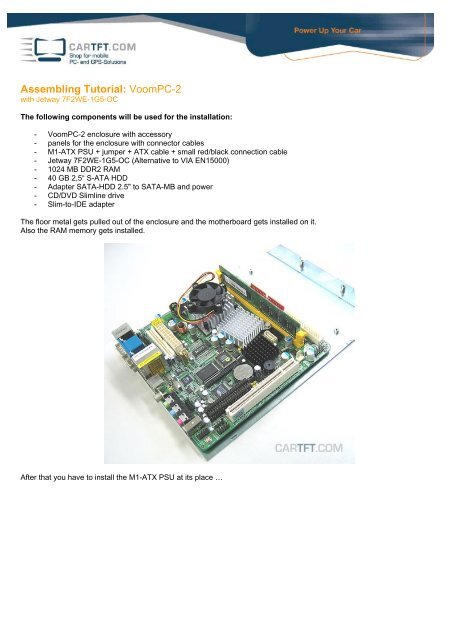
<strong>Assembling</strong> <strong>Tutorial</strong>: <strong>VoomPC</strong>-2<br />
with Jetway 7F2WE-1G5-OC<br />
The following <strong>com</strong>ponents will be used for the installation:<br />
- <strong>VoomPC</strong>-2 enclosure with accessory<br />
- panels for the enclosure with connector cables<br />
- M1-ATX PSU + jumper + ATX cable + small red/black connection cable<br />
- Jetway 7F2WE-1G5-OC (Alternative to VIA EN15000)<br />
- 1024 MB DDR2 RAM<br />
- 40 GB 2,5“ S-ATA HDD<br />
- Adapter SATA-HDD 2.5" to SATA-MB and power<br />
- CD/DVD Slimline drive<br />
- Slim-to-IDE adapter<br />
The floor metal gets pulled out of the enclosure and the motherboard gets installed on it.<br />
Also the RAM memory gets installed.<br />
After that you have to install the M1-ATX PSU at its place …
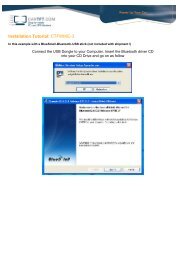
… and the jumper has to be set on „B“:<br />
The adapter for the front connectors gets attached to the floor metal:
The HDD gets installed onto the drive mounting unit:<br />
The IDE-cable is cut like shown in the picture, the rest of the cable on the right side is garbage:
The Slim-to-IDE adapter gets screwed at the CD/DVD drive:<br />
Then the CD/DVD drive gets installed at the drive mounting unit, which gets screwed at the side with 2 small screws:
The front side with the 2 system fans gets screwed into the drive mounting unit afterwards:<br />
Here you can see the connections with their respective connection cables:<br />
IDE-cable as well as S-ATA cable gets connected to the drives and to the power plugs of the ATX cable.
The ATX cable is attached so that the end is put with the further power connections on the M1-ATX power supply and the<br />
other one end on the motherboard. The ATX cable or all other cables, too, have to be laid flat, <strong>com</strong>pact and space-saving,<br />
so that the floor metal can be put into the <strong>VoomPC</strong>-2 enclosure without problems. This is what it should look like:<br />
The ATX-cable should be laid like shown in the picture:<br />
Ports on the front side:
Fans: System fans<br />
Audio: 2 RCA connectors<br />
USB = 2 USB ports<br />
LED = LED, which enlightens the <strong>CarTFT</strong>.<strong>com</strong> Logo. Pay attention that the red cable is there as pointed in the picture.<br />
Also pay attention that no cable goes over the CPU fan. Please correct something like that:
The floor metal gets pushed with the drive mounting unit into the enclosure carefully, so that no cable gets stuck or gets<br />
damaged.<br />
After that the 6 case screws have to be tightened.
At the rear the power connector cable gets led out and put it into the rear faceplate.<br />
The back panel blend gets put in and the rear panel gets screwed.
Now just add the front panel and the <strong>VoomPC</strong>-2-system is ready to use.<br />
Author: B. Lambert - <strong>CarTFT</strong>.<strong>com</strong><br />
Last update: 26.01.2007