
Create successful ePaper yourself
Turn your PDF publications into a flip-book with our unique Google optimized e-Paper software.
Rev 2 – June 2013<br />
<strong>Key</strong> <strong>Digital</strong> ® , led by digital video pioneer Mike Tsinberg,<br />
develops and manufactures high quality, cutting-edge<br />
technology solutions for virtually all applications where<br />
high quality video imaging is important. <strong>Key</strong> <strong>Digital</strong> ®<br />
is at the forefront of the video industry for Home Theater<br />
Retailers, Custom Installers, System Integrators,<br />
Broadcasters, Manufacturers, and Consumers.<br />
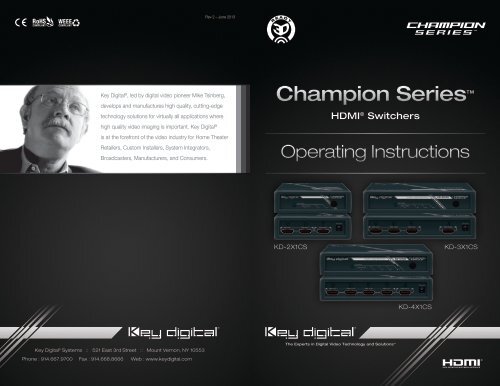
Champion Series <br />
HDMI ® Switchers<br />
Operating Instructions<br />
KD-2X1CS<br />
KD-3X1CS<br />
KD-4X1CS<br />
<strong>Key</strong> <strong>Digital</strong> ® Systems :: 521 East 3rd Street :: Mount Vernon, NY 10553<br />
Phone : 914.667.9700 Fax : 914.668.8666 Web : www.keydigital.com<br />
The Experts in <strong>Digital</strong> Video Technology and Solutions
4 1<br />
Table of Contents<br />
Introduction ................................................................ 1<br />
Quick Setup Guide .......................................................... 2<br />
Installation and <strong>Operation</strong> ..................................................... 2<br />
Push Button Control ..................................................... 3<br />
Remote Control ........................................................ 3<br />
IR Emitter Control ....................................................... 3<br />
EDID Setup ........................................................... 4<br />
Addressing mode ....................................................... 4<br />
Resetting to Factory Default ............................................... 4<br />
Specifications .............................................................. 5<br />
Important Product Warnings & Safety Instructions ................................... 6<br />
How to Contact <strong>Key</strong> <strong>Digital</strong> ® ................................................... 7<br />
Warranty Information ......................................................... 8<br />
Introduction<br />
<strong>Key</strong> <strong>Digital</strong> ® Champion Series HDMI switchers are designed and engineered to offer the<br />
best in quality, performance, and reliability while providing a cost effective HDMI switching<br />
solution. The KD-2X1CS, KD-3X1CS, KD-4X1CS HDMI switchers provide multiple input<br />
to one output switching and maintain crystal-clear, pristine picture and sound quality.<br />
Champion Series HDMI switchers are a transparent solution for all digital video/audio<br />
switching applications and support all SD, HD, and VESA video standards, including<br />
1080p/60, 1920x1200, and 3D. KD-2X1CS, KD-3X1CS, KD-4X1CS HDMI switchers feature<br />
pushbutton and optical IR switching, status-monitoring LEDs, and support for advanced<br />
HDMI 3D feature.<br />
About the KD-2X1CS, KD-3X1CS, KD-4X1CS<br />
››<br />
<strong>Digital</strong> switching of multiple (2, 3 or 4) HDMI inputs to one (1) HDMI output<br />
››<br />
Supports all SD, HD, and VESA (VGA, SVGA, XGA, WXGA, SXGA, UXGA) resolutions up to<br />
1080p (60Hz & 50Hz)<br />
»»<br />
SD & HD: 480i, 480p, 720p, 1080i, 1080p<br />
»»<br />
VESA: From 640x480p up to 1920x1200p<br />
››<br />
EDID and HDCP Transparency between display and sources<br />
››<br />
Supports signal rates up to 10.2 Gb per second<br />
››<br />
Compliant with HDCP copyright protection<br />
››<br />
Supports CEC (Consumer Electronics Control)<br />
››<br />
Pushbutton and IR control<br />
››<br />
Input and Output status indicated by LED<br />
››<br />
Compatible with all control systems<br />
Advanced HDMI ® Features<br />
››<br />
3D – Capability to pass 3D stereoscopic signal formats<br />
Accessories<br />
››<br />
External power supply: 5V 1A<br />
››<br />
HDMI Lacing Clip<br />
››<br />
Operating Instructions<br />
››<br />
Warranty Card<br />
Always follow the instructions provided in this Operating <strong>Manual</strong>.<br />
© 2013 <strong>Key</strong> <strong>Digital</strong>, Inc. All rights reserved.
Satellite Box<br />
2 3<br />
Cable Box<br />
HDMI<br />
KD-4X1CS<br />
HDMI<br />
Plasma TV<br />
Quick Setup Guide<br />
››<br />
Step 1: Find a safe and convenient location to mount or place your KD-2X1CS, KD-3X1CS,<br />
HDMI<br />
KD-4X1CS unit<br />
››<br />
Step 2: Begin with the KD-2X1CS, KD-3X1CS, KD-4X1CS unit and all input/output devices<br />
turned off with power cables removed<br />
››<br />
Step 3: Connect your HDMI sources to the input ports of your KD-2X1CS, KD-3X1CS,<br />
HDMI<br />
HDMI<br />
KD-4X1CS unit<br />
››<br />
Step 4: Connect your HDMI display to the output port of your KD-2X1CS, KD-3X1CS,<br />
KD-4X1CS unit<br />
››<br />
Step 7: Connect power to the KD-2X1CS, KD-3X1CS, KD-4X1CS unit<br />
››<br />
Step 8: Power on input/output devices<br />
DVD Player<br />
Blu-Ray<br />
Satellite Box<br />
HDMI<br />
Plasma TV<br />
Pushbutton Control<br />
Your KD-2X1CS, KD-3X1CS, KD-4X1CS unit may be controlled via the pushbutton on the front<br />
of the unit. Select your desired input by depressing the “Input Select” button. The front LED<br />
indicators (1, 2, 3, 4) correspond to the input that has been selected.<br />
IR Remote Control<br />
The KD-2X1CS, KD-3X1CS, KD-4X1CS can also be operated using the IR remote control<br />
provided with your unit. The KD-2X1CS, KD-3X1CS, KD-4X1CS switcher features an IR sensor<br />
on the front of the unit for reception of the IR command signals.<br />
HDMI<br />
Cable Box<br />
HDMI<br />
Input Select<br />
DVD Player<br />
Input Select<br />
Scroll Up/Down<br />
Blu-Ray<br />
HDMI<br />
KD-4X1CS<br />
Numeric <strong>Key</strong>pad<br />
All buttons not listed/<br />
described in this manual<br />
are currently inactive<br />
R1, R2, R3<br />
Reserved for future use<br />
HDMI<br />
HDMI<br />
Installation and <strong>Operation</strong><br />
Before permanently securing the unit for final installation of cabling behind walls or ceilings, test for<br />
proper operation of the unit and the cables in your system.<br />
It is recommended that you leave enough ventilation space to<br />
provide sufficient airflow and cooling, especially if you are going<br />
to leave the unit powered at all times.<br />
An optional HDMI cable clip (included) enables a method for<br />
securing HDMI cables the KD-2X1CS, KD-3X1CS, KD-4X1CS<br />
units and helps defeat intermittent or complete signal loss due<br />
to poor connection.<br />
Optional HDMI Cable<br />
clip (included)<br />
IR Emitter Control<br />
When using an IR Emitter / IR Extender (sold separately), the IR Emitter must be mounted over<br />
the IR Sensor on the front of the KD-2X1CS, KD-3X1CS, KD-4X1CS unit. One end of the cable<br />
is connected to the IR Receiver / Master Controller / IR Extender / IR Connecting Block, while the<br />
other end is mounted over the IR Sensor of the KD-2X1CS, KD-3X1CS, KD-4X1CS unit.
4 5<br />
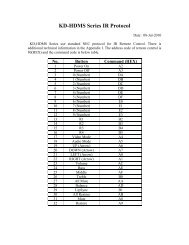
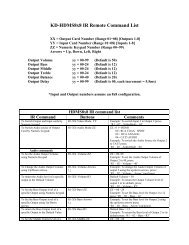
EDID Setup<br />
EDID (Extended Display Identification Data) is a data structure provided by a digital display to<br />
describe its capabilities to a video source. This data is also known as a “handshake” and typically<br />
includes manufacturer, serial number, product type, resolutions supported by the display, display<br />
size, pixel mapping data, etc.<br />
<strong>Key</strong> <strong>Digital</strong> EDID Control allows the integrator to choose the handshake that will be provided to<br />
source devices of the system. The EDID handshake is relayed to the source from the Champion<br />
Series switch, not from any of the displays/output devices of the system. This handshake will<br />
always be the EDID information that the source device receives.<br />
To change the EDID of the system, press the following buttons on the <strong>Key</strong> <strong>Digital</strong> IR Remote<br />
control: R2 » R1 » R3 » XX.<br />
The XX characters will be replaced with the two digit number that corresponds to the EDID you<br />
wish to set. Use the below chart to find the various EDID settings. The default EDID is ‘00’--Copy<br />
EDID from output 1.<br />
The possible EDID settings can range from ‘00’ to ‘12’. (‘00’ is the default).<br />
00 Copy EDID from HDMI Output 1 07 3D, 2Ch Audio<br />
01 1080i, 2Ch Audio 08 3D, Dolby/DTS 5.1<br />
02 1080i, Dolby/DTS 5.1 09 3D, HD Audio<br />
03 1080i, HD Audio 10 1280x1024 DVI<br />
04 1080p, 2Ch Audio 11 1920x1080 DVI<br />
05 1080p, Dolby/DTS 5.1 12 1920x1200 DVI<br />
06 1080p, HD Audio<br />
Addressing Mode<br />
Units may be addressed when used in a cascaded configuration. To address your Champion<br />
Series switch, press the following buttons on the <strong>Key</strong> <strong>Digital</strong> IR remote control:<br />
R2 » R1 » R3 » XX<br />
The XX characters will be replaced with the two digit address you wish to assign to the unit.<br />
The default address is 00--Single unit mode.<br />
Resetting to Factory Default<br />
To reset your unit to factory default, press and hold the Input Select button on the front panel<br />
for 10 seconds.<br />
Specifications<br />
Technical:<br />
»»<br />
Input (Each): HDMI Connector, Type A, 19 Pin Female<br />
»»<br />
Output: HDMI Connector, Type A, 19 Pin Female<br />
»»<br />
Bandwidth: TMDS bandwidth 10.2 Gb/s<br />
»»<br />
Control: Front panel push buttons and LEDs; IR sensor front/rear; RS-232 Tx/Rx lines with<br />
full bi-directional operation<br />
»»<br />
Deep Color Support: <strong>Digital</strong> video formats in Deep Color Mode up to 12 bits/color<br />
»»<br />
HDMI ® and HDCP Licensing: Fully licensed and compatible with all HDMI<br />
and HDCP techologies<br />
»»<br />
Compliance with HDMI Standards: Supports all versions of HDMI and HDCP<br />
»»<br />
Link:Single Link<br />
»»<br />
EDID Control:EDID information is assigned to the inputs from the internal EDID library or<br />
from a display’s internal EDID data<br />
»»<br />
Lossless Compressed <strong>Digital</strong> Audio: Supports Dolby ® TrueHD, Dolby ® <strong>Digital</strong> Plus and<br />
DTS -HD Master Audio<br />
»»<br />
DDC Signal (Data):Input DDC Signal - 5 Volts p-p (TTL)<br />
»»<br />
HDMI Video/Audio Signal:Input Video Signal - 1.2 Volts p-p<br />
»»<br />
DDC Communication:EDID and HDCP Bi-directional Transparency from Display to Source<br />
»»<br />
Wired IR: modulated IR signal input, 0-5V TTL or -10to +10V.<br />
»»<br />
Power: 5 Volt DC @ 1 Amp, 100-240 VAC, 50-60 Hz<br />
General:<br />
»»<br />
Regulation: CE, RoHS, WEEE<br />
»»<br />
Enclosure: Black Plastic<br />
»»<br />
Product Dimensions: KD-2x1CS W = 3.75”, H = 1”, D = 2.5”<br />
KD-3x1CS W = 5.5”, H = 1”, D = 2.75”<br />
KD-4x1CS W = 5.5”, H = 1”, D = 2.75”<br />
»»<br />
Shipping Dimensions: 7.67” x 7.1” x 2”<br />
»»<br />
Product Weight: KD-2x1CS - 0.5 lb<br />
KD-3x1CS - 0.9 lb<br />
KD-4x1CS - 0.9 lb<br />
»»<br />
Shipping Weight: 6 lb
6 7<br />
Important Product Warnings:<br />
1. Connect all cables before providing power to the unit.<br />
2. Test for proper operation before securing unit behind walls or in hard to access spaces.<br />
3. If installing the unit into wall or mounting bracket into sheet-rock, provide proper screw support<br />
with bolts or sheet-rock anchors.<br />
Safety Instructions:<br />
Please be sure to follow these instructions for safe operation of your unit.<br />
1. Read and follow all instructions.<br />
2. Heed all warnings.<br />
3. Do not use this device near water.<br />
4. Clean only with dry cloth.<br />
5. Install in accordance with the manufacturer’s instructions.<br />
6. Do not install near any heat sources such as radiators, heat registers, stoves, or other<br />
apparatus (including amplifiers) that produce heat.<br />
7. Only use attachments/accessories specified by the manufacturer.<br />
8. Refer all servicing to qualified service personnel. Servicing is required when the device has<br />
been damaged in any way including:<br />
»»<br />
Damage to the power supply or power plug<br />
»»<br />
Exposure to rain or moisture<br />
Power Supply Use:<br />
You MUST use the Power Supply provided with your unit or you VOID the<br />
<strong>Key</strong> <strong>Digital</strong> ® Warranty and risk damage to your unit and associated equipment.<br />
How to Contact <strong>Key</strong> <strong>Digital</strong> ®<br />
System Design Group (SDG)<br />
For system design questions please contact us at:<br />
››<br />
Phone: 914-667-9700<br />
››<br />
E-mail: sdg@keydigital.com<br />
<strong>Key</strong> <strong>Digital</strong> Trainings<br />
For questions about <strong>Key</strong> <strong>Digital</strong> ® Trainings please contact us at:<br />
››<br />
Phone: 914-667-9700<br />
››<br />
E-mail: training@keydigital.com<br />
Customer Support<br />
For customer support questions please contact us at:<br />
››<br />
Phone: 914-667-9700<br />
››<br />
E-mail: customersupport@keydigital.com<br />
Technical Support<br />
For technical questions about using <strong>Key</strong> <strong>Digital</strong> ® products, please contact us at:<br />
››<br />
Phone: 914-667-9700<br />
››<br />
E-mail: tech@keydigital.com<br />
Marketing and Public Relations:<br />
For marketing and public relations information, please contact us at:<br />
››<br />
Phone: 914-667-9700<br />
››<br />
E-mail: marketing@keydigital.com<br />
Repairs and Warranty Service<br />
Should your product require warranty service or repair, please obtain a <strong>Key</strong> <strong>Digital</strong> ® Return Material<br />
Authorization (RMA) number by contacting us at:<br />
››<br />
Phone: 914-667-9700<br />
››<br />
E-mail: rma@keydigital.com<br />
Feedback<br />
Please email any comments/questions about the manual to:<br />
››<br />
E-mail: customersupport@keydigital.com
8 9<br />
Warranty Information<br />
All <strong>Key</strong> <strong>Digital</strong> ® products are built to high manufacturing standards and should<br />
provide years of trouble-free operation. They are backed by a limited three-year<br />
parts and labor warranty.