1000 kg Side Lift Jack - AL-KO
1000 kg Side Lift Jack - AL-KO
1000 kg Side Lift Jack - AL-KO

Create successful ePaper yourself
Turn your PDF publications into a flip-book with our unique Google optimized e-Paper software.
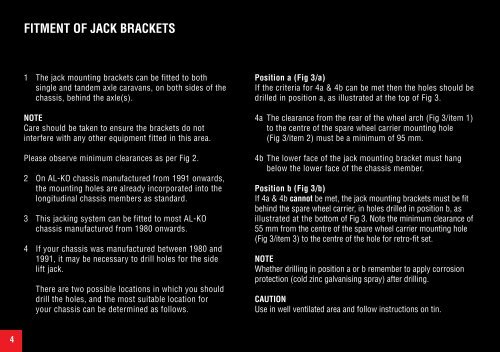
FITMENT OF JACK BRACKETS<br />
1 The jack mounting brackets can be fitted to both<br />
single and tandem axle caravans, on both sides of the<br />
chassis, behind the axle(s).<br />
NOTE<br />
Care should be taken to ensure the brackets do not<br />
interfere with any other equipment fitted in this area.<br />
Please observe minimum clearances as per Fig 2.<br />
2 On <strong>AL</strong>-<strong>KO</strong> chassis manufactured from 1991 onwards,<br />
the mounting holes are already incorporated into the<br />
longitudinal chassis members as standard.<br />
3 This jacking system can be fitted to most <strong>AL</strong>-<strong>KO</strong><br />
chassis manufactured from 1980 onwards.<br />
4 If your chassis was manufactured between 1980 and<br />
1991, it may be necessary to drill holes for the side<br />
lift jack.<br />
There are two possible locations in which you should<br />
drill the holes, and the most suitable location for<br />
your chassis can be determined as follows.<br />
Position a (Fig 3/a)<br />
If the criteria for 4a & 4b can be met then the holes should be<br />
drilled in position a, as illustrated at the top of Fig 3.<br />
4a The clearance from the rear of the wheel arch (Fig 3/item 1)<br />
to the centre of the spare wheel carrier mounting hole<br />
(Fig 3/item 2) must be a minimum of 95 mm.<br />
4b The lower face of the jack mounting bracket must hang<br />
below the lower face of the chassis member.<br />
Position b (Fig 3/b)<br />
If 4a & 4b cannot be met, the jack mounting brackets must be fit<br />
behind the spare wheel carrier, in holes drilled in position b, as<br />
illustrated at the bottom of Fig 3. Note the minimum clearance of<br />
55 mm from the centre of the spare wheel carrier mounting hole<br />
(Fig 3/item 3) to the centre of the hole for retro-fit set.<br />
NOTE<br />
Whether drilling in position a or b remember to apply corrosion<br />
protection (cold zinc galvanising spray) after drilling.<br />
CAUTION<br />
Use in well ventilated area and follow instructions on tin.<br />
4