Gepida Reptila 1100 Contents - Electric bikes & folding bikes
Gepida Reptila 1100 Contents - Electric bikes & folding bikes
Gepida Reptila 1100 Contents - Electric bikes & folding bikes

You also want an ePaper? Increase the reach of your titles
YUMPU automatically turns print PDFs into web optimized ePapers that Google loves.
<strong>Gepida</strong> <strong>Reptila</strong> <strong>1100</strong> <strong>Contents</strong><br />
<strong>Gepida</strong> <strong>Reptila</strong> <strong>1100</strong> Pedelec<br />
1 Pair of pedals<br />
1 pc. Battery (optional 2 batteries)<br />
1 pc. Battery charger<br />
1 pc. User’s manual CD<br />
1 pc. USB-Can adaptor (Peak)<br />
1 pc. <strong>Gepida</strong>-Binder adaptor cable (Peak)
<strong>Gepida</strong> <strong>Reptila</strong> <strong>1100</strong> – Instruction Manual 2<br />
<strong>Gepida</strong> Service and Registration Software for New Generation Pedelecs<br />
The <strong>Gepida</strong> Service and Registration System is a multifunctional<br />
software solution with special functional elements to give useful<br />
help for its users (official <strong>Gepida</strong> dealers).<br />
It provides technical background for a quick troubleshooting<br />
with checking the voltage of the cells and help users<br />
to define the required further technical steps.<br />
It is a quite simple method for the Registration and Warranty processes.<br />
The Battery Management System (BMS) has been implemented in the<br />
<strong>Gepida</strong> battery packs which continuously saves the electrical parameters into<br />
its memory chip.<br />
This log file is readable by the software and the log table includes all<br />
electrical information regarding electrical errors for the last period of battery<br />
pack in use.<br />
This technical information helps the service points to give correct<br />
information to customers or to handle occasional customer complaints.<br />
Olimpia Bicycle Ltd. – www.gepida.eu 2
<strong>Gepida</strong> <strong>Reptila</strong> <strong>1100</strong> – Instruction Manual 3<br />
Content of <strong>Gepida</strong> Service and Registration Pack<br />
1. CD with <strong>Gepida</strong> Service and Registration Software<br />
2. USB-CAN BUS adaptor<br />
Olimpia Bicycle Ltd. – www.gepida.eu 3
<strong>Gepida</strong> <strong>Reptila</strong> <strong>1100</strong> – Instruction Manual 4<br />
Preparing the software<br />
Insert CD into CD-ROM.<br />
If you are running Windows XP or Windows XP SP 1, temporarily disconnect your PC from the Internet. This can be done by either removing the<br />
network cable from your PC or by disabling your network card by going to the ”Control Panel\Network and Dial-Up Connections”, rightclicking<br />
on the appropriate connection and selecting ”Disable” from the menu. The connection can be re-enabled after the installation is complete. This<br />
is not necessary under Windows XP SP 2 if configured to ask before connecting to Windows Update. Windows XP SP 2 can have the settings for<br />
Windows.<br />
Update changed through ”Control Panel\System” then select the ”Hardware” tab and click ”Windows Update”.<br />
Connect the CANUSB to a spare USB port on your PC. Information will be shown that Windows<br />
XP has found a new hardware, see picture below.<br />
Olimpia Bicycle Ltd. – www.gepida.eu 4
<strong>Gepida</strong> <strong>Reptila</strong> <strong>1100</strong> – Instruction Manual 5<br />
Preparing the software<br />
This will then launch the Windows Found New Hardware Wizard. If there is no available<br />
Internet connection or Windows XP SP 2 is configured to ask before connecting to<br />
Windows Update, the screen below is shown. Select ”No, not this time” from the<br />
options available and then click ”Next” to proceed with the installation. If there is an<br />
available Internet connection, Windows XP will silently connect to the Windows Update<br />
website and install any suitable driver it finds for the device in preference to the driver<br />
manually selected.<br />
Select ”Install from a list or specified location (Advanced)<br />
” as shown below and then click ”Next”.<br />
Olimpia Bicycle Ltd. – www.gepida.eu 5
<strong>Gepida</strong> <strong>Reptila</strong> <strong>1100</strong> – Instruction Manual 6<br />
Preparing the software<br />
Select ”Search for the best driver in these locations” and enter the file path in the<br />
combo-box (”C:\CANUSB\Drivers\CDM_2.08.02_CANUSB” in the example below) or<br />
browse to it by clicking the browse button. Once the file path has been entered in the<br />
box, click next to proceed (note that this path is a sample and you may have put this<br />
location elsewhere).<br />
If Windows XP is configured to warn when unsigned (non-WHQL certified) drivers are about to<br />
be installed, the following screen will be displayed. Click on ”Continue Anyway” to continue<br />
with the installation. If Windows XP is configured to ignore file signature warnings, no message<br />
will appear.<br />
Olimpia Bicycle Ltd. – www.gepida.eu 6
<strong>Gepida</strong> <strong>Reptila</strong> <strong>1100</strong> – Instruction Manual 7<br />
Preparing the software<br />
The following screen will be displayed as Windows XP copies the required driver files.<br />
Windows should then display a message indicating that the installation was successful.<br />
Click ”Finish” to complete the installation. This has installed the serial converter. The COM<br />
port emulation driver must be installed after this has completed.<br />
Olimpia Bicycle Ltd. – www.gepida.eu 7
<strong>Gepida</strong> <strong>Reptila</strong> <strong>1100</strong> – Instruction Manual 8<br />
Preparing the software<br />
After complete this process start to install „canusbdrv018.exe” that’s located in the folder: canusbdrv018. Follow the process on the pictures.<br />
Olimpia Bicycle Ltd. – www.gepida.eu 8
<strong>Gepida</strong> <strong>Reptila</strong> <strong>1100</strong> – Instruction Manual 9<br />
Preparing the software<br />
After completing the processes above the <strong>Gepida</strong> BMS Program is ready to run.<br />
To run the <strong>Gepida</strong> BMS Program choose the „gepida_software.exe” that’s located in the folder: ebike_service_software_canusb<br />
Olimpia Bicycle Ltd. – www.gepida.eu 9
<strong>Gepida</strong> <strong>Reptila</strong> <strong>1100</strong> – Instruction Manual 10<br />
Connecting the battery pack with the computer<br />
1. Connect the Serial side of the Binder connector<br />
to the serial port of the USB-CAN adapter.<br />
2. Plug the USB connector of the adapter into the<br />
computer.<br />
3. Plug the Binder connector into the battery pack or into the<br />
carrier.<br />
4. You can also charge your battery through the<br />
bicycle’s Binder connector.<br />
Olimpia Bicycle Ltd. – www.gepida.eu 10
<strong>Gepida</strong> <strong>Reptila</strong> <strong>1100</strong> – Instruction Manual 11<br />
Registration process<br />
STEP 1 , Typing the datas :<br />
When a <strong>Gepida</strong> New Generation Pedelec is purchased, the battery pack and the pedelec’s new owner must be registered in the <strong>Gepida</strong><br />
database. The registration is compulsory for the owner’s good, because of warranty reasons and for future identification of the bicycle in case<br />
it got stolen. You can do this process on the first page, named: „General information”. Here you can add the necessary information about the<br />
customer.<br />
1. Choose the side (left, right or both)<br />
of the battery.<br />
2. Fill in all the fields for the identification of the<br />
owner.<br />
3. Fill in all the fields for the<br />
identification of the dealer.<br />
4. Press the Write button, to store<br />
the filled data in the BMS of<br />
the battery pack. The data will be<br />
saved in the BMS’s database.<br />
Olimpia Bicycle Ltd. – www.gepida.eu 11
<strong>Gepida</strong> <strong>Reptila</strong> <strong>1100</strong> – Instruction Manual 12<br />
Registration process<br />
STEP 2 , Preparing the registration form :<br />
After the identification data is written into the BMS of the battery pack, it has to be printed out for warranty reasons. You can do this process<br />
on the last page, named: „Tools and Setting”.<br />
1. Switch to the last tab: Tools&Setting.<br />
2. Click the Print Registration Form button.<br />
3. The report will be saved as a text file,<br />
in the root directory of the software.<br />
4. As usual, you can change the default filename,<br />
and the destionation directory as well.<br />
Attention!<br />
The new batteries are shipped in a pre-registered state, but the customer registration must be done before selling Pedelecs.<br />
After this electronic registration process the Pedelecs and the battery packs switch to registered state.<br />
Olimpia Bicycle Ltd. – www.gepida.eu 12
<strong>Gepida</strong> <strong>Reptila</strong> <strong>1100</strong> – Instruction Manual 13<br />
Registration process<br />
STEP 3 , Validate the Registration Form<br />
<br />
Fields containing customer information.<br />
<br />
Fields containing dealer information.<br />
<br />
Fields containing bicycle and battery packs<br />
information.<br />
<br />
Fields for signatures.<br />
Warning!<br />
Signing the form by both side is very important for<br />
warranty reasons! Without the signatures, the<br />
Registration Form is invalid!<br />
Olimpia Bicycle Ltd. – www.gepida.eu 13
<strong>Gepida</strong> <strong>Reptila</strong> <strong>1100</strong> – Instruction Manual 14<br />
Service process<br />
STEP 1 , Identification :<br />
When a <strong>Gepida</strong> New Generation Pedelec is returned, the battery pack and its owner must be identified with the help of the software. On the<br />
first page you will see the serial numbers, and the information about the owner and the purchase.<br />
1. Choose the side of the battery<br />
you wish to examine<br />
(side of the battery what you have).<br />
2. Press the Read button to display<br />
the data stored in the battery pack.<br />
3. On the upper-left part, you can see<br />
all the identification data about<br />
the customer.<br />
4. On the lower-left part you can see<br />
all the identification data about<br />
the purchase.<br />
Olimpia Bicycle Ltd. – www.gepida.eu 14
<strong>Gepida</strong> <strong>Reptila</strong> <strong>1100</strong> – Instruction Manual 15<br />
Service process<br />
STEP 2 , Retrieving technical parameters :<br />
This part will provide information which is needed for servicing, such as cell voltage values, overall voltage of battery, software and hardware<br />
versions, and the number of charging cycles.<br />
1. Click on the second tab named Technical details.<br />
2. Click the READ button to display the data stored<br />
in the battery pack.<br />
<br />
<br />
<br />
<br />
<br />
<br />
On the upper-left part you can see the voltage<br />
value of each cell. When the battery is in good<br />
condition the TOV number is between 40-42 V.<br />
Every cell should have a minimum voltage: 3,5V.<br />
A battery contains 10 cells.<br />
There can be difference between the cell’s voltage<br />
that will be levelled up by charging.<br />
No one of cell’s voltage can be lower than 3,5V. In<br />
such a case the battery can not work properly.<br />
If the voltage is under 3V the software is incapable<br />
to display the voltage data.<br />
Notification!<br />
Make sure, that the battery is always fully charged<br />
when not in use, to maintain a prolonged durability!<br />
Olimpia Bicycle Ltd. – www.gepida.eu 15
<strong>Gepida</strong> <strong>Reptila</strong> <strong>1100</strong> – Instruction Manual 16<br />
Service process<br />
STEP 2 , Retrieving technical parameters :<br />
This part will provide information which is needed for servicing, such as cell voltage values, overall voltage of battery, software and hardware<br />
versions, and the number of charge cycles.<br />
<br />
On the lower-left part you can see the<br />
temperature and the version number of the<br />
battery pack. (software/hardware)<br />
The value of „temperatures” display the inside<br />
temperature of the battery. If this value is too<br />
high or too low the battery is not possible to be<br />
charged until its temperature reaches a value in<br />
the optimum interval again.<br />
<br />
On the upper-right part you can see the state of<br />
charge and maximum cell mismatch, and the<br />
number of charging cycles.<br />
Olimpia Bicycle Ltd. – www.gepida.eu 16
<strong>Gepida</strong> <strong>Reptila</strong> <strong>1100</strong> – Instruction Manual 17<br />
Service process<br />
STEP 3 , Reading the error log :<br />
On the third page, you will see the error log of the battery pack. It can contain such electric problems from the past like under- or overvoltage<br />
of certain cells or under- and over temperature of the battery. The log file stores all discrepancies that might have occurred.<br />
1. Click on the third tab named Error logging.<br />
2. Choose the side of the battery you wish<br />
to examine (side of the battery what you have).<br />
<br />
Click the READ button to display the data<br />
stored in the battery pack.<br />
<br />
It the table you can see the log history, sorted by<br />
time.<br />
Olimpia Bicycle Ltd. – www.gepida.eu 17
<strong>Gepida</strong> <strong>Reptila</strong> <strong>1100</strong> – Instruction Manual 18<br />
Service process<br />
STEP 4 , Creating the report file :<br />
On the fourth page, you can create a report file, set the device time of the battery pack’s BMS, set the language and see some background<br />
information about the software.<br />
1. Click on the last tab named<br />
Tools & Settings.<br />
2. Click the SAVE REPORT button.<br />
3. The report will be saved as a<br />
text file, in the root directory<br />
of the software.<br />
4. As usual, you can change the<br />
a filename and the<br />
destination directory as well.<br />
Olimpia Bicycle Ltd. – www.gepida.eu 18
<strong>Gepida</strong> <strong>Reptila</strong> <strong>1100</strong> – Instruction Manual 19<br />
Service process<br />
If the dealer cannot help to solve the problem, we will need<br />
the report file (maybe the battery too) you created to perform further diagnostics. For further details about the technical values, check<br />
Appendix A: Troubleshooting.<br />
Caution!<br />
Make sure to read the data on all three pages (General Information, Technical details, Error logging) before saving the report file, otherwise the<br />
report file will contain insufficient or false information!<br />
Warning!<br />
Do not try to disassemble the battery pack or the control unit! Not only is it dangerous but it also voids the warranty of the set.<br />
Olimpia Bicycle Ltd. – www.gepida.eu 19
<strong>Gepida</strong> <strong>Reptila</strong> <strong>1100</strong> – Instruction Manual 20<br />
How to handle the battery pack<br />
1. Grab the battery pack in the position shown<br />
on the picture. You just have to see the<br />
„GEPIDA” sign on it.<br />
2. Push the battery pack firmly into the console, until<br />
you hear it clicking.<br />
3. Use the lock to secure the battery pack in its<br />
place. You are able to remove the key only if the lock<br />
is closed. The picture shows the lock in closed<br />
position.<br />
Notification!<br />
Make sure that the lock is always closed during riding the<br />
pedelec. Check it each time before using the bicycle!<br />
Olimpia Bicycle Ltd. – www.gepida.eu 20
<strong>Gepida</strong> <strong>Reptila</strong> <strong>1100</strong> – Instruction Manual 21<br />
About the battery<br />
1. Do not touch the contacts of the battery<br />
with any objects as it might cause a short circuit<br />
2. Do not spray water on the battery or immerse the<br />
the battery in water<br />
3. Do not throw the battery into fire<br />
4. Do not leave the battery in an automobile<br />
5. Do not drop or shake the battery<br />
6. Do not use the battery if it is damaged<br />
7. Do not disassemble the battery<br />
8. Do not use the battery on other electrical products<br />
Olimpia Bicycle Ltd. – www.gepida.eu 21
<strong>Gepida</strong> <strong>Reptila</strong> <strong>1100</strong> – Instruction Manual 22<br />
Battery Characteristics<br />
This <strong>Gepida</strong> battery is a large-capacity, high performance lithium-ion (Li-ion) battery that outputs large current. More compact and lightweight<br />
than the conventional nickel cadmium (Ni-Cd) and nickel-metal hydride (Ni-Mh) batteries as well as it can keep a large amount of electricity.<br />
Moreover, conventional batteries suffered from the memory effect, that is a symptom wherein batteries that were charged repeatedly before<br />
being entirely discharged each time had an apparently strong decrease in capacity over the time. In contrast, the Li-ion battery does not have<br />
the memory effect, so you can charge it anytime at your convenience.<br />
Battery does not operate well in extremely hot or cold environment. During charging cycles, the battery goes through a chemical reaction<br />
which is greatly influenced by temperature.<br />
A battery is subject to self-discharge even if it is not used. The loss suffered due to self-discharge can be recovered by charging the battery<br />
before use.<br />
Sometimes, the travel distance with a new battery might be shorter, but this will improve by using and charging it 2 to 3 times.<br />
In a cold environment, below approximately 10 °C, the output capacity of the battery decreases, leading to a shorter travel distance or a<br />
reduced power assist. Its capacity automatically recovers by the rising temperature. Even a high-performance Li-ion battery will suffer a gradual<br />
decline in its capacity after repeated charge-and-discharge cycles (appr. 800 cycles), necessitating its replacement. This is the nature of the<br />
battery and is not considered as a malfunction.<br />
Olimpia Bicycle Ltd. – www.gepida.eu 22
<strong>Gepida</strong> <strong>Reptila</strong> <strong>1100</strong> – Instruction Manual 23<br />
Battery characteristics<br />
Avoid charging the battery at high temperatures, such as exposed to direct sunlight or near hot stove, or immediately after operating the<br />
battery. These conditions can shorten the battery life or travel distance. If the temperature of the battery increases significantly as a result of<br />
direct heating, it might become unusable.<br />
The self-discharge rate is lower than that of the conventional batteries. Nonetheless, a battery that is completely discharged will suffer<br />
accelerated deterioration. If you do not ride the Pedelec for a period of 3 months or more, remove the battery from the vehicle and place it<br />
apart. Store it indoors, in cool (10-20 °C), dry area.<br />
The Li-ion battery does not operate well at high temperature.<br />
Do not store the battery at high temperatures such as inside an automobile exposed to direct sunlight or near to any kind of heating device.<br />
Do not charge a battery that is fully charged.<br />
The necessity of replacing the battery depends on the usage of the pedelec, external temperature, and charging method. If the travel distance<br />
per charge becomes considerably shorter than normal; it is time to replace the battery.<br />
Olimpia Bicycle Ltd. – www.gepida.eu 23
<strong>Gepida</strong> <strong>Reptila</strong> <strong>1100</strong> – Instruction Manual 24<br />
Battery characteristics<br />
After 350 to 450 charging cycles the capacity of the battery decreases to approximately the half of the new battery. This average is calculated<br />
on the basis of a usage at general road conditions, and an annual 200 charging cycles at 25 °C.<br />
The necessity of replacing the battery depends on storage conditions, charging temperature, riding conditions, and external temperature. The<br />
replacement interval might be shorter than the above stated if the battery is used under unfavourable conditions.<br />
The Li-ion batteries are recyclable. When a used battery is due for replacement, you can have it recycled by the dealer. By taking this little<br />
effort, you can contribute to a sustainable development of the planet.<br />
Olimpia Bicycle Ltd. – www.gepida.eu 24
<strong>Gepida</strong> <strong>Reptila</strong> <strong>1100</strong> – Instruction Manual 25<br />
Before charging the battery<br />
Do not use the power cord if it is damaged.<br />
Keep the charger away from pets and the reach of children in order to avoid injuries.<br />
Never use the charger to charge other electrical appliances.<br />
Do not handle the power plug for charger with wet hands nor touch the contacts of<br />
charger.<br />
Do not touch the charger or the battery for long time during charging.<br />
The temperature of the charger might reach 40 °C to 60 °C during charging.<br />
Be sure to use the original Pedelec charger, because other chargers a likely to cause<br />
unrecoverable damage to the battery.<br />
Olimpia Bicycle Ltd. – www.gepida.eu 25
Before charging the battery<br />
Place the charger on a flat and stable surface.<br />
Avoid dropping the charger.<br />
Do not place any objects on or cover the charger during charging.<br />
Do not step on the charger.<br />
Make sure the contact points of the charger and the battery are clean and dry.<br />
Do not touch the contact points with metal object.<br />
Unplug the charger when not in use.<br />
Do not expose the charger to water, moisture or excessive humidity.<br />
Do not charge the battery near gasoline or other flammable materials.
<strong>Gepida</strong> <strong>Reptila</strong> <strong>1100</strong> – Instruction Manual 27<br />
Charging<br />
The optimum temperature for charging the battery is between 15 °C -25 °C. The internal temperature of the battery can be higher immediately<br />
after a ride or if the battery is exposed to direct sunlight. This can result in the internal temperature of the battery exceeding the specified<br />
starting charging temperature, which prevents it from being charged. To cool down the internal battery temperature, to a level that enables<br />
the charger to start charging, can take up to approximately 3 hours when the room temperature is 30 °C.<br />
. Choose a location that meets the following conditions for charging:<br />
Flat and stable surface<br />
Dry place<br />
Well-ventillated and without excessive humidity<br />
Out of reach of children or pets<br />
Room temperature between 15 °C and 25 °C<br />
Even though charging might start normally, it will terminate automatically in case the temperature<br />
falls below 20 °C, or rises above 30°C.<br />
Olimpia Bicycle Ltd. – www.gepida.eu 27
<strong>Gepida</strong> <strong>Reptila</strong> <strong>1100</strong> – Instruction Manual 28<br />
Charging<br />
There are two ways of charging:<br />
1. Connecting the charger to the battery directly.<br />
2. Leaving the battery in the console of the pedelec, and charging it<br />
via the carrier console.<br />
The remaining capacity of the battery pack can be checked any time<br />
by pressing the button on the left side (as shown in the picture).<br />
Each LED indicates about 20% of the overall capacity of the battery pack.<br />
If the battery pack is on the charger, it indicates the charging process with<br />
the green LEDs „running”. When the LEDs stop running, it means the process<br />
has ended and the battery pack is fully charged.<br />
Now you can unplug the charger.<br />
The batteries are protected against overcharging.<br />
Olimpia Bicycle Ltd. – www.gepida.eu 28
<strong>Gepida</strong> <strong>Reptila</strong> <strong>1100</strong> – Instruction Manual 29<br />
Specifications of <strong>Gepida</strong> Battery Pack<br />
Item<br />
Nominal Capacity<br />
Nominal Charging Voltage<br />
Nominal Output Potential<br />
Charging Current<br />
Charging Time<br />
Operating Current Range<br />
Specification<br />
6000 mAh<br />
42 V<br />
36.5 V<br />
1400 mAh<br />
4.5 hours<br />
max. 10 A<br />
Weight<br />
Dimensions<br />
2.44 kg<br />
Lenght: 173 mm<br />
Width: 100 mm<br />
Height: 105 mm<br />
Operating Temperature Charge: 0 to 45 °C<br />
Storage Temperature 10 - 20 °C<br />
Olimpia Bicycle Ltd. – www.gepida.eu 29
<strong>Gepida</strong> <strong>Reptila</strong> <strong>1100</strong> – Instruction Manual 30<br />
Specifications of <strong>Gepida</strong> Battery Pack<br />
Temperature Dependence of Discharge Capacity<br />
Discharge<br />
Temperature<br />
-10 °C 0 °C 25 °C 45 °C<br />
Relative Capacity 50 % 70 % 100 % 100 %<br />
Temperature Dependence of Charge Capacity<br />
Charge<br />
Temperature<br />
- 0 °C 25 °C 45 °C<br />
Relative Capacity - 80 % 100 % 100 %<br />
Olimpia Bicycle Ltd. – www.gepida.eu 30
<strong>Gepida</strong> <strong>Reptila</strong> <strong>1100</strong> – Instruction Manual 31<br />
Specifications of Accessories<br />
3 Phase Motor<br />
Nominal Input Potencial:<br />
Maximum Input Power:<br />
Weight:<br />
36 V<br />
250 W<br />
3.2 kg<br />
Energy Bus connector<br />
Support Nominal 36 V DC and High Speed Can-Bus interface<br />
High Speed Can-Bus interface (125 kBits/s)<br />
TJA 1040 (max.: 1 Mbit/s)<br />
Current Consumption in sleep mode<br />
Less than 500 µAmps<br />
Quality requirements<br />
According to ISO 9001<br />
Olimpia Bicycle Ltd. – www.gepida.eu 31
<strong>Gepida</strong> <strong>Reptila</strong> <strong>1100</strong> – Instruction Manual 32<br />
Features of the Control Unit<br />
1. To turn the control unit on, press the lower-right button<br />
and hold it for one second.<br />
2. If the bicycle icon is flashing, that means the battery pack<br />
is not fitted properly. This means you will not have the<br />
assistance! In this case the remaining distance meter is<br />
empty as well.<br />
3. If the bike sign is permanently visible and you see a<br />
remaining distance value, the assist system is ready for<br />
operation. Now you can adjust the assistance level for your<br />
convenience. Use the left (decrease) and right (increase) arrow<br />
buttons. However you can also change the assist level<br />
during riding.<br />
4. Final step, you should check the light and set them<br />
on\off\auto mode with the lower left button.<br />
5. Now you are ready to go!<br />
Olimpia Bicycle Ltd. – www.gepida.eu 32
<strong>Gepida</strong> <strong>Reptila</strong> <strong>1100</strong> – Instruction Manual 33<br />
Features of the Control Unit<br />
1. To reach the secondary functions of the Control Unit,<br />
press the middle button and hold it for 1 second.<br />
2. Now, by pressing the left arrow button, you can switch<br />
between the following data (holding it for 1.5 sec to reset):<br />
- Total distance<br />
- Average speed<br />
- Maximum speed<br />
3. Pressing the right arrow button will start the stop-watch<br />
and pressing again will stop it. To reset the stop-watch,<br />
hold the button for 1.5 second.<br />
4. To return to primary functions, press the middle button<br />
again (do not hold it).<br />
5. For further details about the control unit, check<br />
Appendix B.<br />
Olimpia Bicycle Ltd. – www.gepida.eu 33
<strong>Gepida</strong> <strong>Reptila</strong> <strong>1100</strong> – Instruction Manual 34<br />
<strong>Gepida</strong> Automatic Reduction System<br />
There are 10 different assist levels for you to be able to use the pedelec always at your convenience. If the battery charge status is less than<br />
35% the <strong>Gepida</strong> Automatic Reduction System lowers the assistance ratio down to the optimum level ensuring maximum range with assistance.<br />
When the system turns on, the change in the assist level becomes immediately visible on the display.<br />
Olimpia Bicycle Ltd. – www.gepida.eu 34
<strong>Gepida</strong> <strong>Reptila</strong> <strong>1100</strong> – Instruction Manual 35<br />
GPDS system<br />
The assistance is switched on by the speed sensor soon after you start pedaling the bicycle. So when the pedelec starts moving, you will<br />
instantly experience the assistance. The reason why the assistance does not start immediately when pressing the pedal is to avoid accident for<br />
instance in case you just put your foot back on the pedal at the traffic light. That is why the system is set in a way that the speed senson must<br />
capture a minimal speed to turn the assistance on. When the assistance is on, ride the bicycle just like a regular one. The power and the<br />
duration of the assist force depends on two factors:<br />
1. How strong you push the pedal.<br />
This is captured by the special torque sensor, and is very important at accelerations, when usually a higher pedal force is needed, so the assist<br />
force will be higher as well.<br />
2. Which assist level the pedelec is used on.<br />
This factor is more important after the starting period, when you want to keep a desired speed during the ride. If you wish a higher travelling<br />
speed, just raise the assistance level on the control unit. The torque sensor will still work at this part though, so if you press the pedal harder,<br />
the assist force will raise allowing an easy acceleration.<br />
Warning!<br />
If the assistance level is set to maximum or near, be cautious when accelerating! In this case, the assist force is really high that may „pull” the bicycle<br />
from under you, which may lead to accidents and/or injuries.<br />
Olimpia Bicycle Ltd. – www.gepida.eu 35
<strong>Gepida</strong> <strong>Reptila</strong> <strong>1100</strong> – Instruction Manual 36<br />
Range at different assist levels<br />
Assist Level 10<br />
AL5<br />
AL4<br />
AL3<br />
AL2<br />
AL1<br />
Assist Level 9<br />
AL5<br />
AL4<br />
AL3<br />
AL2<br />
AL1<br />
Assist Level 8<br />
AL5<br />
AL4<br />
AL3<br />
AL2<br />
AL1<br />
Assist Level 7<br />
AL5<br />
AL4<br />
AL3<br />
AL2<br />
AL1<br />
Assit Level 6<br />
AL5<br />
AL4<br />
AL3<br />
AL2<br />
AL1<br />
AL5<br />
AL4<br />
AL3<br />
AL2<br />
AL1<br />
AL4<br />
AL3<br />
AL2<br />
AL1<br />
AL3<br />
AL2<br />
AL1<br />
AL2<br />
AL1<br />
AL1<br />
Total distance 60 km<br />
Olimpia Bicycle Ltd. – www.gepida.eu 36
<strong>Gepida</strong> <strong>Reptila</strong> <strong>1100</strong> – Instruction Manual 37<br />
Conditions that can influence travel distance<br />
Frequent stop-and-go<br />
Heavy loads<br />
Steep uphills<br />
Poor road conditions<br />
Strong headwins<br />
Low tire inflation pressure<br />
Low ambient temperature<br />
Low battery performance<br />
Olimpia Bicycle Ltd. – www.gepida.eu 37
<strong>Gepida</strong> <strong>Reptila</strong> <strong>1100</strong> – Instruction Manual 38<br />
Winter Useage<br />
The nature of the Li-ion batteries changes when used and stored at low temperatures. In such a case the capacity of the battery diminishes<br />
compared to its nominal capacity (at the optimal temperature 15-20°C). This change can be observed already during the first ride under 10°C<br />
that may manifest in the reduced range of the pedelec or in the automatic switch off the assistance on lower assist levels (1-4). The capacity of<br />
the used/stored battery reduces by approx. 30-60%. at around 0°C.<br />
Therefore in wintertime you shall consider the following few easy steps below to extend the riding experience provided by your GPDS pedelec.<br />
Winter storage: The recommended conditions to store the battery are between 15-20 °C in dry place, thus the battery is immediately ready to<br />
be used when charged. It is also possible to store the battery at low temperature.<br />
Winter charging: Even if the battery was used or stored in cold, it must be let reaching and keeping room temperature (approx. 20°C) for<br />
approx. 1 hour before charging. The charging at inappropriate temperature can cause low efficiency and ultimately damage the cells of the<br />
battery. The recommended external temperature for charging is approximately 20°C.<br />
Winter usage: If you are using your pedelec in cold temperature, please make sure to put the battery into the console only right before leaving,<br />
until then try to keep it at a warm place as much as it is possible. When riding around 0°C the battery cells cool down below optimal<br />
temperature in about 1 hour, that is enough to travel 10-15 km by using the 10th assist level.<br />
During this shortened time you should use the assist system on the maximum assist level (10) in order to take advantage of the optimum<br />
battery capacity. With the temperature decreasing the output efficiency of the battery is proportionally reduces.<br />
If you interrupt your ride try to take the battery to a warm place until you continue your ride.<br />
It is recommended to use only one battery at a time and keep the other at warm place if possible.<br />
The decrease of the range can be observed at every assist level, while in lower assist levels the battery safety functions might switch the<br />
assistance off.<br />
Olimpia Bicycle Ltd. – www.gepida.eu 38
<strong>Gepida</strong> <strong>Reptila</strong> <strong>1100</strong> – Instruction Manual 39<br />
<strong>Gepida</strong> Security System<br />
The GPDS Software contains all specialized security tools that are necessary for a safe ride.<br />
The electric engine switches off at 25 km/h and the assistance stops as at the same speed as well.<br />
Lights remain in operation for about 1 hour after the battery has been discharged.<br />
The engine turns off when the temperature reaches a limit value so to avoid the irreversible damage of the engine.<br />
You might notice during the ride that the engine makes a quiet noise; this is normal and not considered a malfunction.<br />
Olimpia Bicycle Ltd. – www.gepida.eu 39
<strong>Gepida</strong> <strong>Reptila</strong> <strong>1100</strong> – Instruction Manual 40<br />
GPDS Assist System Description<br />
The <strong>Gepida</strong> electric bicycle uses the following levels of assistance:<br />
Zero Assist Level: At this stage there is no electric power assistance, but all other functions are available on display (lights, speed, etc).<br />
1-7th Assist Level: This is the ideal interval for urban use, and longer-term biking.<br />
Level 1 supports approximately 10% power assistance which is the most economical and energy saver option for planning a longer journey.<br />
From level 1 up to 7th assist level increases steadily, the power assist provides a convenient and energetic biking. Certainly, the use of higher<br />
assist level decreases the maximum range.<br />
8-10th Assist Level: These 3 levels should be used when the terrain conditions are harsher (eg. uphill). The 3-step Dynamic Allocation: Low,<br />
Middle and High. There is no time delay on these levels, which means that even the slightest pedal force is enough for a powerful assistance<br />
but it is also the least energy-efficient option.<br />
Olimpia Bicycle Ltd. – www.gepida.eu 40
<strong>Gepida</strong> <strong>Reptila</strong> <strong>1100</strong> – Instruction Manual 41<br />
Operation of the lamps<br />
There are two operation modes of the lights:<br />
1. Normal operation: When this is on, the lights<br />
are continuously on.<br />
2. Automatic mode: When this is on, the switching<br />
of the lights is controlled by the built-in sensor.<br />
- You can switch between the three states<br />
(on\off\auto) by pressing the lower-left button<br />
on the control unit.<br />
- The actual status icon of the lights is shown on the<br />
left side of the panel.<br />
- The light sensor is placed between the two lower<br />
buttons. Keep it clean and dry for optimal operation!<br />
- For safety reasons, the rear light will remain in<br />
operation for 5 minutes, after you have<br />
stopped and turned the assist system off.<br />
Olimpia Bicycle Ltd. – www.gepida.eu 41
<strong>Gepida</strong> <strong>Reptila</strong> <strong>1100</strong> – Instruction Manual 42<br />
Special issues regarding the pedelec<br />
Basically a pedal assisted bicycle (Pedelec) can almost be used as a regular bike. However, there are a few things that you should keep in mind,<br />
if you have a pedelec:<br />
- Keep your battery pack(s) charged if possible, to have the advantage of the assistance.<br />
- You have the option to leave your battery pack(s) at home, thus using your pedelec as a normal bicycle, but you have to<br />
mind the following:<br />
1. If there is no battery pack in the bicycle, lights will operate only with the help of the dynamo.<br />
2. Since the battery pack is required for the control unit to work, you will not even have basic information available such<br />
as time, actual speed, distance ridden, etc.<br />
- Brake efficiency might be different to a normal bike.<br />
Attention!<br />
Since the assist system means a significant extra weight to the bike, in some cases the performance of the brakes may be less, compared to a normal bike.<br />
Always keep this in mind when riding!<br />
Olimpia Bicycle Ltd. – www.gepida.eu 42
<strong>Gepida</strong> <strong>Reptila</strong> <strong>1100</strong> – Instruction Manual 43<br />
Things to do before starting<br />
1. Check the charge level of the battery pack(s) and choose your route accordingly.<br />
2. Ensure the connections of the battery pack and the consol are clean and dry!<br />
3. Put the battery pack into the consol, then check if it is fastened (mind the holders of the carrier).<br />
4. Lock it with the key.<br />
5. Open the rear wheel-lock with the same key (lock is optional).<br />
6. Turn the control unit ON (by pressing and holding the lower-right button).<br />
7. Check if the control unit operates properly.<br />
8. Check if any of the warning-signs is lighting (if it is so, read Appendix A: Troubleshooting for further instructions).<br />
9. Check the lights (it is in automatic mode by default, but you can change it with the lower-left button).<br />
Olimpia Bicycle Ltd. – www.gepida.eu 43
<strong>Gepida</strong> <strong>Reptila</strong> <strong>1100</strong> – Instruction Manual 44<br />
How to start to ride the Pedelec<br />
1. After raising the stand, mount the saddle, and place one foot on the pedal in order to prepare for the start-off. Before start, check the<br />
traffic around you and slowly press on the pedal. The assist system will start off immediately when the speed sensor captures the<br />
motion of the pedelec.<br />
2. Practice riding in a safe location such as an empty lot or public park. Familiarize yourself with the characteristics of the power assist<br />
system before riding in real traffic conditions. Start with the lower assist levels in order to gradually get used to riding a pedelec.<br />
Do not ride on one pedal (to get the bicycle in motion and mount once in motion). It can cause injury and accident.<br />
Olimpia Bicycle Ltd. – www.gepida.eu 44
<strong>Gepida</strong> <strong>Reptila</strong> <strong>1100</strong> – Instruction Manual 45<br />
Cleaning<br />
Do not expose the Pedelec to direct water pressure such as by washing it with a steam cleaner or high pressure water hose.<br />
Never apply wax to rubber parts such as tires and brake shoes. This can impair the effectiveness of the brakes.<br />
To clean the battery area use a dry cloth to wipe the dirt off. Never use water to clean the battery.<br />
Do not polish the contact points nor use any object to clean them. This can cause damage, injury or electric shock.<br />
Never use gasoline, or highly acidic cleaner, or others solvents. They can cause the material to crack.<br />
Olimpia Bicycle Ltd. – www.gepida.eu 45
<strong>Gepida</strong> <strong>Reptila</strong> <strong>1100</strong> – Instruction Manual 46<br />
Appendix A: Troubleshooting<br />
Symptom<br />
Advice<br />
The Control Unit would not turn on (After pressing and holding<br />
down the lower-right button).<br />
- Check if there is a battery pack in the bicycle if so, make sure<br />
the battery pack is locked in the console properly.<br />
- Check the battery pack is not discharged. If it is, change it to a<br />
recharged one.<br />
Bicycle icon is flashing and the charge level meter is empty on the<br />
Control Unit.<br />
- No communication detected between the bike and the battery<br />
pack. Take the battery pack out and put it back again.<br />
No assist power experienced. (The bicycle icon is visible and the<br />
charge level meter is not empty).<br />
- Check the assistance level meter on the Control Unit. If it is<br />
empty, increase the assist level with the right arrow button.<br />
- Reset the torque sensor. (see at Appendix B)<br />
The assist power becomes insufficient in a low-temperature<br />
environment in winter.<br />
- If the battery temperature becomes low, a safety function is<br />
activated to prevent the battery from deterioration.<br />
Olimpia Bicycle Ltd. – www.gepida.eu 46
<strong>Gepida</strong> <strong>Reptila</strong> <strong>1100</strong> – Instruction Manual 47<br />
Symptom<br />
Advice<br />
The assist power becomes insufficient in a high-temperature<br />
environment during summer.<br />
- If the battery temperature becomes high, a safety function is<br />
activated to prevent the battery from deteriorating.<br />
The assist power becomes insufficient when riding on steep uphill<br />
continuously<br />
- When riding on steep slope continuously, the battery<br />
temperature increases and it may reach a temperature level at<br />
which the safety function is activated to stop the discharge<br />
method to prevent the battery from deterioration.<br />
Assist power weakens rapidly (within normal circumstances). - The battery pack may have become deteriorated.<br />
Remaining distance seems to be decreasing rapidly. - Decrease the assist level of shift to a lower gear to decrease<br />
pedal torque.<br />
Olimpia Bicycle Ltd. – www.gepida.eu 47
<strong>Gepida</strong> <strong>Reptila</strong> <strong>1100</strong> – Instruction Manual 48<br />
Symptom<br />
Explanation, advices<br />
Lights do not operate in on\auto mode, plus the red Lamp Indicator<br />
icon appears.<br />
- The cable connectors by the front or rear light may have<br />
become loose. If it has, reconnect the loose cable.<br />
Lights remain in operation in a luminous environment while in auto<br />
mode.<br />
- Check if the light sensor built in the control unit is not wet or<br />
dirty. If it is, please clean it.<br />
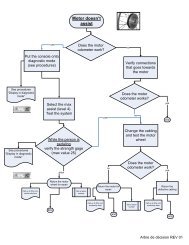
No assist power experienced, plus the red motor indicator icon<br />
appears.<br />
- Check if the cables by the front hub are connected properly, if<br />
not, reconnect the loose cable.<br />
Charging does not work, plus the red charger indicator icon appears. - Your charger might have to be replaced.<br />
Olimpia Bicycle Ltd. – www.gepida.eu 48
<strong>Gepida</strong> <strong>Reptila</strong> <strong>1100</strong> – Instruction Manual 49<br />
Symptom<br />
Advice<br />
No assist power experienced, plus the red sensor indicator icon<br />
appears.<br />
- Reset the sensor. (Check Appendix B)<br />
- The torque sensor might have gone wrong or needs<br />
recalibration.<br />
The assist power seems unusual or wobbly, plus the red sensor<br />
indicator icon appears.<br />
- Reset the sensor. (Check Appendix B)<br />
- The torque sensor needs recalibration.<br />
The red LEFT battery indicator icon appears. - <strong>Electric</strong> failure occurred in the left side battery pack.<br />
The red RIGHT battery indicator icon appears. - Electronic failure occurred in the right side battery pack.<br />
Olimpia Bicycle Ltd. – www.gepida.eu 49
<strong>Gepida</strong> <strong>Reptila</strong> <strong>1100</strong> – Instruction Manual 50<br />
Symptom<br />
Advice<br />
Reduced capacity of the battery. Decreasing range. - The battery pack has exceeded its guaranteed life period. The<br />
capacity will be lower than 70%.<br />
The battery pack is unchargable and the cell mismatch value is<br />
bigger than 0.2 volts.<br />
- Temporary short-circuit may have occurred in the cell(s). If the<br />
problem persists, the battery pack needs to be replaced.<br />
The battery pack is unchargable and one or more of the cells has<br />
extreme voltage value (0,5 volts difference to the rest).<br />
- Temporary short-circuit may have occurred in the cell(s). If the<br />
problem persists, the battery pack needs to be replaced.<br />
Attention!<br />
In case you encounter any kind of problem that is not listed in this troubleshooting or you can not find the answer to your question in this<br />
manual, please contact your dealer for further help and information!<br />
Olimpia Bicycle Ltd. – www.gepida.eu 50
<strong>Gepida</strong> <strong>Reptila</strong> <strong>1100</strong> – Instruction Manual 51<br />
Appendix B: Control Unit function chart<br />
Assist bar: 1-7 blocks: Normal usage for city biking (larger range)<br />
8-10 blocks: Heavy usage for uphill riding (smaller range)<br />
Olimpia Bicycle Ltd. – www.gepida.eu 51
<strong>Gepida</strong> <strong>Reptila</strong> <strong>1100</strong> – Instruction Manual 52<br />
Primary functions of the display<br />
Press<br />
for 1 sec to turn the display on<br />
Current functions:<br />
Remaining range<br />
Speed<br />
Bike icon<br />
Assit bar<br />
Parameters<br />
Watch/Stop watch<br />
Assist bars<br />
Press for 1 sec to turn off the display Change assist level by pressing:<br />
Olimpia Bicycle Ltd. – www.gepida.eu 52
<strong>Gepida</strong> <strong>Reptila</strong> <strong>1100</strong> – Instruction Manual 53<br />
Secondary functions of the display<br />
(secondary functions are accessible from primary functions screen)<br />
Press<br />
for 1 sec to access secondary functions<br />
Stop watch<br />
Press<br />
to start/stop stop-watch<br />
To reset stop-watch press it for more than 1.5 sec.<br />
Secondary data (total-, daily mileage, average-, maximum speed)<br />
Press<br />
to switch to secondary data.<br />
To reset each figure hold it for more than 1.5 sec.<br />
Press<br />
to go back to basic function.<br />
Olimpia Bicycle Ltd. – www.gepida.eu 53
<strong>Gepida</strong> <strong>Reptila</strong> <strong>1100</strong> – Instruction Manual 54<br />
Settings (3rd level functions) of the display<br />
Press<br />
for 10 sec to access 3rd function<br />
Press to decrease press to increase the value.<br />
Set time:<br />
hour (hh) min (mm)<br />
Press to set time value<br />
Press<br />
Press<br />
to set lamp mode<br />
to change hour/min/sec<br />
Lamp mode: Auto mode, On, Off<br />
Press<br />
to set auto mode/on/off<br />
Press<br />
to set display backlight<br />
Display backlight<br />
Olimpia Bicycle Ltd. – www.gepida.eu 54
<strong>Gepida</strong> <strong>Reptila</strong> <strong>1100</strong> – Instruction Manual 55<br />
Settings (3rd level) functions of the display<br />
Display backlight:<br />
Press to decrease and press to<br />
increase the value.<br />
Press<br />
to set mileage unit.<br />
Set unit: km - mile<br />
Press<br />
to set km/mile units<br />
Press<br />
back to Primary functions<br />
Olimpia Bicycle Ltd. – www.gepida.eu 55
<strong>Gepida</strong> <strong>Reptila</strong> <strong>1100</strong> – Instruction Manual 56<br />
Service Function A<br />
The Service Function is accessible from Primary Functions screen<br />
Press and hold together for more than 2 seconds.<br />
Sensor-setting<br />
During the sensor-setting the sensor indicator is flashing 3 times.<br />
After a successful sensor-setting the indicator light turns off,<br />
however if the error persists, the light remains on.<br />
Olimpia Bicycle Ltd. – www.gepida.eu 56
<strong>Gepida</strong> <strong>Reptila</strong> <strong>1100</strong> – Instruction Manual 57<br />
Service function B<br />
The Service Function is accessible from Primary Functions screen<br />
Press and hold<br />
together for more than 5 sec.<br />
LCD test<br />
To turn all display segments on press<br />
To quit to Primary Functions press<br />
After 10 seconds the Service Function automatically switch to Primary Functions screen.<br />
Olimpia Bicycle Ltd. – www.gepida.eu 57
<strong>Gepida</strong> <strong>Reptila</strong> <strong>1100</strong> – Instruction Manual 58<br />
Indicator LED’s<br />
The Indicator leds can indicate the below malfunctions.<br />
Malfunctions<br />
Sensor Failure<br />
Battery Left Failure<br />
Battery Right Failure<br />
Charging Failure<br />
Light Failure<br />
Motor Controller Failure<br />
Olimpia Bicycle Ltd. – www.gepida.eu 58
<strong>Gepida</strong> <strong>Reptila</strong> <strong>1100</strong> – Instruction Manual 59<br />
Charging<br />
The Charging mode on the screen.<br />
Battery Charge bars until the battery is fully charged.<br />
Olimpia Bicycle Ltd. – www.gepida.eu 59
<strong>Gepida</strong> <strong>Reptila</strong> <strong>1100</strong> – Instruction Manual 60<br />
Appendix C: Removing the front wheel<br />
1. Prepare the bike for the wheel removal.<br />
2. Set the brake cable free.<br />
3. Take the motor connector box off, by removing<br />
the (3mm Torx) screws.<br />
Olimpia Bicycle Ltd. – www.gepida.eu 60
<strong>Gepida</strong> <strong>Reptila</strong> <strong>1100</strong> – Instruction Manual 61<br />
4. Disassemble the connectors by pressing<br />
the connector clips.<br />
5. Loosen the wheel screws on the<br />
connector side.<br />
6. Pull the connector holder plate gently off.<br />
Olimpia Bicycle Ltd. – www.gepida.eu 61
<strong>Gepida</strong> <strong>Reptila</strong> <strong>1100</strong> – Instruction Manual 62<br />
7. Loose the wheel screw on the other side and<br />
the wheel can be removed in the usual way.<br />
8. Take care for the positioning of anti-turn<br />
backstay when putting the wheel back.<br />
Olimpia Bicycle Ltd. – www.gepida.eu 62
<strong>Gepida</strong> <strong>Reptila</strong> <strong>1100</strong> – Instruction Manual 63<br />
9. Mind the position and direction of the connector<br />
holder plate when putting it back.<br />
10. Re-install the brake cable.<br />
Warning!<br />
Leaving the brake cable uninstalled, may lead to<br />
serious accidents and/or injuries!<br />
Olimpia Bicycle Ltd. – www.gepida.eu 63
<strong>Gepida</strong> <strong>Reptila</strong> <strong>1100</strong> – Instruction Manual 64<br />
Company contact information<br />
Factory and office:<br />
OLIMPIA BICYCLE Ltd.<br />
H-1164 Budapest<br />
Ostorhegy str. 4.<br />
Hungary<br />
Phone: +36\1\400-6065<br />
Fax: +36\1\402-0084<br />
E-mail: office@gepida.hu<br />
Web:<br />
www.gepida.eu<br />
Olimpia Bicycle Ltd. – www.gepida.eu 64