
You also want an ePaper? Increase the reach of your titles
YUMPU automatically turns print PDFs into web optimized ePapers that Google loves.
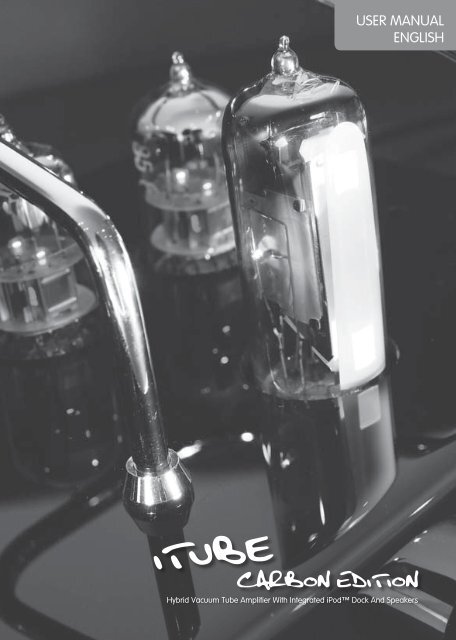
user manual<br />
english<br />
ITube<br />
<strong>Carbon</strong> <strong>EDITIon</strong><br />
hybrid Vacuum Tube amplifier With integrated iPod Dock and speakers
Contents<br />
Page<br />
Kit contents ............................... 3<br />
Safety instructions ......................... 4<br />
Amplifier controls.......................... 5<br />
Remote control............................ 6<br />
Amplifier connections ..................... 7<br />
How to use ................................ 8<br />
Maintenance .............................. 9<br />
Troubleshooting.......................... 10<br />
Specifications............................. 12<br />
Service ................................... 12<br />
Congratulations on your choice of the Fatman iTube by TL Audio.<br />
We have used years of audio engineering experience to bring you a<br />
product that will truly enhance your listening experience.<br />
In order to obtain the best performance from this system please read<br />
this owners manual thoroughly and use your iTube only in accordance<br />
with its instructions.<br />
2<br />
ITube<br />
<strong>Carbon</strong> <strong>EDITIon</strong>
user manual<br />
English<br />
Kit Contents<br />
• iTube Vacuum Tube Amplifier with iPod dock<br />
• High quality directional speaker cables<br />
• Aux source audio cable for connection of portable media devices (Phone/MP3/CD) and Computer<br />
• Video cable to connect between amplifier and TV screen<br />
• Fatman sonically matched speakers for optimum performance<br />
3
Safety Instructions<br />
Please read the following precautions before attempting<br />
to operate the iTube.<br />
• Read instructions - All safety and operating<br />
instructions should be read thoroughly before<br />
attempting to operate the Fatman iTube<br />
• Retain Instructions in a safe place for future reference<br />
• Follow all instructions detailed in this manual<br />
• Observe all safety warnings given in this manual<br />
• This unit should NOT be situated in close proximity to<br />
water. Avoid placement near bathtubs, sinks, washing<br />
machines, swimming pool, etc.<br />
• Avoid exposure to direct sunlight or to extremes of<br />
temperature or humidity<br />
• Do not place near direct heat sources such as<br />
radiators, stoves, gas fires, naked flames or candles.<br />
• Ensure that the unit is placed on a clean, dry and flat<br />
surface before operation<br />
• Do not drop unit, apply excessive force to the<br />
controls or place heavy objects on top of the unit.<br />
• Do not allow excessive levels of dust to gather on the<br />
iTube<br />
• To clean, use a soft dry cloth. If necessary, use a damp<br />
cloth without any solvents<br />
• Ensure that the area in which the unit is situated<br />
has adequate ventilation. Do not place the iTube<br />
in a position where its ventilation may become<br />
obstructed. Avoid placement on beds, sofas, rugs,<br />
enclosed bookcases / cabinets and any other area<br />
which may cause interference to the ventilation of<br />
the product thus causing it to overheat<br />
• Ensure that the unit is connected to the correct<br />
power supply as indicated on the unit. Unplug the<br />
iTube when not in use for a long period. Always<br />
make sure power cables are placed safely and are not<br />
obstructing a walkway<br />
• This product can get hot. Do not touch the tubes<br />
and keep away from babies and children<br />
• To avoid risk of electric shock, do not attempt to<br />
remover the cover or the back of unit - there are no<br />
user serviceable parts<br />
• When this product is moved from a cool to a warm<br />
place, condensation may occur on the surface of<br />
the vacuum tube. In this instance, please allow 1<br />
hour before attempting to operate the unit. This will<br />
avoid leakage or blowout of the vacuum tube due to<br />
sudden heat<br />
• The iTube should be serviced by an authorised<br />
service engineer in the event of any of the following<br />
circumstances<br />
1. The power supply or cord sustains damage<br />
2. The unit is struck by a falling object<br />
3. The unit is exposed to rain or moisture.<br />
4. Liquid is inadvertently spilt on the unit<br />
5. The unit does not seem to operate normally or<br />
exhibits a sudden change in performance<br />
6.The unit has been dropped<br />
• Any unauthorised changes or modifications to<br />
this equipment would render the manufacturer’s<br />
warranty null and void<br />
4<br />
ITube<br />
<strong>Carbon</strong> <strong>EDITIon</strong>
user manual<br />
English<br />
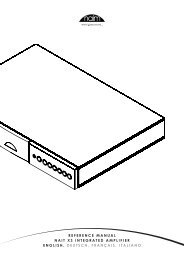
Amplifier controls<br />
Input select IR receiver LED Power button<br />
Volume<br />
FRONT PANEL<br />
The indicator light above the power switch will illuminate when the power is ON. To switch power OFF,<br />
simply turn switch in the alternate direction. Before switching on the power, please set the volume control<br />
to a low setting to avoid damage to your speakers. Please note that a speaker protection circuit will mute<br />
speaker sound for a few seconds after power is switched ON.<br />
Rear Panel<br />
NOTE:<br />
Speaker Outputs<br />
AC Power Input<br />
Although product is pictured without the cage cover, the cage<br />
covering the tubes must be in place during operation. This product<br />
can get hot. Keep away from babies and children<br />
S-Video Output Line Inputs<br />
Composite Video Output<br />
! !<br />
ATTENTION:<br />
Your iTube should only be<br />
re-started 5 minutes after switching off, to<br />
avoid damaging the tubes.<br />
5
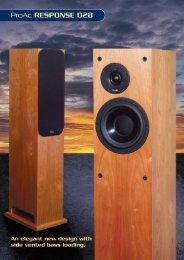
Remote Control<br />
Next/Fast<br />
Foward<br />
Stop<br />
Select<br />
Down<br />
menu<br />
Menu<br />
Back<br />
Light<br />
Mute<br />
Play /<br />
Pause<br />
Power<br />
Button<br />
Previous/<br />
Rewind<br />
Repeat<br />
Shuffle<br />
Up<br />
Menu<br />
Volume<br />
Bass<br />
Treble<br />
Control speaker functions<br />
Power Button<br />
Master Volume<br />
Press to turn on the iTube,<br />
power indicator will illuminate.<br />
Press the “+” button to increase<br />
master volume<br />
Control iPod functions<br />
When an iPod is docked into the dock and dock is turned<br />
on, some iPod functions can be controlled using the<br />
speaker system’s remote control.<br />
Treble Volume<br />
Press the “-” button to decrease<br />
master volume<br />
Press the “+” button to increase<br />
treble volume<br />
Press the “-” button to decrease<br />
treble volume<br />
Play/Pause song<br />
Turn off iPod<br />
Skip to next song<br />
Start a song again<br />
Play previous song<br />
Press play/pause button<br />
Press and hold play button<br />
Press next/fast forward<br />
Press previous/rewind<br />
Press previous/rewind twice<br />
Bass Volume<br />
Press the “+” button to increase<br />
bass volume<br />
Press the “-” button to decrease<br />
bass volume<br />
Fast forward song<br />
Rewind a song<br />
Press and hold next/fast forward<br />
Press and hold previous/rewind<br />
6<br />
ITube<br />
<strong>Carbon</strong> <strong>EDITIon</strong>
user manual<br />
English<br />
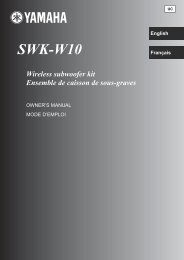
iTube <strong>Carbon</strong> Edition Connections<br />
7
How to Use<br />
Connections<br />
• Before attempting to make any connections to<br />
or from the iTube firstly ensure that the iTube<br />
and all connecting devices are switched OFF.<br />
• When making connections to other devices<br />
from the iTube, take the time to ensure that<br />
they are correct. For instance, (L) Left to (L) left,<br />
and (R) right to (R) right.<br />
• Make sure connecting pins on wires are clean<br />
and dust free and that all connectors are<br />
inserted into the iTube fully and correctly.<br />
• Always turn both the power switches to the<br />
OFF position on the units when connecting or<br />
disconnecting the iTube tube amp or the power<br />
supply.<br />
Power<br />
• Do not switch on the iTube or mains supply<br />
until after you have connected the AC power<br />
adaptor between them. It is recommended<br />
that you disconnect the power supply from the<br />
mains when the unit is in a protracted period<br />
of non-use (when on holiday / travelling for<br />
instance).<br />
Speakers<br />
• When connecting speakers, ensure they have an<br />
impedance of between 4 & 8 ohms.<br />
• Connect the speakers to the terminals using<br />
either the supplied speaker cable (banana plug)<br />
or high quality, bare(stripped) speaker wire.<br />
(Please note that if your speaker wires are not<br />
connected properly you may hear no sound, or<br />
if polarities are reversed, you will hear oddities<br />
in the signal path with an unnatural loss of bass<br />
frequencies.<br />
• When using bare speaker wires, fit at least<br />
1.6mm of insulation inside the speaker terminals<br />
so that no bare wire is visible.<br />
• Make sure the wire holders are firmly screwed in<br />
to prevent wires from becoming loose. If wires<br />
touch each other, the speakers and/or iTube<br />
could be damaged.<br />
8<br />
ITube<br />
<strong>Carbon</strong> <strong>EDITIon</strong>
user manual<br />
English<br />
Maintenance<br />
• Switch off units when out of use<br />
• Allow units to cool completely before cleaning<br />
• Clean using a soft cloth or supplied brush<br />
periodically<br />
• When cleaning the Vacuum tube, take great<br />
care, please only gently shake the tube to take<br />
it down and then install tubes in the same way<br />
after clean<br />
• Do not attempt to clean the products with<br />
chemical solvents - this may damage the finish<br />
of the iTube<br />
9
Troubleshooting<br />
If your iTube fails to operate normally, please check the following points to determine if the fault can be<br />
corrected with one of the simple suggestions below. If you feel your unit is still faulty after reading this,<br />
please contact your authorised dealer or service centre.<br />
SYMPTOM<br />
No Power<br />
- Front LED is off<br />
No Sound from speaker<br />
system<br />
Acoustic image is<br />
unstable, characterised<br />
by unnatural sound and<br />
insufficient low-range<br />
tonal quality<br />
POSSIBLE CAUSE<br />
- Power adaptor is not connected<br />
properly<br />
- Mains supply is off<br />
- If from remote, battery needs<br />
replacing<br />
- Volume control is turned down<br />
- Speakers are not connected<br />
properly<br />
- ‘Input Select’ incorrect<br />
- The positive (+) and<br />
negative (-) polarities of the<br />
iTube and speaker system<br />
are not matched<br />
REMEDY<br />
- Make sure power is firmly plugged in.<br />
- Test with another appliance/different<br />
socket.<br />
- Replace battery<br />
- Turn volume up slowly until desired level<br />
- Check wires are firmly and correctly<br />
inserted<br />
- Ensure that you have control selected to<br />
either iPod dock or Aux, depending on<br />
which you are using.<br />
- Reconnect the speakers ensuring the<br />
polarities are aligned to the iTube<br />
iPod volume does not<br />
increase audio volume<br />
Crackling sound from<br />
speakers<br />
- iPod volume control only controls<br />
volume to the headphone jack<br />
- Bad connection<br />
- A problem with your audio<br />
source<br />
- Use the iTube’s amplifier volume control<br />
when the iPod is docked<br />
- Check connection if iPod is in docking<br />
station, check connection of the 3.5mm<br />
stereo cable. Make sure it is connected<br />
‘line out’ ‘audio out’ or ‘headphone out’ of<br />
your source and NOT ‘speaker out’<br />
- Unplug the 3.5mm stereo cable from<br />
the audio source, then plug it into the<br />
headphone jack of an alternative source<br />
(e.g. CD player, Mp3 player)<br />
10<br />
ITube<br />
<strong>Carbon</strong> <strong>EDITIon</strong>
user manual<br />
English<br />
SYMPTOM<br />
Sound is distorted<br />
Radio Interference<br />
Remote control doesn’t<br />
work<br />
TV can not display<br />
POSSIBLE CAUSE<br />
- Volume level on iTube is<br />
too high<br />
- Sound source is distorted<br />
- Too close to a radio tower<br />
- Low battery<br />
- Remote is not pointing in correct<br />
direction or within range<br />
- Bad connection<br />
- iPod video set up is incorrect<br />
REMEDY<br />
- Decrease the volume to a<br />
more appropriate level<br />
- WAV and MIDI files are often of poor<br />
quality; therefore distortion and noise<br />
are easily noticed through a high quality<br />
system. Try a different audio source such<br />
as music CD<br />
- Move speakers to different positions<br />
to see if interference<br />
- Replace battery<br />
- Point the remote control towards the<br />
docking station within 20ft of the unit<br />
- Check connection if iPod is in<br />
docking station, check connection<br />
of output cable<br />
- Please check iPod video set up<br />
11
Specification<br />
• Power Output:<br />
• Frequency Response:<br />
• Harmonic Distortion:<br />
• Signal-To-Noise Ratio:<br />
• Input Impedance:<br />
• Output Impedance:<br />
• Valve Type:<br />
• Power Supply:<br />
25Wx2<br />
20Hz - 20KHz (±1.5dB)<br />
≤0.5%<br />
≥86dB<br />
47KΩ<br />
4Ω, 8Ω<br />
1x 6E2, 2x 6N2<br />
AC100~120V/50~60Hz<br />
AC220~240V/50~60Hz<br />
• Dimensions:<br />
Amp: 374 x 205 x 155mm (WxHxD)<br />
Single Speaker: 150 x 198 x 245mm (WxHxD)<br />
• Weight<br />
Amp: 5.8kgs<br />
Single Speaker: 2.5kgs<br />
Service<br />
Please contact your local authorised dealer or reseller.<br />
info@fat-man.co.uk<br />
www.fat-man.co.uk<br />
FATMAN<br />
by<br />
TLAudio ®<br />
12<br />
ITube<br />
<strong>Carbon</strong> <strong>EDITIon</strong><br />
Apple, the Apple logo and iPod are trademarks of Apple Computer<br />
Inc., registered in the U.S. and other countries.