

PDF Download - Glidewell Dental Labs
PDF Download - Glidewell Dental Labs
PDF Download - Glidewell Dental Labs

Create successful ePaper yourself
Turn your PDF publications into a flip-book with our unique Google optimized e-Paper software.
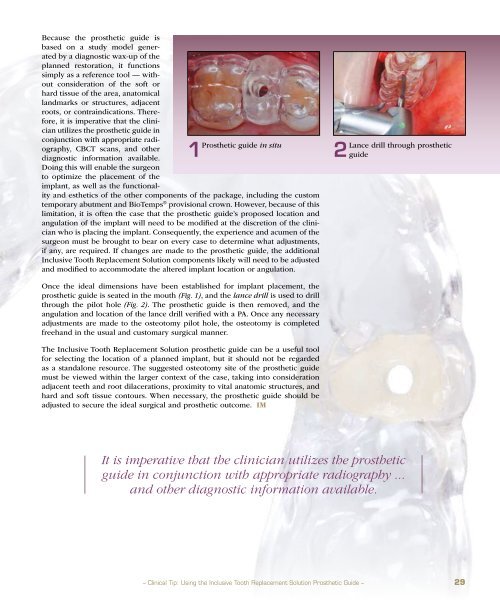
1Prosthetic guide in situ<br />
Because the prosthetic guide is<br />
based on a study model generated<br />
by a diagnostic wax-up of the<br />
planned restoration, it functions<br />
simply as a reference tool — without<br />
consideration of the soft or<br />
hard tissue of the area, anatomical<br />
landmarks or structures, adjacent<br />
roots, or contraindications. Therefore,<br />
it is imperative that the clinician<br />
utilizes the prosthetic guide in<br />
conjunction with appropriate radiography,<br />
CBCT scans, and other<br />
diagnostic information available.<br />
Doing this will enable the surgeon<br />
to optimize the placement of the<br />
implant, as well as the functionality<br />
and esthetics of the other components of the package, including the custom<br />
temporary abutment and BioTemps ® provisional crown. However, because of this<br />
limitation, it is often the case that the prosthetic guide’s proposed location and<br />
angulation of the implant will need to be modified at the discretion of the clinician<br />
who is placing the implant. Consequently, the experience and acumen of the<br />
surgeon must be brought to bear on every case to determine what adjustments,<br />
if any, are required. If changes are made to the prosthetic guide, the additional<br />
Inclusive Tooth Replacement Solution components likely will need to be adjusted<br />
and modified to accommodate the altered implant location or angulation.<br />
2Lance drill through prosthetic<br />
guide<br />
Once the ideal dimensions have been established for implant placement, the<br />
prosthetic guide is seated in the mouth (Fig. 1), and the lance drill is used to drill<br />
through the pilot hole (Fig. 2). The prosthetic guide is then removed, and the<br />
angulation and location of the lance drill verified with a PA. Once any necessary<br />
adjustments are made to the osteotomy pilot hole, the osteotomy is completed<br />
freehand in the usual and customary surgical manner.<br />
The Inclusive Tooth Replacement Solution prosthetic guide can be a useful tool<br />
for selecting the location of a planned implant, but it should not be regarded<br />
as a standalone resource. The suggested osteotomy site of the prosthetic guide<br />
must be viewed within the larger context of the case, taking into consideration<br />
adjacent teeth and root dilacerations, proximity to vital anatomic structures, and<br />
hard and soft tissue contours. When necessary, the prosthetic guide should be<br />
adjusted to secure the ideal surgical and prosthetic outcome. IM<br />
It is imperative that the clinician utilizes the prosthetic<br />
guide in conjunction with appropriate radiography ...<br />
and other diagnostic information available.<br />
– Clinical Tip: Using the Inclusive Tooth Replacement Solution Prosthetic Guide – 29


