Documentation for Turnitin.com Getting Started:
Documentation for Turnitin.com Getting Started:
Documentation for Turnitin.com Getting Started:

Create successful ePaper yourself
Turn your PDF publications into a flip-book with our unique Google optimized e-Paper software.
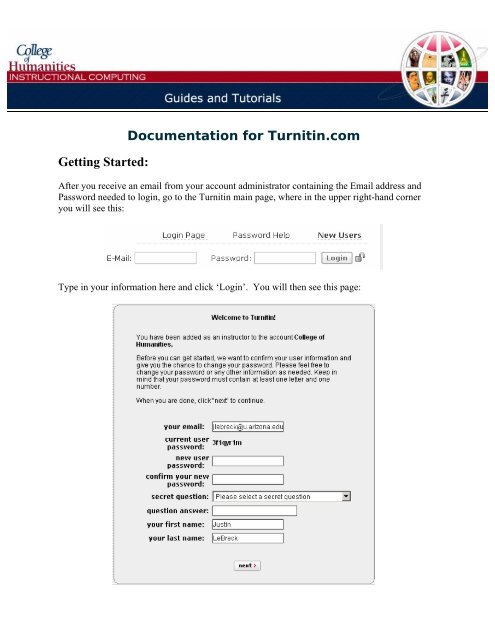
<strong>Getting</strong> <strong>Started</strong>:<br />
<strong>Documentation</strong> <strong>for</strong> <strong>Turnitin</strong>.<strong>com</strong><br />
After you receive an email from your account administrator containing the Email address and<br />
Password needed to login, go to the <strong>Turnitin</strong> main page, where in the upper right-hand corner<br />
you will see this:<br />
Type in your in<strong>for</strong>mation here and click ‘Login’. You will then see this page:
Fill out the <strong>for</strong>m and click the ‘next’ button.<br />
Click the ‘I agree -- finish profile’ link.<br />
Click ‘start class setup wizard’ to setup your first class and first assignment. Otherwise click<br />
‘log in and start using <strong>Turnitin</strong>’ to go to your main page.<br />
Type in the name of your class and click the ‘next’ button.
Record the class ID number <strong>for</strong> future use and choose a password <strong>for</strong> this class. Class IDs can<br />
be viewed from your main page at a later time.<br />
You will have to create an assignment at this point. Fill this in with any assignment that <strong>com</strong>es<br />
to mind. The assignment can be edited at a later time.
Click ‘end wizard and log in’. This will bring you to your main page.<br />
Adding a Class:<br />
From the main menu you should see this header bar:<br />
Click on the ‘add a class’ link. You will now see the following menu:
Master Class vs. Standard Class<br />
Master Class: These types of classes are specifically meant to be broken into sections. The<br />
class is controlled by the creator, but each section requires a secondary instructor to lead it.<br />
Students are added to distinct sections and their assignments are uploaded to only those<br />
sections. The master instructor has the ability to view all uploaded assignments at all times.<br />
Both the master instructor and section leaders can create new assignments.<br />
Standard Class: These types of classes are led by a single teacher and students are not split<br />
into sections. All assignments are created by the primary instructor and uploaded papers are<br />
pooled into a single location <strong>for</strong> each assignment.<br />
Let students view their own Originality Reports <strong>for</strong> all paper assignments in this class?<br />
Option (available <strong>for</strong> both class types): If yes is chosen, students will be able to view the<br />
Originality Reports <strong>for</strong> their papers up to 24 hours be<strong>for</strong>e the paper due date. This decision<br />
must be made when the class is created and will reflect upon all assignments turned in. This<br />
choice cannot be decided on a per assignment basis.<br />
After filling out the <strong>for</strong>m, click ‘submit’. Your new class should be created and accessible<br />
from the main page.<br />
Adding Students:<br />
From the main menu choose the class you<br />
would like to add students to:<br />
Next, click on the ‘students’ button on the menu bar like the one that appears below.<br />
You will see another menu appear with the following choices.
add student: This choice will allow you to manually add a single student at a time. Fill-in<br />
the student’s in<strong>for</strong>mation and click the ‘submit’ button at the top-right.<br />
Note: If you are adding students to a Master Class you will<br />
need to choose a section to add them to.<br />
upload student list: This option will allow you submit a list of all of your students at once.<br />
This will save a lot of time <strong>com</strong>pared to the ‘add student’ option if you have all of your<br />
students’ in<strong>for</strong>mation written in a document already.<br />
Note: If you are adding students to a Master Class<br />
you must choose a section. All of the students in the<br />
uploaded file will go into this section.<br />
For each user in your list, you must include the following three pieces of in<strong>for</strong>mation: 1) first<br />
name, 2) last name, and 3) e-mail address. Furthermore, these three pieces of in<strong>for</strong>mation must<br />
appear in this exact order with <strong>com</strong>mas separating them. <strong>Turnitin</strong> accepts files in plain text,<br />
Word, and Excel <strong>for</strong>mats. Here is one example of a properly <strong>for</strong>matted list:<br />
connie, williams, cwilliams@myschool.edu<br />
Patricia, Wong, pwong@myschool.edu
Once you click the ‘submit’ button you will be prompted with the following page. It will<br />
display each of the students from the uploaded file separated into their parts. Review the list<br />
and click ‘yes, submit’ when done.<br />
Adding an Assignment:<br />
From the main menu choose the class you would<br />
like to add an assignment to:<br />
On the next menu you will see the ‘create a new<br />
assignment’ choice. Click it. You will see the menu below.<br />
paper assignment: This choice is used to create a new stand-alone assignment or the first in a<br />
series of drafts.<br />
revision assignment: This choice is used when one assignment already exists <strong>for</strong> the class and<br />
students are to turn in a revised or final version of the same assignment. All of the students<br />
from the original assignment will be carried over.
Choose the start and end dates <strong>for</strong> the assignment. If you are using a master class you will be<br />
asked if you want to push the assignment into all of the sections or save it <strong>for</strong> later. If you<br />
choose ‘yes’ <strong>for</strong> the last question (‘Show advanced assignment options?’), you will see this<br />
menu:<br />
Make any final changes here, then click the ‘submit’ button.<br />
All of the students in your class will now see the assignment in their ‘assignment list’:<br />
They can click the ‘submit’ button, locate their document, and upload it to <strong>Turnitin</strong>. Once an<br />
assignment is turned in you can view it from your Inbox. For more in<strong>for</strong>mation on this see the<br />
section entitled Viewing Turned-In Assignments (below).<br />
Submitting a Student’s Assignment:<br />
There is a way to submit assignments from your end if you choose not to have your students<br />
submit their papers themselves. Go into your class from the main page and you will see this<br />
menu:<br />
At this point you will need an assignment created to submit the paper to. In this menu the<br />
assignment is named ‘Essay 1’. In the middle of the row there is a ‘submit’ button. Clicking<br />
on it will bring up this menu:
Here are your choices under Submit a paper by:<br />
File Upload: This choice allows you to upload a single file.<br />
Cut and paste: This choice allows you to cut and paste the text directly from the student’s<br />
paper into the browser and submit that way.<br />
Bulk upload: This choice allows you to upload multiple files at one time.<br />
Zip file: This choice accepts a single zip file that can contain multiple files within it. The zip<br />
file must not exceed 100 mbs in size.<br />
If you choose File Upload or Cut and paste you will be given the choice of author. Under<br />
‘author’ you will see a list of all of the students in the class or the option of ‘non-enrolled<br />
student’. After choosing the author of the file, click the ‘Browse…’ button to locate the file.<br />
When finished click the ‘submit’ button.<br />
Viewing Turned-In Assignments:<br />
Once an assignment is created and students begin submitting papers you will be able to view<br />
their Originality Reports. Go into your class from the main page and you will see this menu:<br />
In this menu the assignment is named ‘Essay 1’. In the middle of the row there is an ‘inbox’<br />
button. Clicking on it will bring up this menu:
In this menu you will see a list of the students who have submitted papers. From this menu<br />
you can also submit a student’s paper. For more in<strong>for</strong>mation on this please refer to the<br />
Submitting a Student’s Assignment section (above).<br />
Under the ‘title’ column you will see links with the names of the papers. These links allow you<br />
to view the paper that was submitted. Under the ‘report’ column you will see the percentage<br />
results from the Originality Report. Clicking this gauge will bring up the Report as seen below:<br />
The Originality Report will show you the original document on the left and on the right a list of<br />
the content that was found elsewhere. By clicking on the itemized items on the right the report<br />
will cue up the corresponding portions on the left. Remember that even though a student’s<br />
paper may not return a 0% from the Originality Report, that does not mean that any of the<br />
material was plagiarized. By reviewing the data on this page you can get a better idea of how<br />
the student did.<br />
Itemized Matches: A list of matches will appear on the right side of the report. They will<br />
look like the images below. Clicking their links will bring you to the referenced material. If<br />
the material is from a student at your University or another one, you will need to send a request<br />
through <strong>Turnitin</strong>.<strong>com</strong> to view that document.
Extending an Assignment’s Due Date:<br />
From the main menu choose the class that has the<br />
assignment you would like to extend the due date on:<br />
Select your assignment to be extended.<br />
Now there are two ways to extend an assigment’s due date. Either the original due date can be<br />
changed or students can be allowed to submit after the due date.<br />
Change The Due Date:<br />
After clicking on the assignment name, this page will appear.<br />
Change the date next ‘due date:’ and click the ‘submit’ button.<br />
Allow Late Submissions:<br />
After clicking on the assignment name, you will see a drop-down window that says ‘Show<br />
advanced assignment options?’.
Choose ‘yes’ and you will see this menu:<br />
Set the second option, ‘Allow submissions after the due date?’, to yes. Click the ‘submit’<br />
button. Now students will be able to submit papers <strong>for</strong> this assignment at any time.