Setting Up Your Air Bed - InnoMax
Setting Up Your Air Bed - InnoMax
Setting Up Your Air Bed - InnoMax

You also want an ePaper? Increase the reach of your titles
YUMPU automatically turns print PDFs into web optimized ePapers that Google loves.
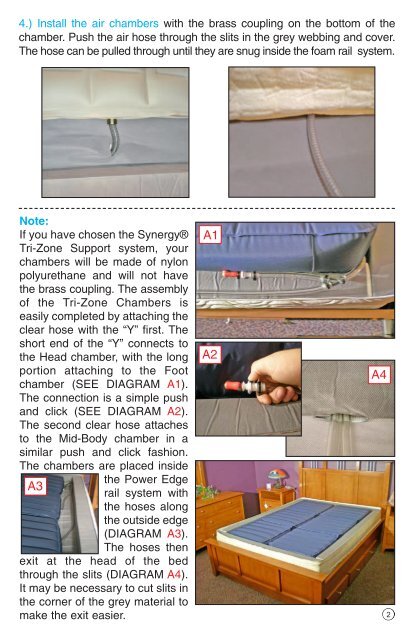
4.) Install the air chambers with the brass coupling on the bottom of the<br />
chamber. Push the air hose through the slits in the grey webbing and cover.<br />
The hose can be pulled through until they are snug inside the foam rail system.<br />
Note:<br />
If you have chosen the Synergy®<br />
Tri-Zone Support system, your<br />
chambers will be made of nylon<br />
polyurethane and will not have<br />
the brass coupling. The assembly<br />
of the Tri-Zone Chambers is<br />
easily completed by attaching the<br />
clear hose with the “Y” first. The<br />
short end of the “Y” connects to<br />
the Head chamber, with the long<br />
portion attaching to the Foot<br />
chamber (SEE DIAGRAM A1).<br />
The connection is a simple push<br />
and click (SEE DIAGRAM A2).<br />
The second clear hose attaches<br />
to the Mid-Body chamber in a<br />
similar push and click fashion.<br />
The chambers are placed inside<br />
A3<br />
the Power Edge<br />
rail system with<br />
the hoses along<br />
the outside edge<br />
(DIAGRAM A3).<br />
The hoses then<br />
exit at the head of the bed<br />
through the slits (DIAGRAM A4).<br />
It may be necessary to cut slits in<br />
the corner of the grey material to<br />
make the exit easier.<br />
A1<br />
A2<br />
A4<br />
2