Luxury Support Warranty/04' - InnoMax
Luxury Support Warranty/04' - InnoMax
Luxury Support Warranty/04' - InnoMax

Create successful ePaper yourself
Turn your PDF publications into a flip-book with our unique Google optimized e-Paper software.
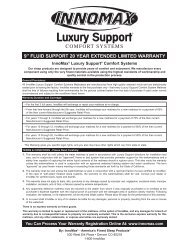
PLEASE READ CAREFULLY:<br />
Our Sleep Systems are designed to provide years of comfort and enjoyment.<br />
Your Sleep System is manufactured from the best materials available using<br />
the highest standards of workmanship in the construction.<br />
The following manufactured components are warranted, as noted, against<br />
defects in material and workmanship that impair the serviceability of the<br />
product other than normal wear and tear:<br />
<strong>Warranty</strong> applies to: Quilted Zipper Cover, Box Foundation, Foam Rails<br />
WARRANTY<br />
YEAR<br />
Year 1<br />
Year 2<br />
Year 3<br />
Year 4<br />
Year 5<br />
Year 6<br />
Year 7<br />
Year 8<br />
Year 9<br />
Year 10<br />
Year 11<br />
Year 12<br />
Year 13<br />
Year 14<br />
Year 15<br />
Year 16<br />
Year 17<br />
Year 18<br />
Year 19<br />
Year 20<br />
Year 21<br />
Year 22<br />
Year 23<br />
Year 24<br />
Year 25<br />
PLATINUM DEEP FILL<br />
NATURAL ESSENCE SERIES<br />
N/C<br />
N/C<br />
N/C<br />
N/C<br />
N/C<br />
65%<br />
65%<br />
65%<br />
65%<br />
65%<br />
75%<br />
75%<br />
75%<br />
75%<br />
75%<br />
85%<br />
85%<br />
85%<br />
85%<br />
85%<br />
90%<br />
90%<br />
90%<br />
90%<br />
90%<br />
Please Note: Any stretching or conforming of the cover is a natural part of<br />
the breaking-in process for the bed system. Covers which have stretched to<br />
accommodate this natural process are not considered defective and are not<br />
covered under warranty. (Please refer to the section “Break-in Period” for<br />
further information on mattress.<br />
This warranty is limited to repair or replacement of the Sleep System<br />
at the option of the manufacturer, and any damages or breach of warranty<br />
due to consequential losses to property other than the warranted<br />
Sleep System components are expressly excluded. In addition, all<br />
implied warranties are limited to the duration of this written warranty.<br />
This is the exclusive express warranty for the Evolutions, Comfort<br />
Craft®, Genesis & <strong>Luxury</strong> <strong>Support</strong>® beds, and any other statements<br />
or express warranties are expressly denied.<br />
LIMITED WARRANTY COVERAGE<br />
PERFECTION<br />
FRAME FREE FLOTATION<br />
N/C<br />
N/C<br />
N/C<br />
N/C<br />
N/C<br />
65%<br />
65%<br />
65%<br />
65%<br />
65%<br />
75%<br />
75%<br />
75%<br />
75%<br />
75%<br />
85%<br />
85%<br />
85%<br />
85%<br />
85%<br />
90%<br />
90%<br />
90%<br />
90%<br />
90%<br />
• Normal leveling or flattening out of filling materials, which occur in normal use of the mattress,<br />
are not covered in the warranty. Body impressions in any new mattress indicate the<br />
upholstery layers are conforming to your body’s individual contours. These are not<br />
structural defects but normal occurrences in the superior performance of a mattress.<br />
• These impressions will be more noticeable on Queen and King sized mattresses.<br />
BREAK-IN PERIOD — Please Note: In order to provide equal support, the heavier body<br />
parts must sink further into the sleep system than the lighter body parts. When this occurs,<br />
your bed’s outside cover must stretch or “conform” to the unique shape of your body as it<br />
accomplishes a state of equilibrium in your new sleep system. The stretching or “conforming”<br />
of your cover is a natural part of the breaking-in process for your new bed system. Normally<br />
this takes from 4–12 weeks and will vary according to your body proportions, size, type of<br />
system, and the fill level you have chosen. Covers which have stretched and conformed to<br />
accommodate this natural process (and provide you with contoured support benefits) are<br />
not considered defective and are not covered under warranty.<br />
GENERAL PROVISIONS:<br />
Proof of Purchase: All Sleep Systems are warranted from the date of the original<br />
retail sale as validated by proof of purchase. <strong>Warranty</strong> coverage will be determined<br />
from this date. This warranty is provided to the original purchaser only.<br />
WARRANTY DURATION:<br />
Repair or Replacement: The manufacturer reserves as their legal right, the<br />
option to repair or replace parts covered under this warranty according to its<br />
discretion; to make substitutions as required, of materials and components of<br />
comparable value and utility as the original part. Any cover returned must be<br />
in sanitary condition. Soiled covers will not be accepted for warranty service.<br />
If a defect occurs beyond the full replacement portion of the warranty, the<br />
manufacturer will repair or replace, at its option, the defective product at listed<br />
percentage of current retail price at time of the warranty claim for the Sleep<br />
System purchased or a comparable model of the product, if the product<br />
originally purchased is no longer in production, plus freight charges.<br />
Transportation: The consumer is responsible for all freight costs to & from factory.<br />
Honoring the <strong>Warranty</strong>: This warranty will only be honored by direct approval of<br />
the manufacturer when all provisions of proof of application and availability of part<br />
for evaluation have been met. Manufacturer will not be liable for damage or<br />
shrinkage to covers caused by attempts to clean in a conventional washer/dryer.<br />
Dealer <strong>Warranty</strong> Responsibility: Dealers accepting any responsibility for the<br />
product warranty analysis do so only at the request of the customer and are under<br />
no requirement to do so by the manufacturer, and their statements about validity<br />
and proration charges are not necessarily the opinion of the manufacturer. The<br />
manufacturer retains & reserves the exclusive right to make warranty determinations.<br />
Disclaimer: The manufacturer disclaims liability for any aspect of installation,<br />
and any inconvenience caused by a defective part of a component needing to be<br />
replaced or repaired. Since the customer controls the installation, inflation/fill, end<br />
use, and maintenance of the product, the manufacturer disclaims all liability for<br />
any damages caused by the use or misuse of this bed. This warranty excludes<br />
all other statutory or implied warranties upon which this mattress is sold.<br />
OTHER PROVISIONS:<br />
1. This warranty shall be void unless the Sleep System components are used<br />
in accordance with the enclosed instructions.<br />
2. This warranty does not apply to tears, punctures, or damage caused by<br />
improper use, negligence, excessive strain, improper installation, accidents,<br />
acts of nature, or failures caused by extreme temperature.<br />
3. Any apparently defective component must be returned to the manufacturer<br />
at the purchaser’s expense with an explanation of the problem. A proof of<br />
purchase (sales receipt) verifying date & price of purchase must be included.<br />
NOTE: <strong>Warranty</strong> is void if product is used commercially. Consumer is responsible for listed percentage of current retail price at time of warranty claim.<br />
(Complete <strong>Warranty</strong> Registration below, detach, & mail within 14 days of purchase. Mail to: <strong>InnoMax</strong> • 530 W. Elk Place • Denver, CO 80216).<br />
You can also process your <strong>Warranty</strong> Registration online at www.innomax.com.<br />
✃ Date Purchased: ________________________<br />
Model Purchase: _______________________________________________<br />
Owner’s Name: ________________________________________________<br />
Address: ______________________________________________________<br />
City: ____________________State: ______Zip Code: ________________<br />
Phone: __________________E-mail: ______________________________<br />
Purchased from:________________________________________________<br />
City: ________________________________State: __________________<br />
I have read the attached warranty:<br />
(signature) ____________________________________________________<br />
Check Applicable Boxes:<br />
Is this your first ❐ Air <strong>Support</strong> - ❐ Fluid <strong>Support</strong> Mattress (check one)<br />
❐ Married ❐ Own Home Date of birth of user: Month_____Yr._______<br />
❐ Single ❐ Rent Home<br />
Select the most important reason(s) for purchasing a Sleep System:<br />
❐ Reputation of Mfr. ❐ Comfort ❐ Salesperson ❐ <strong>Warranty</strong><br />
❐ Price ❐ Dealer Reputation ❐ Literature ❐ Had One Before<br />
❐ Quality of Product ❐ Health ❐ Advertising ❐ Style/Design<br />
P RODUCT WARRANTY R EGISTRATION<br />
Complete, detach, & mail to: <strong>InnoMax</strong><br />
530 W. Elk Place • Denver, CO 80216<br />
How did you become aware of this product?<br />
❐ In-Store Display ❐ TV Commercial ❐ Gift ❐ Magazine Ad<br />
❐ Newspaper Ad ❐ Friend/Relative ❐ Physician ❐ Store Salesperson<br />
❐ Radio<br />
❐ Other<br />
Which group best defines your household income?<br />
❐ 16,000 & under ❐ 17,000-25,000 ❐ 26,000-50,000 ❐ 51,000-75,000 ❐ 75,000 & above<br />
What is the occupation(s) of the person(s) for whom this bed was purchased?<br />
❐ Homemaker ❐ Craftsman/Tradesman ❐ Upper Mgmt./Administration<br />
❐ Physician/Dentist ❐ Clerical/White Collar ❐ Professional/Technician<br />
❐ Retired ❐ Sales/Service Student ❐ Other ________________<br />
Which of the following health problems, if any, apply to the user(s) of this mattress?<br />
❐ Back Problems ❐ Insomnia ❐ Arthritis ❐ Other<br />
What other mattress types did you consider before purchasing this Sleep System?<br />
________________________________________________________________________<br />
Reason(s) for choosing this mattress over others? ____________________________<br />
Type of bed owned previously?<br />
❐ Innerspring ❐ Water ❐ Foam ❐ Air Other__________________________
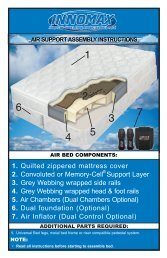
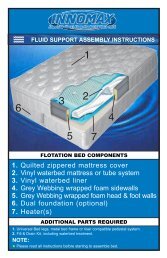
FLUID SUPPORT ASSEMBLY INSTRUCTIONS<br />
C<br />
G<br />
E<br />
A<br />
B<br />
D<br />
F<br />
SIDEWALLS<br />
HEAD & FOOT<br />
1.Unpack the box: Take all of the components<br />
out of the box. You should have the following<br />
items:<br />
A. Power Edge <strong>Support</strong> Rail System including<br />
head & foot rails and two side rails.<br />
B. Fluid <strong>Support</strong> Chamber(s) or Tubes.<br />
C. Low Watt (120 Watts or less) Waterbed<br />
Temperature Control System(s).<br />
D. Vinyl Safety Liner.<br />
E. Mattress Cover/Pillow Top enclosure.<br />
6.Unfold the fluid support chamber(s) and place on top of the vinyl safety liner.<br />
The valves on the mattress should be located at the foot of the bed. Open both<br />
valves to allow the vacuum sealed water mattress to begin to expand. Square<br />
the corners of the mattress with the corners of the Power Edge <strong>Support</strong><br />
System. This is CRITICAL and must be done before filling the mattress(es) with<br />
fluid. To assist in this process, you may fill the chambers with air using a shop<br />
vac or a hair dryer with a cool setting. Inflate the mattress until it is approximately<br />
18” - 24” above the foam rails. Place the caps back into the valves and push<br />
down on the center of the mattress. This will pop the corners out so they can<br />
be easily adjusted to align with the corners of the rail system.<br />
7.Begin filling the mattress with warm water. If the hot water tank is drained, shut<br />
down the filling process and allow the water heater to replenish. While this<br />
method may require a longer filling time, the end result is a more comfortable<br />
sleeping environment from the first night on.<br />
F. K or Q Split or Single T/F Foundation<br />
(optional).<br />
G. 9 point center support metal bed frame<br />
(optional purchase, but it is required to have<br />
center support system that is adequately<br />
designed for flotation sleep - please consult<br />
your dealer).<br />
2.Your entire Fluid <strong>Support</strong> System can be easily assembled: First step,<br />
determine where your bed will be positioned. If you are using a headboard,<br />
make sure you have enough room before you begin to fill your mattress.<br />
Assemble the support base you intend to use. This can be a center support<br />
metal bed frame of a modern platform pedestal with drawers. Once this is complete,<br />
place your box foundation in the frame with the open side down. Many platform<br />
pedestals do not require the use of a foundation. You may skip this step and<br />
move to number three. If using a platform, ensure you have a solid deck, not slats.<br />
3.Unfold the mattress enclosure and completely unzip the cover. Insert the side<br />
rails inside the cover. The head of the bed should be stamped and will have two<br />
slits in the grey webbing material. This is for the exit of your temperature<br />
control sensor and heater pad power cord. The head and foot rails are<br />
inserted in between the side rails with the webbing as smooth as possible.<br />
4.Install the heater pad(s) directly on the grey webbing material in a head to toe<br />
position, ensuring that the entire pad is on a solid surface and not over the crack<br />
between foundation halves or plywood pieces in a platform. It is best to place the<br />
pad as far down the bed as possible to avoid constant pressure of sitting on<br />
the pad. Push the pad power cord through the slits in the grey webbing and<br />
cover. The temperature sensor on the control can be pulled through from the<br />
outside. Make sure the sensor is a minimum of 12” away from the pad and is not<br />
tucked under any portion of the Power Edge Rail System to ensure proper<br />
temperature readings. DO NOT PLUG IN THE HEATER UNTIL THE FLOTATION<br />
MATTRESS IS COMPLETELY FILLED WITH WATER!<br />
5.Place the vinyl safety liner over the heater pad(s) and tuck around the Power<br />
Edge Rail System, making sure the corners of the fitted liner are matching the<br />
corners of the rail system. Smooth the vinyl away from the center of the<br />
mattress area and toward the edge rails.<br />
8.Proper fill depth is approximately 1” below the top edge of the support rail. For<br />
a firmer feel, lower the water level slightly. For a softer feel, add a small amount<br />
of water. Never fill the mattress so that it is above the side rail. After filling to the<br />
desired level, remove all air from the mattress with the use of an air extractor<br />
or by pushing the air toward the valve. For mattresses with a greater degree of<br />
motion control and support, this process will need to be repeated several times<br />
during the first month of use. Add one 8 ounce bottle of Fiber Conditioner. This<br />
should be repeated every twelve months. Use vinyl conditioner on the outside<br />
of the vinyl chamber every 2-3 months.<br />
9.Zip up the cover/pillow top; install new mattress pad and sheets. Enjoy a great<br />
night’s rest.<br />
DRAINING INSTRUCTIONS:<br />
1. UNPLUG THE WATERBED HEATER BEFORE DRAINING THE MATTRESS.<br />
2. It is strongly recommended that an electric drain pump be utilized to<br />
prevent damage to the internal support structure of your mattress. Contact<br />
your dealer for rental information. A typical electric pump will remove nearly<br />
all of the water in a king sized mattress in 45 minutes or less.<br />
3.If no electric pump is available, the use of a standard fill and drain kit will<br />
assist in removing the water from the mattress. Attach the faucet adapter to<br />
the sink, taking care not to cross thread the adapter. Screw the siphon<br />
pump to the adapter and attach the hose to the siphon. Using the hose<br />
adapter, attach the opposite end of the hose to the valve on the mattress.<br />
4.To start the siphon action, turn on the faucet to a moderate level. if your<br />
siphon is self priming, the pump will soon begin to remove water. If it is not<br />
self priming, turn the bottom of the pump to the “fill” setting and allow water<br />
to go into the mattress. Once the hose is free of air, twist the bottom of the<br />
pump to the “drain” setting to create a siphon to remove water. Continue<br />
this until the mattress is completely vacuum sealed and is free from water.<br />
Fold the top 1/3 of the bed toward the foot to assist in final draining. Once<br />
the process is complete, remove the hose adapter and quickly insert the<br />
cap and seal to maintain a vacuum inside the mattress. This will<br />
hold all of the internal components of the mattress in their desired location.<br />
5.When moving the mattress, do not drag it across the floor as this can cause a<br />
friction burn in the vinyl.<br />
PLACE<br />
STAMP<br />
HERE<br />
<strong>InnoMax</strong> Corporation<br />
530 West Elk Place<br />
Denver, CO 80216