Luxury Support Warranty/04' - InnoMax
Luxury Support Warranty/04' - InnoMax
Luxury Support Warranty/04' - InnoMax

You also want an ePaper? Increase the reach of your titles
YUMPU automatically turns print PDFs into web optimized ePapers that Google loves.
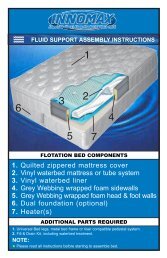
FLUID SUPPORT ASSEMBLY INSTRUCTIONS<br />
C<br />
G<br />
E<br />
A<br />
B<br />
D<br />
F<br />
SIDEWALLS<br />
HEAD & FOOT<br />
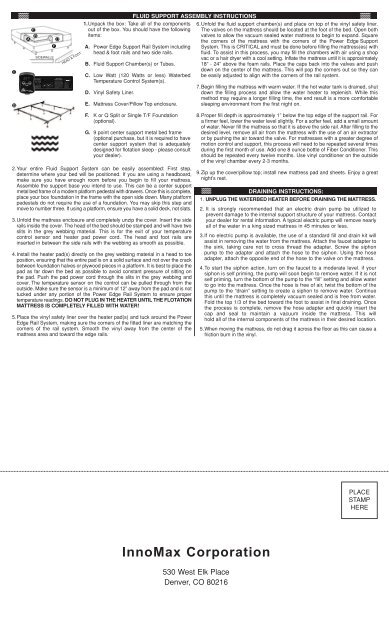
1.Unpack the box: Take all of the components<br />
out of the box. You should have the following<br />
items:<br />
A. Power Edge <strong>Support</strong> Rail System including<br />
head & foot rails and two side rails.<br />
B. Fluid <strong>Support</strong> Chamber(s) or Tubes.<br />
C. Low Watt (120 Watts or less) Waterbed<br />
Temperature Control System(s).<br />
D. Vinyl Safety Liner.<br />
E. Mattress Cover/Pillow Top enclosure.<br />
6.Unfold the fluid support chamber(s) and place on top of the vinyl safety liner.<br />
The valves on the mattress should be located at the foot of the bed. Open both<br />
valves to allow the vacuum sealed water mattress to begin to expand. Square<br />
the corners of the mattress with the corners of the Power Edge <strong>Support</strong><br />
System. This is CRITICAL and must be done before filling the mattress(es) with<br />
fluid. To assist in this process, you may fill the chambers with air using a shop<br />
vac or a hair dryer with a cool setting. Inflate the mattress until it is approximately<br />
18” - 24” above the foam rails. Place the caps back into the valves and push<br />
down on the center of the mattress. This will pop the corners out so they can<br />
be easily adjusted to align with the corners of the rail system.<br />
7.Begin filling the mattress with warm water. If the hot water tank is drained, shut<br />
down the filling process and allow the water heater to replenish. While this<br />
method may require a longer filling time, the end result is a more comfortable<br />
sleeping environment from the first night on.<br />
F. K or Q Split or Single T/F Foundation<br />
(optional).<br />
G. 9 point center support metal bed frame<br />
(optional purchase, but it is required to have<br />
center support system that is adequately<br />
designed for flotation sleep - please consult<br />
your dealer).<br />
2.Your entire Fluid <strong>Support</strong> System can be easily assembled: First step,<br />
determine where your bed will be positioned. If you are using a headboard,<br />
make sure you have enough room before you begin to fill your mattress.<br />
Assemble the support base you intend to use. This can be a center support<br />
metal bed frame of a modern platform pedestal with drawers. Once this is complete,<br />
place your box foundation in the frame with the open side down. Many platform<br />
pedestals do not require the use of a foundation. You may skip this step and<br />
move to number three. If using a platform, ensure you have a solid deck, not slats.<br />
3.Unfold the mattress enclosure and completely unzip the cover. Insert the side<br />
rails inside the cover. The head of the bed should be stamped and will have two<br />
slits in the grey webbing material. This is for the exit of your temperature<br />
control sensor and heater pad power cord. The head and foot rails are<br />
inserted in between the side rails with the webbing as smooth as possible.<br />
4.Install the heater pad(s) directly on the grey webbing material in a head to toe<br />
position, ensuring that the entire pad is on a solid surface and not over the crack<br />
between foundation halves or plywood pieces in a platform. It is best to place the<br />
pad as far down the bed as possible to avoid constant pressure of sitting on<br />
the pad. Push the pad power cord through the slits in the grey webbing and<br />
cover. The temperature sensor on the control can be pulled through from the<br />
outside. Make sure the sensor is a minimum of 12” away from the pad and is not<br />
tucked under any portion of the Power Edge Rail System to ensure proper<br />
temperature readings. DO NOT PLUG IN THE HEATER UNTIL THE FLOTATION<br />
MATTRESS IS COMPLETELY FILLED WITH WATER!<br />
5.Place the vinyl safety liner over the heater pad(s) and tuck around the Power<br />
Edge Rail System, making sure the corners of the fitted liner are matching the<br />
corners of the rail system. Smooth the vinyl away from the center of the<br />
mattress area and toward the edge rails.<br />
8.Proper fill depth is approximately 1” below the top edge of the support rail. For<br />
a firmer feel, lower the water level slightly. For a softer feel, add a small amount<br />
of water. Never fill the mattress so that it is above the side rail. After filling to the<br />
desired level, remove all air from the mattress with the use of an air extractor<br />
or by pushing the air toward the valve. For mattresses with a greater degree of<br />
motion control and support, this process will need to be repeated several times<br />
during the first month of use. Add one 8 ounce bottle of Fiber Conditioner. This<br />
should be repeated every twelve months. Use vinyl conditioner on the outside<br />
of the vinyl chamber every 2-3 months.<br />
9.Zip up the cover/pillow top; install new mattress pad and sheets. Enjoy a great<br />
night’s rest.<br />
DRAINING INSTRUCTIONS:<br />
1. UNPLUG THE WATERBED HEATER BEFORE DRAINING THE MATTRESS.<br />
2. It is strongly recommended that an electric drain pump be utilized to<br />
prevent damage to the internal support structure of your mattress. Contact<br />
your dealer for rental information. A typical electric pump will remove nearly<br />
all of the water in a king sized mattress in 45 minutes or less.<br />
3.If no electric pump is available, the use of a standard fill and drain kit will<br />
assist in removing the water from the mattress. Attach the faucet adapter to<br />
the sink, taking care not to cross thread the adapter. Screw the siphon<br />
pump to the adapter and attach the hose to the siphon. Using the hose<br />
adapter, attach the opposite end of the hose to the valve on the mattress.<br />
4.To start the siphon action, turn on the faucet to a moderate level. if your<br />
siphon is self priming, the pump will soon begin to remove water. If it is not<br />
self priming, turn the bottom of the pump to the “fill” setting and allow water<br />
to go into the mattress. Once the hose is free of air, twist the bottom of the<br />
pump to the “drain” setting to create a siphon to remove water. Continue<br />
this until the mattress is completely vacuum sealed and is free from water.<br />
Fold the top 1/3 of the bed toward the foot to assist in final draining. Once<br />
the process is complete, remove the hose adapter and quickly insert the<br />
cap and seal to maintain a vacuum inside the mattress. This will<br />
hold all of the internal components of the mattress in their desired location.<br />
5.When moving the mattress, do not drag it across the floor as this can cause a<br />
friction burn in the vinyl.<br />
PLACE<br />
STAMP<br />
HERE<br />
<strong>InnoMax</strong> Corporation<br />
530 West Elk Place<br />
Denver, CO 80216