SB 300 - JBL.com
SB 300 - JBL.com
SB 300 - JBL.com

You also want an ePaper? Increase the reach of your titles
YUMPU automatically turns print PDFs into web optimized ePapers that Google loves.
<strong>SB</strong> <strong>300</strong><br />
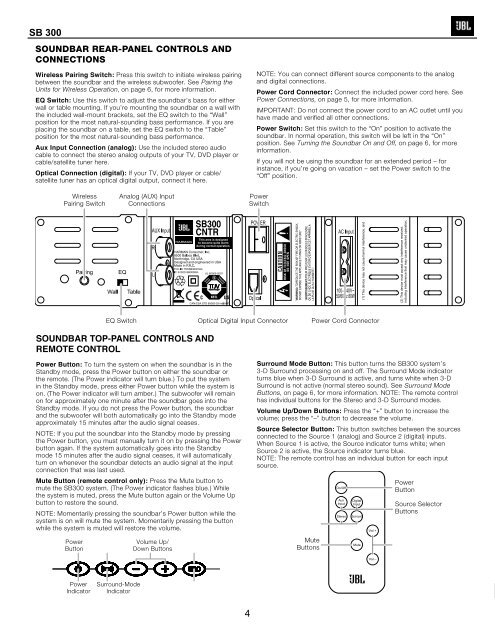
SOUNDBAR REAR-PANEL CONTROLS AND<br />
CONNECTIONS<br />
Press this switch to initiate wireless pairing<br />
between the soundbar and the wireless subwoofer. See Pairing the<br />
Units for Wireless Operation, on page 6, for more information.<br />
Use this switch to adjust the soundbar’s bass for either<br />
wall or table mounting. If you’re mounting the soundbar on a wall with<br />
the included wall-mount brackets, set the EQ switch to the “Wall”<br />
position for the most natural-sounding bass performance. If you are<br />
placing the soundbar on a table, set the EQ switch to the “Table”<br />
position for the most natural-sounding bass performance.<br />
Use the included stereo audio<br />
cable to connect the stereo analog outputs of your TV, DVD player or<br />
cable/satellite tuner here.<br />
If your TV, DVD player or cable/<br />
satellite tuner has an optical digital output, connect it here.<br />
NOTE: You can connect different source <strong>com</strong>ponents to the analog<br />
and digital connections.<br />
Connect the included power cord here. See<br />
Power Connections, on page 5, for more information.<br />
IMPORTANT: Do not connect the power cord to an AC outlet until you<br />
have made and verified all other connections.<br />
Set this switch to the “On” position to activate the<br />
soundbar. In normal operation, this switch will be left in the “On”<br />
position. See Turning the Soundbar On and Off, on page 6, for more<br />
information.<br />
If you will not be using the soundbar for an extended period – for<br />
instance, if you’re going on vacation – set the Power switch to the<br />
“Off” position.<br />
Wireless<br />
Pairing Switch<br />
Analog (AUX) Input<br />
Connections<br />
Power<br />
Switch<br />
EQ Switch Optical Digital Input Connector Power Cord Connector<br />
<br />
<br />
To turn the system on when the soundbar is in the<br />
Standby mode, press the Power button on either the soundbar or<br />
the remote. (The Power indicator will turn blue.) To put the system<br />
in the Standby mode, press either Power button while the system is<br />
on. (The Power indicator will turn amber.) The subwoofer will remain<br />
on for approximately one minute after the soundbar goes into the<br />
Standby mode. If you do not press the Power button, the soundbar<br />
and the subwoofer will both automatically go into the Standby mode<br />
approximately 15 minutes after the audio signal ceases.<br />
NOTE: If you put the soundbar into the Standby mode by pressing<br />
the Power button, you must manually turn it on by pressing the Power<br />
button again. If the system automatically goes into the Standby<br />
mode 15 minutes after the audio signal ceases, it will automatically<br />
turn on whenever the soundbar detects an audio signal at the input<br />
connection that was last used.<br />
Press the Mute button to<br />
mute the <strong>SB</strong><strong>300</strong> system. (The Power indicator flashes blue.) While<br />
the system is muted, press the Mute button again or the Volume Up<br />
button to restore the sound.<br />
NOTE: Momentarily pressing the soundbar’s Power button while the<br />
system is on will mute the system. Momentarily pressing the button<br />
while the system is muted will restore the volume.<br />
Power<br />
Button<br />
Volume Up/<br />
Down Buttons<br />
This button turns the <strong>SB</strong><strong>300</strong> system’s<br />
3-D Surround processing on and off. The Surround Mode indicator<br />
turns blue when 3-D Surround is active, and turns white when 3-D<br />
Surround is not active (normal stereo sound). See Surround Mode<br />
Buttons, on page 6, for more information. NOTE: The remote control<br />
has individual buttons for the Stereo and 3-D Surround modes.<br />
Press the “+” button to increase the<br />
volume; press the “–” button to decrease the volume.<br />
This button switches between the sources<br />
connected to the Source 1 (analog) and Source 2 (digital) inputs.<br />
When Source 1 is active, the Source indicator turns white; when<br />
Source 2 is active, the Source indicator turns blue.<br />
NOTE: The remote control has an individual button for each input<br />
source.<br />
Mute<br />
Buttons<br />
On/Off<br />
Aux<br />
Input<br />
Stereo<br />
Digital<br />
Input<br />
Surround<br />
Mute<br />
Vol.+<br />
Power<br />
Button<br />
Source Selector<br />
Buttons<br />
Vol.–<br />
<br />
Power<br />
Indicator<br />
Surround-Mode<br />
Indicator<br />
4