

MSD 8998 Ignition Tester Installation Instructions - Jegs
MSD 8998 Ignition Tester Installation Instructions - Jegs
MSD 8998 Ignition Tester Installation Instructions - Jegs

You also want an ePaper? Increase the reach of your titles
YUMPU automatically turns print PDFs into web optimized ePapers that Google loves.
<strong>MSD</strong> Digital <strong>Ignition</strong> <strong>Tester</strong><br />
PN <strong>8998</strong><br />
These instructions detail how to use the <strong>Ignition</strong> tester with an <strong>MSD</strong> 6, 7, 8, 10, or SCI Series <strong>Ignition</strong><br />
and the CPC <strong>Ignition</strong>, PN 7600. If you need to test an <strong>MSD</strong> DIS <strong>Ignition</strong>, you need tester PN 8996.<br />
Warning: Do not connect directly to the coil or this unit will be damaged.<br />
PARTS INCLUDED:<br />
1 - Digital <strong>Ignition</strong> <strong>Tester</strong>, PN <strong>8998</strong><br />
1 - Load Plug<br />
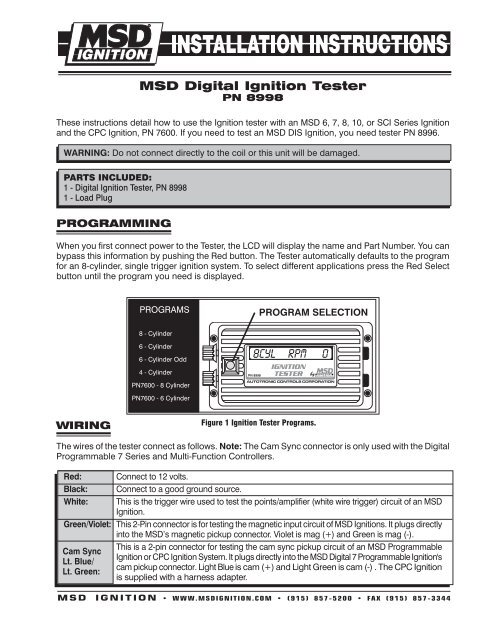
PROGRAMMING<br />
When you first connect power to the <strong>Tester</strong>, the LCD will display the name and Part Number. You can<br />
bypass this information by pushing the Red button. The <strong>Tester</strong> automatically defaults to the program<br />
for an 8-cylinder, single trigger ignition system. To select different applications press the Red Select<br />
button until the program you need is displayed.<br />
PROGRAMS<br />
PROGRAM SELECTION<br />
8 - Cylinder<br />
6 - Cylinder<br />
6 - Cylinder Odd<br />
4 - Cylinder<br />
PN7600 - 8 Cylinder<br />
PN7600 - 6 Cylinder<br />
WIRING<br />
Figure 1 <strong>Ignition</strong> <strong>Tester</strong> Programs.<br />
The wires of the tester connect as follows. Note: The Cam Sync connector is only used with the Digital<br />
Programmable 7 Series and Multi-Function Controllers.<br />
Red:<br />
Black:<br />
White:<br />
Connect to 12 volts.<br />
Connect to a good ground source.<br />
This is the trigger wire used to test the points/amplifier (white wire trigger) circuit of an <strong>MSD</strong><br />
<strong>Ignition</strong>.<br />
Green/Violet: This 2-Pin connector is for testing the magnetic input circuit of <strong>MSD</strong> <strong>Ignition</strong>s. It plugs directly<br />
into the <strong>MSD</strong>’s magnetic pickup connector. Violet is mag (+) and Green is mag (-).<br />
Cam Sync<br />
Lt. Blue/<br />
Lt. Green:<br />
This is a 2-pin connector for testing the cam sync pickup circuit of an <strong>MSD</strong> Programmable<br />
<strong>Ignition</strong> or CPC <strong>Ignition</strong> System. It plugs directly into the <strong>MSD</strong> Digital 7 Programmable <strong>Ignition</strong>'s<br />
cam pickup connector. Light Blue is cam (+) and Light Green is cam (-) . The CPC <strong>Ignition</strong><br />
is supplied with a harness adapter.<br />
M S D I G N I T I O N • www.msdignition.com • (915) 857-5200 • FAX (915) 857-3344
INSTALLATION INSTRUCTIONS<br />
RPM Adjustment<br />
The <strong>MSD</strong> Digital <strong>Tester</strong> has two rpm adjustments; Coarse and Fine:<br />
Coarse Adjustment: When this knob is turned clockwise the rpm will<br />
increase in 100 rpm increments. This allows a large spread of rpm to<br />
be covered in a short period of time.<br />
Fine Adjustment: When this knob is turned clockwise the rpm will<br />
increase in 1 rpm increments for precise adjustments.<br />
INSTALLATION & USE<br />
Figure 2 Adjusting the <strong>Tester</strong>’s RPM.<br />
1. Be sure the ignition is Off.<br />
2. Remove the coil wire from the distributor cap and install the <strong>MSD</strong> Load Plug. Connect the Plug to<br />
a ground source. Make sure the ground source is away from fuel lines, the carburetor or throttle<br />
body as a spark will jump the gap.<br />
WARNING: A spark is going to jump across the tester’s gap. Make sure there are no fuel sources<br />
or wiring near the tester. Never touch the test plug with the tester connected.<br />
3. Attach the <strong>Tester</strong>’s Red wire to a 12 volt source such as the positive battery terminal.<br />
4. Connect the Black wire to ground.<br />
5. Connect the trigger wire to fit your application. This will be the wire with the White alligator clip or<br />
the 2-pin connector for magnetic pickups. Note: The 2-pin mag pickup connector will never be<br />
used with the White trigger wire.<br />
6. Make sure both the coarse and the fine adjustments on the tester are turned to the full counter<br />
clockwise position (zero).<br />
7. Turn the ignition switch On and press the red button of the <strong>Tester</strong> until your appropriate engine<br />
combination is selected.<br />
8. Increase the Coarse adjustment until you reach the desired rpm. Note that a spark will be firing<br />
across the load plug. The fine adjustment can be used to get the exact rpm you desire.<br />
Figure 3 Testing an <strong>MSD</strong> 6 Series Through the White Wire.<br />
M S D I G N I T I O N • www.msdignition.com • (915) 857-5200 • FAX (915) 857-3344
INSTALLATION INSTRUCTIONS<br />
<br />
Figure 4 Testing an <strong>MSD</strong> 6 Series Through the Mag Pickup.<br />
Figure 5 Testing an <strong>MSD</strong> 6 Series with a Timing Control.<br />
M S D I G N I T I O N • www.msdignition.com • (915) 857-5200 • FAX (915) 857-3344
INSTALLATION INSTRUCTIONS<br />
Figure 6 Testing an <strong>MSD</strong> 7 Series <strong>Ignition</strong> Through the White Wire.<br />
Figure 7 Testing an <strong>MSD</strong> 7 Series <strong>Ignition</strong> Through the Mag Pickup.<br />
M S D I G N I T I O N • www.msdignition.com • (915) 857-5200 • FAX (915) 857-3344
INSTALLATION INSTRUCTIONS<br />
<br />
Figure 8 Testing an <strong>MSD</strong> 7 Series with a Timing Control.<br />
Figure 9 Testing an <strong>MSD</strong> Programmable 7 Series Inition.<br />
M S D I G N I T I O N • www.msdignition.com • (915) 857-5200 • FAX (915) 857-3344
INSTALLATION INSTRUCTIONS<br />
Figure10 Testing an <strong>MSD</strong> 10 Series <strong>Ignition</strong> Control.<br />
Figure 10 Testing an <strong>MSD</strong> 10 Plus <strong>Ignition</strong>.<br />
M S D I G N I T I O N • www.msdignition.com • (915) 857-5200 • FAX (915) 857-3344
INSTALLATION INSTRUCTIONS<br />
<br />
Note: The Dual Coil <strong>MSD</strong> 10 has been replaced<br />
by the <strong>MSD</strong> 10-Plus <strong>Ignition</strong>.<br />
Figure 11 Testing a Dual Coil <strong>MSD</strong> 10 <strong>Ignition</strong>.<br />
TIPS & TROUBLESHOOTING:<br />
No spark after <strong>Tester</strong> is connected:<br />
• Inspect the wiring of the tester. Make sure you have a good ground and 12 volt source.<br />
• Check to make sure you have the correct testing program for your application.<br />
• Swap another coil in and repeat the test. If spark occurs, the coil is at fault.<br />
M S D I G N I T I O N • www.msdignition.com • (915) 857-5200 • FAX (915) 857-3344
TECH NOTES<br />
_________________________________________________________________________________________________________________________<br />
_________________________________________________________________________________________________________________________<br />
_________________________________________________________________________________________________________________________<br />
_________________________________________________________________________________________________________________________<br />
_________________________________________________________________________________________________________________________<br />
_________________________________________________________________________________________________________________________<br />
_________________________________________________________________________________________________________________________<br />
_________________________________________________________________________________________________________________________<br />
_________________________________________________________________________________________________________________________<br />
_________________________________________________________________________________________________________________________<br />
_________________________________________________________________________________________________________________________<br />
_________________________________________________________________________________________________________________________<br />
_________________________________________________________________________________________________________________________<br />
_________________________________________________________________________________________________________________________<br />
_________________________________________________________________________________________________________________________<br />
_________________________________________________________________________________________________________________________<br />
Service<br />
In case of malfunction, this <strong>MSD</strong> component will be repaired free of charge according to the terms of the warranty.<br />
When returning <strong>MSD</strong> components for warranty service, Proof of Purchase must be supplied for verification. After<br />
the warranty period has expired, repair service is based on a minimum and maximum fee.<br />
All returns must have a Return Material Authorization (RMA) number issued to them before<br />
being returned. To obtain an RMA number please contact <strong>MSD</strong> Customer Service at 1 (888) <strong>MSD</strong>-7859 or<br />
visit our website at www.msdignition.com/rma to automatically obtain a number and shipping information.<br />
When returning the unit for repair, leave all wires at the length in which you have them installed. Be sure to include<br />
a detailed account of any problems experienced, and what components and accessories are installed on the vehicle.<br />
The repaired unit will be returned as soon as possible using Ground shipping methods (ground shipping is covered<br />
by warranty). For more information, call <strong>MSD</strong> <strong>Ignition</strong> at (915) 855-7123. <strong>MSD</strong> technicians are available from 7:00<br />
a.m. to 6:00 p.m. Monday - Friday (mountain time).<br />
Limited Warranty<br />
<strong>MSD</strong> IGNITION warrants this product to be free from defects in material and workmanship under its intended normal<br />
use*, when properly installed and purchased from an authorized <strong>MSD</strong> dealer, for a period of one year from the date<br />
of the original purchase. This warranty is void for any products purchased through auction websites. If found to be<br />
defective as mentioned above, it will be repaired or replaced at the option of <strong>MSD</strong> <strong>Ignition</strong>. Any item that is covered<br />
under this warranty will be returned free of charge using Ground shipping methods.<br />
This shall constitute the sole remedy of the purchaser and the sole liability of <strong>MSD</strong> <strong>Ignition</strong>. To the extent permitted<br />
by law, the foregoing is exclusive and in lieu of all other warranties or representation whether expressed or implied,<br />
including any implied warranty of merchantability or fitness. In no event shall <strong>MSD</strong> <strong>Ignition</strong> or its suppliers be liable<br />
for special or consequential damages.<br />
*Intended normal use means that this item is being used as was originally intended and for the original application<br />
as sold by <strong>MSD</strong> <strong>Ignition</strong>. Any modifications to this item or if it is used on an application other than what <strong>MSD</strong> <strong>Ignition</strong><br />
markets the product, the warranty will be void. It is the sole responsibility of the customer to determine that this item<br />
will work for the application they are intending. <strong>MSD</strong> <strong>Ignition</strong> will accept no liability for custom applications.<br />
M S D I G N I T I O N • www.msdignition.com • (915) 857-5200 • FAX (915) 857-3344<br />
© 2007 Autotronic Controls Corporation<br />
FRM28619 Revised 05/07 Printed in U.S.A.


