WARNING! DO NOT OVERTIGHTEN VIOLIN STRINGS! - JHS
WARNING! DO NOT OVERTIGHTEN VIOLIN STRINGS! - JHS
WARNING! DO NOT OVERTIGHTEN VIOLIN STRINGS! - JHS

Create successful ePaper yourself
Turn your PDF publications into a flip-book with our unique Google optimized e-Paper software.
<strong>WARNING</strong>! <strong>DO</strong> <strong>NOT</strong> <strong>OVERTIGHTEN</strong> <strong>VIOLIN</strong> <strong>STRINGS</strong>!<br />
They are easily snapped and are not covered under warranty. Replacements can be purchased from any good music store.<br />
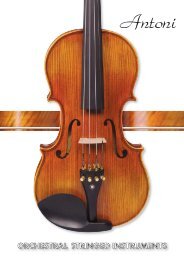
Antoni Antoni<br />
Antoni<br />
Antoni<br />
Antoni<br />
Congratulations on choosing this Antoni violin<br />
and we trust you will have many years of pleasure playing the instrument.<br />
However, before playing you will need to fully prepare the instrument. In order to do this we have detailed below<br />
a simple step-by-step guide to help you obtain the best possible sound.<br />
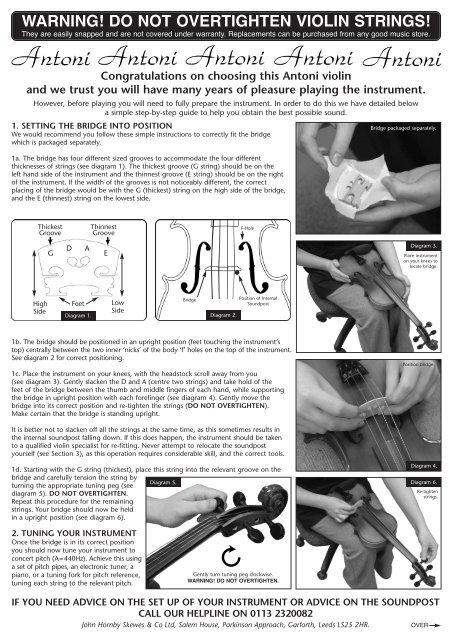
1. SETTING THE BRIDGE INTO POSITION<br />
We would recommend you follow these simple instructions to correctly fit the bridge<br />
which is packaged separately.<br />
1a. The bridge has four different sized grooves to accommodate the four different<br />
thicknesses of strings (see diagram 1). The thickest groove (G string) should be on the<br />
left hand side of the instrument and the thinnest groove (E string) should be on the right<br />
of the instrument. If the width of the grooves is not noticeably different, the correct<br />
placing of the bridge would be with the G (thickest) string on the high side of the bridge,<br />
and the E (thinnest) string on the lowest side.<br />
Bridge packaged separately.<br />
Thickest<br />
Groove<br />
Thinnest<br />
Groove<br />
1.<br />
F-Hole<br />
G<br />
D<br />
A<br />
E<br />
Diagram 3.<br />
Place instrument<br />
on your knees to<br />
locate bridge.<br />
High<br />
Side<br />
Feet<br />
Diagram 1.<br />
Low<br />
Side<br />
Bridge<br />
Diagram 2.<br />
Bridge<br />
Position of Internal<br />
Soundpost<br />
1b. The bridge should be positioned in an upright position (feet touching the instrument’s<br />
top) centrally between the two inner ‘nicks’ of the body ‘f’ holes on the top of the instrument.<br />
See diagram 2 for correct positioning.<br />
1c. Place the instrument on your knees, with the headstock scroll away from you<br />
(see diagram 3). Gently slacken the D and A (centre two strings) and take hold of the<br />
feet of the bridge between the thumb and middle fingers of each hand, while supporting<br />
the bridge in upright position with each forefinger (see diagram 4). Gently move the<br />
bridge into its correct position and re-tighten the strings (<strong>DO</strong> <strong>NOT</strong> <strong>OVERTIGHTEN</strong>).<br />
Make certain that the bridge is standing upright.<br />
Position bridge.<br />
It is better not to slacken off all the strings at the same time, as this sometimes results in<br />
the internal soundpost falling down. If this does happen, the instrument should be taken<br />
to a qualified violin specialist for re-fitting. Never attempt to relocate the soundpost<br />
yourself (see Section 3), as this operation requires considerable skill, and the correct tools.<br />
1d. Starting with the G string (thickest), place this string into the relevant groove on the<br />
bridge and carefully tension the string by<br />
Diagram 5.<br />
turning the appropriate tuning peg (see<br />
diagram 5). <strong>DO</strong> <strong>NOT</strong> <strong>OVERTIGHTEN</strong>.<br />
Repeat this procedure for the remaining<br />
strings. Your bridge should now be held<br />
in a upright position (see diagram 6).<br />
Diagram 4.<br />
Diagram 6.<br />
Re-tighten<br />
strings.<br />
2. TUNING YOUR INSTRUMENT<br />
Once the bridge is in its correct position<br />
you should now tune your instrument to<br />
concert pitch (A=440Hz). Achieve this using<br />
a set of pitch pipes, an electronic tuner, a<br />
piano, or a tuning fork for pitch reference,<br />
tuning each string to the relevant pitch.<br />
Gently turn tuning peg clockwise.<br />
<strong>WARNING</strong>! <strong>DO</strong> <strong>NOT</strong> <strong>OVERTIGHTEN</strong>.<br />
IF YOU NEED ADVICE ON THE SET UP OF YOUR INSTRUMENT OR ADVICE ON THE SOUNDPOST<br />
CALL OUR HELPLINE ON 0113 2320082<br />
John Hornby Skewes & Co Ltd, Salem House, Parkinson Approach, Garforth, Leeds LS25 2HR.<br />
OVER
• MUSICAL MERCHANDISE •<br />
W OR LD WID E DIST RIB U TIO N<br />
<strong>WARNING</strong>! <strong>DO</strong> <strong>NOT</strong> <strong>OVERTIGHTEN</strong> <strong>VIOLIN</strong> <strong>STRINGS</strong>!<br />
They are easily snapped and are not covered under warranty. Replacements can be purchased from any good music store.<br />
3. THE POSITION OF THE SOUNDPOST INSIDE THE INSTRUMENT<br />
The soundpost is an unglued cylindrical piece of wood, held in position by tension and accurate fitting. Any sharp blow to the instrument<br />
may dislodge it, or move it into an incorrect position.<br />
The soundpost should stand erect when viewed through the right hand ‘f’ hole, and should be approximately 3.5mm behind the foot of the<br />
bridge, under the E string, and 1mm in from the outside edge of the foot of the bridge.<br />
These measurements are not absolutely crucial for your purposes, but are the standards that a skilled violin maker or repairer would normally<br />
work to. If you find that the soundpost is positioned substantially outside these measurements, or is leaning considerably, take the instrument<br />
to violin specialist for correction.<br />
Similarly, if the soundpost has become dislodged, it needs to be relocated by a violin technician using a specialist tool that operates through<br />
the ‘f’ hole.<br />
Diagram 7.<br />
Correct positioning of bridge and soundpost are essential if the instrument is to play well.<br />
4. PREPARING THE BOW<br />
The hair on the bow when used for playing should be taut, but not overtaut.<br />
4a. To tighten the bowhair, turn the button on the end of the bowstick clockwise (see<br />
diagram 7) until the bowhair becomes taut. <strong>DO</strong> <strong>NOT</strong> <strong>OVERTIGHTEN</strong> as such could damage<br />
the bowhair and/or the bowstick.<br />
4b. As a rule, tighten the bowhair so that there is a gap (approximately the width of your<br />
little finger) between the bowstick and the underside of the bowhair.<br />
Turn button clockwise to tighten<br />
Approximately the width of your little finger<br />
Turn button clockwise to tighten<br />
4c. Apply rosin (supplied) to the bowhair by running the block of rosin along the length<br />
of the bowhair several times (see diagram 8).<br />
Diagram 8.<br />
If you do not apply sufficient rosin to bowhair, the instrument strings when played will not<br />
respond correctly. This is because the rosin creates the friction between the bow and the<br />
strings, which in turn is transmitted through the bridge and amplified through the body<br />
of the instrument.<br />
Tip: Score the surface of the rosin block several times before applying to the hair. If scoring the<br />
surface of the rosin does not achieve the desired result, grind a small amount of rosin into a<br />
fine powder and rub it onto the bowhair before continuing with the normal procedure<br />
described above).<br />
4d. After playing we recommend that the bow be slackened off to prolong the life of the<br />
bow and ensure it retains its correct shape. Do not overslacken.<br />
Antoni<br />
www.jhs.co.uk/antoniviolins.html<br />
IF YOU NEED ADVICE ON THE SET UP OF YOUR INSTRUMENT OR ADVICE ON THE SOUNDPOST<br />
CALL OUR HELPLINE ON 0113 2320082<br />
John Hornby Skewes & Co Ltd, Salem House, Parkinson Approach, Garforth, Leeds LS25 2HR.<br />
<strong>WARNING</strong>! <strong>DO</strong> <strong>NOT</strong> <strong>OVERTIGHTEN</strong> <strong>VIOLIN</strong> <strong>STRINGS</strong>!<br />
They are easily snapped and are not covered under warranty. Replacements can be purchased from any good music store.