Maintenance and Repair Manual for SAF Disc ... - Jupojos technika
Maintenance and Repair Manual for SAF Disc ... - Jupojos technika
Maintenance and Repair Manual for SAF Disc ... - Jupojos technika

You also want an ePaper? Increase the reach of your titles
YUMPU automatically turns print PDFs into web optimized ePapers that Google loves.
Installation Instructions – PAN 19-1<br />
Install the brake pads <strong>and</strong> adjust the clearance, following the steps as<br />
described in section 4.5. Observe the notes.<br />
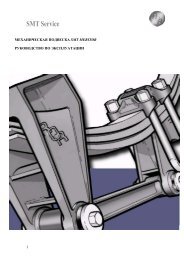
4.10 Replace Brake Cylinder<br />
Caution: Do not use power wrenches! When working on the brakes or<br />
when shifting the brake calliper, hold with your h<strong>and</strong>s only on the<br />
outside in order to avoid crushing of the fingers between brake calliper<br />
<strong>and</strong> brake carrier!<br />
Fig. 56<br />
Note: Use only brake cylinders specified by the trailer manufacturer. The<br />
following work steps serve essentially only as in<strong>for</strong>mation <strong>for</strong> the removal <strong>and</strong><br />
installation of the brake cylinder on the axle. Detailed installation instructions<br />
<strong>and</strong> the testing <strong>and</strong> installation specifications must be taken from the<br />
specifications of the manufacturer of the cylinder type employed..<br />
Removal sequence:<br />
<strong>Disc</strong>onnect the air connection from the brake cylinder<br />
(according to the instructions of the cylinder manufacturer).<br />
Remove the brake cylinder from the brake calliper by loosening the<br />
nuts of the brake cylinder <strong>and</strong> removed from the brake calliper<br />
(Table 1, position V).<br />
Installation sequence:<br />
Fig. 57<br />
Caution: Depending on the installation position of the brake, the lower<br />
drainage opening on the brake cylinder (facing downwards) must be<br />
open! The other openings must be sealed with plugs!<br />
Be<strong>for</strong>e installing the brake cylinder, clean the sealing surface on the<br />
brake calliper <strong>and</strong> grease the spherical seat (arrow) in the brake lever.<br />
Install brake cylinder on brake calliper <strong>and</strong> tighten nuts with a wrench<br />
(Table 1, position V).<br />
Connect the brake hose to the brake cylinder<br />
(according to the instructions of the cylinder manufacturer).<br />
Note: The brake hose must never be twisted <strong>and</strong> must be laid so that it cannot<br />
rub against other part. The brake hose must exert no preload on the sliding<br />
function of the brake calliper.<br />
Check the air connection <strong>for</strong> leaks (according to the instructions of the<br />
cylinder manufacturer).<br />
Carry out a function <strong>and</strong> effectiveness test (according to the<br />
instructions of the cylinder manufacturer).<br />
Fig. 58<br />
SK RB/RLB 9019 WI with WABCO PAN 19-1 11.411GB Edition 09/05 - 42 -