compact component system fs-sd5/fs-sd7/fs-sd9 - JVC
compact component system fs-sd5/fs-sd7/fs-sd9 - JVC
compact component system fs-sd5/fs-sd7/fs-sd9 - JVC

Create successful ePaper yourself
Turn your PDF publications into a flip-book with our unique Google optimized e-Paper software.
REMOTE CONTROL<br />
DIMMER<br />
DISPLAY<br />
PROGRAM<br />
AHB PRO<br />
SLEEP<br />
AUTO<br />
PRESET<br />
RANDOM<br />
DOOR<br />
SLIDE<br />
FM MODE<br />
REPEAT<br />
CD<br />
BASS TREBLE CANCEL<br />
FADE MUTING<br />
MD/AUX<br />
UP<br />
SET<br />
DOWN<br />
CD<br />
VOLUME<br />
REMOTE CONTROL<br />
DIMMER<br />
DISPLAY<br />
PROGRAM<br />
AHB PRO<br />
SLEEP<br />
AUTO<br />
PRESET<br />
RANDOM<br />
DOOR<br />
SLIDE<br />
FM / AM<br />
FM MODE<br />
REPEAT<br />
CD<br />
BASS TREBLE CANCEL<br />
FADE MUTING<br />
MD/AUX<br />
UP<br />
SET<br />
DOWN<br />
CD<br />
VOLUME<br />
FM / AM<br />
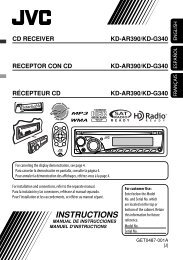
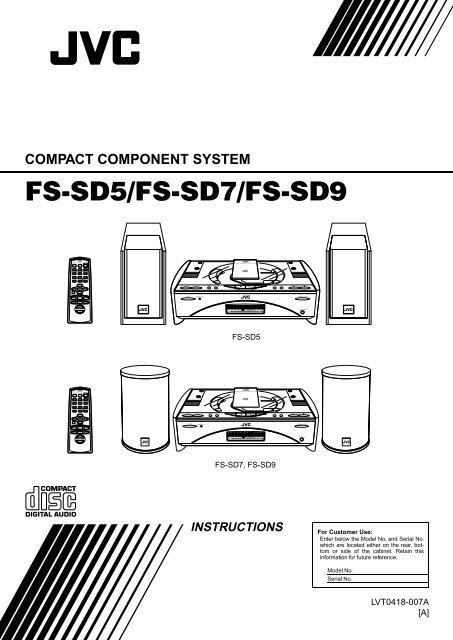
COMPACT COMPONENT SYSTEM<br />
FS-SD5/FS-SD7/FS-SD9<br />
FS-SD5<br />
FS-SD7, FS-SD9<br />
INSTRUCTIONS<br />
For Customer Use:<br />
Enter below the Model No. and Serial No.<br />
which are located either on the rear, bottom<br />
or side of the cabinet. Retain this<br />
information for future reference.<br />
Model No.<br />
Serial No.<br />
LVT0418-007A<br />
[A]
PHONES<br />
Warnings, Cautions and Others<br />
IMPORTANT FOR LASER PRODUCTS<br />
REPRODUCTION OF LABELS<br />
1 CLASSIFICATION LABEL, PLACED ON EXTERIOR<br />
SURFACE<br />
1 CLASS 1 LASER PRODUCT<br />
2 DANGER: Invisible laser radiation when open and interlock<br />
failed or defeated. Avoid direct exposure to beam.<br />
3 CAUTION: Do not open the top cover. There are no user serviceable<br />
parts inside the Unit; leave all servicing to qualified<br />
service personnel.<br />
CLASS 1<br />
LASER PRODUCT<br />
2 WARNING LABEL, PLACED INSIDE THE UNIT<br />
Caution — % switch!<br />
Disconnect the mains plug to shut the power off completely.<br />
The switch in any position does not disconnect the mains<br />
line. The power can be remote controlled.<br />
CAUTION<br />
To reduce the risk of electrical shocks, fire, etc.:<br />
1 Do not remove screws, covers or cabinet.<br />
2 Do not expose this appliance to rain or moisture.<br />
Caution: Proper Ventilation<br />
To avoid risk of electric shock and fire, and to prevent damage, locate the apparatus as follows:<br />
1 Front: No obstructions and open spacing.<br />
2 Sides/ Top/ Back: No obstructions should be placed in the areas shown by the dimensions below.<br />
3 Bottom: Place on the level surface. Maintain an adequate air path for ventilation by placing on a stand with a height<br />
of 10 cm or more.<br />
Front view<br />
Side view<br />
15 cm<br />
15 cm<br />
15 cm 1 cm 1 cm<br />
STANDBY/ON<br />
OPEN/CLOSE<br />
15 cm<br />
15 cm<br />
10 cm<br />
CAUTION<br />
■ About the Internal Cooling Fan<br />
This unit includes an internal cooling fan, so as to allow for high-power operation within a small space.<br />
This fan comes on when the sound level is set high, and may also come on even at low sound levels if the internal temperature rises. To ensure<br />
effective fan operation, please leave at least 15cm clearance between the rear of the unit and the wall, and at least 1cm clearance on each side of<br />
the unit.<br />
G-1
Introduction<br />
Thank you for purchasing the <strong>JVC</strong> Compact Component System.<br />
We hope it will be a valued addition to your home, giving you years of enjoyment.<br />
Be sure to read this instruction manual carefully before operating your new stereo <strong>system</strong>.<br />
In it you will find all the information you need to set up and use the <strong>system</strong>.<br />
If you have a query that is not answered by the manual, please contact your dealer.<br />
Features<br />
Here are some of the things that make your System both powerful and simple to use.<br />
■ The controls and operations have been redesigned to make them very easy to use, freeing you to<br />
just enjoy the music.<br />
• With <strong>JVC</strong>’s COMPU PLAY you can turn on the System and automatically start the Radio or<br />
CD Player with a single touch.<br />
■ The System incorporates Active Hyper Bass PRO circuitry to faithfully reproduce low frequency<br />
sounds.<br />
■ A 45-station preset capability (30 FM and 15 AM (MW/LW)) in addition to auto-seek and manual tuning.<br />
■ CD options that include repeat, random and program play.<br />
■ Timer functions; Daily Timer and Sleep Timer.<br />
■ You can connect various external units, such as an MD recorder.<br />
How This Manual Is Organized<br />
• Basic information that is the same for many different functions - e.g. setting the volume - is given in the section<br />
‘Basic Operations’, and not repeated under each function.<br />
• The names of buttons/controls and display messages are written in all capital letters: e.g. FM/AM, “NO DISC”.<br />
• System functions are written with an initial capital letter only: e.g. Normal Play.<br />
Use the table of contents to look up specific information you require.<br />
We have enjoyed making this manual for you, and hope it serves you in enjoying the many features built into your System.<br />
WARNINGS<br />
• DO NOT PUT ANYTHING ON THE TOP COVER. IF THE SYSTEM IS OPERATED WITH SOMETHING<br />
PUT ON THE TOP COVER, IT WILL BE DAMAGED WHEN YOU TRY TO OPEN THE TOP COVER.<br />
• NEVER REMOVE THE TOP COVER FROM THE UNIT. SERIOUS INJURY MAY OCCUR IF THE SYS-<br />
TEM IS OPERATED WITHOUT THE TOP COVER.<br />
IMPORTANT CAUTIONS<br />
1 Installation of the System<br />
• Select a place which is level, dry and neither too hot nor too cold. (Between 5°C and 35°C or 41°F and 95°F.)<br />
• Leave sufficient distance between the System and a TV.<br />
• Do not use the System in a place subject to vibrations.<br />
2 Power cord<br />
• Do not handle the power cord with wet hands!<br />
• Some power is always consumed as long as the power cord is connected to the wall outlet.<br />
• When unplugging the System from the wall outlet, always pull the plug, not the power cord.<br />
3 Malfunctions, etc.<br />
• There are no user serviceable parts inside. In case of <strong>system</strong> failure, unplug the power cord and consult your dealer.<br />
• Do not insert any metallic object into the System.<br />
• Do not insert your hand between the Top Cover and the main body when the Top Cover is being closed.<br />
1
Table of Contents<br />
2<br />
Introduction ........................................................................................................ 1<br />
Features ...................................................................................................................................... 1<br />
How This Manual Is Organized ................................................................................................. 1<br />
WARNINGS .............................................................................................................................. 1<br />
IMPORTANT CAUTIONS ....................................................................................................... 1<br />
Getting Started ................................................................................................... 3<br />
Accessories................................................................................................................................. 3<br />
How To Put Batteries In the Remote Control ............................................................................ 3<br />
Using the Remote Control.......................................................................................................... 3<br />
Connecting the FM Antenna ......................................................................................................4<br />
Connecting the AM (MW/LW) Antenna ................................................................................... 5<br />
Connecting the Speakers ............................................................................................................ 6<br />
Attaching the Spacers................................................................................................................. 7<br />
Connecting a Subwoofer ............................................................................................................ 7<br />
Connecting External Equipment ................................................................................................ 7<br />
Connecting an MD Recorder, etc (Digital Output).................................................................... 7<br />
Connecting the AC Power Cord................................................................................................. 8<br />
COMPU Play.............................................................................................................................. 8<br />
Automatic Power On.................................................................................................................. 8<br />
Basic Operations ............................................................................................... 9<br />
Turning the Power On and Off...................................................................................................9<br />
Adjusting the Brightness (DIMMER)........................................................................................ 9<br />
Adjusting the Volume ................................................................................................................ 9<br />
Fade-out Muting (FADE MUTING)........................................................................................ 10<br />
Reinforcing the Bass Sound (AHB PRO) ................................................................................ 10<br />
Tone Control (BASS/TREBLE)............................................................................................... 10<br />
Showing the Time (CLOCK/DISPLAY) ................................................................................. 10<br />
Sliding the Top Cover (DOOR SLIDE)................................................................................... 10<br />
Using the Tuner................................................................................................ 11<br />
Tuning In a Station................................................................................................................... 11<br />
Presetting Stations.................................................................................................................... 12<br />
Auto Presetting......................................................................................................................... 12<br />
To Change the FM Reception Mode....................................................................................... 12<br />
Using the CD Player......................................................................................... 13<br />
To Insert a CD.......................................................................................................................... 13<br />
To Unload a CD ....................................................................................................................... 14<br />
Basics of Using the CD Player-Normal Play ........................................................................... 14<br />
Programming the Playing Order of the Tracks ........................................................................ 14<br />
Random Play ............................................................................................................................ 15<br />
Repeating Tracks...................................................................................................................... 15<br />
Using External Equipments ............................................................................ 16<br />
Listening to External Equipment.............................................................................................. 16<br />
Recording the System’s Source to External Equipment .......................................................... 16<br />
Using the Timers.............................................................................................. 17<br />
Setting the Clock ...................................................................................................................... 17<br />
Setting the Daily Timer............................................................................................................ 17<br />
Setting the SLEEP Timer .........................................................................................................19<br />
Care And Maintenance .................................................................................... 20<br />
Troubleshooting............................................................................................... 21<br />
Specifications....................................................................................Back cover
Getting Started<br />
Accessories<br />
Make sure that you have all of the following items, which are supplied with the System.<br />
Power Cord (1)<br />
AM Loop Antenna (1)<br />
Remote Control (1)<br />
Batteries (2)<br />
FM Wire Antenna (1)<br />
Speaker Cords (2)<br />
Spacers (6) (only for FS-SD7 / SD9)<br />
If any of these items are missing, contact your dealer immediately.<br />
How To Put Batteries In the Remote Control<br />
Match the polarity (+ and –) on the batteries with the + and – markings in the battery compartment.<br />
R6P(SUM-3)/AA(15F)<br />
CAUTION:<br />
• Handle batteries properly.<br />
■<br />
To avoid battery leakage or explosion:<br />
• Remove batteries when the Remote Control will not be used for a long time.<br />
• When you need to replace the batteries, replace both batteries at the same time with new ones.<br />
• Do not use an old battery with a new one.<br />
• Do not use different types of batteries together.<br />
Using the Remote Control<br />
The Remote Control makes it easy to use many of the functions of the System from a distance of up to 7m (23 feet) away.<br />
You need to point the Remote Control at the remote sensor on the System’s front panel.<br />
STANDBY/ON<br />
OPEN/CLOSE<br />
PHONES<br />
Remote sensor<br />
3
Getting Started<br />
CAUTION:<br />
• Make all connections before plugging the System into an AC power outlet.<br />
Connecting the FM Antenna<br />
Rear Panel of the Unit<br />
SUB WOOFER<br />
CD DIGITAL OUT<br />
OUT<br />
IN<br />
SPEAKERS IMPEDANCE 4 16<br />
R<br />
L<br />
MD / AUX<br />
ANTENNA<br />
AC IN<br />
AM EXT FM(75 )<br />
COAXIAL<br />
AM LOOP<br />
Using the Supplied Wire Antenna<br />
FM wire antenna (supplied)<br />
• Before attaching a 75 ohm coaxial lead (the kind with a<br />
round wire going to an outdoor antenna), disconnect the<br />
supplied FM Wire Antenna.<br />
Using the Coaxial Type Connector<br />
(Not Supplied)<br />
A 75-ohm antenna with coaxial type connector (IEC or<br />
DIN45 325) should be connected to the FM 75-ohm CO-<br />
AXIAL terminal.<br />
If reception is poor, connect the outdoor antenna.<br />
Coaxial cable<br />
FM outdoor<br />
antenna<br />
(Not supplied)<br />
4
Getting Started<br />
Connecting the AM (MW/LW) Antenna<br />
Rear Panel of the Unit<br />
SUB WOOFER<br />
CD DIGITAL OUT<br />
OUT<br />
IN<br />
SPEAKERS IMPEDANCE 4 16<br />
R<br />
L<br />
MD / AUX<br />
ANTENNA<br />
AC IN<br />
AM EXT FM(75 )<br />
COAXIAL<br />
AM LOOP<br />
AM loop antenna (Supplied)<br />
ANTENNA<br />
Attach the AM loop to its base by snapping the tabs on<br />
the loop into the slot in the base.<br />
AM EXT FM(75 )<br />
COAXIAL<br />
AM LOOP<br />
Turn the loop until you have the best reception.<br />
CAUTION:<br />
• To avoid noise, keep antennas away from the System, the connecting cord and the AC power<br />
cord.<br />
5
Getting Started<br />
CAUTION:<br />
• Make all connections before plugging the System into an AC power outlet.<br />
Connecting the Speakers<br />
1. Open each of the terminals to connect the speaker wire leads.<br />
2. Connect the speaker cords between the Speaker terminals of the Unit and the terminals of the Speakers.<br />
Connect the cords with a black line to the (–) terminals and cords without a black line to the (+) terminals.<br />
3. Close each of the terminals to securely connect the cords.<br />
Right side (rear view)<br />
Marked with a black line<br />
Left side (rear view)<br />
SPEAKERS IMPEDANCE 4 16<br />
R<br />
L<br />
• Since both speakers are the same, you can put either one to the right or left side.<br />
CAUTION:<br />
• A TV may display irregular colors if located near the speakers. If this happens, set the speakers<br />
away from the TV.<br />
Removing the speaker grilles<br />
The speaker grilles can be moved.<br />
When removing:<br />
1. Pull the top forwards you with your fingers.<br />
2. Also pull the bottom towords you.<br />
(FS-SD5)<br />
(FS-SD7 and FS-SD9)<br />
• When removing the speaker grille from the FS-SD9’s<br />
speaker, be careful not to damage the cabinet.<br />
When attaching the speaker grille:<br />
(FS-SD5)<br />
(FS-SD7 and FS-SD9)<br />
6<br />
Speaker<br />
grille<br />
Speaker<br />
grille
Getting Started<br />
Attaching the Spacers<br />
CAUTION:<br />
Note for installation<br />
• Take special care to select an appropriate installation<br />
place where an earthquake or shock does not<br />
cause the speaker to collapse or drop on the floor.<br />
Spacer<br />
(FS-SD7)<br />
Spacer<br />
(FS-SD9)<br />
FS-SD7 / SD9<br />
Attach the supplied spacers to the bottom of the speaker to<br />
protect the cabinet, prevent slipping, and absorb the cabinet<br />
vibration. Peel off the backing from a spacer and attach it.<br />
Connecting a Subwoofer<br />
Connect a signal cord (not supplied) between the System’s SUBWOOFER terminal and the input terminal of an external subwoofer.<br />
Subwoofer (not supplied)<br />
SUB WOOFER<br />
CD DIGITAL OUT<br />
OUT<br />
IN<br />
ANTENNA<br />
MD / AUX<br />
Signal cord (not supplied)<br />
*<br />
11mm Max.<br />
AM EXT FM(75 11mm Max/ )<br />
COAXIAL<br />
AM LOOP<br />
* Use the plug whose diameter is 11mm or less.<br />
Connecting External Equipment<br />
Connect signal cords (not supplied) between the System’s MD/AUX-OUT/IN terminals and the output/input terminals of the<br />
external MD recorder, tape deck, etc.<br />
You can then listen to the external source through the System or record the System’s CD player or tuner to the external unit.<br />
SUB WOOFER<br />
CD DIGITAL OUT<br />
ANTENNA<br />
OUT<br />
AM EXT FM(75 )<br />
COAXIAL<br />
AM LOOP<br />
Connecting an MD Recorder, etc (Digital Output)<br />
MD / AUX<br />
* Use the plug whose diameter is 11mm or less.<br />
IN<br />
Signal cord (not supplied)<br />
*<br />
Stereo mini-plug<br />
Signal cord (not supplied)<br />
11mm Max.<br />
*<br />
Stereo mini-plug<br />
Pin-plug x 2<br />
Pin-plug x 2<br />
MD recorder or tape deck<br />
(not supplied)<br />
Unplug the cap and connect an optical digital cord (not supplied) between the System’s CD DIGITAL OUT terminal and the<br />
input terminal of the MD recorder, etc.<br />
You can record the digital output signal from the System’s CD Player to the MD recorder, etc.<br />
Cap<br />
11mm Max.<br />
CD DIGITAL OUT<br />
11mm Max.<br />
*<br />
MD recorder, etc. (not supplied)<br />
* Use the plug whose diameter is 11mm or less.<br />
Optical digital cord (not supplied)<br />
7
Getting Started<br />
Connecting the AC Power Cord<br />
Firmly insert the supplied AC power cord into the AC inlet on the back of the Unit.<br />
AC IN<br />
Power cord<br />
CAUTIONS:<br />
• ONLY USE THE <strong>JVC</strong> POWER CORD PROVIDED WITH THIS SYSTEM TO AVOID MALFUNC-<br />
TION OR DAMAGE TO THE SYSTEM.<br />
• BE SURE TO UNPLUG THE POWER CORD FROM THE OUTLET WHEN GOING OUT OR WHEN<br />
THE SYSTEM IS NOT IN USE FOR AN EXTENDED PERIOD OF TIME.<br />
Now you can plug the AC power cord into the wall outlet, and your System is at your command!<br />
COMPU Play<br />
<strong>JVC</strong>’s COMPU PLAY feature lets you control the most frequently used System functions with a single touch.<br />
With One Touch Operation you can play a CD, turn on the radio, or listen to an external equipment with a single press of the<br />
play button for that function. One Touch Operation turns the power on for you, then starts the function you have specified. At<br />
the same time, the Top Cover moves backward to allow the Unit’s top button operation. If the System is not ready (no CD in<br />
place), the System still powers on so you can insert a CD.<br />
How One Touch Operation works in each case is explained in the section dealing with that function.<br />
The COMPU PLAY buttons are:<br />
On the Remote Control<br />
CD #/8 button<br />
FM/AM button<br />
MD/AUX button<br />
Automatic Power On<br />
The System automatically turns on with the following operation.<br />
• When you press the CD 0 button on the Remote Control or the OPEN/CLOSE button on the Unit, the System automatically<br />
turns on and the Top Cover opens to allow CD setting. However, this operation does not change the function to CD.<br />
When you press the % button to turn off the System, the Top Cover will be automatically closed if it is opened.<br />
• When you press the DOOR SLIDE button on the Remote Control, the System automatically turns on and the Top Cover<br />
moves backwards to allow button operation.<br />
When you press the % button to turn off the System, the Top Cover will automatically moves back to the original position,<br />
if it is in the backward position.<br />
8
MD/AUX<br />
FM/AM<br />
STANDBY/ON<br />
PRESET<br />
TUNING<br />
AHB PRO CLOCK TIMER VOLUME<br />
DOWN<br />
MULTI CONTROL<br />
UP<br />
OPEN/CLOSE<br />
PHONES<br />
Basic Operations<br />
DIMMER<br />
DISPLAY<br />
AHB PRO<br />
BASS<br />
FADE<br />
MUTING<br />
REMOTE CONTROL<br />
DIMMER<br />
DISPLAY<br />
PROGRAM<br />
AHB PRO<br />
SLEEP<br />
AUTO<br />
PRESET<br />
RANDOM<br />
DOOR<br />
SLIDE<br />
FM MODE<br />
REPEAT<br />
CD<br />
BASS TREBLE CANCEL<br />
FADE MUTING<br />
MD/AUX<br />
UP<br />
SET<br />
DOWN<br />
CD<br />
FM / AM<br />
%<br />
DOOR SLIDE<br />
TREBLE<br />
CD<br />
AHB PRO CLOCK VOLUME+,–<br />
Top Cover<br />
VOLUME+,–<br />
VOLUME<br />
STANDBY/ON indicator<br />
%<br />
PHONES<br />
Turning the Power On and Off<br />
Turning the System On<br />
Press the % button.<br />
The Top Cover moves backward and the Unit’s top buttons<br />
appear. The display comes on and “HELLO” is displayed<br />
once. The STANDBY/ON indicator lights in green.<br />
The System comes on ready to continue in the mode it was<br />
in when the power was last turned off.<br />
■ For example, if the last thing you were doing was listening<br />
to a CD, you are now ready to listen to a CD again. If<br />
you wish, you can change to another source.<br />
■ If you were listening to the Tuner last, the Tuner comes<br />
on playing the station it was last set to.<br />
Turning the System Off<br />
Press the % button again.<br />
The Top Cover moves back to the original position.<br />
“GOOD BYE” is displayed and the display goes out, except<br />
for the clock display. The STANDBY/ON indicator lights in<br />
red.<br />
■ Some power is always consumed even though power is<br />
turned off (called Standby Mode).<br />
■ To switch off the System completely, unplug the AC<br />
power cord from the wall outlet. When you unplug the<br />
AC power cord, the clock will be reset to 0:00 after about<br />
20 minutes.<br />
Adjusting the Brightness<br />
(DIMMER)<br />
You can adjust the brightness of the backlighting for the display.<br />
When the System is Turned On<br />
Each time you press the DIMMER button on the Remote<br />
Control, the brightness of the backlighting changes as follows:<br />
Bright = Dark = (back to the beginning)<br />
When the System is Turned Off<br />
(STANDBY MODE)<br />
Each time you press the DIMMER button on the Remote<br />
Control, the brightness of the backlighting changes as follows:<br />
No backlighting = Dark backlighting<br />
= (back to the beginning)<br />
• When the System is turned off again after power on, the<br />
brightness in Standby mode will be restored to the previous<br />
one since the brightness setting in Standby mode is<br />
stored in memory.<br />
Adjusting the Volume<br />
Press the VOLUME + button to increase the volume or<br />
press the VOLUME – button to decrease it.<br />
You can adjust the volume level between 0 and 50.<br />
CAUTION:<br />
• DO NOT turn on the System and/or start<br />
playing any source without first setting the<br />
VOLUME control to minimum, as a sudden<br />
blast of sound could damage your hearing,<br />
speakers and/or headphones.<br />
For private listening<br />
Connect a pair of headphones to the PHONES jack. No<br />
sound comes out of the speakers.<br />
Be sure to turn down the volume before connecting or putting<br />
on headphones.<br />
9
Basic Operations<br />
Fade-out Muting (FADE MUTING)<br />
You can mute the output with one touch operation.<br />
To mute the output, press the FADE MUTING button<br />
on the Remote Control. Then, the output will be faded out<br />
and becomes 0.<br />
To release muting, press the FADE MUTING button once<br />
again. Then, the output will be faded in to the original level.<br />
Showing the Time<br />
(CLOCK/DISPLAY)<br />
You can show the current time on the display.<br />
To display the clock, press the CLOCK button on the<br />
Unit or DISPLAY button on the Remote Control.<br />
To return to the previous mode, press the same button<br />
again.<br />
Reinforcing the Bass Sound<br />
(AHB PRO)<br />
You can reinforce the bass sound to maintain rich, full bass<br />
at low volume.<br />
To get the effect, press the AHB (Active Hyper Bass)<br />
PRO button.<br />
The “AHB PRO” indicator lights up on the display.<br />
To cancel the effect, press the button again.<br />
The “AHB PRO” indicator goes out.<br />
Tone Control (BASS/TREBLE)<br />
You can control the tone by changing the bass and treble.<br />
BASS Control<br />
You can adjust the bass level (low frequency range level)<br />
between –6 and +6. (0: Flat)<br />
1 Press the BASS button on the Remote<br />
Control.<br />
2 Press the UP or DOWN button on the<br />
Remote Control to adjust the bass level.<br />
• To let the clock work, you need to set the clock first. (See<br />
“Setting the Clock” on page 17.)<br />
Sliding the Top Cover<br />
(DOOR SLIDE)<br />
Each time you press the DOOR SLIDE button on the Remote<br />
Control, the Top Cover slides back and forth.<br />
Slide the Top Cover backward to allow Unit’s top button<br />
operation. Slide it toward you to cover the buttons.<br />
DOWN<br />
BASS<br />
UP<br />
TREBLE Control<br />
You can adjust the treble level (high frequency range level)<br />
between –6 and +6. (0: Flat)<br />
1 Press the TREBLE button on the<br />
Remote Control.<br />
2 Press the UP or DOWN button on the<br />
Remote Control to adjust the treble<br />
level.<br />
DOWN<br />
TREBLE<br />
UP<br />
10
Using the Tuner<br />
REMOTE CONTROL<br />
DIMMER<br />
SLEEP<br />
AUTO<br />
PRESET<br />
DISPLAY<br />
PROGRAM<br />
AHB PRO<br />
AUTO<br />
PRESET<br />
RANDOM<br />
DOOR<br />
SLIDE<br />
FM MODE<br />
REPEAT<br />
CD<br />
FM MODE<br />
MD/AUX<br />
FM/AM<br />
PRESET<br />
TUNING AHB PRO CLOCK TIMER VOLUME<br />
CD<br />
DOWN<br />
UP<br />
MULTI CONTROL<br />
<<br />
SET<br />
4<br />
BASS TREBLE CANCEL<br />
UP<br />
SET<br />
DOWN<br />
FADE MUTING<br />
CD<br />
MD/AUX<br />
FM / AM<br />
UP<br />
><br />
DOWN<br />
FM/AM<br />
¢<br />
FM/AM<br />
PRESET 4<br />
TUNING<br />
¢<br />
Band display, Frequency display, Preset channel<br />
VOLUME<br />
FM mode<br />
indicators<br />
STEREO<br />
MONO<br />
* When the System is in use, the display shows other items as well.<br />
For simplicity, we show here only the items described in this section.<br />
You can listen to FM and AM (MW/LW) stations. Stations<br />
can be tuned in manually, automatically, or from preset<br />
memory storage.<br />
■ Before listening to the radio:<br />
• Make sure that both the FM and AM (MW/LW) antennas<br />
are correctly connected. (See pages 4 and 5).<br />
One Touch Radio<br />
Just press the FM/AM button to turn on the System and start<br />
playing the station you were last tuned to.<br />
■ You can switch from any other sound source to the radio<br />
by pressing the FM/AM button.<br />
Tuning In a Station<br />
1 Press the FM/AM button.<br />
The Band and Frequency you were last tuned to appear<br />
on the display.<br />
(If the last station was selected using the preset number,<br />
the preset number appears first.)<br />
Each time you press the button, the band alternates between<br />
FM and AM (MW/LW).<br />
AM<br />
FM / AM<br />
(on the Remote Control)<br />
FM<br />
2 Select a station using one of the following<br />
methods.<br />
● Manual Tuning<br />
Press the 4 or ¢ button on the Unit or the Remote<br />
Control repeatedly to move from frequency to<br />
frequency until you find the station you want.<br />
OR<br />
AM<br />
FM/AM<br />
(on the Unit)<br />
FM<br />
● Auto Tuning<br />
If you press and hold the 4 or ¢ button on the<br />
Unit or the Remote Control for one second or more,<br />
the frequency changes down, or up, automatically until<br />
a station is found.<br />
OR<br />
● Preset Tuning using the Remote Control<br />
(Possible only after presetting stations)<br />
Select the desired preset number using the UP,<br />
DOWN, > and < button on the Remote Control. After<br />
1 second the display will show the preset number’s<br />
band and frequency.<br />
Example:<br />
Press the UP button until the preset number 12 “P12”<br />
appears.<br />
UP<br />
or<br />
DOWN<br />
(After 1 second)<br />
● Preset Tuning using the Unit<br />
Press the PRESET TUNING button to select the desired<br />
preset number.<br />
Its band and frequency are displayed.<br />
• In AM broadcast, reception sensitivity will be changed by<br />
turning the AM loop antenna. Turn the AM loop antenna<br />
for best reception.<br />
11
Using the Tuner<br />
Presetting Stations<br />
You can preset up to 30 FM stations and up to 15 AM (MW/<br />
LW) stations using the Remote Control.<br />
• Preset numbers may have been set to factory test frequencies<br />
prior to shipment. This is not a malfunction. You<br />
can preset the stations you want into memory by following<br />
one of the presetting methods below.<br />
Manual Presetting<br />
FM / AM<br />
1 Select a band by pressing the FM/AM<br />
button.<br />
2 Press the 4 or ¢ button to tune in a<br />
station.<br />
3 Press the SET button.<br />
“SET” will blink for 5 seconds.<br />
Within 5 seconds, proceed to the next step.<br />
When the display returns to the one set in step 2 after 5<br />
seconds, press the SET button again.<br />
4 Press the UP, DOWN, >, or < button<br />
within 5 seconds to select the preset<br />
number.<br />
UP or DOWN button:Increase or decrease the preset<br />
number by 1.<br />
Pressing and holding the button<br />
will continuously increase or decrease<br />
the preset number.<br />
> or < button: Increase or decrease the preset<br />
number by 1.<br />
Pressing and holding the button<br />
will rapidly increase or decrease<br />
the preset number.<br />
5 Press the SET button within 5 seconds.<br />
“STORED” appears and after 2 seconds, the display returns<br />
to the broadcast frequency display.<br />
6 Repeat above steps 1 to 5 for each station<br />
you want to store in memory with a<br />
preset number.<br />
To change the preset stations, repeat the same<br />
steps as above.<br />
SET<br />
SET<br />
DOWN<br />
When changing the Band FM = 30, AM = 15<br />
UP<br />
or<br />
STORED<br />
SET<br />
Auto Presetting<br />
In each band, you can automatically preset FM-30, AM-15<br />
(MW/LW) stations. Preset numbers will be allocated as stations<br />
are found, starting from the lowest frequency and<br />
moving up the frequency.<br />
FM / AM<br />
1 Select a band by pressing the FM/AM<br />
button.<br />
2 Press the AUTO PRESET button on the<br />
Remote Control for more than two seconds.<br />
3 Repeat steps 1-2 for the other band.<br />
■ If you want to change the preset stations, carry out the<br />
Manual Presetting for the desired preset numbers.<br />
CAUTION:<br />
• Even if the <strong>system</strong> is unplugged or if the<br />
power failure occurs, the preset stations<br />
will be stored for about 24 hours. However,<br />
in case the preset stations are erased, you<br />
will need to preset the stations again.<br />
To Change the FM<br />
Reception Mode<br />
When you are tuned into an FM stereo broadcast, the<br />
“STEREO” indicator lights up and you can hear stereo effects.<br />
If an FM stereo broadcast is hard to receive or noisy, you<br />
can select Monaural mode. Reception improves, but you<br />
lose stereo effect.<br />
Press the FM MODE button on the Remote Control<br />
so that the “MONO” indicator lights up on the display.<br />
FM MODE<br />
AUTO<br />
PRESET (for 2 seconds)<br />
MONO<br />
To restore the stereo effect, press the FM MODE button<br />
on the Remote Control so that the “MONO” indicator goes off.<br />
12
MD/AUX<br />
FM/AM<br />
PRESET<br />
TUNING<br />
AHB PRO CLOCK TIMER VOLUME<br />
DOWN<br />
MULTI CONTROL<br />
UP<br />
% STANDBY/ON<br />
OPEN/CLOSE<br />
PHONES<br />
Using the CD Player<br />
REMOTE CONTROL<br />
DIMMER<br />
SLEEP<br />
PROGRAM<br />
RANDOM<br />
SET<br />
<<br />
DISPLAY<br />
PROGRAM<br />
AHB PRO<br />
AUTO<br />
PRESET<br />
RANDOM<br />
DOOR<br />
SLIDE<br />
FM MODE<br />
REPEAT<br />
CD<br />
BASS TREBLE CANCEL<br />
UP<br />
SET<br />
REPEAT<br />
CD 0<br />
CANCEL<br />
UP<br />
><br />
CD<br />
¢<br />
4 7 CD #¥8<br />
Top Cover<br />
DOWN<br />
FADE MUTING<br />
CD<br />
DOWN<br />
MD/AUX<br />
FM / AM<br />
CD #/8<br />
4 ¢<br />
7<br />
VOLUME<br />
Track number, Playing time, Preset number<br />
OPEN/CLOSE<br />
PROGRAM RANDOM ALL<br />
1 2 3 4 5 6 7 8 9 10 11 12 13 14 15 16 17 18 19 20<br />
Play mode indicators<br />
Music calendar<br />
Track number exceeding 20 is not<br />
displayed.<br />
* When the System is in use, the display shows other items as well.<br />
For simplicity, we show here only the items described in this section.<br />
You can use Normal, Random, Program or Repeat Play. Repeat<br />
Play can repeat all the tracks or just one of the tracks<br />
on the CD.<br />
Here are the basic things you need to know to play a CD and<br />
locate the different tracks on it.<br />
The Quickest Way To Start a CD Is With the One<br />
Touch Operation<br />
■ Press the CD #¥8 button on the Remote Control.<br />
• The power is automatically turned on and the Top Cover<br />
moves backward to allow the Unit’s top button operation.<br />
If a CD is already inserted, it will start playing from<br />
the first track.<br />
• If no CD is inserted, “NO DISC” appears on the display<br />
and the CD Player remains in Stop mode.<br />
To Insert a CD<br />
1 Press the OPEN/CLOSE button on the<br />
Unit (or the CD 0 button on the<br />
Remote Control).<br />
The Top Cover opens.<br />
2 Place a CD, with its label side up as<br />
shown below. Press down on the CD’s<br />
center until you hear a click.<br />
3 Press the OPEN/CLOSE button (or CD 0<br />
button) again to close the Top Cover.<br />
• To close the Top Cover and play the CD, you can just<br />
press the CD #¥8 button.<br />
■ You can place an 8 cm (3'') CD without an adaptor.<br />
■ If the CD cannot be read correctly (because it is<br />
scratched, for example), “ 0 0:00” appears on the display.<br />
■ You can insert a CD while listening to the other source.<br />
CAUTION:<br />
• DO NOT try to open or close the Top Cover<br />
by hands as it will be damaged.<br />
13
Using the CD Player<br />
To Unload a CD<br />
Take out the CD as shown below.<br />
To pause, press the CD #¥8 button. The playback time<br />
blinks on the display.<br />
To cancel pause, press the same button again. Play continues<br />
from the point where it was paused.<br />
To Select a Track or Passage within a Track<br />
During playback, press the 4 or ¢ (< or >) button to select<br />
the track you want.<br />
• The selected track starts playing.<br />
• Press the ¢ or > button once to skip to the beginning<br />
of the next track.<br />
• Press the 4 or < button to skip to the beginning of<br />
the track being played. Press twice quickly to skip to<br />
the beginning of the previous track.<br />
• When the > or < button on the Remote Control is<br />
kept pressing, the track continuously skips.<br />
Search Play<br />
Holding down the 4 or ¢ button, during playback, will<br />
fast forward/backwards the CD so you can quickly find a<br />
particular passage in the track you are listening to.<br />
Programming the<br />
Playing Order of the Tracks<br />
Basics of Using the<br />
CD Player-Normal Play<br />
To Play a CD<br />
1 Insert a CD.<br />
2 Press the CD #¥8 button.<br />
The first track of the CD begins playing.<br />
You can program the playing order of the tracks using the<br />
Remote Control.<br />
■ You can program up to 32 tracks in any desired order including<br />
the same tracks.<br />
■ You can only make a program when the CD Player is<br />
stopped.<br />
1 Insert a CD.<br />
2 Press the CD #/8 button.<br />
3 Press the 7 button to stop the CD.<br />
4 Press the PROGRAM button.<br />
The System enters the programming mode and the<br />
“PROGRAM” indicator lights up.<br />
Track number<br />
Playback time<br />
PROGRAM<br />
• The track number that has already played disappears<br />
from the music calendar.<br />
• The CD Player automatically stops when the last<br />
track of the CD has finished playing.<br />
To stop playing the CD, press the 7 button.<br />
The following information for the CD is displayed.<br />
PROGRAM<br />
5 Press the UP, DOWN, >, or < button to<br />
select the track to program.<br />
UP or > button: Increases the track number by 1.<br />
DOWN or < button:Decreases the track number by 1.<br />
• When the > or < button is kept pressing, the track<br />
number changes rapidly.<br />
Total track number<br />
Total playback time<br />
To stop playing and remove the CD, press the<br />
OPEN/CLOSE button on the Unit or CD 0 button on the<br />
Remote Control to open the Top Cover.<br />
14
Using the CD Player<br />
6 Press the SET button.<br />
UP<br />
DOWN<br />
SET<br />
Program order number<br />
(After 2 seconds)<br />
Total playback time of the programmed tracks<br />
7 Repeat steps 5 and 6 to select the other<br />
tracks for the program.<br />
You can see the total playback time of programmed<br />
tracks on the display. Also, you can see the programmed<br />
tracks on the music calendar.<br />
8 Press the CD # /8 button.<br />
The System plays the tracks in the order you have programmed<br />
them.<br />
■ You can skip to a particular program track by pressing the<br />
4 or ¢ button during Program Play.<br />
■ To stop playing, press the 7 button once.<br />
To confirm the programmed tracks while the CD<br />
player is stopped, each time press the 4 or ¢ button;<br />
the tracks making up the program will successively be<br />
displayed in the programmed order.<br />
To delete all the tracks in the program, in stop mode,<br />
press the 7 button. Pressing the CD 0 button to open the<br />
Top Cover will also clear the programmed tracks.<br />
To exit the program mode once, while the CD Player<br />
is stopped, press the PROGRAM button to light off the<br />
“PROGRAM” indicator.<br />
• If the total playback time of the programmed tracks exceeds<br />
99 minutes 59 seconds, the total playback time will<br />
go out on the display.<br />
• If you try to program the 33rd track, “MEMORY FULL” appears<br />
on the display for about 2 seconds.<br />
To Modify the Program<br />
Modify the contents of the program while the CD Player is<br />
stopped.<br />
Each time you press the CANCEL button, the last track in<br />
the program is deleted. To add new tracks to the end of the<br />
program, repeat above steps 5 to 7.<br />
Random Play<br />
The tracks will play in no special order when you use this<br />
mode.<br />
1 Press the RANDOM button on the<br />
Remote Control.<br />
The “RANDOM” indicator lights up on the display.<br />
2 Press the CD #/8 button.<br />
The tracks are played in random order.<br />
To skip a track during playback, press the ¢ button<br />
to jump to the next track in the random sequence. Press the<br />
4 button to jump back to the start of a track being played.<br />
To exit Random Play mode, while the CD Player is<br />
stopped, press the RANDOM button to light off the “RAN-<br />
DOM” indicator and carry out Normal Play, or press the CD<br />
0 button to open the Top Cover.<br />
Repeating Tracks<br />
You can repeat all tracks or individual track, as many times<br />
as you like.<br />
Press the REPEAT button on the Remote Control.<br />
The Repeat indicator changes with each press of the button,<br />
as shown below.<br />
= ALL=blank display = (back to the<br />
beginning)<br />
: Repeats one track.<br />
ALL:<br />
In Normal Play mode, repeats all the tracks.<br />
In Program Play mode, repeats all the tracks<br />
in the program.<br />
In Random Play mode, repeats all the tracks<br />
in random order.<br />
To exit Repeat mode, press the REPEAT button until the<br />
Repeat indicator on the display goes out.<br />
■ In Random Play, cannot be selected.<br />
■ Repeat mode remains in effect even when you change the<br />
play mode.<br />
15
Using External Equipments<br />
REMOTE CONTROL<br />
DIMMER<br />
SLEEP<br />
DISPLAY<br />
AUTO<br />
PRESET<br />
FM MODE<br />
PROGRAM<br />
RANDOM<br />
REPEAT<br />
AHB PRO<br />
DOOR<br />
SLIDE<br />
CD<br />
BASS TREBLE CANCEL<br />
UP<br />
SET<br />
MD/AUX<br />
FM/AM<br />
PRESET<br />
TUNING AHB PRO CLOCK TIMER VOLUME<br />
CD<br />
DOWN<br />
UP<br />
MULTI CONTROL<br />
DOWN<br />
FADE MUTING<br />
MD/AUX<br />
MD/AUX<br />
CD<br />
FM / AM<br />
MD/AUX<br />
VOLUME<br />
Listening to External<br />
Equipment<br />
You can listen to external equipment such as MD recorder,<br />
turntable or other auxiliary.<br />
■ First make sure that the external equipment is properly<br />
connected to the System. (See page 7).<br />
1 Set the VOLUME control to the minimum<br />
position.<br />
2 Press the MD/AUX button.<br />
“MD/AUX” appears on the display.<br />
Recording the System’s Source<br />
to External Equipment<br />
You can record the System’s source to external equipment<br />
which is connected to the MD/AUX-IN/OUT or CD DIGI-<br />
TAL OUT terminals of the System, such as cassette deck or<br />
MD recorder, etc.<br />
■ First make sure that the external equipment is properly<br />
connected to the System. (See page 7).<br />
Play the System’s CD Player or tune in to<br />
a station.<br />
■ The recording level is not affected by the VOLUME level<br />
set by the System. Also it is not affected by the sound effects.<br />
3 Start playing the external equipment.<br />
4 Adjust the VOLUME control to the<br />
desired listening level.<br />
5 Apply sound effects, if you wish.<br />
■ Press the AHB PRO button to reinforce the bass sound.<br />
■ Press the BASS/TREBLE button on the Remote Control<br />
to control the tone. (See “Tone Control” on page 10.)<br />
To exit MD/AUX mode, you will automatically switch<br />
out of MD/AUX mode when you select another source.<br />
• For operation of the external equipment, refer to its Instructions.<br />
• For operation of the external equipment, refer to its Instructions.<br />
16
Using the Timers<br />
REMOTE CONTROL<br />
DIMMER<br />
SLEEP<br />
SLEEP<br />
DISPLAY<br />
AUTO<br />
PRESET<br />
FM MODE<br />
PROGRAM<br />
RANDOM<br />
REPEAT<br />
MD/AUX<br />
FM/AM<br />
PRESET<br />
TUNING AHB PRO CLOCK TIMER VOLUME<br />
CD<br />
AHB PRO<br />
DOOR<br />
SLIDE<br />
CD<br />
BASS TREBLE CANCEL<br />
DOWN<br />
MULTI CONTROL<br />
UP<br />
TIMER<br />
UP<br />
4 ¢<br />
CLOCK<br />
SET<br />
FADE MUTING<br />
MD/AUX<br />
DOWN<br />
CD<br />
FM / AM<br />
ON time, OFF time,<br />
Source, Volume<br />
VOLUME<br />
SLEEP<br />
Timer indicator<br />
SLEEP indicator<br />
* When the System is in use, the display shows other items as well.<br />
For simplicity, we show here only the items described in this section.<br />
The timers let you control listening functions automatically.<br />
Setting the Clock<br />
• Use the Unit’s button to set the clock.<br />
• When you plug the AC power cord into the wall outlet,<br />
the time indication “0:00” blinks on the display.<br />
• The clock must be correctly set for the timers to work.<br />
• The procedure must be completed within two minutes.<br />
Otherwise, the setting is cleared and must be repeated<br />
from the beginning.<br />
1 Press the % button.<br />
Then, the Unit’s top buttons appear.<br />
CLOCK<br />
(for 2 seconds)<br />
DOWN<br />
2 Press the CLOCK button on the Unit for<br />
more than two seconds.<br />
The hour digit of the time indication rapidly blinks on<br />
the display.<br />
3 Press the ¢ or 4 button on the Unit<br />
to set the hour.<br />
Pressing the ¢ button moves the time forwards and<br />
pressing the 4 button moves it backwards. Hold<br />
down the button to move the time rapidly.<br />
4 Press the CLOCK button.<br />
The minute digits of the time indication rapidly blink on<br />
the display.<br />
CD<br />
MULTI CONTROL<br />
UP<br />
CLOCK<br />
5 Press the ¢ or 4 button to set the<br />
minute.<br />
6 Press the CLOCK button.<br />
The selected time is set and the seconds start counting<br />
from 0.<br />
CAUTION:<br />
• If there is a power failure, the clock loses its<br />
setting after about 20 minutes. “0:00”<br />
blinks on the display and the clock must be<br />
reset.<br />
• The clock may gain or lose one to two minutes per month.<br />
Setting the Daily Timer<br />
Once you have set the Daily Timer, the timer will be activated<br />
at the same time every day.<br />
The Timer indicator on the display shows that the Daily<br />
Timer you have set is in effect.<br />
• Use the Unit’s button to set the timer.<br />
• Perform each setting within 30 seconds. Otherwise, setting<br />
will be cleared and the procedure must be repeated<br />
from the beginning.<br />
17
Using the Timers<br />
1 Setting the ON time (Example: 10:15).<br />
1. Press the TIMER button on the Unit for more than<br />
two seconds.<br />
The Timer indicator lights up and the hour digit of the<br />
current ON time blinks on the display.<br />
• When the clock is not set, “CLOCK” and “ADJUST”<br />
appear alternately on the display. Set the clock first.<br />
Press the ¢ or 4 button on the Unit to set the<br />
hour you want the Unit to come on.<br />
Pressing the ¢ button moves the time forwards and<br />
pressing the 4 button moves it backwards. Hold<br />
down the button to move the time rapidly.<br />
2. Press the TIMER button.<br />
The minute digits of the ON time blink on the display.<br />
Set the minute you want the Unit to be turned off, using<br />
the ¢ and 4 buttons.<br />
3 Selecting the music source.<br />
1. Press the TIMER button.<br />
The “TUNER” or “CD” blinks on the display.<br />
2. Press the ¢ or 4 button to select the music<br />
source you want to listen to.<br />
The display changes as shown below.<br />
TUNERÔCDÔ(back to the beginning)<br />
4 Setting the volume level.<br />
1. Press the TIMER button.<br />
The current volume setting blinks on the display.<br />
2. Press the ¢ or 4 button to select the volume level.<br />
-- :The current volume level will be used.<br />
0 to 50 :When the timer is turned on, the Volume<br />
will be automatically set to the selected<br />
level.<br />
18<br />
Set the minute you want the Unit to come on, using<br />
the ¢ or 4 button.<br />
2 Setting the OFF time (Example: 13:30).<br />
1. Press the TIMER button.<br />
The hour digit of the OFF time blinks on the display.<br />
(The same time as the ON time will be automatically<br />
set.)<br />
Set the hour you want the Unit to be turned off, using<br />
the ¢ or 4 button.<br />
2. Press the TIMER button.<br />
The minute digits of the OFF time blink on the display.<br />
5 Press the TIMER button.<br />
The timer setting is completed and the display returns to<br />
the display before you set the Timer. The Timer indicator<br />
remains lit.<br />
6 Before turning off the System, prepare<br />
the music source selected in step 3.<br />
TUNER: Tune in to the desired station.<br />
CD: Insert a CD. (Playback will start from the first<br />
track at Timer on.)<br />
7 Press the % button to turn off the System.<br />
In standby mode, you can see the Timer indicator ( )<br />
on the display.<br />
• When the timer turns on, the Timer indicator starts<br />
blinking and the prepared source in step 6 will be<br />
played.<br />
To cancel the timer, press the TIMER button. The<br />
Timer indicator ( ) goes out on the display.<br />
To re-activate the cancelled timer, press the TIM-<br />
ER button to light the Timer indicator ( ).<br />
At this time, you can see the current timer settings. Each<br />
setting appears on the display for two seconds in the order<br />
of ON time, OFF time, music source and volume.<br />
To change the timer setting, repeat the setting procedure<br />
from the beginning.<br />
CAUTION:<br />
• If the System is unplugged, or a power failure<br />
occurs, the timer setting will be lost.<br />
You will need to reset the clock first, then<br />
the timer.
Using the Timers<br />
Setting the SLEEP Timer<br />
(Using the Remote Control)<br />
Use the Sleep Timer to turn the System off after a certain<br />
number of minutes when it is playing. By setting the Sleep<br />
Timer, you can fall asleep to music and know that your System<br />
will turn off by itself rather than play all night.<br />
■ You can only set the Sleep Timer when the System is on<br />
and a source is playing.<br />
1 Play a CD or tune in to the desired station.<br />
2 Press the SLEEP button on the Remote<br />
Control.<br />
The “SLEEP” indicator lights up.<br />
■When the clock is not set, “CLOCK” and “ADJUST”<br />
appear alternately on the display. Set the clock at first.<br />
3 Set the length of time you want the<br />
source to play before shutting off.<br />
• Each time you press the SLEEP button, it changes<br />
the number of minutes shown on the display in this<br />
sequence:<br />
10 = 20 = 30 = 60 = 90 = 120 = Cancelled =<br />
(back to the beginning)<br />
The selected number of minutes for the Sleep Timer will<br />
stop blinking five seconds later and the display returns to<br />
the original one before setting the Sleep Timer. (The display<br />
is dimmed.)<br />
The System is now set to turn off after the number of minutes<br />
you set.<br />
To Confirm the Sleep Time:<br />
When the SLEEP button is pressed, the remaining sleep<br />
time is displayed. Wait until the display returns to the original<br />
display.<br />
To Cancel the SLEEP Timer Setting:<br />
Press the SLEEP button until the “SLEEP” indicator goes<br />
out on the display.<br />
Turning off the System also cancels the SLEEP Timer.<br />
■ If you are setting the Daily Timer, the System will be<br />
turned on at the set time to wake you up.<br />
19
Care And Maintenance<br />
Handle your CDs carefully, and they will last a long time.<br />
Compact Discs<br />
• Only CDs bearing this mark can<br />
be used with this System. However,<br />
continued use of irregular<br />
shape CDs (heart-shape, octagonal,<br />
etc.) can damage the System.<br />
Cleaning the Lens<br />
If the lens in the CD pickup is dirty, dropout, etc., could degrade<br />
sound.<br />
Open the Top Cover and clean the lens as shown.<br />
• Use a blower (available from a camera store) to blow<br />
dust off the lens.<br />
Blower<br />
Lens<br />
• Remove the CD from its case by<br />
holding it at the edges while<br />
pressing the case’s center hole<br />
lightly.<br />
• Do not touch the shiny surface of<br />
the CD, or bend the CD.<br />
• Put the CD back in its case after<br />
use to prevent warping.<br />
• Be careful not to scratch the surface<br />
of the CD when placing it<br />
back in the case.<br />
• Avoid exposure to direct sunlight,<br />
temperature extremes, and moisture.<br />
• If there are fingerprints, etc. on the lens, gently wipe<br />
clean with a cotton swab.<br />
• A dirty CD may not play correctly.<br />
If a CD does become dirty,<br />
wipe it with a soft cloth in a<br />
straight line from center to edge.<br />
CAUTION:<br />
• Do not use any solvent (for example, conventional<br />
record cleaner, spray thinner,<br />
benzine, etc.) to clean a CD.<br />
General Notes<br />
In general, you will have the best performance by keeping<br />
your CDs and the mechanism clean.<br />
• Store CDs in their cases, and keep them in cabinets or on<br />
shelves.<br />
• Keep the System’s Top Cover closed when not in use.<br />
Moisture Condensation<br />
Moisture may condense on the lens<br />
inside the System in the following<br />
cases:<br />
• After turning on heating in the<br />
room.<br />
• In a damp room.<br />
• If the System is brought directly<br />
from a cold to a warm place.<br />
Should this occur, the System may<br />
malfunction. In this case, leave the<br />
System turned on for a few hours until<br />
the moisture evaporates, unplug<br />
the AC power cord, and then plug it<br />
in again.<br />
20
Troubleshooting<br />
• If you are having a problem with your System, check this<br />
list for a possible solution before calling for service.<br />
• If you cannot solve the problem from the hints given<br />
here, or the System has been physically damaged, call a<br />
qualified person, such as your dealer, for service.<br />
No sound is heard.<br />
Poor radio reception<br />
Symptom Possible Cause Action<br />
• Connections are incorrect, or loose.<br />
• Headphones are connected.<br />
• The antenna is disconnected.<br />
• The AM Loop Antenna is too close<br />
to the System.<br />
• The FM Wire Antenna is not properly<br />
extended and positioned.<br />
• Check all connections and make corrections.<br />
(See pages 4 to 8.)<br />
• Disconnect the headphones.<br />
• Reconnect the antenna securely.<br />
• Change the position and direction of<br />
the AM Loop Antenna.<br />
• Extend FM Wire Antenna to the best<br />
reception position.<br />
The CD skips. The CD is dirty or scratched. Clean or replace the CD.<br />
The CD does not play. The CD is upside down. Put the CD in with the label side up.<br />
Unable to operate the Remote Control.<br />
Operations are disabled.<br />
• The path between the Remote Control<br />
and the sensor on the Unit is<br />
blocked.<br />
• The batteries have lost their charge.<br />
The built-in microprocessor has malfunctioned<br />
due to external electrical interference.<br />
• Remove the obstruction.<br />
• Replace the batteries.<br />
Unplug the System then plug it back in<br />
after a few minutes.<br />
21
Specifications<br />
Amplifier<br />
Output Power 38 W (19 W + 19 W) at 4 ohms (Max.)<br />
30 W (15 W + 15 W) at 4 ohms (10% THD)<br />
Input Sensitivity/Impedance (1 kHz)<br />
MD/AUX IN 500 mV/47 kohms<br />
Output Sensitivity/Impedance (1 kHz)<br />
MD/AUX OUT 500 mV/5 kohms<br />
CD DIGITAL OUT (Optical out) –21 dBm - –15 dBm<br />
Speaker terminals 4 - 16 ohms<br />
Subwoofer out 230mV/19kohms<br />
Phones 16 ohms - 1 kohm<br />
0 - 15 mW/ch output into 32 ohms<br />
CD Player<br />
Signal-To-Noise Ratio 90 dB<br />
Wow And Flutter Unmeasurable<br />
Tuner<br />
FM Tuner<br />
Tuning Range 87.5 MHz - 108.0 MHz<br />
AM Tuner<br />
Tuning Range (MW) 522 kHz – 1, 629kHz<br />
(LW) 144 kHz – 288kHz<br />
Center Unit (FS-SD5/SD7/SD9)<br />
Dimensions 300mm ✕ 75mm ✕ 215mm (W/H/D)<br />
Mass Approx. 3.0kg<br />
Speaker Specifications (each unit)<br />
FS-SD5<br />
Speakers 8 cm cone<br />
Impedance 4 ohms<br />
Dimensions 100mm ✕ 186mm ✕ 193.5mm (W/H/D)<br />
Mass 1.5kg<br />
FS-SD7<br />
Speakers 8 cm cone<br />
Impedance 4 ohms<br />
Dimensions 137mm ✕ 231mm ✕ 141mm (W/H/D)<br />
Mass 1.4kg<br />
FS-SD9<br />
Speakers 8 cm cone<br />
Impedance 4 ohms<br />
Dimensions 135mm ✕ 231mm ✕ 141mm (W/H/D)<br />
Mass 1.4kg<br />
Accessories<br />
Power Cord (1)<br />
AM Loop Antenna (1)<br />
Remote Control (1)<br />
Batteries R6P (SUM-3)/AA (15F) (2)<br />
FM Wire Antenna (1)<br />
Speaker Cords (2)<br />
Spacers (6) (only for FS-SD7/SD9)<br />
Power Specifications<br />
Power Requirements AC 240 V ~ , 50 Hz<br />
Power Consumption 25 watts (power on mode)<br />
1.9 watts (in Standby mode)<br />
Design and specifications are subject to change without notice.<br />
VICTOR COMPANY OF JAPAN, LIMITED<br />
EN<br />
22<br />
0200MNMCREJSC