KD-R416 / KD-R415 / KD-R316 / KD-R315 - JVC
KD-R416 / KD-R415 / KD-R316 / KD-R315 - JVC
KD-R416 / KD-R415 / KD-R316 / KD-R315 - JVC

Create successful ePaper yourself
Turn your PDF publications into a flip-book with our unique Google optimized e-Paper software.
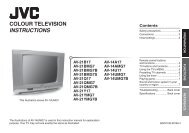
ENGLISH<br />
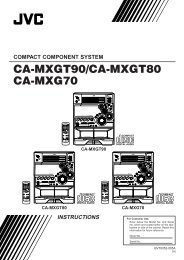
<strong>KD</strong>-<strong>R416</strong> / <strong>KD</strong>-<strong>R415</strong> /<br />
<strong>KD</strong>-<strong>R316</strong> / <strong>KD</strong>-<strong>R315</strong><br />
CD RECEIVER /<br />
For canceling the display demonstration, see page 4. /<br />
For installation and connections, refer to the separate manual.<br />
INSTRUCTIONS<br />
GET0623-001A<br />
[U/UH]
Thank you for purchasing a <strong>JVC</strong> product.<br />
Please read all instructions carefully before operation, to ensure your complete understanding and<br />
to obtain the best possible performance from the unit.<br />
IMPORTANT FOR LASER PRODUCTS<br />
1. CLASS 1 LASER PRODUCT<br />
2. CAUTION: Do not open the top cover. There are no user serviceable parts inside the unit; leave<br />
all servicing to qualified service personnel.<br />
3. CAUTION: Visible and/or invisible class 1M laser radiation when open. Do not view directly with<br />
optical instruments.<br />
4. REPRODUCTION OF LABEL: CAUTION LABEL, PLACED OUTSIDE THE UNIT.<br />
[European Union only]<br />
Warning:<br />
If you need to operate the unit while driving,<br />
be sure to look around carefully or you may be<br />
involved in a traffic accident.<br />
For safety...<br />
• Do not raise the volume level too much, as<br />
this will block outside sounds, making driving<br />
dangerous.<br />
• Stop the car before performing any<br />
complicated operations.<br />
How to read this manual<br />
The following icons/symbols are used to<br />
indicate:<br />
[Hold]<br />
Press and hold the button(s)<br />
until the desired operation<br />
begins.<br />
Turn the control dial.<br />
Turn the control dial<br />
to make a selection,<br />
then press to confirm.<br />
( XX) Reference page number<br />
Menu setting item<br />
Continued on the next page<br />
Temperature inside the car...<br />
If you have parked the car for a long time in<br />
hot or cold weather, wait until the temperature<br />
in the car becomes normal before operating<br />
the unit.<br />
2 ENGLISH
How to attach/detach the control<br />
panel<br />
How to reset your unit<br />
Your preset adjustments<br />
will also be erased.<br />
How to forcibly eject a disc<br />
[Hold]<br />
• You can forcibly eject the loaded disc even<br />
if the disc is locked. To lock/unlock the disc,<br />
8.<br />
• Be careful not to drop the disc when it ejects.<br />
• If this does not work, reset your unit.<br />
CONTENTS<br />
2 How to read this manual<br />
3 How to attach/detach the control<br />
panel<br />
3 How to reset your unit<br />
3 How to forcibly eject a disc<br />
4 Canceling the display<br />
demonstration<br />
4 Setting the clock<br />
5 Preparing the remote controller<br />
(RM-RK50)<br />
6 Basic operations<br />
7 Listening to the radio<br />
8 Listening to a disc<br />
10 Listening to a USB device<br />
(For <strong>KD</strong>-<strong>R416</strong>/<strong>KD</strong>-<strong>R415</strong>)<br />
11 Listening to the other external<br />
components<br />
12 Selecting a preset sound mode<br />
13 Menu operations<br />
15 Title assignment<br />
16 Maintenance<br />
17 More about this unit<br />
19 Troubleshooting<br />
22 Specifications<br />
ENGLISH<br />
3
Canceling the display demonstration<br />
1 Turn on the power.<br />
4 Select .<br />
2<br />
3<br />
[Hold]<br />
(Initial setting)<br />
5<br />
6 Finish the procedure.<br />
Setting the clock<br />
1 Turn on the power.<br />
2<br />
[Hold]<br />
(Initial setting)<br />
3 Select .<br />
4 Select .<br />
5 Adjust the hour.<br />
6 Adjust the minute.<br />
7 Finish the procedure.<br />
4 ENGLISH
Preparing the remote controller (RM-RK50)<br />
When you use the remote controller for the first<br />
time, pull out the insulation sheet.<br />
Insulation<br />
sheet<br />
If the effectiveness of the remote controller<br />
decreases, replace the battery.<br />
Replacing the lithium coin battery<br />
CR2025<br />
Warning (to prevent accidents and<br />
damage):<br />
• Do not install any battery other than CR2025<br />
or its equivalent.<br />
• Do not leave the remote controller in a place<br />
(such as dashboards) exposed to direct<br />
sunlight for a long time.<br />
• Store the battery in a place where children<br />
cannot reach.<br />
• Do not recharge, short, disassemble, heat the<br />
battery, or dispose of it in a fire.<br />
• Do not leave the battery with other metallic<br />
materials.<br />
• Do not poke the battery with tweezers or<br />
similar tools.<br />
• Wrap the battery with tape and insulate when<br />
throwing away or saving it.<br />
Caution:<br />
• Danger of explosion if battery is incorrectly<br />
replaced. Replace only with the same or<br />
equivalent type.<br />
• Battery shall not be exposed to excessive heat<br />
such as sunshine, fire, or the like.<br />
ENGLISH<br />
5
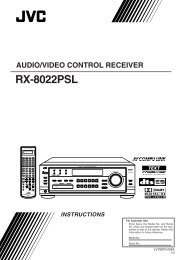
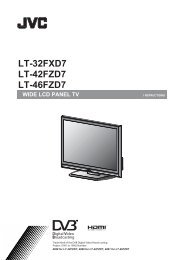
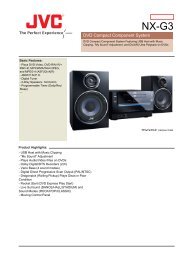
Basic operations<br />
Ejects the disc<br />
Control dial<br />
Loading slot<br />
Display window<br />
Detaches the panel<br />
Remote sensor<br />
• DO NOT expose to bright sunlight.<br />
Auxiliary input jack<br />
For <strong>KD</strong>-<strong>R416</strong>/<br />
<strong>KD</strong>-<strong>R415</strong><br />
USB (Universal Serial<br />
Bus) input jack<br />
When you press or hold the following button(s)...<br />
Main unit<br />
Remote<br />
controller<br />
General operation<br />
Turns on.<br />
• When the power is on, pressing /I/ATT on the remote controller<br />
also mutes the sound or pauses. Press /I/ATT again to cancel<br />
muting or resume playback.<br />
Turns off if pressed and held.<br />
Selects the available sources (if the power is turned on).<br />
• If the source is ready, playback also starts.<br />
Adjusts the volume level.<br />
— Selects items.<br />
• Mutes the sound while listening to a source. If the source is “CD“<br />
or “USB,“ playback pauses. Press the control dial again to cancel<br />
—<br />
muting or resume playback.<br />
• Confirms selection.<br />
Selects the sound mode.<br />
• Enters tone level adjustment directly ( 12) if pressed and held<br />
EQ BASS-TRE on the main unit.<br />
— Enters playback mode menu directly ( 9).<br />
6 ENGLISH
Main unit<br />
General operation<br />
Returns to the previous menu.<br />
Power off : Checks the current clock time.<br />
Power on : Changes the display information.<br />
Listening to the radio<br />
~<br />
Ÿ<br />
] “FM” or “AM”<br />
“ST” lights up when receiving an FM stereo broadcast with sufficient signal strength.<br />
Manual search<br />
[Hold]<br />
“M” flashes, then press<br />
the button repeatedly.<br />
When an FM stereo broadcast is<br />
hard to receive<br />
1<br />
[Hold]<br />
Automatic presetting (FM)—<br />
SSM (Strong-station Sequential Memory)<br />
You can preset up to 18 stations for FM.<br />
While listening to a station...<br />
1<br />
2<br />
[Hold]<br />
2<br />
] ] ]<br />
<br />
Reception improves, but stereo effect<br />
will be lost.<br />
To restore the stereo effect, repeat the same<br />
procedure to select .<br />
Changing the display information<br />
Station name * = Frequency =<br />
Clock = (back to the beginning)<br />
* If no title is assigned to a station, “NO NAME”<br />
appears for a few seconds. To assign a title to a<br />
station, 15.<br />
] ] ]<br />
/ /<br />
<br />
“SSM” flashes and local stations with<br />
the strongest signals are searched and<br />
stored automatically.<br />
To preset another 6 stations, repeat the<br />
above procedure by selecting one of the other<br />
6 SSM setting ranges.<br />
ENGLISH<br />
7
Manual presetting (FM/AM)<br />
You can preset up to 18 stations for FM and 6<br />
stations for AM.<br />
Ex.: Storing FM station of 92.50 MHz into preset<br />
number “04.”<br />
1<br />
Selecting a preset station<br />
1<br />
or<br />
2<br />
2<br />
3<br />
] “92.50MHz”<br />
[Hold]<br />
“PRESET MODE” flashes.<br />
Using the remote controller<br />
5 U / D ∞ : Changes the preset<br />
stations<br />
2 R / F 3 : Searches for stations<br />
] Selects preset number “04.”<br />
“P04” flashes and “MEMORY” appears.<br />
Listening to a disc<br />
~<br />
Ÿ<br />
] Turn on the power.<br />
All tracks will be played repeatedly until you<br />
change the source or eject the disc.<br />
Stopping playback and ejecting<br />
the disc<br />
“NO DISC” appears.<br />
Press / SOURCE to listen to<br />
another playback source.<br />
Prohibiting disc ejection<br />
Caution on volume setting:<br />
Discs produce very little noise compared<br />
with other sources. Lower the volume before<br />
playing a disc to avoid damaging the speakers<br />
by the sudden increase of the output level.<br />
[Hold]<br />
To cancel the prohibition, repeat the same<br />
procedure.<br />
8 ENGLISH
Selects folder of the MP3/WMA<br />
Selects track<br />
Fast-forwards or<br />
reverses the track<br />
Selecting a track/folder<br />
1<br />
2<br />
[Hold]<br />
For MP3/WMA discs, select the desired folder,<br />
then the desired track by repeating step 2.<br />
• To return to the previous menu, press BACK.<br />
Changing the display information<br />
Disc title/Album name/performer (folder<br />
name)* = Track title (file name)* = Current<br />
track number with the elapsed playing time<br />
= Current track number with the clock<br />
time = (back to the beginning)<br />
* If the current disc is an audio CD, “NO NAME”<br />
appears.<br />
If an MP3/WMA file does not have Tag<br />
information or is set to<br />
( 13), folder name and file name<br />
appear.<br />
Selecting the playback modes<br />
You can use only one of the following playback<br />
modes at a time.<br />
1<br />
2<br />
3<br />
] “REPEAT” “RANDOM”<br />
REPEAT<br />
TRACK RPT : Repeats current track<br />
FOLDER RPT : Repeats current folder<br />
RANDOM<br />
FOLDER RND : Randomly plays all tracks<br />
of current folder, then<br />
tracks of next folders<br />
ALL RND : Randomly plays all tracks<br />
To cancel repeat play or random play, select<br />
“RPT OFF” or “RND OFF.”<br />
Using the remote controller<br />
5 U / D ∞ : Selects folder of the<br />
MP3/WMA<br />
2 R / F 3 : Selects track<br />
2 R / F 3<br />
[Hold]<br />
: Fast-forwards or<br />
reverses the track<br />
ENGLISH<br />
9
Listening to a USB device (For <strong>KD</strong>-<strong>R416</strong>/<strong>KD</strong>-<strong>R415</strong>)<br />
This unit can play MP3/WMA tracks stored in a USB device.<br />
~<br />
] Turn on the<br />
power.<br />
Ÿ<br />
USB input jack<br />
USB memory<br />
All tracks will be played repeatedly until you change the<br />
source or detach the USB device.<br />
If a USB device has been attached...<br />
Pressing / SOURCE turns on the power and<br />
playback starts from where it has been stopped<br />
previously.<br />
• If a different USB device is currently attached,<br />
playback starts from the beginning.<br />
Stopping playback and detaching<br />
the USB device<br />
Straightly pull it out from the unit.<br />
“NO USB” appears. Press / SOURCE to listen to<br />
another playback source.<br />
You can operate the USB device in the same<br />
way you operate the files on a disc. ( 8, 9)<br />
Caution on volume setting:<br />
USB devices produce very little noise compared<br />
with other sources. Lower the volume before<br />
playing a USB device to avoid damaging the<br />
speakers by sudden increase of the output<br />
level.<br />
Cautions:<br />
• Avoid using the USB device if it might hinder<br />
your safety driving.<br />
• Do not pull out and attach the USB device<br />
repeatedly while “READING” is shown on the<br />
display.<br />
• Do not start the car engine if a USB device is<br />
connected.<br />
• This unit may not be able to play the files<br />
depending on the type of USB device.<br />
• Operation and power supply may not work as<br />
intended for some USB devices.<br />
• You cannot connect a computer to the USB<br />
input terminal of the unit.<br />
• Make sure all important data has been backed<br />
up to avoid losing the data.<br />
• Do not leave a USB device in the car, expose<br />
to direct sunlight, or high temperature to<br />
avoid deformation or cause damages to the<br />
device.<br />
• Some USB devices may not work immediately<br />
after attaching USB device or turn on the<br />
power.<br />
• For more details about USB operations, see<br />
pages 18 and 19.<br />
10 ENGLISH
Listening to the other external<br />
components<br />
You can connect an external component to the<br />
AUX (auxiliary) input jack on the control panel.<br />
Preparation: Make sure is selected<br />
for the = setting.<br />
( 15)<br />
• For details, refer also to the instructions<br />
supplied with the adapter or external<br />
components.<br />
~<br />
] “AUX IN”<br />
Ÿ Turn on the connected component<br />
and start playing the source.<br />
!<br />
] Adjust the volume.<br />
⁄ Adjust the sound as you<br />
want. ( 12)<br />
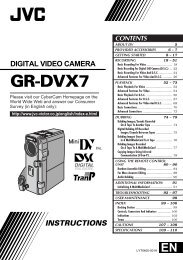
Connecting an external component to the AUX input jack<br />
3.5 mm stereo mini plug<br />
(not supplied)<br />
Portable audio player,<br />
etc.<br />
ENGLISH<br />
11
Selecting a preset sound mode<br />
You can select a preset sound mode suitable<br />
for the music genre.<br />
FLAT = NATURAL = DYNAMIC =<br />
VOCAL BOOST = BASS BOOST = USER =<br />
(back to the beginning)<br />
Storing your own sound mode<br />
You can store your own adjustments in<br />
memory.<br />
1<br />
2<br />
[Hold]<br />
While listening, you can adjust the tone level of<br />
the selected sound mode.<br />
1<br />
2<br />
Tone<br />
BASS<br />
MIDDLE<br />
TREBLE<br />
[Hold]<br />
Adjust the level (–06 to +06) of the<br />
selected tone (BASS / MIDDLE / TREBLE).<br />
The sound mode is automatically stored<br />
and changed to “USER.”<br />
Sound element<br />
Frequency Level Q<br />
60 Hz<br />
80 Hz<br />
100 Hz<br />
200 Hz<br />
0.5 kHz<br />
1.0 kHz<br />
1.5 kHz<br />
2.5 kHz<br />
10.0 kHz<br />
12.5 kHz<br />
15.0 kHz<br />
17.5 kHz<br />
–06 to +06 Q1.0<br />
Q1.25<br />
Q1.5<br />
Q2.0<br />
–06 to +06 Q0.75<br />
Q1.0<br />
Q1.25<br />
–06 to +06 Q FIX<br />
3<br />
] ] / /<br />
<br />
Adjust the sound elements of the<br />
selected tone. ( table on the left)<br />
4 Repeat steps 2 and 3 to adjust other<br />
tones.<br />
The adjustments made will be stored<br />
automatically in “USER.”<br />
The current sound mode changes to “USER”<br />
automatically.<br />
12 ENGLISH
Menu operations<br />
1 2 3<br />
[Hold]<br />
Repeat step 2 if necessary.<br />
• To return to the previous menu,<br />
press BACK.<br />
• To exit from the menu, press DISP<br />
or MENU.<br />
Category Menu item Selectable setting, [ Initial: Underlined ]<br />
DEMO<br />
CLOCK<br />
PRO EQ<br />
DISPLAY<br />
TUNER<br />
DEMO<br />
Display<br />
demonstration<br />
CLOCK SET<br />
Clock setting<br />
• DEMO ON : Display demonstration will be activated<br />
automatically if no operation is done for about<br />
20 seconds. ( 4)<br />
• DEMO OFF : Cancels.<br />
[ 1:00 ] : Adjust the hour, then the minute. ( 4)<br />
BASS — : For settings, 12.<br />
MIDDLE<br />
TREBLE<br />
DIMMER<br />
SCROLL * 1<br />
TAG DISPLAY<br />
SSM * 2<br />
Strong-station<br />
Sequential<br />
Memory<br />
MONO * 2<br />
Monaural<br />
mode<br />
IF BAND<br />
Intermediate<br />
frequency<br />
band<br />
• DIMMER ON<br />
• DIMMER OFF<br />
• SCROLL ONCE<br />
• SCROLL AUTO<br />
• SCROLL OFF<br />
: Dims the display and button illumination.<br />
: Cancels.<br />
: Scrolls the displayed information once.<br />
: Repeats scrolling (at 5-second intervals).<br />
: Cancels.<br />
Pressing DISP for more than one second can scroll the display<br />
regardless of the setting.<br />
• TAG ON<br />
• TAG OFF<br />
• SSM 01 – 06<br />
• SSM 07 – 12<br />
• SSM 13 – 18<br />
• MONO ON<br />
• MONO OFF<br />
• AUTO<br />
• WIDE<br />
: Shows the Tag information while playing MP3/<br />
WMA tracks.<br />
: Cancels.<br />
: For settings, 7.<br />
: Activate monaural mode to improve FM<br />
reception, but stereo effect will be lost.<br />
: Restore the stereo effect. ( 7)<br />
: Increases the tuner selectivity to reduce<br />
interference noises between adjacent stations.<br />
(Stereo effect may be lost.)<br />
: Subject to interference noises from adjacent<br />
stations, but sound quality will not be degraded<br />
and the stereo effect will remain.<br />
* 1 Some characters or symbols will not be shown correctly (or will be blanked) on the display.<br />
* 2 Displayed only when the source is “FM.”<br />
ENGLISH<br />
13
Category Menu item Selectable setting, [ Initial: Underlined ]<br />
AUDIO<br />
FADER * 3 R06 – F06 [ 00 ] : Adjust the front and rear speaker output<br />
balance.<br />
BALANCE * 4 L06 – R06 [ 00 ] : Adjust the left and right speaker output<br />
balance.<br />
LOUD<br />
Loudness<br />
AUX ADJUST * 5<br />
Auxiliary adjust<br />
(For <strong>KD</strong>-<strong>R316</strong>/<br />
<strong>KD</strong>-<strong>R315</strong>)<br />
VOL ADJUST<br />
Volume adjust<br />
(For <strong>KD</strong>-<strong>R416</strong>/<br />
<strong>KD</strong>-<strong>R415</strong>)<br />
L/O MODE<br />
Line output<br />
mode<br />
SUB.W FREQ * 6<br />
Subwoofer cutoff<br />
frequency<br />
SUB.W LEVEL * 6<br />
Subwoofer level<br />
• LOUD ON<br />
• LOUD OFF<br />
AUX ADJ 00 —<br />
AUX ADJ 05<br />
VOL ADJ –05 —<br />
VOL ADJ +05<br />
[ VOL ADJ 00 ]<br />
• SUB.W<br />
• REAR<br />
• LOW<br />
• MID<br />
• HIGH<br />
SUB.W 00 —<br />
SUB.W 08<br />
[ SUB.W 04 ]<br />
* 3 If you are using a two-speaker system, set the fader level to “00.”<br />
* 4 This adjustment will not affect the subwoofer output.<br />
* 5 Displayed only when is set to .<br />
* 6 Displayed only when is set to .<br />
: Boost low and high frequencies to produce a<br />
well-balanced sound at a low volume level.<br />
: Cancels.<br />
: Adjust the auxiliary input level to avoid the<br />
sudden increase of the output level when<br />
changing the source to external component<br />
connected to the AUX input jack on the<br />
control panel.<br />
: Preset the volume adjustment level of<br />
each source (except FM), compared to the<br />
FM volume level. The volume level will<br />
automatically increase or decrease when you<br />
change the source.<br />
• Before making an adjustment, select the<br />
source you want to adjust.<br />
• “VOL ADJ FIX” appears on the display if “FM”<br />
is selected as the source.<br />
: Select if the REAR LINE OUT terminals are<br />
used for connecting a subwoofer (through an<br />
external amplifier).<br />
: Select if the REAR LINE OUT terminals are<br />
used for connecting the speakers (through an<br />
external amplifier).<br />
: Frequencies lower than 72 Hz are sent to the<br />
subwoofer.<br />
: Frequencies lower than 111 Hz are sent to the<br />
subwoofer.<br />
: Frequencies lower than 157 Hz are sent to the<br />
subwoofer.<br />
: Adjust the subwoofer output level.<br />
14 ENGLISH
Category Menu item Selectable setting, [ Initial: Underlined ]<br />
AUDIO<br />
SRC SELECT<br />
BEEP<br />
AMP GAIN * 7<br />
Amplifier gain<br />
control<br />
AM * 8<br />
AM station<br />
AUX IN * 9<br />
Auxiliary input<br />
• BEEP ON<br />
• BEEP OFF<br />
• LOW POWER<br />
• HIGH POWER<br />
• AM ON<br />
• AM OFF<br />
• AUX ON<br />
• AUX OFF<br />
: Activates the keypress tone.<br />
: Deactivates the keypress tone.<br />
: VOLUME 00 – VOLUME 30 (Select if the<br />
maximum power of each speaker is less than<br />
50 W to prevent damaging the speakers.)<br />
: VOLUME 00 – VOLUME 50<br />
: Enable “AM” in source selection.<br />
: Disable “AM” in source selection.<br />
: Enable “AUX IN” in source selection.<br />
: Disable “AUX IN” in source selection.<br />
* 7 The volume level automatically changes to “VOLUME 30” if you change to with the<br />
volume level is set higher than “VOLUME 30.”<br />
* 8 Displayed only when any source other than “AM” is selected.<br />
* 9 Displayed only when any source other than “AUX IN” is selected.<br />
Title assignment<br />
You can assign titles to 30 station frequencies<br />
(FM and AM) using 8 characters (maximum) for<br />
each title.<br />
• If you try to assign titles to more than 30<br />
station frequencies, “NAME FULL” appears.<br />
Delete unwanted titles before assignment.<br />
1<br />
2<br />
] “FM” or “AM”<br />
[Hold]<br />
5<br />
6<br />
Repeat steps 3 and 4 until you have<br />
finished entering the title.<br />
To erase the entire title<br />
In step 2 on the left column...<br />
[Hold]<br />
3<br />
4<br />
] Show the title entry screen.<br />
] Select a character.<br />
Available characters<br />
A B C D E F G H I<br />
J K L M N O P Q R<br />
S T U V W X Y Z 0<br />
1 2 3 4 5 6 7 8 9<br />
— / < > Space<br />
] Move to the next (or previous)<br />
character position.<br />
ENGLISH<br />
15
Maintenance<br />
How to clean the connectors<br />
Frequent detachment will deteriorate the<br />
connectors.<br />
To minimize this possibility, periodically wipe<br />
the connectors with a cotton swab or cloth<br />
moistened with alcohol, being careful not to<br />
damage the connectors.<br />
Connectors<br />
Moisture condensation<br />
Moisture may condense on the lens inside the<br />
unit in the following cases:<br />
• After starting the heater in the car.<br />
• If it becomes very humid inside the car.<br />
Should this occur, the unit may malfunction.<br />
In this case, eject the disc and leave the unit<br />
turned on for a few hours until the moisture<br />
has evaporated.<br />
To keep discs clean<br />
A dirty disc may not play<br />
correctly. If a disc does become<br />
dirty, wipe it with a soft cloth<br />
in a straight line from center to<br />
edge.<br />
• Do not use any solvents (for example,<br />
conventional record cleaner, spray, thinner,<br />
benzine, etc.) to clean discs.<br />
To play new discs<br />
New discs may have some<br />
rough spots around the inner<br />
and outer edges. If such a disc<br />
is used, this unit may reject the<br />
disc.<br />
To remove these rough spots, rub the edges<br />
with a pencil or ball-point pen, etc.<br />
Do not use the following discs:<br />
Single CD (8 cm disc) Warped disc<br />
How to handle discs<br />
When removing a disc Center holder<br />
from its case, press down<br />
the center holder of the case<br />
and lift the disc out, holding<br />
it by the edges.<br />
• Always hold the disc by the edges. Do not<br />
touch its recording surface.<br />
When storing a disc in its case, gently insert<br />
the disc around the center holder (with the<br />
printed surface facing up).<br />
• Make sure to store discs in cases after use.<br />
Sticker and sticker<br />
residue<br />
Unusual shape<br />
Transparent or<br />
semitransparent<br />
parts on its recording<br />
area<br />
Stick-on label<br />
C-thru Disc<br />
(semitransparent<br />
disc)<br />
16 ENGLISH
More about this unit<br />
Basic operations<br />
General<br />
• If you turn off the power while listening to<br />
a track, playback will start from where it had<br />
been stopped previously next time you turn<br />
on the power.<br />
• If no operation is done for about 60 seconds<br />
after pressing MENU button, the operation will<br />
be canceled.<br />
Tuner operations<br />
Storing stations in memory<br />
• During SSM search...<br />
– All previously stored stations are erased and<br />
the stations are stored anew.<br />
– When SSM is over, the station stored in the<br />
lowest preset number will be automatically<br />
tuned in.<br />
• When storing a station manually, the<br />
previously preset station is erased when<br />
a new station is stored in the same preset<br />
number.<br />
Disc operations<br />
Caution for DualDisc playback<br />
• The Non-DVD side of a “DualDisc” does not<br />
comply with the “Compact Disc Digital Audio”<br />
standard. Therefore, the use of Non-DVD side<br />
of a DualDisc on this product may not be<br />
recommended.<br />
General<br />
• This unit has been designed to reproduce<br />
CDs/CD Texts, and CD-Rs (Recordable)/CD-<br />
RWs (Rewritable) in audio CD (CD-DA), MP3<br />
and WMA formats.<br />
• If you change the source while listening to a<br />
disc, playback stops. Next time you select “CD”<br />
as the playback source, playback will start<br />
from where it had been stopped previously.<br />
• When a disc is inserted upside down, “PLEASE”<br />
and “EJECT” appear alternately on the display.<br />
Press 0 to eject the disc.<br />
• If the ejected disc is not removed within<br />
15 seconds, it is automatically inserted into<br />
the loading slot again to protect it from dust.<br />
• MP3 and WMA “tracks” (words “file” and “track”<br />
are used interchangeably) are recorded in<br />
“folders.”<br />
• While fast-forwarding or reversing on an MP3<br />
or WMA disc, you can only hear intermittent<br />
sounds.<br />
Playing a CD-R or CD-RW<br />
• Use only “finalized” CD-Rs or CD-RWs.<br />
• This unit can only play back files of the same<br />
type as those detected first if a disc includes<br />
both audio CD (CD-DA) files and MP3/WMA<br />
files.<br />
• This unit can play back multi-session discs;<br />
however, unclosed sessions will be skipped<br />
while playing.<br />
• Some CD-Rs or CD-RWs may not play back on<br />
this unit because of their disc characteristics,<br />
or for the following reasons:<br />
– Discs are dirty or scratched.<br />
– Moisture condensation has occurred on the<br />
lens inside the unit.<br />
– The pickup lens inside the unit is dirty.<br />
– The files on the CD-R/CD-RW are written<br />
using the “Packet Write” method.<br />
– There are improper recording conditions<br />
(missing data, etc.) or media conditions<br />
(stained, scratched, warped, etc.).<br />
• CD-RWs may require a longer readout time<br />
since the reflectance of CD-RWs is lower than<br />
that of regular CDs.<br />
ENGLISH<br />
17
• Do not use the following CD-Rs or CD-RWs:<br />
– Discs with stickers, labels, or a protective seal<br />
stuck to the surface.<br />
– Discs on which labels can be directly printed<br />
by an ink jet printer.<br />
Using these discs under high temperature<br />
or high humidity may cause malfunctions or<br />
damage to the unit.<br />
Playing an MP3/WMA disc<br />
• This unit can play back MP3/WMA files with<br />
the extension code or <br />
(regardless of the letter case—upper/lower).<br />
• This unit can show the names of albums,<br />
artists (performer), and Tag (Version 1.0, 1.1,<br />
2.2, 2.3, or 2.4) for MP3 files and for WMA files.<br />
• This unit can display only one-byte characters.<br />
No other characters can be correctly<br />
displayed.<br />
• This unit can play back MP3/WMA files<br />
meeting the conditions below:<br />
– Bit rate:<br />
MP3: 32 kbps — 320 kbps<br />
WMA: 32 kbps — 192 kbps<br />
– Sampling frequency of MP3:<br />
32 kHz, 44.1 kHz, 48kHz (for MPEG-1)<br />
16 kHz, 22.05 kHz, 24 kHz (for MPEG-2)<br />
– Sampling frequency of WMA:<br />
22.05 kHz, 32 kHz, 44.1 kHz, 48kHz<br />
– Disc format: ISO 9660 Level 1/Level 2,<br />
Romeo, Joliet, Windows extension<br />
• The maximum number of characters for<br />
file/folder names (includes 4 extension<br />
characters— or ): 12 — 128<br />
characters (depending on the media used,<br />
etc.).<br />
• This unit can recognize a total of 512 files, 255<br />
folders, and 8 hierarchical levels.<br />
• This unit can play back files recorded in VBR<br />
(variable bit rate).<br />
Files recorded in VBR have a discrepancy<br />
in the elapsed time display, and do not<br />
show the actual elapsed time. In particular,<br />
this difference becomes noticeable after<br />
performing the search function.<br />
• This unit cannot play back the following files:<br />
– MP3 files encoded in MP3i and MP3 PRO<br />
format.<br />
– MP3 files encoded in an inappropriate<br />
format.<br />
– MP3 files encoded with Layer 1/2.<br />
– WMA files encoded in lossless, professional,<br />
and voice format.<br />
– WMA files which are not based upon<br />
Windows Media ® Audio.<br />
– WMA files copy-protected with DRM.<br />
– Files which have data such as AIFF, ATRAC3,<br />
etc.<br />
• The search function works but search speed is<br />
not constant.<br />
Playing MP3/WMA tracks from a USB<br />
device (for <strong>KD</strong>-<strong>R416</strong>/<strong>KD</strong>-<strong>R415</strong>)<br />
• While playing from a USB device, the playback<br />
order may differ from other players.<br />
• This unit may be unable to play back some<br />
USB devices or some files due to their<br />
characteristics or recording conditions.<br />
• Depending on the shape of the USB devices<br />
and connection ports, some USB devices may<br />
not be attached properly or the connection<br />
might be loose.<br />
• Connect one USB mass storage class device to<br />
the unit at a time. Do not use a USB hub.<br />
• If the connected USB device does not have<br />
the correct files, “CANNOT PLAY” appears.<br />
• This unit can show Tag (Version 1.0, 1.1, 2.2,<br />
2.3, or 2.4) for MP3 files and for WMA files.<br />
• This unit can play back MP3/WMA files<br />
meeting the conditions below:<br />
18 ENGLISH
– Bit rate of MP3/WMA: 32 kbps — 320 kbps<br />
– Sampling frequency of MP3:<br />
32 kHz, 44.1 kHz, 48 kHz (for MPEG-1)<br />
16 kHz, 22.05 kHz, 24 kHz (for MPEG-2)<br />
– Sampling frequency of WMA:<br />
22.05 kHz, 32 kHz, 44.1 kHz, 48 kHz<br />
• This unit can play back MP3 files recorded in<br />
VBR (variable bit rate).<br />
• The maximum number of characters for:<br />
– Folder names : 32 characters<br />
– File names : 32 characters<br />
– MP3 Tag : 64 characters<br />
– WMA Tag : 32 characters<br />
• This unit can recognize a total of 5 000 files,<br />
255 folders (255 files per folder including<br />
folder without unsupported files), and of 8<br />
hierarchies.<br />
• This unit does not support SD card reader.<br />
• This unit cannot recognize a USB device<br />
whose rating is other than 5 V and exceeds<br />
500 mA.<br />
• USB devices equipped with special functions<br />
such as data security functions cannot be<br />
used with the unit.<br />
• Do not use a USB device with 2 or more<br />
partitions.<br />
• This unit may not recognized a USB device<br />
connected through a USB card reader.<br />
• This unit may not play back files in a USB<br />
device properly when using a USB extension<br />
cord.<br />
• This unit cannot play back the following files:<br />
– MP3 files encoded with MP3i and MP3 PRO<br />
format.<br />
– MP3 files encoded in an inappropriate<br />
format.<br />
– MP3 files encoded with Layer 1/2.<br />
– WMA files encoded in lossless, professional,<br />
and voice format.<br />
– WMA files not based on Windows Media®<br />
Audio.<br />
Troubleshooting<br />
General<br />
FM/AM<br />
Symptom<br />
Sound cannot be heard from the<br />
speakers.<br />
“PROTECT” appears on the display<br />
and no operations can be done.<br />
Remedy/Cause<br />
• Adjust the volume to the optimum level.<br />
• Make sure the unit is not muted/paused ( 6).<br />
• Check the cords and connections.<br />
Check to be sure the terminals of the speaker leads<br />
are covered with insulating tape properly, then<br />
reset the unit ( 3).<br />
If “PROTECT” does not disappear, consult your <strong>JVC</strong><br />
car audio dealer or a company supplying kits.<br />
The unit does not work at all. Reset the unit. ( 3)<br />
“AUX” cannot be selected.<br />
Check the = setting.<br />
( 15)<br />
SSM automatic presetting does Store stations manually.<br />
not work.<br />
Static noise while listening to the Connect the antenna firmly.<br />
radio.<br />
“AM” cannot be selected. Check the = setting. ( 15)<br />
ENGLISH<br />
19
Disc playback<br />
MP3/WMA playback<br />
Symptom<br />
Disc cannot be played back.<br />
• CD-R/CD-RW cannot be played<br />
back.<br />
• Tracks on the CD-R/CD-RW<br />
cannot be skipped.<br />
Disc can neither be played back<br />
nor ejected.<br />
Disc sound is sometimes<br />
interrupted.<br />
“NO DISC” appears on the display.<br />
“PLEASE” and “EJECT“ appear<br />
alternately on the display.<br />
Disc cannot be played back.<br />
Noise is generated.<br />
A longer readout time is required<br />
(“READING” keeps flashing on the<br />
display).<br />
Tracks do not play back in the order<br />
you have intended them to play.<br />
The elapsed playing time is not<br />
correct.<br />
For <strong>KD</strong>-<strong>R416</strong>/<strong>KD</strong>-<strong>R415</strong>: “NO FILE”<br />
appears on the display.<br />
“NOT SUPPORT” appears on the<br />
display and track skips.<br />
The correct characters are not<br />
displayed (e.g. album name).<br />
Remedy/Cause<br />
Insert the disc correctly.<br />
• Insert a finalized CD-R/CD-RW.<br />
• Finalize the CD-R/CD-RW with the component<br />
which you used for recording.<br />
• Unlock the disc. ( 8)<br />
• Eject the disc forcibly. ( 3)<br />
• Stop playback while driving on rough roads.<br />
• Change the disc.<br />
• Check the cords and connections.<br />
Insert a playable disc into the loading slot.<br />
Press 0, then insert a disc correctly.<br />
• Use a disc with MP3/WMA tracks recorded in a<br />
format compliant with ISO 9660 Level 1, Level 2,<br />
Romeo, or Joliet.<br />
• Add the extension code or to the<br />
file names.<br />
Skip to another track or change the disc. (Do not<br />
add the extension code or to<br />
non-MP3 or WMA tracks.)<br />
Do not use too many hierarchical levels and folders.<br />
The playback order is determined when the files are<br />
recorded.<br />
This sometimes occurs during playback. This is<br />
caused by how the tracks are recorded on the disc.<br />
Selected folder is an empty folder *. Select another<br />
folder that contains MP3/WMA tracks.<br />
* Folder that is physically empty or folder that contains<br />
data but does not contain valid MP3/WMA track.<br />
Skip to the next track encoded in an appropriate<br />
format or to the next non-copy-protected WMA<br />
track.<br />
This unit can only display letters (upper case),<br />
numbers, and a limited number of symbols.<br />
20 ENGLISH
Symptom<br />
Noise is generated.<br />
“READING” keeps flashing on<br />
the display.<br />
Remedy/Cause<br />
The track played back is not an MP3/WMA track. Skip to<br />
another file. (Do not add the extension code or<br />
to non-MP3 or WMA tracks.)<br />
• Readout time varies depending on the USB device.<br />
• Do not use too many hierarchy or folders.<br />
• Turn off the power then on again.<br />
• Reattach the USB device again.<br />
USB device playback (for <strong>KD</strong>-<strong>R416</strong>/<strong>KD</strong>-<strong>R415</strong>)<br />
“NO FILE” appears on the<br />
display.<br />
“NOT SUPPORT” appears on the<br />
display and track skips.<br />
Tracks/folders are not played<br />
back in the order you have<br />
intended.<br />
• “CANNOT PLAY” flashes on<br />
the display.<br />
• “NO USB” appears on the<br />
display.<br />
• The unit cannot detect the<br />
USB device.<br />
Selected folder is an empty folder*. Select another<br />
folder that contains MP3/WMA tracks.<br />
* Folder that is physically empty or folder that contains<br />
data but does not contain valid MP3/WMA track.<br />
Skip to the next track encoded in an appropriate format<br />
or to the next non-copy-protected WMA track.<br />
The playback order is determined by the write-in time<br />
stamp. The first track/folder written into the USB device<br />
will be the first track/folder for playback.<br />
• Attach a USB device that contains tracks encoded in<br />
an appropriate format.<br />
• Reattach the USB device again.<br />
While playing a track, sound is<br />
sometimes interrupted.<br />
The correct characters are not<br />
displayed (e.g. album name).<br />
The MP3/WMA tracks have not been properly copied<br />
into the USB device.<br />
Copy MP3/WMA tracks again into the USB device, and<br />
try again.<br />
This unit can only display letters (upper case), numbers,<br />
and a limited number of symbols.<br />
<strong>JVC</strong> bears no responsibility for any loss of the data in the USB mass storage class device<br />
while using this System.<br />
Microsoft and Windows Media are either registered trademarks or trademarks of Microsoft<br />
Corporation in the United States and/or other countries.<br />
ENGLISH<br />
21
Specifications<br />
AUDIO AMPLIFIER SECTION<br />
TUNER SECTION<br />
Maximum Power Output:<br />
Continuous Power Output (RMS):<br />
Load Impedance:<br />
Front/<br />
Rear:<br />
Front/<br />
Rear:<br />
50 W per channel<br />
19 W per channel into 4 Ω, 40 Hz to<br />
20 000 Hz at no more than 0.8% total<br />
harmonic distortion.<br />
4 Ω (4 Ω to 8 Ω allowance)<br />
Tone Control Range: Bass: ±12 dB (60 Hz, 80 Hz, 100 Hz, 200 Hz)<br />
Q1.0, Q1.25, Q1.5, Q2.0<br />
Middle: ±12 dB (0.5 kHz, 1.0 kHz, 1.5 kHz, 2.5 kHz)<br />
Q0.75, Q1.0, Q1.25<br />
Treble: ±12 dB (10.0 kHz, 12.5 kHz, 15.0 kHz,<br />
17.5 kHz)<br />
Q (Fixed)<br />
Frequency Response:<br />
40 Hz to 20 000 Hz<br />
Signal-to-Noise Ratio:<br />
70 dB<br />
Line-Out Level/Impedance:<br />
<strong>KD</strong>-<strong>R416</strong>/ 5.0 V/20 kΩ load (full scale)<br />
<strong>KD</strong>-<strong>R415</strong><br />
<strong>KD</strong>-<strong>R316</strong>/ 2.5 V/20 kΩ load (full scale)<br />
<strong>KD</strong>-<strong>R315</strong><br />
Subwoofer-Out Level/Impedance: <strong>KD</strong>-<strong>R416</strong>/ 5.0 V/20 kΩ load (full scale)<br />
<strong>KD</strong>-<strong>R415</strong><br />
<strong>KD</strong>-<strong>R316</strong>/ 2.5 V/20 kΩ load (full scale)<br />
<strong>KD</strong>-<strong>R315</strong><br />
Output Impedance:<br />
1 kΩ<br />
Other Terminal:<br />
AUX (auxiliary) input jack, USB input jack (for<br />
<strong>KD</strong>-<strong>R416</strong>/<strong>KD</strong>-<strong>R415</strong>), Antenna input<br />
Frequency Range: FM: 87.5 MHz to 108.0 MHz<br />
AM:<br />
531 kHz to 1 602 kHz<br />
FM Tuner: Usable Sensitivity: 9.3 dBf (0.8 μV/75 Ω)<br />
50 dB<br />
16.3 dBf (1.8 μV/75 Ω)<br />
Quieting Sensitivity:<br />
Alternate Channel 65 dB<br />
Selectivity (400 kHz):<br />
Frequency Response: 40 Hz to 15 000 Hz<br />
Stereo Separation: 40 dB<br />
AM Tuner: Sensitivity: 20 μV<br />
Selectivity:<br />
40 dB<br />
22 ENGLISH
CD PLAYER SECTION<br />
USB SECTION (for<br />
<strong>KD</strong>-<strong>R416</strong>/<strong>KD</strong>-<strong>R415</strong>)<br />
GENERAL<br />
Type:<br />
Signal Detection System:<br />
Number of Channels:<br />
Frequency Response:<br />
Dynamic Range:<br />
Signal-to-Noise Ratio:<br />
Wow and Flutter:<br />
MP3 Decoding Format: (MPEG1/2 Audio Layer 3)<br />
WMA (Windows Media® Audio) Decoding Format:<br />
Compact disc player<br />
Non-contact optical pickup<br />
(semiconductor laser)<br />
2 channels (stereo)<br />
5 Hz to 20 000 Hz<br />
93 dB<br />
98 dB<br />
Less than measurable limit<br />
Max. Bit Rate: 320 kbps<br />
Max. Bit Rate: 192 kbps<br />
USB Standard: USB 1.1, USB 2.0<br />
Data Transfer Rate (Full Speed):<br />
Max. 12 Mbps<br />
Compatible Device:<br />
Mass storage class<br />
Compatible File System: FAT 32/16/12<br />
Playable Audio Format:<br />
MP3/WMA<br />
Max. Current: DC 5 V 500 mA<br />
Power Requirement: Operating Voltage: DC 14.4 V (11 V to 16 V allowance)<br />
Grounding System:<br />
Negative ground<br />
Allowable Operating Temperature:<br />
0°C to +40°C<br />
Dimensions (W × H × D): Installation Size: 182 mm × 52 mm × 160 mm<br />
(approx.)<br />
Panel Size:<br />
188 mm × 58 mm × 6 mm<br />
Mass:<br />
1.3 kg (excluding accessories)<br />
Design and specifications are subject to change without notice.<br />
ENGLISH<br />
23
Having TROUBLE with operation?<br />
Please reset your unit<br />
Refer to page of How to reset your unit<br />
EN, TH<br />
© 2009 Victor Company of Japan, Limited<br />
1009DTSMDTJEIN
GET0623-006A<br />
[U/UH]<br />
<strong>KD</strong>-<strong>R416</strong>/<strong>KD</strong>-<strong>R415</strong>/<br />
<strong>KD</strong>-<strong>R316</strong>/<strong>KD</strong>-<strong>R315</strong><br />
Installation/Connection Manual<br />
การติดตั้ง/คู่มือการติดตั้ง<br />
ENGLISH / ไทย<br />
1009DTSMDTJEIN<br />
EN, TH<br />
© 2009 Victor Company of Japan, Limited<br />
You need the installation kits which corresponds to your car. /<br />
ต้องใช้ชุดติดตั้งที่เหมาะสมกับรถของท่าน<br />
Check the battery system in your car /<br />
ตรวจสอบระบบแบตเตอรี่ในรถ<br />
To the car system /<br />
สำหรับระบบในรถยนต์<br />
12 V DC, NEGATIVE ground /<br />
ไฟฟ้ ากระแสตรง 12 V, พื้นดินเป็นขั้วลบ<br />
• To prevent short circuits:<br />
– Disconnect the battery’s negative terminal and make all electrical connections before installing the unit.<br />
– Cover the terminals of the UNUSED leads with insulating tape.<br />
• Be sure to ground this unit to the car’s chassis again after installation.<br />
• Replace the fuse with one of the specified rating.<br />
• Connect speakers with a maximum power of more than 50 W (impedance of 4 Ω to 8 Ω). Otherwise,<br />
change the setting. (See page 15 of the INSTRUCTIONS.)<br />
• The heat sink becomes very hot after use. Be careful not to touch it when removing this unit.<br />
WARNINGS / คำเตือน<br />
• เพื่อป้ องกันไฟฟ้ าลัดวงจร:<br />
– ถอดขั้วลบของแบตเตอรี่ออก และเชื่อมต่อไฟฟ้ าทั้งหมดก่อนติดตั้งเครื่อง<br />
– ปิดขั้วต่อของสายที่ไม่ได้ใช้ด้วยเทปป้ องกัน<br />
• ตรวจสอบให้แน่ใจว่าติดตั้งเครื่องกับโครงรถก่อนการติดตั้ง<br />
• เปลี่ยนฟิวส์เป็นฟิวส์ตามพิกัดที่ระบุ<br />
• ต่อลำโพงเข้ากับแหล่งจ่ายไฟฟ้ าไม่เกิน 50 W (ค่าความต้านทาน 4 Ω ถึง 8 Ω) หรือเปลี่ยนการตั้งค่า (ดูหน้า<br />
15 คำแนะนำ)<br />
• แผ่นระบายความร้อนร้อนมากหลังใช้งาน ห้ามสัมผัสเมื่อถอดเครื่องออก<br />
Heat sink / แผ่นระบายความร้อน<br />
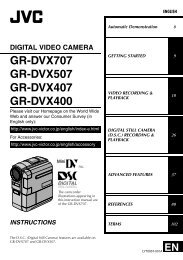
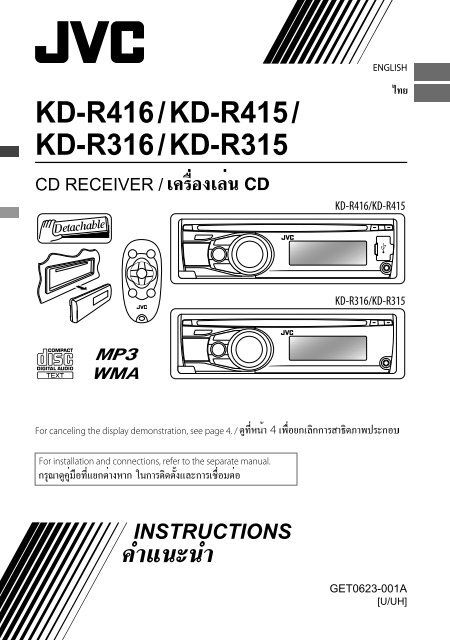
The following illustration shows a typical installation. If you have any questions or require information<br />
regarding installation kits, consult your <strong>JVC</strong> car audio dealer or a company supplying kits.<br />
In-dash mounting / การติดตั้งจอแบบ In-dash<br />
* 1<br />
When installing the unit without using the sleeve / เมื่อติดตั้งเครื่องโดยไม่ใช้ปลอกหุ้ม<br />
Flat head screws (M5 × 8 mm) / ตะปูควงหัวแบน (M5 × 8 mm) * 2 INSTALLATION / การติดตั้ง<br />
ภาพประกอบต่อไปนี ้แสดงการติดตั้งแบบปกติ หากท่านมีคำถามหรือต้องการข้อมูลเกี่ยวกับชุดติดตั้ง<br />
โปรดปรึกษาตัวแทนจำหน่ายเครื่องเสียงติดรถยนต์ <strong>JVC</strong> ของท่านหรือบริษัทที่จัดหาชุดอุปกรณ์ให้<br />
Do the required electrical connections.<br />
เชื่อมต่อไฟฟ้ าที่จำเป็น<br />
Install the unit at an angle of<br />
less than 30˚.<br />
ติดตั้งเครื่องในมุมน้อยกว่า 30˚<br />
Bend the appropriate tabs to hold the sleeve firmly<br />
in place.<br />
บิดแถบล็อคเพื่อรองรับปลอกหุ้มให้เข้าที่อย่างแน่นหนา<br />
Removing the unit / การถอดเครื่อง<br />
Release the rear section first... / ปล่อยส่วนหลังก่อน...<br />
Part list / รายการอุปกรณ์<br />
A Hard case / โครงแบบหนา (×1)<br />
B Control panel / แผงควบคุม (×1)<br />
C Sleeve / ปลอกหุ้ม (×1)<br />
D Trim plate / ทริมเพลท (×1)<br />
E Power cord / สายไฟ (×1)<br />
F Handles / ที่จับ (×2)<br />
Pocket / กระเป๋ า<br />
Bracket / ขาแขวน * 2<br />
* 1 When you stand the unit, be careful not to damage the fuse on the rear.<br />
* 2 Not supplied for this unit.<br />
* 1 เมื่อวางเครื่อง ระวังอย่าทำให้ฟิวส์ด้านหลังเสียหาย<br />
* 2 ไมได้จัดส่งให้สำหรับเครื่องนี้<br />
1
IMPORTANT: A custom wiring harness (separately purchased) which is suitable for your car is<br />
recommanded for connection between the unit and your car.<br />
• Consult your <strong>JVC</strong> car audio dealer or a company supplying kits for details.<br />
ELECTRICAL CONNECTIONS / การเชื่อมต่อไฟฟ้ า<br />
ข้อสำคัญ: ขอแนะนำให้ใช้ชุดสายไฟแบบสั่งทำ (แยกซื้อต่างหาก) ซึ ่งเหมาะสำหรับรถของคุณ<br />
เพื่อใช้เชื่อมต่อระหว่างเครื่องและรถ<br />
• สอบถามตัวแทนจำหน่ายวิทยุ <strong>JVC</strong> ของคุณหรือบริษัทที่จัดส่งชุดอุปกรณ์เพื่อขอรายละเอียด<br />
PRECAUTIONS on power supply and speaker connections<br />
• DO NOT connect the speaker leads of the power cord to the car battery; otherwise, the unit will be<br />
seriously damaged.<br />
• BEFORE connecting the speaker leads of the power cord to the speakers, check the speaker wiring in<br />
your car.<br />
ข้อควรระวังเกี่ยวกับการเชื่อมต่อแหล่งจ่ายไฟและลำโพง<br />
• อย่าต่อสายลำโพงที่เป็นสายไฟกับแบตเตอรี่รถยนต์ ไม่เช่นนั้นเครื่องอาจได้รับความเสียหายร้ายแรง<br />
• ก่อนต่อสายลำโพงที่เป็นสายไฟกับลำโพง ควรตรวจสอบการเดินสายลำโพงในรถของท่าน<br />
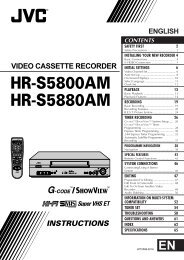
Connecting the external amplifier or subwoofer / การเชื่อมต่อเครื่องขยายเสียงหรือซับวูฟเฟอร์ภายนอก<br />
Reset the unit. / ตั้งค่าเครื่องใหม่<br />
Y-connector / ข้อต่อ Y * 1<br />
Remote lead / สายรีโมท<br />
Signal cord / สายสัญญาณ * 1<br />
<strong>JVC</strong> Amplifier /<br />
แอมพลิฟลายเออร์ของ<br />
<strong>JVC</strong><br />
To the blue (white stripe) lead<br />
of the unit / สำหรับสายสีน้ำเงิน<br />
(แถบสีขาว) ของเครื่อง<br />
Rear speakers or subwoofer (Make the setting accordingly,<br />
see page 14 of the INSTRUCTIONS.) / ลำโพงหลังหรือซับวูฟเฟอร์ (ตั้งค่า<br />
ให้สอดคล้อง ดูหน้า 14 คำแนะนำ)<br />
Antenna terminal / ขั้วต่อสายอากาศ<br />
Rear ground terminal / ขั้วต่อสายดินด้านหลัง<br />
15 A fuse / ฟิวส์ 15 A<br />
Front speaker (left) /<br />
ลำโพงหน้า (ซ้าย)<br />
Front speaker (right) /<br />
ลำโพงหน้า (ขวา)<br />
Rear speaker (left) /<br />
ลำโพงหลัง (ซ้าย)<br />
Rear speaker (right) /<br />
ลำโพงหลัง (ขวา)<br />
White / สีขาว<br />
White (black stripe) / สีขาว (แถบสีดำ)<br />
Gray / สีเทา<br />
Gray (black stripe) / สีเทา (แถบสีดำ)<br />
Green / สีเขียว<br />
Green (black stripe) / สีเขียว (แถบสีดำ)<br />
Purple / สีม่วง<br />
Purple (black stripe) / สีม่วง (แถบสีดำ)<br />
Black / สีดำ<br />
To the metallic body or chassis of the car /<br />
สำหรับตัวเครื่องที่เป็นโลหะหรือโครงรถ<br />
Yellow / สีเหลือง * 3<br />
Red / สีแดง<br />
Blue / สีนำเงิน<br />
Blue (white stripe) /<br />
สีน้ำเงิน (แถบสีขาว)<br />
To a live terminal (constant 12 V) /<br />
สำหรับขั้วต่อที่ใช้งาน (คงที่ 12 V)<br />
To an accessory terminal /<br />
สำหรับขั้วต่ออุปกรณ์เสริม<br />
Ignition switch /<br />
สวิตช์จุดระเบิด<br />
Fuse block /<br />
กล่องฟิวส์<br />
To the automatic antenna if any (250 mA max.) /<br />
สำหรับสายอากาศอัตโนมัติ ถ้ามี (สูงสุด 250 mA)<br />
To the remote lead of other equipment (200 mA max.) /<br />
สำหรับสายรีโมทของอุปกรณ์อื่น (สูงสุด 200 mA)<br />
* 1 Not supplied for this unit.<br />
* 2 Firmly attach the ground wire to the metallic body or to the chassis of the car—to the place uncoated<br />
with paint.<br />
* 3 Before checking the operation of this unit prior to installation, this lead must be connected; otherwise,<br />
the power cannot be turned on.<br />
* 1 ไมได้จัดส่งให้สำหรับเครื่องนี้<br />
* 2 ติดสายดินกับตัวเครื่องที่เป็นโลหะหรือโครงรถให้แน่นหนา—ในส่วนที่ไม่ได้พ่นสีทับ<br />
* 3 ก่อนตรวจสอบการทำงานของเครื่องนี้ก่อนการติดตั้ง สายไฟต้องต่อไว้แล้ว ไม่เช่นนั้นจะไม่สามารถเปิดเครื่องได้<br />
• The fuse blows. ] Are the red and black leads connected correctly?<br />
• Power cannot be turned on. ] Is the yellow lead connected?<br />
• No sound from the speakers. ] Is the speaker output lead short-circuited?<br />
• “PROTECT” appears on the display and no operation can be done. ] Is the speaker output lead<br />
short-circuited or touches the chassis of the car/head unit? ; Have you reset your unit?<br />
• Sound is distorted. ] Is the speaker output lead grounded? ; Are the “–” terminals of L and R speakers<br />
grounded in common?<br />
• Noise interfere with sounds. ] Is the rear ground terminal connected to the car’s chassis using shorter<br />
and thicker cords?<br />
• This unit becomes hot. ] Is the speaker output lead grounded? ; Are the “–” terminals of L and R<br />
speakers grounded in common?<br />
• This unit does not work at all. ] Have you reset your unit?<br />
TROUBLESHOOTING / การแก้ ไขปั ญหาเบื้องต้น<br />
• ฟิ วส์ขาด ] ต่อสายสีแดงและสีดำถูกต้องหรือไม่?<br />
• ไม่สามารถเปิ ดเครื่องได้ ] ต่อสายสีเหลืองแล้วหรือไม่?<br />
• ไม่ได้ยินเสียงจากลำโพง ] สายสัญญาณออกของลำโพงลัดวงจรหรือไม่?<br />
• ข้อความ “PROTECT” ปรากฏขึ ้นบนหน้าจอและเครื่องไม่สามารถทำงานได้ ] สายสัญญาณออกของลำโพงลัดวงจร<br />
หรือสัมผัสกับโครงรถ/ตัวเครื่องหลักหรือไม่? ; ท่านตั้งเครื่องใหม่ใช่หรือไม่?<br />
• เสียงผิดเพี้ยน ] สายสัญญาณออกของลำโพงต่อกับสายดินหรือไม่? ; ขั้วต่อ “–” ของลำโพง L (ซ้าย) และ R (ขวา)<br />
ต่อสายดินไว้ด้วยกันหรือไม่?<br />
• มีเสียงรบกวน ] ขั้วต่อสายดินด้านหลังที่ต่อกับโครงรถใช้สายที่สั้นและหนากว่าหรือไม่?<br />
• เครื่องร้อน ] สายสัญญาณออกของลำโพงต่อกับสายดินหรือไม่? ; ขั้วต่อ “–” ของลำโพง L (ซ้าย) และ R (ขวา)<br />
ต่อสายดินไว้ด้วยกันหรือไม่?<br />
• เครื่องใช้งานไม่ได้เลย ] ท่านตั้งเครื่องใหม่ใช่หรือไม่?<br />
2