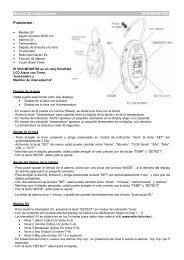
Sonic - Pulse
Sonic - Pulse
Sonic - Pulse

Create successful ePaper yourself
Turn your PDF publications into a flip-book with our unique Google optimized e-Paper software.
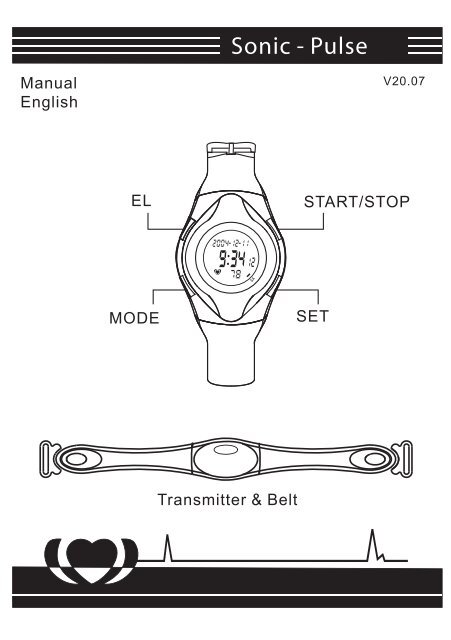
<strong>Sonic</strong> - <strong>Pulse</strong><br />
Manual<br />
English<br />
V20.07<br />
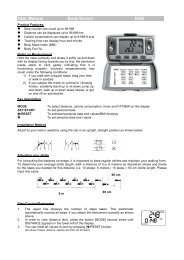
EL<br />
START/STOP<br />
MODE<br />
SET<br />
Transmitter & Belt<br />
www.kasper-richter.de
<strong>Sonic</strong> <strong>Pulse</strong> is your BEST fitness product<br />
that guides you to achieve your<br />
physical goal & healthy lifestyle.<br />
HEALTH NOTICE<br />
This product is for displaying heart rate during exercise only<br />
and cannot predict the intensity level that is safe for you. It is<br />
not intended for medical diagnostic purposes or for prevention<br />
of heart related health problems. Before you begin any<br />
exercise program, please consult your physician, especially if<br />
you have been inactive for a period of time, have a history of<br />
cardiac illness, smoke, have high blood pressure and/ or are<br />
over-weight. If you use a pacemaker, do not use a heart rate<br />
monitor until you consult with your doctor.<br />
SPECIFICATIONS<br />
Watch Receiver:<br />
Heart Rate Accuracy<br />
Operating Temperature<br />
Storage Temperature<br />
Battery<br />
Weight<br />
1 beat per minute<br />
0°C ~ 50°C<br />
-14°C ~ 70°C<br />
3 volt lithium 2032 cell<br />
50 grams<br />
Transmitter & belt:<br />
Battery<br />
Weight (including belt)<br />
Adjustable Chest Belt<br />
3 volt lithium 2032 cell<br />
80 grams<br />
-1-
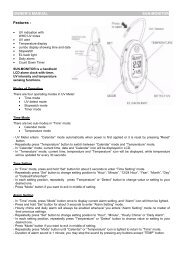
How to wear your <strong>Sonic</strong> <strong>Pulse</strong><br />
The transmitter should be positioned<br />
right below the breasts / pectoral<br />
muscles.<br />
The strap should be comfortable, but<br />
secure.<br />
Transmitter<br />
Elastic Strap<br />
Press to fix<br />
Note: Do not use Athletic Watch near high voltage power cables .<br />
FEATURES:<br />
Time of Day (12/24h)<br />
Day / Date Calendar<br />
Stopwatch<br />
Alarmfunction (Time)<br />
Current/ Average/ Max. HR display<br />
EL Backlight<br />
Wireless ECG Measurement<br />
Large Easy-to-View LCD Display<br />
Ultra-Slim Ergonomic Chest Belt Transmitter<br />
State-of-Art attractive Wrist Watch design<br />
Nightsight (Backlit Display Light)<br />
Press the " EL " key to activate NIGHTSIGHT. To facilitate<br />
night time monitoring, the display will illuminate and the heart<br />
rate reading will " freeze" for 5 seconds.<br />
-2-
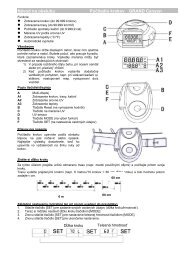
Time/Date Function<br />
1. To set the time and date, press the [MODE] button till you get to the time/date<br />
function.<br />
2. Press and hold the [SET] button for 3 seconds the the year digits would start<br />
flashing.<br />
3. Adjust your year by pressing the [SET] (to count down) or [START/STOP] (to<br />
count up).<br />
4. When the year is set, press the [MODE] button and the month-digits will then<br />
flash. Now press [SET] (to count down) or [START/STOP] (to count up).<br />
5. When the month is set, press the [MODE] button and the day-digits will then<br />
flash. Now press [SET] (to count down) or [START/STOP] (to count up).<br />
6. When the day is set, press the [MODE] button and the hour-digits will then<br />
flash. Now press [SET] (to count down) or [START/STOP] (to count up).<br />
7. When the hour is set, press the [MODE] button and the minutes-digits will<br />
then flash. Now press [SET] (to count down) or [START/STOP] (to count up).<br />
8. When the minute is set, press the [MODE] button and the time-digits will then<br />
flash. Now press [SET] to change the time system between 12h and 24h.<br />
9. Noted thath the day of the week is displayed at the bottom of the watch and<br />
will be automaticly set according to the date and year selected.<br />
10.Press [SET] button to select the 24-hour or the 12-hour. The " " icon<br />
represent nighttime and the " " icon represent daytime.<br />
Note: If no changes (adjustment) are made after 1 minute, it will automaticly<br />
return to the main display.<br />
STOPWATCH<br />
1. Press the [MODE] key till you get to the stop watch<br />
function<br />
2. To start the stopwatch, press the [START/STOP] key.<br />
3. To stop the stopwatch, press the [START/STOP] key.<br />
4. To reset, press the [SET] key.<br />
-3-
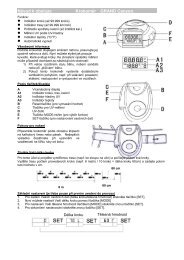
ALARM<br />
1) Press “Mode” till you get to the alarm function.<br />
2) To set your alarm, Press and hold the “Set ” button for 5 seconds and the hour digit<br />
should start flashing.<br />
3) Adjust you hour of the alarm by pressing the “Set ” (to count down) or the “Start/Stop”<br />
(to count up).<br />
4) Then press the “mode” button to set the next part of the setting which is the minutes. And<br />
once again, press either the “Set” (to count down) or the “Start/Stop” (to count up)<br />
5) Press the “mode” button to complete the setting of the alarm.<br />
6) To activate or deactivate the alarm “ “ , press the “Set” button.<br />
TARGET HEART RATE TRAINING GUIDE<br />
Beats per minutes (bpm)<br />
Training Areas:<br />
50% - 60% Maintain Fitness<br />
60% - 70% Endurance<br />
70% - 80% Slight Resistance<br />
80% - 90% Sustained Resistance<br />
Maximum <strong>Pulse</strong> Limit (MPL/bpm)<br />
= 220-Age<br />
For Maintain Fitness TZ setting:<br />
Max HR = 60% * MPL<br />
Min HR = 50% * MPL<br />
Target zone will vary for each individual, depending on Ages,<br />
Personal fitness goals, Existing health considerations (High<br />
blood pressure, circulation or respiration), Medications and<br />
Doctor's recommendations.<br />
-4-
Heart rate measurement<br />
Present Heart Rate<br />
1) Press the “mode” key till you have got to the present heart rate function located on the main<br />
display, below the time/date function.<br />
2) Wait for the “ “ to reach the heart rate watch and your heart rate should appear in a few<br />
seconds.<br />
Highest Heart Rate Mode<br />
The maximum heart rate mode records your highest ever heart rate and if you have a even higher<br />
heart rate then your previous record, it will replace the old one and only the new will be shown on<br />
the highest heart rate mode.<br />
1) Press “mode” till you get to the highest heart rate mode which is below the time/date function.<br />
2) Press the “mode” button again till you see the word max next to the heart rate section like this.<br />
Then it will tell you your maximum heart rate.<br />
Average Heart Rate<br />
The average heart rate records your average heart rate and it is changed as you use it more often,<br />
on average heart rate replacing the other as you use it more.<br />
1) Press the “mode” key till you get to the average heart rate which is below the time/date<br />
function.<br />
2) Press the “mode” button once and you’ll see the AVG next to the display of heart rate. Then<br />
you’ll see you average heart rate.<br />
Note: The heart rate ranges from the lowest of 35 and the maximum of 250.<br />
-5-
MAINTENANCE<br />
1. The elastic strap:<br />
The strap can be rinsed in surface fresh water or washed with a<br />
mild soap. Never scrape strap to wear out may need to replaced.<br />
2. Transmitter:<br />
Never scrap the rubber electrode surface. The first signs of a<br />
worn out transmitter are often erratic heart rate numbers which<br />
jump up and down. To extend the life, avoid bending the<br />
electrodes.<br />
3.Watch<br />
If the display contrast changes and figures become faint, it's<br />
time to replace the watch battery. Consider changing the watch<br />
and transmitter batteries at the same time.<br />
It's a good practice.<br />
NOTE: Do not expose your Athletic Watch to extremely cold or hot<br />
temperatures. For example, do not leave your unit in your car<br />
in direct sunlight.<br />
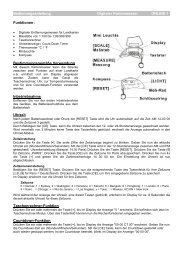
4. Batteries and Battery Replacement:<br />
Transmitter:<br />
Unscrew the battery cover located on the back of the transmitter<br />
Remove the new battery, model CR2032, with the (+) side facing<br />
up. Press reset after battery replacement.<br />
Replace the cover and tighten screws.<br />
Unscrew the four screws on the stainless steel back cover closely<br />
at the battery. After removing the housing, Unscrew the inside<br />
two small screws located at the 4 o'clock and 8 o'clock positions.<br />
Gently remove the battery and replace it with a new battery, model<br />
CR2032, the(+) side facing up.<br />
NOTE: Be careful not to over tighten and "strip" the casing.<br />
O R in g<br />
Reset<br />
CR2032<br />
BATTERY<br />
-6-
TROUBLESHOOTING<br />
1. Heart rate does not show up:<br />
Make sure that you have good contact between the<br />
electrodes and your skin. Re-moiste the electrodes. Make<br />
sure your chest belt fits securely and is properly positioned<br />
at the center of the chest. The transmitter battery may be<br />
worn out. Replace the battery. Make sure the battery is<br />
installed correctly with the (+) side facing up.<br />
2. Display is black or very light:<br />
The battery power may be low. Try a new battery--make<br />
sure the battery is installed correctly.<br />
3. Display becomes dark or black:<br />
The unit is too hot. Place the unit in a shaded area, and it<br />
should return to normal.<br />
4. The unit operates slowly or struggled:<br />
The unit is too cold,. Warm the unit, and it should return to<br />
normal.<br />
5. Heart rate varies enormously:<br />
Make sure your chest belt fits securely and is properly<br />
positioned at the center of the chest.<br />
Check your surroundings for electromagnetic or high<br />
energy interference and move away from the source of<br />
interference. (e.g. car, near computer or handy ...)<br />
- 7 -