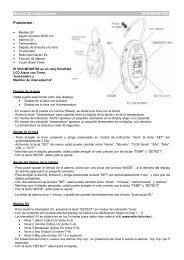
OWNER'S MANUAL SUN-MONITOR Features : - Kasper & Richter
OWNER'S MANUAL SUN-MONITOR Features : - Kasper & Richter
OWNER'S MANUAL SUN-MONITOR Features : - Kasper & Richter

Create successful ePaper yourself
Turn your PDF publications into a flip-book with our unique Google optimized e-Paper software.
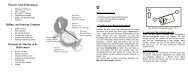
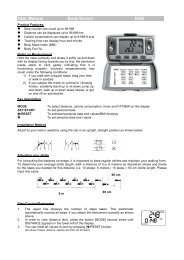
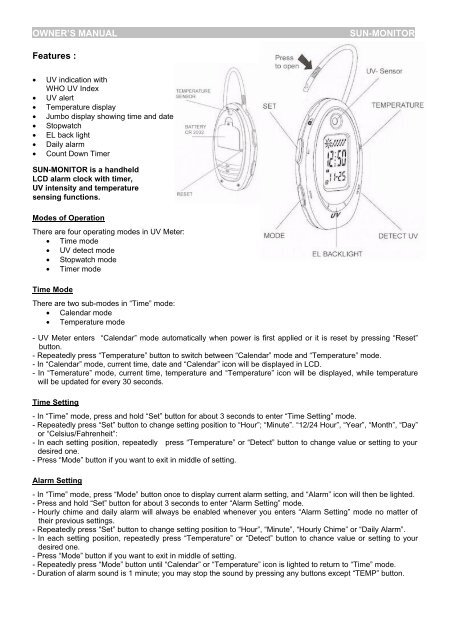
OWNER’S <strong>MANUAL</strong><br />
<strong>SUN</strong>-<strong>MONITOR</strong><br />
<strong>Features</strong> :<br />
• UV indication with<br />
WHO UV Index<br />
• UV alert<br />
• Temperature display<br />
• Jumbo display showing time and date<br />
• Stopwatch<br />
• EL back light<br />
• Daily alarm<br />
• Count Down Timer<br />
<strong>SUN</strong>-<strong>MONITOR</strong> is a handheld<br />
LCD alarm clock with timer,<br />
UV intensity and temperature<br />
sensing functions.<br />
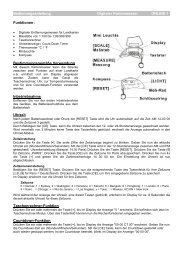
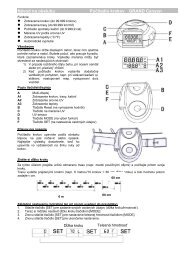
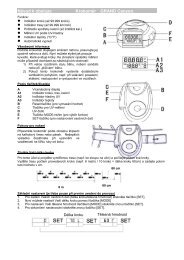
Modes of Operation<br />
There are four operating modes in UV Meter:<br />
• Time mode<br />
• UV detect mode<br />
• Stopwatch mode<br />
• Timer mode<br />
Time Mode<br />
There are two sub-modes in “Time” mode:<br />
• Calendar mode<br />
• Temperature mode<br />
- UV Meter enters “Calendar” mode automatically when power is first applied or it is reset by pressing “Reset”<br />
button.<br />
- Repeatedly press “Temperature” button to switch between “Calendar” mode and “Temperature” mode.<br />
- In “Calendar” mode, current time, date and “Calendar” icon will be displayed in LCD.<br />
- In “Temerature” mode, current time, temperature and “Temperature” icon will be displayed, while temperature<br />
will be updated for every 30 seconds.<br />
Time Setting<br />
- In “Time” mode, press and hold “Set” button for about 3 seconds to enter “Time Setting” mode.<br />
- Repeatedly press “Set” button to change setting position to “Hour”; “Minute”. “12/24 Hour”, “Year”, “Month”, “Day”<br />
or “Celsius/Fahrenheit”:<br />
- In each setting position, repeatedly press “Temperature” or “Detect” button to change value or setting to your<br />
desired one.<br />
- Press “Mode” button if you want to exit in middle of setting.<br />
Alarm Setting<br />
- In “Time” mode, press “Mode” button once to display current alarm setting, and “Alarm” icon will then be lighted.<br />
- Press and hold “Set” button for about 3 seconds to enter “Alarm Setting” mode.<br />
- Hourly chime and daily alarm will always be enabled whenever you enters “Alarm Setting” mode no matter of<br />
their previous settings.<br />
- Repeatedly press “Set” button to change setting position to “Hour”, “Minute”, “Hourly Chime” or “Daily Alarm”.<br />
- In each setting position, repeatedly press “Temperature” or “Detect” button to chance value or setting to your<br />
desired one.<br />
- Press “Mode” button if you want to exit in middle of setting.<br />
- Repeatedly press “Mode” button until “Calendar” or “Temperature” icon is lighted to return to “Time” mode.<br />
- Duration of alarm sound is 1 minute; you may stop the sound by pressing any buttons except “TEMP” button.
UV Detect Mode<br />
- In “Time” mode,, press “Detect” button to enter “UV Detect” mode. Current UV Index will then be displayed on<br />
LCD and “UV Index” icon will be lighted.<br />
- UV intensity is divided into five levels (more about www.who.int/uv/en) as described below:<br />
• Level 1 Weak ( UV index 0~2 )<br />
• Level 2 Low ( UV index 3~4 )<br />
• Level 3 Moderate ( UV index 5~6 )<br />
• Level 4 High ( UV index 7~9 )<br />
• Level 5 Very High ( UV index 10 or above )<br />
- If UV intensity is at level 4, buzzer will sound “bi bi” once, if UV intensity is at level 5, buzzer will sound “ bi bi”<br />
for 5 seconds.<br />
- Press “Detect” button again to return to “Time” mode or the unit will return to “Time” mode automatically after 2<br />
minutes.<br />
Sunbath<br />
- In “UV Detect” mode, press and hold “Set” button for about 3 seconds to enter “Sunbath” mode, “Sunbath” will<br />
be lighted.<br />
- In this mode, UV intensity will be detected and shown for every 10 minutes.<br />
- Press “Detect” to return to “Time” mode or the unit will return to “Time” mode automatically after 6 hours.<br />
Stopwatch Mode<br />
In “Time” mode, repeatedly press “Mode” button until “Stopwatch” icon is lighted to enter “Stopwatch” mode, and<br />
there are two sub-modes:<br />
• Simple Stopwatch<br />
• Split Stopwatch<br />
Simple Stopwatch<br />
- Press “Temperature” button to start up counting.<br />
- Press “Temperature” button again to pause counting.<br />
- Press “Set” button to reset counting value to zero or press “Temperature” button to resume counting.<br />
Split Stopwatch<br />
- Press “Temperature” button to start up counting.<br />
- Press “Set” button to hold current counting value on LCD while counting remain continues in background.<br />
- Press “Set” button again to resume display of counting value on LCD.<br />
- Press “Temperature” button to pause counting, then press “Set” button to reset counting value to zero or press<br />
“Temperature” button again to resume counting.<br />
- Repeatedly press “Mode” to return to “Time” mode. But counting will not be stopped by pressing “Mode” button if<br />
it is counting.<br />
Timer Mode<br />
In “Time” mode, repeatedly press “Mode” button until “Timer” icon is lighted to enter “Timer” mode.<br />
Timer Setting<br />
- In “Timer” mode, press and hold “Set” button for about 3 seconds to enter “Timer Setting” mode.<br />
- Repeatedly press “Set” button to change setting position to “Hour”, “Minute” or “Second”.<br />
- In each setting position, repeatedly press “Temperature” or “Detect” button to change value to your desired one.<br />
- Press “Mode” button if you want to exit in middle of setting.<br />
- Press “Temperature” button to start down counting.<br />
- Press “Temperature” button again to pause counting, then press “Set” to reset counting value to your original<br />
setting or press “Temperature” button again to resume counting.<br />
- When counting value reaches zero, buzzer will sound for 1 minute; you may stop the sound by pressing any<br />
buttons except “EL” button. And counting value will reset to your original setting automatically.<br />
- Repeatedly press “Mode” to return to “Time” mode. But counting will not be stopped by pressing “Mode” button if<br />
it is counting.<br />
EL-Backlight<br />
Press button “EL” to use the EL-Backlight