ECHOGRAPH-HRP.S High-Speed Ultrasonic ... - Karl Deutsch
ECHOGRAPH-HRP.S High-Speed Ultrasonic ... - Karl Deutsch
ECHOGRAPH-HRP.S High-Speed Ultrasonic ... - Karl Deutsch
You also want an ePaper? Increase the reach of your titles
YUMPU automatically turns print PDFs into web optimized ePapers that Google loves.
<strong>ECHOGRAPH</strong>-<strong>HRP</strong>.S<br />
<strong>High</strong>-<strong>Speed</strong> <strong>Ultrasonic</strong> Inspection of Bars
<strong>ECHOGRAPH</strong>-<strong>HRP</strong>.S<br />
<strong>High</strong>-<strong>Speed</strong> <strong>Ultrasonic</strong> Inspection of Bars<br />
Principle of closing mechanics of test chamber:<br />
a) opened test chamber while bar is tested<br />
b) bar is leaving the test chamber and one side of<br />
chamber is already closed.<br />
The ultrasonic probes are active as long as the<br />
bar is within the ultrasonic beams. The electronic<br />
test enable signals (to activate the probes) are<br />
programmable to reach the shortest possible untested<br />
ends.<br />
<strong>High</strong>-<strong>Speed</strong> <strong>Ultrasonic</strong> Inspection of Bars<br />
KARL DEUTSCH has developed ultrasonic<br />
testing equipment since 1951 and has<br />
shipped the first inspection system for billet<br />
inspection in 1965. Many improvements for<br />
the <strong>ECHOGRAPH</strong>-electronics, the robust<br />
testing mechanics and the ultrasonic probes<br />
have led to our current state-of-the-art.<br />
KARL DEUTSCH maintains a strict quality<br />
management system according to DIN EN<br />
ISO 9001:2000.<br />
At the moment, a bar diameter range from<br />
7 to 93 mm can be tested with the ECHO-<br />
GRAPH-<strong>HRP</strong>.S system. The testing system<br />
works with the immersion technique, meaning<br />
that the part of the bar to be inspected is<br />
fully immersed in water. The system uses a<br />
water chamber and several probe cassettes<br />
on which the ultrasonic probes are mounted<br />
around the circumference of the bar. No mechanical<br />
rotation is employed in this concept,<br />
therefore avoiding mechanical wear of the<br />
testing mechanics and the untested zones<br />
which might occur with helical test traces<br />
and high testing speeds.<br />
A key feature of the testing concept with stationary<br />
probes is the high inspection speed<br />
of up to 2 m/sec and the robust mechanics<br />
which shows very little wear since no rotational<br />
components are used. The ultrasonic<br />
pulse density in the transportation direction<br />
is high enough so that overlap in the transportation<br />
direction is produced. Therefore,<br />
another important feature of the system is the<br />
detection of short defects.<br />
Most defects show a longitudinal geometry<br />
due to the rolling process. The determination<br />
of the length for longitudinal defects<br />
is an easy task with stationary probes. The<br />
defect is always found by the same probe.<br />
Counting the pulses above the calibrated<br />
amplitude threshold and knowing the pulse<br />
density quickly produces the defect length.<br />
To avoid pseudo indications, e.g. from surface<br />
scratches, a pulse counter can be set<br />
to a value which is suitable for the bar quality.<br />
A minimum number of ultrasonic pulses<br />
over the pre-set threshold is required before<br />
the system alarm becomes active. Again this<br />
feature can be used to adjust the minimum<br />
flaw length which should be detected with<br />
the system.<br />
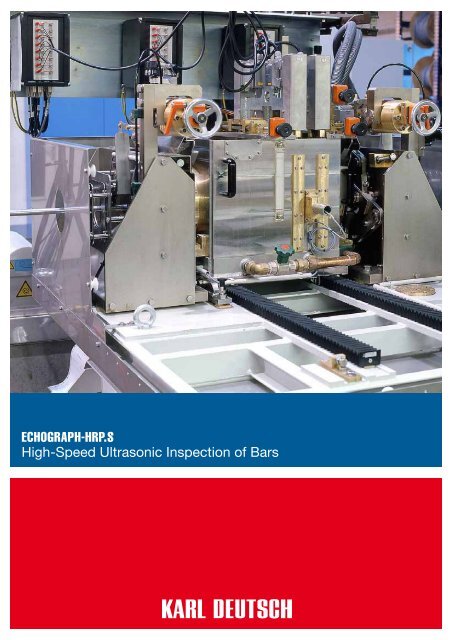
Water-filled test chamber in opened and closed condition.
<strong>ECHOGRAPH</strong>-<strong>HRP</strong>.S<br />
<strong>High</strong>-<strong>Speed</strong> <strong>Ultrasonic</strong> Inspection of Bars<br />
System calibration by means of short bar carrying artificial defects. The bar is rotated<br />
such that the defect is passing each ultrasonic probe. Afterwards, the automated<br />
sensitivity adjustment equalizes the sensitivity of all probes. For the calibration<br />
process, the test chamber is moved into the calibration position (offline).<br />
Since the invention of the <strong>HRP</strong>.S-setup, many probe configurations have been realized.<br />
For bar testing, a setup with 16 angle beam probes and 5 straight-beam<br />
probes has been proven to be a reliable setup for 100%-cross sectional coverage<br />
of the bars. The more probes are used, the higher is the probability of detection<br />
(POD) also of oblique and crack-type defects.<br />
Special line-focussed probes for angular incidence in different sizes to test the<br />
respective bar diameters. Each probe covers 30 degree of the bar surface – independent<br />
of the bar diameter.<br />
Test cassette with ring of ultrasonic probes. Angle beam probes are used to detect<br />
surface defects while straight-beam probes are used to detect core defects.The<br />
testing angle of all angle-beam probes is centrally adjusted by the spindle and the<br />
orange dial.
<strong>ECHOGRAPH</strong>-<strong>HRP</strong>.S<br />
<strong>High</strong>-<strong>Speed</strong> <strong>Ultrasonic</strong> Inspection of Bars<br />
Similar test results can be obtained by using ultrasonic phased arrays. The bar is entirely enclosed by an annular ring array. The phased array technique can then be<br />
used to produce straight-beam testing (yellow beam) or angle beam testing (green beam). The advantage of a phased array setup is the fast change-over time for<br />
another dimension and to adjust all test parameters electronically. On the other hand, this technique requires many electronic testing channels and extensive probe<br />
arrays.<br />
Specimens<br />
Bars<br />
Diameter range (D)<br />
Specimen ends<br />
Straightness deviation<br />
Surface condition<br />
Ovality<br />
10 - 90 mm<br />
machined, no burr<br />
max. 1 mm/m<br />
machined (desirable)<br />
max. 1% of D<br />
PI <strong>HRP</strong>_S e 2010 04 • Subject to change without notice • Printed in Germany<br />
KARL DEUTSCH Prüf- und Messgerätebau GmbH + Co KG<br />
Otto-Hausmann-Ring 101 · 42115 Wuppertal · Germany<br />
Phone (+49 -202) 7192-0 · Fax (+49 -202) 7149 32<br />
info@karldeutsch.de · www.karldeutsch.de<br />
DIN EN ISO<br />
9001:2000<br />
c e r t i f i e d


