
You also want an ePaper? Increase the reach of your titles
YUMPU automatically turns print PDFs into web optimized ePapers that Google loves.
<strong>Руководство</strong> <strong>по</strong><br />
<strong>эксплуатации</strong><br />
КУХОННАЯ ПЛИТА<br />
RS<br />
,1<br />
GB<br />
English, 14<br />
Содержание<br />
Монтаж, 2-6<br />
Рас<strong>по</strong>ложение и нивелировка<br />
Электрическое <strong>по</strong>дсоединение<br />
Подсоединение к газопроводу<br />
Настроика на различные типы газа<br />
Технические данные<br />
Таблица характеристик горелок и форсунок<br />
Описание изделия, 7<br />
Общии вид<br />
Панель управления<br />
KN6G217/RU<br />
KN6G217S/RU<br />
Включение и эксплуатация, 8-10<br />
Эксплуатация варочнои панели<br />
Эксплуатация духового шкафа<br />
Таблица приготовления в духовом шкафу<br />
Предосторожности и рекомендации,11<br />
Общие требования к безопасности<br />
Утилизация<br />
Экономия электроэнергии и охрана окружающеи<br />
среды<br />
Техническое обслуживание и уход, 12-13<br />
Отключение электропитания<br />
Чистка изделия<br />
Уход за рукоятками газовои варочнои панели<br />
Порядок замены лам<strong>по</strong>чки в духовом шкафу<br />
Техническое обслуживание
Установка<br />
RS<br />
!<br />
<br />
<br />
<br />
!<br />
<br />
<br />
!<br />
<br />
<br />
<br />
<br />
<br />
<br />
<br />
<br />
<br />
<br />
<br />
<br />
<br />
<br />
<br />
<br />
<br />
<br />
<br />
<br />
<br />
<br />
<br />
<br />
<br />
<br />
<br />
<br />
<br />
<br />
<br />
<br />
<br />
<br />
<br />
<br />
<br />
A<br />
<br />
<br />
<br />
<br />
<br />
<br />
<br />
!<br />
<br />
<br />
<br />
<br />
<br />
<br />
<br />
<br />
<br />
<br />
<br />
<br />
<br />
<br />
!<br />
<br />
<br />
<br />
<br />
<br />
<br />
<br />
<br />
<br />
<br />
<br />
<br />
<br />
!<br />
<br />
<br />
!<br />
<br />
<br />
<br />
<br />
<br />
<br />
<br />
<br />
<br />
<br />
<br />
<br />
<br />
<br />
<br />
<br />
2
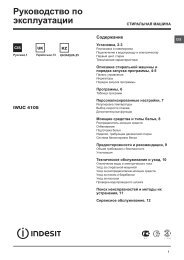
mm.<br />
420<br />
Min.<br />
HOOD<br />
Min. 600 mm.<br />
Min. 420 mm.<br />
<br />
<br />
<br />
<br />
<br />
<br />
<br />
<br />
<br />
<br />
<br />
<br />
<br />
<br />
<br />
<br />
<br />
<br />
<br />
<br />
<br />
<br />
<br />
<br />
<br />
min. 650 mm. with hood<br />
min. 700 mm. without hood<br />
<br />
<br />
<br />
<br />
<br />
<br />
<br />
<br />
<br />
<br />
<br />
<br />
<br />
<br />
<br />
<br />
<br />
<br />
<br />
<br />
<br />
<br />
<br />
<br />
<br />
<br />
<br />
<br />
<br />
<br />
!<br />
<br />
<br />
!<br />
<br />
!<br />
<br />
<br />
! <br />
<br />
<br />
<br />
<br />
<br />
<br />
<br />
<br />
<br />
<br />
<br />
<br />
<br />
<br />
<br />
<br />
<br />
!<br />
<br />
<br />
<br />
<br />
<br />
<br />
<br />
<br />
<br />
<br />
<br />
<br />
<br />
<br />
<br />
<br />
<br />
<br />
<br />
<br />
<br />
<br />
RS<br />
3
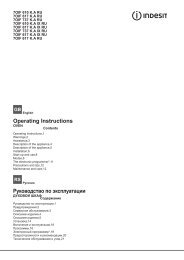
RS<br />
Точка соединения<br />
Изолирующая<br />
заглушка<br />
Крепление<br />
шланга<br />
Точка соединения<br />
Крепление<br />
шланга<br />
ГОРЯЧАЯ ПОВЕРХНОСТЬ<br />
Изолирующая<br />
заглушка<br />
!<br />
<br />
<br />
<br />
<br />
<br />
<br />
<br />
<br />
<br />
<br />
<br />
<br />
<br />
<br />
!<br />
<br />
<br />
<br />
Порядок регуляции минимального пламени<br />
конфорок на варочной панели:<br />
1. <strong>по</strong>верните рукоятку в <strong>по</strong>ложение минимального<br />
пламени;<br />
2. снимите рукоятку и <strong>по</strong>верните регуляционный<br />
винт, рас<strong>по</strong>ложенный внутри или рядом со<br />
стержнем крана, вплоть до <strong>по</strong>лучения стабильного<br />
малого пламени.<br />
! В случае ис<strong>по</strong>льзования сжиженного природного<br />
газа винт регуляции должен быть отвинчен против<br />
часовой стрелки;<br />
3. проверьте, чтобы конфорка не гасла при резком<br />
<strong>по</strong>вороте крана из <strong>по</strong>ложения максимального<br />
пламени в <strong>по</strong>ложение минимального пламени.<br />
! Конфорки варочной панели не нуждаются в какойлибо<br />
регуляции первичного воздуха.<br />
Настройка духового шкафа<br />
Порядок замены форсунки газовой горелки<br />
духового шкафа:<br />
1. <strong>по</strong>лностью откройте дверцу<br />
духового шкафа;<br />
2. выньте съемное дно<br />
духовки (см. рисунок);<br />
<br />
<br />
<br />
<br />
Настройка на различные типы газа<br />
Изделие может быть настроено на тип газа,<br />
отличающийся от оригинального (указан на<br />
этикетке настройки на крышке).<br />
Настройка варочной панели<br />
Порядок замены форсунок конфорок на варочной<br />
панели:<br />
1. снимите решетки с варочной панели и выньте<br />
горелки из своих гнезд;<br />
2. отвинтите форсунки при<br />
<strong>по</strong>мощи <strong>по</strong>лого ключа 7 мм<br />
(см. рисунок) и замените их на<br />
форсунки, расчитанные на<br />
новый тип газа (см. таблицу<br />
Характеристики горелок и<br />
форсунок);<br />
3. восстановите на место все комплектующие,<br />
вы<strong>по</strong>лняя операции в обратном <strong>по</strong>рядке <strong>по</strong><br />
отношению к описанным выше.<br />
V<br />
3. отвинтите крепежные винты<br />
горелки и снимите горелку<br />
духового шкафа, сняв винт V;<br />
4. отвинтите форсунку горелки<br />
при <strong>по</strong>мощи специального<br />
<strong>по</strong>лого ключа для форсунок<br />
(см. рисунок) или <strong>по</strong>лого<br />
ключа 7 мм и замените<br />
форсунку на новую,<br />
расчитанную на новый тип<br />
газа (см. таблицу<br />
Характеристики горелок и форсунок).<br />
Регуляция минимального пламени горелки<br />
духового шкафа:<br />
1. включите горелку (см. Пуск и Эксплуатация);<br />
2. оставьте рукоятку примерно в течение 10 минут<br />
в <strong>по</strong>ложении максимального пламени (МАКС),<br />
затем <strong>по</strong>верните ее в <strong>по</strong>ложение минимального<br />
4
пламени (МИН);<br />
3. снимите рукоятку;<br />
4. <strong>по</strong>верните регулировочный винт,<br />
рас<strong>по</strong>ложенный внутри стержня термостата (см.<br />
рисунок), вплоть до <strong>по</strong>лучения малого стабильного<br />
пламени.<br />
! В случае ис<strong>по</strong>льзования сжиженного природного<br />
газа винт регуляции должен быть отвинчен против<br />
часовой стрелки;<br />
5. проверьте, чтобы горелка не гасла при резком<br />
вращении рукоятки-регулятора из <strong>по</strong>ложения МАКС<br />
в <strong>по</strong>ложение МИН или при резком открывании или<br />
закрывании дверцы духовки.<br />
V<br />
<br />
<br />
<br />
<br />
<br />
<br />
<br />
<br />
<br />
<br />
I<br />
<br />
<br />
<br />
<br />
<br />
!<br />
<br />
!<br />
<br />
!<br />
<br />
<br />
<br />
<br />
!<br />
<br />
<br />
<br />
<br />
<br />
<br />
<br />
<br />
<br />
Изделие:<br />
Торговая марка:<br />
Торговый знак изготовителя:<br />
Модель:<br />
Комбинированная плита<br />
KN6G217/RU; KN6G217S/RU<br />
Изготовитель:<br />
<strong>Indesit</strong> Company<br />
Страна-изготовитель:<br />
Польша<br />
Габаритные размеры духового<br />
31x43,5x43,5 см / 58 л<br />
шкафа / Объем:<br />
Номинальное значение<br />
напряжения электропитания или 220-240 V ~<br />
диапазон напряжения<br />
Условное обозначение рода<br />
электрического тока или<br />
50/60Hz<br />
номинальная частота переменного<br />
тока<br />
Класс зашиты от <strong>по</strong>ражения<br />
Класс защиты I<br />
электрическим током<br />
Класс энерго<strong>по</strong>требления<br />
ТАБЛИЧКА С ЭЛЕКТРИЧЕСКИМИ<br />
ДАННЫМИ<br />
В случае необходимости<br />
<strong>по</strong>лучения информации <strong>по</strong><br />
сертификатам соответствия или<br />
<strong>по</strong>лучения копий сертификатов<br />
соответствия на данную технику,<br />
Вы можете отправить запрос <strong>по</strong><br />
электронному адресу<br />
cert.rus@indesit.com.<br />
Дату производства данной техники<br />
можно <strong>по</strong>лучить из серийного<br />
номера, рас<strong>по</strong>ложенного <strong>по</strong>д<br />
штрих-кодом (S/N XXXXXXXXX *<br />
XXXXXXXXXXX), следующим<br />
образом:<br />
Производитель:<br />
Им<strong>по</strong>ртер:<br />
С вопросами (в России)<br />
обращаться <strong>по</strong> адресу:<br />
Директива ЕС: Директива ЕС: 2006/95/EC от<br />
12/12/06 (Низкое напряжение) с<br />
<strong>по</strong>следующими изменениями – 2004/108/ЕC<br />
от 15/12/04 (Электромагнитная<br />
совместимость) с <strong>по</strong>следующими<br />
изменениями – 2009/142/ЕC от 30/11/09 (Газ) -<br />
90/68/СЕЕ от 22/07/93 с <strong>по</strong>следующими<br />
изменениями – 2002/96/ЕС.<br />
1275/2008 (Stand-by/ Off mode)<br />
- 1-ая цифра в S/N соответствует <strong>по</strong>следней<br />
цифре года,<br />
- 2-ая и 3-я цифры в S/N - <strong>по</strong>рядковому<br />
номеру месяца года,<br />
- 4-ая и 5-ая цифры в S/N - числу<br />
определенного месяца и года.<br />
<strong>Indesit</strong> Company S.p.A.<br />
Виале А. Мерлони 47, 60044, Фабриано (АН),<br />
Италия<br />
ООО "Индезит РУС"<br />
до 01.01.2011: Россия, 129223, Москва,<br />
Проспект Мира, ВВЦ, пав. 46<br />
с 01.01.2011: Россия, 127018, Москва, ул.<br />
Двинцев, дом 12, корп. 1<br />
RS<br />
5
RS<br />
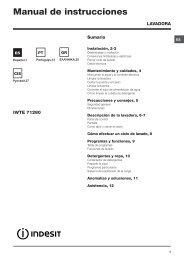
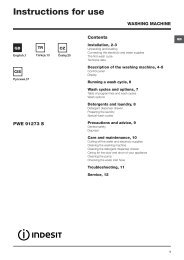
Характеристики горелок и жиклеров<br />
Таблица 1 Сжиженный газ Природный газ<br />
Горелка Диаметр Тепловая мощность Байпас форсунка расход* форсунка расход* форсунка расход*<br />
(мм) кВт (p.c.s.*) 1/100 1/100 гр/час 1/100 л/час 1/100 л/час<br />
Номинал. Сокращ. (мм) (мм) *** ** (мм) (мм)<br />
Быстрая<br />
(Большая)(R)<br />
100 3.00 0.7 41 86 218 214 116 286 143 286<br />
Полубыстрая<br />
(Средняя)(S)<br />
75 1.90 0.4 30 70 138 136 106 181 118 181<br />
Вс<strong>по</strong>могательн<br />
ая (Малая) (А)<br />
55 1.00 0.4 30 50 73 71 79 95 80 95<br />
Духовка - 2.60 1.0 52 78 189 186 119 248 132 248<br />
Гриль - 2.30 - - 75 167 164 114 219 139 227<br />
Номинальное (мбар)<br />
28-30 37<br />
20<br />
13<br />
Давление<br />
Минимальное (мбар)<br />
20 25<br />
17<br />
6,5<br />
<strong>по</strong>дачи<br />
Максимальное (мбар)<br />
35 45<br />
25<br />
18<br />
При 15°C и 1013 мбар – сухой газ *** Бутан P.C.S. = 49,47 Мдж/кг<br />
* Пропан P.C.S. = 50,37 Мдж/кг Натуральный P.C.S. = 37,78 Мдж/кг<br />
<br />
<br />
<br />
<br />
S<br />
R<br />
S<br />
A<br />
KN6G217/RU<br />
KN6G217S/RU<br />
! <br />
<br />
<br />
<br />
<br />
<br />
<br />
6
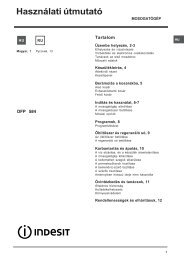
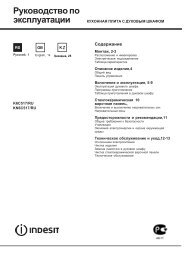
Описание изделия<br />
Общии вид<br />
RS<br />
Стеклянная крышка<br />
Газовые конфорки<br />
Поддерживающая решетка<br />
для <strong>по</strong>суды<br />
Панель управления<br />
Решетка духовки<br />
Противень (<strong>по</strong>ддон)<br />
Рабочая <strong>по</strong>верхность плиты<br />
Позиции (уровни духовки)<br />
Направляющие для решетки /<br />
противня (<strong>по</strong>ддона)<br />
5<br />
4<br />
3<br />
2<br />
1<br />
Регулируемые ножки<br />
Регулируемые ножки<br />
Панель управления<br />
Рукоятка<br />
управления духовкой<br />
Рукоятки управления<br />
газовыми горелками<br />
рабочей <strong>по</strong>верхности плиты<br />
Кнопка Вкл./Выкл. освещения<br />
духовки и вертеля<br />
Электро<strong>по</strong>джиг горелок<br />
рабочей <strong>по</strong>верхности плиты<br />
*<br />
Имеется только в некоторых моделях<br />
7
Включение и эксплуатация<br />
RS<br />
Ис<strong>по</strong>льзование рабочей <strong>по</strong>верхности<br />
Зажигание газовых горелок<br />
Вокруг каждой рукоятки управления горелкой указаны<br />
символы, обозначающие силу пламени соответствующей<br />
горелки.<br />
Чтобы зажечь одну из горелок на рабочей <strong>по</strong>верхности<br />
плиты:<br />
1. Поднесите зажженную спичку или зажигалку<br />
к горелке.<br />
2. Нажмите рукоятку горелки, <strong>по</strong>верните ее против<br />
часовой стрелки и установите в <strong>по</strong>зицию максимального<br />
пламени .<br />
3. Отрегулируйте интенсивность пламени, установив<br />
его желаемый уровень вращением рукоятки<br />
против часовой стрелки. Рукоятку можно устанавливать<br />
в <strong>по</strong>зиции: — минимальное пламя,<br />
— максимальное пламя или в любое <strong>по</strong>ложение<br />
между указанными <strong>по</strong>зициями.<br />
В моделях, имеющих устройство<br />
электронного<br />
зажигания*(С), нажмите<br />
кнопку электронного зажигания,<br />
обозначенную<br />
символом , затем нажмите<br />
и <strong>по</strong>верните рукоятку<br />
против часовой стрелки<br />
к <strong>по</strong>зиции максимального пламени, удерживайте<br />
рукоятку нажатой, <strong>по</strong>ка пламя не загорится. При<br />
отпускании рукоятки пламя может <strong>по</strong>гаснуть. В этом<br />
случае <strong>по</strong>вторите действия, удерживая рукоятку дольше<br />
нажатой.<br />
! Если пламя случайно <strong>по</strong>гасло, выключите горелку<br />
и <strong>по</strong>дождите не менее 1 минуты , прежде чем снова<br />
зажечь ее.<br />
В моделях, оснащенных устройством безопасного<br />
пламени (Х)*, нажмите и держите рукоятку горелки<br />
нажатой примерно 2–3 секунды, чтобы удержать<br />
горение пламени и активировать устройство.<br />
Чтобы выключить горелку, <strong>по</strong>верните ее рукоятку до<br />
у<strong>по</strong>ра и установите в <strong>по</strong>ложение «•» — выключено.<br />
Практические рекомендации <strong>по</strong> ис<strong>по</strong>льзованию<br />
газовых горелок<br />
Для наиболее эффективной работы газовых горелок<br />
и экономного <strong>по</strong>требления газа ис<strong>по</strong>льзуйте только<br />
<strong>по</strong>суду с крышками и плоским дном. Также <strong>по</strong>суда<br />
должна <strong>по</strong>дходить <strong>по</strong> размеру к горелке.<br />
Горелка<br />
Диаметр дна <strong>по</strong>суды, см<br />
Быстрая (R) 24–26<br />
Полубыстрая (S) 16–20<br />
Вс<strong>по</strong>могательная (А) 10–14<br />
Чтобы определить тип горелки, обратитесь к табл.<br />
«Характеристики горелок и жиклеров».<br />
! Уменьшенная решетка (при наличии) должна ис<strong>по</strong>льзоваться<br />
только для вс<strong>по</strong>могательной горелки<br />
с <strong>по</strong>судой, диаметр которой не превышает 12 см.<br />
Ис<strong>по</strong>льзование духовки<br />
! Перед первым ис<strong>по</strong>льзованием в течение <strong>по</strong>лучаса<br />
прокалите пустую духовку с закрытой дверцей<br />
при максимальной температуре. Прежде чем выключить<br />
оборудование и открыть дверцу, удостоверьтесь<br />
в наличии хорошей вентиляции в <strong>по</strong>мещении.<br />
Появившийся во время прокаливания неприятный<br />
запах вызван сгоранием защитных веществ, ис<strong>по</strong>льзуемых<br />
во время производства оборудования.<br />
! Прежде чем ис<strong>по</strong>льзовать оборудование, удалите<br />
с его боковых сторон пластиковую пленку.<br />
! Ничего не кладите на дно духовки — это может<br />
<strong>по</strong>вредить его эмалевое <strong>по</strong>крытие. Ис<strong>по</strong>льзуйте 1-й<br />
уровень духовки только при готовке на вертеле (при<br />
его наличии).<br />
Включение духовки<br />
Чтобы зажечь горелку духовки,<br />
<strong>по</strong>днесите горящую спичку<br />
или зажигалку к отверстию «F»<br />
(см. рис.), нажмите и <strong>по</strong>верните<br />
рукоятку управления духовкой<br />
против часовой стрелки в <strong>по</strong>ложение<br />
Max.<br />
Если модель оснащена устройством электронного<br />
зажигания, нажмите кнопку электро<strong>по</strong>джига, обозначенную<br />
символом , затем нажмите и <strong>по</strong>верните<br />
рукоятку управления духовкой против часовой стрелки<br />
к <strong>по</strong>зиции максимального пламени, удерживайте<br />
рукоятку нажатой, <strong>по</strong>ка пламя не загорится. Если<br />
спустя 15 секунд пламя не загорится, отпустите рукоятку,<br />
откройте дверцу духовки и <strong>по</strong>дождите не менее<br />
1 минуты, прежде чем снова зажигать пламя. При<br />
отсутствии электропитания горелку духовки можно<br />
зажечь с <strong>по</strong>мощью спички или зажигалки, вы<strong>по</strong>лняя<br />
манипуляции с рукояткой, описанные выше.<br />
* Только для некоторых модификаций модели.<br />
8
Регуляция температуры<br />
Для <strong>по</strong>лучения нужнои температуры<br />
приготовления <strong>по</strong>верните против часовои стрелки<br />
рукоятку ДУХОВКИ. Значения температуры<br />
указаны на панели управления и начинаются с<br />
МИН (140°C) до МАКС (250°C). По достижении<br />
заданнои температуры в духовке она будет<br />
<strong>по</strong>ддерживаться <strong>по</strong>стояннои термостатом.<br />
Регулировка температуры<br />
Чтобы установить желаемую температуру, вращайте<br />
рукоятку управления духовкой против часовой<br />
стрелки. Значения температуры <strong>по</strong>казаны на панели<br />
управления и могут варьироваться в диапазоне от<br />
150 °С (MIN) до 250 °С (MAX).<br />
При достижении заданной температуры термостат<br />
духовки будет <strong>по</strong>ддерживать ее на <strong>по</strong>стоянном<br />
уровне.<br />
! Гриль оснащен предохранительным устроиством,<br />
<strong>по</strong>этому необходимо держать рукоятку ДУХОВКИ<br />
нажатои примерно 6 секунд.<br />
! В случае внезапного гашения пламени<br />
выключите горелку и <strong>по</strong>дождите примерно 1<br />
минуту перед ее <strong>по</strong>вторным включением гриля.<br />
Освещение духового шкафа<br />
Лам<strong>по</strong>чка может быть включена в любои момент<br />
при <strong>по</strong>мощи кнопки ОСВЕЩЕНИЕ ДУХОВОГО<br />
ШКАФА.<br />
Таимер<br />
Порядок включения Таимера (часов):<br />
1. <strong>по</strong>верните <strong>по</strong> часовои стрелке 4 рукоятку<br />
ТАИМЕР <strong>по</strong>чти на один <strong>по</strong>лныи <strong>по</strong>ворот для<br />
завода таимера;<br />
2. <strong>по</strong>верните против часовои стрелки 5 рукоятку<br />
ТАИМЕР, выбрав нужное время.<br />
Нижнии отсек<br />
Снизу духового шкафа имеется отсек, которыи<br />
может быть ис<strong>по</strong>льзован для хранения кухонных<br />
принадлежностеи или кастрюль.<br />
! Не <strong>по</strong>мещаите возгораемых предметов в нижнии<br />
отсек.<br />
! Внутренняя <strong>по</strong>верхность ящика (если он<br />
имеется) может сильно нагреться.<br />
RS<br />
D<br />
! Когда вы ис<strong>по</strong>льзуете гриль,<br />
необходимо оставить дверцу<br />
духового шкафа <strong>по</strong>луоткрытои,<br />
установив между<br />
дверцеи и панелью<br />
управления отражатель D (см.<br />
рисунок), препятствующии<br />
нагреванию рукояток.<br />
Вертел<br />
Порядок включения вертела (см. рисунок):<br />
1. установите противень на 1-ыи уровень;<br />
2. установите<br />
держатель вертела на<br />
4-ыи уровень и<br />
вставьте вертел в<br />
специальное отверстие<br />
в заднеи стенке<br />
духового шкафа;<br />
3. включите вертел,<br />
нажав на кнопку<br />
ВЕРТЕЛ.<br />
*<br />
Имеется только в некоторых моделях<br />
9
RS<br />
Таблица приготовления в духовом шкафу<br />
Приготавливаемый<br />
продукт<br />
Макаронные изделия<br />
Лазанья<br />
Каннеллони<br />
Запеканка из макарон<br />
Мясо<br />
Телятина<br />
Курица<br />
Индейка<br />
Утка<br />
Кролик<br />
Свинина<br />
Баранина<br />
Рыба<br />
Скумбрия<br />
Зубан<br />
Форель в фольге<br />
Вес<br />
(кг)<br />
2.5<br />
2.5<br />
2.5<br />
1.7<br />
1.5<br />
3.0<br />
1.8<br />
2.0<br />
2.1<br />
1.8<br />
Рас<strong>по</strong>ложение<br />
на уровнях<br />
духовки снизу<br />
вверх<br />
3<br />
3<br />
3<br />
3<br />
3<br />
3<br />
3<br />
3<br />
3<br />
3<br />
Температура<br />
(°C)<br />
210<br />
210<br />
210<br />
230<br />
220<br />
MAKC<br />
230<br />
230<br />
230<br />
230<br />
Продолжительность<br />
нагрева (мин.)<br />
15<br />
15<br />
15<br />
15<br />
15<br />
15<br />
15<br />
15<br />
15<br />
15<br />
Время<br />
приготовления<br />
(мин.)<br />
75-80<br />
75-80<br />
75-80<br />
85-90<br />
110-115<br />
95-100<br />
120-125<br />
105-110<br />
100-110<br />
90-95<br />
1.1<br />
1.5<br />
1.0<br />
3<br />
3<br />
3<br />
210-230<br />
210-230<br />
210-230<br />
15<br />
15<br />
15<br />
55-60<br />
60-65<br />
40-45<br />
Неа<strong>по</strong>льская пицца 1.0 3 MAKC 15 30-35<br />
Бисквитный кекс<br />
Печенье<br />
Песочный торт с<br />
начинкой<br />
Шоколадный торт<br />
Выпечка из<br />
дрожжевого теста<br />
Приготовление на<br />
гриле<br />
Горячие бутерброды<br />
Отбивные<br />
Скумбрия<br />
Жаркое<br />
Телятина на вертеле<br />
Курица на вертеле<br />
0.5<br />
1.1<br />
1.0<br />
1.0<br />
1.5<br />
1.1<br />
3<br />
3<br />
3<br />
3<br />
4<br />
4<br />
4<br />
180<br />
180<br />
200<br />
200<br />
15<br />
15<br />
15<br />
15<br />
30-35<br />
30-35<br />
45-50<br />
50-55<br />
1<br />
2<br />
2<br />
2<br />
80<br />
90<br />
N.B.: Указанная продолжительность приготовления служит только в качестве примера и может быть изменена в<br />
соответствии с личными вкусами. При ис<strong>по</strong>льзовании гриля противень всегда устанавливается на самый нижний<br />
уровень духовки.<br />
4-5<br />
30<br />
35<br />
* Имеется только в некоторых моделях<br />
10
Предупреждения и<br />
рекомендации<br />
! Оборудование разработано и изготовлено в соответ ствии<br />
с международными нормами безопасности. Внимательно<br />
прочитайте настоящие предупреждения, приводимые в<br />
целях вашей безопасности.<br />
Основные правила безопасности<br />
• Данные указания касаются только стран, указанных<br />
в руководстве и табличке технических характеристик,<br />
рас<strong>по</strong>ложенной на оборудовании.<br />
• Оборудование разработано для бытового ис<strong>по</strong>льзования<br />
в домашних условиях и не предназначено<br />
для применения на предприятиях промышленности<br />
и торговли.<br />
• Оборудование не должно устанавливаться на открытом<br />
воздухе (даже <strong>по</strong>д навесом). Чрезвычайно<br />
опасно оставлять оборудование <strong>по</strong>д воздействием<br />
дождя / грозы.<br />
• Не касайтесь оборудования, если ваши ноги / руки<br />
мокрые; не <strong>по</strong>льзуйтесь оборудованием, когда Вы<br />
босиком.<br />
• Оборудование должно ис<strong>по</strong>льзоваться только<br />
взрослыми лицами для приготовления пищи и в<br />
соответствии с инструкциями данного руководства.<br />
Любое другое ис<strong>по</strong>льзование оборудования<br />
(напр., для обогрева <strong>по</strong>мещения) является неправильным<br />
и опасным. Производитель не несет<br />
ответственности за <strong>по</strong> вреждение оборудования<br />
в результате его неправильного, нецелевого ис<strong>по</strong>льзования.<br />
• Инструкции руководства относятся к оборудованию<br />
класса 1 (свободная установка) или класса 2 <strong>по</strong>дкласса<br />
1 (установка между двумя шкафами).<br />
• Во время работы оборудования нагревательные<br />
элементы и некоторые части дверцы духовки сильно<br />
нагреваются. Не прикасайтесь к ним и держите детей<br />
на безопасном расстоянии.<br />
• Удостоверьтесь, что питающие кабели других электроприборов<br />
не соприкасаются с горячими час тями<br />
оборудования.<br />
• Не перегораживайте отверстия, предназначенные для<br />
вентиляции и отвода тепла.<br />
• Пользуйтесь кухонными рукавицами / прихватками,<br />
<strong>по</strong>мещая и вынимая <strong>по</strong>суду из духовки.<br />
• Не ис<strong>по</strong>льзуйте воспламеняющиеся жидкости (спирт,<br />
бензин и т.п.) рядом с включенным оборудованием.<br />
• Не <strong>по</strong>мещайте в отделение духовки для хранения<br />
горючие материалы: случайное включение оборудования<br />
может привести к возгоранию.<br />
• Всегда проверяйте, что рукоятки управления находятся<br />
в <strong>по</strong>зиции «•», когда оборудование не ис<strong>по</strong>льзуется.<br />
• Отключая оборудование от электросети, не тяните<br />
за питающий кабель, чтобы вынуть вилку из розетки:<br />
беритесь за вилку.<br />
• Перед любыми работами <strong>по</strong> чистке и обслуживанию<br />
оборудования обязательно отключите его от электросети,<br />
вынув вилку из розетки.<br />
•<br />
В случае неисправности, ни при каких обстоятельствах<br />
не пытайтесь <strong>по</strong>чинить оборудование самостоятельно.<br />
Ремонт, вы<strong>по</strong>лненный неквалифицированными лицами,<br />
может безвозвратно <strong>по</strong>вредить оборудование или<br />
стать причиной его неправильного функционирования.<br />
Обратитесь за <strong>по</strong>мощью в Авторизованный сервисный<br />
центр.<br />
Не кладите тяжелые предметы на открытую дверцу<br />
духовки.<br />
Оборудованием не должны <strong>по</strong>льзоваться лица (включая<br />
детей) со сниженными физическими, сенсорными<br />
или умственными с<strong>по</strong>собностями, а также не знакомые<br />
с инструкциями данного руководства. Ис<strong>по</strong>льзование<br />
ими оборудования допускается только <strong>по</strong>д контролем<br />
лиц, ответственных за их безопасность или <strong>по</strong>сле<br />
<strong>по</strong>лучения инструкций <strong>по</strong> работе оборудования.<br />
Не <strong>по</strong>зволяйте детям играть с оборудованием.<br />
ВНИМАНИЕ! Доступные части оборудования достигают<br />
высокой температуры при работе гриля. Не<br />
<strong>по</strong>дпускайте детей близко к плите.<br />
•<br />
•<br />
•<br />
•<br />
Утилизация<br />
• При уничтожении упаковочного материала и в случае<br />
избавления от старого оборудования соблюдайте<br />
действующие требования <strong>по</strong> их утилизации.<br />
• Согласно Европейской директиве 2002/96/EC <strong>по</strong><br />
утилизации электрического и электронного оборудования<br />
(WEEE) старые электробытовые приборы<br />
не должны <strong>по</strong>мещаться в общий городской<br />
неотсортированный <strong>по</strong>ток отходов: они должны<br />
собираться отдельно, чтобы оптимизировать восстановление<br />
и переработку их материалов и уменьшить<br />
негативное воздействие на здоровье человека и экологию.<br />
Указанный на изделии символ перечеркнутого<br />
ведра на колесах на<strong>по</strong>минает, что при утилизации это<br />
оборудование следует <strong>по</strong>местить отдельно.<br />
Для <strong>по</strong>лучения информации о правильной утилизации<br />
старого оборудования <strong>по</strong>требители должны обратиться<br />
в местные органы управления или в фирму<strong>по</strong>ставщик.<br />
Экономия энергии и охрана окружающей<br />
среды<br />
• Ис<strong>по</strong>льзование оборудования утром или вечером<br />
<strong>по</strong>зволяет снизить пиковую нагрузку на электросеть<br />
и сэкономить <strong>по</strong>требление энергии.<br />
• Регулярно проверяйте уплотнители дверцы и протирайте<br />
их, очищая от любой грязи и сора: во избежание<br />
утечки тепла уплотнители должны плотно прилегать<br />
к дверце духовки.<br />
RS<br />
11
Обслуживание и уход<br />
RS<br />
Отключение оборудования<br />
! Перед любыми работами <strong>по</strong> обслуживанию оборудования<br />
отключайте его от электросети.<br />
Чистка оборудования<br />
! Не ис<strong>по</strong>льзуйте для чистки оборудования абразивные<br />
или агрессивные средства (пятноудалители,<br />
средства для удаления ржавчины, абразивные губки):<br />
они могут необратимо <strong>по</strong>вредить <strong>по</strong>верхность<br />
оборудования.<br />
! Никогда не ис<strong>по</strong>льзуйте для чистки духовки пароочистители<br />
и аэрозоли.<br />
• После каждой готовки протирайте рабочую <strong>по</strong>верхность<br />
плиты влажной губкой, затем высушите<br />
кухонным бумажным <strong>по</strong>лотенцем.<br />
• Эмалированные внешние части или <strong>по</strong>верхности<br />
из нержавеющей стали, а также резиновые<br />
уплотнители очищайте губкой, смоченной в растворе<br />
теплой воды с нейтральным мылом, затем<br />
о<strong>по</strong>лосните и тщательно вытрите. Для удаления<br />
устойчивых пятен ис<strong>по</strong>льзуйте специальные средства.<br />
После очистки о<strong>по</strong>лосните и вытрите насухо.<br />
Не применяйте абразивные <strong>по</strong>рошки или средства,<br />
содержащие агрессивные вещества.<br />
• Решетки рабочей <strong>по</strong>верхности, крышки горелок,<br />
пламярассекатели и верхние горелки для облегчения<br />
чистки можно снять; промойте их теплой водой<br />
с неабразивным моющим средством, удаляя нагар,<br />
затем высушите.<br />
• Регулярно следует очищать наконечники устройств<br />
безопасности* и проверять, не засорены ли газовые<br />
отверстия горелок.<br />
• Духовку идеально очищать изнутри <strong>по</strong>сле каждого<br />
ис<strong>по</strong>льзования, <strong>по</strong>ка она не остыла. Ис<strong>по</strong>льзуйте<br />
горячую воду и нейтральное моющее средство,<br />
затем хорошо о<strong>по</strong>лосните и вытрите мягкой тканью.<br />
Не ис<strong>по</strong>льзуйте абразивные чистящие средства.<br />
• Стекло дверцы духовки очищайте с <strong>по</strong>мощью<br />
губки и неабразивного чистящего средства, затем<br />
вытрите насухо мягкой тканью. Не ис<strong>по</strong>льзуйте<br />
абразивные средства или металлические скребки,<br />
которые могут <strong>по</strong>вредить <strong>по</strong>верхность и привести<br />
образованию трещин на стекле.<br />
• Принадлежности оборудования можно мыть, как<br />
и обычную <strong>по</strong>суду (даже в <strong>по</strong>судомоечной машине).<br />
• На элементах из нержавеющей стали могут оставаться<br />
пятна <strong>по</strong>сле длительного контакта с жесткой<br />
водой или агрессивными чистящими средствами,<br />
содержащими фосфор. Для очистки ком<strong>по</strong>нентов<br />
из нержавеющей стали ис<strong>по</strong>льзуйте специальные<br />
чистящие средства, затем тщательно о<strong>по</strong>лосните<br />
и вытрите насухо.<br />
Проверка уплотнителей<br />
Регулярно проверяйте уплотнители дверцы <strong>по</strong> всему<br />
периметру. В случае их <strong>по</strong>вреждения обратитесь<br />
в Авторизованный сервисный центр. Не <strong>по</strong>льзуйтесь<br />
духовкой, <strong>по</strong>ка уплотнители не будут заменены.<br />
Уход за вентилями рукояток<br />
Со временем газовые вентили (краны) рукояток могут<br />
начать застревать или с трудом проворачиваться.<br />
В этом случае их нужно заменить.<br />
! Эта процедура должна вы<strong>по</strong>лняться квалифицированным<br />
техническим персоналом сервисного центра.<br />
Замена лампы освещения<br />
1. Отключите оборудования от<br />
электросети, затем снимите<br />
стеклянный плафон с патрона<br />
лампы.<br />
2. Выверните перегоревшую<br />
лампу и замените ее лам<strong>по</strong>й<br />
с аналогичными характеристиками:<br />
напряжение 230 В,<br />
мощность – 25 Вт, тип – Е 14.<br />
3. Установите стеклянный плафон на место и снова<br />
<strong>по</strong>дключите оборудование к электросети.<br />
Помощь<br />
! Не <strong>по</strong>льзуйтесь услугами лиц, не у<strong>по</strong>лномоченных<br />
Производителем. При ремонте требуйте ис<strong>по</strong>льзования<br />
оригинальных запасных частей.<br />
Сообщите в Авторизованный сервисный центр:<br />
• номер гарантийного документа (сервисной книжки,<br />
сервисного сертификата и т.п.);<br />
• модель плиты (Мод.) и серийный номер (S/N),<br />
указанные в информационной табличке, рас<strong>по</strong>ложенной<br />
на оборудовании, на упаковке или<br />
в гарантийном документе.<br />
Техническое обслуживание<br />
При обращении в Центр Технического Обслуживания необходимо<br />
сообщить:<br />
• модель изделия (Мод.)<br />
• номер тех. пас<strong>по</strong>рта (серииныи №)<br />
Последние сведения находятся на заводскои табличке,<br />
рас<strong>по</strong>ложеннои на изделии и/или на упаковке.<br />
* Для некоторых модификаций модели.<br />
12
Мы заботимся о своих <strong>по</strong>купателях и<br />
стараемся сделать сервисное обслуживание<br />
наиболее качественным. Мы <strong>по</strong>стоянно<br />
совершенствуем наши продукты, чтобы<br />
сделать Ваше общение с техникой простым и<br />
приятным.<br />
RS<br />
Уход за техникой<br />
Продлите срок <strong>эксплуатации</strong> и снизьте<br />
вероятность <strong>по</strong>ломки техники.<br />
Вос<strong>по</strong>льзуйтесь профессиональными средствами<br />
для ухода за техникой от <strong>Indesit</strong> Professional для<br />
наиболее простого, эффективного и легкого ухода<br />
за Вашей бытовой техникой.<br />
Продукты <strong>Indesit</strong> Professional производятся в<br />
Италии с соблюдением высоких европейских<br />
стандартов в области качества, экологии и<br />
безопасности ис<strong>по</strong>льзования и созданы с учетом<br />
многолетнего опыта производителя техники.<br />
Узнайте <strong>по</strong>дробнее на сайте<br />
www.indesit.com в разделе «Сервис» и<br />
спрашивайте в магазинах Вашего города.<br />
Авторизованные сервисные центры<br />
Чтобы быть ближе к нашим <strong>по</strong>требителям, мы<br />
создали широкую сервисную сеть, особенностью<br />
которой является высокая <strong>по</strong>дготовка,<br />
профессионализм и честность сервисных<br />
мастеров. На сегодняшний день она насчитывает<br />
около 350 сервисных центров на территории<br />
России и СНГ.<br />
Их контакты Вы можете найти в сервисном<br />
сертификате и на сайте<br />
www.indesit.com в<br />
разделе «Сервис».<br />
Если вам надо обратиться в сервисный<br />
центр:<br />
Внимание! При ремонте требуйте<br />
ис<strong>по</strong>льзования оригинальных запасных<br />
частей.<br />
Другую <strong>по</strong>лезную информацию и новости Вы<br />
можете найти на сайте<br />
www.indesit.com в разделе «Сервис».<br />
13
Operating Instructions<br />
COOKER<br />
GB<br />
RS<br />
РУССКИЙ, 26<br />
GB<br />
English, 14<br />
Contents<br />
Installation, 15-19<br />
Positioning and levelling<br />
Electrical connections<br />
Gas connection<br />
Adapting to different types of gas<br />
Technical data<br />
Table of burner and nozzle specifications<br />
Description of the appliance, 20<br />
Overall view<br />
Control panel<br />
KN6G217/RU<br />
KN6G217S/RU<br />
Start-up and use, 21-23<br />
Using the hob<br />
Using the oven<br />
Oven cooking advice table<br />
Precautions and tips, 24<br />
General safety<br />
Disposal<br />
Respecting and conserving the environment<br />
Maintenance and care, 25<br />
Switching the appliance off<br />
Cleaning the appliance<br />
Gas tap maintenance<br />
Replacing the oven light bulb<br />
Assistance
Installation<br />
! Before operating your new appliance please read<br />
this instruction booklet carefully. It contains<br />
important information concerning the safe installation<br />
and operation of the appliance.<br />
! Please keep these operating instructions for future<br />
reference. Make sure that the instructions are kept<br />
with the appliance if it is sold, given away or moved.<br />
! The appliance must be installed by a qualified<br />
professional according to the instructions provided.<br />
! Any necessary adjustment or maintenance must be<br />
performed after the cooker has been disconnected<br />
from the electricity supply.<br />
Room ventilation<br />
The appliance may only be installed in permanentlyventilated<br />
rooms, according to current national<br />
legislation. The room in which the appliance is<br />
installed must be ventilated adequately so as to<br />
provide as much air as is needed by the normal gas<br />
combustion process (the flow of air must not be<br />
lower than 2 m 3 /h per kW of installed power).<br />
The air inlets, protected by grilles, should have a<br />
duct with an inner cross section of at least 100 cm 2<br />
and should be positioned so that they are not liable<br />
to even partial obstruction (see figure A).<br />
These inlets should be enlarged by 100% - with a<br />
minimum of 200 cm 2 - whenever the surface of the<br />
hob is not equipped with a flame failure safety<br />
device. When the flow of air is provided in an<br />
indirect manner from adjacent rooms (see figure B),<br />
provided that these are not communal parts of a<br />
building, areas with increased fire hazards or<br />
bedrooms, the inlets should be fitted with a<br />
ventilation duct leading outside as described above.<br />
A B<br />
Ventilation opening for<br />
comburent air<br />
A<br />
Adjacent room<br />
Room requiring<br />
ventilation<br />
Increase in the gap between<br />
the door and the flooring<br />
! After prolonged use of the appliance, it is<br />
advisable to open a window or increase the speed of<br />
any fans used.<br />
Disposing of combustion fumes<br />
The disposal of combustion fumes should be<br />
guaranteed using a hood connected to a safe and<br />
efficient natural suction chimney, or using an electric<br />
fan that begins to operate automatically every time<br />
the appliance is switched on (see figure).<br />
Fumes channelled<br />
straight outside<br />
! The liquefied petroleum gases are heavier than air<br />
and collect by the floor, therefore all rooms<br />
containing LPG cylinders must have openings<br />
leading outside so that any leaked gas can escape<br />
easily.<br />
LPG cylinders, therefore, whether partially or<br />
completely full, must not be installed or stored in<br />
rooms or storage areas that are below ground level<br />
(cellars, etc.). Only the cylinder being used should<br />
be stored in the room; this should also be kept well<br />
away from sources of heat (ovens, chimneys,<br />
stoves) that may cause the temperature of the<br />
cylinder to rise above 50°C.<br />
Positioning and levelling<br />
Fumes channelled through<br />
a chimney or a branched<br />
flue system (reserved for<br />
cooking appliances)<br />
! It is possible to install the appliance alongside<br />
cupboards whose height does not exceed that of the<br />
hob surface.<br />
! Make sure that the wall in contact with the back of<br />
the appliance is made from a non-flammable, heatresistant<br />
material (T 90°C).<br />
To install the appliance correctly:<br />
• Place it in the kitchen, dining room or the bed-sit<br />
(not in the bathroom).<br />
• If the top of the hob is higher than the cupboards,<br />
the appliance must be installed at least 600 mm<br />
away from them.<br />
• If the cooker is installed underneath a wall<br />
cabinet, there must be a minimum distance of 420<br />
mm between this cabinet and the top of the hob.<br />
This distance should be increased to 700 mm if the<br />
wall cabinets are flammable (see figure).<br />
GB<br />
15
GB<br />
mm.<br />
420<br />
Min.<br />
HOOD<br />
Min. 600 mm.<br />
Min. 420 mm.<br />
min. 650 mm. with hood<br />
min. 700 mm. without hood<br />
• Do not position<br />
blinds behind the<br />
cooker or less than 200<br />
mm away from its<br />
sides.<br />
• Any hoods must be<br />
installed according to<br />
the instructions listed in<br />
the relevant operating<br />
manual.<br />
! Once the appliance has been installed, the power<br />
supply cable and the electrical socket must be<br />
easily accessible.<br />
! The cable must not be bent or compressed.<br />
! The cable must be checked regularly and replaced<br />
by authorised technicians only.<br />
! The manufacturer declines any liability should<br />
these safety measures not be observed.<br />
Levelling<br />
If it is necessary to level the<br />
appliance, screw the<br />
adjustable feet into the<br />
places provided on each<br />
corner of the base of the<br />
cooker (see figure).<br />
The legs* fit into the slots on<br />
the underside of the base of<br />
the cooker.<br />
Gas connection<br />
Connection to the gas network or to the gas cylinder<br />
may be carried out using a flexible rubber or steel<br />
hose, in accordance with current national legislation<br />
and after making sure that the appliance is suited to<br />
the type of gas with which it will be supplied (see the<br />
rating sticker on the cover: if this is not the case see<br />
below). When using liquid gas from a cylinder, install a<br />
pressure regulator which complies with current national<br />
regulations. To make connection easier, the gas<br />
supply may be turned sideways*: reverse the position<br />
of the hose holder with that of the cap and replace the<br />
gasket that is supplied with the appliance.<br />
Electrical connection<br />
Install a standardised plug corresponding to the<br />
load indicated on the appliance data plate (see<br />
Technical data table).<br />
The appliance must be directly connected to the mains<br />
using an omnipolar circuit-breaker with a minimum<br />
contact opening of 3 mm installed between the<br />
appliance and the mains. The circuit-breaker must be<br />
suitable for the charge indicated and must comply with<br />
current national legislation (the earthing wire must not<br />
be interrupted by the circuit-breaker). The supply cable<br />
must be positioned so that it does not come into<br />
contact with temperatures higher than 50°C at any point.<br />
Before connecting the appliance to the power<br />
supply, make sure that:<br />
• The appliance is earthed and the plug is compliant<br />
with the law.<br />
• The socket can withstand the maximum power of<br />
the appliance, which is indicated by the data plate.<br />
• The voltage is in the range between the values<br />
indicated on the data plate.<br />
• The socket is compatible with the plug of the<br />
appliance. If the socket is incompatible with the<br />
plug, ask an authorised technician to replace it.<br />
Do not use extension cords or multiple sockets.<br />
* Only available in certain models<br />
! Check that the pressure of the gas supply is<br />
consistent with the values indicated in the Table of<br />
burner and nozzle specifications (see below). This<br />
will ensure the safe operation and durability of your<br />
appliance while maintaining efficient energy<br />
consumption.<br />
Gas connection using a flexible rubber hose<br />
Make sure that the hose complies with current<br />
national legislation. The internal diameter of the hose<br />
must measure: 8 mm for liquid gas supply; 13 mm<br />
for methane gas supply.<br />
Once the connection has been performed, make<br />
sure that the hose:<br />
• Does not come into contact with any parts that<br />
reach temperatures of over 50°C.<br />
• Is not subject to any pulling or twisting forces and<br />
that it is not kinked or bent.<br />
• Does not come into contact with blades, sharp<br />
corners or moving parts and that it is not<br />
compressed.<br />
• Is easy to inspect along its whole length so that<br />
its condition may be checked.<br />
• Is shorter than 1500 mm.<br />
• Fits firmly into place at both ends, where it will be<br />
fixed using clamps that comply with current<br />
regulations.<br />
16
! If one or more of these conditions is not fulfilled or if<br />
the cooker must be installed according to the conditions<br />
listed for class 2 - subclass 1 appliances (installed<br />
between two cupboards), the flexible steel hose must<br />
be used instead (see below).<br />
Connecting a flexible jointless stainless steel<br />
pipe to a threaded attachment<br />
Make sure that the hose and gaskets comply with<br />
current national legislation.<br />
To begin using the hose, remove the hose holder on<br />
the appliance (the gas supply inlet on the appliance<br />
is a cylindrical threaded 1/2 gas male attachment).<br />
! Perform the connection in such a way that the hose<br />
length does not exceed a maximum of 2 metres,<br />
making sure that the hose is not compressed and<br />
does not come into contact with moving parts.<br />
Checking the tightness of the connection<br />
When the installation process is complete, check the<br />
hose fittings for leaks using a soapy solution. Never<br />
use a flame.<br />
Adjusting the hob burners’ minimum setting:<br />
1. Turn the tap to the minimum position.<br />
2. Remove the knob and adjust the regulatory<br />
screw, which is positioned inside or next to the tap<br />
pin, until the flame is small but steady.<br />
! If the appliance is connected to a liquid gas<br />
supply, the regulatory screw must be fastened as<br />
tightly as possible.<br />
3. While the burner is alight, quickly change the position<br />
of the knob from minimum to maximum and vice versa<br />
several times, checking that the flame is not<br />
extinguished.<br />
! The hob burners do not require primary air adjustment.<br />
Adapting the oven<br />
Replacing the oven burner nozzle:<br />
1. Open the oven door fully<br />
2. Pull out the sliding oven<br />
bottom (see diagram).<br />
V<br />
3. Remove the oven burner<br />
after unscrewing the screws V<br />
(see figure).<br />
GB<br />
Adapting to different types of gas<br />
It is possible to adapt the appliance to a type of gas<br />
other than the default type (this is indicated on the<br />
rating label on the cover).<br />
Adapting the hob<br />
specifications table).<br />
4. Unscrew the nozzle using a<br />
special nozzle socket spanner<br />
(see figure) or with a 7 mm<br />
socket spanner, and replace it<br />
with a new nozzle that is<br />
suited to the new type of gas<br />
(see Burner and nozzle<br />
Replacing the nozzles for the hob burners:<br />
1. Remove the hob grids and<br />
slide the burners off their<br />
seats.<br />
2. Unscrew the nozzles using<br />
a 7 mm socket spanner (see<br />
figure), and replace them with<br />
nozzles suited to the new type<br />
of gas (see Burner and nozzle<br />
specifications table).<br />
3. Replace all the components by following the<br />
above instructions in reverse.<br />
Adjusting the gas oven burner’s minimum<br />
setting:<br />
1. Light the burner (see Start-up and Use).<br />
2. Turn the knob to the minimum position (MIN) after<br />
it has been in the maximum position (MAX) for<br />
approximately 10 minutes.<br />
3. Remove the knob.<br />
4. Tighten or loosen the adjustment screws on the<br />
outside of the thermostat pin (see figure) until the<br />
flame is small but steady.<br />
! In the case of natural gas, the adjustment screw must<br />
be unscrewed by turning it anti-clockwise.<br />
17
GB<br />
5. Turn the knob from the MAX position to the MIN<br />
position quickly or open and shut the oven door,<br />
making sure that the burner is not extinguished.<br />
Adapting the grill<br />
Replacing the grill burner nozzle:<br />
1. Remove the oven burner<br />
after loosening screw V (see<br />
figure).<br />
V<br />
I<br />
2. Unscrew the grill burner<br />
nozzle using a special nozzle<br />
socket spanner (see figure) or<br />
preferably with a 7 mm socket<br />
spanner, and replace it with a<br />
new nozzle that is suited to the<br />
new type of gas (see Burner<br />
and nozzle specifications table).<br />
! Be careful of the spark plug wires and the<br />
thermocouple tubes.<br />
! The oven and grill burners do not require primary<br />
air adjustment.<br />
! After adjusting the appliance so it may be used<br />
with a different type of gas, replace the old rating<br />
label with a new one that corresponds to the new<br />
type of gas (these labels are available from<br />
Authorised Technical Assistance Centres).<br />
! Should the gas pressure used be different (or vary<br />
slightly) from the recommended pressure, a suitable<br />
pressure regulator must be fitted to the inlet hose in<br />
accordance with current national regulations relating<br />
to “regulators for channelled gas”.<br />
We recommend cleaning the oven before using it for<br />
the first time, following the instructions provided in<br />
the "Care and maintenance" section.<br />
TECHNICAL DATA<br />
Oven Dimensions<br />
HxWxD<br />
Volume<br />
Useful<br />
measurements<br />
relating to the<br />
oven compartment<br />
Voltage and<br />
frequency<br />
Burners<br />
31x43,5x43,5 cm<br />
58 l<br />
width 46 cm<br />
depth 42 cm<br />
height 8,5 cm<br />
see data plate<br />
may be adapted for use with any<br />
type of gas shown on the data<br />
plate.<br />
EC Directives 2006/95/EC dated<br />
12/12/06 (Low Voltage) and<br />
subsequent amendments -<br />
04/108/EC dated 15/12/04<br />
(Electromagnetic Compatibility)<br />
and subsequent amendments -<br />
2009/142/EC dated 30/11/09 (Gas)<br />
and subsequent amendments -<br />
90/68/EEC dated 22/07/93 and<br />
subsequent amendments. -<br />
2002/96/EC.<br />
1275/2008(Stand-by/Off-mode)<br />
18
Table of burner and nozzle specifications<br />
GB<br />
Table 1 Liquid Gas Natural Gas<br />
Burner Diameter<br />
(mm)<br />
Thermal Power<br />
kW (p.c.s.*)<br />
By Pass<br />
1/100<br />
Nozzle<br />
1/100<br />
Flow*<br />
g/h<br />
Nozzle<br />
1/100<br />
Flow*<br />
l/h<br />
Nozzle<br />
1/100<br />
Flow*<br />
l/h<br />
Nominal Reduced (mm) (mm) *** ** (mm) (mm)<br />
Fast<br />
(Large)(R)<br />
100 3.00 0.7 41 86 218 214 116 286 143 286<br />
Semi Fast<br />
(Medium)(S)<br />
75 1.90 0.4 30 70 138 136 106 181 118 181<br />
Auxiliary<br />
(Small)(A)<br />
55 1.00 0.4 30 50 73 71 79 95 80 95<br />
Oven - 2.60 1.0 52 78 189 186 119 248 132 248<br />
Grill - 2.30 - - 75 167 164 114 219 139 227<br />
Nominal (mbar)<br />
28-30 37 20<br />
13<br />
Supply<br />
Minimum (mbar)<br />
20 25 17<br />
6,5<br />
Pressures<br />
Maximum (mbar)<br />
35 45 25<br />
18<br />
* At 15°C 1013 mbar-dry gas *** Butane P.C.S. = 49,47 MJ/Kg<br />
** Propane P.C.S. = 50,37 MJ/Kg Natural P.C.S. = 37,78 MJ/m³<br />
WARNING! The glass lid can<br />
break in if it is heated up. Turn<br />
off all the burners and the<br />
electric plates before closing<br />
the lid. *Applies to the models<br />
with glass cover only.<br />
S<br />
R<br />
S<br />
A<br />
KN6G217/RU<br />
KN6G217S/RU<br />
19
Description of the<br />
appliance<br />
GB<br />
Overall view<br />
Glass cover*<br />
Gas burner<br />
Hob grid<br />
Control panel<br />
GRILL rack<br />
DRIPPING PAN<br />
Adjustable foot<br />
Containment<br />
surface for spills<br />
GUIDE RAILS<br />
for the sliding racks<br />
position 5<br />
position 4<br />
position 3<br />
position 2<br />
position 1<br />
Adjustable foot<br />
Control panel<br />
Button for Oven<br />
Light and Rotisserie<br />
Electronic Lighting<br />
for Hob Burners<br />
Oven and Grill<br />
Control Knob<br />
Timer Knob<br />
Control Knobs for Gas<br />
Burners on Hob<br />
*<br />
Only available in certain models.<br />
20
Start-up and use<br />
Using the hob<br />
Lighting the burners<br />
For each BURNER knob there is a complete ring<br />
showing the strength of the flame for the relevant<br />
burner.<br />
To light one of the burners on the hob:<br />
1. Bring a flame or gas lighter close to the burner.<br />
2. Press the BURNER knob and turn it in an<br />
anticlockwise direction so that it is pointing to the<br />
maximum flame setting E.<br />
3. Adjust the intensity of the flame to the desired<br />
level by turning the BURNER knob in an<br />
anticlockwise direction. This may be the minimum<br />
setting C, the maximum setting E or any position in<br />
between the two.<br />
If the appliance is fitted with<br />
an electronic lighting<br />
X<br />
device* (C), press the<br />
ignition button, marked with<br />
the symbol 1 , then hold<br />
C the BURNER knob down<br />
and turn it in an<br />
anticlockwise direction, towards the maximum flame<br />
setting, until the burner is lit.The burner may be<br />
extinguished when the knob is released. If this<br />
occurs, repeat the operation, holding the knob down<br />
for a longer period of time.<br />
! If the flame is accidentally extinguished, switch off<br />
the burner and wait for at least 1 minute before<br />
attempting to relight it.<br />
If the appliance is equipped with a flame failure<br />
safety device (X)*, press and hold the BURNER<br />
knob for approximately 2-3 seconds to keep the<br />
flame alight and to activate the device.<br />
To switch the burner off, turn the knob until it<br />
reaches the stop position •.<br />
Practical advice on using the burners<br />
For the burners to work in the most efficient way<br />
possible and to save on the amount of gas<br />
consumed, it is recommended that only pans that<br />
have a lid and a flat base are used. They should also<br />
be suited to the size of the burner.<br />
*<br />
Only available in certain models.<br />
<br />
<br />
<br />
<br />
<br />
<br />
<br />
<br />
To identify the type of burner, please refer to the<br />
diagrams contained in the “Burner and nozzle<br />
specifications”.<br />
! On the models supplied with a reducer shelf,<br />
remember that this should be used only for the<br />
auxiliary burner when you use casserole dishes with<br />
a diameter under 12 cm.<br />
Using the oven<br />
! The first time you use your appliance, heat the<br />
empty oven with its door closed at its maximum<br />
temperature for at least half an hour. Ensure that the<br />
room is well ventilated before switching the oven off<br />
and opening the oven door. The appliance may emit<br />
a slightly unpleasant odour caused by protective<br />
substances used during the manufacturing process<br />
burning away.<br />
! Before operating the product, remove all plastic<br />
film from the sides of the appliance.<br />
! Never put objects directly on the bottom of the<br />
oven; this will avoid the enamel coating being<br />
damaged. Only use position 1 in the oven when<br />
cooking with the rotisserie spit.<br />
Lighting the oven<br />
F<br />
To light the oven burner, bring<br />
a flame or gas lighter close to<br />
opening F (see figure) and<br />
press the OVEN control knob<br />
while turning it in an<br />
anticlockwise direction until it<br />
reaches the MAX position.<br />
If the appliance is fitted with an electronic lighting<br />
device*, press the ignition button, marked with the<br />
symbol 1 , then hold the OVEN control knob and<br />
turn it in an anticlockwise direction, towards the MAX<br />
position, until the burner is lit. If, after 15 seconds,<br />
the burner is still not alight, release the knob, open<br />
the oven door and wait for at least 1 minute before<br />
trying to light it again. If there is no electricity the<br />
burner may be lit using a flame or a lighter, as<br />
described above.<br />
GB<br />
21
GB<br />
! The oven is fitted with a safety device and it is<br />
therefore necessary to hold the OVEN control knob<br />
down for approximately 6 seconds.<br />
! If the flame is accidentally extinguished, switch off<br />
the burner and wait for at least 1 minute before<br />
attempting to relight the oven.<br />
Adjusting the temperature<br />
To set the desired cooking temperature, turn the<br />
OVEN control knob in an anticlockwise direction.<br />
Temperatures are displayed on the control panel and<br />
may vary between MIN (150°C) and MAX (250°C).<br />
Once the set temperature has been reached, the<br />
oven will keep it constant by using its thermostat.<br />
Grill<br />
To light the grill, bring a flame or gas lighter close to<br />
the burner and press the OVEN control knob while<br />
turning it in a clockwise direction until it reaches the<br />
d position. The grill enables the surface of food to<br />
be browned evenly and is particularly suitable for<br />
roast dishes, schnitzel and sausages. Place the<br />
rack in position 4 or 5 and the dripping pan in<br />
position 1 to collect fat and prevent the formation of<br />
smoke.<br />
If the appliance is fitted with an electronic lighting<br />
device*, press the ignition button, marked with the<br />
symbol 1 , then hold the OVEN control knob and<br />
turn it in an clockwise direction, towards the d<br />
position. If, after 15 seconds, the burner is still not<br />
alight, release the knob, open the oven door and<br />
wait for at least 1 minute before trying to light it<br />
again. If there is no electricity the burner may be lit<br />
using a flame or a lighter, as described above.<br />
! The grill is fitted with a safety device and it is<br />
therefore necessary to hold the OVEN control knob<br />
down for approximately 6 seconds.<br />
! If the flame is accidentally extinguished, switch off<br />
the burner and wait for at least 1 minute before<br />
attempting to relight the grill.<br />
Turnspit<br />
To operate the rotisserie (see diagram) proceed as<br />
follows:<br />
1. Place the dripping<br />
pan in position 1.<br />
2. Place the rotisserie<br />
support in position 4<br />
and insert the spit in the<br />
hole provided on the<br />
back panel of the oven.<br />
3. Acitvate the function<br />
by pressing the<br />
TURNSPIT button.<br />
Oven light<br />
The light may be switched on at any moment by<br />
pressing the OVEN LIGHT button.<br />
Timer<br />
To activate the Timer proceed as follows:<br />
1. Turn the TIMER knob in a clockwise direction 4<br />
for almost one complete revolution to set the buzzer.<br />
2. Turn the TIMER knob in an anticlockwise direction<br />
5 to set the desired length of time.<br />
Lower compartment<br />
There is a compartment underneath the oven that<br />
may be used to store oven accessories or deep<br />
dishes.<br />
! The internal surfaces of the compartment (where<br />
present) may become hot.<br />
! Do not place flammable materials in the lower oven<br />
compartment.<br />
D<br />
! When using the grill, leave<br />
the oven door ajar, positioning<br />
the deflector D between the<br />
door and the control panel<br />
(see figure) in order to prevent<br />
the knobs from overheating.<br />
*<br />
Only available in certain models.<br />
22
23<br />
GB<br />
Oven cooking advice table
Precautions and tips<br />
GB<br />
! This appliance has been designed and manufactured in<br />
compliance with international safety standards.<br />
The following warnings are provided for safety reasons and<br />
must be read carefully.<br />
General safety<br />
• These instructions are only valid for the<br />
countries whose symbols appear in the<br />
manual and on the serial number plate.•<br />
The appliance was designed for domestic use inside the<br />
home and is not intended for commercial or industrial use.<br />
• The appliance must not be installed outdoors, even in<br />
covered areas. It is extremely dangerous to leave the<br />
appliance exposed to rain and storms.<br />
• Do not touch the appliance with bare feet or with wet or<br />
damp hands and feet.<br />
• The appliance must be used by adults only for<br />
the preparation of food, in accordance with the<br />
instructions outlined in this booklet. Any other<br />
use of the appliance (e.g. for heating the room)<br />
constitutes improper use and is dangerous.<br />
The manufacturer may not be held liable for<br />
any damage resulting from improper, incorrect<br />
and unreasonable use of the appliance.<br />
• The instruction booklet accompanies a class 1 (insulated)<br />
or class 2 - subclass 1 (recessed between 2 cupboards)<br />
appliance.<br />
• Keep children away from the oven.<br />
• Make sure that the power supply cables of other electrical<br />
appliances do not come into contact with the hot parts of<br />
the oven.<br />
• The openings used for the ventilation and dispersion of<br />
heat must never be covered.<br />
• Do not close the glass hob cover (selected models only)<br />
when the burners are alight or when they are still hot.<br />
• Always use oven gloves when placing cookware in the<br />
oven or when removing it.<br />
• Do not use flammable liquids (alcohol, petrol, etc...) near<br />
the appliance while it is in use.<br />
• Do not place flammable material in the lower storage<br />
compartment or in the oven itself. If the appliance is<br />
switched on accidentally, it could catch fire.<br />
• Always make sure the knobs are in the • position and that<br />
the gas tap is closed when the appliance is not in use.<br />
• When unplugging the appliance, always pull the plug from<br />
the mains socket; do not pull on the cable.<br />
• Never perform any cleaning or maintenance work without<br />
having disconnected the appliance from the electricity<br />
mains.<br />
• If the appliance breaks down, under no circumstances<br />
should you attempt to repair the appliance yourself.<br />
Repairs carried out by inexperienced persons may cause<br />
injury or further malfunctioning of the appliance. Contact<br />
Assistance.<br />
• Do not rest heavy objects on the open oven door.<br />
• The appliance should not be operated by people<br />
(including children) with reduced physical,<br />
sensory or mental capacities, by inexperienced<br />
individuals or by anyone who is not familiar with<br />
the product. These individuals should, at the very<br />
least, be supervised by someone who assumes<br />
responsibility for their safety or receive<br />
preliminary instructions relating to the operation of<br />
the appliance.<br />
• Do not let children play with the appliance.<br />
Disposal<br />
• When disposing of packaging material: observe local<br />
legislation so that the packaging may be reused.<br />
• The European Directive 2002/96/EC relating to Waste<br />
Electrical and Electronic Equipment (WEEE) states that<br />
household appliances should not be disposed of using the<br />
normal solid urban waste cycle. Exhausted appliances<br />
should be collected separately in order to optimise the cost<br />
of re-using and recycling the materials inside the machine,<br />
while preventing potential damage to the atmosphere and<br />
to public health. The crossed-out dustbin is marked on all<br />
products to remind the owner of their obligations regarding<br />
separated waste collection.<br />
Exhausted appliances may be collected by the public<br />
waste collection service, taken to suitable collection areas<br />
in the area or, if permitted by current national legislation,<br />
they may be returned to the dealers as part of an<br />
exchange deal for a new equivalent product.<br />
All major manufacturers of household appliances<br />
participate in the creation and organisation of systems for<br />
the collection and disposal of old and disused appliances.<br />
Respecting and conserving the<br />
environment<br />
• You can help to reduce the peak load of the electricity<br />
supply network companies by using the oven in the hours<br />
between late afternoon and the early hours of the morning.<br />
• Check the door seals regularly and wipe them clean to<br />
ensure they are free of debris so that they adhere properly<br />
to the door, thus avoiding<br />
heat dispersion.<br />
24
Care and maintenance<br />
Switching the appliance off<br />
Disconnect your appliance from the electricity supply<br />
before carrying out any work on it.<br />
Cleaning the appliance<br />
! Do not use abrasive or corrosive detergents such as<br />
stain removers, anti-rust products, powder detergents or<br />
sponges with abrasive surfaces: these may scratch the<br />
surface beyond repair.<br />
! Never use steam cleaners or pressure cleaners on the<br />
appliance.<br />
• It is usually sufficient simply to wash the hob using a<br />
damp sponge and dry it with absorbent kitchen roll.<br />
• The stainless steel or enamel-coated external parts and<br />
the rubber seals may be cleaned using a sponge that<br />
has been soaked in lukewarm water and neutral soap.<br />
Use specialised products for the removal of stubborn<br />
stains. After cleaning, rinse well and dry thoroughly. Do<br />
not use abrasive powders or corrosive substances.<br />
• The hob grids, burner caps, flame spreader rings<br />
and the hob burners can be removed<br />
to make cleaning easier; wash them in hot water and<br />
non-abrasive detergent, making sure all burnt-on<br />
residue is removed before drying them thoroughly.<br />
• For hobs with electronic ignition, the terminal part of the<br />
electronic lighting devices should be cleaned<br />
frequently and the gas outlet holes should be checked<br />
for blockages.<br />
• The inside of the oven should ideally be cleaned after<br />
each use, while it is still lukewarm. Use hot water and<br />
detergent, then rinse well and dry with a soft cloth. Do<br />
not use abrasive products.<br />
• Clean the glass part of the oven door using a sponge<br />
and a non-abrasive cleaning product, then dry<br />
thoroughly with a soft cloth. Do not use rough abrasive<br />
material or sharp metal scrapers as these could<br />
scratch the surface and cause the glass to crack.<br />
• The accessories can be washed like everyday<br />
crockery, and are even dishwasher safe.<br />
• Stainless steel can be marked by hard water that has<br />
been left on the surface for a long time, or by<br />
aggressive detergents containing phosphorus. After<br />
cleaning, rinse well and dry thoroughly. Any remaining<br />
drops of water should also be dried.<br />
Inspecting the oven seals<br />
Check the door seals around the oven periodically. If the<br />
seals are damaged, please contact your nearest<br />
Authorised After-sales Service Centre. We recommend<br />
that the oven is not used until the seals have been<br />
replaced.<br />
Gas tap maintenance<br />
Over time, the taps may become jammed or difficult to<br />
turn. If this occurs, the tap must be replaced.<br />
! This procedure must be performed by a qualified<br />
technician who has been authorised by the<br />
manufacturer.<br />
Replacing the oven light bulb<br />
1. After disconnecting the oven<br />
from the electricity mains, remove<br />
the glass lid covering the lamp<br />
socket (see figure).<br />
2. Remove the light bulb and<br />
replace it with a similar one:<br />
voltage 230 V, wattage 25 W, cap<br />
E 14.<br />
3. Replace the lid and reconnect the oven to the electricity<br />
supply.<br />
Assistance<br />
Please have the following information handy:<br />
• The appliance model (Mod.).<br />
• The serial number (S/N).<br />
This information can be found on the data plate located on<br />
the appliance and/or on the packaging.<br />
GB<br />
25
GB<br />
26
27<br />
GB
10/2012 - 195085211.04<br />
XEROX FABRIANO<br />
GB<br />
28