86306 sommario-descrizione.p65 - Indesit
86306 sommario-descrizione.p65 - Indesit
86306 sommario-descrizione.p65 - Indesit

You also want an ePaper? Increase the reach of your titles
YUMPU automatically turns print PDFs into web optimized ePapers that Google loves.
GB<br />
English<br />
Operating Instructions<br />
COOKER AND OVEN<br />
Contents<br />
Operating Instructions,1<br />
Description of the appliance-Overall view,2<br />
Description of the appliance-Control Panel,3<br />
Installation,4<br />
Start-up and use,8<br />
Using the hob,9<br />
Precautions and tips,11<br />
Care and maintenance,12<br />
Assistance,12<br />
K3G21/R<br />
K3G21S/R<br />
K3G21S/UA<br />
KN3G27/RU<br />
KN3G217S/RU<br />
KN3G217/RU<br />
KN3G2107/RU<br />
RS<br />
<br />
<br />
<br />
<br />
,1<br />
- ,2<br />
- ,3<br />
,14<br />
,19<br />
B ,22<br />
,23<br />
,23<br />
KZ<br />
<br />
<br />
<br />
<br />
1<br />
2<br />
3<br />
24<br />
28<br />
31<br />
32<br />
32
GB<br />
RS<br />
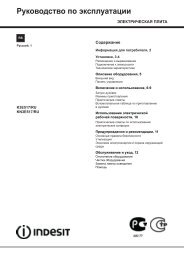
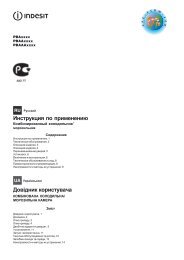
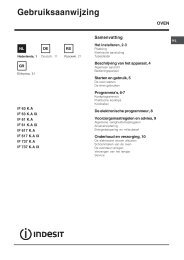
Description of the appliance<br />
Overall view<br />
1. Hob burner<br />
2. Hob Grid<br />
3.Containment surface for spills<br />
4.Control panel<br />
5..Sliding grill rack<br />
6.DRIPPING pan<br />
7.Adjustable foot<br />
8.GUIDE RAILS for the sliding racks<br />
9.position 5<br />
10.position 4<br />
11.position 3<br />
12.position 2<br />
13.position 1<br />
14.Glass Cover (Only on certain models)<br />
<br />
<br />
1. <br />
2. <br />
3. <br />
4. <br />
5. <br />
6. <br />
7. <br />
8.HAPABE <br />
9. 1<br />
10. 2<br />
11. 3<br />
12. 4<br />
13. 5<br />
14.C <br />
( .)<br />
1<br />
2<br />
4<br />
5<br />
6<br />
7<br />
14<br />
3<br />
8<br />
9<br />
10<br />
11<br />
12<br />
13<br />
7<br />
KZ<br />
<br />
<br />
1 Газ оттығы<br />
2. Плита торы<br />
3. Төгілген сұйықтықтарды ұстайтын бет<br />
4. Басқару тақтасы<br />
5. ГРИЛЬ<br />
6. ТҰТҚАЛЫ ТАБА<br />
7. Реттелетін аяқ<br />
8. Сырғымалы тартпаларға арналған<br />
БАҒЫТТАУШЫ ЖОЛДАР<br />
9.<br />
10.<br />
11.<br />
12.<br />
13.<br />
14.<br />
5-позиция<br />
4-позиция<br />
3-позиция<br />
2-позиция<br />
1-позиция<br />
Шыны қақпақ ( ).<br />
2
1 2 3 4 5<br />
1 2 3 4 5<br />
GB<br />
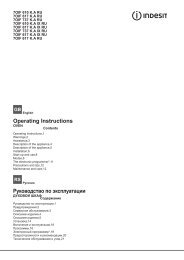
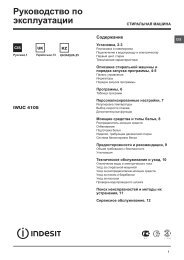
Description of the appliance<br />
Control panel<br />
1.GAS BURNER IGNITION button (Only on certain<br />
models)<br />
2.TIMER knob (Only on certain models)<br />
3.OVEN AND GRILL CONTROL knob<br />
4.OVEN LIGHT / ROTISSERIE button (Only on<br />
certain models)<br />
5.Hob BURNER control knob<br />
RS<br />
<br />
<br />
1. <br />
( .)<br />
2. ( .)<br />
3. <br />
4. / <br />
( .)<br />
5. <br />
<br />
KZ<br />
<br />
<br />
1. <br />
2. *<br />
3. <br />
4. - <br />
5. <br />
3
Installation<br />
GB<br />
! Before operating your new appliance please read<br />
this instruction booklet carefully. It contains<br />
important information concerning the safe installation<br />
and operation of the appliance.<br />
! Please keep these operating instructions for future<br />
reference. Make sure that the instructions are kept<br />
with the appliance if it is sold, given away or moved.<br />
! The appliance must be installed by a qualified<br />
professional according to the instructions provided.<br />
! Any necessary adjustment or maintenance must be<br />
performed after the cooker has been disconnected<br />
from the electricity supply.<br />
! We recommend cleaning the oven before using it<br />
for the first time, following the instructions provided<br />
in the "Care and maintenance" section.<br />
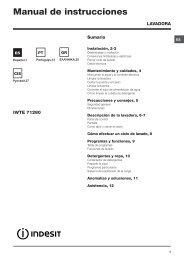
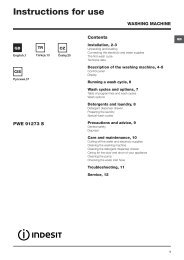
Room ventilation<br />
The appliance may only be installed in permanentlyventilated<br />
rooms, according to current national<br />
legislation. The room in which the appliance is<br />
installed must be ventilated adequately so as to<br />
provide as much air as is needed by the normal gas<br />
combustion process (the flow of air must not be<br />
lower than 2 m 3 /h per kW of installed power).<br />
The air inlets, protected by grilles, should have a<br />
duct with an inner cross section of at least 100 cm 2<br />
and should be positioned so that they are not liable<br />
to even partial obstruction (see figure A).<br />
These inlets should be enlarged by 100% - with a<br />
minimum of 200 cm 2 - whenever the surface of the<br />
hob is not equipped with a flame failure safety<br />
device. When the flow of air is provided in an<br />
indirect manner from adjacent rooms (see figure B),<br />
provided that these are not communal parts of a<br />
building, areas with increased fire hazards or<br />
bedrooms, the inlets should be fitted with a<br />
ventilation duct leading outside as described above.<br />
A<br />
Ventilation opening for<br />
comburent air<br />
A<br />
B<br />
Adjacent room<br />
Room requiring<br />
ventilation<br />
Increase in the gap between<br />
the door and the flooring<br />
! After prolonged use of the appliance, it is<br />
advisable to open a window or increase the speed of<br />
any fans used.<br />
Disposing of combustion fumes<br />
The disposal of combustion fumes should be<br />
guaranteed using a hood connected to a safe and<br />
efficient natural suction chimney, or using an electric<br />
fan that begins to operate automatically every time<br />
the appliance is switched on (see figure).<br />
Fumes channelled<br />
straight outside<br />
cooking appliances)<br />
! The liquefied petroleum gases are heavier than air<br />
and collect by the floor, therefore all rooms<br />
containing LPG cylinders must have openings<br />
leading outside so that any leaked gas can escape<br />
easily.<br />
LPG cylinders, therefore, whether partially or<br />
completely full, must not be installed or stored in<br />
rooms or storage areas that are below ground level<br />
(cellars, etc.). Only the<br />
cylinder being used should be stored in the room;<br />
this should also be kept well away from sources<br />
of heat (ovens, chimneys, stoves) that may cause<br />
the temperature of the cylinder to rise above 50°C.<br />
Positioning and levelling<br />
Fumes channelled through<br />
a chimney or branched<br />
flue system reserved for<br />
! It is possible to install the appliance alongside<br />
cupboards whose height does not exceed that of the<br />
hob surface.<br />
! Make sure that the wall in contact with the back of<br />
the appliance is made from a non-flammable, heatresistant<br />
material (T 90°C).<br />
To install the appliance correctly:<br />
• Place it in the kitchen, dining room or the bed-sit<br />
(not in the bathroom).<br />
• If the top of the hob is higher than the cupboards,<br />
the appliance must be installed at least 200 mm<br />
away from them.<br />
• If the cooker is installed underneath a wall cabinet,<br />
there must be a minimum distance of 420 mm<br />
between this cabinet and the top of the hob.<br />
This distance should be increased to 700 mm if<br />
the wall cabinets are flammable (see figure).<br />
4
mm.<br />
420<br />
Min.<br />
Levelling<br />
HOOD<br />
Min. 600 mm.<br />
Min. 420 mm.<br />
min. 650 mm. with hood<br />
min. 700 mm. without hood<br />
• Do not position<br />
blinds behind the<br />
cooker or less than 200<br />
mm away from its<br />
sides.<br />
• Any hoods must be<br />
installed according to<br />
the instructions listed in<br />
the relevant operating<br />
manual.<br />
If it is necessary to level the<br />
appliance, screw the<br />
adjustable feet into the places<br />
provided on each corner of the<br />
base of the cooker (see<br />
figure).<br />
The legs* fit into the slots on<br />
the underside of the base of<br />
the cooker.<br />
! Once the appliance has been installed, the power<br />
supply cable and the electrical socket must be<br />
easily accessible.<br />
! The cable must not be bent or compressed.<br />
! The cable must be checked regularly and replaced<br />
by authorised technicians only.<br />
! The manufacturer declines any liability should<br />
these safety measures not be observed.<br />
Gas connection<br />
Connection to the gas network or to the gas cylinder<br />
may be carried out using a flexible rubber or steel<br />
hose, in accordance with current national legislation<br />
and after making sure that the appliance is suited to<br />
the type of gas with which it will be supplied (see the<br />
rating sticker on the cover: if this is not the case see<br />
below). When using liquid gas from a cylinder, install a<br />
pressure regulator which complies with current national<br />
regulations. To make connection easier, the gas<br />
supply may be turned sideways*: reverse the position<br />
of the hose holder with that of the cap and replace the<br />
gasket that is supplied with the appliance.<br />
GB<br />
Electrical connection<br />
Install a standardised plug corresponding to the<br />
load indicated on the appliance data plate (see<br />
Technical data table).<br />
The appliance must be directly connected to the mains<br />
using an omnipolar circuit-breaker with a minimum<br />
contact opening of 3 mm installed between the<br />
appliance and the mains. The circuit-breaker must be<br />
suitable for the charge indicated and must comply with<br />
NFC 15-100 regulations (the earthing wire must not be<br />
interrupted by the circuit-breaker). The supply cable<br />
must be positioned so that it does not come into<br />
contact with temperatures higher than 50°C at any point.<br />
Before connecting the appliance to the power<br />
supply, make sure that:<br />
• The appliance is earthed and the plug is compliant<br />
with the law.<br />
• The socket can withstand the maximum power of<br />
the appliance, which is indicated by the data plate.<br />
• The voltage is in the range between the values<br />
indicated on the data plate.<br />
• The socket is compatible with the plug of the<br />
appliance. If the socket is incompatible with the<br />
plug, ask an authorised technician to replace it.<br />
Do not use extension cords or multiple sockets.<br />
* Only available in certain models<br />
! Check that the pressure of the gas supply is<br />
consistent with the values indicated in the Table of<br />
burner and nozzle specifications (see below). This<br />
will ensure the safe operation and durability of your<br />
appliance while maintaining efficient energy<br />
consumption.<br />
Gas connection using a flexible rubber hose<br />
Make sure that the hose complies with current<br />
national legislation. The internal diameter of the hose<br />
must measure: 8 mm for liquid gas supply; 13 mm<br />
for methane gas supply.<br />
Once the connection has been performed, make<br />
sure that the hose:<br />
• Does not come into contact with any parts that<br />
reach temperatures of over 50°C.<br />
• Is not subject to any pulling or twisting forces and<br />
that it is not kinked or bent.<br />
• Does not come into contact with blades, sharp<br />
corners or moving parts and that it is not<br />
compressed.<br />
• Is easy to inspect along its whole length so that<br />
its condition may be checked.<br />
• Is shorter than 1500 mm.<br />
• Fits firmly into place at both ends, where it will be<br />
fixed using clamps that comply with current<br />
regulations.<br />
5
GB<br />
! If one or more of these conditions is not fulfilled or<br />
if the cooker must be installed according to the<br />
conditions listed for class 2 - subclass 1 appliances<br />
(installed between two cupboards), the flexible steel<br />
hose must be used instead (see below).<br />
Connecting a flexible jointless stainless steel pipe<br />
to a threaded attachment<br />
Make sure that the hose and gaskets comply with<br />
current national legislation.<br />
To begin using the hose, remove the hose holder on the<br />
appliance (the gas supply inlet on the appliance is a<br />
cylindrical threaded 1/2 gas male attachment).<br />
3. While the burner is alight, quickly change the position<br />
of the knob from minimum to maximum and vice versa<br />
several times, checking that the flame is not<br />
extinguished.<br />
! The hob burners do not require primary air adjustment.<br />
Adapting the oven<br />
Replacing the oven burner nozzle:<br />
1. Remove the oven compartment.<br />
2. Slide out the protection<br />
panel A<br />
(see diagram).<br />
! Perform the connection in such a way that the hose<br />
length does not exceed a maximum of 2 metres,<br />
making sure that the hose is not compressed and<br />
does not come into contact with moving parts.<br />
Checking the connection for leaks<br />
When the installation process is complete, check<br />
the hose fittings for leaks using a soapy solution.<br />
Never use a flame.<br />
A<br />
V<br />
3. Remove the oven burner<br />
after unscrewing the screws V<br />
(see figure).<br />
The whole operation will be<br />
made easier if the oven door<br />
is removed.<br />
Adapting to different types of gas<br />
It is possible to adapt the appliance to a type of gas<br />
other than the default type (this is indicated on the<br />
rating label on the cover).<br />
Adapting the hob<br />
Replacing the nozzles for the hob burners:<br />
1. Remove the hob grids and slide the burners off<br />
their seats.<br />
2. Unscrew the nozzles using a<br />
7 mm socket spanner (see<br />
figure), and replace them with<br />
nozzles suited to the new type<br />
of gas(see Burner and nozzle<br />
specifications table).<br />
3. Replace all the components<br />
by following the above<br />
instructions in reverse.<br />
Adjusting the hob burners’ minimum setting:<br />
1. Turn the tap to the minimum position.<br />
2. Remove the knob and adjust the regulatory<br />
screw, which is positioned inside or next to the tap<br />
pin, until the flame is small but steady.<br />
! If the appliance is connected to a liquid gas<br />
supply, the regulatory screw must be fastened as<br />
tightly as possible.<br />
4. Unscrew the nozzle using a<br />
special nozzle socket spanner<br />
(see figure) or with a 7 mm<br />
socket spanner, and replace it<br />
with a new nozzle that is<br />
suited to the new type of gas<br />
(see Burner and nozzle<br />
specifications table).<br />
Adjusting the gas oven burner’s minimum setting:<br />
1. Light the burner (see Start-up and Use).<br />
2. Turn the knob to the minimum position (MIN) after<br />
it has been in the maximum position (MAX) for<br />
approximately 10 minutes.<br />
3. Remove the knob.<br />
4. Tighten or loosen the adjustment screws on the<br />
outside of the thermostat pin (see figure) until the<br />
flame is small but steady.<br />
! If the appliance is connected to liquid gas, the<br />
adjustment screw must be fastened as tightly as<br />
possible.<br />
6
5. Turn the knob from the MAX position to the MIN<br />
position quickly or open and shut the oven door,<br />
making sure that the burner is not extinguished.<br />
Adapting the grill<br />
We recommend cleaning the oven before using it for the<br />
first time, following the instructions provided in the<br />
"Care and maintenance" section.<br />
GB<br />
Replacing the grill burner nozzle:<br />
1. Remove the oven burner<br />
after loosening screw V (see<br />
figure).<br />
V<br />
2. Unscrew the grill burner<br />
nozzle using a special nozzle<br />
socket spanner (see figure) or<br />
preferably with a 7 mm socket<br />
spanner, and replace it with a<br />
new nozzle that is suited to the<br />
new type of gas (see Burner<br />
I<br />
and nozzle specifications table).<br />
! Be careful of the spark plug wires and the<br />
thermocouple tubes.<br />
! The oven and grill burners do not require primary<br />
air adjustment.<br />
! After adjusting the appliance so it may be used<br />
with a different type of gas, replace the old rating<br />
label with a new one that corresponds to the new<br />
type of gas (these labels are available from<br />
Authorised Technical Assistance Centres).<br />
! Should the gas pressure used be different (or vary<br />
slightly) from the recommended pressure, a suitable<br />
pressure regulator must be fitted to the inlet hose in<br />
accordance with current national regulations relating<br />
to “regulators for channelled gas”.<br />
Table of burner and nozzle specifications<br />
TECHNICAL DATA<br />
Oven dimensions<br />
(HxWxD)<br />
Volume<br />
Useful<br />
measurements<br />
relating to the oven<br />
compartment<br />
Power supply voltage<br />
and frequency<br />
Burners<br />
Table 1 Liquid Gas Natural Gas<br />
34x39x44 cm<br />
58 l<br />
width 42 cm<br />
depth 44 cm<br />
height 17 cm<br />
see data plate<br />
may be adapted for use with any<br />
type of gas shown on the data<br />
plate, which is located inside the<br />
flap or, after the oven<br />
compartment has been opened,<br />
on the left-hand wall inside the<br />
oven.<br />
EC Directives: 2006/95/EC dated<br />
12/12/06 (Low Voltage) and<br />
subsequent amendments -<br />
2004/108/EC dated 15/12/04<br />
(Electromagnetic Compatibility)<br />
and subsequent amendments -<br />
2009/142/EC dated 30/11/09<br />
(Gas) and subsequent<br />
amendments - 93/68/EEC dated<br />
22/07/93 and subsequent<br />
amendments - 2002/96/EC.<br />
1275/2008 (Stand-by/ Off mode)<br />
Burner<br />
Diameter<br />
(mm)<br />
Thermal Power<br />
kW (p.c.s.*)<br />
By-Pass<br />
1/100<br />
Nozzle<br />
1/100<br />
Flow*<br />
g/h<br />
Nozzle<br />
1/100<br />
Flow*<br />
l/h<br />
Nozzle<br />
1/100<br />
Nominal Reduced (mm) (mm) *** ** (mm) (mm)<br />
Fast<br />
(Large)(R)<br />
100 3.00 0.7 41 87 218 214 128 286 143 286<br />
Semi Fast<br />
(Medium)(S)<br />
75 1.90 0.4 30 70 138 136 104 181 118 181<br />
Auxiliary<br />
(Small)(A)<br />
51 1.00 0.4 30 52 73 71 76 95 80 95<br />
Oven - 2.80 1.0 46 80 204 200 119 267 132 257<br />
Grill - 2.30 - - 75 167 164 114 219 139 227<br />
Supply<br />
Pressures<br />
Nominal (mbar)<br />
Minimum (mbar)<br />
Maximum (mbar)<br />
28-30<br />
20<br />
35<br />
37<br />
25<br />
45<br />
20<br />
17<br />
25<br />
13<br />
6,5<br />
18<br />
Flow*<br />
l/h<br />
A<br />
S<br />
S<br />
R<br />
K3G21/R<br />
K3G21S/R<br />
K3G21S/UA<br />
KN3G27/RU<br />
KN3G217S/RU<br />
KN3G217/RU<br />
KN3G2107/RU<br />
7
Start-up and use<br />
GB<br />
Using the hob<br />
Lighting the burners<br />
For each BURNER knob there is a complete ring<br />
showing the strength of the flame for the relevant<br />
burner.<br />
To light one of the burners on the hob:<br />
1. Bring a flame or gas lighter close to the burner.<br />
2. Press the BURNER knob and turn it in an<br />
anticlockwise direction so that it is pointing to the<br />
maximum flame setting .<br />
3. Adjust the intensity of the flame to the desired<br />
level by turning the BURNER knob in an<br />
anticlockwise direction. This may be the minimum<br />
setting , the maximum setting or any position<br />
in between the two.<br />
If the appliance is fitted with<br />
an electronic lighting<br />
X<br />
device* (see figure), press<br />
the ignition button, marked<br />
with the symbol , then<br />
hold the BURNER knob<br />
C<br />
down and turn it in an<br />
anticlockwise direction, towards the maximum flame<br />
setting, until the burner is lit.<br />
Several models are equipped with an ignition device<br />
which is built into the knob; in this case the<br />
electronic ignition device* is present (C) but the<br />
ignition button is not. Simply press the BURNER<br />
knob and turn it in an anticlockwise direction so that<br />
it is pointing to the maximum flame setting, until the<br />
burner is lit. The burner may be extinguished when<br />
the knob is released. If this occurs, repeat the<br />
operation, holding the knob down for a longer period<br />
of time.<br />
! If the flame is accidentally extinguished, switch off<br />
the burner and wait for at least 1 minute before<br />
attempting to relight it.<br />
If the appliance is equipped with a flame failure<br />
safety device*(X), press and hold the BURNER knob<br />
for approximately 2-3 seconds to keep the flame<br />
alight and to activate the device.<br />
To switch the burner off, turn the knob until it<br />
reaches the stop position •.<br />
WARNING! The glass lid can<br />
break in if it is heated up. Turn<br />
off all the burners and the<br />
electric plates before closing<br />
the lid. *Applies to the models<br />
with glass cover only.<br />
Practical advice on using the burners<br />
For the burners to work in the most efficient way<br />
possible and to save on the amount of gas<br />
consumed, it is recommended that only pans that<br />
have a lid and a flat base are used. They should also<br />
be suited to the size of the burner.<br />
<br />
<br />
<br />
<br />
To identify the type of burner, please refer to the<br />
diagrams contained in the “Burner and nozzle<br />
specifications”.<br />
Using the oven<br />
! The first time you use your appliance, heat the<br />
empty oven with its door closed at its maximum<br />
temperature for at least half an hour. Ensure that the<br />
room is well ventilated before switching the oven off<br />
and opening the oven door. The appliance may emit a<br />
slightly unpleasant odour caused by protective<br />
substances used during the manufacturing process<br />
burning away.<br />
! Before operating the product, remove all plastic film<br />
from the sides of the appliance.<br />
! Never put objects directly on the bottom of the<br />
oven; this will avoid the enamel coating being<br />
damaged. Only use position 1 in the oven when<br />
cooking with the rotisserie spit.<br />
Lighting the oven<br />
F<br />
To light the oven burner, bring<br />
a flame or gas lighter close to<br />
opening F (see figure) and<br />
press the OVEN control knob<br />
while turning it in an<br />
anticlockwise direction until it<br />
reaches the MAX position.<br />
If, after 15 seconds, the burner is still not alight,<br />
release the knob, open the oven door and wait for at<br />
least 1 minute before trying to light it again.<br />
! The oven is fitted with a safety device and it is<br />
therefore necessary to hold the OVEN control knob<br />
down for approximately 6 seconds.<br />
*<br />
Only available in certain models.<br />
<br />
<br />
<br />
<br />
8
! If the flame is accidentally extinguished, switch off<br />
the burner and wait for at least 1 minute before<br />
attempting to relight the oven.<br />
Adjusting the temperature<br />
To set the desired cooking temperature, turn the<br />
OVEN control knob in an anticlockwise direction.<br />
Temperatures are displayed on the control panel and<br />
may vary between MIN (140°C) and MAX (250°C).<br />
Once the set temperature has been reached, the<br />
oven will keep it constant by using its thermostat.<br />
Grill<br />
3. Acitvate the function by pressing the TURNSPIT<br />
button.<br />
Oven light<br />
The light may be switched on at any moment by<br />
pressing the OVEN LIGHT button.<br />
Timer*<br />
To activate the Timer proceed as follows:<br />
1. Turn the TIMER knob in a clockwise direction <br />
for almost one complete revolution to set the buzzer.<br />
2. Turn the TIMER knob in an anticlockwise direction<br />
to set the desired length of time.<br />
GB<br />
To light the grill, bring a flame or gas lighter close to<br />
the burner and press the OVEN control knob while<br />
turning it in a clockwise direction until it reaches the<br />
position. The grill enables the surface of food to<br />
be browned evenly and is particularly suitable for<br />
roast dishes, schnitzel and sausages. Place the<br />
rack in position 4 or 5 and the dripping pan in<br />
position 1 to collect fat and prevent the formation of<br />
smoke.<br />
! The grill is fitted with a safety device and it is<br />
therefore necessary to hold the OVEN control knob<br />
down for approximately 6 seconds.<br />
Lower compartment*<br />
There is a compartment<br />
underneath the oven<br />
that may be used to<br />
store oven accessories<br />
or deep dishes. To open<br />
the door pull it<br />
downwards (see<br />
figure).<br />
! If the flame is accidentally extinguished, switch off<br />
the burner and wait for at least 1 minute before<br />
attempting to relight the grill.<br />
Turnspit*<br />
D<br />
! When using the grill, leave<br />
the oven door ajar, positioning<br />
the deflector D between the<br />
door and the control panel<br />
(see figure) in order to prevent<br />
the knobs from overheating.<br />
! The internal surfaces of the compartment (where<br />
present) may become hot.<br />
! Do not place flammable materials in the lower oven<br />
compartment.<br />
A<br />
In gas cooker models, there is<br />
a sliding protection layer A<br />
that shields the lower<br />
compartment from the heat<br />
generated by the burner (see<br />
figure).<br />
To operate the<br />
rotisserie (see diagram)<br />
proceed as follows:<br />
1. Place the dripping<br />
pan in position 1.<br />
2. Place the rotisserie<br />
support in position 4<br />
and insert the spit in the<br />
hole provided on the<br />
back panel of the oven.<br />
S<br />
To remove the sliding<br />
protection remove the screw S<br />
(see figure). To replace it, lock<br />
it in place with the screw S.<br />
! Before using the oven make<br />
sure that the sliding protection<br />
is fixed correctly.<br />
* Only available in certain models.<br />
9
GB<br />
Oven cooking advice table<br />
Food to be cooked<br />
Wt.<br />
(Kg)<br />
Cooking position of<br />
shelves from bottom<br />
Temperature<br />
(°C)<br />
Pre-heating time (min)<br />
Cooking time<br />
(min.)<br />
Pasta<br />
Lasagne<br />
Cannelloni<br />
Pasta bakes au gratin<br />
Meat<br />
Veal<br />
Chicken<br />
Duck<br />
Rabbit<br />
Pork<br />
Lamb<br />
Fish<br />
Mackerel<br />
Dentex<br />
Trout baked in paper<br />
2.5<br />
2.5<br />
2.5<br />
1.5<br />
1.5<br />
1.8<br />
2.0<br />
2.1<br />
1.8<br />
1.1<br />
1.5<br />
1.0<br />
3<br />
3<br />
3<br />
3<br />
3<br />
3<br />
3<br />
3<br />
3<br />
200-210<br />
200<br />
200<br />
200-210<br />
210-220<br />
200<br />
200<br />
200<br />
200<br />
180-200<br />
180-200<br />
180-200<br />
Pizza<br />
Napolitan 1.0 4 210-220 15<br />
Cake<br />
Biscuits<br />
Tarts<br />
Savoury pie<br />
Raised Cakes<br />
Grill cooking<br />
Veal steaks<br />
Cutlets<br />
Hamburgers<br />
Mackerels<br />
Toast sandwiches<br />
Grill cooking with<br />
rotisserie<br />
Veal on the spit<br />
Chicken on the spit<br />
0.5<br />
1.1<br />
1.0<br />
1.0<br />
1<br />
1,5<br />
1<br />
1<br />
n.° 4<br />
1<br />
2<br />
Grill cooking with multiskewer<br />
rotisserie (only a<br />
few models)<br />
Meat kebabs<br />
Vegetable kebabs 1,0<br />
0,8<br />
4<br />
4<br />
4<br />
4<br />
4<br />
4<br />
4<br />
4<br />
4<br />
4<br />
3<br />
4<br />
4<br />
-<br />
-<br />
-<br />
-<br />
180<br />
180<br />
180<br />
170<br />
10<br />
10<br />
10<br />
10<br />
10<br />
10<br />
10<br />
10<br />
10<br />
10<br />
10<br />
10<br />
15<br />
15<br />
15<br />
15<br />
5<br />
5<br />
5<br />
5<br />
5<br />
5<br />
5<br />
5<br />
5<br />
75-85<br />
50-60<br />
50-60<br />
95-100<br />
90-100<br />
100-110<br />
70-80<br />
70-80<br />
100-105<br />
45-50<br />
45-55<br />
45-50<br />
20-25<br />
25-35<br />
40-45<br />
50-55<br />
40-45<br />
15-20<br />
20<br />
20-30<br />
15-20<br />
4-5<br />
70-80<br />
70-80<br />
40-45<br />
25-30<br />
NB: cooking times are approximate and may vary according to personal taste. When cooking using the grill, the dripping-pan must<br />
always be placed on the 1st oven rack from the bottom.<br />
* Only available in certain models.<br />
10
Precautions and tips<br />
! This appliance has been designed and manufactured in<br />
compliance with international safety standards.<br />
The following warnings are provided for safety reasons and<br />
must be read carefully.<br />
General safety<br />
• These instructions are only valid for the<br />
countries whose symbols appear in the<br />
manual and on the serial number plate.•<br />
The appliance was designed for domestic use inside the<br />
home and is not intended for commercial or industrial use.<br />
• The appliance must not be installed outdoors, even in<br />
covered areas. It is extremely dangerous to leave the<br />
appliance exposed to rain and storms.<br />
• Do not touch the appliance with bare feet or with wet or<br />
damp hands and feet.<br />
• The appliance must be used by adults only for<br />
the preparation of food, in accordance with the<br />
instructions outlined in this booklet. Any other<br />
use of the appliance (e.g. for heating the room)<br />
constitutes improper use and is dangerous.<br />
The manufacturer may not be held liable for<br />
any damage resulting from improper, incorrect<br />
and unreasonable use of the appliance.<br />
• The instruction booklet accompanies a class 1 (insulated)<br />
or class 2 - subclass 1 (recessed between 2 cupboards)<br />
appliance.<br />
• Keep children away from the oven.<br />
• Make sure that the power supply cables of other electrical<br />
appliances do not come into contact with the hot parts of<br />
the oven.<br />
• The openings used for the ventilation and dispersion of<br />
heat must never be covered.<br />
• Do not close the glass hob cover (selected models only)<br />
when the burners are alight or when they are still hot.<br />
• Always use oven gloves when placing cookware in the<br />
oven or when removing it.<br />
• Do not use flammable liquids (alcohol, petrol, etc...) near<br />
the appliance while it is in use.<br />
• Do not place flammable material in the lower storage<br />
compartment or in the oven itself. If the appliance is<br />
switched on accidentally, it could catch fire.<br />
• Always make sure the knobs are in the • position and that<br />
the gas tap is closed when the appliance is not in use.<br />
• When unplugging the appliance, always pull the plug from<br />
the mains socket; do not pull on the cable.<br />
• Never perform any cleaning or maintenance work without<br />
having disconnected the appliance from the electricity<br />
mains.<br />
• If the appliance breaks down, under no circumstances<br />
should you attempt to repair the appliance yourself.<br />
Repairs carried out by inexperienced persons may cause<br />
injury or further malfunctioning of the appliance. Contact<br />
Assistance.<br />
• Do not rest heavy objects on the open oven door.<br />
• The appliance should not be operated by people<br />
(including children) with reduced physical,<br />
sensory or mental capacities, by inexperienced<br />
individuals or by anyone who is not familiar with<br />
the product. These individuals should, at the very<br />
least, be supervised by someone who assumes<br />
responsibility for their safety or receive<br />
preliminary instructions relating to the operation of<br />
the appliance.<br />
• Do not let children play with the appliance.<br />
Disposal<br />
• When disposing of packaging material: observe local<br />
legislation so that the packaging may be reused.<br />
• The European Directive 2002/96/EC relating to Waste<br />
Electrical and Electronic Equipment (WEEE) states that<br />
household appliances should not be disposed of using the<br />
normal solid urban waste cycle. Exhausted appliances<br />
should be collected separately in order to optimise the cost<br />
of re-using and recycling the materials inside the machine,<br />
while preventing potential damage to the atmosphere and<br />
to public health. The crossed-out dustbin is marked on all<br />
products to remind the owner of their obligations regarding<br />
separated waste collection.<br />
Exhausted appliances may be collected by the public<br />
waste collection service, taken to suitable collection areas<br />
in the area or, if permitted by current national legislation,<br />
they may be returned to the dealers as part of an<br />
exchange deal for a new equivalent product.<br />
All major manufacturers of household appliances<br />
participate in the creation and organisation of systems for<br />
the collection and disposal of old and disused appliances.<br />
Respecting and conserving the<br />
environment<br />
• You can help to reduce the peak load of the electricity<br />
supply network companies by using the oven in the hours<br />
between late afternoon and the early hours of the morning.<br />
• Check the door seals regularly and wipe them clean to<br />
ensure they are free of debris so that they adhere properly<br />
to the door, thus avoiding<br />
heat dispersion.<br />
GB<br />
11
Care and maintenance<br />
GB<br />
Switching the appliance off<br />
Disconnect your appliance from the electricity supply<br />
before carrying out any work on it.<br />
Cleaning the appliance<br />
! Do not use abrasive or corrosive detergents such as<br />
stain removers, anti-rust products, powder detergents or<br />
sponges with abrasive surfaces: these may scratch the<br />
surface beyond repair.<br />
! Never use steam cleaners or pressure cleaners on the<br />
appliance.<br />
• It is usually sufficient simply to wash the hob using a<br />
damp sponge and dry it with absorbent kitchen roll.<br />
• The stainless steel or enamel-coated external parts and<br />
the rubber seals may be cleaned using a sponge that<br />
has been soaked in lukewarm water and neutral soap.<br />
Use specialised products for the removal of stubborn<br />
stains. After cleaning, rinse well and dry thoroughly. Do<br />
not use abrasive powders or corrosive substances.<br />
• The hob grids, burner caps, flame spreader rings<br />
and the hob burners can be removed<br />
to make cleaning easier; wash them in hot water and<br />
non-abrasive detergent, making sure all burnt-on<br />
residue is removed before drying them thoroughly.<br />
• For hobs with electronic ignition, the terminal part of the<br />
electronic lighting devices should be cleaned<br />
frequently and the gas outlet holes should be checked<br />
for blockages.<br />
• The inside of the oven should ideally be cleaned after<br />
each use, while it is still lukewarm. Use hot water and<br />
detergent, then rinse well and dry with a soft cloth. Do<br />
not use abrasive products.<br />
• Clean the glass part of the oven door using a sponge<br />
and a non-abrasive cleaning product, then dry<br />
thoroughly with a soft cloth. Do not use rough abrasive<br />
material or sharp metal scrapers as these could<br />
scratch the surface and cause the glass to crack.<br />
• The accessories can be washed like everyday<br />
crockery, and are even dishwasher safe.<br />
• Stainless steel can be marked by hard water that has<br />
been left on the surface for a long time, or by<br />
aggressive detergents containing phosphorus. After<br />
cleaning, rinse well and dry thoroughly. Any remaining<br />
drops of water should also be dried.<br />
The cover<br />
If the cooker is fitted with a<br />
glass cover, this cover<br />
should be cleaned using<br />
lukewarm water. Do not use<br />
abrasive products.<br />
It is possible to remove the<br />
cover in order to make<br />
cleaning the area behind<br />
the hob easier. Open the<br />
cover fully and pull it<br />
upwards (see figure).<br />
! Do not close the cover when the burners are alight or<br />
when they are still hot.<br />
Inspecting the oven seals<br />
Check the door seals around the oven periodically. If the<br />
seals are damaged, please contact your nearest<br />
Authorised After-sales Service Centre. We recommend<br />
that the oven is not used until the seals have been<br />
replaced.<br />
Gas tap maintenance<br />
Over time, the taps may become jammed or difficult to<br />
turn. If this occurs, the tap must be replaced.<br />
! This procedure must be performed by a qualified<br />
technician who has been authorised by the<br />
manufacturer.<br />
Replacing the oven light bulb<br />
1. After disconnecting the oven<br />
from the electricity mains, remove<br />
the glass lid covering the lamp<br />
socket (see figure).<br />
2. Remove the light bulb and<br />
replace it with a similar one:<br />
voltage 230 V, wattage 25 W, cap<br />
E 14.<br />
3. Replace the lid and reconnect the oven to the electricity<br />
supply.<br />
Assistance<br />
Please have the following information handy:<br />
• The appliance model (Mod.).<br />
• The serial number (S/N).<br />
This information can be found on the data plate located on<br />
the appliance and/or on the packaging.<br />
12
:<br />
:<br />
:<br />
:<br />
:<br />
-:<br />
<br />
<br />
<br />
<br />
<br />
() <br />
K3G21/R, K3G21S/R, KN3G27/RU, KN3G217S/RU,<br />
KN3G217/RU, KN3G2107/RU<br />
<strong>Indesit</strong> Company<br />
<br />
220–240 ~<br />
50/60 <br />
I<br />
RS<br />
<br />
. ( )<br />
<br />
<br />
, <br />
<br />
cert.rus@indesit.com.<br />
<br />
, <br />
-<br />
(S/N XXXXXXXXX * XXXXXXXXXXX),<br />
:<br />
58 <br />
3100 <br />
- 1- S/N <br />
;<br />
- 2- 3- S/N — <br />
,<br />
- 4- 5- S/N — <br />
.<br />
-<br />
, . , <br />
, . -<br />
. <br />
- .<br />
:<br />
<strong>Indesit</strong> Company S.p.A.<br />
. 47, 60044, (), <br />
:<br />
« »<br />
( ) : , 127018, , . , 12, . 1<br />
13
RS<br />
! <br />
-<br />
: <br />
, <br />
.<br />
! <br />
-<br />
.<br />
! <br />
<br />
.<br />
! -<br />
.<br />
<br />
<br />
<br />
-<br />
. <br />
, -<br />
( <br />
2 3 / -<br />
). , <br />
, -<br />
, <br />
100 2 , <br />
(. A).<br />
-<br />
, <br />
100% ( -<br />
200 2 ).<br />
<br />
( , <br />
, <br />
), <br />
-<br />
, (. B).<br />
A<br />
<br />
<br />
<br />
<br />
B<br />
,<br />
<br />
<br />
<br />
<br />
<br />
<br />
! -<br />
<br />
.<br />
<br />
<br />
, -<br />
, <br />
, <br />
, (c. .).<br />
<br />
<br />
(<br />
)<br />
!<br />
, -<br />
. , <br />
, -<br />
, <br />
. <br />
, -<br />
( ).<br />
<br />
<br />
(, , ..), <br />
50°.<br />
<br />
! <br />
, <br />
.<br />
! , -<br />
, -<br />
, ( <br />
90 °C).<br />
:<br />
, , <br />
.<br />
<br />
, -<br />
<br />
200 <br />
.<br />
-<br />
<br />
<br />
-<br />
() <br />
420 .<br />
-<br />
14
700 , <br />
(. .).<br />
/ <br />
200 -<br />
.<br />
-<br />
.<br />
<br />
<br />
<br />
, <br />
. -<br />
, <br />
<br />
(. .).<br />
-<br />
*, -<br />
<br />
.<br />
,<br />
, <br />
.<br />
<br />
-<br />
( <br />
), <br />
3 ,<br />
-<br />
. ,<br />
<br />
, 50 ° <br />
.<br />
, :<br />
<br />
.<br />
<br />
(. <br />
).<br />
-<br />
, <br />
.<br />
, -<br />
— <br />
. <br />
.<br />
! -<br />
-<br />
.<br />
! .<br />
! , <br />
-<br />
.<br />
<br />
-<br />
.<br />
<br />
<br />
-<br />
, <br />
<br />
, <br />
(. <br />
): <br />
§ « ». <br />
, <br />
<br />
(), -<br />
.<br />
, <br />
*:<br />
<br />
(<br />
).<br />
! , -<br />
, « <br />
». -<br />
<br />
.<br />
<br />
, -<br />
. <br />
: 8 — <br />
; 13 — <br />
, :<br />
, <br />
50 °;<br />
, , <br />
, ;<br />
<br />
;<br />
<br />
;<br />
1500 ;<br />
-<br />
, <br />
.<br />
RS<br />
* .<br />
15
RS<br />
! <br />
, , -<br />
, <br />
2 1 ( -<br />
), <br />
<br />
.<br />
<br />
<br />
<br />
.<br />
. <br />
<br />
1/2 .<br />
! <br />
2 . , -<br />
.<br />
<br />
, <br />
, . <br />
.<br />
<br />
,<br />
(. <br />
).<br />
<br />
:<br />
1) <br />
-<br />
;<br />
2) 7 <br />
(. .)<br />
<br />
(.<br />
. «<br />
»);<br />
3) , <br />
.<br />
<br />
<br />
1. <br />
.<br />
2. <br />
( -<br />
), , .<br />
! -<br />
.<br />
3. -<br />
-<br />
, , <br />
.<br />
! <br />
.<br />
<br />
:<br />
1) () <br />
<br />
;<br />
2) -<br />
«» (. .);<br />
3) «V» -<br />
(. .) — <br />
<br />
-<br />
;<br />
4) <br />
<br />
7 (.<br />
.) -<br />
-<br />
<br />
(. . <br />
).<br />
<br />
1. (. -<br />
).<br />
2. -<br />
10 (MAX), —<br />
(MIN) .<br />
3. .<br />
4. , -<br />
, , <br />
.<br />
! -<br />
.<br />
5. , -<br />
«MAX» «MIN» <br />
.<br />
16
:<br />
1) «V» -<br />
(. .);<br />
<br />
<br />
34 ;<br />
39 ;<br />
44 <br />
RS<br />
2) <br />
<br />
7 (.<br />
.) <br />
-<br />
(.<br />
. -<br />
).<br />
! , <br />
-<br />
.<br />
! <br />
.<br />
! <br />
— <br />
( <br />
).<br />
! <br />
, <br />
( -<br />
<br />
).<br />
! <br />
-<br />
, .<br />
<br />
<br />
-<br />
<br />
-<br />
<br />
<br />
58 <br />
17 ;<br />
42 ;<br />
44 <br />
. . -<br />
<br />
<br />
, -<br />
. -<br />
<br />
2006/95/<br />
12.12.06 (« -<br />
») <br />
;<br />
2004/108/EC 15.12.04<br />
(« -<br />
» <br />
;<br />
2009/142/EC 30.11.09<br />
(«») <br />
;<br />
93/68/EEC 22.07.93 -<br />
–<br />
2002/96/EC;<br />
1275/2008 ( <br />
Stand-by / .).<br />
<br />
— . . «<br />
».<br />
17
RS<br />
<br />
<br />
,<br />
<br />
<br />
,<br />
(p.c.s.*)<br />
<br />
1/100<br />
<br />
<br />
1/100<br />
*<br />
/<br />
<br />
1/100<br />
<br />
*<br />
/<br />
. *** ** <br />
() (R) 100 3,00 0,7 41 87 218 214 128 286 143 286<br />
() (S) 75 1,90 0,4 30 70 138 136 104 181 118 181<br />
<br />
() (A)<br />
51 1,00 0,4 30 52 73 71 76 95 80 95<br />
- 2,80 1,0 46 80 204 200 119 267 132 257<br />
- 2,30 - - 75 167 164 114 219 139 227<br />
()<br />
<br />
()<br />
()<br />
* 15 ° 1013 <br />
** P.C.S. = 50,37 M/<br />
*** P.C.S. = 49,47 M/<br />
P.C.S. = 37,78 M/ 3<br />
28-30<br />
20<br />
35<br />
37<br />
25<br />
45<br />
20<br />
17<br />
25<br />
<br />
1/100<br />
13<br />
6,5<br />
18<br />
*<br />
/<br />
! <br />
<br />
. <br />
, <br />
.*<br />
* .<br />
18
, -<br />
.<br />
-<br />
:<br />
1. <br />
.<br />
2. , <br />
-<br />
.<br />
3. , -<br />
<br />
. -<br />
: — ,<br />
— <br />
.<br />
, -<br />
<br />
*(), <br />
,<br />
-<br />
, -<br />
<br />
<br />
, -<br />
, .<br />
-<br />
, <br />
, — <br />
* (. .), <br />
. <br />
-<br />
, .<br />
.<br />
, -<br />
.<br />
! , <br />
1 , <br />
.<br />
, <br />
()*, <br />
2–3 , <br />
.<br />
, <br />
«•» — .<br />
<br />
<br />
<br />
<br />
. <br />
.<br />
<br />
, <br />
(R) 24–26<br />
(S) 16–20<br />
() 10–14<br />
, .<br />
« ».<br />
<br />
! -<br />
<br />
. -<br />
, -<br />
.<br />
<br />
, -<br />
.<br />
! , <br />
.<br />
! — <br />
. 1-<br />
(<br />
).<br />
<br />
-<br />
, <br />
«F»<br />
(. .), <br />
<br />
-<br />
Max.<br />
15 , <br />
, <br />
1 , .<br />
! — <br />
-<br />
6 .<br />
! , -<br />
1 , <br />
.<br />
RS<br />
* .<br />
19
RS<br />
<br />
, -<br />
<br />
. <br />
<br />
140 ° (MIN) 250 ° (MAX).<br />
<br />
<br />
.<br />
<br />
, -<br />
, <br />
<br />
. <br />
<br />
, .<br />
4 5 , <br />
1 — <br />
.<br />
! -<br />
, <br />
6 ,<br />
! , -<br />
1 , <br />
.<br />
! ,<br />
-<br />
. <br />
-<br />
()<br />
D <br />
(. .).<br />
<br />
<br />
.<br />
*<br />
1. , -<br />
<br />
.<br />
2. <br />
, .<br />
*<br />
<br />
-<br />
-<br />
.<br />
<br />
.<br />
! -<br />
.<br />
! -<br />
.<br />
<br />
(. .):<br />
1) <br />
1-<br />
;<br />
2) <br />
4-<br />
<br />
, <br />
-<br />
<br />
;<br />
) , -<br />
<br />
-<br />
.<br />
* .<br />
20
,<br />
<br />
<br />
<br />
,<br />
°C<br />
<br />
,<br />
.<br />
<br />
,<br />
<br />
<br />
2,5 4 200-210 10 75-85<br />
2,5 4 200 10 50-60<br />
2,5 4 200 10 50-60<br />
<br />
1,5 3 200-210 10 95-100<br />
1,5 3 210-220 10 90-100<br />
1,8 3 200 10 100-110<br />
2,0 3 200 10 70-80<br />
2,1 3 200 10 70-80<br />
1,8 3 200 10 100-105<br />
<br />
1,1 3 180-200 10 45-50<br />
1,5 3 180-200 10 45-55<br />
1,0 3 180-200 10 45-50<br />
<br />
1,0 4 210-220 15 20-25<br />
<br />
/ 0,5 4 180 15 25-35<br />
1,1 4 180 15 40-45<br />
1,0 4 180 15 50-55<br />
1,0 4 170 15 40-45<br />
( )<br />
1 4 5 15-20<br />
1,5 4 5 20<br />
1 3 5 20-30<br />
1 4 5 15-20<br />
4 . 4 5 4-5<br />
<br />
1 - 5 70-80<br />
2 - 5 70-80<br />
*<br />
1 - 5 40-45<br />
0,8 - 5 25-30<br />
. -<br />
. 1- () .<br />
RS<br />
* .<br />
21
RS<br />
! <br />
. <br />
, <br />
.<br />
<br />
<br />
<br />
<br />
<br />
<br />
<br />
<br />
<br />
<br />
<br />
<br />
<br />
<br />
<br />
<br />
<br />
, <br />
,<br />
.<br />
-<br />
<br />
<br />
.<br />
-<br />
( ). <br />
<br />
/ .<br />
, / <br />
; , <br />
.<br />
<br />
<br />
-<br />
. <br />
(., ) -<br />
. <br />
<br />
, -<br />
.<br />
<br />
1 ( ) 2 -<br />
1 ( ).<br />
.<br />
, -<br />
<br />
.<br />
, <br />
.<br />
*, <br />
.<br />
/ ,<br />
.<br />
(,<br />
..) .<br />
<br />
: -<br />
.<br />
, -<br />
«•», -<br />
.<br />
, <br />
, :<br />
.<br />
-<br />
<br />
, .<br />
<br />
<br />
<br />
<br />
, <br />
.<br />
, -<br />
, <br />
.<br />
<br />
.<br />
<br />
.<br />
(-<br />
) , <br />
, <br />
. <br />
<br />
, <br />
.<br />
! -<br />
. <br />
.<br />
<br />
<br />
<br />
<br />
<br />
.<br />
2002/96/EC <br />
-<br />
(WEEE) -<br />
<br />
: <br />
, -<br />
<br />
-<br />
. <br />
, <br />
.<br />
<br />
-<br />
-<br />
.<br />
<br />
<br />
<br />
<br />
.<br />
-<br />
, : <br />
<br />
.<br />
* .<br />
22
! -<br />
.<br />
<br />
! -<br />
(,<br />
, -<br />
): <br />
.<br />
! -<br />
.<br />
-<br />
, <br />
.<br />
-<br />
, <br />
, -<br />
, <br />
. <br />
<br />
. <br />
. <br />
, .<br />
<br />
<br />
<br />
<br />
<br />
<br />
, ,<br />
-<br />
; <br />
, ,<br />
.<br />
<br />
, <br />
.<br />
<br />
, . <br />
,<br />
.<br />
.<br />
<br />
, <br />
. <br />
,<br />
<br />
.<br />
, <br />
( -<br />
).<br />
-<br />
<br />
,<br />
. <br />
<br />
, <br />
.<br />
<br />
<br />
*,<br />
<br />
, -<br />
-<br />
. -<br />
-<br />
, <br />
— <br />
<br />
(. .).<br />
! , -<br />
.<br />
<br />
<br />
. <br />
. <br />
, .<br />
<br />
() <br />
.<br />
.<br />
! -<br />
.<br />
<br />
1. <br />
, <br />
<br />
.<br />
2. <br />
<br />
-<br />
: 230 ,<br />
– 25 , – 14.<br />
3. <br />
.<br />
<br />
! , <br />
. -<br />
.<br />
:<br />
( ,<br />
..);<br />
(.) (S/N),<br />
, -<br />
, <br />
.<br />
* .<br />
RS<br />
23
KZ<br />
! <br />
. <br />
<br />
.<br />
! <br />
. ,<br />
, <br />
.<br />
! <br />
.<br />
! <br />
, <br />
.<br />
<br />
<br />
.<br />
,<br />
<br />
( <br />
- 2 3 /. ).<br />
<br />
100 2 <br />
<br />
(A ).<br />
<br />
, <br />
100%- , <br />
200 2 . <br />
, <br />
, <br />
(B <br />
), <br />
.<br />
<br />
<br />
<br />
<br />
<br />
( ).<br />
<br />
<br />
! <br />
, <br />
<br />
<br />
.<br />
, , <br />
, <br />
( <br />
..) . <br />
; <br />
50°C-<br />
<br />
(, , ) <br />
.<br />
<br />
<br />
<br />
<br />
)<br />
A<br />
B<br />
<br />
<br />
<br />
<br />
! <br />
.<br />
! <br />
, (T 90°C)<br />
.<br />
<br />
<br />
A<br />
<br />
<br />
! <br />
<br />
.<br />
:<br />
• , <br />
( ).<br />
• , <br />
200 .<br />
• <br />
, <br />
420 .<br />
<br />
, 700 - <br />
( ).<br />
24
• <br />
<br />
200 - <br />
.<br />
• <br />
<br />
<br />
<br />
.<br />
<br />
, <br />
<br />
<br />
( ).<br />
<br />
<br />
.<br />
! <br />
.<br />
! .<br />
! , <br />
.<br />
! <br />
<br />
.<br />
<br />
<br />
<br />
<br />
<br />
( : <br />
, ). <br />
, <br />
<br />
. <br />
*: <br />
- <br />
.<br />
KZ<br />
<br />
<br />
<br />
( ).<br />
<br />
3 <br />
- .<br />
- NFC<br />
15-100 ( <br />
- ). <br />
50°C- <br />
.<br />
<br />
:<br />
• <br />
.<br />
• <br />
.<br />
• <br />
.<br />
• .<br />
, <br />
. <br />
.<br />
* <br />
! <br />
<br />
( <br />
). <br />
, <br />
.<br />
<br />
<br />
. <br />
: 8 ; <br />
13 .<br />
<br />
:<br />
• 50°C- <br />
.<br />
• <br />
<br />
.<br />
• , <br />
.<br />
• <br />
.<br />
• 1500 - .<br />
• <br />
.<br />
25
KZ<br />
! <br />
2-, 1- <br />
( )<br />
<br />
, <br />
( ).<br />
<br />
<br />
<br />
.<br />
<br />
( <br />
1/2 <br />
).<br />
! <br />
, <br />
2 - .<br />
<br />
, <br />
<br />
. .<br />
<br />
( <br />
) <br />
.<br />
<br />
:<br />
1. , <br />
.<br />
2. 7 <br />
( )<br />
, <br />
, <br />
<br />
( <br />
<br />
).<br />
3. <br />
.<br />
:<br />
1. .<br />
2. , <br />
<br />
.<br />
! , <br />
.<br />
3. <br />
- <br />
, .<br />
! .<br />
<br />
:<br />
1. .<br />
2. «» <br />
<br />
( ).<br />
A<br />
V<br />
3. «V» <br />
<br />
<br />
( ).<br />
,<br />
<br />
.<br />
4. <br />
<br />
( ) 7<br />
<br />
<br />
<br />
<br />
( <br />
).<br />
:<br />
1. (« » <br />
).<br />
2. ( ) <br />
10 ( )<br />
.<br />
3. .<br />
4. <br />
( ) <br />
.<br />
! , <br />
.<br />
26
5. « » « »<br />
,<br />
, <br />
.<br />
« <br />
» <br />
.<br />
A<br />
S<br />
S<br />
R<br />
K3G21/R<br />
K3G21S/R<br />
K3G21S/UA<br />
KN3G27/RU<br />
KN3G217S/RU<br />
KN3G217/RU<br />
KN3G2107/RU<br />
<br />
<br />
34x39x44 <br />
()<br />
<br />
58 <br />
42 <br />
<br />
<br />
<br />
<br />
<br />
44 <br />
17 <br />
<br />
<br />
<br />
<br />
<br />
<br />
<br />
: 12.12.2006<br />
2006/95/EC (<br />
) <br />
– 15.12.04 2004/108/EC<br />
( )<br />
–<br />
30.11.2009 2009/142/EC<br />
() <br />
– 22.07.1993 93/68/<br />
EEC –<br />
2002/96/EC.<br />
1275/2008 (/ )<br />
KZ<br />
<br />
1- <br />
<br />
()<br />
, (p.c.s.*) <br />
1/100<br />
<br />
1/100<br />
* / <br />
1/100<br />
*<br />
/<br />
<br />
1/100<br />
*<br />
/<br />
() () *** ** () ()<br />
<br />
()(R) 100 3.00 0.7 41 87 218 214 128 286 143 286<br />
<br />
<br />
()(S)<br />
75 1.90 0.4 30 70 138 136 104 181 118 181<br />
<br />
()(A) 51 1.00 0.4 30 52 73 71 76 95 80 95<br />
-<br />
2,80<br />
1.0 46 80 204 200 119 267 132 257<br />
Гриль<br />
- 2,30 - - 75 167 164 114 219 139 227<br />
<br />
<br />
()<br />
()<br />
()<br />
28- 30<br />
20<br />
35<br />
37<br />
25<br />
45<br />
20<br />
17<br />
25<br />
13<br />
6,5<br />
18<br />
* 15°C 1013 –<br />
<br />
** P.C.S. = 50,37 /<br />
*** P.C.S. = 49,47 /<br />
P.C.S. = 37,78 / 3<br />
27
KZ<br />
<br />
<br />
<br />
.<br />
:<br />
1. <br />
.<br />
2. , <br />
, <br />
.<br />
3. <br />
.<br />
, <br />
<br />
.<br />
<br />
* (C)<br />
, <br />
<br />
,<br />
<br />
, <br />
, <br />
. <br />
. , <br />
, .<br />
! , ,<br />
1 <br />
.<br />
<br />
(X)* , <br />
<br />
2-3 , .<br />
•<br />
.<br />
<br />
<br />
<br />
.<br />
-, <br />
.<br />
! <br />
. <br />
<br />
<br />
. * <br />
.<br />
<br />
<br />
ø ()<br />
(R) 24 - 26<br />
<br />
(S)<br />
16 - 20<br />
(A) 10 - 14<br />
« <br />
» <br />
.<br />
! <br />
12 - <br />
<br />
.<br />
<br />
! <br />
, <br />
. <br />
, <br />
. <br />
<br />
.<br />
! <br />
<br />
.<br />
! ;<br />
. -<br />
1-<br />
.<br />
<br />
«F» <br />
( ),<br />
<br />
, « »<br />
<br />
.<br />
, 15 , ,<br />
, <br />
1 .<br />
! , <br />
6 ,<br />
.<br />
* .<br />
28
! , , <br />
1 .<br />
<br />
<br />
.<br />
«<br />
» (140°C) « » (250°C) <br />
. <br />
.<br />
Гриль<br />
<br />
, ,<br />
<br />
. <br />
, <br />
. 4- 5-<br />
<br />
1- .<br />
! , <br />
6 ,<br />
.<br />
! , , <br />
1 .<br />
! <br />
( )<br />
«D» , .<br />
Айналмалы істік*<br />
- <br />
( ) <br />
:<br />
1. 1-<br />
.<br />
2. - 4-<br />
, <br />
.<br />
3. « » <br />
.<br />
*<br />
<br />
.<br />
*<br />
<br />
- <br />
<br />
<br />
.<br />
<br />
<br />
( ).<br />
! ( ) <br />
.<br />
! <br />
.<br />
-<br />
- <br />
:<br />
a) 1- <br />
;<br />
b) 4- -<br />
, -<br />
<br />
, <br />
;<br />
c) - <br />
A<br />
S<br />
<br />
<br />
<br />
«» <br />
(<br />
).<br />
<br />
«S» <br />
(<br />
). <br />
«S» <br />
.<br />
! <br />
.<br />
KZ<br />
*<br />
:<br />
1. <br />
.<br />
2. <br />
.<br />
* .<br />
29
KZ<br />
<br />
() <br />
<br />
<br />
<br />
<br />
<br />
<br />
<br />
<br />
<br />
<br />
<br />
<br />
<br />
<br />
<br />
<br />
<br />
<br />
<br />
2.5<br />
2.5<br />
2.5<br />
1.5<br />
1.5<br />
1.8<br />
2.0<br />
2.1<br />
1.8<br />
1.1<br />
1.5<br />
1.0<br />
3<br />
3<br />
3<br />
3<br />
3<br />
3<br />
3<br />
3<br />
3<br />
<br />
(°C)<br />
200-210<br />
200<br />
200<br />
200-210<br />
210-220<br />
200<br />
200<br />
200<br />
200<br />
180-200<br />
180-200<br />
180-200<br />
<br />
<br />
<br />
()<br />
10<br />
10<br />
10<br />
10<br />
10<br />
10<br />
10<br />
10<br />
10<br />
10<br />
10<br />
10<br />
<br />
<br />
()<br />
75-85<br />
50-60<br />
50-60<br />
95-100<br />
90-100<br />
100-110<br />
70-80<br />
70-80<br />
100-105<br />
45-50<br />
45-55<br />
45-50<br />
<br />
1.0 4 210-220 15 20-25<br />
<br />
<br />
<br />
<br />
<br />
<br />
<br />
<br />
<br />
<br />
<br />
- <br />
<br />
<br />
- <br />
( )<br />
<br />
<br />
0.5<br />
1.1<br />
1.0<br />
1.0<br />
1<br />
1,5<br />
1<br />
1<br />
° 4<br />
1<br />
2<br />
1,0<br />
0,8<br />
4<br />
4<br />
4<br />
4<br />
4<br />
4<br />
3<br />
4<br />
4<br />
-<br />
-<br />
-<br />
-<br />
180<br />
180<br />
180<br />
170<br />
15<br />
15<br />
15<br />
15<br />
5<br />
5<br />
5<br />
5<br />
5<br />
5<br />
5<br />
5<br />
5<br />
25-35<br />
40-45<br />
50-55<br />
40-45<br />
15-20<br />
20<br />
20-30<br />
15-20<br />
4-5<br />
70-80<br />
70-80<br />
40-45<br />
25-30<br />
: . <br />
, .<br />
4<br />
4<br />
4<br />
* .<br />
30
! <br />
, .<br />
<br />
.<br />
<br />
• <br />
<br />
.<br />
• , <br />
.<br />
• , <br />
. <br />
.<br />
• <br />
, .<br />
• <br />
, <br />
. <br />
(, <br />
) .<br />
, <br />
<br />
.<br />
• 1- ()<br />
2- - 1- (2 <br />
) .<br />
• .<br />
• <br />
.<br />
• <br />
.<br />
• <br />
( <br />
) .<br />
• <br />
.<br />
• <br />
(, ..) .<br />
• <br />
. ,<br />
.<br />
• • <br />
.<br />
• <br />
, .<br />
• <br />
.<br />
• , <br />
. <br />
<br />
<br />
. .<br />
• .<br />
• , <br />
(<br />
), <br />
.<br />
, , <br />
<br />
<br />
.<br />
• .<br />
<br />
• : <br />
<br />
.<br />
• <br />
(WEEE) 2002/96/EC <br />
<br />
<br />
. <br />
, <br />
<br />
<br />
. <br />
<br />
.<br />
<br />
, <br />
, <br />
, <br />
<br />
.<br />
<br />
<br />
<br />
.<br />
<br />
• <br />
<br />
<br />
.<br />
• , <br />
, <br />
, <br />
.<br />
KZ<br />
31
02/2013 - 1950<strong>86306</strong>.08<br />
XEROX FABRIANO<br />
KZ<br />
<br />
<br />
.<br />
<br />
! , , <br />
<br />
<br />
. <br />
.<br />
! <br />
.<br />
• , , <br />
.<br />
• <br />
<br />
, .<br />
<br />
. <br />
, . <br />
.<br />
• , , <br />
<br />
; <br />
, <br />
.<br />
• <br />
,<br />
<br />
.<br />
• <br />
. <br />
, ,<br />
. <br />
.<br />
• <br />
, <br />
. <br />
, <br />
, .<br />
• - <br />
, <br />
.<br />
• <br />
<br />
<br />
. ,<br />
. -, <br />
.<br />
<br />
<br />
, <br />
<br />
. <br />
.<br />
<br />
<br />
<br />
. <br />
, <br />
<br />
( ).<br />
! <br />
.<br />
<br />
.<br />
, <br />
<br />
. <br />
.<br />
<br />
, <br />
. ,<br />
.<br />
! <br />
.<br />
<br />
<br />
<br />
1. <br />
<br />
<br />
( ).<br />
2. , <br />
:<br />
230 , 25 ,<br />
E 14.<br />
3. , .<br />
<br />
:<br />
• (.).<br />
• (/).<br />
<br />
.<br />
32