Robosapien?V2 manually - WowWee
Robosapien?V2 manually - WowWee
Robosapien?V2 manually - WowWee

You also want an ePaper? Increase the reach of your titles
YUMPU automatically turns print PDFs into web optimized ePapers that Google loves.
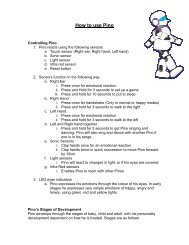
Battery Information<br />
Battery Requirements:<br />
ROBOSAPIEN<strong>V2</strong> BODY AND BRAIN<br />
Your <strong>Robosapien</strong><strong>V2</strong> is powered by 6 x “D” size batteries (not<br />
included) and 4 x “AAA” size batteries (not included). Alkaline<br />
batteries are recommended.<br />
ROBOSAPIEN<strong>V2</strong> CONTROLLER<br />
Your <strong>Robosapien</strong><strong>V2</strong> remote controller is powered by 3 x “AAA” size<br />
batteries (not included). Alkaline batteries are recommended.<br />
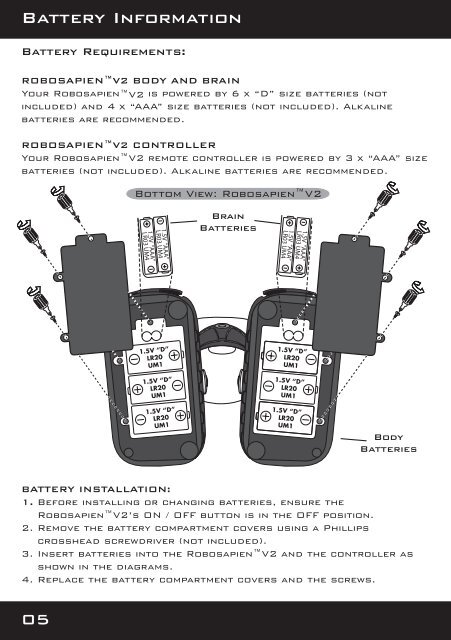
Bottom View: <strong>Robosapien</strong><strong>V2</strong><br />
Brain<br />
Batteries<br />
1.5V “AAA”<br />
LR03 UM4<br />
1.5V “AAA”<br />
LR03 UM4<br />
1.5V “AAA”<br />
LR03 UM4<br />
1.5V “AAA”<br />
LR03 UM4<br />
1.5V “D”<br />
LR20<br />
UM1<br />
1.5V “D”<br />
LR20<br />
UM1<br />
1.5V “D”<br />
LR20<br />
UM1<br />
1.5V “D”<br />
LR20<br />
UM1<br />
1.5V “D”<br />
LR20<br />
UM1<br />
1.5V “D”<br />
LR20<br />
UM1<br />
Body<br />
Batteries<br />
BATTERY INSTALLATION:<br />
1. Before installing or changing batteries, ensure the<br />
<strong>Robosapien</strong><strong>V2</strong>’s ON / OFF button is in the OFF position.<br />
2. Remove the battery compartment covers using a Phillips<br />
crosshead screwdriver (not included).<br />
3. Insert batteries into the <strong>Robosapien</strong><strong>V2</strong> and the controller as<br />
shown in the diagrams.<br />
4. Replace the battery compartment covers and the screws.<br />
05