
Create successful ePaper yourself
Turn your PDF publications into a flip-book with our unique Google optimized e-Paper software.
GRUNDFOS PRODUCT GUIDE<br />
<strong>Grundfos</strong> E-<strong>pumps</strong><br />
Pumps with integrated variable frequency drive
<strong>Grundfos</strong> E-<strong>pumps</strong><br />
Table of contents<br />
1. Introduction to E-<strong>pumps</strong> 3<br />
General introduction 3<br />
2. Product overview 4<br />
<strong>Grundfos</strong> E-<strong>pumps</strong> range 4<br />
4<br />
Functions 9<br />
Speed control of E-<strong>pumps</strong> 12<br />
Applications 15<br />
3. E-<strong>pumps</strong> 20<br />
Introduction 20<br />
CRE, CRIE, CRNE and<br />
CRE-H, CRNE-H <strong>pumps</strong> 20<br />
MTRE, SPKE, CRKE <strong>pumps</strong> 21<br />
CME <strong>pumps</strong> 21<br />
Overview of functions 22<br />
Modes 24<br />
Control modes 24<br />
Setting up the pump 25<br />
Setting via the control panel 25<br />
Setting via the R100 26<br />
Setting via the PC Tool E-products 37<br />
Priority of settings 37<br />
External forced-control signals 38<br />
External setpoint signal 39<br />
Bus signal 39<br />
Other bus standards 39<br />
Indicator lights and signal relay 40<br />
Insulation resistance 42<br />
Further product documentation 42<br />
11. MLE technical data 75<br />
MLE single phase motors 76<br />
MLE three phase motors 1 - 10 Hp 77<br />
MLE three phase motors 15 - 30 Hp 78<br />
MLE motors for CRE-H and CRNE-H 79<br />
MLE technical data 80<br />
12. Accessories 82<br />
Overview of accessories 82<br />
Remote control, R100 83<br />
Potentiometer 83<br />
Pressure sensor 84<br />
<strong>Grundfos</strong> differential-pressure sensor, DPI 85<br />
CIU communication interface units 87<br />
CIM communication interface modules 87<br />
LiqTec 88<br />
13. Further product documentation 91<br />
WebCAPS 91<br />
WinCAPS 92<br />
4. Single-phase MLE motors 43<br />
E-<strong>pumps</strong> with single-phase MLE motors 43<br />
5. Three-phase MLE motors 46<br />
E-<strong>pumps</strong> with three-phase MLE motors 46<br />
6. EMC 52<br />
EMC and proper installation 52<br />
7. E-<strong>pumps</strong> in parallel 55<br />
Control of E-<strong>pumps</strong> connected in parallel 55<br />
8. Bus communication 57<br />
Bus communication with E-<strong>pumps</strong> 57<br />
9. Frequency-controlled operation 61<br />
Variable frequency drive, function and design 61<br />
10. Advanced use of MLE motors 66<br />
Introduction 66<br />
Bearing monitoring 66<br />
Standstill heating 67<br />
Stop function 67<br />
Temperature sensors 1 and 2 69<br />
Signal relays 70<br />
Analog sensor inputs 1 and 2 71<br />
Limit exceeded 1 and 2 72<br />
Pump operating at power limit 73<br />
2
<strong>Grundfos</strong> E-<strong>pumps</strong><br />
1<br />
1. Introduction to E-<strong>pumps</strong><br />
General introduction<br />
This product guide deals with <strong>Grundfos</strong> <strong>pumps</strong> fitted<br />
with <strong>Grundfos</strong> MLE motors, 1/2 to 30 Hp<br />
(0.37 - 22 kW). These motors are standard<br />
asynchronous motors with integrated variable<br />
frequency drive (VFD) and controller. In some cases,<br />
the <strong>pumps</strong> have a factory-fitted sensor.<br />
These <strong>pumps</strong> are referred to as E-<strong>pumps</strong>.<br />
For information about E-<strong>pumps</strong> with a higher shaft<br />
power output, see our CUE range of VFDs,<br />
30 to 300 Hp (22-250 kW).<br />
In new installations, the E-<strong>pumps</strong> provide a number of<br />
advantages. The integrated variable frequency drive<br />
has a built-in motor protection function which protects<br />
both motor and electronics against overload. This<br />
means that E-pump installations do not require a motor<br />
starter, but only a normal short-circuit protection for the<br />
cable.<br />
Setpoint<br />
PI<br />
controller Controller<br />
Introduction to E-<strong>pumps</strong><br />
Variable Freq.<br />
frequency<br />
conv.<br />
drive<br />
M<br />
Fig. 2<br />
Components of a <strong>Grundfos</strong> E-pump<br />
TM05 2979 0812<br />
TM03 0431 5104<br />
Fig. 1<br />
<strong>Grundfos</strong> E-<strong>pumps</strong><br />
An E-pump is not just a pump, but a system which is<br />
able to solve application problems or save energy in<br />
a variety of pump installations. All that is required, is<br />
the power supply connection and the fitting of the<br />
E-pump in the pipe system, and the pump is ready for<br />
operation.<br />
The pump has been tested and pre-configured from<br />
the factory. The operator only has to specify the<br />
desired setpoint (pressure) and the system is<br />
operational.<br />
3
2<br />
<strong>Grundfos</strong> E-<strong>pumps</strong><br />
Product overview<br />
2. Product overview<br />
<strong>Grundfos</strong> E-<strong>pumps</strong> range<br />
<strong>Grundfos</strong> E-<strong>pumps</strong> are available in three different<br />
functional groups:<br />
• Multistage CRE, CRIE, CRNE <strong>pumps</strong> with pressure<br />
sensor.<br />
Multistage CRE, CRIE, CRNE, MTRE, SPKE,<br />
CRKE, CME <strong>pumps</strong> without sensor.<br />
• Single-stage TPE Series 1000 <strong>pumps</strong><br />
without sensor.<br />
• Single-stage TPE Series 2000 <strong>pumps</strong> with<br />
integrated differential-pressure sensor.<br />
As standard, TPE Series 2000 <strong>pumps</strong> are supplied<br />
with a differential-pressure sensor enabling the control<br />
of the differential pressure across the pump.<br />
CRE, CRIE, CRNE <strong>pumps</strong> are available with a<br />
pressure sensor enabling the control of the pressure<br />
on the discharge side of the pump.*<br />
The purpose of supplying the E-<strong>pumps</strong> with a<br />
differential-pressure sensor or pressure sensor is to<br />
make the installation and commissioning simple and<br />
quick. All other E-<strong>pumps</strong> are supplied without sensor.<br />
E-<strong>pumps</strong> without sensor are used when uncontrolled<br />
operation (open loop) is required or when there is a<br />
wish to fit a sensor at a later stage in order to enable:<br />
• Pressure control<br />
• flow control<br />
• level control of liquid in a tank<br />
• temperature control<br />
• differential pressure control<br />
• differential temperature control.<br />
* E-<strong>pumps</strong> without sensor are also used when a<br />
remote analog signal is connected to the setpoint input<br />
terminal.<br />
H<br />
Hset<br />
H<br />
2 set<br />
Proportional<br />
pressure<br />
Fig. 3<br />
Fig. 4<br />
H<br />
Fig. 5<br />
TPE Series 2000 with differential-pressure sensor<br />
H<br />
Hset<br />
Q<br />
Constant<br />
pressure<br />
H<br />
Hset<br />
CRE, CRIE, CRNE with sensor<br />
Qset<br />
Constant flow<br />
Constant<br />
pressure<br />
Q<br />
E-<strong>pumps</strong> without sensor<br />
Q<br />
H<br />
H<br />
Q<br />
H<br />
Q<br />
Constant curve<br />
Q<br />
Constant curve<br />
Constant curve<br />
Q<br />
TM00 7630 1596<br />
TM00 7668 1696<br />
TM01 0684 0808<br />
4
<strong>Grundfos</strong> E-<strong>pumps</strong><br />
2<br />
Product range, CRE<br />
Range CRE 1s CRE 1 CRE 3 CRE 5 CRE 10 CRE 15 CRE 20<br />
Nominal flow rate [US gpm (m 3 h)] 4.5 (1.0) 8.5 (1.9) 15 (3.4) 30 (6.8) 55 (12.5) 95 (21.6) 110 (25.0)<br />
Temperature range [°F (°C)] –4 to +250 (–20 to +121)<br />
Temperature range [°F (°C)] – on request –40 to +356 (–40 to +180)<br />
Max. working pressure [psi (bar)] 362 (25)<br />
Max. pump efficiency [%] 35 49 59 67 70 72 72<br />
Flow range [US gpm (m 3 h)]<br />
0 - 5.7<br />
(0 - 1.3)<br />
0 - 12.8<br />
(0 - 2.9)<br />
0 - 23.8<br />
(0 - 5.4)<br />
0 - 45<br />
(0 - 10.2)<br />
0 - 70<br />
(0 - 15.9)<br />
0 - 125<br />
(0 - 28.4)<br />
Max. pump pressure (H [ft (m)]) 760 (230) 790 (240) 790 (240) 780 (237) 865 (263) 800 (243) 700 (213)<br />
Motor power [Hp] 0.33 - 2 .33 - 3 .33 - 5 .75 - 7.5 .75 - 15 2 - 25 3 - 25<br />
Version<br />
CRE: Cast iron and stainless steel AISI 304 • • • • • • •<br />
CRIE: Stainless steel AISI 304 • • • • • • •<br />
CRNE: Stainless steel AISI 316 • • • • • • •<br />
CRTE: Titanium - - (CRTE 2) (CRTE 4) (CRTE 8) (CRTE 16) -<br />
0-155<br />
(35.2)<br />
Product overview<br />
Range CRE 32 CRE 45 CRE 64 CRE 90 CRE 120 CRE 150<br />
Nominal flow rate [US gpm (m 3 h)] 140 (32) 220 (50) 340 (77) 440 (100) 610 (139) 750 (170)<br />
Temperature range [°F (°C)] –22 to +250 (–30 to +121) 1) –22 to +250 (–30 to +121) 1) & 2)<br />
Temperature range [°F (°C)] – on request –40 to +356 (–40 to +180) - -<br />
Max. working pressure [psi (bar)] 435 (30)<br />
Max. pump efficiency [%] 76 78 79 80 75 73<br />
Flow range [US gpm]<br />
14 - 210<br />
(3.2 - 47.7)<br />
22 - 310<br />
(5.0 - 70.0)<br />
34 - 450<br />
(7.7 - 102.2)<br />
44 - 630<br />
(10.0 - 143.1)<br />
61 - 700<br />
(13.9 - 159.0)<br />
75 - 790<br />
(17.0 - 179.4)<br />
Max. pump pressure (H [ft (m)]) 720 (220) 490 (149) 330 (101) 230 (70) 140 (43) 150 (15)<br />
Motor power [Hp] 5 - 30 7.5 - 30 10 - 30 15 - 30 20 - 25 25 - 30<br />
Version<br />
CRE: Cast iron and stainless steel AISI 304 • • • • • •<br />
CRIE: Stainless steel AISI 304 - - - - - -<br />
CRNE: Stainless steel AISI 316 • • • • • •<br />
CRTE: Titanium - - - - - -<br />
• Available<br />
1) CRN 32 to CRN 90 with HQQE shaft seal: –4 to +250 °F (–20 to +121 °C)<br />
2) CR, CRN 120 and 150 with 75 or 100 Hp motors with HBQE shaft seal: 0 °F to +250 °F (–17 to +121 °C)<br />
5
2<br />
<strong>Grundfos</strong> E-<strong>pumps</strong><br />
Product overview<br />
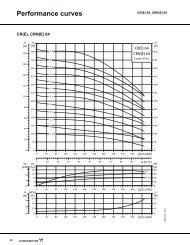
Performance range, CRE, CRIE, CRNE<br />
H<br />
[m]<br />
300<br />
200<br />
H<br />
[ft]<br />
1000<br />
800<br />
600<br />
CRE<br />
60 Hz<br />
100<br />
80<br />
60<br />
50<br />
40<br />
30<br />
20<br />
10<br />
400<br />
300<br />
200<br />
100<br />
80<br />
60<br />
40<br />
30<br />
CRE 1s<br />
CRIE 1s<br />
CRNE 1s<br />
CRE 1<br />
CRIE 1<br />
CRNE 1<br />
CRE 3<br />
CRIE 3<br />
CRNE 3<br />
CRE 5<br />
CRIE 5<br />
CRNE 5<br />
CRE 10<br />
CRIE 10<br />
CRNE 10<br />
CRE 15<br />
CRIE 15<br />
CRNE 15<br />
CRE 20<br />
CRIE 20<br />
CRNE 20<br />
CRE 32<br />
CRE 64<br />
CRNE<br />
CRNE<br />
32 64<br />
CRE 120<br />
CRNE 120<br />
CRE 45<br />
CRE 90<br />
CRNE<br />
CRNE<br />
45 90<br />
CRE 150<br />
CRNE 150<br />
20<br />
Eff<br />
[%]<br />
80<br />
2 4 6 8 10 20 40 60 80 100 200 400 600 8001000<br />
Q [US GPM]<br />
1 2 3 4 5 6 7 8 910<br />
20 30 40 50 60 7080 100 Q [m³/h]<br />
60<br />
40<br />
20<br />
0<br />
2 4 6 8 10 20 40 60 80 100 200 400 600 8001000<br />
Q [US GPM]<br />
TM05 1598 3411<br />
6
<strong>Grundfos</strong> E-<strong>pumps</strong><br />
2<br />
Product range, MTRE<br />
Range MTRE 1s MTRE 1 MTRE 3 MTRE 5 MTRE 10 MTRE 15 MTRE 20 MTRE 32 MTRE 45 MTRE 64<br />
Nominal flow rate [US gpm (m 3 h)] 4.4 (1.0) 8.5 (1.9) 15 (3.4) 30 (6.8) 55 (12.5) 95 (21.6) 110 (25.0) 140 (31.8) 220 (50.0) 340 (77.2)<br />
Temperature range [°F (°C)] +14 to +194 °F (–10 to +90)<br />
Max. pump efficiency [%] 35 49 59 67 70 72 72 76 78 79<br />
Flow range [US gpm (m 3 h)]<br />
Maximum head (H [ft (m)]<br />
0 - 7<br />
(0 - 1.6)<br />
760<br />
(231)<br />
0 - 12.8<br />
(0 - 2.9)<br />
795<br />
(242)<br />
0 - 23.8<br />
(0 - 5.4)<br />
820<br />
(250)<br />
0 - 45<br />
(0 - 10.2)<br />
780<br />
(238)<br />
0 - 68<br />
(0 - 15.4)<br />
835<br />
(255)<br />
0 - 125<br />
(0 - 28.4)<br />
800<br />
(244)<br />
0 - 155<br />
(0 - 35.2)<br />
700<br />
(213)<br />
0 - 210<br />
(0 - 47.7)<br />
630<br />
(192)<br />
0 - 310<br />
(0 - 70.4)<br />
470<br />
(143)<br />
0 - 450<br />
(0 - 102.2)<br />
Motor power [Hp] 0.33 - 2 0.33 - 3 0.5 - 5 0.75 - 7.5 1 - 15 2 - 25 3 - 25 5 - 30 7.5 - 30 10 - 30<br />
320<br />
(98)<br />
Product overview<br />
Performance range, MTRE<br />
H<br />
[m]<br />
300<br />
200<br />
100<br />
90<br />
80<br />
70<br />
60<br />
50<br />
40<br />
31<br />
H<br />
[ft]<br />
1000<br />
800<br />
600<br />
500<br />
400<br />
300<br />
200<br />
100<br />
Eff<br />
[%]<br />
80<br />
60<br />
40<br />
MTRE<br />
60 Hz<br />
MTRE 1s MTRE 1 MTRE 3 MTRE 5 MTRE 10 MTRE 15 MTRE 20 MTRE 32 MTRE 45 MTRE 64<br />
2 3 4 5 6 8 10 15 20 30 40 50 60 80 100 150 200 300 400 500<br />
Q [US GPM]<br />
1 2 3 4 5 6 7 8 9 10 20 30 40 50 60 Q [m³/h]<br />
20<br />
0<br />
2 3 4 5 6 8 10 15 20 30 40 50 60 80 100 150 200 300 400 500<br />
Q [US GPM]<br />
TM03 4251 3211<br />
7
2<br />
<strong>Grundfos</strong> E-<strong>pumps</strong><br />
Product overview<br />
Product range, TPE<br />
Range TPE 32 TPE 40 TPE 50 TPE 80 TPE 100<br />
Nominal flow rate [US gpm (m 3 h)] 31 - 39 (7.0 - 8.9) 45 - 64 (10.2 - 14.5) 70 - 100 (15.9 - 22.7) 120 - 154 (27.3 - 35.0) 178 - 242 (40.4 - 55.0)<br />
Temperature range [°F (°C)] +32 to +284 °F (0 to +140)<br />
Max. pump efficiency [%] 68 71 74 78 80<br />
Flow range [US gpm (m 3 h)] 0 - 70 (0 - 15.9) 0 - 100 (0 - 22.7) 0 - 150 (0 - 34.1) 0 - 240 (0 - 54.5) 0 - 300 (0 - 68.1)<br />
Maximum pressure (H [ft (m)] 47 (14.3) 63 (19.2) 63 (19.2) 67.5 (20.6) 49 (14.9)<br />
Motor power [Hp] 0.33 - .75 0.33 - 1.5 0.33 - 2 0.5 - 3 1 - 3<br />
Performance range, TPE<br />
H<br />
[m]<br />
20<br />
18<br />
16<br />
14<br />
12<br />
H<br />
[ft]<br />
70<br />
65<br />
60<br />
55<br />
50<br />
45<br />
40<br />
TPE<br />
60 Hz<br />
10<br />
35<br />
30<br />
8<br />
6<br />
25<br />
20<br />
TPE 32<br />
TPE 40<br />
TPE 50<br />
TPE 80<br />
TPE 100<br />
4<br />
15<br />
10<br />
2<br />
5<br />
0<br />
0<br />
0 20 40 60 80 100 120 140 160 180 200 220 240 260 280 300 320<br />
Q [US GPM]<br />
0 10 20 30 40 50 60 Q [m³/h]<br />
TM05 1595 3211<br />
8
<strong>Grundfos</strong> E-<strong>pumps</strong><br />
2<br />
Functions<br />
The functions of the E-<strong>pumps</strong> depend on pump type<br />
and whether the pump is supplied with or without<br />
sensor.<br />
The difference in functions is seen in the settings<br />
offered via the R100 remote control. As described<br />
later, the menu structure of the R100 depends on the<br />
E-pump type in question.<br />
The tables on the following pages show which<br />
functions are available for the different E-pump types.<br />
CRE, CRIE, CRNE with sensor and all multistage<br />
<strong>pumps</strong> without sensor have the same menu structure<br />
in the R100.<br />
All single-stage <strong>pumps</strong>, such as the TPE Series 1000<br />
and the TPE Series 2000, have a different menu<br />
structure.<br />
The result is two totally different menu structures for<br />
the complete E-<strong>pumps</strong> range.<br />
Product overview<br />
9
2<br />
<strong>Grundfos</strong> E-<strong>pumps</strong><br />
Product overview<br />
Overview of functions<br />
E-pump functions<br />
CRE, CRIE, CRNE<br />
with sensor<br />
CRE, CRIE, CRNE,<br />
SPKE, CRKE, MTRE,<br />
CME<br />
without sensor<br />
E-pump type<br />
TPE<br />
Series 1000<br />
without sensor<br />
TPE<br />
Series 2000<br />
with sensor<br />
Singlephase<br />
Threephase<br />
Singlephase<br />
Threephase<br />
Singlephase<br />
Threephase<br />
Singlephase<br />
Threephase<br />
Motor sizes [Hp] .5 - 1.5 1 - 30 .5 - 1.5 1 - 30 .33 - 1.5 .75 - 30 .33 - 1.5 .75 - 30<br />
Setting via control panel<br />
Setpoint ● ● ● ● ● ● ● ●<br />
Start/stop ● ● ● ● ● ● ● ●<br />
Max. curve ● ● ● ● ● ● ● ●<br />
Min. curve ● ● ● ● ● ● ● ●<br />
Alarm reset ● ● ● ● ● ● ● ●<br />
Constant or proportional pressure ● ●<br />
Reading via control panel<br />
Setpoint ● ● ● ● ● ● ● ●<br />
Operating indication ● ● ● ● ● ● ● ●<br />
Fault indication ● ● ● ● ● ● ● ●<br />
Setting via the R100<br />
Setpoint ● ● ● ● ● ● ● ●<br />
Start/stop ● ● ● ● ● ● ● ●<br />
Max. curve ● ● ● ● ● ● ● ●<br />
Min. curve ● ● ● ● ● ● ● ●<br />
Alarm reset ● ● ● ● ● ● ● ●<br />
Warning reset ● ● ● ●<br />
Controlled or uncontrolled ● ● ● ● ● ●<br />
Constant pressure, proportional<br />
pressure or constant curve<br />
●<br />
●<br />
Controller constants, K p , T i ● ● ● ● ●<br />
External setpoint signal ● ● ● ● ● ● ● ●<br />
Signal relay 1 ● ● ● ● ● ● ● ●<br />
Signal relay 2 ● 2) ● 2) ● 2) ● 2)<br />
Buttons on pump ● ● ● ● ● ● ● ●<br />
Pump number (for bus communication) ● ● ● ● ● ● ● ●<br />
Digital input ● ● ● ● ● ● ● ●<br />
Stop function ● ● ● ●<br />
Flow limit ● ●<br />
Sensor range and signal ● 1) ● 1) ● ● ● ●<br />
Duty/standby ● ● ● ●<br />
Operating range (min./max. speed) ● ● ● ● ● ●<br />
Motor bearing monitoring ● ● ● ●<br />
Motor bearings changed or lubricated ● 3) ● 3) ● 3) ● 3)<br />
Standstill heating ● ● ● ●<br />
Reading via the R100<br />
Setpoint ● ● ● ● ● ● ● ●<br />
Operating mode ● ● ● ● ● ● ● ●<br />
Actual sensor value ● ● ● ● ● ● ● ●<br />
Pump speed ● ● ● ● ● ● ● ●<br />
Power input ● ● ● ● ● ● ● ●<br />
Power consumption ● ● ● ● ● ● ● ●<br />
Operating hours ● ● ● ● ● ● ● ●<br />
Lubrication status (bearings) ● 2) ● 2) ● 2) ● 2)<br />
Replacement status (bearings) ● ● ● ●<br />
● Available<br />
1) Sensor-fitted<br />
2) Only 15 - 30 Hp<br />
3) Lubricated only 15 - 30 Hp<br />
10
<strong>Grundfos</strong> E-<strong>pumps</strong><br />
2<br />
E-pump functions<br />
CRE, CRIE, CRNE<br />
with sensor<br />
CRE, CRIE, CRNE,<br />
SPKE, CRKE, MTRE,<br />
CME<br />
without sensor<br />
E-pump type<br />
TPE<br />
Series 1000<br />
without sensor<br />
TPE<br />
Series 2000<br />
with sensor<br />
Setting via GENIbus<br />
Setpoint ● ● ● ● ● ● ● ●<br />
Start/stop ● ● ● ● ● ● ● ●<br />
Max. curve ● ● ● ● ● ● ● ●<br />
Min. curve ● ● ● ● ● ● ● ●<br />
Controlled or uncontrolled ● ● ● ● ● ●<br />
Constant pressure, proportional pressure<br />
or constant curve<br />
●<br />
●<br />
Reading via GENIbus<br />
Setpoint ● ● ● ● ● ● ● ●<br />
Operating indication ● ● ● ● ● ● ● ●<br />
Singlephase<br />
Threephase<br />
Singlephase<br />
Threephase<br />
Singlephase<br />
Threephase<br />
Singlephase<br />
Threephase<br />
Motor sizes [Hp] .5 - 1.5 1 - 30 .5 - 1.5 1 - 30 .33 - 1.5 .75 - 30 .33 - 1.5 .75 - 30<br />
Product overview<br />
Pump status ● ● ● ● ● ● ● ●<br />
Setting via external signal<br />
Setpoint ● ● ● ● ● ● ● ●<br />
Start/stop ● ● ● ● ● ● ● ●<br />
Min./max. curve via digital input ● ● ● ●<br />
Min./max. curve, external fault, flow<br />
switch via digital input<br />
● ● ● ●<br />
Reading via external signal<br />
Fault signal (relay)<br />
●<br />
Fault, Operation or Ready signal (relay) ● ● ●<br />
Fault, Operation, Ready, Pump running,<br />
Bearing lubrication, Warning, Limit<br />
exceeded 1 and 2<br />
● ● ● ●<br />
Twin-pump function ● ●<br />
● Available<br />
1) Sensor-fitted<br />
2) Only 15 - 30 Hp<br />
3) Lubricated only 15 - 30 Hp<br />
11
2<br />
<strong>Grundfos</strong> E-<strong>pumps</strong><br />
Product overview<br />
Speed control of E-<strong>pumps</strong><br />
Adjustment of pump performance is a must in many<br />
applications today. No doubt the best performance<br />
adjustment is achieved by means of a variable<br />
frequency drive (VFD) as this gives the following<br />
advantages:<br />
• large energy savings<br />
• enhanced comfort<br />
• longer life for systems as well as for individual<br />
components<br />
• no appreciable loss of efficiency<br />
• reduced water hammer<br />
• fewer starts/stops.<br />
A <strong>Grundfos</strong> E-pump is a good choice when<br />
performance adjustment is required.<br />
This section describes what happens to the<br />
performance and energy consumption of an E-pump<br />
when its speed is controlled by means of a VFD.<br />
The description includes the following:<br />
• presentation of affinity equations<br />
• presentation of the performance curves of<br />
speed-controlled <strong>pumps</strong><br />
• presentation of the system characteristics of closed<br />
as well as open systems.<br />
Affinity equations<br />
The following affinity equations apply with close<br />
approximation to the change of speed of centrifugal<br />
<strong>pumps</strong>:<br />
Q<br />
--------- n<br />
Q x<br />
<br />
n<br />
-------- n<br />
n x<br />
H<br />
--------- n<br />
H x<br />
n n<br />
------<br />
n x<br />
2<br />
<br />
<br />
<br />
P n<br />
------<br />
P x<br />
n n 3<br />
------<br />
<br />
n x <br />
H = head in feet<br />
Q = flow rate in gpm<br />
P = input power in Hp<br />
n = speed.<br />
Q x , H x and P x are the appropriate variables for the<br />
speed n x . The approximated formulas apply on<br />
condition that the system characteristic remains<br />
unchanged for n n and n x and that it is based on this<br />
formula<br />
H = k x Q 2<br />
k = a constant, i.e. a parabola through 0.0 as appears<br />
from fig. 6.<br />
The power equation furthermore implies that the pump<br />
efficiency is unchanged at the two speeds. In practice,<br />
this is not quite correct. Finally, it is worth noting that<br />
the efficiencies of the VFD and the motor must also be<br />
taken into account if a precise calculation of the power<br />
saving resulting from a reduction of the pump speed is<br />
desired.<br />
<br />
H<br />
Eta<br />
Fig. 6<br />
P<br />
n n<br />
n x<br />
Affinity equations<br />
Q<br />
------ n<br />
Q x<br />
H<br />
------ n<br />
H x<br />
From the formulas it appears that the pump flow (Q) is<br />
proportional to the pump speed (n). The head (H) is<br />
proportional to the square of the speed (n) whereas<br />
the power (P) is proportional to the third power of the<br />
speed.<br />
In practice, a reduction of the speed will result in a<br />
slight fall in efficiency. But this does not change the<br />
fact that there are often large power savings involved<br />
in controlling pump speed.<br />
The formula for the calculation of the efficiency () is:<br />
When used, the formula gives good approximation for<br />
speeds down to 40 % of maximum speed.<br />
n x<br />
n x<br />
n n 0.1<br />
x<br />
= 1–<br />
1–<br />
n<br />
<br />
------<br />
<br />
n x <br />
n n<br />
n<br />
x<br />
P n<br />
------<br />
P x<br />
=<br />
Q<br />
Q<br />
Q<br />
n n<br />
-----<br />
n x<br />
n n<br />
-----<br />
2<br />
=<br />
<br />
----- = 1<br />
n n<br />
n x<br />
n n<br />
-----<br />
3<br />
=<br />
<br />
n x<br />
TM00 8720 3496<br />
12
<strong>Grundfos</strong> E-<strong>pumps</strong><br />
2<br />
Performance curves of speed-controlled<br />
<strong>pumps</strong><br />
Performance curves<br />
The curve chart below shows a CRE 15-3. The top part<br />
of the chart shows the QH performance curves at<br />
different speeds. Curves for speeds between 100 %<br />
and 40 % are included at 10 % intervals. Finally, a<br />
minimum curve at 25 % is shown.<br />
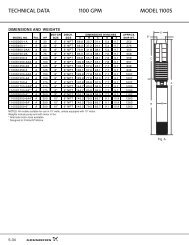
The bottom part of the chart shows P1 (input power<br />
from the power supply). NPSH for the pump at<br />
maximum speed is shown in the same diagram.<br />
eta [%]<br />
90%<br />
80%<br />
70%<br />
60%<br />
50%<br />
40%<br />
30%<br />
20%<br />
10%<br />
0%<br />
0<br />
100%<br />
80%<br />
60%<br />
60% 80% 100%<br />
100%<br />
80%<br />
60%<br />
1.0 2.0 3.0 4.0 5.0 6.0 Q [gpm]<br />
0 5 10 15 20 25 30 Q [m3/h]<br />
}<br />
}<br />
}<br />
η MLE<br />
η P<br />
η TOT<br />
TM05 0878 1811<br />
Product overview<br />
Fig. 9<br />
Efficiency curves for MLE, pump and complete<br />
E-pump at 100 %, 80 % and 60 % speed<br />
Fig. 7 Performance curve of a CRE 15-3<br />
Efficiency<br />
The total efficiency of the E-pump η total is calculated by<br />
multiplying the efficiency of the MLE with the pump<br />
efficiency.<br />
Fig. 8<br />
P 1 P 2<br />
MLE<br />
η MLE<br />
P 1 = input power, MLE motor<br />
P 2 = input power, pump<br />
P H = hydraulic power<br />
η pump<br />
Efficiency of an E-pump<br />
The efficiency of the MLE motor depends on the size of<br />
the motor, the speed and the load of the shaft.<br />
Firstly, the efficiency of the pump depends on the flow<br />
Q, and secondly the speed of the pump.<br />
P H<br />
TM03 0433 5104<br />
TM00 8720 4996<br />
Figure 9 shows the efficiency of the MLE and the pump<br />
part and finally the resulting efficiency of a CRE 15-3<br />
with a 4 Hp (3 kW) MLE motor. The curves are drawn<br />
as a function of flow Q and for three different speed<br />
values: 100 %, 80 % and 60 %.<br />
Assuming the situation shown in fig. 9, with a duty<br />
point at 100 % speed equal to Q = 76.6 gpm<br />
(17.4 m 3 /h) and H = 105 ft (32 m), the change in<br />
efficiency at 80 and 60 % speed is shown in the<br />
following table:<br />
Speed<br />
[%]<br />
100<br />
80<br />
60<br />
Q H P 1 P 2 P H η P η MLE η TOT<br />
[gpm<br />
(m 3 /h)]<br />
76.6<br />
(17.4)<br />
61.6<br />
(14)<br />
46.2<br />
(10.5)<br />
[ft<br />
(m)]<br />
105<br />
(32)<br />
69<br />
(21.1)<br />
39<br />
(12)<br />
[kW] [kW] [kW] [%] [%] [%]<br />
3.55<br />
(2.65)<br />
1.97<br />
(1.47)<br />
0.89<br />
(0.66)<br />
2.86<br />
(2.13)<br />
1.53<br />
(1.14)<br />
0.66<br />
(0.49)<br />
2.02<br />
(1.51)<br />
1.07<br />
(0.8)<br />
0.46<br />
(0.34)<br />
71.1 80.4 57.2<br />
70.5 77.6 54.7<br />
70.4 73.8 51.9<br />
The pump efficiency η P is reduced from 71.1 % to<br />
70.4 %, meaning less than one % point drop in<br />
efficiency.<br />
Due to the big drop in speed and shaft load, the<br />
efficiency of the MLE is reduced in the range of 7 %<br />
points resulting in an overall reduction of E-pump<br />
efficiency equal to 5.3 % points.<br />
Efficiency is important, but what counts is the power<br />
consumption as it directly influences the energy costs.<br />
As appears from the table above, the power<br />
consumption P 1 drops from 3.55 Hp to 0.89 Hp<br />
(2.65 kW to 0.66 kW) which is a 75 % reduction.<br />
The conclusion is that the speed reduction is the most<br />
important factor with regard to energy saving, and that<br />
the drop in efficiency will only have minor influence on<br />
the possible savings achieved through speed control.<br />
13
2<br />
<strong>Grundfos</strong> E-<strong>pumps</strong><br />
Product overview<br />
System characteristics<br />
The characteristic of a system indicates the head<br />
required of a pump to circulate a given quantity of<br />
water through the system. In the following, distinction<br />
is made between closed and open systems.<br />
Closed systems (circulation systems)<br />
In a closed system, the liquid is flowing round in a<br />
closed circuit such as a radiator system. On condition<br />
that the system is fully vented and closed, the pump in<br />
a closed system does not have to overcome any static<br />
pressure.<br />
Head = friction loss in the entire closed system.<br />
In a closed system, the system characteristic will be a<br />
parabola through the Q/H-point 0.0. The curve shows<br />
that the friction loss in the system increases squarely<br />
with the circulated quantity of water.<br />
The system characteristic will normally start in a point<br />
on the H-axis corresponding to the level difference.<br />
When this point has been reached, the characteristic<br />
will follow the line of a quadratic parabola:<br />
"k" represents the resistance in the system (pipes, fittings,<br />
valves, etc.).<br />
H<br />
H = H 0<br />
+ k<br />
Q 2<br />
H = k<br />
Q 2<br />
The variable "k" is a constant. The higher "k" is, the<br />
steeper the parabola will be, and vice versa. The lower<br />
"k" is, the flatter the parabola will be. "k" is determined<br />
by valve position and friction loss.<br />
Figure 10 shows system characteristics in a closed<br />
system (circulation system).<br />
H 0<br />
H 0<br />
Q<br />
H<br />
TM00 8725 3496<br />
Q<br />
TM00 8724 3496<br />
Fig. 11 System characteristic + static head, open system<br />
Duty point<br />
The duty point in a pumping system is always the point<br />
of intersection between the system characteristic and<br />
the performance curve of the pump.<br />
Figure 12 shows the performance curve and the<br />
system characteristic of a closed and an open system,<br />
respectively.<br />
H<br />
H<br />
Fig. 10 System characteristics, closed system<br />
Open systems (booster systems)<br />
In many pumping jobs in open systems, there is a<br />
static head (H 0 ) to overcome. This is the case in fig. 11<br />
where the pump is to pump from an open vessel up to<br />
a tank. H 0 is the level difference between the vessel<br />
the pump is pumping from and the tank into which the<br />
pump is to deliver the water.<br />
Head = level difference + friction loss in the system.<br />
Q<br />
H 0<br />
Fig. 12 Duty point of a closed and an open system,<br />
respectively<br />
Q<br />
TM00 8726 3496<br />
14
<strong>Grundfos</strong> E-<strong>pumps</strong><br />
2<br />
Advantages of speed control<br />
Adaptation of performance through frequencycontrolled<br />
speed control offers some obvious<br />
advantages:<br />
Energy conservation<br />
An E-pump uses only the energy required for the<br />
pumping application. Compared to other control<br />
methods, frequency-controlled speed control is the<br />
method offering the highest efficiency and thus the<br />
most efficient utilization of the energy. Depending on<br />
the application and pump type, savings of up to 50 %<br />
or more are realistic.<br />
Low operating costs<br />
The efficient utilization of the energy offers the<br />
customer an attractive reduction of his/her operating<br />
costs. This is seen in the form of lower daily energy<br />
costs, but also in the form of lower wear on <strong>pumps</strong> and<br />
system components which again reduces the need for<br />
replacements.<br />
Applications<br />
Overview of applications<br />
E-<strong>pumps</strong> can be used with advantage in many<br />
applications falling into one or more of the following<br />
three groups:<br />
• E-<strong>pumps</strong> will generally be very beneficial in all<br />
pump applications with a varying demand for pump<br />
performance. Using E-<strong>pumps</strong> will result in energy<br />
saving and/or improved comfort or process quality,<br />
depending on the application.<br />
• In some applications, E-<strong>pumps</strong> will reduce the need<br />
for control valves and costly components. In many<br />
cases, E-<strong>pumps</strong> can reduce the total system<br />
investment.<br />
• E-<strong>pumps</strong> can also be a very good choice in<br />
applications where communication between the<br />
different units in the system, such as <strong>pumps</strong>, valves,<br />
etc. and the control system is required.<br />
Product overview<br />
Protection of the environment<br />
The efficient utilization of energy offers some<br />
environmental advantages in the form of less pollution.<br />
Pumps using less energy demand less power from the<br />
power stations.<br />
Increased comfort<br />
For the customer, controlled operation of the pumping<br />
system means increased comfort due to the automatic<br />
control and a lower noise level from <strong>pumps</strong> and<br />
pipework, etc.<br />
15
2<br />
<strong>Grundfos</strong> E-<strong>pumps</strong><br />
Product overview<br />
The table below shows the most common E-pump applications and which E-pump types can be used for which<br />
applications. The use of E-<strong>pumps</strong> in a number of applications is described on page 17.<br />
Systems<br />
Heating system<br />
Applications<br />
CRE, CRIE,<br />
CRNE<br />
with sensor<br />
E-pump type<br />
CRE, CRIE, CRNE,<br />
SPKE, CRKE, MTRE,<br />
CME without sensor<br />
TPE<br />
Series 1000<br />
without<br />
sensor<br />
TPE Series<br />
2000<br />
with sensor<br />
Main circulator pump ● ● 1)<br />
Floor heating ● 1)<br />
Mixing loops ● 1)<br />
Boiler shunt<br />
Pressure-holding system ● 2) ● 2)<br />
Exhaust gas exchanger<br />
●<br />
Flow filter<br />
●<br />
Domestic hot-water production<br />
●<br />
Domestic hot-water recirculation<br />
●<br />
Heat surface<br />
●<br />
Heat recovery<br />
●<br />
Circulator pump in substation ● ● 1)<br />
District heating system Temperature shunt<br />
Booster pump<br />
Boiler feeding Feed pump ●<br />
Air-conditioning<br />
Pressure boosting<br />
Water treatment<br />
Primary circulator pump<br />
●<br />
Secondary circulator pump ● ● 1)<br />
Zone circulator pump ● ● 1)<br />
Pressure-holding system ● 2)<br />
Dry-cooler circulator pump<br />
●<br />
Wet-cooling tower pump ● ●<br />
Wet-cooling tower internal circulator<br />
●<br />
Heat recovery pump<br />
●<br />
Boost-up from break tank ● ● 2)<br />
Boost-down from roof tank ● ● 2)<br />
Boost direct from mains ● ● 2)<br />
Pumping out system (waterworks) ● ● 2)<br />
Booster pump in mains ● ● 2)<br />
Inlet booster pump ● ●<br />
Treated-water supply pump ● ●<br />
Reverse osmosis booster pump ● ●<br />
Circulator pump<br />
●<br />
Swimming pools<br />
Filter pump<br />
●<br />
Fountains Dry-pit pump ● ● ●<br />
Commercial/industrial cooling<br />
Cleaning and washdown<br />
Brine primary circulator pump ● ●<br />
Brine secondary circulator pump ● ● ●<br />
Brine zone circulator pump ● ● ●<br />
Cooling surface pump ● ● ●<br />
Pressure-holding system ● 2)<br />
Dry-cooler circulator pump<br />
●<br />
Wet-cooling tower pump ● ●<br />
Wet-cooling tower internal circulator<br />
●<br />
Heat recovery pump<br />
●<br />
Pressure boosting ● ● 2)<br />
CIP system ● ● 2)<br />
Machine tooling Coolant pump ●<br />
Temperature control units Cooling of tooling or injection molding machines ● ● ●<br />
● Available.<br />
1) <strong>Grundfos</strong> MAGNA <strong>pumps</strong> can also be used.<br />
2)<br />
Hydro MPC or Hydro Multi-E systems are preferred.<br />
●<br />
●<br />
●<br />
16
<strong>Grundfos</strong> E-<strong>pumps</strong><br />
2<br />
Application examples<br />
As discussed earlier, speed control of <strong>pumps</strong> is an<br />
efficient way of adjusting pump performance to the<br />
system.<br />
In this section, we will discuss the possibilities of<br />
combining speed-controlled <strong>pumps</strong> with PI controllers<br />
and sensors measuring system parameters, such as<br />
pressure, differential pressure and temperature.<br />
On the following pages, the different options will be<br />
presented through examples.<br />
Constant-temperature control<br />
Performance adjustment by means of speed control is<br />
suitable for a number of industrial applications. Figure<br />
14 shows a system with an injection molding machine<br />
which must be water-cooled to ensure high quality<br />
production.<br />
Setpoint t set t set<br />
PI<br />
controller<br />
Actual value t r<br />
Product overview<br />
Constant-pressure control<br />
A pump supplies tap water from a break tank to various<br />
taps in a building.<br />
The demand for tap water varies, and so does the<br />
system characteristic, according to the required flow.<br />
To achieve comfort and energy savings, a constant<br />
supply pressure is recommended.<br />
Cooling<br />
plant<br />
Speed<br />
controller<br />
Temperature<br />
transmitter<br />
Injection molding<br />
machine<br />
h<br />
Setpoint p set set<br />
Break Break tank<br />
tank<br />
PT<br />
Q 1<br />
p 1<br />
H 1<br />
H<br />
n n<br />
n x<br />
p set<br />
h<br />
PI-<br />
controller<br />
Speed<br />
controller<br />
Q 1<br />
Fig. 13 Constant-pressure control<br />
Actual value p 1<br />
Pressure transmitter<br />
transmitter<br />
Q max<br />
As appears from fig. 13, the solution is a speedcontrolled<br />
pump with a PI controller. The PI controller<br />
compares the required pressure, p set , with the actual<br />
supply pressure, p 1 , measured by a pressure<br />
transmitter PT.<br />
If the actual pressure is higher than the setpoint, the<br />
PI controller reduces the speed and consequently the<br />
performance of the pump until p 1 = p set . Figure 13<br />
shows what happens when the flow is reduced from<br />
Q max. to Q 1 .<br />
The controller reduces the speed of the pump from<br />
n n to n x in order to ensure that the required discharge<br />
pressure is p 1 = p set . The pump ensures that the<br />
supply pressure is constant in the flow range of<br />
0 to Q max. . The supply pressure is independent of the<br />
level (h) in the break tank. If h changes, the PI<br />
controller adjusts the speed of the pump so that p 1<br />
always corresponds to the setpoint.<br />
Q<br />
Taps<br />
TM03 0410 5004<br />
Fig. 14 Constant-temperature control<br />
The pump will be operating at a fixed system<br />
characteristic. The controller will ensure that the actual<br />
flow, Q 1 , is sufficient to ensure that t r = t set .<br />
The machine is cooled with water at 59 °F (15 °C) from<br />
a cooling plant. To ensure that the molding machine<br />
runs properly and is cooled sufficiently, the return-pipe<br />
temperature has to be kept at a constant level,<br />
t r = 68 °F (20 °C). The solution is a speed-controlled<br />
pump, controlled by a PI controller. The PI controller<br />
compares the required temperature, t set , with the<br />
actual return-pipe temperature, t r , which is measured<br />
by a temperature transmitter TT. This system has a<br />
fixed system characteristic, and therefore the duty<br />
point of the pump is located on the curve between<br />
Q min and Q max . The higher the heat loss in the<br />
machine, the higher the flow of cooling water needed<br />
to ensure that the return-pipe temperature is kept at a<br />
constant level of 68 °F (20 °C).<br />
TM03 0412 5004<br />
17
2<br />
<strong>Grundfos</strong> E-<strong>pumps</strong><br />
Product overview<br />
Constant differential pressure in a circulation<br />
system<br />
Circulation systems (closed systems) are well-suited<br />
for speed-controlled pump solutions.<br />
It is an advantage that circulation systems with<br />
variable system characteristic are fitted with a<br />
differential-pressure-controlled circulator pump.<br />
See fig. 15.<br />
Setpoint H set PI Actual value H 1<br />
controller<br />
Proportional differential-pressure control<br />
The main function of the pumping system in fig. 16 is<br />
to maintain a constant differential pressure across the<br />
control valves at the radiators. In order to do so, the<br />
pump must be able to overcome friction losses in<br />
pipes, heat exchangers, fittings, etc.<br />
Setpoint H<br />
Setpoint set<br />
set PI-<br />
Actual value value H1<br />
H 1<br />
controller<br />
Speed<br />
controller<br />
Q 1<br />
Speed<br />
controller<br />
DPT 1<br />
DPT 2<br />
Differential-pressure<br />
transmitter<br />
H<br />
H set<br />
Fig. 15 Constant differential-pressure control<br />
Figure 15 shows a heating system consisting of a heat<br />
exchanger where the circulated water is heated and<br />
delivered to three radiators by a speed-controlled<br />
pump. A control valve is connected in series at each<br />
radiator to control the flow according to the heat<br />
requirement.<br />
The pump is controlled according to a constant<br />
differential pressure measured across the pump.<br />
This means that the pump system offers constant<br />
differential pressure in the Q range of 0 to Q max ,<br />
represented by the horizontal line in fig. 15.<br />
TM03 0409 5004<br />
H f H 1<br />
n x<br />
n n<br />
Q<br />
Fig. 16 Proportional differential-pressure control<br />
Q 1<br />
Q max<br />
The circulator pump is controlled in a way that ensures<br />
that the pump head is increased in case of increased<br />
flow.<br />
As mentioned earlier, the pressure loss in a system is<br />
proportional to the square of the flow. The best way to<br />
control a circulator pump in a system like the one<br />
shown in fig. 16, is to allow the pump to deliver a<br />
pressure which increases when the flow increases.<br />
When the flow demand is low, the pressure losses in<br />
the pipes, heat exchangers, fittings, etc. are low as<br />
well, and the pump only supplies a pressure equivalent<br />
to what the control valve requires, H set to H f . When the<br />
flow demand increases, the pressure losses increase,<br />
and therefore the pump has to increase the delivered<br />
pressure as shown in fig. 16.<br />
TM03 0411 5004<br />
18
<strong>Grundfos</strong> E-<strong>pumps</strong><br />
2<br />
Such a pumping system can be designed in two ways:<br />
• The differential-pressure transmitter (DPT 1 in<br />
fig. 16) is placed across the pump, and the system<br />
is running with proportional differential-pressure<br />
control.<br />
• The differential-pressure transmitter (DPT 2 in<br />
fig. 16) is placed close to the radiators, and the<br />
system is running with proportional differential<br />
pressure control.<br />
The advantage of the first solution, which is equal to<br />
a TPE Series 2000 pump solution, is that the pump,<br />
PI controller, speed control and transmitter are placed<br />
close to one another, making the installation easy.<br />
This solution makes it possible to get the entire system<br />
as one single unit. In order to get the system up and<br />
running, pump curve data must be stored in the<br />
controller. These data are used to calculate the flow<br />
and likewise to calculate how much the setpoint, H set ,<br />
has to be reduced at a given flow to ensure that the<br />
pump performance meets the requirements.<br />
The second solution involves higher installation costs<br />
as the transmitter has to be fitted near the radiators<br />
and extra cabling is required. The performance of this<br />
system is more or less similar to the first system. The<br />
transmitter measures the differential pressure at the<br />
radiator and the PI controller compensates<br />
automatically for the increase in required pressure in<br />
order to overcome the increase in pressure losses in<br />
the supply pipes, etc.<br />
PI controller<br />
The MLE has a built-in PI controller for speed control<br />
of <strong>pumps</strong>. The factory setting of gain (Kp) and integral<br />
time (Ti) can easily be changed. The controller can<br />
operate in both normal and inverse mode.<br />
Normal mode<br />
Normal mode is used in systems in which an increase<br />
in pump performance will result in a rise in the value<br />
measured at the feedback sensor. This will typically be<br />
the case in most MLE applications.<br />
Normal mode is selected by setting the gain (Kp) to a<br />
positive value in the control panel.<br />
Inverse mode<br />
Inverse mode is used in systems in which an increase<br />
in pump performance will result in a drop in the value<br />
measured at the feedback sensor. This mode will<br />
typically be used for constant level operation (filling a<br />
tank) and for constant temperature operation in cooling<br />
systems.<br />
Inverse mode is selected by setting the gain (Kp) to a<br />
negative value in the control panel.<br />
System/application<br />
p<br />
L [m]<br />
p<br />
p<br />
t<br />
t<br />
Q<br />
L [m]<br />
L [m]<br />
L [m]<br />
t<br />
Heating<br />
systems<br />
<br />
K p<br />
0.5<br />
0.5<br />
Cooling<br />
system<br />
<br />
T i<br />
0.5<br />
L 1) < 16.4 ft: 0.5<br />
L > 16.4 ft: 3<br />
L > 32.8 ft: 5<br />
0.5 0.5<br />
0.5 0.5<br />
0.5 –0.5 10 + 1.52L<br />
0.5 10 + 1.52L<br />
0.5 –0.5 30 + 1.52L<br />
+2.5 100<br />
Heating systems are systems in which an increase in pump<br />
performance will result in a rise in temperature at the sensor.<br />
Cooling systems are systems in which an increase in pump<br />
performance will result in a drop in temperature at the sensor.<br />
L) Distance in [ft] between pump and sensor<br />
Product overview<br />
19
3<br />
<strong>Grundfos</strong> E-<strong>pumps</strong><br />
E-<strong>pumps</strong><br />
3. E-<strong>pumps</strong><br />
Introduction<br />
<strong>Grundfos</strong> E-<strong>pumps</strong> are fitted with a frequencycontrolled<br />
standard <strong>Grundfos</strong> MLE motor with built-in<br />
PI controller for single-phase or three-phase power<br />
supplies.<br />
<strong>Grundfos</strong> E-<strong>pumps</strong> include the following pump types:<br />
• CRE, CRIE and CRNE <strong>pumps</strong> with and without<br />
integrated pressure sensor<br />
• CRE-H and CRNE-H <strong>pumps</strong> with and without<br />
integrated pressure sensor<br />
• MTRE <strong>pumps</strong><br />
• SPKE <strong>pumps</strong><br />
• CRKE <strong>pumps</strong><br />
• CME <strong>pumps</strong>.<br />
CRE, CRIE, CRNE and<br />
CRE-H, CRNE-H <strong>pumps</strong><br />
Pumps with pressure sensor<br />
CRE, CRIE, CRNE and CRE-H, CRNE-H <strong>pumps</strong> with<br />
pressure sensor are used in closed-loop control<br />
(constant pressure or controlled operation). The<br />
<strong>pumps</strong> are factory-fitted with a pressure sensor and<br />
are pre-configured for constant discharge pressure<br />
control. E-<strong>pumps</strong> with pressure sensor are quick and<br />
easy to install and commission.<br />
Constant pressure<br />
Fig. 19 CRE, CRIE, CRNE and CRE-H, CRNE-H <strong>pumps</strong><br />
with pressure sensor<br />
TM03 9199 3507<br />
Fig. 17 Examples of CRE, CRIE, CRNE <strong>pumps</strong><br />
Fig. 18 Example of CRE-H (CRNE-H pump not shown)<br />
<strong>Grundfos</strong> CRE, CRIE, CRNE and CRE-H, CRNE-H<br />
<strong>pumps</strong> are available in two variants:<br />
• with pressure sensor<br />
• without sensor.<br />
TM05 0300 0911<br />
TM04 4177 0909<br />
Pumps without sensor<br />
CRE, CRIE, CRNE and CRE-H, CRNE-H <strong>pumps</strong><br />
without sensor are not factory-fitted with a sensor, but<br />
require setup on installation.<br />
• They can be set up for any type of sensor and be<br />
operated in closed-loop operation, controlling a<br />
process or a sub-process.<br />
• They can be set up for open-loop operation on a<br />
specific curve or be controlled by an external control<br />
circuit.<br />
Applications of CRE, CRIE, CRNE and<br />
CRE-H, CRNE-H <strong>pumps</strong><br />
CRE, CRIE, CRNE and CRE-H, CRNE-H <strong>pumps</strong> are<br />
used in a wide variety of pumping systems where the<br />
performance and materials of the pump are required to<br />
meet specific demands.<br />
Below is a list of general fields of application:<br />
Industry<br />
• Pressure boosting in process water systems<br />
• washing and cleaning systems<br />
• cooling and air-conditioning systems (refrigerants)<br />
• boiler feed and condensate systems<br />
• machine tools<br />
• aquafarming<br />
• transfer of oils, alcohols, acids, alkalis, glycol and<br />
coolants.<br />
Water supply<br />
• Filtration and transfer at water utilities<br />
• distribution from waterworks<br />
• pressure boosting for industrial water supply.<br />
20
<strong>Grundfos</strong> E-<strong>pumps</strong><br />
3<br />
Water treatment<br />
• Ultra-filtration systems<br />
• reverse osmosis systems<br />
• softening, ionizing, demineralizing systems<br />
• distillation systems<br />
• separators.<br />
• industrial washing machines<br />
• filtering systems.<br />
CME <strong>pumps</strong><br />
E-<strong>pumps</strong><br />
Irrigation<br />
• Field irrigation (flooding)<br />
• sprinkler irrigation<br />
• drip-feed irrigation.<br />
MTRE, SPKE, CRKE <strong>pumps</strong><br />
Fig. 20 MTRE <strong>pumps</strong><br />
MTRE, SPKE and CRKE <strong>pumps</strong> are vertical multistage<br />
centrifugal <strong>pumps</strong> designed to be mounted on top of<br />
tanks with the chamber stack immersed in the pumped<br />
liquid.<br />
The <strong>pumps</strong> are available in various sizes and with<br />
various numbers of stages to provide the flow and<br />
the pressure required.<br />
The <strong>pumps</strong> consist of two main components:<br />
The motor and the pump.<br />
• The motor is a standard <strong>Grundfos</strong> MLE motor with<br />
integrated variable frequency drive.<br />
• The pump has optimized hydraulics as well as<br />
various types of connections, chambers, a motor<br />
stool, and various other parts.<br />
MTRE, SPKE and CRKE <strong>pumps</strong> can be connected to<br />
an external sensor enabling the control of pressure,<br />
differential pressure, temperature, differential<br />
temperature, flow, or level control of liquid in a tank.<br />
Applications of MTRE, SPKE, CRKE<br />
The <strong>pumps</strong> are used in a wide variety of pumping<br />
systems where the performance and materials of the<br />
pump are required to meet specific demands.<br />
Below is a list representing some general examples of<br />
applications:<br />
• spark machine tools<br />
• grinding machines<br />
• machining centers<br />
• cooling units<br />
TM02 8537 0508<br />
Fig. 21 CME pump<br />
CME <strong>pumps</strong> are reliable, quiet and compact horizontal<br />
end-suction <strong>pumps</strong>. The modular pump design makes<br />
it easy to make customized solutions. The CME <strong>pumps</strong><br />
are available in cast iron and stainless steel.<br />
The <strong>pumps</strong> are available in a large number of sizes<br />
and stages to provide the flow and pressure required.<br />
The <strong>pumps</strong> consist of two main components:<br />
The motor and the pump.<br />
• The motor is a standard <strong>Grundfos</strong> MLE motor with<br />
integrated variable frequency drive.<br />
• The pump is available in three material variants:<br />
cast iron, AISI 304 stainless steel, and AISI 316<br />
stainless steel. It has optimized hydraulics and is<br />
available with various connections, for example<br />
DIN/JIS/ANSI flanges.<br />
CME <strong>pumps</strong> can be connected to an external sensor<br />
enabling the control of pressure, differential pressure,<br />
temperature, differential temperature, flow, or level<br />
control of liquid in a tank.<br />
Applications of CME<br />
The <strong>pumps</strong> are used in a wide variety of pumping<br />
systems where the performance of the pump is<br />
required to meet specific demands.<br />
Below is a list representing some general examples of<br />
applications:<br />
• pressure boosting<br />
• water supply<br />
• water treatment<br />
• industrial washing and cleaning<br />
• heating and cooling in industrial processes<br />
• fertilizer systems<br />
• dosing systems.<br />
GrA8697<br />
21
3<br />
<strong>Grundfos</strong> E-<strong>pumps</strong><br />
E-<strong>pumps</strong><br />
Overview of functions<br />
E-pump function<br />
CRE, CRIE, CRNE with sensor<br />
E-pump type<br />
CRE, CRIE, CRNE, SPKE,<br />
CRKE, MTRE, CME<br />
without sensor<br />
Single-phase Three-phase Single-phase Three-phase<br />
Motor sizes [Hp] 0.5 - 1.5 1.0 - 30 0.5 - 1.5 1.0 - 30<br />
Setting via control panel<br />
Setpoint ● ● ● ●<br />
Start/stop ● ● ● ●<br />
Max. curve ● ● ● ●<br />
Min. curve ● ● ● ●<br />
Alarm reset ● ● ● ●<br />
Reading via control panel<br />
Setpoint ● ● ● ●<br />
Operating indication ● ● ● ●<br />
Fault indication ● ● ● ●<br />
Setting via the R100<br />
Setpoint ● ● ● ●<br />
Start/stop ● ● ● ●<br />
Max. curve ● ● ● ●<br />
Min. curve ● ● ● ●<br />
Alarm reset ● ● ● ●<br />
Warning reset ● ●<br />
Digital input ● ● ● ●<br />
Motor bearing monitoring ● ●<br />
Motor bearings changed or lubricated ● 3) ● 3)<br />
Standstill heating ● ●<br />
Controlled or uncontrolled ● ● ● ●<br />
Controller constants, K p , T i ● ● ● ●<br />
External setpoint signal ● ● ● ●<br />
Signal relay 1 ● ● ● ●<br />
Signal relay 2 ● 2) ● 2)<br />
Buttons on pump ● ● ● ●<br />
Pump number (for bus communication) ● ● ● ●<br />
Stop function ● ● ● ●<br />
Flow limit ● ●<br />
Sensor range and signal ● 1) ● 1) ● ●<br />
Duty/standby ● ● ● ●<br />
Operating range (min./max. speed) ● ● ● ●<br />
Reading via the R100<br />
Setpoint ● ● ● ●<br />
Operating mode ● ● ● ●<br />
Actual sensor value ● ● ● ●<br />
Pump speed ● ● ● ●<br />
Power input ● ● ● ●<br />
Power consumption ● ● ● ●<br />
Operating hours ● ● ● ●<br />
Lubrication status (bearings) ● 2) ● 2)<br />
Replacement status (bearings) ● ●<br />
● Available.<br />
1)<br />
Sensor fitted.<br />
2) Only 15-30 Hp.<br />
3)<br />
Lubricated, only 15-30 Hp.<br />
22
<strong>Grundfos</strong> E-<strong>pumps</strong><br />
3<br />
E-pump function<br />
CRE, CRIE, CRNE with sensor<br />
E-pump type<br />
CRE, CRIE, CRNE, SPKE,<br />
CRKE, MTRE, CME<br />
without sensor<br />
E-<strong>pumps</strong><br />
Single-phase Three-phase Single-phase Three-phase<br />
Motor sizes [Hp] 0.5 - 1.5 1.0 - 30 0.5 - 1.5 1.0 - 30<br />
Setting via GENIbus<br />
Setpoint ● ● ● ●<br />
Start/stop ● ● ● ●<br />
Max. curve ● ● ● ●<br />
Min. curve ● ● ● ●<br />
Controlled or uncontrolled ● ● ● ●<br />
Reading via GENIbus<br />
Setpoint ● ● ● ●<br />
Operating indication ● ● ● ●<br />
Pump status ● ● ● ●<br />
Setting via external signal<br />
Setpoint ● ● ● ●<br />
Start/stop ● ● ● ●<br />
Min./max. curve, external fault, flow switch via digital<br />
input<br />
● ● ● ●<br />
Reading via external signal<br />
Fault, Operation or Ready signal (relay) ● ● ● ●<br />
Fault, Operation, Ready, Pump running, Bearing<br />
lubrication, Warning, Limit exceeded 1 and 2<br />
●<br />
●<br />
● Available.<br />
1)<br />
Sensor fitted.<br />
2)<br />
Only 15-30 Hp.<br />
3) Lubricated, only 15-30 Hp.<br />
23
3<br />
<strong>Grundfos</strong> E-<strong>pumps</strong><br />
E-<strong>pumps</strong><br />
Modes<br />
<strong>Grundfos</strong> E-<strong>pumps</strong> are set and controlled according to<br />
operating and control modes.<br />
Overview of modes<br />
Operating modes Normal Stop Min. Max.<br />
Control modes<br />
Pumps without factory-fitted sensor<br />
The <strong>pumps</strong> are factory-set to control mode<br />
"Uncontrolled".<br />
In control mode "Uncontrolled", the pump will operate<br />
according to the constant curve set. See fig. 23.<br />
Control modes Uncontrolled Controlled<br />
H<br />
Constant curve<br />
Constant<br />
pressure 1)<br />
1) In this example, the pump is fitted with a pressure sensor. The<br />
pump may also be fitted with a temperature sensor in which case<br />
the description would be constant temperature in control mode<br />
"Controlled".<br />
Operating mode<br />
When the operating mode is set to "Normal", the<br />
control mode can be set to "Controlled" or<br />
"Uncontrolled".<br />
The other operating modes that can be selected are<br />
"Stop", "Min." or "Max.".<br />
• Stop: The pump has been stopped.<br />
• Min.: The pump is operating at its minimum speed.<br />
• Max.: The pump is operating at its maximum speed.<br />
Figure 22 is a schematic illustration of min. and max.<br />
curves.<br />
Fig. 22 Min. and max. curves<br />
H<br />
Min.<br />
Max.<br />
The max. curve can for instance be used in connection<br />
with the venting procedure during installation.<br />
The min. curve can be used in periods in which a<br />
minimum flow is required.<br />
If the power supply to the pump is disconnected, the<br />
mode setting will be stored.<br />
The R100 remote control offers additional settings and<br />
status displays. See section Setting via the R100,<br />
page 26.<br />
Q<br />
TM00 5547 0995<br />
Fig. 23 Pump in control mode "Uncontrolled"<br />
(constant curve)<br />
Pumps with pressure sensor<br />
The pump can be set to one of two control modes,<br />
i.e. "Controlled" and "Uncontrolled". See fig. 24.<br />
In control mode "Controlled", the pump will adjust its<br />
performance, i.e. pump discharge pressure, to the<br />
desired setpoint for the control parameter.<br />
In control mode "Uncontrolled", the pump will operate<br />
according to the constant curve set.<br />
H<br />
HHset<br />
Controlled<br />
Q<br />
Uncontrolled<br />
Fig. 24 Pump in control mode "Controlled" (constant<br />
pressure) or "Uncontrolled" (constant curve)<br />
H<br />
Q<br />
Q<br />
TM00 7746 1304<br />
TM00 7668 0404<br />
24
<strong>Grundfos</strong> E-<strong>pumps</strong><br />
3<br />
Setting up the pump<br />
Factory setting<br />
Pumps without factory-fitted sensor<br />
The <strong>pumps</strong> have been factory-set to control mode<br />
"Uncontrolled".<br />
The setpoint value corresponds to 100 % of the maximum<br />
pump performance. See pump performance<br />
curve.<br />
Pumps with pressure sensor<br />
The <strong>pumps</strong> have been factory-set to control mode<br />
"Controlled". The setpoint value corresponds to 50 %<br />
of the sensor measuring range (see sensor nameplate).<br />
Setpoint setting<br />
Set the desired setpoint by pressing or .<br />
The light fields on the control panel will indicate the<br />
setpoint set.<br />
Pump in control mode "Controlled" (pressure<br />
control)<br />
Example<br />
Figure 27 shows that the light fields 5 and 6 are yellow,<br />
indicating a desired setpoint of 3 bar (43.5 psi).<br />
The setting range is equal to the sensor measuring<br />
range (see sensor nameplate).<br />
6<br />
[bar]<br />
E-<strong>pumps</strong><br />
Setting via the control panel<br />
The pump control panel (fig. 25 or 26) incorporates the<br />
following buttons and indicator lights:<br />
• buttons, and , for setpoint setting<br />
• light fields, yellow, for indication of setpoint<br />
• indicator lights, green (operation) and red (fault).<br />
Light fields<br />
Buttons<br />
3<br />
0<br />
Fig. 27 Setpoint set to 3 bar (pressure control)<br />
Pump in control mode "Uncontrolled"<br />
TM00 7743 0904<br />
Example<br />
In control mode "Uncontrolled", the pump performance<br />
is set within the range from min. to max. curve.<br />
See fig. 28.<br />
Indicator lights<br />
TM00 7600 0304<br />
H<br />
Fig. 25 Control panel, single-phase <strong>pumps</strong>, .5 Hp - 1.5 Hp<br />
(0.37 kW - 1.1 kW)<br />
Light fields<br />
Buttons<br />
Q<br />
TM00 7746 1304<br />
Fig. 28 Pump performance setting, control mode<br />
"Uncontrolled"<br />
Indicator lights<br />
TM02 8513 0304<br />
Fig. 26 Control panel, three-phase <strong>pumps</strong>, 1 Hp -30 Hp<br />
(0.75 - 22 kW)<br />
25
3<br />
<strong>Grundfos</strong> E-<strong>pumps</strong><br />
E-<strong>pumps</strong><br />
Setting to max. curve duty<br />
Press continuously to change to the max. curve of<br />
the pump (top light field flashes). See fig. 29. When the<br />
top light field is on, press for 3 seconds until the<br />
light field starts flashing.<br />
To change back, press continuously until the<br />
desired setpoint is indicated.<br />
Setting via the R100<br />
The pump is designed for wireless communication with<br />
the <strong>Grundfos</strong> R100 remote control.<br />
H<br />
TM02 0936 0501<br />
Q<br />
Fig. 29 Max. curve duty<br />
Setting to min. curve duty<br />
Press continuously to change to the min. curve of<br />
the pump (bottom light field flashes). See fig. 30. When<br />
the bottom light field is on, press for 3 seconds until<br />
the light field starts flashing.<br />
To change back, press continuously until the<br />
desired setpoint is indicated.<br />
H<br />
TM00 7345 1304<br />
Fig. 31 R100 communicating with the pump via infrared<br />
light<br />
During communication, the R100 must be pointed at<br />
the control panel. When the R100 communicates with<br />
the pump, the red indicator light will flash rapidly. Keep<br />
pointing the R100 at the control panel until the red indicator<br />
light stops flashing.<br />
The R100 offers setting and status displays for the<br />
pump.<br />
The displays are divided into four parallel menus,<br />
fig. 32 :<br />
0. GENERAL (see operating instructions for the R100)<br />
1. OPERATION<br />
2. STATUS<br />
3. INSTALLATION<br />
Fig. 30 Min. curve duty<br />
Q<br />
TM00 7346 1304<br />
Start/stop of pump<br />
Start the pump by continuously pressing until the<br />
desired setpoint is indicated. This is operating mode<br />
"Normal".<br />
Stop the pump by continuously pressing until none<br />
of the light fields are activated and the green indicator<br />
light flashes.<br />
26
<strong>Grundfos</strong> E-<strong>pumps</strong><br />
3<br />
Menu overview<br />
E-<strong>pumps</strong><br />
0. GENERAL 1. OPERATION 2. STATUS 3. INSTALLATION<br />
1.1 2.1 3.1 3.9 (2)<br />
1.2 2.2 3.2 3.9 (2)<br />
1.3 2.3 3.3 3.10<br />
1.4 (1) 2.4 3.4 (3) 3.11 (1)<br />
1.5 2.5 3.5 (2) 3.12<br />
2.6 3.6 (2) 3.13 (1)<br />
1.6 (1) 2.7 (2) 3.7 3.14<br />
2.8 (2) 3.8 3.15 (1)<br />
2.9 (1) 3.9 (2) 3.16 (1)<br />
(1) This display only appears for three-phase <strong>pumps</strong>, 1 - 30 Hp.<br />
(2) This display only appears for three-phase <strong>pumps</strong>, 15 - 30 Hp.<br />
(3) This display only appears for single- and three-phase <strong>pumps</strong>,<br />
0.5 - 10 Hp.<br />
(4) This display only appears if an advanced I/O module is installed.<br />
3.9 (2) 3.17 (1)<br />
Fig. 32 Menu overview<br />
27
3<br />
<strong>Grundfos</strong> E-<strong>pumps</strong><br />
E-<strong>pumps</strong><br />
One display<br />
Pumps without or with factory-fitted sensor have the<br />
same function.<br />
Two displays<br />
Pumps without or with factory-fitted pressure sensor<br />
have different functions and factory settings.<br />
Menu OPERATION<br />
This is the first display in this menu:<br />
Setpoint<br />
Without sensor<br />
(Uncontrolled)<br />
Setpoint set<br />
Actual setpoint<br />
Actual value<br />
Set the setpoint in [%].<br />
With pressure sensor<br />
(Controlled)<br />
Setpoint set<br />
Actual setpoint<br />
Actual value<br />
Set the desired pressure<br />
in [psi].<br />
In control mode "Uncontrolled", the setpoint is set in %<br />
of the maximum performance. The setting range will lie<br />
between the min. and max. curves.<br />
In control mode "Controlled", the setting range is equal<br />
to the sensor measuring range.<br />
Note: If the pump is connected to an external setpoint<br />
signal, the value in this display will be the maximum<br />
value of the external setpoint signal.<br />
Operating mode<br />
Select one of the following operating modes:<br />
• Stop<br />
• Min.<br />
• Normal (duty)<br />
• Max.<br />
The operating modes can be selected without<br />
changing the setpoint setting.<br />
Fault indications<br />
In E-<strong>pumps</strong>, faults may result in two types of<br />
indication: Alarm or Warning.<br />
An "alarm" fault will activate an alarm indication in the<br />
R100 and cause the pump to change operating mode,<br />
typically to stop. However, for some faults resulting in<br />
alarm, the pump is set to continue operating even if<br />
there is an alarm.<br />
A "warning" fault will activate a warning indication in<br />
the R100, but the pump will not change operating or<br />
control mode.<br />
Note: The indication "Warning" only applies to<br />
three-phase <strong>pumps</strong>.<br />
Alarm/warning<br />
Setpoint and external signal<br />
The setpoint cannot be set if the pump is controlled via<br />
external signals (Stop, Min. or Max). The R100 will<br />
give this warning: External control!<br />
Check if the pump is stopped via terminals 2 and 3<br />
(open circuit) or set to min. or max. via terminals<br />
1 and 9 (see page 38).<br />
Setpoint and bus communication<br />
The setpoint cannot be set if the pump is controlled<br />
from an external control system or via bus communication.<br />
The R100 will give this warning: Bus control!<br />
To override bus communication, disconnect the bus<br />
connection.<br />
In case of fault or malfunction of the MLE, the latest<br />
five warnings and latest five alarms can be found in the<br />
log menus.<br />
Alarm<br />
In case of an alarm, the MLE will stop the pump or<br />
change the operating mode depending on the alarm<br />
type.<br />
Pump operation will be resumed when the cause of the<br />
alarm has been remedied and the alarm has been<br />
reset.<br />
Warning<br />
The MLE will continue the operation as long as the<br />
warning is active. The warning remains active until the<br />
cause no longer exists.<br />
Resetting an alarm manually<br />
• Press OK in the alarm display of the R100<br />
• Press the or buttons on the MLE control panel<br />
• Activate the digital input DI 1 (Start/stop).<br />
28
<strong>Grundfos</strong> E-<strong>pumps</strong><br />
3<br />
Warning and alarm list<br />
Fault<br />
code<br />
Single phase MLE Three phase MLE Warning Alarm<br />
3 External fault External fault ●<br />
4 Too many restarts Too many restarts ●<br />
7 Too many restarts ●<br />
30 Replace motor bearings ●<br />
31 Replace varistor* ●<br />
32 Overvoltage Overvoltage ●<br />
40 Undervoltage Undervoltage ●<br />
41 Undervoltage transient ●<br />
45 Mains asymmetry ●<br />
49 Overload Overload ●<br />
51 Blocked motor ●<br />
55 Motor current protection Motor current protection ●<br />
56 Underload ●<br />
57 Dry run ●<br />
65 Motor temperature protection Motor temperature protection ●<br />
73 Hardware shutdown Hardware shutdown ●<br />
76 Internal communication error ●<br />
77 Duty/Standby communication error ●<br />
85 Unrecoverable EEPROM fault Unrecoverable EEPROM fault ●<br />
88 Sensor fault Sensor 1 fault ●<br />
91 Temperature sensor 1 fault ●<br />
93 Sensor 2 fault ●<br />
96<br />
Reference input fault<br />
Common term: “External setpoint fault”<br />
Reference input fault<br />
Common term: “External setpoint fault”<br />
● 1) ● 2)<br />
105 Electronic rectifier protection Electronic rectifier protection ●<br />
106 Electronic inverter protection Electronic inverter protection ●<br />
148 Drive-end bearing temperature ●<br />
149 Non drive-end bearing temperature ●<br />
155 Undervoltage ●<br />
156 Internal communication error ●<br />
175 Temperature sensor 2 fault ●<br />
190 Limit 1 exceeded ●<br />
191 Limit 2 exceeded ●<br />
240 Relubricate motor bearings ●<br />
255 Unknown ●<br />
E-<strong>pumps</strong><br />
*The varistor protects the pump against power supply<br />
transients. If voltage transients occur, the varistor will be worn<br />
over time and need to be replaced. The more transients, the<br />
more quickly the varistor will be worn. A <strong>Grundfos</strong> technician<br />
is required for replacement of the varistor.<br />
1)<br />
Single phase MLE<br />
2)<br />
Three phase MLE<br />
29
3<br />
<strong>Grundfos</strong> E-<strong>pumps</strong><br />
E-<strong>pumps</strong><br />
Fault log<br />
For both fault types, alarm and warning, the R100 has<br />
a log function.<br />
Alarm log<br />
Actual setpoint<br />
Without sensor<br />
(Uncontrolled)<br />
With pressure sensor<br />
(Controlled)<br />
In case of "alarm" faults, the last five alarm indications<br />
will appear in the alarm log. "Alarm log 1" shows the<br />
latest fault.<br />
The example above gives this information:<br />
• The alarm indication "Undervoltage".<br />
• The fault code (73).<br />
• The number of minutes the pump has been<br />
connected to the power supply after the fault<br />
occurred, 8 min.<br />
Warning log (only three-phase <strong>pumps</strong>)<br />
Tolerance: ± 2 % Tolerance: ± 2 %<br />
This display shows the actual setpoint and the external<br />
setpoint in % of the range from minimum value to the<br />
setpoint set.<br />
Operating mode<br />
This display shows the actual operating mode (Stop,<br />
Min., Normal (duty) or Max.). Furthermore, it shows<br />
where this operating mode was selected (R100, Pump,<br />
Bus, External or Stop func.).<br />
Actual value<br />
In case of "warning" faults, the last five warning<br />
indications will appear in the warning log.<br />
"Warning log 1" shows the latest fault.<br />
The example above gives this information:<br />
• The warning indication "Relubricate motor<br />
bearings".<br />
• The fault code (240).<br />
• The number of minutes the pump has been<br />
connected to the power supply since the fault<br />
occurred, 30 min.<br />
Menu STATUS<br />
The displays appearing in this menu are status<br />
displays only. It is not possible to change or set values<br />
in the status menu.<br />
The displayed values are the values that applied when<br />
the last communication between the pump and the<br />
R100 took place. If a status value is to be updated,<br />
point the R100 at the control panel, and press [OK].<br />
If a parameter, e.g. speed, should be called up<br />
continuously, press [OK] constantly during the period<br />
in which the parameter in question should be<br />
monitored.<br />
The tolerance of the displayed value is stated under<br />
each display. The tolerances are stated as a guide in<br />
% of the maximum values of the parameters.<br />
Without sensor<br />
(Uncontrolled)<br />
With pressure sensor<br />
(Controlled)<br />
This display shows the value actually measured by<br />
a connected sensor.<br />
If a sensor is not connected to the pump, "-" will<br />
appear in the display.<br />
30
<strong>Grundfos</strong> E-<strong>pumps</strong><br />
3<br />
Speed<br />
Time until relubrication of motor bearings<br />
(only 15-30 Hp)<br />
E-<strong>pumps</strong><br />
Tolerance: ± 5 %<br />
The actual pump speed will appear in this display.<br />
Power input and power consumption<br />
Tolerance: ± 10 %<br />
This display shows the actual pump input power from<br />
the power supply. The power is displayed in W or kW.<br />
The pump power consumption can also be read from<br />
this display. The value of power consumption is an<br />
accumulated value calculated from the pump’s birth<br />
and it cannot be reset.<br />
Operating hours<br />
This display shows when to relubricate the motor bearings.<br />
The controller monitors the operating pattern of<br />
the pump and calculates the period between bearing<br />
relubrications. If the operating pattern changes, the<br />
calculated time until relubrication may change as well.<br />
Displayable values:<br />
• in 2 years<br />
• in 1 year<br />
• in 6 months<br />
• in 3 months<br />
• in 1 month<br />
• in 1 week<br />
• Now!<br />
Time until replacement of motor bearings<br />
(only three-phase <strong>pumps</strong>)<br />
When the motor bearings have been relubricated a<br />
prescribed number of times stored in the controller, the<br />
display in the previous section will be replaced by the<br />
display below.<br />
Tolerance: ± 2 %<br />
The value of operating hours is an accumulated value<br />
and cannot be reset.<br />
Lubrication status of motor bearings<br />
(only 15-30 Hp)<br />
This display shows how many times the motor<br />
bearings have been relubricated and when to replace<br />
the motor bearings.<br />
When the motor bearings have been relubricated,<br />
confirm this action in the INSTALLATION menu.<br />
See Confirming relubrication/replacement of motor<br />
bearings (only three-phase <strong>pumps</strong>), page 37. When<br />
relubrication is confirmed, the figure in the above<br />
display will be increased by one.<br />
This display shows when to replace the motor bearings.<br />
The controller monitors the operating pattern of<br />
the pump and calculates the period between bearing<br />
replacements.<br />
Displayable values:<br />
• in 2 years<br />
• in 1 year<br />
• in 6 months<br />
• in 3 months<br />
• in 1 month<br />
• in 1 week<br />
• Now!<br />
31
3<br />
<strong>Grundfos</strong> E-<strong>pumps</strong><br />
E-<strong>pumps</strong><br />
Menu INSTALLATION<br />
Control mode<br />
Without sensor<br />
(Uncontrolled)<br />
Select one of the following<br />
control modes (see<br />
fig. 24):<br />
• Controlled<br />
• Uncontrolled.<br />
With pressure sensor<br />
(Controlled)<br />
Select one of the following<br />
control modes (see<br />
fig. 24):<br />
• Controlled<br />
• Uncontrolled.<br />
Note: If the pump is connected to a bus, the control<br />
mode cannot be selected via the R100.<br />
Controller<br />
E-<strong>pumps</strong> have a factory default setting of gain (K p ) and<br />
integral time (T i ). However, if the factory setting is not<br />
the optimum setting, the gain and the integral time can<br />
be changed in the display below.<br />
If one of the signal types is selected, the actual<br />
setpoint is influenced by the signal connected to the<br />
setpoint input terminal 4. See page 38.<br />
Signal relay<br />
Pumps of 0.5 - 10 Hp have one signal relay.<br />
The factory setting of the relay will be "Fault".<br />
Pumps of 15 - 30 Hp have two signal relays. Signal<br />
relay 1 is factory-set to "Alarm" and signal relay 2 to<br />
"Warning".<br />
Select how the signal relay should be activated.<br />
Single-phase <strong>pumps</strong><br />
0.5 - 1.5 Hp<br />
• Ready<br />
• Fault<br />
• Operation.<br />
Three-phase <strong>pumps</strong><br />
1.0 - 30 Hp<br />
Three-phase <strong>pumps</strong><br />
15 - 30 kW<br />
• The gain (K p ) can be set within the range from<br />
0.1to20.<br />
• The integral time (T i ) can be set within the range<br />
from 0.1 to 3600 s. If "3600 s" is selected, the<br />
controller will function as a P controller.<br />
• Furthermore, it is possible to set the controller to<br />
inverse control, meaning that if the setpoint is<br />
increased, the speed will be reduced. In the case of<br />
inverse control, the gain (K p ) must be set within the<br />
range from -0.1 to -20.<br />
External setpoint<br />
The input for external setpoint signal can be set to<br />
different signal types.<br />
Select one of the following types:<br />
• 0-10 V<br />
• 0-20 mA<br />
• 4-20 mA<br />
• Not active.<br />
If "Not active" is selected, the setpoint set via the R100<br />
or on the control panel will apply.<br />
• Ready<br />
• Alarm<br />
• Operation<br />
• Pump running<br />
• Warning<br />
• Relubricate<br />
(15-30 Hp).<br />
• Ready<br />
• Alarm<br />
• Operation<br />
• Pump running<br />
• Warning<br />
• Relubricate.<br />
Ready<br />
Pump is ready to run or running.<br />
Warning<br />
There is a warning<br />
Alarm<br />
There is an alarm.<br />
Operation<br />
The pump is running or has been stopped by a stop<br />
function.<br />
Relubricate<br />
Lubrication time is exceeded.<br />
32
<strong>Grundfos</strong> E-<strong>pumps</strong><br />
3<br />
Buttons on pump<br />
The operating buttons and on the control panel<br />
can be set to these values:<br />
• Active<br />
• Not active.<br />
When set to "Not active" (locked), the buttons do not<br />
function. Set the buttons to "Not active" if the pump<br />
should be controlled via an external control system.<br />
Pump number<br />
A number between 1 and 64 can be allocated to the<br />
pump. In the case of bus communication, a number<br />
must be allocated to each pump.<br />
Digital inputs<br />
Flow switch<br />
When this function is selected, the pump will be<br />
stopped when a connected flow switch detects low<br />
flow.<br />
It is only possible to use this function if the pump is<br />
connected to a pressure sensor and the control mode<br />
is set to "Controlled."<br />
If the input is activated for more than 5 seconds, the<br />
stop function incorporated in the pump will take over.<br />
The pump will automatically restart when flow is<br />
restored and the flow switch detects flow.<br />
Dry running (only 15-30 Hp)<br />
When this function is selected, lack of inlet pressure or<br />
water shortage can be detected. This requires the use<br />
of an accessory, such as<br />
• a <strong>Grundfos</strong> Liqtec ® dry-running sensor<br />
• a pressure switch installed on the suction side of<br />
apump<br />
• a float switch installed on the suction side of<br />
a pump.<br />
When lack of inlet pressure or water shortage<br />
(Dry running) is detected, the pump will be stopped.<br />
The pump will automatically restart when the dry run<br />
input is not activated.<br />
Stop function<br />
E-<strong>pumps</strong><br />
The digital inputs of the pump (terminal 1, fig. 40,<br />
page 38) can be set to various functions.<br />
Select one of the following functions:<br />
• Min. (min. curve)<br />
• Max. (max. curve)<br />
• External fault<br />
• Flow switch<br />
• Dry running (from external sensor) (only 15-30 Hp).<br />
The selected function is activated by closing the contact<br />
between either terminals 1 and 9, 9 and 10 or<br />
9 and 11. See fig. 40, page 38.<br />
Min.:<br />
When the input is activated, the pump will operate<br />
according to the min. curve.<br />
Max.:<br />
When the input is activated, the pump will operate<br />
according to the max. curve.<br />
External fault<br />
When the input is activated, a timer will be started.<br />
If the input is activated for more than 5 seconds, the<br />
pump will be stopped and a fault will be indicated.<br />
If the input is deactivated for more than 5 seconds, the<br />
fault condition will cease and the pump can only be<br />
restarted manually by resetting the fault indication.<br />
The stop function can be set to these values:<br />
• Active<br />
• Not active.<br />
When the stop function is active, the pump will be<br />
stopped at very low flows.<br />
Purpose of the stop function:<br />
• to avoid heating of the pumped liquid which<br />
damages the pump<br />
• to reduce wear of the shaft seals<br />
• to reduce noise from operation.<br />
Stop pressure<br />
ΔH<br />
Start pressure<br />
H<br />
Q<br />
Fig. 33 Difference between start and stop pressures (ΔH)<br />
TM00 7744 1896<br />
33
3<br />
<strong>Grundfos</strong> E-<strong>pumps</strong><br />
E-<strong>pumps</strong><br />
ΔH is factory-set to 10 % of actual setpoint.<br />
ΔH can be set within the range from 5 % to 30 % of<br />
actual setpoint.<br />
Low flow can be detected in two ways:<br />
• a built-in "low-flow detection function" which<br />
functions if the digital input is not set up for flow<br />
switch<br />
• a flow switch connected to the digital input.<br />
Low-flow detection function<br />
The pump will check the flow regularly by reducing the<br />
speed for a short time. If there is no or only a small<br />
change in pressure, this means that there is low flow.<br />
The speed will be increased until the stop pressure<br />
(actual setpoint + 0.5 x ΔH) is reached and the pump<br />
will stop. When the pressure has fallen to the start<br />
pressure (actual setpoint - 0.5 x ΔH), the pump will<br />
restart.<br />
When restarting, the <strong>pumps</strong> will react differently<br />
according to pump type:<br />
0.5 - 1.5 Hp, single-phase <strong>pumps</strong><br />
The pump will return to continuous operation at<br />
constant pressure and continue checking the flow<br />
regularly by reducing the speed for a short time.<br />
1.0 - 30 Hp, three-phase <strong>pumps</strong><br />
1. If the flow is higher than the low-flow limit, the pump<br />
will return to continuous operation at constant<br />
pressure.<br />
2. If the flow is still lower than the low-flow limit, the<br />
pump will continue in start/stop operation until the<br />
flow is higher than the low-flow limit. When the flow<br />
is higher than the low-flow limit, the pump will return<br />
to continuous operation.<br />
Flow switch<br />
When the digital input is activated for more than<br />
5 seconds because there is low flow, the speed will be<br />
increased until the stop pressure (actual setpoint +<br />
0.5 x H) is reached, and the pump will stop. When the<br />
pressure has fallen to the start pressure, the pump will<br />
start again. If there is still no flow, the pump will quickly<br />
reach the stop pressure and stop. If there is flow, the<br />
pump will continue operating according to the setpoint.<br />
Operating conditions for the stop function<br />
It is only possible to use the stop function if the system<br />
incorporates a pressure sensor, a non-return valve and<br />
a diaphragm tank.<br />
Note: The non-return valve must always be installed<br />
before the pressure sensor. See figures 34 and 35.<br />
Non-return<br />
valve<br />
Fig. 34 Position of the non-return valve and pressure<br />
sensor in system with suction lift operation<br />
Fig. 35 Position of the non-return valve and pressure<br />
sensor in system with positive inlet pressure<br />
Diaphragm tank<br />
The stop function requires a diaphragm tank of a<br />
certain minimum size. The tank must be installed<br />
immediately after the pump, and the precharge<br />
pressure must be 0.7 x actual setpoint.<br />
Recommended diaphragm tank size:<br />
Rated flow of pump<br />
[gpm (m 3 h)]<br />
0 - 26<br />
(0 - 5.9)<br />
27 - 105<br />
(6.1 - 23.8)<br />
106 - 176<br />
(24.2 - 40)<br />
177 - 308<br />
(40.2 - 70.0)<br />
309 - 440<br />
(70.2 - 99.9)<br />
441 - 750<br />
(100 - 170)<br />
Pump<br />
Pressure sensor<br />
Pump<br />
Pressure sensor<br />
CRE pump<br />
Diaphragm tank<br />
Diaphragm tank<br />
Non-return valve<br />
If a diaphragm tank of the above size is installed in the<br />
system, the factory setting of ΔH is the correct setting.<br />
If the tank installed is too small, the pump will start and<br />
stop too often. This can be remedied by increasing ΔH.<br />
TM03 8582 1907<br />
TM03 8583 1907<br />
Typical diaphragm<br />
tank size [gal (liter)]<br />
1s, 1, 3 2 (7.6)<br />
5, 10, 15 4.4 (16.7)<br />
20, 32 14 (53.0)<br />
45 34 (128.7)<br />
64, 90 62 (234.7)<br />
120, 150 86 (325.5)<br />
34
<strong>Grundfos</strong> E-<strong>pumps</strong><br />
3<br />
Flow limit for the stop function<br />
(only three-phase <strong>pumps</strong>)<br />
Note: Flow limit for the stop function only works if the<br />
system is not set up for flow switch.<br />
bar, mbar, m, kPa, psi, ft, m 3 /h, m 3 /s, l/s, gpm, °C,<br />
°F, %<br />
• Sensor measuring range.<br />
Duty/standby (only three-phase <strong>pumps</strong>)<br />
The duty/standby function applies to two <strong>pumps</strong> connected<br />
in parallel and controlled via GENIbus.<br />
E-<strong>pumps</strong><br />
In order to set at which flow rate the system is to go<br />
from continuous operation at constant pressure to<br />
start/stop operation, select among these four values of<br />
which three are pre-configured flow limits:<br />
• Low<br />
• Normal<br />
• High<br />
• Custom.<br />
The default setting of the pump is "Normal", representing<br />
approx. 10 % of the pump rated flow.<br />
If a lower flow limit than "Normal" is desired or the tank<br />
size is smaller than recommended, select "Low".<br />
If a higher flow than "Normal" is desired or a large tank<br />
is used, select "High".<br />
The value "Custom" can be seen in the R100, but it<br />
can only be set via the PC Tool E-products. "Custom"<br />
is for customized setup and optimizing to the process.<br />
Fig. 36 Three pre-configured flow limits, "Low", "Normal"<br />
and "High"<br />
Sensor<br />
Low<br />
∆H<br />
Normal<br />
Without sensor<br />
(Uncontrolled)<br />
High<br />
With pressure sensor<br />
(Controlled)<br />
The setting of the sensor is only relevant in the case of<br />
controlled operation.<br />
Select among the following values:<br />
• Sensor output signal<br />
0-10 V<br />
0-20 mA<br />
4-20 mA<br />
• Unit of measurement of sensor:<br />
TM03 9060 3307<br />
The duty/standby function can be set to these values:<br />
• Active<br />
• Not active.<br />
When the function is set to "Active", the following<br />
applies:<br />
• Only one pump is running at a time.<br />
• The stopped pump (standby) will automatically be<br />
cut in if the running pump (duty) has a fault. A fault<br />
will be indicated.<br />
• Changeover between the duty pump and the<br />
standby pump will take place every 24 hours.<br />
Activate the duty/standby function as follows:<br />
1. Install and prime the two <strong>pumps</strong> per the installation<br />
and operating instructions included with the <strong>pumps</strong>.<br />
2. Verify the power supply is connected to the first<br />
pump per the installation and operating instructions.<br />
3. Use the <strong>Grundfos</strong> R100 programmer to set the<br />
duty/standby to "not active" in the installation menu.<br />
4. Use the <strong>Grundfos</strong> R100 programmer to set the<br />
"operating mode" to "stop" in the operation menu.<br />
5. Use the <strong>Grundfos</strong> R100 programmer to set the other<br />
displays as required for the pump application (such<br />
as setpoint).<br />
6. Disconnect the power supply to both <strong>pumps</strong>.<br />
7. Installation of the "AYB" cable (91125604):<br />
a. Remove the plug from each MLE casing with a<br />
flat head screw driver (see fig. 37).<br />
b. Thread a new cable gland into each MLE casing<br />
with a crescent wrench (see fig. 37).<br />
c. Loosen the new cable gland caps and push the<br />
cable ends through the cable glands and into MLE<br />
motors.<br />
d. Remove the "AYB" connector plug from the first<br />
MLE motor (see fig. 38).<br />
e. Connect the black wire to the "A" terminal of the<br />
"AYB" connector plug.<br />
f. Connect the orange wire to the "Y" terminal of the<br />
"AYB" connector plug.<br />
g. Connect the red wire to the "B" terminal of the<br />
"AYB" connector plug.<br />
h. Reconnect the "AYB" connector plug to the first<br />
MLE motor.<br />
i. Tighten the new cable gland cap to secure the<br />
cable (see fig. 37).<br />
j. Repeat steps "d" through "i" for the second MLE<br />
motor.<br />
35
3<br />
<strong>Grundfos</strong> E-<strong>pumps</strong><br />
E-<strong>pumps</strong><br />
8. Connect the power supply to the two <strong>pumps</strong> per the<br />
installation and operation instructions.<br />
9. Use the <strong>Grundfos</strong> R100 programmer to verify the<br />
"operating mode" is set to "normal" in the operation<br />
menu of the second pump.<br />
10.Use the <strong>Grundfos</strong> R100 programmer to set the<br />
other displays as required for the pump application<br />
(such as "setpoint").<br />
11.Use the <strong>Grundfos</strong> R100 programmer to set the<br />
duty/standby to "active" in the installation menu of<br />
the second pump.<br />
Please note the second pump will search for the first<br />
pump and automatically set the duty/standby to<br />
"active" in the installation menu.<br />
12.The second pump will operate for the first 24 hours.<br />
The two <strong>pumps</strong> will then alternate operation every<br />
24 hours.<br />
Operating range<br />
How to set the operating range:<br />
• Set the min. curve within the range from max. curve<br />
to 12 % of maximum performance. The pump has<br />
been factory-set to 24 % of maximum performance.<br />
• Set the max. curve within the range from maximum<br />
performance (100 %) to min. curve.<br />
The area between the min. and max. curves is the<br />
operating range.<br />
H<br />
100 %<br />
Max. curve<br />
Plug<br />
Cable gland<br />
Fig. 37 Connecting cable gland to plug<br />
PE<br />
L3<br />
L2<br />
L1<br />
TM05 1626 3311<br />
Min. curve<br />
12 %<br />
Operating range<br />
Fig. 39 Setting of the min. and max. curves in % of<br />
maximum performance<br />
Motor bearing monitoring<br />
(only three-phase <strong>pumps</strong>)<br />
Q<br />
TM00 7747 1896<br />
NC C NO<br />
Group 2<br />
L1 L2 L3<br />
Group 3<br />
0-10 V<br />
0/4-20 mA 4-20 mA<br />
1/0<br />
1 9 8 7<br />
AYB connector plug<br />
B Y A<br />
13: GND (frame)<br />
12: Analog output<br />
11: Digital input 4<br />
10: Digital input 3<br />
1: Digital input<br />
9: GND (frame)<br />
8: +24 V<br />
7: Sensor input<br />
B: RS-485B<br />
Y: Screen<br />
A: RS-485A<br />
The motor bearing monitoring function can be set to<br />
these values:<br />
• Active<br />
• Not active.<br />
When the function is set to "Active", a counter in the<br />
controller will start counting the mileage of the<br />
bearings. See section Lubrication status of motor bearings<br />
(only 15-30 Hp), page 31.<br />
Note: The counter will continue counting even if the<br />
function is switched to "Not active", but a warning will<br />
not be given when it is time for relubrication.<br />
When the function is switched to "Active" again, the<br />
accumulated mileage will again be used to calculate<br />
the relubrication time.<br />
STOP<br />
RUN<br />
0/4-20 mA 0-10 V<br />
10K<br />
6 5 4 3 2<br />
6: GND (frame)<br />
5: +10 V<br />
4: Setpoint input<br />
3: GND (frame)<br />
2: Start/stop<br />
TM05 1627 3311<br />
Fig. 38 AYB connector plug<br />
36
<strong>Grundfos</strong> E-<strong>pumps</strong><br />
3<br />
Confirming relubrication/replacement of motor<br />
bearings (only three-phase <strong>pumps</strong>)<br />
Priority of settings<br />
The priority of settings depends on two factors:<br />
1. control source<br />
2. settings.<br />
1. Control source<br />
E-<strong>pumps</strong><br />
This function can be set to these values:<br />
• Relubricated (15-30 Hp)<br />
• Replaced<br />
• Nothing done.<br />
When the bearing monitoring function is "Active", the<br />
controller will give a warning indication when the motor<br />
bearings are due to be relubricated or replaced.<br />
See section Fault indications, page 28.<br />
When the motor bearings have been relubricated or<br />
replaced, select "Relubricated" or "Replaced" in the<br />
motor bearings screen. Then press "OK" to the screen<br />
"Relubrication/Replacement just done".<br />
Note: "Relubricated" cannot be selected for a period of<br />
time after confirming relubrication.<br />
Standstill heating (only three-phase <strong>pumps</strong>)<br />
The standstill heating function can be set to these values:<br />
• Active<br />
• Not active.<br />
When the function is set to "Active", an AC voltage will<br />
be applied to the motor windings. The applied AC<br />
voltage will ensure that sufficient heat is generated to<br />
avoid condensation in the motor.<br />
Setting via the PC Tool E-products<br />
Special setup requirements differing from the settings<br />
available via the R100 require the use of the <strong>Grundfos</strong><br />
PC Tool E-products. This again requires the assistance<br />
of a <strong>Grundfos</strong> service technician or engineer. Contact<br />
your local <strong>Grundfos</strong> company for more information.<br />
Control panel<br />
R100<br />
External signals<br />
(external setpoint signal, digital inputs, etc.)<br />
Communication from another control system via bus<br />
2. Settings<br />
• Operating mode "Stop"<br />
• operating mode "Max." (max. curve)<br />
• operating mode "Min." (min. curve)<br />
• setpoint setting.<br />
An E-pump can be controlled by different control<br />
sources at the same time, and each of these sources<br />
can be set differently. Consequently, it is necessary<br />
to set an order of priority of the control sources<br />
and the settings.<br />
Note: If two or more settings are activated at the same<br />
time, the pump will operate according to the function<br />
with the highest priority.<br />
Priority of settings without bus communication<br />
Priority Control panel or R100 External signals<br />
1 Stop<br />
2 Max.<br />
3 Stop<br />
4 Max.<br />
5 Min. Min.<br />
6 Setpoint setting Setpoint setting<br />
Example: If the E-pump has been set to operating<br />
mode "Max." (max. frequency) via an external signal,<br />
such as digital input, the control panel or the R100 can<br />
only set the E-pump to operating mode "Stop".<br />
Priority of settings with bus communication<br />
Priority<br />
Control panel<br />
or R100<br />
External<br />
signals<br />
Bus<br />
communication<br />
1 Stop<br />
2 Max.<br />
3 Stop Stop<br />
4 Max.<br />
5 Min.<br />
6 Setpoint setting<br />
Example: If the E-pump is operating according to a<br />
setpoint set via bus communication, the control panel<br />
or the R100 can set the E-pump to operating mode<br />
"Stop" or "Max.", and the external signal can only set<br />
the E-pump to operating mode "Stop".<br />
37
3<br />
<strong>Grundfos</strong> E-<strong>pumps</strong><br />
E-<strong>pumps</strong><br />
External forced-control signals<br />
The pump has inputs for external signals for these<br />
forced-control functions:<br />
• start/stop of pump<br />
• digital input.<br />
Connection terminals<br />
Group 2<br />
Group 3<br />
Start/stop input<br />
Functional diagram: Start/stop input<br />
Start/stop<br />
(terminals 2 and 3)<br />
H<br />
H<br />
Q<br />
Q<br />
Normal duty<br />
Stop<br />
Digital inputs<br />
Via the R100, one of the following functions can be<br />
selected for the digital input:<br />
• Normal (duty)<br />
• Min. (curve)<br />
• Max. (curve)<br />
• External fault<br />
• Flow switch<br />
• Dry running.<br />
13: GND (frame)<br />
12: Analog output<br />
11: Digital input 4<br />
10: Digital input 3<br />
1: Digital input<br />
9: GND (frame)<br />
8: +24 V<br />
7: Sensor input<br />
B: RS-485B<br />
Y: Screen<br />
A: RS-485A<br />
Group 1<br />
Functional diagram: Input for digital function<br />
Digital function<br />
(terminals 1 and 9) (terminals 9 and 10) (terminals 9 and 11)<br />
H<br />
H<br />
H<br />
H<br />
5 s<br />
delay<br />
H<br />
5 s<br />
delay<br />
5 s<br />
H<br />
Q<br />
Q<br />
Q<br />
Q<br />
Q<br />
Q<br />
Normal duty<br />
Min. curve<br />
Max. curve<br />
External fault<br />
Flow switch<br />
Dry running<br />
Fig. 40 Connection terminals<br />
6: GND (frame)<br />
5: +10 V<br />
4: Setpoint input<br />
3: GND (frame)<br />
2: Start/stop<br />
TM05 1502 2811<br />
38
<strong>Grundfos</strong> E-<strong>pumps</strong><br />
3<br />
External setpoint signal<br />
The setpoint can be remote-set by connecting an<br />
analog signal transmitter to the input for the setpoint<br />
signal (terminal 4).<br />
Setpoint<br />
External setpoint<br />
signal<br />
Fig. 41 Actual setpoint as a product (multiplied value) of<br />
setpoint and external setpoint signal<br />
Select the actual external signal, 0-10 V, 0-20 mA,<br />
4-20 mA, via the R100. See section External setpoint,<br />
page 32.<br />
In control mode "Controlled", the setpoint can be set<br />
externally within the range from sensor min to the<br />
setpoint set on the pump or via the R100.<br />
[m]<br />
Actual<br />
setpoint<br />
Actual setpoint<br />
Sensor max<br />
Actual setpoint<br />
Setpoint set via the control<br />
panel, R100 or PC Tool<br />
E-products<br />
Sensor min<br />
External setpoint signal<br />
0 10 V<br />
0 20 mA<br />
4 20 mA<br />
Fig. 42 Relation between the actual setpoint and the<br />
external setpoint signal in control mode<br />
"Controlled"<br />
Example: At a sensor min value of 0 psi, a setpoint set<br />
of 50 psi and an external setpoint of 80 % (an 8V<br />
analog signal to Terminal 4 if using an analog signal of<br />
0 - 10V), the actual setpoint will be as follows:<br />
Actual setpoint = (setpoint - sensor min) x % external setpoint +<br />
sensor min<br />
= (50 - 0) x 80 % + 0<br />
= 40 psi<br />
TM03 8601 2007<br />
TM02 8988 1304<br />
If control mode "Uncontrolled" is selected via the<br />
R100, the pump can be controlled by any controller.<br />
In control mode "Uncontrolled", the setpoint can be set<br />
externally within the range from the min. curve to the<br />
setpoint set on the pump or via the R100. To obtain full<br />
pump performance, adjust the setpoint on the MLE to<br />
100 %.<br />
[m]<br />
Actual<br />
setpoint<br />
External setpoint signal<br />
0 10 V<br />
0 20 mA<br />
4 20 mA<br />
Fig. 43 Relation between the actual setpoint and the<br />
external setpoint signal in control mode<br />
"Uncontrolled"<br />
Bus signal<br />
Actual setpoint<br />
Max curve<br />
The pump supports serial communication via an<br />
RS-485 input. The communication is carried out<br />
according to the <strong>Grundfos</strong> bus protocol, GENIbus, and<br />
enables connection to a building management system<br />
or another external control system.<br />
Operating parameters, such as setpoint, operating<br />
mode, etc. can be remote-set via the bus signal. At the<br />
same time, the pump can provide status information<br />
about important parameters, such as actual value of<br />
control parameter, input power, fault indications, etc.<br />
Contact <strong>Grundfos</strong> for further details.<br />
Note: If a bus signal is used, the number of settings<br />
available via the R100 will be reduced.<br />
Other bus standards<br />
Setpoint set via the control<br />
panel, R100 or PC Tool<br />
E-products<br />
Min curve<br />
<strong>Grundfos</strong> offers various bus solutions with<br />
communication according to other standards.<br />
Contact <strong>Grundfos</strong> for further details.<br />
TM02 8988 1304<br />
E-<strong>pumps</strong><br />
39
3<br />
<strong>Grundfos</strong> E-<strong>pumps</strong><br />
E-<strong>pumps</strong><br />
Indicator lights and signal relay<br />
The operating condition of the pump is indicated by the green and red indicator lights on the pump control panel and<br />
inside the terminal box. See figs. 44, 45, and 46.<br />
Green<br />
Red<br />
Green<br />
Red<br />
TM00 7600 0304<br />
TM02 0838 0203<br />
Fig. 44 Position of indicator lights on single-phase <strong>pumps</strong><br />
Green<br />
Red<br />
Green<br />
Red<br />
Green<br />
Red<br />
TM02 8513 0304<br />
TM02 9036 4404<br />
TM03 9063 3307<br />
Fig. 45 Position of indicator lights on three-phase <strong>pumps</strong><br />
NC C NO<br />
Group 2<br />
L1 L2 L3<br />
Group 3<br />
13: GND (frame)<br />
12: Analog output<br />
11: Digital input 4<br />
10: Digital input 3<br />
1: Digital input 2<br />
9: GND (frame)<br />
8: +24 V<br />
7: Sensor input<br />
B: RS-485B<br />
Y: Screen<br />
A: RS-485A<br />
Group 1<br />
AYB connector plug<br />
6: GND (frame)<br />
5: +10 V<br />
4: Setpoint input<br />
3: GND (frame)<br />
2: Start/stop<br />
TM05 2980 0812<br />
Fig. 46 Connection terminals<br />
The pump incorporates an output for a potential-free<br />
signal via an internal relay.<br />
For signal relay output values, see section Signal<br />
relay, page 32.<br />
See signal relays in section 10. Advanced use of MLE<br />
motors on page 66 for additional details.<br />
40
<strong>Grundfos</strong> E-<strong>pumps</strong><br />
3<br />
The functions of the two indicator lights and the signal relay are as shown in the following table:<br />
Fault<br />
(red)<br />
Indicator lights<br />
Operation<br />
(green)<br />
Fault/Alarm,<br />
Warning and<br />
Relubricate<br />
Signal relay activated during:<br />
Operating Ready Pump running<br />
Description<br />
E-<strong>pumps</strong><br />
Off Off The power supply has been switched off.<br />
C<br />
NO NC<br />
C<br />
NO NC<br />
C<br />
NO NC<br />
C<br />
NO NC<br />
Off Permanently on The pump is operating.<br />
C NO NC C NO NC C NO NC C NO NC<br />
Off<br />
Permanently on<br />
C NO NC C NO NC C NO NC C NO NC<br />
The pump has been stopped by the stop<br />
function.<br />
Off Flashing The pump has been set to stop.<br />
C<br />
NO NC<br />
C NO NC C NO NC C NO NC<br />
Permanently on<br />
Permanently on<br />
Off<br />
Permanently on<br />
C NO NC C NO NC<br />
C<br />
NO NC<br />
NO NC<br />
C NO NC C NO NC C NO NC C NO NC<br />
C<br />
The pump has stopped because of a<br />
"Fault"/"Alarm" or is running with a<br />
"Warning" or "Relubricate" indication.<br />
If the pump was stopped, restarting will be<br />
attempted (it may be necessary to restart<br />
the pump by resetting the "Fault"<br />
indication).<br />
If the cause is "External fault", the pump<br />
must be restarted manually by resetting the<br />
"Fault" indication.<br />
The pump is operating, but it has or has had<br />
a "Fault"/"Alarm" allowing the pump to<br />
continue operation or it is operating with a<br />
"Warning" or "Relubricate" indication.<br />
If the cause is "Sensor signal outside signal<br />
range", the pump will continue operating<br />
according to the 70% curve and the fault<br />
indication cannot be reset until the signal is<br />
inside the signal range.<br />
If the cause is "Setpoint signal outside<br />
signal range", the pump will continue<br />
operating according to the min. curve and<br />
the fault indication cannot be reset until the<br />
signal is inside the signal range.<br />
Permanently on<br />
Flashing<br />
C NO NC C NO NC C NO NC C NO NC<br />
The pump has been set to stop, but it has<br />
been stopped because of a "Fault".<br />
Resetting of fault indication<br />
A fault indication can be reset in one of the following<br />
ways:<br />
• Briefly press or on the pump. This will not<br />
change the setting of the pump.<br />
A fault indication cannot be reset by means of or<br />
if the buttons have been locked.<br />
• Switch off the power supply until the indicator lights<br />
are off.<br />
• Switch the external start/stop input off and then on<br />
again.<br />
• Use the R100. See section Fault indications,<br />
page 28.<br />
When the R100 communicates with the pump, the red<br />
indicator light will flash rapidly.<br />
41
3<br />
<strong>Grundfos</strong> E-<strong>pumps</strong><br />
E-<strong>pumps</strong><br />
Insulation resistance<br />
0.5 to 10 Hp<br />
Do not measure the insulation resistance of motor<br />
windings or an installation incorporating E-<strong>pumps</strong><br />
using high-voltage megging equipment, as this may<br />
damage the built-in electronics.<br />
15 to 30 Hp<br />
Do not measure the insulation resistance of an<br />
installation incorporating E-<strong>pumps</strong> using high-voltage<br />
megging equipment, as this may damage the built-in<br />
electronics.<br />
The motor conductors can be disconnected separately<br />
and the insulation resistance of the motor windings can<br />
be tested.<br />
Further product documentation<br />
Specific product guides are also available at<br />
www.grundfos.us/WebCAPS. For further information<br />
on WebCAPS, see section Further product documentation<br />
on p. 91.<br />
42
<strong>Grundfos</strong> E-<strong>pumps</strong><br />
4<br />
4. Single-phase MLE motors<br />
E-<strong>pumps</strong> with single-phase<br />
MLE motors<br />
<strong>Grundfos</strong> single phase MLE motors offer these<br />
features:<br />
• Single-phase power supply connection.<br />
• Single-phase, asynchronous squirrel-cage induction<br />
motors designed to current IEC, DIN and VDE<br />
guidelines and standards. The motors incorporate<br />
a variable frequency drive and PI controller.<br />
• Used for continuously variable speed control of<br />
<strong>Grundfos</strong> E-<strong>pumps</strong>.<br />
• Available in power sizes 0.33 to 1.0 Hp, 4-pole, and<br />
0.5 to 1.5 Hp, 2-pole.<br />
Setpoint signals<br />
• Potentiometer<br />
0-10 VDC, 10 kΩ (via internal voltage supply).<br />
Screened cable: 0.5 - 1.5 mm 2 / 28-16 AWG.<br />
Maximum cable length: 328 ft (100 m).<br />
• Voltage signal<br />
0-10 VDC, R i 50 kΩ.<br />
Tolerance: + 0 %/- 3 % at maximum voltage signal.<br />
Screened cable: 0.5 - 1.5 mm 2 / 28-16 AWG.<br />
Maximum cable length: 1640 ft (500 m).<br />
• Current signal<br />
DC 0-20 mA/4-20 mA, R i = 175 Ω.<br />
Tolerance: + 0 %/- 3 % at maximum current signal.<br />
Screened cable: 0.5 - 1.5 mm 2 / 28-16 AWG.<br />
Maximum cable length: 1640 ft (500 m).<br />
Single-phase MLE motors<br />
Fig. 47 Single-phase MLE motor<br />
Supply voltage<br />
1 x 200-240 V - 10 %/+ 10 %, 50/60 Hz, PE.<br />
1 x 208-230 V - 10 %/+ 10 %, 50/60 Hz, PE.<br />
Back-up fuse<br />
See <strong>Grundfos</strong> Installation and Operating Instructions<br />
for this product.<br />
Leakage current<br />
Earth leakage current: < 3.5 mA.<br />
The leakage currents are measured in accordance with<br />
EN 60355-1.<br />
Input/output<br />
Start/stop<br />
• External potential-free switch.<br />
Voltage: 5 VDC.<br />
Current: < 5 mA.<br />
Screened cable: 0.5 - 1.5 mm 2 / 28-16 AWG.<br />
Digital input<br />
• External potential-free switch.<br />
Voltage: 5 VDC.<br />
Current: < 5 mA.<br />
Screened cable: 0.5 - 1.5 mm 2 / 28-16 AWG.<br />
TM02 1502 0101<br />
Sensor signals<br />
• Voltage signal<br />
0-10 VDC, R i > 50 kΩ (via internal voltage supply).<br />
Tolerance: + 0 %/- 3 % at maximum voltage signal.<br />
Screened cable: 0.5 - 1.5 mm 2 / 28-16 AWG.<br />
Maximum cable length: 1640 ft (500 m).<br />
• Current signal<br />
DC 0-20 mA/4-20 mA, R i = 175 Ω.<br />
Tolerance: + 0 %/- 3 % at maximum current signal.<br />
Screened cable: 0.5 - 1.5 mm 2 / 28-16 AWG.<br />
Maximum cable length: 1640 ft (500 m).<br />
• Power supply to sensor:<br />
+24 VDC, max. 40 mA.<br />
Signal output<br />
• Potential-free changeover contact.<br />
Maximum contact load: 250 VAC, 2 A.<br />
Minimum contact load: 5 VDC, 10 mA.<br />
Screened cable: 0.5 - 1.5 mm 2 / 28-16 AWG.<br />
Maximum cable length: 1640 ft (500 m).<br />
Bus input<br />
• <strong>Grundfos</strong> GENIbus protocol, RS-485.<br />
Screened 2-core cable: 0.5 - 1.5 mm 2 / 28-16 AWG.<br />
Maximum cable length: 1640 ft (500 m).<br />
43
4<br />
<strong>Grundfos</strong> E-<strong>pumps</strong><br />
Single-phase MLE motors<br />
EMC (electromagnetic compatibility)<br />
Emission<br />
Comply with the limits in EN 61800-3 for the first<br />
environment (residential areas), unrestricted<br />
distribution, corresponding to CISPR11, group 1,<br />
class B.<br />
Immunity<br />
Fulfill the requirements for both the first and the<br />
second environment according to EN 61800-3.<br />
For further information about EMC, see section<br />
E-<strong>pumps</strong> with single-phase MLE motors on p. 43.<br />
Motor protection<br />
The motor requires no external motor protection.<br />
The motor incorporates thermal protection against<br />
slow overloading and blocking (TP 211 to IEC 34-11).<br />
Additional protection<br />
If the motor is connected to an electric installation<br />
where an earth leakage circuit breaker is used as<br />
additional protection, this circuit breaker must be<br />
marked with the following symbol:<br />
ELCB<br />
Enclosure class<br />
Standard enclosure class: IP55 (TEFC).<br />
Insulation class<br />
F (IEC 85).<br />
Ambient temperature<br />
• During operation:<br />
-4 °F (-20 °C) to +104 °F (+40 °C).<br />
• During storage/transport:<br />
-40 °F (-40 °C) to +140 °F (+60 °C).<br />
Relative air humidity<br />
Maximum 95 %.<br />
Sound pressure level<br />
Note: When an earth leakage circuit breaker is<br />
selected, the total leakage current of all the electrical<br />
equipment in the installation must be taken into<br />
account.<br />
Start/stop of pump<br />
The number of starts and stops via the power supply<br />
must not exceed 4 times per hour.<br />
When the pump is switched on via the power supply, it<br />
will start after approx. 5 seconds.<br />
If a higher number of starts and stops is desired, the<br />
input for external start/stop must be used when<br />
starting/stopping the pump.<br />
When the pump is started/stopped via an external<br />
on/off switch, it will start immediately.<br />
Motor<br />
[Hp]<br />
0.5<br />
0.75<br />
1.0<br />
1.5<br />
Approvals<br />
Speed as stated on<br />
the nameplate<br />
[rpm]<br />
1400-1500<br />
1700-1800<br />
2800-3000<br />
3400-3600<br />
1400-1500<br />
1700-1800<br />
2800-3000<br />
3400-3600<br />
1400-1500<br />
1700-1800<br />
2800-3000<br />
3400-3600<br />
2800-3000<br />
3400-3600<br />
Sound pressure<br />
level<br />
[dB(A)]<br />
< 70<br />
44
<strong>Grundfos</strong> E-<strong>pumps</strong><br />
4<br />
Wiring diagram<br />
1 x 200-240 V - 10 %/+ 10 %, 50/60 Hz<br />
External switch<br />
N<br />
L<br />
PE<br />
ELCB<br />
Max. 10 A<br />
Fig. 48 Wiring diagram, single-phase MLE motors<br />
Other connections<br />
N<br />
PE<br />
L<br />
Figure 49 shows the connection terminals of external<br />
potential-free contacts for start/stop and digital<br />
function, external setpoint signal, sensor signal,<br />
GENIbus and relay signal.<br />
Note: If no external on/off switch is connected,<br />
short-circuit terminals 2 and 3 using a short wire.<br />
Note: As a precaution, the wires to be connected to<br />
the following connection groups must be separated<br />
from each other by reinforced insulation in their entire<br />
lengths:<br />
• Group 1: Inputs<br />
– External start/stop (terminals 2-3)<br />
– Digital input function (terminals 1-9)<br />
– Setpoint (terminals 4, 5, 6)<br />
– Sensor signals (terminals 7-8)<br />
– Bus connection (terminals B, Y, A).<br />
All inputs (group 1) are internally separated from<br />
the power supply-conducting parts by reinforced<br />
insulation and galvanically separated from other<br />
circuits. All control terminals are supplied by<br />
protective extra-low voltage (PELV), thus ensuring<br />
protection against electric shock.<br />
• Group 2: Output<br />
– Relay signal (terminals NC, C, NO)<br />
The output (group 2) is galvanically separated<br />
from other circuits. A maximum supply voltage of<br />
250 volts can be connected to the output as<br />
desired.<br />
• Group 3: Power supply (terminals N, PE, L).<br />
A galvanically safe separation must fulfill the<br />
requirements for reinforced insulation including<br />
creepage distances and clearances specified in<br />
EN 60335.<br />
TM02 0792 0101<br />
NC C NO<br />
0/4-20 mA 0-10 V<br />
Group 2<br />
STOP<br />
RUN<br />
10K<br />
Fig. 49 Connection terminals<br />
N PE L<br />
6 5 4 3 2<br />
Group 3<br />
1: Digital input 2<br />
9: GND (frame)<br />
8: +24 V<br />
7: Sensor input<br />
6: GND (frame)<br />
5: +10 V<br />
4: Setpoint input<br />
3: GND (frame)<br />
2: Start/stop<br />
Group 1<br />
TM05 2984 0812<br />
Single-phase MLE motors<br />
45
5<br />
<strong>Grundfos</strong> E-<strong>pumps</strong><br />
Three-phase MLE motors<br />
5. Three-phase MLE motors<br />
E-<strong>pumps</strong> with three-phase<br />
MLE motors<br />
<strong>Grundfos</strong> three-phase MLE motors offer these<br />
features:<br />
• Three-phase power supply connection.<br />
• Three-phase, asynchronous squirrel-cage induction<br />
motors designed to current IEC, DIN and VDE<br />
guidelines and standards. The motors incorporate<br />
a variable frequency drive and PI controller.<br />
• Used for continuously variable speed control of<br />
<strong>Grundfos</strong> E-<strong>pumps</strong>.<br />
• Available in power sizes 1 to 30 Hp, 2-pole.<br />
Fig. 50 Three-phase MLE motor<br />
Supply voltage<br />
3 x 480 V - 10 %/+ 10 %, 60 Hz, PE.<br />
Back-up fuse<br />
See Installation and Operating Instructions.<br />
Leakage current<br />
Motor size<br />
[Hp]<br />
Leakage current<br />
[mA]<br />
1.0 - 3.0 < 3.5<br />
5.0 - 7.5 < 5<br />
10 < 10<br />
15 - 30 >10<br />
The leakage currents are measured in accordance with<br />
EN 60355-1 for 1.0 to 10 Hp and EN 61800-5-1 for<br />
15 to 30 Hp motors.<br />
GR8275<br />
Input/output<br />
Start/stop<br />
• External potential-free switch.<br />
Voltage: 5 VDC.<br />
Current: < 5 mA.<br />
Screened cable: 0.5 - 1.5 mm 2 / 28-16 AWG.<br />
Digital input<br />
• External potential-free switch.<br />
Voltage: 5 VDC.<br />
Current: < 5 mA.<br />
Screened cable: 0.5 - 1.5 mm 2 / 28-16 AWG.<br />
Setpoint signals<br />
• Potentiometer<br />
0-10 VDC, 10 kΩ (via internal voltage supply).<br />
Screened cable: 0.5 - 1.5 mm 2 / 28-16 AWG.<br />
Maximum cable length: 328 ft (100 m).<br />
• Voltage signal<br />
0-10 VDC, R i > 50 kΩ.<br />
Tolerance: + 0 %/- 3 % at maximum voltage signal.<br />
Screened cable: 0.5 - 1.5 mm 2 / 28-16 AWG.<br />
Maximum cable length: 1640 ft (500 m).<br />
• Current signal<br />
DC 0-20 mA/4-20 mA, R i = 175 Ω.<br />
Tolerance: + 0 %/- 3 % at maximum current signal.<br />
Screened cable: 0.5 - 1.5 mm 2 / 28-16 AWG.<br />
Maximum cable length: 1640 ft (500 m).<br />
Sensor signals<br />
• Voltage signal<br />
0-10 VDC, R i > 50 kΩ (via internal voltage supply).<br />
Tolerance: + 0 %/- 3 % at maximum voltage signal.<br />
Screened cable: 0.5 - 1.5 mm 2 / 28-16 AWG.<br />
Maximum cable length: 1640 ft (500 m).<br />
• Current signal<br />
DC 0-20 mA/4-20 mA, R i = 175 Ω.<br />
Tolerance: + 0 %/- 3 % at maximum current signal.<br />
Screened cable: 0.5 - 1.5 mm 2 / 28-16 AWG.<br />
Maximum cable length: 1640 ft (500 m).<br />
• Power supply to sensor<br />
+24 VDC, max. 40 mA.<br />
Signal output<br />
• Potential-free changeover contact.<br />
Maximum contact load: 250 VAC, 2 A.<br />
Minimum contact load: 5 VDC, 10 mA.<br />
Screened cable: 0.5 - 1.5 mm 2 / 28-16 AWG.<br />
Maximum cable length: 1640 ft (500 m).<br />
Bus input<br />
• <strong>Grundfos</strong> GENIbus protocol, RS-485.<br />
Screened cable: 0.5 - 1.5 mm 2 / 28-16 AWG.<br />
Maximum cable length: 1640 ft (500 m).<br />
46
<strong>Grundfos</strong> E-<strong>pumps</strong><br />
5<br />
EMC (electromagnetic compatibility to<br />
EN 61800-3)<br />
Motor<br />
[Hp]<br />
Emission/immunity<br />
1.0 Emission:<br />
1.5<br />
2.0<br />
3.0<br />
5.0<br />
7.5<br />
10<br />
The motors may be installed in residential areas<br />
(first environment), unrestricted distribution, corresponding<br />
to CISPR11, group 1, class B.<br />
Immunity:<br />
The motors fulfill the requirements for both the first and second<br />
environment.<br />
15 Emission:<br />
20 The motors are category C3, corresponding to CISPR11,<br />
25 group 2, class A, and may be installed in industrial areas<br />
(second environment).<br />
30<br />
If fitted with an external <strong>Grundfos</strong> EMC filter, the motors are<br />
category C2, corresponding to CISPR11, group 1, class A,<br />
and may be installed in residential areas (first environment).<br />
When the motors are installed in residential<br />
areas, supplementary measures may be<br />
Note:<br />
required as the motors may cause radio<br />
interference.<br />
Immunity:<br />
The motors fulfill the requirements for both the first and second<br />
environment.<br />
Sound pressure level<br />
Motor<br />
[Hp]<br />
Approvals<br />
Speed stated on the<br />
nameplate<br />
[rpm]<br />
Sound pressure<br />
level<br />
[dB(A)]<br />
1.0<br />
65<br />
1.5 65<br />
2.0 70<br />
3.0 70<br />
5.0 75<br />
7.5 3400-3600<br />
80<br />
10 69<br />
15 70<br />
20 70<br />
25 74<br />
30 78<br />
1 - 10 Hp<br />
15 - 30 Hp<br />
Three-phase MLE motors<br />
For further information about EMC, see section 8. Bus<br />
communication on page 57.<br />
Enclosure class<br />
Standard: IP55 (IEC34-5) (TEFC).<br />
Insulation class<br />
F (IEC 85).<br />
Ambient temperature<br />
During operation: -4 °F to +104 °F (-20 °C to +40 °C)<br />
During storage/transport:<br />
1.0 to 10 Hp: -40°F to +140 °F<br />
(-40 °C to +60 °C)<br />
15 to 30 Hp: -13 °F to +158 °F<br />
(-25 °C to +70 °C)<br />
Relative air humidity<br />
Maximum 95 %.<br />
47
5<br />
<strong>Grundfos</strong> E-<strong>pumps</strong><br />
Three-phase MLE motors<br />
Motor protection<br />
The motor requires no external motor protection.<br />
The motor incorporates thermal protection against<br />
slow overloading and blocking (TP 211 to IEC 34-11).<br />
Additional protection<br />
If the motor is connected to an electric installation<br />
where an earth leakage circuit breaker is used as<br />
additional protection, this circuit breaker must fulfill the<br />
following:<br />
• It is suitable for handling leakage currents and<br />
cutting-in in case of short pulse-shaped leakage.<br />
• It trips out when alternating fault currents and fault<br />
currents with DC content, i.e. pulsating DC and<br />
smooth DC fault currents, occur.<br />
For these <strong>pumps</strong> an earth leakage circuit breaker<br />
type B must be used.<br />
This circuit breaker must be marked with the following<br />
symbols:<br />
ELCB<br />
Note: When an earth leakage circuit breaker is<br />
selected, the total leakage current of all the electrical<br />
equipment in the installation must be taken into<br />
account.<br />
Start/stop of pump<br />
The number of starts and stops via the power supply<br />
voltage must not exceed 4 times per hour.<br />
When the pump is switched on via the power supply, it<br />
will start after approx. 5 seconds.<br />
If a higher number of starts and stops is desired, the<br />
input for external start/stop must be used when<br />
starting/stopping the pump.<br />
When the pump is started/stopped via an external<br />
on/off switch, it will start immediately.<br />
48
<strong>Grundfos</strong> E-<strong>pumps</strong><br />
5<br />
Wiring diagram, 1.0 to 7.5 Hp<br />
3 x 480 V - 10 %/+ 10 %, 60 Hz<br />
L1<br />
L2<br />
L3<br />
PE<br />
ELCB<br />
External switch<br />
Max. 16/32 A<br />
L1<br />
L2<br />
L3<br />
TM00 9270 4696<br />
Group 2<br />
Group 3<br />
Three-phase MLE motors<br />
Fig. 51 Wiring diagram, three-phase MLE motors,<br />
1.0 to 7.5 Hp<br />
Other connections<br />
Figure 52 shows the connection terminals of external<br />
potential-free contacts for start/stop and digital<br />
function, external setpoint signal, sensor signal,<br />
GENIbus and relay signal.<br />
Note: If no external on/off switch is connected,<br />
short-circuit terminals 2 and 3 using a short wire.<br />
Note: As a precaution, the wires to be connected to<br />
the following connection groups must be separated<br />
from each other by reinforced insulation in their entire<br />
lengths:<br />
• Group 1: Inputs<br />
– External start/stop (terminals 2-3)<br />
– Digital input function (terminals 1-9)<br />
– Setpoint (terminals 4, 5, 6)<br />
– Sensor signals (terminals 7-8)<br />
– Bus connection (terminals B, Y, A).<br />
All inputs (group 1) are internally separated from<br />
the power supply-conducting parts by reinforced<br />
insulation and galvanically separated from other<br />
circuits. All control terminals are supplied by<br />
protective extra-low voltage (PELV), thus ensuring<br />
protection against electric shock.<br />
• Group 2: Output<br />
– Relay signal (terminals NC, C, NO and NC, C2,<br />
NO.)<br />
The output (group 2) is galvanically separated<br />
from other circuits. A maximum supply voltage of<br />
250 volts can be connected to the output as<br />
desired.<br />
• Group 3: Power supply (terminals L1, L2, L3,<br />
Ground).<br />
A galvanically safe separation must fulfill the<br />
requirements for reinforced insulation including<br />
creepage distances and clearances specified in<br />
EN 60335.<br />
Fig. 52 Connection terminals<br />
1: Digital input 2<br />
9: GND (frame)<br />
8: +24 V<br />
7: Sensor input<br />
B: RS-485B<br />
Y: Screen<br />
A: RS-485A<br />
6: GND (frame)<br />
5: +10 V<br />
4 Setpoint input<br />
3: GND (frame)<br />
2: Start/stop<br />
Group 1<br />
TM05 3239 1012<br />
49
5<br />
<strong>Grundfos</strong> E-<strong>pumps</strong><br />
Three-phase MLE motors<br />
Wiring diagram, 10 Hp<br />
3 x 480 V - 10 %/+ 10 %, 60 Hz<br />
L1<br />
L2<br />
L3<br />
PE<br />
ELCB<br />
External switch<br />
Max. 16/32 A<br />
Fig. 53 Wiring diagram, three-phase MLE motors,<br />
10 Hp<br />
L1<br />
L2<br />
L3<br />
TM00 9270 4696<br />
Group 2<br />
Group 3<br />
Other connections<br />
Figure 54 shows the connection terminals of external<br />
potential-free contacts for start/stop and digital<br />
function, external setpoint signal, sensor signal,<br />
GENIbus and relay signal.<br />
Note: If no external on/off switch is connected,<br />
short-circuit terminals 2 and 3 using a short wire.<br />
Note: As a precaution, the wires to be connected to<br />
the following connection groups must be separated<br />
from each other by reinforced insulation in their entire<br />
lengths:<br />
• Group 1: Inputs<br />
– External start/stop (terminals 2-3)<br />
– Digital input function (terminals 1-9, 9-10, 9-11)<br />
– Setpoint (terminals 4, 5, 6)<br />
– Sensor signals (terminals 7-8)<br />
– Bus connection (terminals B, Y, A).<br />
All inputs (group 1) are internally separated from<br />
the power supply-conducting parts by reinforced<br />
insulation and galvanically separated from other<br />
circuits. All control terminals are supplied by<br />
protective extra-low voltage (PELV), thus ensuring<br />
protection against electric shock.<br />
• Group 2: Output<br />
– Relay signal (terminals NC, C, NO and NC, C2,<br />
NO.)<br />
The output (group 2) is galvanically separated<br />
from other circuits. A maximum supply voltage of<br />
250 volts can be connected to the output as<br />
desired.<br />
• Group 3: Power supply (terminals L1, L2, L3,<br />
Ground).<br />
A galvanically safe separation must fulfill the<br />
requirements for reinforced insulation including<br />
creepage distances and clearances specified in<br />
EN 60335.<br />
Fig. 54 Connection terminals<br />
13: GND (frame)<br />
12: Analog output<br />
11: Digital input 4<br />
10: Digital input 3<br />
1: Digital input 2<br />
9: GND (frame)<br />
8: +24 V<br />
7: Sensor input<br />
B: RS-485B<br />
Y: Screen<br />
A: RS-485A<br />
6: GND (frame)<br />
5: +10 V<br />
4: Setpoint input<br />
3: GND (frame)<br />
2: Start/stop<br />
Group 1<br />
TM05 2985 0812<br />
50
<strong>Grundfos</strong> E-<strong>pumps</strong><br />
5<br />
Wiring diagram, 15 - 30 Hp<br />
3 x 480 V - 10 %/+ 10 %, 60 Hz<br />
L1<br />
L2<br />
L3<br />
PE<br />
ELCB<br />
External switch<br />
Max. 26/51 A<br />
L1<br />
L2<br />
L3<br />
TM00 9270 4696<br />
Group 2<br />
Group 3<br />
Three-phase MLE motors<br />
Fig. 55 Wiring diagram, three-phase MLE motors,<br />
15 - 30 Hp<br />
Other connections<br />
Note: As a precaution, the wires to be connected to<br />
the following connection groups must be separated<br />
from each other by reinforced insulation in their entire<br />
lengths:<br />
Group 1: Inputs<br />
• Start/stop (terminals 2 and 3)<br />
• digital input (terminals 1 and 9, 9 and 10, 9 and 11)<br />
• setpoint input (terminals 4, 5 and 6)<br />
• sensor input (terminals 7 and 8)<br />
• GENIbus (terminals B, Y and A)<br />
• Analog output (terminals 12 and 13)<br />
• Sensor input 2 (terminals 14 and 15)<br />
• PT100 (terminals 17, 18, 19 and 20).<br />
All inputs (group 1) are internally separated from the<br />
mains-conducting parts by reinforced insulation and<br />
galvanically separated from other circuits.<br />
All control terminals are supplied by protective<br />
extra-low voltage (PELV), thus ensuring protection<br />
against electric shock.<br />
• Group 2: Output relay signal<br />
(terminals NC, C1, NO, and NC, C2, NO).<br />
The output (group 2) is galvanically separated from<br />
other circuits. Therefore, the supply voltage or<br />
protective extra-low voltage can be connected to the<br />
output as desired.<br />
• Group 3: Power supply (terminals L1, L2, L3).<br />
A galvanically safe separation must fulfill the<br />
requirements for reinforced insulation including<br />
creepage distances and clearances specified in<br />
EN 61800-5-1.<br />
Fig. 56 Connection terminals<br />
20: PT 100 B<br />
19: PT 100 B<br />
18: PT 100 A<br />
17: PT 100 A<br />
16: GND (frame)<br />
15: +24 V<br />
14: Sensor input 2<br />
13: GND<br />
12: Analog output<br />
11: Digital input 4<br />
10: Digital input 3<br />
1: Digital input 2<br />
9: GND (frame)<br />
8: +24 V<br />
7: Sensor input<br />
B: RS-485B<br />
Y: Screen<br />
A: RS-485A<br />
6: GND (frame)<br />
5: +10 V<br />
4: Setpoint input<br />
3: GND (frame)<br />
2: Start/stop<br />
Group 1<br />
TM05 2986 0812<br />
51
6<br />
<strong>Grundfos</strong> E-<strong>pumps</strong><br />
EMC<br />
6. EMC<br />
EMC and proper installation<br />
General information<br />
The growing use of electric/electronic controls and<br />
electronic equipment including PLCs and computers<br />
within all business areas require these products to<br />
fulfill the existing standards within EMC<br />
(ElectoMagnetic Compatibility). The equipment must<br />
be mounted properly.<br />
This section deals with these issues.<br />
What is EMC?<br />
ElectoMagnetic Compatibility is an electric or<br />
electronic device's ability to function in a given<br />
electromagnetic environment without disturbing the<br />
surroundings and without being disturbed by other<br />
devices in the surroundings. EMC is normally split into<br />
emission and immunity.<br />
Emission<br />
Emission is defined as the electric or electromagnetic<br />
noise emitted by a device during operation and which<br />
can reduce the function of other devices or disturb<br />
various radio communications, including radio/TV.<br />
Immunity<br />
Immunity deals with a device's ability to function in<br />
spite of the presence of electric or electromagnetic<br />
noise, such as sparking noise from contactors or<br />
high-frequency fields from various transmitters, mobile<br />
phones, etc.<br />
E-<strong>pumps</strong> and EMC<br />
All <strong>Grundfos</strong> E-<strong>pumps</strong> are CE- and C-tick-marked<br />
indicating that the product is designed to meet the<br />
EMC requirements defined by the EU (European<br />
Union) and Australia / New Zealand.<br />
EMC and CE<br />
All E-<strong>pumps</strong> fulfill the EMC directive 2004/108/EC and<br />
are tested according to standard EN 61800-3. All<br />
E-<strong>pumps</strong> are fitted with a radio interference filter and<br />
varistors in the power supply input to protect the<br />
electronics against voltage peaks and noise present in<br />
the mains supply (immunity). At the same time, the<br />
filter will limit the amount of electrical noise which the<br />
E-pump emits to the power supply network (emission).<br />
All remaining inputs included in the electronic unit will<br />
also be protected against peaks and noise which can<br />
damage or disturb the function of the unit.<br />
The mechanical and electronic designs are made in<br />
such a way that the unit can operate sufficiently under<br />
a certain level of radiated electromagnetic disturbance.<br />
The limits which the E-<strong>pumps</strong> are tested against are<br />
listed in standard EN 61800-3.<br />
EMC and C-tick<br />
All E-<strong>pumps</strong> marked with the C-tick logo fulfill the<br />
requirements for EMC in Australia and New Zealand.<br />
The C-tick approval is based on the EN standards, and<br />
the units are therefore tested according to the<br />
European standard EN 61800-3.<br />
Only E-<strong>pumps</strong> with MLE-motors are marked with<br />
C-tick.<br />
The C-tick only covers emission.<br />
Where can E-<strong>pumps</strong> be installed?<br />
All E-<strong>pumps</strong> with MLE motors can be used in both<br />
residential areas (first environment) and industrial<br />
areas (second environment) within certain limitations.<br />
What is meant by the first and the second<br />
environment?<br />
The first environment (residential areas) includes<br />
establishments directly connected to a low-voltage<br />
power supply network which supplies domestic<br />
buildings.<br />
The second environment (industrial areas) include<br />
establishments which are not connected to a<br />
low-voltage network that supplies domestic buildings.<br />
The level of electromagnetic disturbance can be<br />
expected to be much higher than in the first<br />
environment.<br />
EMC and proper installation<br />
With the CE and C-tick marks the E-<strong>pumps</strong> live up to<br />
and have been tested to meet specific EMC<br />
requirements. This, however, does not mean that<br />
E-<strong>pumps</strong> are immune to all the sources of noise to<br />
which they can be exposed in practice. In some<br />
installations the impact may exceed the level to which<br />
the product is designed and tested.<br />
Furthermore, unproblematic operation in a noisy<br />
environment presupposes that the installation of the<br />
E-pump is made properly.<br />
Below you will find a description of a correct E-pump<br />
installation.<br />
Connection of power supply to MLE<br />
Practice shows that big cable loops are often made<br />
inside the terminal box to get some 'spare cable'.<br />
Of course, this can be useful, However, with regard to<br />
EMC it is a poor solution as these cable loops will<br />
function as antennas inside the terminal box.<br />
To avoid EMC problems, the power supply cable and<br />
its individual conductors in the terminal box of the<br />
E-pump must be as short as possible. If required,<br />
spare cable can be established outside the E-pump.<br />
52
<strong>Grundfos</strong> E-<strong>pumps</strong><br />
6<br />
Connecting sensor and equipment on<br />
other low-voltage inputs<br />
All connections to control inputs (terminals 1-9, 9-10,<br />
and 9-11) should be made with screened cables.<br />
To obtain an efficient EMC protection, the screen must<br />
be connected to ground/frame in both ends and be<br />
unbroken between the two connection points.<br />
It is important that the screen is connected to<br />
ground/frame as direct as possible, i.e. by means of a<br />
metal cable bracket to encircle the screen completely.<br />
See fig. 57.<br />
To ensure a good connection between the cable<br />
bracket and ground/frame, any painting and surface<br />
treatment on the metal surfaces must be removed.<br />
• If the E-pump is connected to an electronic unit,<br />
control panel, etc. with a cable clamp identical to the<br />
one on the E-pump, the screen must be connected<br />
to this cable clamp. See fig. 58.<br />
• If the unit or panel has no cable clamp as shown in<br />
fig. 59, the screen is left unconnected at this end.<br />
A<br />
Y<br />
B<br />
1<br />
2<br />
3<br />
E-pump<br />
1 A<br />
2<br />
Y<br />
3<br />
B<br />
Fig. 59 Connection with screened 3-core cable and metal<br />
cable bracket at only the E-pump end<br />
TM02 8841 0904<br />
EMC<br />
Fig. 57 Mounting of brackets on cable<br />
TM03 0266 5004<br />
b) Replacing an existing pump<br />
• If a screened 2-core cable is used in the existing<br />
installation, it must be connected as shown in<br />
fig. 60. Make sure that the "pig's tail" is as short as<br />
possible.<br />
An intertwined screen (also called a pig's tail) is a very<br />
bad closing as the pig's tail can destroy the whole<br />
screen effect.<br />
Connection to signal relay in E-<strong>pumps</strong><br />
Connection to relay (terminals NC, C, NO) should be<br />
made by means of a screened cable.<br />
Provided the voltage used is low-voltage, the<br />
connection can be used together with the other control<br />
signals. Otherwise, a separate cable must be used.<br />
Connection to GENIbus, A, Y, B<br />
a) New installations<br />
For the bus connection a screened 3-core cable must<br />
be used.<br />
A 1<br />
2<br />
Y 3<br />
B<br />
Fig. 58 Connection with screened 3-core cable and metal<br />
cable bracket at both ends<br />
1<br />
2<br />
3<br />
E-pump<br />
A<br />
Y<br />
B<br />
TM03 0265 5004<br />
A<br />
Y<br />
B<br />
1<br />
2<br />
E-pump<br />
1 A<br />
Y<br />
2<br />
B<br />
Fig. 60 Connection with screened 2-core cable<br />
• If a screened 3-core cable is used in the existing<br />
installation, follow the instructions above for a) New<br />
installations.<br />
Connection in control panel<br />
Control panels often contain contactors, relays,<br />
solenoid valves for pneumatics and other<br />
electromechanical components. These components<br />
and cables to and from these can be considered<br />
potential sources of noise and therefore, if possible,<br />
should be placed separately from any electronic<br />
equipment in the same panel. This means that a<br />
distance as long as possible should be kept to these,<br />
and the components should be screened against their<br />
influence.<br />
Cable ducts should be divided so that cables to<br />
electronics and cables to contactors should be carried<br />
separately.<br />
TM02 8842 0904<br />
53
6<br />
<strong>Grundfos</strong> E-<strong>pumps</strong><br />
EMC<br />
Back plate<br />
Control panels are often made of metal and/or have<br />
a metal back plate. This back plate can therefore be<br />
used as reference for all screening, i.e. all screens are<br />
connected to this back plate via cable brackets.<br />
When installing the cable brackets, make sure that<br />
they have a good electrical connection to the metal<br />
back plate. Therefore, any painting and surface<br />
treatment must be removed.<br />
b) Extension of control cable<br />
If an extension of the screened control cable is<br />
required, it must be made properly.<br />
As shown in fig. 62, both cable ends must be closed by<br />
a cable bracket to the common back plate and the<br />
unscreened cable ends must be as short as possible.<br />
Control signal from E-<strong>pumps</strong> to control<br />
panel<br />
a) Unbroken control cable<br />
An unbroken connection from the E-pump to the<br />
connection in the control panel is always preferable.<br />
Immediately after entry of the cable into the panel,<br />
remove a piece of insulation, and connect the screen<br />
to the back plate via a cable bracket. See page 61.<br />
Back plate<br />
Electronic unit<br />
Screen to back<br />
plate via bracket<br />
Fig. 61 Schematic drawing of connection of cable to back<br />
plate<br />
Connect the cable to the back plate of the control<br />
panel close to the final connection. The unscreened<br />
cable ends must be as short as possible.<br />
TM03 0249 5004<br />
Fig. 62 Schematic drawing of extension of control cable<br />
Keep as long a distance as possible to contactors and<br />
power current installation.<br />
Other conditions of importance<br />
Unscreened cable sections must be twisted-pair<br />
cables and as short as possible.<br />
Non-conductive panels<br />
Control panels not made of metal and with metal back<br />
plate are generally a bad solution with regard to EMC.<br />
In such cases, it is of great importance to be careful<br />
with the placing of the different types of unit and to<br />
keep distance between the noisy and sensitive units.<br />
Cabling<br />
Do not place the control signal cables in the same<br />
bunch as the power cables. A distance of 4 to 8 in.<br />
(10 to 20 cm) between the two groups should be<br />
observed.<br />
TM03 0250 5004<br />
54
<strong>Grundfos</strong> E-<strong>pumps</strong><br />
7<br />
7. E-<strong>pumps</strong> in parallel<br />
Control of E-<strong>pumps</strong> connected in<br />
parallel<br />
E-<strong>pumps</strong> represent a complete system consisting of<br />
pump, variable frequency drive, PI controller and in<br />
some cases a sensor. E-<strong>pumps</strong> offer a closed-loop<br />
control solution resulting in for instance constant<br />
pressure in the system.<br />
In some applications, parallel pump operation is<br />
required for one or more of the following reasons:<br />
• One pump cannot achieve the required performance<br />
(flow).<br />
• Standby capacity is required to ensure reliability of<br />
supply.<br />
• Overall efficiency needs to be improved in case of<br />
big variations in the flow demand.<br />
E-<strong>pumps</strong> in parallel<br />
The table below shows the possibilities of controlling<br />
E-<strong>pumps</strong> connected in parallel.<br />
Parallel operation<br />
Control possibilities<br />
Built-in duty/standby function<br />
CRE, CRIE, CRNE with<br />
sensor<br />
CRE, CRIE, CRNE,<br />
SPKE, CKE,<br />
MTRE, CME<br />
without sensor<br />
●<br />
●<br />
Hydro Multi-E<br />
● -<br />
BoosterpaQ Hydro MPC<br />
● -<br />
● Available.<br />
55
7<br />
<strong>Grundfos</strong> E-<strong>pumps</strong><br />
E-<strong>pumps</strong> in parallel<br />
Duty/standby function for three-phase<br />
CRE <strong>pumps</strong><br />
The "Duty/standby" function enables duty/standby<br />
operation of two CRE <strong>pumps</strong> connected in parallel and<br />
controlled via GENIbus.<br />
This means the following:<br />
• Only one pump is operating at a time.<br />
• If a fault occurs in the operating pump, the idle<br />
pump (in standby) automatically starts up and a fault<br />
indication appears in the pump which was in<br />
operation.<br />
• The two <strong>pumps</strong> run alternately for 24 operating<br />
hours.<br />
• As the two <strong>pumps</strong> never operate at the same time,<br />
both pump type, pump size and operating mode<br />
may differ.<br />
The two <strong>pumps</strong> are connected by means of the<br />
GENIbus interface. The function must be enabled with<br />
the R100. See page 35.<br />
GENIbus<br />
Fig. 63 Pumps connected via GENIbus interface<br />
CRE <strong>pumps</strong> running duty/standby in this way cannot<br />
use the GENIbus interface for remote communication.<br />
TM03 0414 5004<br />
E-<strong>pumps</strong> controlled by external<br />
controllers<br />
E-<strong>pumps</strong> can be connected to control systems in the<br />
following two ways:<br />
E-<strong>pumps</strong> connected to Control MPC<br />
E-<strong>pumps</strong> can be connected directly to the <strong>Grundfos</strong><br />
Control MPC.<br />
Control MPC incorporates among other things a<br />
CU 351 controller that can control up to six <strong>pumps</strong>.<br />
The CU 351 incorporates features such as:<br />
Start-up wizard<br />
Correct installation and commissioning is a<br />
prerequisite for attaining optimum performance of the<br />
system and trouble-free operation year in and year out.<br />
During commissioning of the system, a start-up wizard<br />
is shown on the display of the CU 351. The wizard will<br />
guide the operator through the various steps via a<br />
series of dialogue boxes to ensure that all settings are<br />
done in the correct sequence.<br />
Application-optimized software<br />
The CU 351 incorporates application-optimized<br />
software which helps you set up your system to the<br />
application in question.<br />
Furthermore, navigating through the menus of the<br />
controller is done in a user-friendly way. You do not<br />
need any training to be able to set and monitor the<br />
system.<br />
Ethernet connection<br />
The CU 351 incorporates an Ethernet connection<br />
which makes it possible to get full and unlimited<br />
access to the setting and monitoring of the system via<br />
a remote PC.<br />
Service port (GENI TTL)<br />
The service port of the CU 351 enables easy access to<br />
updating software and data logging in service<br />
situations.<br />
External communication<br />
Control MPC enables communication with other<br />
fieldbus protocols. In order to communicate with other<br />
fieldbus protocols, a GENIbus module and a gateway<br />
are required.<br />
Control MPC can communicate with Profibus,<br />
Interbus-S, radio/modem/PLC via G100 gateway and<br />
LON bus via G10 LON gateway.<br />
56
<strong>Grundfos</strong> E-<strong>pumps</strong><br />
8<br />
8. Bus communication<br />
Bus communication with E-<strong>pumps</strong><br />
All <strong>Grundfos</strong> E-<strong>pumps</strong> are fitted with a fieldbus<br />
interface based on the RS-485 hardware platform.<br />
The bus is named GENIbus (<strong>Grundfos</strong> Electronics<br />
Network Intercommunication) and is a <strong>Grundfos</strong>developed<br />
bus with its own protocol. The GENIbus<br />
was first introduced in 1991 when <strong>Grundfos</strong> introduced<br />
the first <strong>pumps</strong> with integrated variable frequency drive<br />
and controller to the market.<br />
Bus communication between E-<strong>pumps</strong> and other<br />
equipment like building management systems<br />
(SCADA) can take place with a <strong>Grundfos</strong> gateway and<br />
a standardized fieldbus, for instance Profibus.<br />
CIU<br />
CIM<br />
Communication to other equipment via<br />
a <strong>Grundfos</strong> gateway<br />
E-<strong>pumps</strong> can communicate with building management<br />
systems (SCADA) via a CIU unit which converts from<br />
the GENIbus to another fieldbus, such as LON,<br />
Profibus, Modbus, etc.<br />
CIU unit<br />
The <strong>Grundfos</strong> CIU unit (Communication Interface Unit)<br />
is used as a gateway for communication between<br />
E-<strong>pumps</strong> and other buses than GENIbus.<br />
The CIU unit is to be mounted on the wall or in a<br />
cabinet. It contains a CIM module (Communication<br />
Interface Module) for a specific bus.<br />
The CIU unit has no functionality in itself, but must<br />
have a CIM module fitted to be able to communicate.<br />
The CIU unit must be used for MLE motors, 10 Hp and<br />
below. The CIM module can be fitted directly in the<br />
MLE motor terminal box (15 - 30 Hp only).<br />
Communication<br />
The CIU unit can communicate the following data<br />
points between the E-<strong>pumps</strong> and the management<br />
system:<br />
CIU unit<br />
Bus communication<br />
Only 15 - 30 Hp<br />
<strong>pumps</strong><br />
Fig. 64 Bus communication for E-<strong>pumps</strong><br />
TM05 2979 0812<br />
Data points<br />
Multistage<br />
E-<strong>pumps</strong> with or<br />
without sensor<br />
TP<br />
Series 1000<br />
without<br />
sensor<br />
TPE<br />
Series<br />
2000<br />
From management system (SCADA) to E-pump<br />
Control mode ● 1) ● 1) ● 2)<br />
Setpoint, 0-100 % ● ● ●<br />
Start/stop ● ● ●<br />
Max. ● ● ●<br />
Min. ● ● ●<br />
From E-pump to management system (SCADA)<br />
Fault indication ● ● ●<br />
Operating indication ● ● ●<br />
Actual control mode ● ● ●<br />
Actual head ● 3) ● 3) ●<br />
Actual power consumption<br />
● ● ●<br />
Operating hours ● ● ●<br />
Energy consumption ● ● ●<br />
Liquid temperature ● ● ●<br />
Speed [rpm] ● ● ●<br />
● Available.<br />
1) Control modes: Controlled or uncontrolled.<br />
2)<br />
Control modes: Proportional pressure, constant pressure or<br />
constant curve.<br />
3) Actual controlled value, depending on sensor type.<br />
57
8<br />
<strong>Grundfos</strong> E-<strong>pumps</strong><br />
Bus communication<br />
Buses<br />
The following CIU units are available:<br />
• CIU 100, LON<br />
• CIU 150, Profibus DP<br />
• CIU 200, Modbus RTU.<br />
• CIU 250, Modbus/SMS messaging<br />
• CIU 300, BACnet MS/TP<br />
Technical details for these buses can be found in the<br />
following sections.<br />
CIM 100 LON module<br />
GrA6119<br />
Fig. 65 CIM 100 LON module<br />
The CIM 100 LON module (CIM = Communication<br />
Interface Module) enables data transmission between<br />
a LON network and a <strong>Grundfos</strong> E-pump.<br />
The CIM 100 is fitted in the E-pump to be<br />
communicated with or in a CIU unit.<br />
The CIM 100 can communicate the following data<br />
points between the E-pump and a management<br />
system.<br />
CIM 100<br />
Data points<br />
Multistage E-<strong>pumps</strong><br />
with or without sensor<br />
15 - 30 Hp<br />
From management system (SCADA) to E-pump<br />
Control mode ● 2)<br />
Setpoint, 0-100 %<br />
Start/stop<br />
Max.<br />
Min.<br />
From E-pump to management system (SCADA)<br />
Fault indication<br />
●<br />
Operating indication<br />
●<br />
Actual control mode<br />
●<br />
Actual head ● 3)<br />
Actual flow<br />
Actual power consumption<br />
●<br />
Operating hours<br />
●<br />
Energy consumption<br />
●<br />
Liquid temperature ● 3)<br />
Speed [rpm]<br />
● Available.<br />
1) Control modes: Proportional pressure, constant pressure or constant curve.<br />
2)<br />
Control modes: Constant pressure, constant flow or constant curve,<br />
depending on connected sensor type.<br />
3) Depending on connected sensor type:<br />
If a differential-pressure sensor is connected, head is indicated in [kPa].<br />
If a flow sensor is connected, flow is indicated in [m 3 /h].<br />
If a temperature sensor is connected, liquid temperature is indicated in [°C].<br />
●<br />
●<br />
●<br />
●<br />
●<br />
58
<strong>Grundfos</strong> E-<strong>pumps</strong><br />
8<br />
CIM 150 Profibus module<br />
Fig. 66 CIM 150 Profibus module<br />
The CIM 150 Profibus module (CIM = Communication<br />
Interface Module), which is a Profibus slave, enables<br />
data transmission between a Profibus-DP network and<br />
a <strong>Grundfos</strong> E-pump.<br />
The CIM 150 is fitted in the E-pump to be<br />
communicated with or in a CIU unit.<br />
The CIM 150 can communicate the following data<br />
points between the E-pump and a management<br />
system.<br />
GrA6121<br />
CIM 200 Modbus module<br />
Fig. 67 CIM 200 Modbus module<br />
The CIM 200 Modbus module (CIM = Communication<br />
Interface Module), which is a Modbus slave, enables<br />
data transmission between a Modbus RTU network<br />
and a <strong>Grundfos</strong> E-pump.<br />
The CIM 200 is fitted in the E-pump to be<br />
communicated with or in a CIU unit.<br />
The CIM 200 can communicate the following data<br />
points between the E-pump and a management<br />
system.<br />
GrA6120<br />
Bus communication<br />
CIM 150<br />
CIM 200<br />
Data points<br />
Multistage E-<strong>pumps</strong><br />
with or without sensor<br />
15 - 30 Hp<br />
Data points<br />
Multistage E-<strong>pumps</strong><br />
with or without sensor<br />
15 - 30 Hp<br />
From management system (SCADA) to E-pump<br />
Control mode ● 2)<br />
Setpoint, 0-100 %<br />
Start/stop<br />
Max.<br />
Min.<br />
From E-pump to management system (SCADA)<br />
Fault indication<br />
●<br />
Operating indication<br />
●<br />
Actual control mode<br />
●<br />
Actual head ● 3)<br />
Actual flow<br />
Actual power consumption<br />
●<br />
Operating hours<br />
●<br />
Energy consumption<br />
●<br />
Liquid temperature ● 3)<br />
Speed [rpm]<br />
●<br />
● Available.<br />
1)<br />
Control modes: Proportional pressure, constant pressure or<br />
constant curve.<br />
2)<br />
Control modes: Constant pressure, constant flow, constant curve,<br />
depending on connected sensor type.<br />
3) Depending on connected sensor type:<br />
If a differential-pressure sensor is connected, head is indicated in<br />
[kPa].<br />
If a flow sensor is connected, flow is indicated in [m 3 /h].<br />
If a temperature sensor is connected, liquid temperature is indicated<br />
in [°C].<br />
●<br />
●<br />
●<br />
●<br />
From management system (SCADA) to E-pump<br />
Control mode ● 2)<br />
Setpoint, 0-100 %<br />
Start/stop<br />
Max.<br />
Min.<br />
From E-pump to management system (SCADA)<br />
Fault indication<br />
●<br />
Operating indication<br />
●<br />
Actual control mode<br />
●<br />
Actual head ● 3)<br />
Actual flow<br />
Actual power consumption<br />
●<br />
Operating hours<br />
●<br />
Energy consumption<br />
●<br />
Liquid temperature ● 3)<br />
Speed [rpm]<br />
●<br />
● Available.<br />
1)<br />
Control modes: Proportional pressure, constant pressure or<br />
constant curve.<br />
2)<br />
Control modes: Constant pressure, constant flow or constant<br />
curve, depending on connected sensor type.<br />
3) Depending on connected sensor type:<br />
If a differential-pressure sensor is connected, head is indicated in<br />
[kPa].<br />
If a flow sensor is connected, flow is indicated in [m 3 /h].<br />
If a temperature sensor is connected, liquid temperature is indicated<br />
in [°C].<br />
●<br />
●<br />
●<br />
●<br />
59
8<br />
<strong>Grundfos</strong> E-<strong>pumps</strong><br />
Bus communication<br />
CIM 250 GSM/GPRS module<br />
Fig. 68 CIM 250 GSM/GPRS module<br />
The CIM 250 GSM/GPRS module (CIM = Communication<br />
Interface Module) enables data transmission<br />
between a GSM/GPRS network and a <strong>Grundfos</strong><br />
E-pump.<br />
The CIM 250 is fitted in the E-pump to be<br />
communicated with or in a CIU unit.<br />
The CIM 250 can communicate the following data<br />
points between the E-pump and a management<br />
system.<br />
Data points<br />
CIM 250<br />
Multistage E-<strong>pumps</strong><br />
with or without sensor<br />
15 - 30 Hp<br />
From management system (SCADA) to E-pump<br />
Control mode ● 2)<br />
Setpoint, 0-100 %<br />
Start/stop<br />
Max.<br />
Min.<br />
From E-pump to management system (SCADA)<br />
Fault indication<br />
●<br />
Operating indication<br />
●<br />
Actual control mode<br />
●<br />
Actual head ● 3)<br />
Actual flow<br />
Actual power consumption<br />
●<br />
Operating hours<br />
●<br />
Energy consumption<br />
●<br />
Liquid temperature ● 3)<br />
Speed [rpm]<br />
●<br />
● Available.<br />
1)<br />
Control modes: Proportional pressure, constant pressure or<br />
constant curve.<br />
2)<br />
Control modes: Constant pressure, constant flow or constant<br />
curve, depending on connected sensor type.<br />
3) Depending on connected sensor type:<br />
If a differential-pressure sensor is connected, head is indicated in<br />
[kPa].<br />
If a flow sensor is connected, flow is indicated in [m 3 /h].<br />
If a temperature sensor is connected, liquid temperature is indicated<br />
in [°C].<br />
●<br />
●<br />
●<br />
●<br />
TM04 6260 5209<br />
CIM 300 BACnet module<br />
Fig. 69 CIM 300 BACnet module<br />
The CIM 300 BACnet module (CIM = Communication<br />
Interface Module), which is a BACnet master, enables<br />
data transmission between a BACnet MS/TP<br />
(Master-Slave/Token Passing) network and a <strong>Grundfos</strong><br />
E-pump.<br />
The CIM 300 is fitted in the E-pump to be<br />
communicated with or in a CIU unit.<br />
The CIM 300 can communicate the following data<br />
points between the E-pump and a management<br />
system.<br />
Data points<br />
CIM 300<br />
Multistage E-<strong>pumps</strong><br />
with or without sensor<br />
15 - 30 Hp<br />
From management system (SCADA) to E-pump<br />
Control mode ● 2)<br />
Setpoint, 0-100 %<br />
Start/stop<br />
Max.<br />
Min.<br />
From E-pump to management system (SCADA)<br />
Fault indication<br />
●<br />
Operating indication<br />
●<br />
Actual control mode<br />
●<br />
Actual head ● 3)<br />
Actual flow<br />
Actual power consumption<br />
●<br />
Operating hours<br />
●<br />
Energy consumption<br />
●<br />
Liquid temperature ● 3)<br />
Speed [rpm]<br />
● Available.<br />
1) Control modes: Proportional pressure, constant pressure or<br />
constant curve.<br />
2)<br />
Control modes: Constant pressure, constant flow or constant<br />
curve, depending on connected sensor type.<br />
3)<br />
Depending on connected sensor type:<br />
If a differential-pressure sensor is connected, head is indicated in<br />
[kPa].<br />
If a flow sensor is connected, flow is indicated in [m 3 /h].<br />
If a temperature sensor is connected, liquid temperature is indicated<br />
in [°C].<br />
●<br />
●<br />
●<br />
●<br />
●<br />
GrA6120<br />
60
<strong>Grundfos</strong> E-<strong>pumps</strong><br />
9<br />
9. Frequency-controlled operation<br />
Variable frequency drive, function<br />
and design<br />
Variable frequency drive (VFD)<br />
Speed control of <strong>pumps</strong> involves a variable frequency<br />
drive. So it will be relevant to have a closer look at<br />
what a variable frequency drive is, how it operates and<br />
finally to discuss related precautions involved in using<br />
a variable frequency drive.<br />
Basic function and characteristics<br />
It is a well-known fact that the speed of an<br />
asynchronous motor depends primarily on the number<br />
of poles and the frequency of the supply voltage. The<br />
amplitude of the voltage supplied and the load on the<br />
motor shaft also influence the motor speed, however,<br />
not to the same degree. Consequently, changing the<br />
frequency of the supply voltage is an ideal method for<br />
asynchronous motor speed control. In order to ensure<br />
a correct motor magnetization, it is also necessary to<br />
change the amplitude of the voltage.<br />
MT<br />
Fig. 70 Displacement of motor torque characteristic<br />
A frequency/voltage control results in a displacement<br />
of the torque characteristic whereby the speed is<br />
changed. Figure 70 shows the motor torque<br />
characteristic (T) as a function of the speed (n) at two<br />
different frequencies/voltages. In the same diagram is<br />
also drawn the load characteristic of the pump. As it<br />
appears from the figure, the speed is changed by<br />
changing the frequency/voltage of the motor. The<br />
variable frequency drive changes frequency and<br />
voltage, so therefore we can conclude that the basic<br />
task of a variable frequency drive is to change the<br />
fixed supply voltage/frequency, for instance 3 x 480 V,<br />
60 Hz, into a variable voltage/frequency.<br />
f 2<br />
f 1<br />
f >f 1 2<br />
n<br />
TM00 8876 3396<br />
Components of the variable frequency<br />
drive<br />
In principle, all variable frequency drives consist of the<br />
same functional blocks. As mentioned previously, the<br />
basic function is to convert the supply voltage into a<br />
new AC voltage with another frequency and amplitude.<br />
First, variable frequency rectifies the incoming supply<br />
voltage and stores the energy in an intermediate circuit<br />
consisting of a capacitor. The resulting DC voltage is<br />
then converted to a new AC voltage with another<br />
frequency and amplitude.<br />
Because of the intermediate circuit in the variable<br />
frequency drive, the frequency of the supply voltage<br />
has no direct influence on the output frequency and<br />
thus on the motor speed. It does not matter whether<br />
the frequency is 50 or 60 Hz as the rectifier can handle<br />
both. Additionally, the incoming frequency will not<br />
influence the output frequency, as this is defined by the<br />
voltage/frequency pattern which is defined in the<br />
inverter. Keeping the above mentioned facts in mind,<br />
using a variable frequency drive in connection with<br />
asynchronous motors provides the following benefits:<br />
• The system can be used in both 50 and 60 Hz areas<br />
without any modifications.<br />
• The output frequency of the variable frequency drive<br />
is independent of the incoming frequency.<br />
• The variable frequency drive can supply output<br />
frequencies which are higher than power supply<br />
frequency which makes oversynchronous operation<br />
possible.<br />
Power Mains supply AC AC<br />
EMC<br />
EMC filter<br />
filter<br />
Rectifier<br />
Rectifier<br />
Interme-<br />
Intermediate<br />
circuit<br />
DC<br />
Control circuit<br />
Inverter<br />
Inverter<br />
Fig. 71 The main blocks of a variable frequency drive<br />
TM03 0432 5104<br />
Frequency-controlled operation<br />
61
9<br />
<strong>Grundfos</strong> E-<strong>pumps</strong><br />
Frequency-controlled operation<br />
EMC filter<br />
This block is not part of the primary function of the<br />
variable frequency drive and therefore, in principle,<br />
could be left out. However, in order to meet the<br />
requirements of the EMC directive of the European<br />
Union or other local requirements, the filter is<br />
necessary. The EMC filter ensures that the variable<br />
frequency drive does not send unacceptably high<br />
noise signals back to the power supply, thus disturbing<br />
other electronic equipment connected to the power<br />
supply. At the same time, the filter ensures that noise<br />
signals in the power supply generated by other<br />
equipment do not enter the electronic components of<br />
the variable frequency drive causing damage or<br />
disturbances.<br />
The mean value of these pulses forms a sinusoidal<br />
voltage of the desired frequency and amplitude. The<br />
switching frequency can be from a few kHz and up to<br />
20 kHz, depending on the type and size of the inverter.<br />
To avoid noise generation in the motor windings, a<br />
variable frequency drive with a switching frequency<br />
above the range of audibility (~16 kHz) is preferable.<br />
This principle of inverter operation is called PWM<br />
(Pulse Width Modulation) control, and it is the control<br />
principle which is most common in variable frequency<br />
drives today. The motor current itself is almost<br />
sinusoidal. This is shown in fig. 73 (a) indicating motor<br />
current (top) and motor voltage. In fig. 73 (b) a section<br />
of the motor voltage is shown. This indicates how the<br />
pulse/pause ratio of the voltage changes.<br />
Rectifier<br />
Single-phase MLE motors are fitted with a rectifier<br />
followed by a so-called PFC circuit (PFC = Power<br />
Factor Correction). The purpose of this circuit is to<br />
ensure that the current input from the power supply is<br />
sinusoidal and that the power factor is very close to 1.<br />
The PFC circuit is necessary in order to comply with<br />
the EMC directive, standard EN 61000-3-2 stipulating<br />
the limits for harmonic current emissions. For a<br />
detailed description of the PFC circuit and its influence<br />
on its surroundings, see page 64.<br />
In three-phase MLE motors, the rectifier is a<br />
conventional rectifier without any power factor<br />
correction. This will result in a non-sinusoidal current.<br />
This subject will be covered later.<br />
a)<br />
b)<br />
TM00 8706 3396<br />
Control circuit<br />
The control circuit block has two functions: It controls<br />
the variable frequency drive and at the same time it<br />
takes care of the entire communication between the<br />
product and the surroundings.<br />
The inverter<br />
The output voltage from a variable frequency drive is<br />
not sinusoidal as is the case for the supply voltage.<br />
The voltage supplied to the motor consists of a number<br />
of square wave pulses. See fig. 72.<br />
U motor<br />
Umotor<br />
‹‹<br />
‹‹<br />
‹‹<br />
‹‹<br />
‹‹<br />
‹‹<br />
‹‹<br />
‹‹<br />
‹‹<br />
‹‹<br />
‹‹<br />
‹‹<br />
‹‹<br />
‹‹<br />
‹‹<br />
‹‹<br />
‹‹<br />
‹‹<br />
‹‹<br />
‹‹<br />
‹‹<br />
‹‹‹‹‹<br />
‹‹‹‹‹<br />
‹‹‹‹‹<br />
‹‹‹‹‹<br />
‹‹‹‹‹<br />
‹‹‹‹‹<br />
‹‹‹‹‹<br />
‹‹‹‹‹<br />
‹‹‹‹‹<br />
‹‹‹‹‹<br />
‹‹‹‹‹<br />
‹‹‹‹‹<br />
‹‹‹‹‹<br />
‹‹‹‹‹<br />
‹‹‹‹‹<br />
‹‹‹‹‹<br />
‹‹‹‹‹<br />
‹‹‹‹‹<br />
‹‹‹‹‹<br />
‹‹‹‹‹<br />
‹‹‹‹‹<br />
‹‹‹‹‹‹<br />
‹‹‹‹‹‹<br />
‹‹‹‹‹‹<br />
‹‹‹‹‹‹<br />
‹‹‹‹‹‹<br />
‹‹‹‹‹‹<br />
‹‹‹‹‹‹<br />
‹‹‹‹‹‹<br />
‹‹‹‹‹‹<br />
‹‹‹‹‹‹<br />
‹‹‹‹‹‹<br />
‹‹‹‹‹‹<br />
‹‹‹‹‹‹<br />
‹‹‹‹‹‹<br />
‹‹‹‹‹‹<br />
‹‹‹‹‹‹<br />
‹‹‹‹‹‹<br />
‹‹‹‹‹‹<br />
‹‹‹‹‹‹<br />
‹‹‹‹‹‹<br />
‹‹‹‹‹‹<br />
‹‹‹‹‹‹‹‹‹‹<br />
‹‹‹‹‹‹‹‹‹‹<br />
‹‹‹‹‹‹‹‹‹‹<br />
‹‹‹‹‹‹‹‹‹‹<br />
‹‹‹‹‹‹‹‹‹‹<br />
‹‹‹‹‹‹‹‹‹‹<br />
‹‹‹‹‹‹‹‹‹‹<br />
‹‹‹‹‹‹‹‹‹‹<br />
‹‹‹‹‹‹‹‹‹‹<br />
‹‹‹‹‹‹‹‹‹‹<br />
‹‹‹‹‹‹‹‹‹‹<br />
‹‹‹‹‹‹‹‹‹‹<br />
‹‹‹‹‹‹‹‹‹‹<br />
‹‹‹‹‹‹‹‹‹‹<br />
‹‹‹‹‹‹‹‹‹‹<br />
‹‹‹‹‹‹‹‹‹‹<br />
‹‹‹‹‹‹‹‹‹‹<br />
‹‹‹‹‹‹‹‹‹‹<br />
‹‹‹‹‹‹‹‹‹‹<br />
‹‹‹‹‹‹‹‹‹‹<br />
‹‹‹‹‹‹‹‹‹‹<br />
‹‹‹‹‹‹‹<br />
‹‹‹‹‹‹‹<br />
‹‹‹‹‹‹‹<br />
‹‹‹‹‹‹‹<br />
‹‹‹‹‹‹‹<br />
‹‹‹‹‹‹‹<br />
‹‹‹‹‹‹‹<br />
‹‹‹‹‹‹‹<br />
‹‹‹‹‹‹‹<br />
‹‹‹‹‹‹‹<br />
‹‹‹‹‹‹‹<br />
‹‹‹‹‹‹‹<br />
‹‹‹‹‹‹‹<br />
‹‹‹‹‹‹‹<br />
‹‹‹‹‹‹‹<br />
‹‹‹‹‹‹‹<br />
‹‹‹‹‹‹‹<br />
‹‹‹‹‹‹‹<br />
‹‹‹‹‹‹‹<br />
‹‹‹‹‹‹‹<br />
‹‹‹‹‹‹‹<br />
‹‹‹‹<br />
‹‹‹‹<br />
‹‹‹‹<br />
‹‹‹‹<br />
‹‹‹‹<br />
‹‹‹‹<br />
‹‹‹‹<br />
‹‹‹‹<br />
‹‹‹‹<br />
‹‹‹‹<br />
‹‹‹‹<br />
‹‹‹‹<br />
‹‹‹‹<br />
‹‹‹‹<br />
‹‹‹‹<br />
‹‹‹‹<br />
‹‹‹‹<br />
‹‹‹‹<br />
‹‹‹‹<br />
‹‹‹‹<br />
‹‹‹‹<br />
‹‹<br />
‹‹<br />
‹‹<br />
‹‹<br />
‹‹<br />
‹‹<br />
‹‹<br />
‹‹<br />
‹‹<br />
‹‹<br />
‹‹<br />
‹‹<br />
‹‹<br />
‹‹<br />
‹‹<br />
‹‹<br />
‹‹<br />
‹‹<br />
‹‹<br />
‹‹<br />
‹‹<br />
‹‹<br />
‹‹<br />
‹‹<br />
‹‹<br />
‹‹<br />
‹‹<br />
‹‹<br />
‹‹<br />
‹‹<br />
‹‹<br />
‹‹<br />
‹‹<br />
‹‹<br />
‹‹<br />
‹‹<br />
‹‹<br />
‹‹<br />
‹‹<br />
‹‹<br />
‹‹<br />
‹‹‹‹‹<br />
‹‹‹‹‹<br />
‹‹‹‹‹<br />
‹‹‹‹‹<br />
‹‹‹‹‹<br />
‹‹‹‹‹<br />
‹‹‹‹‹<br />
‹‹‹‹‹<br />
‹‹‹‹‹<br />
‹‹‹‹‹<br />
‹‹‹‹‹<br />
‹‹‹‹‹<br />
‹‹‹‹‹<br />
‹‹‹‹‹<br />
‹‹‹‹‹<br />
‹‹‹‹‹<br />
‹‹‹‹‹<br />
‹‹‹‹‹<br />
‹‹‹‹‹<br />
‹‹‹‹‹<br />
T = 1/fm<br />
Mean value of voltage<br />
‹‹‹‹‹‹<br />
‹‹‹‹‹‹<br />
‹‹‹‹‹‹<br />
‹‹‹‹‹‹<br />
‹‹‹‹‹‹<br />
‹‹‹‹‹‹<br />
‹‹‹‹‹‹<br />
‹‹‹‹‹‹<br />
‹‹‹‹‹‹<br />
‹‹‹‹‹‹<br />
‹‹‹‹‹‹<br />
‹‹‹‹‹‹<br />
‹‹‹‹‹‹<br />
‹‹‹‹‹‹<br />
‹‹‹‹‹‹<br />
‹‹‹‹‹‹<br />
‹‹‹‹‹‹<br />
‹‹‹‹‹‹<br />
‹‹‹‹‹‹<br />
‹‹‹‹‹‹<br />
‹‹‹‹‹‹‹‹‹‹<br />
‹‹‹‹‹‹‹‹‹‹<br />
‹‹‹‹‹‹‹‹‹‹<br />
‹‹‹‹‹‹‹‹‹‹<br />
‹‹‹‹‹‹‹‹‹‹<br />
‹‹‹‹‹‹‹‹‹‹<br />
‹‹‹‹‹‹‹‹‹‹<br />
‹‹‹‹‹‹‹‹‹‹<br />
‹‹‹‹‹‹‹‹‹‹<br />
‹‹‹‹‹‹‹‹‹‹<br />
‹‹‹‹‹‹‹‹‹‹<br />
‹‹‹‹‹‹‹‹‹‹<br />
‹‹‹‹‹‹‹‹‹‹<br />
‹‹‹‹‹‹‹‹‹‹<br />
‹‹‹‹‹‹‹‹‹‹<br />
‹‹‹‹‹‹‹‹‹‹<br />
‹‹‹‹‹‹‹‹‹‹<br />
‹‹‹‹‹‹‹‹‹‹<br />
‹‹‹‹‹‹‹‹‹‹<br />
‹‹‹‹‹‹‹‹‹‹<br />
‹‹‹‹‹‹‹<br />
‹‹‹‹‹‹‹<br />
‹‹‹‹‹‹‹<br />
‹‹‹‹‹‹‹<br />
‹‹‹‹‹‹‹<br />
‹‹‹‹‹‹‹<br />
‹‹‹‹‹‹‹<br />
‹‹‹‹‹‹‹<br />
‹‹‹‹‹‹‹<br />
‹‹‹‹‹‹‹<br />
‹‹‹‹‹‹‹<br />
‹‹‹‹‹‹‹<br />
‹‹‹‹‹‹‹<br />
‹‹‹‹‹‹‹<br />
‹‹‹‹‹‹‹<br />
‹‹‹‹‹‹‹<br />
‹‹‹‹‹‹‹<br />
‹‹‹‹‹‹‹<br />
‹‹‹‹‹‹‹<br />
‹‹‹‹‹‹‹<br />
‹‹‹‹<br />
‹‹‹‹<br />
‹‹‹‹<br />
‹‹‹‹<br />
‹‹‹‹<br />
‹‹‹‹<br />
‹‹‹‹<br />
‹‹‹‹<br />
‹‹‹‹<br />
‹‹‹‹<br />
‹‹‹‹<br />
‹‹‹‹<br />
‹‹‹‹<br />
‹‹‹‹<br />
‹‹‹‹<br />
‹‹‹‹<br />
‹‹‹‹<br />
‹‹‹‹<br />
‹‹‹‹<br />
‹‹‹‹<br />
‹‹<br />
‹‹<br />
‹‹<br />
‹‹<br />
‹‹<br />
‹‹<br />
‹‹<br />
‹‹<br />
‹‹<br />
‹‹<br />
‹‹<br />
‹‹<br />
‹‹<br />
‹‹<br />
‹‹<br />
‹‹<br />
‹‹<br />
‹‹<br />
‹‹<br />
‹‹<br />
t<br />
TM00 8680 3396<br />
Fig. 73 a) indicates motor current (top) and motor voltage.<br />
b) indicates a section of the motor voltage<br />
Special conditions regarding variable<br />
frequency drives<br />
When installing and using variable frequency drives, or<br />
<strong>pumps</strong> with integrated variable frequency drives, the<br />
installer and user must take account of the following.<br />
A variable frequency drive will behave differently on<br />
the power supply side than a standard asynchronous<br />
motor. This is described in detail below.<br />
TM00 8707 3396<br />
Fig. 72 The voltage supplied to the motor consists of<br />
a number of square wave pulses<br />
62
<strong>Grundfos</strong> E-<strong>pumps</strong><br />
9<br />
Non-sinusoidal power input, variable<br />
frequency drives supplied by three-phase<br />
supply<br />
A variable frequency drive designed as the one<br />
described above will not receive sinusoidal current<br />
from the power supply. Among other things, this will<br />
influence the sizing of power supply cable, power<br />
switches, etc. Figure 74 shows how supply current and<br />
voltage appear for the following:<br />
a) three-phase, two-pole standard asynchronous<br />
motor<br />
b) three-phase, two-pole standard asynchronous<br />
motor with variable frequency drive.<br />
In both cases, the motor supplies 4 Hp to the shaft.<br />
a)<br />
TM00 8708 3396<br />
A comparison of the current in the two cases shows<br />
the following differences. See fig. 74.<br />
• The current for the system with variable frequency<br />
drive is not sinusoidal.<br />
• The peak current is much higher (approx. 52 %<br />
higher) for the variable frequency drive solution.<br />
Standard motor<br />
Motor with variable<br />
frequency drive<br />
Supply voltage 400 V 400 V<br />
Supply current, RMS 6.4 A 6.36 A<br />
Supply current, peak 9.1 A 13.8 A<br />
Power input, P1 4.93 Hp 4.94 Hp<br />
Cos φ, power factor (PF) Cos φ = 0.83 PF = 0.86<br />
This is due to the design of the variable frequency<br />
drive connecting the power supply to a rectifier<br />
followed by a capacitor. The charging of the capacitor<br />
happens during short time periods in which the<br />
rectified voltage is higher than the voltage in the<br />
capacitor at that moment. As mentioned above, the<br />
non-sinusoidal current results in other conditions at the<br />
power supply side of the motor. For a standard motor<br />
without a variable frequency drive, the relation<br />
between voltage (U), current (I) and power (P) is as<br />
follows:<br />
Frequency-controlled operation<br />
b)<br />
TM00 8709 3396<br />
P = 3 U I<br />
Cos <br />
U is the voltage between two phases and (I) is the<br />
phase current, both effective values (RMS values), and<br />
φ is phase displacement between current and voltage.<br />
In the example the following applies:<br />
U = 400 V, I = 6.2 A, Cos φ = 0.83.<br />
The result is a power input of P = 4.78 Hp.<br />
Fig. 74 Supply current and voltage for a) a standard<br />
asynchronous motor and b) a three-phase MLE<br />
motor<br />
63
9<br />
<strong>Grundfos</strong> E-<strong>pumps</strong><br />
Frequency-controlled operation<br />
The same formula cannot be used for the calculation of<br />
the power input in connection with motors with<br />
variable frequency drives. In fact, in this case, there is<br />
no safe way of calculating the power input, based on<br />
simple current and voltage measurements, as these<br />
are not sinusoidal. Instead, the power must be<br />
calculated by means of instruments and on the basis of<br />
instantaneous measurements of current and voltage.<br />
If the power (P) is known as well as the RMS value of<br />
current and voltage, the so-called power factor (PF)<br />
can be calculated using this formula:<br />
Unlike what is the case when current and voltage are<br />
sinusoidal, the power factor has no direct connection<br />
with the way in which current and voltage are<br />
displaced in time.<br />
For MLE motors the following values are provided as a<br />
guideline to the power factor depending on motor size:<br />
Three-phase MLE motor<br />
3600 rpm<br />
[Hp]<br />
PF = ---------------------<br />
P<br />
3 UI<br />
Power factor<br />
(PF)<br />
1.0 0.73<br />
1.5 0.83<br />
2.0 0.87<br />
3.0 0.91<br />
5.0 0.92<br />
7.5 0.94<br />
10 0.93<br />
15 0.89<br />
20 0.89<br />
25 0.88<br />
30 0.88<br />
When measuring the input current in connection with<br />
installation and service of a system with a variable<br />
frequency drive, it is necessary to use an instrument<br />
that is capable of measuring "non-sinusoidal" currents.<br />
In general, current measuring instruments for variable<br />
frequency drives must be of a type measuring "True<br />
RMS".<br />
Power input, variable frequency drives<br />
supplied by single-phase supply<br />
Single-phase MLE motors are fitted with the so-called<br />
PCF circuit, which generally speaking ensures<br />
sinusoidal power input. The PFC circuit also ensures<br />
that the current is in phase with the voltage in order to<br />
achieve a power factor close to 1. When PF = 1, the<br />
input current to the MLE motor will be as low as<br />
possible.<br />
Figure 75 shows the supply voltage and current for a<br />
1.5 Hp MLE motor with PFC circuit. As appears, the<br />
supply current is more or less sinusoidal and in phase<br />
with the voltage.<br />
Fig. 75 Supply voltage and current for a 1.5 Hp MLE motor<br />
with PFC circuit<br />
TM02 1236 3396<br />
64
<strong>Grundfos</strong> E-<strong>pumps</strong><br />
9<br />
Power factor and typical input supply current at rated<br />
load have the following values for the single-phase<br />
MLE motor range:<br />
Motor P2<br />
[Hp]<br />
PF<br />
Input current at rated voltage<br />
(230 V) and rated P2 at 3600 rpm<br />
[A]<br />
0.5 0.96 2.5<br />
0.75 0.97 3.5<br />
1.0 0.97 4.7<br />
1.5 0.97 6.8<br />
As mentioned previously, the PFC circuit is a result of<br />
the requirements of EN 61000-3-2 concerning limits for<br />
harmonic current emissions. EN 61000-3-2 is a<br />
harmonized standard under the EMC directive<br />
2004/108/EC, and the purpose is to ensure that the<br />
power supply is not "contaminated" by non-sinusoidal<br />
loads which have a tendency to distort the waveform of<br />
the power supply voltage and furthermore cause<br />
unnecessarily high peak currents.<br />
The requirements of EN 61000-3-2 can be<br />
summarized as follows:<br />
• Class A products must comply with the limits for<br />
harmonic current emissions laid down by the<br />
standard.<br />
• The standard is applicable to all equipment<br />
connected to the public power supply network with<br />
an input current up to 16 A.<br />
Note: Exempted from this are:<br />
– products with an input power lower than 0.10 Hp<br />
– products exclusively designed for professional<br />
use with an input power exceeding 1.5 Hp.<br />
As appears, the standard does NOT apply to<br />
professional equipment with an input power from the<br />
power supply above 1.34 Hp. In principle, this means<br />
that the standard does not apply to <strong>Grundfos</strong>' 1.5 Hp<br />
(P2) MLE motors as their input power from the power<br />
supply exceeds 1.34 Hp. Nevertheless, due to the<br />
obvious advantages of the PFC circuit it has been<br />
decided that the entire range of single-phase E-<strong>pumps</strong><br />
from 0.5 Hp up to and including 1.5 Hp must comply<br />
with the standard.<br />
The PFC circuit features the following advantages for<br />
the customer:<br />
• Compliance with EN 61000-3-2 concerning<br />
harmonic current emissions.<br />
• The pump current input is more or less sinusoidal<br />
and the power factor (PF) is very close to 1<br />
(0.95 - 0.97).<br />
In practical terms, this means the following:<br />
• The RMS value of the current is 40-50 % lower than<br />
for single-phase E-<strong>pumps</strong> without PFC circuit.<br />
• Cables with a lower cross-section can be used.<br />
• Smaller fuses are required in the installation.<br />
• When connecting several <strong>pumps</strong> supplied by<br />
different phases in parallel, the current in the<br />
common neutral lead will be balanced so that the<br />
neutral lead current will never exceed the current in<br />
any one of the supply phases.<br />
• The pump is less sensitive to variations in the<br />
supply voltage (the MLE motor can yield full power<br />
with the entire voltage supply range 200-240 V<br />
- 10 %/+ 10 % corresponding to 180-264 V).<br />
Variable frequency drives and earth<br />
leakage circuit breakers (ELCB)<br />
Earth leakage circuit breakers are used increasingly as<br />
extra protection in electrical installations. If a variable<br />
frequency drive is to be connected to such an<br />
installation, it must be ensured that the circuit breaker<br />
installed is of a type which will surely break, also if<br />
failure occurs on the DC side of the variable frequency<br />
drive.<br />
The circuit breakers must be marked as follows in<br />
order to ensure correct functioning.<br />
• For single-phase MLE motors, the circuit breaker<br />
must be marked with the following symbol:<br />
ELCB<br />
• For three-phase MLE motors, the circuit breaker<br />
must be marked with the following symbol:<br />
Frequency-controlled operation<br />
ELCB<br />
Both types of earth leakage circuit breaker are<br />
available in the market today.<br />
65
10<br />
<strong>Grundfos</strong> E-<strong>pumps</strong><br />
Advanced use of MLE motors<br />
10. Advanced use of MLE motors<br />
Introduction<br />
<strong>Grundfos</strong> MLE motors have many features for the<br />
advanced user.<br />
<strong>Grundfos</strong> three-phase MLE motors have features such<br />
as bearing monitoring, standstill heating, stop function,<br />
signal relays, analog sensors and limit exceeded.<br />
These features give a unique opportunity to customize<br />
the E-<strong>pumps</strong>.<br />
The PC Tool E-products gives access to most of the<br />
settings available in the products, as well as the<br />
possibility of logging and viewing data.<br />
All of these features are described below.<br />
Bearing monitoring<br />
Bearing monitoring is a built-in function indicating the<br />
time to relubricate or replace the bearings of the<br />
MLE motor. The relubrication feature is only available<br />
for three-phase <strong>pumps</strong> of 15-30 Hp.<br />
Purpose and benefits<br />
The purpose of this function is to give an indication to<br />
the user when it is time to relubricate or replace the<br />
motor bearings. This is important information for<br />
maintenance planning.<br />
Bearing monitoring provides these benefits:<br />
• The bearing can be relubricated at the right time<br />
according to the manufacturer’s recommendations.<br />
• Maximum life of the motor bearings is obtained.<br />
• Maintenance intervals are determined by the pump<br />
itself.<br />
• No worn-down or damaged bearings, and<br />
consequently no costly down-time, due to overseen<br />
maintenance.<br />
Applications<br />
Bearing monitoring is application-independent and<br />
available in these pump sizes:<br />
Description<br />
When the bearing monitoring function determines that<br />
it is time to relubricate the bearings, the user will<br />
receive a warning via the R100, PC Tool E-products,<br />
bus or relay.<br />
When the bearings have been relubricated, a certain<br />
number of times, the warning function will inform the<br />
user to replace the bearings.<br />
The number of relubrications before bearing<br />
replacement is set up by <strong>Grundfos</strong>.<br />
Technical description<br />
The bearing monitoring function is available on two<br />
levels for calculating the relubrication interval, basic<br />
and advanced:<br />
Bearing monitoring function<br />
Basic level<br />
Calculation of relubrication intervals based on motor revolutions.<br />
The basic level is a standard feature of the 15 - 30 Hp basic<br />
controller and no special functional module is required.<br />
Advanced level (only 15 - 30 Hp)<br />
Calculation of relubrication intervals based on motor revolutions<br />
and bearing temperature.<br />
Note: The advanced-level function requires the following:<br />
• The extended functional module is fitted in the MLE motor as<br />
standard.<br />
• Temperature sensors are fitted at the drive end and at the<br />
non-drive end of the motor.<br />
2-pole<br />
[Hp]<br />
Single-phase <strong>pumps</strong><br />
4-pole<br />
[Hp]<br />
0.50 - 1.5 0.33 - 1.0<br />
- -<br />
Three-phase <strong>pumps</strong><br />
2-pole<br />
[Hp]<br />
1.0 - 10 15 - 30<br />
●<br />
●<br />
66
<strong>Grundfos</strong> E-<strong>pumps</strong><br />
10<br />
Standstill heating<br />
Standstill heating is a feature ensuring that even<br />
during standstill periods the motor windings have a<br />
certain minimum temperature.<br />
Purpose and benefits<br />
The purpose of this function is to make the MLE motor<br />
more suitable for outdoor installation. During standstill<br />
periods, there is a need to keep the motor temperature<br />
higher than the ambient temperature to avoid<br />
condensation in and on the motor.<br />
Traditionally this issue has been solved by using an<br />
anti-condensation heater on the stator coil heads.<br />
Now <strong>Grundfos</strong> provides this feature by means of a<br />
special function within the MLE motor and terminal<br />
box.<br />
The MLE motor has standstill heating included.<br />
An external heater on the stator coil is not necessary.<br />
Applications<br />
This function is especially suitable in outdoor<br />
applications and at installation sites with fluctuating<br />
temperatures.<br />
This function is available in these pump sizes:<br />
2-pole<br />
[Hp]<br />
Single-phase <strong>pumps</strong><br />
4-pole<br />
[Hp]<br />
0.50 - 1.5 0.33 - 1.0<br />
- -<br />
Three-phase <strong>pumps</strong><br />
2-pole<br />
[Hp]<br />
1.0 - 10 15 - 30<br />
●<br />
●<br />
Description<br />
The working principle is that AC voltage is applied to<br />
the motor windings. The applied AC voltage will ensure<br />
that sufficient heat is generated to avoid condensation<br />
in the motor. The terminal box is kept warm and dry by<br />
the heat generated via the power supply. However, it is<br />
a condition that the terminal box is not exposed to<br />
open air. It must be provided with a suitable cover to<br />
protect it from rain.<br />
Stop function<br />
The stop function ensures that the pump is stopped at<br />
low or no flow. The function is also called low-flow stop<br />
function.<br />
Purpose and benefits<br />
The purpose of the stop function is to stop the pump<br />
when low flow is detected.<br />
The stop function provides these benefits:<br />
• The energy consumption is optimized and the<br />
system efficiency is improved.<br />
• Unnecessary heating of the pumped liquid which<br />
damages <strong>pumps</strong>.<br />
• Wear of the shaft seals is reduced.<br />
• Noise from operation is reduced.<br />
Applications<br />
The stop function is used in systems with periodically<br />
low or no consumption thus preventing the pump from<br />
running against closed valve.<br />
This function is available in these pump sizes:<br />
2-pole<br />
[Hp]<br />
Single-phase <strong>pumps</strong><br />
4-pole<br />
[Hp]<br />
0.50 - 1.5 0.33 - 1.0<br />
●<br />
●<br />
Three-phase <strong>pumps</strong><br />
2-pole<br />
[Hp]<br />
1.0 - 10 15 - 30<br />
●<br />
●<br />
Advanced use of MLE motors<br />
67
10<br />
<strong>Grundfos</strong> E-<strong>pumps</strong><br />
Advanced use of MLE motors<br />
Operating conditions for the stop function<br />
A pressure sensor, a non-return valve, and a<br />
diaphragm tank are required for the stop function to<br />
operate properly.<br />
Note: The non-return valve must always be installed<br />
before the pressure sensor. See fig. 76 and fig. 77.<br />
Fig. 76 Position of the non-return valve and pressure<br />
sensor in system with suction lift operation<br />
Pump<br />
Pressure sensor<br />
Pump<br />
Non-return valve<br />
Pressure sensor<br />
Diaphragm tank<br />
Diaphragm tank<br />
Fig. 77 Position of the non-return valve and pressure<br />
sensor in system with positive inlet pressure<br />
When low flow is detected, the pump is in on/off<br />
operation. If there is flow, the pump will continue<br />
operating according to the setpoint. See fig. 78.<br />
Stop pressure<br />
∆H<br />
Start pressure<br />
Non-return valve<br />
On/off operation<br />
Continuous operation<br />
Fig. 78 Constant pressure with stop function.<br />
Differenc between start and stop pressures (∆H)<br />
Diaphragm tank<br />
The stop function requires a diaphragm tank of a<br />
certain minimum size. The tank must be installed near<br />
the discharge of the pump, and the precharge air<br />
pressure must be 0.7 x setpoint.<br />
TM03 8582 1907<br />
TM03 8583 1907<br />
TM03 8477 1607<br />
Recommended diaphragm tank size:<br />
Rated flow of pump<br />
[gpm (m 3 h)]<br />
0 - 26<br />
(0 - 5.9)<br />
27 - 105<br />
(6.1 - 23.8)<br />
106 - 176<br />
(24.2 - 40)<br />
177 - 308<br />
(40.2 - 70.0)<br />
309 - 440<br />
(70.2 - 99.9)<br />
441 - 750<br />
(100 - 170)<br />
CRE pump<br />
Typical diaphragm<br />
tank size [gal (liter)]<br />
1s, 1, 3 2 (7.6)<br />
5, 10, 15 4.4 (16.7)<br />
20, 32 14 (53.0)<br />
45 34 (128.7)<br />
64, 90 62 (234.7)<br />
120, 150 86 (325.5)<br />
If a diaphragm tank of the above size is installed in the<br />
system, no additional adjustment should be necessary.<br />
If the tank installed is too small, the pump will start and<br />
stop often. Tank size will influence at which flow the<br />
system will go into start/stop operation.<br />
Description<br />
The low-flow stop function can operate in two different<br />
ways:<br />
• by means of an integrated "low-flow detection<br />
function"<br />
• by means of an external flow switch connected to<br />
the digital input.<br />
Low-flow detection function<br />
• The low-flow detection function will check the flow<br />
regularly by reducing the speed for a short time. A<br />
small change in pressure or no change in pressure<br />
means that there is low flow.<br />
Low-flow detection with flow switch<br />
• When a flow switch detects low flow, the digital input<br />
will be activated.<br />
Contact <strong>Grundfos</strong> for further information.<br />
Dry-running protection<br />
This function protects the pump against dry running.<br />
When lack of inlet pressure or water shortage is<br />
detected, the pump will be stopped before being<br />
damaged.<br />
Lack of inlet pressure or water shortage can be<br />
detected with a switch connected to a digital input<br />
configured to dry-running protection.<br />
The use of a digital input requires an accessory, such<br />
as:<br />
• a <strong>Grundfos</strong> Liqtec® dry-running switch (for more<br />
information on LiqTec, see section 12. Accessories)<br />
• a pressure switch installed on the suction side of the<br />
pump<br />
• a float switch installed on the suction side of the<br />
pump.<br />
The pump cannot restart as long as the digital input is<br />
activated.<br />
68
<strong>Grundfos</strong> E-<strong>pumps</strong><br />
10<br />
Temperature sensors 1 and 2<br />
One or two Pt100 temperatures sensors may be<br />
connected to the input terminals 17, 18, 19, and 20.<br />
Extended<br />
module<br />
17: Pt100 A<br />
18: Pt100 A<br />
19: Pt100 B<br />
20: Pt100 B<br />
Applications<br />
The temperature inputs can be used in all applications<br />
where temperatures in the system or in the motor need<br />
to be monitored.<br />
Note: The temperature sensor inputs are available on<br />
all MLE motors.<br />
This function is available in these pump sizes:<br />
2-pole<br />
[Hp]<br />
Single-phase <strong>pumps</strong><br />
4-pole<br />
[Hp]<br />
0.50 - 1.5 0.33 - 1.0<br />
- -<br />
Advanced use of MLE motors<br />
Fig. 79 Temperature sensor connections in the extended<br />
functional module<br />
Purpose and benefits<br />
The temperature sensor inputs 1 and 2 provide these<br />
benefits:<br />
• The temperature sensor inputs can be used as input<br />
to the "limit exceeded" functions 1 and 2.<br />
• In combination with the bearing monitoring function,<br />
the temperature sensors provide optimum<br />
monitoring of the motor bearings.<br />
• A bearing warning or a bearing alarm can be<br />
indicated as the motor bearing temperature is<br />
measured.<br />
• Status readings of the measured temperatures are<br />
available via the R100, PC Tool E-products and bus.<br />
• The function has a built-in signal fault detection<br />
if the temperature sensors fail or a conductor is<br />
broken.<br />
TM03 9191 3507<br />
Three-phase <strong>pumps</strong><br />
2-pole<br />
[Hp]<br />
1.0 - 10 15 - 30<br />
- ●<br />
Description<br />
The temperature sensor inputs enable several<br />
functions.<br />
• The temperature sensor inputs 1 and 2 can be used<br />
as input to the "limit exceeded" functions 1 and 2.<br />
If a limit is exceeded, this will be indicated. The<br />
indication will be in the form of outputs (relay) or<br />
alarms/warnings set up/defined in the "limit<br />
exceeded" functions 1 and 2.<br />
• The temperature sensor inputs 1 and 2 can be set<br />
up to measure bearing temperature. The measured<br />
values of temperature sensor 1 and 2 are used in<br />
the calculation of relubrication intervals.<br />
Additionally, the measured value can activate the<br />
indication of a bearing warning or a bearing alarm.<br />
In case of high bearing temperature, a warning or<br />
an alarm can be logged and force the pump to stop.<br />
69
10<br />
<strong>Grundfos</strong> E-<strong>pumps</strong><br />
Advanced use of MLE motors<br />
Signal relays<br />
Signal relays are used to give an output indication of<br />
the current operational status of the MLE. The signal<br />
relay is a potential free contact (also called a dry<br />
contact). The output signals are typically transmitted to<br />
external control systems.<br />
Purpose and benefits<br />
The signal relays offer these features:<br />
• The signal relays can be remotely (via bus) or<br />
internally controlled.<br />
• The signal relays can be set up to indicate several<br />
types of operational status.<br />
• A relay delay can be defined to avoid activating the<br />
relay in case of periodic failures.<br />
Description<br />
The signal relays can be set up with these three<br />
parameters:<br />
• relay control<br />
• relay setup<br />
• relay delay.<br />
Fig. 80 Signal relay parameters for 0.5 - 10 Hp <strong>pumps</strong><br />
Applications<br />
Signal relays can be used in all applications involving a<br />
need to read out the operational status to e.g. a control<br />
room or to a superior control system.<br />
<strong>Grundfos</strong> E-<strong>pumps</strong> have one or two signal relays,<br />
depending on the size of the pump.<br />
2-pole<br />
[Hp]<br />
Single-phase <strong>pumps</strong><br />
4-pole<br />
[Hp]<br />
0.50 - 1.5 0.33 - 1.0<br />
●<br />
●<br />
1 relay 1 relay<br />
Three-phase <strong>pumps</strong><br />
2-pole<br />
[Hp]<br />
1.0 - 10 15 - 30<br />
●<br />
●<br />
1 relay 2 relays<br />
Fig. 81 Signal relay parameters for 15 - 30 Hp <strong>pumps</strong><br />
Relay control<br />
See information in section 3. E-<strong>pumps</strong> on page 32 for<br />
basic signal relay activation. The relay time is<br />
0 seconds and the signal relay in internally controlled.<br />
The advanced relay control can only be set via the<br />
PC Tool E-products.<br />
Relay control has these two setting options:<br />
• Internally controlled<br />
The relay is internally controlled by the variable<br />
frequency drive software according to the setup of<br />
the relay [Ready, Fault, Operation].<br />
• Remotely controlled<br />
The relay is controlled via commands from the<br />
GENIbus.<br />
70
<strong>Grundfos</strong> E-<strong>pumps</strong><br />
10<br />
Analog sensor inputs 1 and 2<br />
The analog sensor inputs 1 and 2 are standardized<br />
inputs for measuring all types of analog parameters.<br />
Sensor input 1 is the only sensor input set up for<br />
closed-loop operation. The input will be used as the<br />
sensor feedback input.<br />
Sensor input 2 is referred to as the secondary sensor.<br />
Extended<br />
module<br />
16: GND<br />
15: + 24 V<br />
14: Sensor input 2<br />
9: GND<br />
8: + 24 V<br />
7: Sensor input 1<br />
Description<br />
The analog sensors 1 and 2 enable several functions.<br />
• When the secondary sensor is set up as an input to<br />
the "limit exceeded" functions 1 and 2, defined<br />
outputs or warnings or alarms can be given when<br />
system parameters are outside defined system limits.<br />
• Connecting a flow sensor.<br />
When sensor input 2 is set up with a flow sensor,<br />
the measured value can be used as input to the<br />
proportional-pressure function. The flow displayed<br />
in the R100 will be the measured flow instead of the<br />
estimated flow.<br />
The flow measurement can also be used in the<br />
low-flow stop function to detect low flow instead of<br />
estimating the flow by lowering the speed of the<br />
pump.<br />
• Sensor reading via the R100 and PC Tool<br />
E-products.<br />
When sensors are set up. the user can get a status<br />
reading via the R100 and PC Tool E-products.<br />
Advanced use of MLE motors<br />
Fig. 82 Sensor inputs 1 and 2 connections<br />
Purpose and benefits<br />
The analog sensor inputs 1 and 2 provide these<br />
benefits:<br />
• Sensor input 1 can be feedback input for the built-in<br />
PI controller.<br />
• It is possible to monitor secondary parameters in<br />
the process, e.g. flow or liquid temperature.<br />
• The secondary sensor can be set up as a redundant<br />
sensor.<br />
• The sensors can give input to the "limit exceeded"<br />
functions 1 and 2.<br />
• Status readings of the inputs are available via the<br />
R100 and PC Tool E-products.<br />
Applications<br />
Analog sensor inputs 1 and 2 can be used in applications<br />
with a need for monitoring essential parameters.<br />
This function is available in these pump sizes:<br />
Single-phase <strong>pumps</strong><br />
2-pole [Hp]<br />
4-pole [Hp]<br />
0.50 - 1.5 0.33 - 1.0<br />
●<br />
●<br />
1 analog input 1 analog input<br />
Three-phase <strong>pumps</strong><br />
2-pole [Hp]<br />
1.0 - 10 15 - 30<br />
●<br />
●<br />
1 analog input 2 analog inputs<br />
TM03 9214 3607<br />
Analog output<br />
Analog output<br />
The analog output (0-10 mA) can be set via the PC<br />
Tool to one of these indications:<br />
• feedback value<br />
• speed<br />
• frequency<br />
• motor current<br />
• external setpoint input<br />
• limit exceeded.<br />
The analog output is default set to not active.<br />
Feedback value<br />
The output signal is a function of the actual feedback<br />
sensor.<br />
Speed<br />
The output signal is a function of the actual pump<br />
speed.<br />
Frequency<br />
The output signal is a function of the actual frequency.<br />
Motor current<br />
The output signal is a function of the actual motor<br />
current.<br />
External setpoint input<br />
The output signal is a function of the external setpoint<br />
input.<br />
Limit exceeded<br />
The output signal indicates whether the limit is<br />
exceeded:<br />
• Minimum output = limit is not exceeded.<br />
• Maximum output = limit is exceeded.<br />
71
10<br />
<strong>Grundfos</strong> E-<strong>pumps</strong><br />
Advanced use of MLE motors<br />
Limit exceeded 1 and 2<br />
Limit exceeded is a monitoring function monitoring one<br />
or two values/inputs. The function enables different<br />
inputs to activate various outputs and alarms/<br />
warnings when the signal input has exceeded<br />
pre-determined limits.<br />
Input<br />
Fig. 83 Example of a "limit exceeded" sequence<br />
Purpose and benefits<br />
The purpose of this function is to monitor parameters<br />
which are central for the application. This will enable<br />
the controller to react to possible, abnormal operating<br />
conditions. This makes the E-pump a more important<br />
and integrated part of a system, and it can thus replace<br />
other existing monitoring units.<br />
The liquid temperature can be monitored, and thus the<br />
E-pump can ensure that the system temperature does<br />
not exceed a maximum permissible level.<br />
The minimum inlet pressure can be monitored, and<br />
thus the E-pump can prevent damage caused by a<br />
cavitation or dry run.<br />
Applications<br />
The limit exceeded function is typically used for<br />
monitoring secondary parameters in the systems.<br />
This function is available in these pump sizes:<br />
2-pole<br />
[Hp]<br />
Limit exceeded<br />
Single-phase <strong>pumps</strong><br />
Outputs<br />
Alarm/warning<br />
4-pole<br />
[Hp]<br />
0.50 - 1.5 0.33 - 1.0<br />
- -<br />
Three-phase <strong>pumps</strong><br />
2-pole<br />
[Hp]<br />
1.0 - 10 15 - 30<br />
●<br />
●<br />
TM03 9188 3507<br />
Description<br />
The figures below show two examples of setpoint monitoring<br />
by means of the limit exceeded function.<br />
Monitored value = feedback value<br />
Limit<br />
Setpoint<br />
Action<br />
Not active<br />
Detection<br />
delay<br />
Fig. 84 Limit exceeded sequence with the limit type<br />
"max. limit", for example monitoring of bearing<br />
temperature<br />
Monitored value = feedback value<br />
Setpoint<br />
Limit<br />
Action<br />
Not active<br />
Detection<br />
delay<br />
Reset hysteresis<br />
Active<br />
Reset hysteresis<br />
Active<br />
Reset delay<br />
Reset delay<br />
Fig. 85 Limit exceeded sequence with the limit type<br />
"min. limit"<br />
When the limit is exceeded, the signal input crosses<br />
the limit as an increasing or decreasing value, and the<br />
function can be set to cover both situations.<br />
TM03 9197 3607<br />
TM03 9196 3607<br />
72
<strong>Grundfos</strong> E-<strong>pumps</strong><br />
10<br />
Pump operating at power limit<br />
When a pump in operation is running at maximum<br />
output power (P2) in the entire performance range<br />
from closed valve to maximum flow, it is said to be<br />
operating at power limit.<br />
H<br />
Extended operating range as a<br />
result of this function<br />
Power curve of a standard<br />
E-pump<br />
Power curve for an E-pump<br />
operating at power limit<br />
Fig. 86 Power curves of a standard pump and a pump<br />
operating at power limit<br />
Purpose and benefits<br />
This function utilizes the fact that often a standard<br />
E-pump does not load the MLE motor fully in the entire<br />
operating range. By controlling the MLE motor to<br />
always put out maximum power, irrespective of the<br />
load, it is now possible to extend the performance<br />
range of the pump without overloading the MLE motor.<br />
See fig. 86.<br />
In practice, this function provides these benefits:<br />
• The pressure range of the pump can be increased<br />
at low flows without using a bigger motor, provided<br />
that the pump construction can handle the pressure.<br />
• In some cases, the pump can be fitted with a<br />
smaller motor than the corresponding standard<br />
pump when the E-pump has a fixed operating range<br />
at low flows.<br />
This function is available in these pump sizes:<br />
Q<br />
TM03 9187 3507<br />
Applications<br />
This function is most often used in applications with<br />
relatively low flow in relation to rated performance<br />
where at the same time the demanded maximum pressure<br />
corresponds to the maximum pressure that motor<br />
and pump can achieve.<br />
Examples of application:<br />
• washing and cleaning<br />
• irrigation<br />
• boiler feed.<br />
Description<br />
As mentioned in section Purpose and benefits, there<br />
are two primary fields of application for this function:<br />
Increased pressure<br />
Figure 87 illustrates the operating range of a standard<br />
60 Hz E-pump with increased pressure range achieved<br />
by using the "pump operating at power limit" function.<br />
Performance<br />
curve for<br />
the standard<br />
E-pump<br />
H<br />
f<br />
Output frequency<br />
for the standard<br />
E-pump<br />
Maximum performance<br />
when operating at power<br />
limit<br />
Maximum power curve<br />
when operating at power<br />
limit<br />
Power curve for the<br />
standard E-pump<br />
Q<br />
Output frequency<br />
when operating at<br />
power limit<br />
Load<br />
TM05 3248 1012<br />
Advanced use of MLE motors<br />
2-pole<br />
[Hp]<br />
Single-phase <strong>pumps</strong><br />
4-pole<br />
[Hp]<br />
0.50 - 1.5 0.33 - 1.0<br />
- -<br />
Three-phase <strong>pumps</strong><br />
2-pole<br />
[Hp]<br />
1.0 - 10 15 - 30<br />
●<br />
●<br />
Fig. 87 Standard performance curve vs a performance<br />
curve with the "pump operating at power limit"<br />
function<br />
The MLE motor is set to a higher speed (f max ) than the<br />
rated speed of the pump. This leads to a higher pressure<br />
at closed valve and low flow.<br />
The pump will operate at a speed corresponding to the<br />
set frequency (f max ) until the pump reaches the flow<br />
where the motor is loaded to its full rated power. If the<br />
flow is increased further, the motor will reduce its<br />
speed so as not to exceed its rated power.<br />
Note: The pump will be running at oversynchronous<br />
speed in the low-flow area which may alter the sound<br />
level.<br />
73
10<br />
<strong>Grundfos</strong> E-<strong>pumps</strong><br />
Advanced use of MLE motors<br />
Reduced motor size<br />
Figure 88 shows the operating range of a standard<br />
60 Hz pump where the "pump operating at power limit"<br />
function is used to optimize pump performance in<br />
relation to the motor size.<br />
A pump operating at low flows and relatively high<br />
pressures (1) can be fitted with a smaller motor whose<br />
power matches this operating range. At higher flows<br />
and relatively lower pressures (2), the motor will<br />
reduce its speed when the power limit is exceeded and<br />
follow a steeper curve corresponding to the power<br />
available.<br />
Operating range at low flows<br />
Maximum power curve when<br />
operating at power limit<br />
High ambient temperature<br />
If the ambient temperature is above 104 °F (40 C), the<br />
motor full load amps must be reduced per fig. 89.<br />
P2<br />
[%]<br />
100<br />
90<br />
80<br />
70<br />
60<br />
50<br />
68 77 86 95 104 113 122 131 140 149 t [°F]<br />
20 25 30 35 40 45 50 55 60 65 t [°C]<br />
3280 7382 11483 ft<br />
1000 2250 3500 m<br />
TM05 1592 3211<br />
Power consumption curve of<br />
the pump<br />
Fig. 89 Derating curve shows performance reduction at<br />
increased ambient temperature and installation<br />
altitude<br />
1 2<br />
Reduced performance<br />
when the pump<br />
consumes more<br />
power than the motor<br />
can provide<br />
TM03 8615 2007<br />
Fig. 88 Standard performance curve vs a curve operated<br />
at reduced power limit<br />
Size of pump and MLE motor<br />
No special considerations need to be taken when<br />
sizing pump and motor. If the pump is oversized for the<br />
motor, the MLE motor will just reduce its speed and<br />
thus the pump performance according to the<br />
illustration in fig. 88.<br />
Setup<br />
The "pump operating at power limit" function can be<br />
set up via a configuration file downloaded to the product<br />
via the <strong>Grundfos</strong> PC Tool E-products.<br />
Special conditions<br />
The ambient temperature and the installation altitude<br />
are important factors for the motor life, as they affect<br />
the life of the bearings and the insulation system.<br />
High altitude<br />
Motors installed up to 3280 ft above sea level can be<br />
loaded 100%. At higher altitudes, the cooling capability<br />
of air is reduced.<br />
At altitudes above 3,280 ft (1000 m), the full load amps<br />
should be derated in accordance with the diagram in<br />
fig. 89.<br />
At an altitude of 7380 ft (2250 m); the full load amps<br />
(12A) of the MLE must be derated to 95% according to<br />
fig. 89. The MLE full load amps at 7380 ft (2250 m) is<br />
11.4 amps.<br />
74
<strong>Grundfos</strong> E-<strong>pumps</strong><br />
11<br />
11. MLE technical data<br />
<strong>Grundfos</strong> MLE motors are equipped with NEMA<br />
standard C-face flanges.<br />
<strong>Grundfos</strong> MLE 10 Hp and smaller motors are<br />
recognized under the Component Recognition<br />
Program of Underwriters Laboratories Inc. for the<br />
United States and Canada. <strong>Grundfos</strong> MLE motors 15<br />
to 30 Hp are UL Listed for the U.S.A.<br />
MLE motors are equipped with a reinforced bearing<br />
system with locked bearings at the drive end, either a<br />
deep-groove ball bearing or an angular-contact<br />
bearing depending on the motor model.<br />
This ensures an even uptake of the load in order to<br />
maximize the lifetime of the bearings, which are<br />
guaranteed for a minimum of 18,0000 hours service<br />
life. At the non-drive end, the motors are fitted with<br />
bearings with axial clearance in order to meet<br />
production tolerances while allowing for thermal<br />
expansion during motor operation. This ensures<br />
trouble-free operation and long life.<br />
MLE technical data<br />
75
11<br />
<strong>Grundfos</strong> E-<strong>pumps</strong><br />
MLE technical data<br />
MLE single phase motors<br />
Dimensional sketch<br />
AH<br />
BC<br />
C<br />
AG<br />
LL<br />
O<br />
AF<br />
AF<br />
AJ AK<br />
AJ<br />
AB<br />
AK<br />
U<br />
BB<br />
LA<br />
P<br />
AK<br />
AK<br />
45°<br />
AJ<br />
BFxZ<br />
AJ<br />
BD<br />
TM03 1674 2705<br />
2-pole dimensional data<br />
Power<br />
[Hp]<br />
Short<br />
type designation<br />
Stator housing [inches (mm)]<br />
Shaft end [inches (mm)]<br />
P AB AF AF C AG LL U AH<br />
0.5 MLE71AB-2-56C-C 5.55<br />
0.75 MLE71BA-2-56C-C (141)<br />
5.51<br />
(140)<br />
4.13<br />
(105)<br />
4.13<br />
(105)<br />
8.70<br />
(221)<br />
7.52<br />
(191)<br />
6.65<br />
(169)<br />
0.62<br />
(16)<br />
2.06<br />
(52)<br />
1.0 MLE80AA-2-56C-C 5.55<br />
1.5 MLE80BA-2-56C-C (141)<br />
5.51<br />
(140)<br />
4.13<br />
(105)<br />
4.13<br />
(105)<br />
10.67<br />
(271)<br />
9.09<br />
(231)<br />
6.65<br />
(169)<br />
0.62<br />
(16)<br />
2.06<br />
(52)<br />
Power<br />
[Hp]<br />
Short<br />
type designation<br />
Flange [inches (mm)]<br />
Cable entries [mm]<br />
LA AJ AK BD BF BB O<br />
0.5 MLE71AB-2-56C-C 0.47<br />
0.75 MLE71BA-2-56C-C (12)<br />
3.35<br />
(85)<br />
2.76<br />
(70)<br />
4.13<br />
(105)<br />
M6 x 4 mm<br />
0.10<br />
(2.5)<br />
2xM16 + 1xM20 +<br />
1xknock out M16<br />
1.0 MLE80AA-2-56C-C 0.47<br />
1.5 MLE80BA-2-56C-C (12)<br />
3.94<br />
(100)<br />
3.15<br />
(80)<br />
4.72<br />
(120)<br />
M6 x 4 mm<br />
0.12<br />
(3)<br />
2xM16 + 1xM20 +<br />
1xknock out M16<br />
4-pole dimensional data<br />
Power<br />
[hp]<br />
Short<br />
type designation<br />
Stator housing [inches (mm)]<br />
Shaft end [inches (mm)]<br />
P AB AF AF C AG LL U AH<br />
0.35 MLE71AB-4-56C-C 5.55<br />
0.5 MLE71BA-4-56C-C (141)<br />
5.51<br />
(140)<br />
4.13<br />
(105)<br />
4.13<br />
(105)<br />
8.70<br />
(221)<br />
7.52<br />
(191)<br />
6.65<br />
(169)<br />
0.62<br />
(16)<br />
2.06<br />
(52)<br />
0.75 MLE80AA-4-56C-C 5.55<br />
1.0 MLE80BA-4-56C-C (141)<br />
5.51<br />
(140)<br />
4.13<br />
(105)<br />
4.13<br />
(105)<br />
10.67<br />
(271)<br />
9.09<br />
(231)<br />
6.65<br />
(169)<br />
0.62<br />
(16)<br />
2.06<br />
(52)<br />
Power<br />
[hp]<br />
Short<br />
type designation<br />
Flange [inches (mm)]<br />
Cable entries [mm]<br />
LA AJ AK BD BF BB O<br />
0.35 MLE71AB-4-56C-C 0.47<br />
0.5 MLE71BA-4-56C-C (12)<br />
3.35<br />
(85)<br />
2.76<br />
(70)<br />
4.13<br />
(105)<br />
M6 x 4 mm<br />
0.10<br />
2.5)<br />
2xM16 + 1xM20 + 1xknock out M16<br />
0.75 MLE80AA-4-56C-C 0.47<br />
1.0 MLE80BA-4-56C-C (12)<br />
3.94<br />
(100)<br />
3.15<br />
(80)<br />
4.72<br />
(120)<br />
M6 x 4 mm<br />
0.12<br />
(3)<br />
2xM16 + 1xM20 + 1xknock out M16<br />
76
<strong>Grundfos</strong> E-<strong>pumps</strong><br />
11<br />
MLE three phase motors 1 - 10 Hp<br />
Dimensional sketch<br />
C<br />
AH<br />
AG<br />
LL<br />
AF<br />
AF<br />
MLE technical data<br />
BC<br />
O<br />
AJ AK<br />
AJ<br />
AK<br />
AB<br />
U<br />
BB<br />
LA<br />
P<br />
AK<br />
AK<br />
45°<br />
AJ<br />
BFxZ<br />
AJ<br />
BD<br />
TM03 1674 2705<br />
Dimensional data<br />
P2<br />
[Hp]<br />
Short type<br />
designation<br />
1.00 MLE90CC-2-56C-G3<br />
1.50 MLE90CC-2-56C-G3<br />
2.00 MLE90CC-2-56C-G3<br />
3.00 MLE90FA-2-182TC-G3<br />
5.00 MLE112CA-2-184TC-G3<br />
7.50 MLE132DA-2-215TC-G3<br />
10.0 MLE132FA2-215-TC-G3<br />
Stator housing [inches (mm)]<br />
Shaft end<br />
[inches (mm)]<br />
P AB AF AF C AG LL U AH<br />
7.00<br />
(178)<br />
7.00<br />
(178)<br />
8.66<br />
(220)<br />
8.66<br />
(220)<br />
10.24<br />
(260)<br />
6.57<br />
(167)<br />
6.57<br />
(167)<br />
7.40<br />
(188)<br />
7.40<br />
(188)<br />
8.39<br />
(213)<br />
5.20<br />
(132)<br />
5.20<br />
(132)<br />
5.71<br />
(145)<br />
5.71<br />
(145)<br />
5.71<br />
(145)<br />
5.20<br />
(132)<br />
5.20<br />
(132)<br />
5.71<br />
(145)<br />
5.71<br />
(145)<br />
5.71<br />
(145)<br />
15.00<br />
(381)<br />
16.05<br />
(408)<br />
18.25<br />
(464)<br />
18.75<br />
(476)<br />
18.07<br />
(459)<br />
12.95<br />
(329)<br />
13.31<br />
(338)<br />
15.51<br />
(394)<br />
15.51<br />
(394)<br />
14.92<br />
(379)<br />
10.24<br />
(260)<br />
10.24<br />
(260)<br />
11.81<br />
(300)<br />
11.81<br />
(300)<br />
11.81<br />
(300)<br />
0.62<br />
(16)<br />
1.12<br />
(28)<br />
1.12<br />
(28)<br />
1.37<br />
(35)<br />
1.37<br />
(35)<br />
2.06<br />
(52)<br />
2.62<br />
(67)<br />
2.62<br />
(67)<br />
3.12<br />
(79)<br />
3.12<br />
(79)<br />
P2<br />
[Hp]<br />
Short type<br />
designation<br />
1.00 MLE90CC-2-56C-G3<br />
1.50 MLE90CC-2-56C-G3<br />
2.00 MLE90CC-2-56C-G3<br />
3.00 MLE90FA-2-182TC-G3<br />
5.00 MLE112CA-2-184TC-G3<br />
7.50 MLE132DA-2-215TC-G3<br />
10.0 MLE132FA2-215-TC-G3<br />
Flange [inches (mm)]<br />
Cable entries [mm]<br />
LA AJ AK BD BF BB Z O<br />
0.59<br />
(15)<br />
0.75<br />
(19)<br />
0.63<br />
(16)<br />
0.63<br />
(16)<br />
0.63<br />
(16)<br />
5.87<br />
(149)<br />
7.24<br />
(184)<br />
7.24<br />
(184)<br />
7.24<br />
(184)<br />
7.24<br />
(184)<br />
4.5<br />
(114)<br />
8.50<br />
(216)<br />
8.50<br />
(216)<br />
8.50<br />
(216)<br />
8.50<br />
(216)<br />
6.50<br />
(165)<br />
8.50<br />
(216)<br />
8.50<br />
(216)<br />
8.50<br />
(216)<br />
8.50<br />
(216)<br />
3/8 "-16<br />
0.16<br />
(4)<br />
1/2"-13 -<br />
1/2"-13 -<br />
1/2"-13 -<br />
1/2"-13 -<br />
0.16<br />
(4)<br />
0.16<br />
(4)<br />
0.16<br />
(4)<br />
0.16<br />
(4)<br />
0.16<br />
(4)<br />
2xM16 + 1xM25 +2xknock out M16<br />
2xM16 + 1xM25 + 2xknock out M16<br />
2xM16 + 1xM25 + 2xknock out M16<br />
2xM16 +1xM25 + 2xknock out M16<br />
2xM16 + 1xM25 + 2xknock out M16<br />
77
11<br />
<strong>Grundfos</strong> E-<strong>pumps</strong><br />
MLE technical data<br />
MLE three phase motors 15 - 30 Hp<br />
Dimensional sketch<br />
TM04 5498 3309<br />
Dimensional data<br />
P2<br />
[Hp]<br />
Short type<br />
designation<br />
15 MLE160 254TC<br />
20 MLE160 256TC<br />
25 MLE160 284TSC<br />
30 MLE180 286TSC<br />
Stator housing [inches (mm)]<br />
Shaft end [inches]<br />
P AB AF AF C AG LL U AH<br />
13.39<br />
(340)<br />
13.39<br />
(340)<br />
13.39<br />
(340)<br />
13.39<br />
(340)<br />
12.13<br />
(308)<br />
12.13<br />
(308)<br />
12.13<br />
(308)<br />
12.13<br />
(308)<br />
8.27<br />
(210)<br />
8.27<br />
(210)<br />
8.27<br />
(210)<br />
8.27<br />
(210)<br />
8.27<br />
(210)<br />
8.27<br />
(210)<br />
8.27<br />
(210)<br />
8.27<br />
(210)<br />
22.56<br />
(573)<br />
22.56<br />
(573)<br />
24.53<br />
(623)<br />
24.53<br />
(623)<br />
18.78<br />
(477)<br />
18.78<br />
(477)<br />
22.72<br />
(577)<br />
22.72<br />
(577)<br />
15.75<br />
(400)<br />
15.75<br />
(400)<br />
15.75<br />
(400)<br />
15.75<br />
(400)<br />
1.62<br />
(41)<br />
1.62<br />
(41)<br />
1.62<br />
(41)<br />
1.62<br />
(41)<br />
3.75<br />
(95)<br />
3.75<br />
(95)<br />
3.75<br />
(95)<br />
3.75<br />
(95)<br />
P2<br />
[Hp]<br />
Short type<br />
designation<br />
15 MLE160 254TC<br />
20 MLE160 256TC<br />
25 MLE160 284TSC<br />
30 MLE180 286TSC<br />
Flange [inches (mm)]<br />
Cable entries [mm]<br />
AJ AK BD BF BB O<br />
7.25<br />
(184)<br />
7.25<br />
(184)<br />
9.00<br />
(229)<br />
9.00<br />
(229)<br />
8.50<br />
(216)<br />
8.50<br />
(216)<br />
10.50<br />
(267)<br />
10.50<br />
(267)<br />
9.88<br />
(251)<br />
9.88<br />
(251)<br />
10.75<br />
(273)<br />
10.75<br />
(273)<br />
½"<br />
½"<br />
½"<br />
½"<br />
0.26<br />
(7)<br />
0.26<br />
(7)<br />
0.32<br />
(8)<br />
0.32<br />
(8)<br />
1xM40 + 1xM20 + 2xM16 + 2xknock out M16<br />
1xM40 + 1xM20 + 2xM16 + 2xknock out M16<br />
1xM40 + 1xM20 + 2xM16 + 2xknock out M16<br />
1xM40 + 1xM20 + 2xM16 + 2xknock out M16<br />
78
<strong>Grundfos</strong> E-<strong>pumps</strong><br />
11<br />
MLE motors for CRE-H and CRNE-H<br />
(C-Face mounting with foot)<br />
GR9035<br />
MLE technical data<br />
Dimensional sketch<br />
BB<br />
MOUNTING<br />
SURFACE<br />
45°<br />
AK<br />
AJ<br />
D<br />
BC<br />
H<br />
2F<br />
BA<br />
2E<br />
E<br />
A<br />
DIMENSIONS FOR<br />
FRAMES WHERE AJ IS<br />
GREATER THAN AK<br />
BC<br />
BB<br />
MOUNTING<br />
SURFACE<br />
AJ<br />
AK<br />
TM05 3012 0812<br />
Dimensional data<br />
Power Voltage<br />
NEMA<br />
Foot dimensions [inches]<br />
Phase<br />
[Hp] [V]<br />
frame size A D E 2E 2F BA + BC H<br />
1-phase 2-pole MLE motor with foot<br />
0.5 208-230 1 56C 6.00 3.50 2.44 4.88 3.00 2.56 0.34<br />
0.75 208-230 1 56C 6.00 3.50 2.44 4.88 3.00 2.56 0.34<br />
1 208-230 1 56C 6.00 3.50 2.44 4.88 3.00 2.56 0.34<br />
1.5 208-230 1 56C 6.00 3.50 2.44 4.88 3.00 2.56 0.34<br />
3-phase 2-pole MLE motor with foot<br />
1.5 3x208-230 3 56C 6.00 3.50 2.44 4.88 3.00 2.56 0.34<br />
2 3x208-230 3 56C 6.00 3.50 2.44 4.88 3.00 2.56 0.34<br />
3 3x208-230 3 182TC 8.90 4.50 3.75 7.50 4.50 2.87 0.41<br />
5 3x208-230 3 184TC 8.90 4.50 3.75 7.50 5.50 2.87 0.41<br />
7.5 3x208-230 3 215TC 9.96 5.25 4.25 8.50 7.00 3.75 0.41<br />
1 3x460-480 3 56C 6.00 3.50 2.44 4.88 3.00 2.56 0.34<br />
1.5 3x460-480 3 56C 6.00 3.50 2.44 4.88 3.00 2.56 0.34<br />
2 3x460-480 3 56C 6.00 3.50 2.44 4.88 3.00 2.56 0.34<br />
3 3x460-480 3 182TC 8.90 4.50 3.75 7.50 4.50 2.87 0.41<br />
5 3x460-480 3 184TC 8.90 4.50 3.75 7.50 5.50 2.87 0.41<br />
7.5 3x460-480 3 215TC 9.96 5.25 4.25 8.50 7.00 3.75 0.41<br />
10 3x460-480 3 215TC 9.60 5.25 4.25 8.50 7.00 3.75 0.41<br />
15 3x460-480 3 254T 11.30 6.25 5.00 10.00 8.25 4.50 0.53<br />
20 3x460-480 3 256T 11.30 6.25 5.00 10.00 10.00 4.50 0.53<br />
25 3x460-480 3 284TS 12.30 7.00 5.50 11.00 9.50 5.00 0.53<br />
30 3x460-480 3 286TS 12.30 7.00 5.50 11.00 11.00 5.00 0.53<br />
79
11<br />
<strong>Grundfos</strong> E-<strong>pumps</strong><br />
MLE technical data<br />
MLE technical data<br />
2 pole<br />
Hp<br />
Short type<br />
designation<br />
Voltage<br />
[V]<br />
Ph<br />
NEMA<br />
frame<br />
Size<br />
Service<br />
Factor<br />
Motor<br />
full load<br />
efficiency<br />
[%]<br />
Full load<br />
current<br />
amps **<br />
[A]<br />
Service<br />
factor<br />
current<br />
amps<br />
[A]<br />
Power<br />
factor<br />
Full load<br />
speed<br />
[rpm]<br />
Sound<br />
pressure<br />
level<br />
dB(A)<br />
1/2 MLE71AB-2-56C-C 208-230 1 56C 1.0 71.0* 2.8 - 2.5 - 0.96 3400 63<br />
3/4 MLE71BA-2-56C-C 208-230 1 56C 1.0 74.0* 3.9 - 3.5 - 0.97 3400 63<br />
1 MLE80AA-2-56C-C 208-230 1 56C 1.0 76.0* 5.2 - 4.7 - 0.97 3400 62<br />
1 MLE90CC-2-56C-G 460-480 3 56C 1.25 77.0 1.7 2.10 0.73 3500 65<br />
1 1/2 MLE80BA-2-56C-C 208-230 1 56C 1.0 77.0* 7.5 - 6.8 - 0.97 3400 63<br />
1 1/2 MLE90CC-2-56C-G 208-230 3 56C 1.0 82.5 4.35 - 4.05 - 0.94 3480 65<br />
1 1/2 MLE90CC-2-56C-G 460-480 3 56C 1.15 84.0 2.2 2.50 0.83 3480 65<br />
2 MLE90CC-2-56C-G 208-230 3 56C 1.0 84.0 5.75 - 5.25 - 0.95 3460 70<br />
2 MLE90CC-2-56C-G 460-480 3 56C 1.15 85.5 2.7 3.10 0.87 3460 70<br />
3 MLE90FA-2-182TC-G 208-230 3 182TC 1.0 85.5 8.3 - 7.6 - 0.95 3460 70<br />
3 MLE90FA-2-182TC-G 460-480 3 182TC 1.15 86.5 3.7 4.30 0.91 3460 70<br />
5 MLE112CA-2-184TC-G 208-230 3 184TC 1.0 87.5 13.8 - 13.3 - 0.94 3470 75<br />
5 MLE112CA-2-184TC-G 460-480 3 184TC 1.15 88.5 6.1 7.00 0.92 3470 75<br />
7 1/2 MLE132DA-2-215TC-G 208-230 3 215TC 1.0 88.5 20.0 - 18.5 - 0.94 3450 80<br />
7 1/2 MLE132DA-2-215TC-G 460-480 3 215TC 1.15 88.5 8.9 10.3 0.94 3470 80<br />
10 MLE132FA-2-215TC-G 460-480 3 215TC 1.15 89.5 11.6 13.4 0.93 3500 80<br />
15 MLE160AA-2- 254TC-F 460-480 3 254TC 1.15 90.2 18.0 20.6 0.89 3500 68<br />
20 MLE160AB-2- 256TC-F 460-480 3 256TC 1.15 90.2 24.0 27.5 0.89 3540 68<br />
25 MLE160AC-2- 284TC-F 460-480 3 284TC 1.15 91.0 30.5 35.0 0.88 3540 70<br />
30 MLE180AA-2- 286TC-F 460-480 3 286TC 1.15 91.0 36.5 42.0 0.88 3540 70<br />
4 pole<br />
Hp<br />
Short type<br />
designation<br />
Voltage<br />
[V]<br />
Ph<br />
NEMA<br />
frame<br />
Size<br />
Service<br />
Factor<br />
Motor<br />
full load<br />
efficiency<br />
[%]<br />
Full load<br />
current<br />
amps **<br />
[A]<br />
Service<br />
factor<br />
current<br />
amps<br />
[A]<br />
Power<br />
factor<br />
Full load<br />
speed<br />
[rpm]<br />
Sound<br />
pressure<br />
level<br />
dB(A)<br />
1/3 MLE71AB-4-56C-C 208-230 1 56C 1.0 67.0* 2.0 - 1.9 - 0.94 1690 44<br />
1/2 MLE71BA-4-56C-C 208-230 1 56C 1.0 70.0* 2.8 - 2.5 - 0.96 1690 45<br />
3/4 MLE80AA-4-56C-C 208-230 1 56C 1.0 72.0* 4.0 - 3.7 - 0.96 1690 46<br />
1 MLE80BA-4-56C-C 208-230 1 56C 1.0 73.0* 5.4 - 4.9 - 0.97 1690 49<br />
* This is the combined efficiency of the motor and variable frequency drive.<br />
** At 460 volts for 460-480 volt motors.<br />
80
<strong>Grundfos</strong> E-<strong>pumps</strong><br />
11<br />
PC Tool E-products<br />
Application<br />
The PC Tool E-products can be used for these pump<br />
sizes:<br />
2-pole<br />
[Hp]<br />
Single-phase <strong>pumps</strong><br />
4-pole<br />
[Hp]<br />
0.50 - 1.5 0.33 - 1.0<br />
●<br />
●<br />
MLE technical data<br />
Fig. 90 Opening picture in PC Tool E-products<br />
The <strong>Grundfos</strong> PC Tool E-products is the ultimate tool<br />
when working with <strong>Grundfos</strong> E-<strong>pumps</strong>.<br />
With the PC Tool E-products you get access to most of<br />
the settings available in your E-pump, and data can be<br />
logged and viewed.<br />
The PC tool is a combination of a software program<br />
supplied on a CD and hardware connecting your computer<br />
with your E-pump.<br />
Three-phase <strong>pumps</strong><br />
2-pole<br />
[Hp]<br />
1.0 - 10 15 - 30<br />
●<br />
●<br />
Description<br />
The <strong>Grundfos</strong> PC Tool E-products can be used by the<br />
customer for setting up, commissioning and servicing<br />
the E-pump.<br />
Software on a CD<br />
PC Tool Link and connecting cables to PC and<br />
pump<br />
TM03 9291 3707<br />
Fig. 91 Complete PC Tool E-products consisting of software<br />
and hardware<br />
Purpose and benefits<br />
Connection of the <strong>Grundfos</strong> PC Tool E-products offers<br />
a number of advantages during commissioning,<br />
operation and service of E-<strong>pumps</strong>.<br />
PC Tool E-products enables the following:<br />
• monitoring of the operational status of your E-pump<br />
• standard configuration of E-<strong>pumps</strong><br />
• custom configuration of E-<strong>pumps</strong><br />
• saving logged data from E-<strong>pumps</strong>.<br />
81
12<br />
<strong>Grundfos</strong> E-<strong>pumps</strong><br />
Accessories<br />
12. Accessories<br />
Overview of accessories<br />
Product<br />
Page<br />
Remote control, R100 83<br />
Potentiometer 83<br />
Pressure sensor 84<br />
<strong>Grundfos</strong> differential-pressure sensor, DPI 85<br />
CIU communication interface units 87<br />
CIM communication interface modules 87<br />
LiqTec 88<br />
R100 remote control Potentiometer Pressure sensor DPI sensor<br />
R 100<br />
><br />
OK<br />
><br />
><br />
+<br />
-<br />
CIU unit CIM module LiqTec<br />
Fig. 92 Examples of accessories<br />
82
<strong>Grundfos</strong> E-<strong>pumps</strong><br />
12<br />
Remote control, R100<br />
The <strong>Grundfos</strong> R100 remote control is designed for<br />
wireless IR communication with <strong>Grundfos</strong> products.<br />
The R100 is supplied with a case, batteries, a<br />
detachable pocket clip and operating instructions.<br />
The functions available depend on each individual<br />
product. See installation and operating instructions for<br />
the product.<br />
Display<br />
The display is a 1.8 in. x 1.2 in. (46 x 30 mm) graphic<br />
(dot matrix) LCD display with 100 x 65 dots.<br />
The graphics appear in blue color on a grey<br />
background. The display has yellow back light to<br />
facilitate reading.<br />
A countersunk tempered-glass plate protects the<br />
display against knocks and scratches.<br />
Product number<br />
Accessories<br />
Fig. 93 R100 remote control<br />
Construction<br />
The R100 is a robust mechanical construction made of<br />
impact-resistant polycarbonate (PC). The R100 has silicone<br />
rubber buttons.<br />
The R100 is to be regarded as an ordinary service and<br />
measuring tool, and is therefore designed to withstand<br />
wear and stress from everyday use.<br />
An infrared light (IR) transmitter/receiver is located<br />
within the unit.<br />
The design of the unit and the position of the buttons<br />
enable operation of the R100 with one hand only.<br />
The R100 is completely maintenance-free. It can be<br />
cleaned with a damp cloth without cleaning material.<br />
TM00 4498 2802<br />
Product<br />
Product number<br />
R100 96615297<br />
Potentiometer<br />
Potentiometer for setpoint setting and start/stop of the<br />
pump.<br />
Product number<br />
Product<br />
External potentiometer with cabinet for wall<br />
mounting<br />
Fig. 94 SPP 1 potentiometer<br />
Product number<br />
415929<br />
TM05 1512 2811<br />
83
12<br />
<strong>Grundfos</strong> E-<strong>pumps</strong><br />
Accessories<br />
Pressure sensor<br />
Accessory Type Supplier<br />
Pressure sensors<br />
Pressure Transmitter<br />
with 6 ft screened cable<br />
Connection: 1/4" - 18 NPT<br />
Danfoss<br />
MBS3000<br />
Pressure range<br />
[psi (bar)]<br />
Product<br />
number<br />
0 - 87 (0 - 6) 91136169<br />
0 - 145 (0 - 10) 91136170<br />
0 - 232 (0 - 16) 91136171<br />
0 - 362 (0 - 25) 91136172<br />
0 - 580 (0 - 40) 91136173<br />
0 - 870 (0 - 60) 91136174<br />
Technical data<br />
Pressure sensor<br />
Product number 91136169 91136170 91136171 91136172 91136173 91136174<br />
Pressure range [psi (bar)] 0 - 87 (0 - 6) 0 - 145 (0 - 10) 0 - 232 (0 - 16) 0 - 362 (0 - 25) 0 - 580 (0 - 40) 0 - 870 (0 - 60)<br />
Max. operating pressure [psi (bar)] 300 (20.1) 300 (20.1) 750 (51.7) 1450 (100) 2900 (200) 2900 (200)<br />
Supply voltage<br />
9 - 32 VDC<br />
Output signal [mA] 4 - 20<br />
Insulation resistance<br />
> 100 MΩ at 100 V<br />
Accuracy, typical +/- FS [%] 0.5 %<br />
Response time, max. [ms]<br />
4 ms<br />
Medium temperature range [°F (°C)]<br />
-40 to +185 °F (-40 °C to +85 °C)<br />
Ambient temperature range [°F (°C)]<br />
-40 to +185 °F (-40 °C to +85 °C)<br />
Wetted parts, material<br />
AISI 316L<br />
Housing material<br />
AISI 316L<br />
Enclosure rating<br />
IP65<br />
Weight [lb (kg)] 0.3 (0.14)<br />
EMC - Emission EN 61000-6-3<br />
EMC Immunity EN 61000-6-2<br />
Pressure connection NPT 1/4-18<br />
CE-marked<br />
EMC protected in accordance with EU EMC Directive<br />
Dimensions<br />
TM05 1532 2911<br />
Fig. 95 Dimensional sketch<br />
84
<strong>Grundfos</strong> E-<strong>pumps</strong><br />
12<br />
<strong>Grundfos</strong> differential-pressure sensor, DPI<br />
<strong>Grundfos</strong> differential-pressure sensor, DPI<br />
• 1 sensor incl. 0.9 m screened cable (7/16" connections)<br />
• 1 original DPI bracket (for wall mounting)<br />
• 1 <strong>Grundfos</strong> bracket (for mounting on motor)<br />
• 2 M4 screws for mounting of sensor on bracket<br />
• 1 M6 screw (self-cutting) for mounting on 3 Hp and smaller<br />
• 1 M8 screw (self-cutting) for mounting on 5 Hp - 10 Hp<br />
• 1 M10 screw (self-cutting) for mounting on 15 - 25 Hp<br />
• 1 M12 screw (self-cutting) for mounting on 30 Hp<br />
• 3 capillary tubes (short/long)<br />
• 2 fittings (1/4" - 7/16")<br />
• 5 cable clips (black)<br />
• Installation and operating instructions<br />
Pressure range<br />
[psi (bar)]<br />
Product<br />
number<br />
0 - 8.7 (0 - 0.6) 96611522<br />
0 - 14.5 (0 - 1.0) 96611523<br />
0 - 23 (0 - 1.6) 96611524<br />
0 - 36 (0 - 2.5) 96611525<br />
0 - 58 (0 - 4.0) 96611526<br />
0 - 87 (0 - 6.0) 96611527<br />
0 - 145 (0 - 10) 96611550<br />
Accessories<br />
Select the differential-pressure sensor so that the maximum pressure of the sensor is higher than the maximum differential pressure of the pump.<br />
The sensor housing and parts in contact with the liquid<br />
are made of Inox DIN 1.4305 (pos. 3) with composite<br />
PA top (pos. 2). The connections (pos. 4) are DIN<br />
1.4305, 7/16" UNF connection and gaskets are FKM.<br />
A black and screened cable (pos. 1) goes through a<br />
screwed connection PG with M 12 x 1.5 connection.<br />
The sensor is supplied with angular bracket for<br />
mounting on motor or bracket for wall mounting.<br />
A specially coated silicon chip is used for greater<br />
accuracy.<br />
1<br />
2<br />
4<br />
P2<br />
P1<br />
3<br />
TM03 2057 3505<br />
Fig. 96 DPI sensor<br />
85
12<br />
<strong>Grundfos</strong> E-<strong>pumps</strong><br />
Accessories<br />
Technical data<br />
<strong>Grundfos</strong> differential-pressure sensor, DPI<br />
Product number 96611522 96611523 96611524 96611525 96611526 96611527 96611550<br />
Pressure ranges, differential pressure [psi (bar)]<br />
0 - 8.7<br />
(0 - 0.6)<br />
0 - 14.5<br />
(0 - 1.0)<br />
0 - 23<br />
(0 - 1.6)<br />
0 - 36<br />
(0 - 2.5)<br />
0 - 58<br />
(0 - 4.0)<br />
0 - 87<br />
(0 - 6.0)<br />
Supply voltage<br />
12 - 30 VDC<br />
Output signal<br />
4 - 20 mA<br />
Load [Ω]<br />
24 V: max. 500 [Ω], 16 V: max. 200 [Ω], 12 V: max. 100 [Ω]<br />
Max. system pressure, P1 and P2 simultaneously [psi (bar)] 232 (16)<br />
Rupture pressure [bar]<br />
1.5 x system pressure<br />
Measuring accuracy<br />
2.5 % BFSL<br />
Response time<br />
< 0.5 seconds<br />
Liquid temperature range<br />
+14 °F to +158 °F (-10 °C to +70 °C)<br />
Storage temperature range<br />
-40 °F to +176 °F (-40 °C to +80 °C)<br />
Electrical connection<br />
26 GA, 3 ft cable - M12 x 1.5 in sensor top<br />
Short-circuit-proof<br />
Yes<br />
Protected against reverse polarity<br />
Yes<br />
Over supply voltage<br />
Yes<br />
Materials in contact with liquid<br />
DIN 1.4305 FKM and PPS<br />
Enclosure class<br />
IP55<br />
Weight [lb] 1.2<br />
EMC (electromagnetic compatibility) According to EN 60335-1<br />
Emission/immunity According to EN 61800-3<br />
Connections<br />
7/16"-UNF<br />
Sealing material<br />
FKM<br />
0 - 145<br />
(0 - 10)<br />
Dimensions<br />
SW 14<br />
P2<br />
3.03" 77<br />
12-30 V supply<br />
1<br />
voltage<br />
Brown<br />
2 GND (earth lead) Yellow<br />
3 Signal lead Green<br />
4<br />
Test lead (can be<br />
cut off during<br />
mounting). This<br />
lead must not be<br />
connected to the<br />
power supply.<br />
White<br />
7/16 - 20 UNF<br />
P1<br />
∅ ø45 1.77<br />
0.55" 14 6 0.24"<br />
TM03 2059 3505<br />
TM03 2225 3905<br />
Fig. 97 Dimensional sketch<br />
Fig. 98 Wiring<br />
86
<strong>Grundfos</strong> E-<strong>pumps</strong><br />
12<br />
CIU communication interface units<br />
CIM communication interface<br />
modules<br />
Accessories<br />
TM04 2594 1008<br />
Fig. 100<strong>Grundfos</strong> CIM module<br />
TM04 2594 1008<br />
Fig. 99 <strong>Grundfos</strong> CIU unit<br />
The CIU units enable communication of operating<br />
data, such as measured values and setpoints, between<br />
E-<strong>pumps</strong> and a building management system. The<br />
CIU unit incorporates a 24-240 VAC/VDC power supply<br />
module and a CIM module. It can either be fitted on<br />
a DIN rail or on a wall.<br />
We offer the following CIU units:<br />
CIU 100<br />
For communication via LON.<br />
CIU 150<br />
For communication via Profibus DP.<br />
CIU 200<br />
For communication via Modbus RTU.<br />
CIU 250<br />
For wireless communication via GSM, GPRS or SMS.<br />
CIU 300<br />
For communication via BACnet MS/TP.<br />
Description Fieldbus protocol Product number<br />
CIU 100 LON 96753735<br />
CIU 150 Profibus DP 96753081<br />
CIU 200 Modbus RTU 96753082<br />
CIU 250 GSM/GPRS 96787106<br />
CIU 300 BACnet MS/TP 96893769<br />
For further information about data communication via<br />
CIU units and fieldbus protocols, see the CIU<br />
documentation available on www.grundfos.com ><br />
International website > WebCAPS.<br />
The CIM modules enable communication of operating<br />
data, such as measured values and setpoints, between<br />
E-<strong>pumps</strong> of 15 - 30 Hp and a building management<br />
system.<br />
The CIM modules are add-on communication modules<br />
which are fitted in the MLE terminal box.<br />
Note: CIM modules must be fitted by authorized<br />
personnel.<br />
We offer the following CIM modules:<br />
CIM 100<br />
For communication via LON.<br />
CIM 150<br />
For communication via Profibus DP.<br />
CIM 200<br />
For communication via Modbus RTU.<br />
CIU 250<br />
For wireless communication via GSM, GPRS or SMS.<br />
CIM 300<br />
For communication via BACnet MS/TP.<br />
Description Fieldbus protocol Product number<br />
CIM 100 LON 96824797<br />
CIM 150 Profibus DP 96824793<br />
CIM 200 Modbus RTU 96824796<br />
CIM 250 GSM/GPRS 96824795<br />
CIM 300 BACnet MS/TP 96893770<br />
For further information about data communication via<br />
CIM modules and fieldbus protocols, see the CIM<br />
documentation available www.grundfos.com ><br />
International website > WebCAPS.<br />
87
12<br />
<strong>Grundfos</strong> E-<strong>pumps</strong><br />
Accessories<br />
LiqTec<br />
Description<br />
LiqTec features:<br />
• Protects the pump against dry-running.<br />
• Protects the pump against too high liquid<br />
temperature (+266 °F ±9 °F (130 °C ± 5 °C)).<br />
• Has a fail-safe design. If the sensor, sensor cable,<br />
electronic unit or power supply fails, the pump stops<br />
immediately.<br />
• The LiqTec is not to be used with the MGFlex motor.<br />
Mounting the LiqTec sensor<br />
The LiqTec can be fitted to a DIN rail to be incorporated<br />
in a control cabinet.<br />
Electrical connection<br />
Example of electrical connection, see page 90.<br />
Calibration of sensor and controller<br />
Follow the procedure on the next page.<br />
Functions<br />
12<br />
11<br />
Fig. 101LiqTec functions<br />
1 2 3 4<br />
10<br />
1. Connection for dry-running sensor<br />
2. Connection for external restarting<br />
3. Motor PTC<br />
Green light indicates OK or short-circuited<br />
terminals.<br />
Red light indicates too high motor temperature.<br />
The alarm relay is activated.<br />
4. Connection for PTC sensor<br />
This input is not used in connection with E-<strong>pumps</strong><br />
as the variable frequency drive protects the motor<br />
against overload.<br />
5. Sensor indicator light<br />
Red light indicates defective sensor or cable.<br />
The alarm relay is activated.<br />
9<br />
8<br />
5<br />
6<br />
7<br />
TM03 0111 4004<br />
6. Deactivation of the dry-running monitoring function<br />
Press the button to deactivate the dry-running monitoring<br />
function. Red flashing light. The PTC monitoring<br />
function is still active.<br />
Press [Restart] to reactivate the dry-running<br />
monitoring function.<br />
7. High liquid temperature indicator light<br />
Red light indicates too high liquid temperature<br />
(+266 °F ±9 °F (130 °C ± 5 °C)).<br />
The alarm relay is activated.<br />
8. Supply voltage<br />
200-240 VAC, 50/60 Hz and 80-130 VAC 50/60 Hz.<br />
9. Dry-running indicator light<br />
Green light indicates OK (liquid in pump).<br />
Red light indicates dry running (no liquid in pump).<br />
The alarm relay is activated.<br />
10.Alarm/Run relay output<br />
Potential-free changeover contact.<br />
Maximum contact load: 250 V, 1 A, AC (inductive<br />
load).<br />
11.Auto/Man<br />
Changeover between automatic and manual<br />
restarting.<br />
The default setting is "Man".<br />
Changeover is carried out by means of a small<br />
screwdriver.<br />
When "Auto" has been selected, the alarm<br />
indication will automatically be reset<br />
10 to 20 seconds after detection of liquid.<br />
12.Restart<br />
Press [Restart] to restart the pump. The button has<br />
no influence on the PTC monitoring.<br />
88
<strong>Grundfos</strong> E-<strong>pumps</strong><br />
12<br />
Calibration of sensor and controller<br />
Step Action Result<br />
1<br />
2<br />
3<br />
4<br />
Connect the sensor to pos. 1 on Controller and connect the power supply to pos. 8<br />
on the Controller. See page 90.<br />
Submerge the sensor into the pumped liquid. The pumped liquid and the air<br />
temperature are to be +70 °F.<br />
Note: It is important that the pumped liquid is stagnant as the calibration will be<br />
misleading if the sensor is cooled by flowing water.<br />
Press the buttons at pos. 6 and pos. 12 on the Controller for approximately<br />
20 seconds.<br />
When the green indicator lights at pos. 3 and pos. 9 on the Controller are constantly<br />
on, release the buttons at pos. 6 and pos. 12.<br />
All red indicator lights (except pos. 7) start flashing.<br />
The calibration is completed.<br />
Accessories<br />
Further information<br />
Information related to IEC 60730-1:<br />
• Software class A<br />
• Pollution degree 2<br />
• Type 1.<br />
The LiqTec has been cURus-approved according to<br />
UL 508.<br />
Maximum pressure: 580 psi (40 bar).<br />
Maximum liquid temperature: (+266 °F ±9 °F<br />
(130 °C ± 5 °C)).<br />
Maximum ambient temperature: +131 °F (+55 °C).<br />
Power consumption: 5 Watt.<br />
Enclosure class: IPX0.<br />
Maximum cable length: 65.6 ft (20 meters).<br />
Standard cable: 16.4 ft (5 meters).<br />
Extension cable: 49.2 ft (15 meters).<br />
Note:<br />
The LiqTec is not be connected to the PTC<br />
sensor. Assemble a jumper wire between the two<br />
terminals at pos. 4 on the Controller.<br />
The MLE motor software provides protection against<br />
high motor temperature.<br />
The LiqTec is designed for DIN rail mounting in a<br />
control cabinet.<br />
Dry-running protection<br />
Single phase<br />
power supply<br />
LiqTec<br />
Sensor<br />
1/2"<br />
Cable<br />
16.4 ft (5 m)<br />
Extension<br />
cable<br />
49.2 ft (15 m)<br />
Product<br />
number<br />
200-240<br />
VAC<br />
● ● ● - 96556429<br />
80-130<br />
VAC<br />
● ● ● - 96556430<br />
- - - - ● 96443676<br />
TM02 1731 2001<br />
- - ● ● - 96556427<br />
89
12<br />
<strong>Grundfos</strong> E-<strong>pumps</strong><br />
Accessories<br />
Connection of E-pump to LiqTec<br />
Dry-running sensor<br />
Brown<br />
Black<br />
Blue<br />
White<br />
Jumper cable<br />
Set to automatic resetting<br />
Connection terminals on E-pump:<br />
2 (Start/Stop) and 3 (GND)<br />
2<br />
3<br />
1 x 200-240 VAC<br />
or<br />
1 X 80 - 130 VAC<br />
TM03 0437 5104<br />
Fig. 102Connection of E-pump to LiqTec<br />
Setting the digital input<br />
The digital input must be set to "External fault" via the<br />
R100.<br />
Note: After dry-running fault, the E-pump must be<br />
restarted manually.<br />
Disposal<br />
This product or parts of it must be disposed of in an<br />
environmentally sound way:<br />
1. Use the public or private waste collection service.<br />
2. If this is not possible, contact the nearest <strong>Grundfos</strong><br />
company or service workshop.<br />
90
<strong>Grundfos</strong> E-<strong>pumps</strong><br />
13<br />
13. Further product documentation<br />
WebCAPS<br />
WebCAPS is a Web-based Computer Aided Product<br />
Selection program available on www.grundfos.com.<br />
WebCAPS contains detailed information on more than<br />
185,000 <strong>Grundfos</strong> products in more than 20<br />
languages.<br />
In WebCAPS, all information is divided into 6 sections:<br />
• Catalog<br />
• Literature<br />
• Service<br />
• Sizing<br />
• Replacement<br />
• CAD drawings.<br />
Further product documentation<br />
Catalog<br />
This section is based on fields of application and pump types,<br />
and contains<br />
• technical data<br />
• curves (QH, Eta, P1, P2, etc) which can be adapted to the<br />
density and viscosity of the pumped liquid and show the number<br />
of <strong>pumps</strong> in operation<br />
• product photos<br />
• dimensional drawings<br />
• wiring diagrams<br />
• quotation texts, etc.<br />
Literature<br />
In this section you can access all the latest documents of a given<br />
pump, such as<br />
• product guides<br />
• installation and operating instructions<br />
• service documentation, such as Service kit catalog<br />
and Service kit instructions<br />
• quick guides<br />
• product brochures, etc.<br />
Service<br />
This section contains an easy-to-use interactive service catalog.<br />
Here you can find and identify service parts of both existing and<br />
discontinued <strong>Grundfos</strong> <strong>pumps</strong>.<br />
Furthermore, this section contains service videos showing you<br />
how to replace service parts.<br />
91
0 1<br />
13<br />
<strong>Grundfos</strong> E-<strong>pumps</strong><br />
Further product documentation<br />
Sizing<br />
This section is based on different fields of application and installation<br />
examples, and gives easy step-by-step instructions in how<br />
to<br />
• select the most suitable and efficient pump for your installation<br />
• carry out advanced calculations based on energy consumption,<br />
payback periods, load profiles, life cycle costs, etc.<br />
• analyse your selected pump via the built-in life cycle cost tool<br />
• determine the flow velocity in wastewater applications, etc.<br />
Replacement<br />
In this section you find a guide to selecting and comparing<br />
replacement data of an installed pump in order to replace the<br />
pump with a more efficient <strong>Grundfos</strong> pump.<br />
The section contains replacement data of a wide range of <strong>pumps</strong><br />
produced by other manufacturers than <strong>Grundfos</strong>.<br />
Based on an easy step-by-step guide, you can compare <strong>Grundfos</strong><br />
<strong>pumps</strong> with the one you have installed on your site. When<br />
you have specified the installed pump, the guide will suggest a<br />
number of <strong>Grundfos</strong> <strong>pumps</strong> which can improve both comfort and<br />
efficiency.<br />
CAD drawings<br />
In this section it is possible to download 2-dimensional (2D) and<br />
3-dimensional (3D) CAD drawings of most <strong>Grundfos</strong> <strong>pumps</strong>.<br />
These formats are available in WebCAPS:<br />
2-dimensional drawings:<br />
• .dxf, wireframe drawings<br />
• .dwg, wireframe drawings.<br />
3-dimensional drawings:<br />
• .dwg, wireframe drawings (without surfaces)<br />
• .stp, solid drawings (with surfaces)<br />
• .eprt, E-drawings.<br />
WinCAPS<br />
WinCAPS is a Windows-based Computer Aided<br />
Product Selection program containing detailed information<br />
on more than 185,000 <strong>Grundfos</strong> products in<br />
more than 20 languages.<br />
The program contains the same features and functions<br />
as WebCAPS, but is an ideal solution if no Internet<br />
connection is available.<br />
WinCAPS is available on CD-ROM and updated once<br />
a year.<br />
WinCAPS CD-ROM<br />
Subject to alterations.<br />
92
This page intentionally left blank.<br />
93
94<br />
This page intentionally left blank.
This page intentionally left blank.<br />
95
Being responsible is our foundation<br />
Thinking ahead makes it possible<br />
Innovation is the essence<br />
L-ML-PG-001 0412<br />
Repl. 0312<br />
US<br />
© 2011-2012 <strong>Grundfos</strong> Pumps Corp.<br />
The name <strong>Grundfos</strong>, the <strong>Grundfos</strong> logo, and the payoff Be–Think–Innovate are registrated trademarks<br />
owned by <strong>Grundfos</strong> Management A/S or <strong>Grundfos</strong> A/S, Denmark. All rights reserved worldwide.<br />
GRUNDFOS Pumps Corporation<br />
17100 West 118th Terrace<br />
Olathe, Kansas 66061<br />
Phone: +1-913-227-3400<br />
Telefax: +1-913-227-3500<br />
GRUNDFOS Canada Inc.<br />
2941 Brighton Road<br />
Oakville, Ontario L6H 6C9<br />
Canada<br />
Phone: +1-905 829 9533<br />
Telefax: +1-905 829 9512<br />
Bombas GRUNDFOS de Mexico S.A. de C.V.<br />
Boulevard TLC No. 15<br />
Parque Industrial Stiva Aeropuerto<br />
Apodaca, N.L. Mexico 66600<br />
Phone: +52-81-8144 4000<br />
Telefax: +52-81-8144 4010