

SERVICE MANUAL Colour Television - diagramas.diagram...
SERVICE MANUAL Colour Television - diagramas.diagram...
SERVICE MANUAL Colour Television - diagramas.diagram...

Create successful ePaper yourself
Turn your PDF publications into a flip-book with our unique Google optimized e-Paper software.
Purity and Convergence Adjustment<br />
CAUTION: The Convergence and Purity adjustments have been made at the factory. Readjustment<br />
should be made only after picture tube or deflection yoke replacement, following the steps below:<br />
Signals: Use a pattern generator which can output red,<br />
green, blue and white raster and crosshatch<br />
pattern signals.<br />
Procedure: Carry out purity adjustment first, and then carry<br />
out convergence adjustment.<br />
Preparation: The deflection yoke may have several<br />
correction magnets attached to its outer<br />
edge. If replacing the picture tube, the<br />
positions of the magnets can be changed and<br />
they can be re-used, so remove these<br />
magnets and keep them safely so that they<br />
do not get lost.<br />
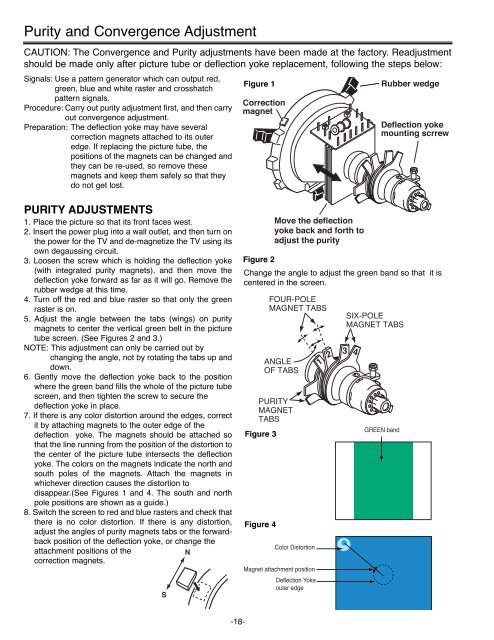
Figure 1<br />
Correction<br />
magnet<br />
Rubber wedge<br />
Deflection yoke<br />
mounting scrrew<br />
PURITY ADJUSTMENTS<br />
1. Place the picture so that its front faces west.<br />
2. Insert the power plug into a wall outlet, and then turn on<br />
the power for the TV and de-magnetize the TV using its<br />
own degaussing circuit.<br />
3. Loosen the screw which is holding the deflection yoke<br />
(with integrated purity magnets), and then move the<br />
deflection yoke forward as far as it will go. Remove the<br />
rubber wedge at this time.<br />
4. Turn off the red and blue raster so that only the green<br />
raster is on.<br />
5. Adjust the angle between the tabs (wings) on purity<br />
magnets to center the vertical green belt in the picture<br />
tube screen. (See Figures 2 and 3.)<br />
NOTE: This adjustment can only be carried out by<br />
changing the angle, not by rotating the tabs up and<br />
down.<br />
6. Gently move the deflection yoke back to the position<br />
where the green band fills the whole of the picture tube<br />
screen, and then tighten the screw to secure the<br />
deflection yoke in place.<br />
7. If there is any color distortion around the edges, correct<br />
it by attaching magnets to the outer edge of the<br />
deflection yoke. The magnets should be attached so<br />
that the line running from the position of the distortion to<br />
the center of the picture tube intersects the deflection<br />
yoke. The colors on the magnets indicate the north and<br />
south poles of the magnets. Attach the magnets in<br />
whichever direction causes the distortion to<br />
disappear.(See Figures 1 and 4. The south and north<br />
pole positions are shown as a guide.)<br />
8. Switch the screen to red and blue rasters and check that<br />
there is no color distortion. If there is any distortion,<br />
adjust the angles of purity magnets tabs or the forwardback<br />
position of the deflection yoke, or change the<br />
attachment positions of the<br />
correction magnets.<br />
S<br />
N<br />
Move the deflection<br />
yoke back and forth to<br />
adjust the purity<br />
Figure 2<br />
Change the angle to adjust the green band so that it is<br />
centered in the screen.<br />
Figure 3<br />
Figure 4<br />
FOUR-POLE<br />
MAGNET TABS<br />
ANGLE<br />
OF TABS<br />
PURITY<br />
MAGNET<br />
TABS<br />
Color Distortion<br />
1<br />
Magnet attachment position<br />
Deflection Yoke<br />
outer edge<br />
2<br />
SIX-POLE<br />
MAGNET TABS<br />
3<br />
4<br />
GREEN band<br />
-18-


