How to: Draft a Vent Lining - BurdaStyle.com
How to: Draft a Vent Lining - BurdaStyle.com
How to: Draft a Vent Lining - BurdaStyle.com

You also want an ePaper? Increase the reach of your titles
YUMPU automatically turns print PDFs into web optimized ePapers that Google loves.
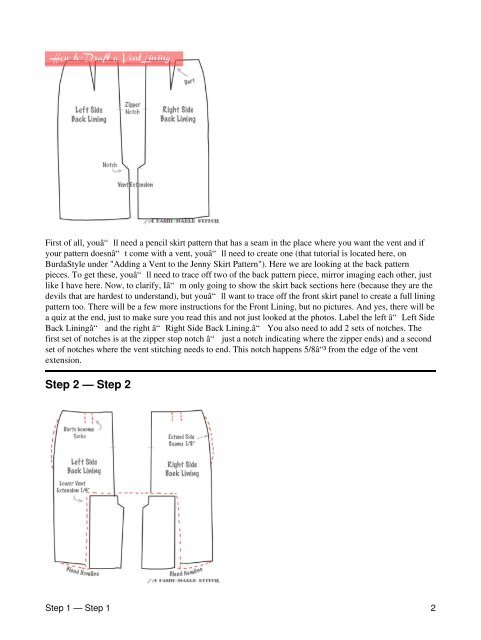
First of all, youâ“ll need a pencil skirt pattern that has a seam in the place where you want the vent and if<br />
your pattern doesnâ“t <strong>com</strong>e with a vent, youâ“ll need <strong>to</strong> create one (that tu<strong>to</strong>rial is located here, on<br />
<strong>BurdaStyle</strong> under "Adding a <strong>Vent</strong> <strong>to</strong> the Jenny Skirt Pattern"). Here we are looking at the back pattern<br />
pieces. To get these, youâ“ll need <strong>to</strong> trace off two of the back pattern piece, mirror imaging each other, just<br />
like I have here. Now, <strong>to</strong> clarify, Iâ“m only going <strong>to</strong> show the skirt back sections here (because they are the<br />
devils that are hardest <strong>to</strong> understand), but youâ“ll want <strong>to</strong> trace off the front skirt panel <strong>to</strong> create a full lining<br />
pattern <strong>to</strong>o. There will be a few more instructions for the Front <strong>Lining</strong>, but no pictures. And yes, there will be<br />
a quiz at the end, just <strong>to</strong> make sure you read this and not just looked at the pho<strong>to</strong>s. Label the left â“Left Side<br />
Back <strong>Lining</strong>â“ and the right â“Right Side Back <strong>Lining</strong>.â“ You also need <strong>to</strong> add 2 sets of notches. The<br />
first set of notches is at the zipper s<strong>to</strong>p notch â“ just a notch indicating where the zipper ends) and a second<br />
set of notches where the vent stitching needs <strong>to</strong> end. This notch happens 5/8⓳ from the edge of the vent<br />
extension.<br />
Step 2 — Step 2<br />
Step 1 — Step 1 2