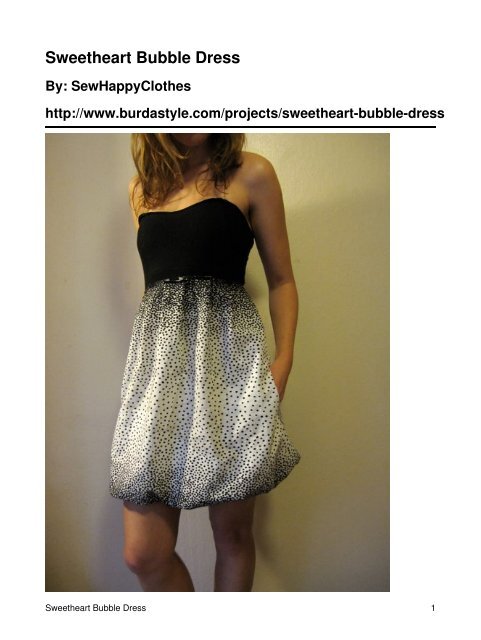
Sweetheart Bubble Dress - BurdaStyle.com
Sweetheart Bubble Dress - BurdaStyle.com
Sweetheart Bubble Dress - BurdaStyle.com

You also want an ePaper? Increase the reach of your titles
YUMPU automatically turns print PDFs into web optimized ePapers that Google loves.
Simple strapless dress for a wintery night out. This is a self-drafted pattern that can be made with the aid of abubble hem pattern like McCall’s Tunic Pattern. It has a simple boned bodice, a stretch lining, and a cottonskirt with pleats at the bodice and a bubble hem. There are no closures.Materialsencased boningStep 2 — MeasureFigure out the dimensions and pattern of the bodice by drawing your measurements on the lining fabric. Imarked the positioning of the dress on my body, the depth of the neckline, and the length of the hem. I fit thehttp://www.burdastyle.<strong>com</strong>/projects/sweetheart-bubble-dress 2
odice to my body because I usually have to alter ready-made patterns anyway. As I said before, I tracedfrom my favorite McCall’s pattern for the skirt, adjusting it to the desired length.Step 6 — SewSew the bodice front and back together at the side seams. Attach the skirt to the bodice by creating pleats thatwill stretch with the fabric (see picture). I sewed the pleats on to the outside of the bodice. To keep the endsfrom fraying, I left the selvadge on the dress.Step 5 — BoningStep 2 — Measure 3
Next sew the boning to the inside of the lining. The boning I used came pre-encased, so I didn’t make asleeve for it but rather sewed it on after trimming the plastic inside the case so that it was shorter than thefabric encasing. I used a clear foot to guide the needle over the slim margin of encasing fabric. Because thedress is lined, there really is no need to sew a lining for <strong>com</strong>fort reasons as the encasing will never touch yourskin (it sits between the dress lining and outside). Make sure to stitch the top and bottom of the boningencasing so that the plastic boning doesn’t slip out.Step 3 — CutStep 5 — Boning 4
From the tracing, cut a bodice and a back from a stretch knit (I like cotton/lycra or rayon/lycra blends). Thencut a lining out of the same material that includes the bodice (for the front piece) and the back (for the backpiece) and extends down for the skirt. Remember that the lining should be two inches shorter than the skirt,and narrower. Don’t forget extra for the selvadge!Cut the front and back of the skirt as discussed in step 1 out of a printed cotton so that it extends from thebodice to two inches past the lining and includes extra for pleating at the bodice. The top of the skirt shouldbe cut along the selvadge so that the top doesn’t fray.Step 1 — Making a bubble hemStep 3 — Cut 5
This dress is cut using McCall’s Tunic Pattern. To make your own bubble hem, you will need to cut anA-line skirt that will extend from the bodice down to 2" past where you want it to hit on your leg. This is thenac<strong>com</strong>panied by a lining, which is cut 2" shorter than the skirt and narrower. It helps if the lining is made outof a stretchy material, like a jersey knit. The bigger the difference in width between the lining and the skirtthe more of a “bubble” effect you will get.Step 1 — Making a bubble hem 6
I also cut my skirt wider at the bodice in order to gather some pleats at the front. The pleating helps the dressstretch over your head and shoulders as you put it on (as this dress does not include a zipper or other closure).Step 4 — Sew skirt and pocketsStep 4 — Sew skirt and pockets 7
Cut two draw pockets (you will have four half-circle shapes). Sew a pocket side to each side of the front andback skirt pieces at the same distance from the top. Line up the front and back of the skirt right sides togetherand sew the side seams together, going around the outside of the pockets. Check out my draw pocket tutorialfor more help.Step 7 — InterfacingTrace the front of the bodice onto fusible interfacing. Cut out a 1/2 inch strip of interfacing that mirrors thebodice top, and attach it below the selvadge onto the bodice top of both the dress and the lining (do not dothis for the back, or else the neckline won’t stretch at all and you won’t be able to put the dress on).Press the selvage over the interfacing and baste. Press and baste the back necklines.Step 8 — Sew the lining to the dressStep 7 — Interfacing 8
Right sides together, sew the dress to the lining at the hem. Make sure to stretch the lining evenly: Evenlyplace about 8 pins around the hem of the dress; repeat for the lining. Pin the dress to the lining where the pinsmatch up. Stretch the lining as you sew.Note: Make sure that you are sewing the front to the front and the back to the back, matching seams, so thatthe lining is not twisted!Step 9 — TurnStep 8 — Sew the lining to the dress 9
Turn the dress right side out. Make sure the lining is not twisted inside the dress. Sew lining to dress at theneckline along the basted stitches.<strong>Sweetheart</strong> <strong>Bubble</strong> <strong>Dress</strong>Step 9 — Turn 10