Fullbust adjustment for princess seams - BurdaStyle.com
Fullbust adjustment for princess seams - BurdaStyle.com
Fullbust adjustment for princess seams - BurdaStyle.com

You also want an ePaper? Increase the reach of your titles
YUMPU automatically turns print PDFs into web optimized ePapers that Google loves.
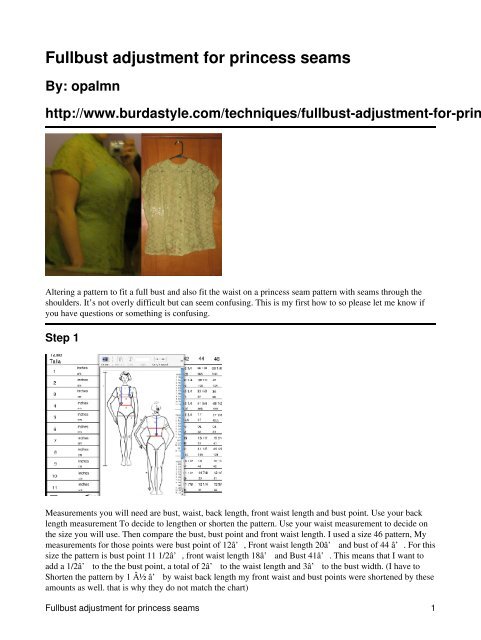
<strong>Fullbust</strong> <strong>adjustment</strong> <strong>for</strong> <strong>princess</strong> <strong>seams</strong>By: opalmnhttp://www.burdastyle.<strong>com</strong>/techniques/fullbust-<strong>adjustment</strong>-<strong>for</strong>-prinAltering a pattern to fit a full bust and also fit the waist on a <strong>princess</strong> seam pattern with <strong>seams</strong> through theshoulders. It’s not overly difficult but can seem confusing. This is my first how to so please let me know ifyou have questions or something is confusing.Step 1Measurements you will need are bust, waist, back length, front waist length and bust point. Use your backlength measurement To decide to lengthen or shorten the pattern. Use your waist measurement to decide onthe size you will use. Then <strong>com</strong>pare the bust, bust point and front waist length. I used a size 46 pattern, Mymeasurements <strong>for</strong> those points were bust point of 12â’, Front waist length 20â’ and bust of 44 â’. For thissize the pattern is bust point 11 1/2â’, front waist length 18â’ and Bust 41â’. This means that I want toadd a 1/2â’ to the the bust point, a total of 2â’ to the waist length and 3â’ to the bust width. (I have toShorten the pattern by 1 ½ â’ by waist back length my front waist and bust points were shortened by theseamounts as well. that is why they do not match the chart)<strong>Fullbust</strong> <strong>adjustment</strong> <strong>for</strong> <strong>princess</strong> <strong>seams</strong> 1
Step 2Prepare your pattern, by cutting out your size, lengthening or shorting it, and drawing the stitch lines on tothe front pieces.Step 3On the Side Front piece mark the bust point (this is the widest point on the curve). Now add the bust point tothe front middle piece by walking the stitching line until you <strong>com</strong>e to the bust point on the side front.Transfer this point to the Center Front piece.Step 4Step 1 2
Lowering the bust point, choose a spot above the bust point by 1-2 inches mark this point on The Side frontpattern piece. Draw a line From the mark to the side seam stitching line3. This is one time I do not fallow therule of keeping alterations perpendicular to the straight of grain. Cut along this line to but not through thestitching line. With paper underneath tape the top part of the piece to paper mark the amount to be increasedat the front stichline and draw a line to the point on the side seam where you cut to. now tape the bottom ofthe piece into place along this line. Redraw the straight of grain using the line from the bottom half of thepattern.Step 5Mark your point on the center front piece the same distance from the bust point Draw a line straight across.Cut the front middle piece all the way across. Put paper underneath and tape the top to the paper Extend thecenter front and fold lines on to the new paper. Measure and mark the amount to be increased from the top,tape the other side of the cut to mark, being sure that the center front and fold lines match upStep 6Step 4 3
Mark a point 1-2 below the bust point draw a line to the side stitch line perpendicular to the grain line. Cut tobut not through the side stitch line. With paper underneath tape the top half of the piece to the paper andmeasure and mark the amount to be increased at the stitching line draw a line from this mark to the cut pointand tape the bottom half in place. Redraw the straight of grain on the side front piece by drawing a lineconnecting the top of the old grain line to the bottom of the old grainline. Clean up the pattern lines using anFrench curve ruler,or sketch in.Step 7Mark the point in the same spot on the center front piece and draw a line straight across, cut apart. Withpaper underneath tape the top of the piece, extend the fold land center front lines. mark you increase anddraw the line across and tape the bottom half to it. redraw the cut lines.Step 8Step 6 4
Adding width Can be done in three places the side seam, the side front font stitch line and the center frontseam line. For the front center <strong>seams</strong> use the bust point <strong>for</strong> the mark and on the side pick a spot above thewaist. draw a straight line in perpendicular from the grain line and draw a line up parallel to the grain line tothe shoulder stitch line. cut alog these lines up to but not through the stitching line of the shoulder <strong>seams</strong>pread each the amount the difference in the bust line mark and tape in place.Step 9Blend the added width into waist. Clean up edges and seam allowances <strong>for</strong> any puckers straighten shoulderseam if it is now out wack from adding width. Walk all <strong>seams</strong> to check fit. Redraw button holes. spreadingthem out as necessary.Step 10Step 8 5
Cut out your altered pattern, and make a muslin to check the fit, adjust as necessary. Now you have a patternto fit your bust and your waist.<strong>Fullbust</strong> <strong>adjustment</strong> <strong>for</strong> <strong>princess</strong> <strong>seams</strong>Step 10 6