Programming Bar Codes - Pointofsale.nl
Programming Bar Codes - Pointofsale.nl
Programming Bar Codes - Pointofsale.nl

You also want an ePaper? Increase the reach of your titles
YUMPU automatically turns print PDFs into web optimized ePapers that Google loves.
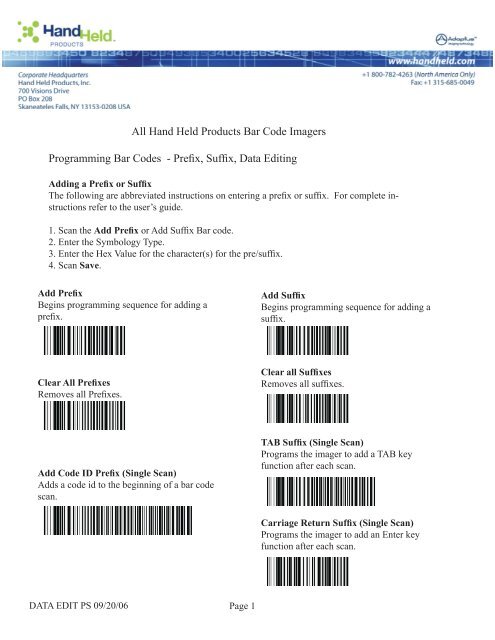
All Hand Held Products <strong>Bar</strong> Code Imagers<br />
<strong>Programming</strong> <strong>Bar</strong> <strong>Codes</strong> - Prefix, Suffix, Data Editing<br />
Adding a Prefix or Suffix<br />
The following are abbreviated instructions on entering a prefix or suffix. For complete instructions<br />
refer to the user’s guide.<br />
1. Scan the Add Prefix or Add Suffix <strong>Bar</strong> code.<br />
2. Enter the Symbology Type.<br />
3. Enter the Hex Value for the character(s) for the pre/suffix.<br />
4. Scan Save.<br />
Add Prefix<br />
Begins programming sequence for adding a<br />
prefix.<br />
Add Suffix<br />
Begins programming sequence for adding a<br />
suffix.<br />
Clear All Prefixes<br />
Removes all Prefixes.<br />
Clear all Suffixes<br />
Removes all suffixes.<br />
Add Code ID Prefix (Single Scan)<br />
Adds a code id to the beginning of a bar code<br />
scan.<br />
TAB Suffix (Single Scan)<br />
Programs the imager to add a TAB key<br />
function after each scan.<br />
Carriage Return Suffix (Single Scan)<br />
Programs the imager to add an Enter key<br />
function after each scan.<br />
DATA EDIT PS 09/20/06<br />
Page 1
All Hand Held Products <strong>Bar</strong> Code Imagers<br />
<strong>Programming</strong> <strong>Bar</strong> <strong>Codes</strong> - Data Editing<br />
Data Format Editor Instructions<br />
The following are abbreviated instructions for entering a data format. For complete instructions<br />
refer to the user’s guide.<br />
Step 1. Scan the Enter Data Format symbol<br />
Step 2. Primary/Alternate Format, scan 0 for Primary Format<br />
Step 3. Terminal Type, scan 99 for any terminal type<br />
Step 4. Code I.D., scan 99 for any bar code type<br />
Step 5. Length, scan 9999 for any length bar code.<br />
Step 6. Editor Commands<br />
Use the <strong>Programming</strong> Chart the follows.<br />
Step 7. Scan Save to save your entries.<br />
Enter Data Format<br />
Begins programming sequence for data<br />
formatting.<br />
Clear all Data Formats<br />
Removes all data formats.<br />
Discard<br />
Save<br />
Factory Defaults<br />
Resets your imager to default settings.<br />
Sample Code 39<br />
DATA EDIT PS 09/20/06<br />
Page 2
All Hand Held Products <strong>Bar</strong> Code Imagers<br />
<strong>Programming</strong> Chart<br />
5<br />
0<br />
B<br />
6<br />
1<br />
C<br />
7<br />
2<br />
D<br />
8<br />
3<br />
9<br />
E<br />
4<br />
A<br />
F<br />
DATA EDIT PS 09/20/06<br />
Page 3