Intermediate OSPF Lab - Router Alley
Intermediate OSPF Lab - Router Alley
Intermediate OSPF Lab - Router Alley

You also want an ePaper? Increase the reach of your titles
YUMPU automatically turns print PDFs into web optimized ePapers that Google loves.
<strong>Intermediate</strong> <strong>OSPF</strong> <strong>Lab</strong> v1.10 – Aaron Balchunas<br />
1<br />
- <strong>Intermediate</strong> <strong>OSPF</strong> <strong>Lab</strong> -<br />
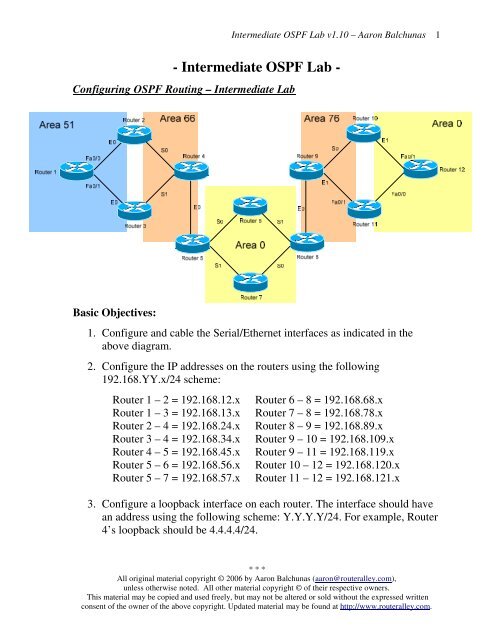
Configuring <strong>OSPF</strong> Routing – <strong>Intermediate</strong> <strong>Lab</strong><br />
Basic Objectives:<br />
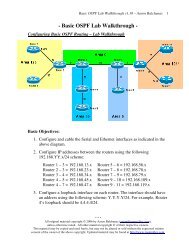
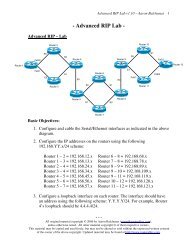
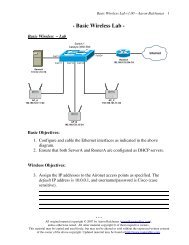
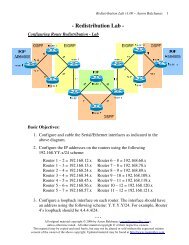
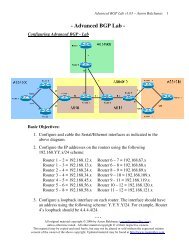
1. Configure and cable the Serial/Ethernet interfaces as indicated in the<br />
above diagram.<br />
2. Configure the IP addresses on the routers using the following<br />
192.168.YY.x/24 scheme:<br />
<strong>Router</strong> 1 – 2 = 192.168.12.x<br />
<strong>Router</strong> 1 – 3 = 192.168.13.x<br />
<strong>Router</strong> 2 – 4 = 192.168.24.x<br />
<strong>Router</strong> 3 – 4 = 192.168.34.x<br />
<strong>Router</strong> 4 – 5 = 192.168.45.x<br />
<strong>Router</strong> 5 – 6 = 192.168.56.x<br />
<strong>Router</strong> 5 – 7 = 192.168.57.x<br />
<strong>Router</strong> 6 – 8 = 192.168.68.x<br />
<strong>Router</strong> 7 – 8 = 192.168.78.x<br />
<strong>Router</strong> 8 – 9 = 192.168.89.x<br />
<strong>Router</strong> 9 – 10 = 192.168.109.x<br />
<strong>Router</strong> 9 – 11 = 192.168.119.x<br />
<strong>Router</strong> 10 – 12 = 192.168.120.x<br />
<strong>Router</strong> 11 – 12 = 192.168.121.x<br />
3. Configure a loopback interface on each router. The interface should have<br />
an address using the following scheme: Y.Y.Y.Y/24. For example, <strong>Router</strong><br />
4’s loopback should be 4.4.4.4/24.<br />
* * *<br />
All original material copyright © 2006 by Aaron Balchunas (aaron@routeralley.com),<br />
unless otherwise noted. All other material copyright © of their respective owners.<br />
This material may be copied and used freely, but may not be altered or sold without the expressed written<br />
consent of the owner of the above copyright. Updated material may be found at http://www.routeralley.com.
<strong>Intermediate</strong> <strong>OSPF</strong> <strong>Lab</strong> v1.10 – Aaron Balchunas<br />
2<br />
Configuring <strong>OSPF</strong> Routing – <strong>Intermediate</strong> <strong>Lab</strong> (continued)<br />
<strong>OSPF</strong> Objectives:<br />
4. Configure <strong>OSPF</strong> routing on all routers. Use whatever process ID you<br />
wish.<br />
___________________________________________________________<br />
___________________________________________________________<br />
___________________________________________________________<br />
5. Manually set the <strong>OSPF</strong> router-ID on your router to your loopback IP.<br />
___________________________________________________________<br />
___________________________________________________________<br />
___________________________________________________________<br />
6. Place each interface on your router into the Area specified by the diagram.<br />
Place loopback interfaces in an area matching your router number (for<br />
example, if you are <strong>Router</strong> 3, the loopback should be in Area 3).<br />
___________________________________________________________<br />
___________________________________________________________<br />
___________________________________________________________<br />
* * *<br />
All original material copyright © 2006 by Aaron Balchunas (aaron@routeralley.com),<br />
unless otherwise noted. All other material copyright © of their respective owners.<br />
This material may be copied and used freely, but may not be altered or sold without the expressed written<br />
consent of the owner of the above copyright. Updated material may be found at http://www.routeralley.com.
<strong>Intermediate</strong> <strong>OSPF</strong> <strong>Lab</strong> v1.10 – Aaron Balchunas<br />
3<br />
Configuring <strong>OSPF</strong> Routing – <strong>Intermediate</strong> <strong>Lab</strong><br />
<strong>OSPF</strong> Objectives:<br />
7. Ensure that all networks are reachable. Virtually every area must be linked<br />
together.<br />
___________________________________________________________<br />
___________________________________________________________<br />
___________________________________________________________<br />
___________________________________________________________<br />
___________________________________________________________<br />
___________________________________________________________<br />
8. Configure <strong>OSPF</strong> md5 authentication throughout your <strong>OSPF</strong> domain. Use<br />
a key of “CISCO” between all neighbors.<br />
___________________________________________________________<br />
___________________________________________________________<br />
___________________________________________________________<br />
9. Ensure that all networks are still reachable.<br />
___________________________________________________________<br />
___________________________________________________________<br />
___________________________________________________________<br />
* * *<br />
All original material copyright © 2006 by Aaron Balchunas (aaron@routeralley.com),<br />
unless otherwise noted. All other material copyright © of their respective owners.<br />
This material may be copied and used freely, but may not be altered or sold without the expressed written<br />
consent of the owner of the above copyright. Updated material may be found at http://www.routeralley.com.