1 2 3 4 5
1 2 3 4 5
1 2 3 4 5

You also want an ePaper? Increase the reach of your titles
YUMPU automatically turns print PDFs into web optimized ePapers that Google loves.
2C•6 TU series engine in-car repair procedures<br />
pulley rotates freely, without any sign of<br />
roughness. If necessary, renew the tensioner<br />
pulley as described in Section 8. Make sure<br />
that the locking tools are still in place, as<br />
described in Section 3.<br />
11 Manoeuvre the timing belt into position,<br />
ensuring that the arrows on the belt are<br />
pointing in the direction of rotation (clockwise,<br />
when viewed from the right-hand end of the<br />
engine).<br />
12 Do not twist the timing belt sharply while<br />
refitting it. Fit the belt over the crankshaft and<br />
camshaft sprockets. Make sure that the “front<br />
run” of the belt is taut - ie, ensure that any<br />
slack is on the tensioner pulley side of the belt.<br />
Fit the belt over the coolant pump sprocket<br />
and tensioner pulley. Ensure that the belt teeth<br />
are seated centrally in the sprockets.<br />
13 Loosen the tensioner pulley retaining nut.<br />
Pivot the pulley anti-clockwise to remove all<br />
free play from the timing belt, then retighten<br />
the nut. Tension the timing belt as described<br />
under the relevant sub-heading.<br />
Tensioning without the special<br />
electronic measuring tool<br />
Note: If this method is used, ensure that the<br />
belt tension is checked by a Peugeot dealer at<br />
the earliest possible opportunity.<br />
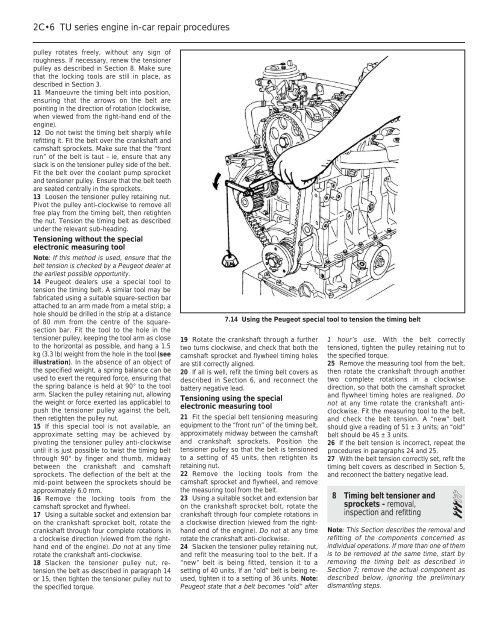
14 Peugeot dealers use a special tool to<br />
tension the timing belt. A similar tool may be<br />
fabricated using a suitable square-section bar<br />
attached to an arm made from a metal strip; a<br />
hole should be drilled in the strip at a distance<br />
of 80 mm from the centre of the squaresection<br />
bar. Fit the tool to the hole in the<br />
tensioner pulley, keeping the tool arm as close<br />
to the horizontal as possible, and hang a 1.5<br />
kg (3.3 lb) weight from the hole in the tool (see<br />
illustration). In the absence of an object of<br />
the specified weight, a spring balance can be<br />
used to exert the required force, ensuring that<br />
the spring balance is held at 90° to the tool<br />
arm. Slacken the pulley retaining nut, allowing<br />
the weight or force exerted (as applicable) to<br />
push the tensioner pulley against the belt,<br />
then retighten the pulley nut.<br />
15 If this special tool is not available, an<br />
approximate setting may be achieved by<br />
pivoting the tensioner pulley anti-clockwise<br />
until it is just possible to twist the timing belt<br />
through 90° by finger and thumb, midway<br />
between the crankshaft and camshaft<br />
sprockets. The deflection of the belt at the<br />
mid-point between the sprockets should be<br />
approximately 6.0 mm.<br />
16 Remove the locking tools from the<br />
camshaft sprocket and flywheel.<br />
17 Using a suitable socket and extension bar<br />
on the crankshaft sprocket bolt, rotate the<br />
crankshaft through four complete rotations in<br />
a clockwise direction (viewed from the righthand<br />
end of the engine). Do not at any time<br />
rotate the crankshaft anti-clockwise.<br />
18 Slacken the tensioner pulley nut, retension<br />
the belt as described in paragraph 14<br />
or 15, then tighten the tensioner pulley nut to<br />
the specified torque.<br />
7.14 Using the Peugeot special tool to tension the timing belt<br />
19 Rotate the crankshaft through a further<br />
two turns clockwise, and check that both the<br />
camshaft sprocket and flywheel timing holes<br />
are still correctly aligned.<br />
20 If all is well, refit the timing belt covers as<br />
described in Section 6, and reconnect the<br />
battery negative lead.<br />
Tensioning using the special<br />
electronic measuring tool<br />
21 Fit the special belt tensioning measuring<br />
equipment to the “front run” of the timing belt,<br />
approximately midway between the camshaft<br />
and crankshaft sprockets. Position the<br />
tensioner pulley so that the belt is tensioned<br />
to a setting of 45 units, then retighten its<br />
retaining nut.<br />
22 Remove the locking tools from the<br />
camshaft sprocket and flywheel, and remove<br />
the measuring tool from the belt.<br />
23 Using a suitable socket and extension bar<br />
on the crankshaft sprocket bolt, rotate the<br />
crankshaft through four complete rotations in<br />
a clockwise direction (viewed from the righthand<br />
end of the engine). Do not at any time<br />
rotate the crankshaft anti-clockwise.<br />
24 Slacken the tensioner pulley retaining nut,<br />
and refit the measuring tool to the belt. If a<br />
“new” belt is being fitted, tension it to a<br />
setting of 40 units. If an “old” belt is being reused,<br />
tighten it to a setting of 36 units. Note:<br />
Peugeot state that a belt becomes “old” after<br />
1 hour’s use. With the belt correctly<br />
tensioned, tighten the pulley retaining nut to<br />
the specified torque.<br />
25 Remove the measuring tool from the belt,<br />
then rotate the crankshaft through another<br />
two complete rotations in a clockwise<br />
direction, so that both the camshaft sprocket<br />
and flywheel timing holes are realigned. Do<br />
not at any time rotate the crankshaft anticlockwise.<br />
Fit the measuring tool to the belt,<br />
and check the belt tension. A “new” belt<br />
should give a reading of 51 ± 3 units; an “old”<br />
belt should be 45 ± 3 units.<br />
26 If the belt tension is incorrect, repeat the<br />
procedures in paragraphs 24 and 25.<br />
27 With the belt tension correctly set, refit the<br />
timing belt covers as described in Section 5,<br />
and reconnect the battery negative lead.<br />
8 Timing belt tensioner and<br />
sprockets - removal, 3<br />
inspection and refitting<br />
Note: This Section describes the removal and<br />
refitting of the components concerned as<br />
individual operations. If more than one of them<br />
is to be removed at the same time, start by<br />
removing the timing belt as described in<br />
Section 7; remove the actual component as<br />
described below, ignoring the preliminary<br />
dismantling steps.