
You also want an ePaper? Increase the reach of your titles
YUMPU automatically turns print PDFs into web optimized ePapers that Google loves.
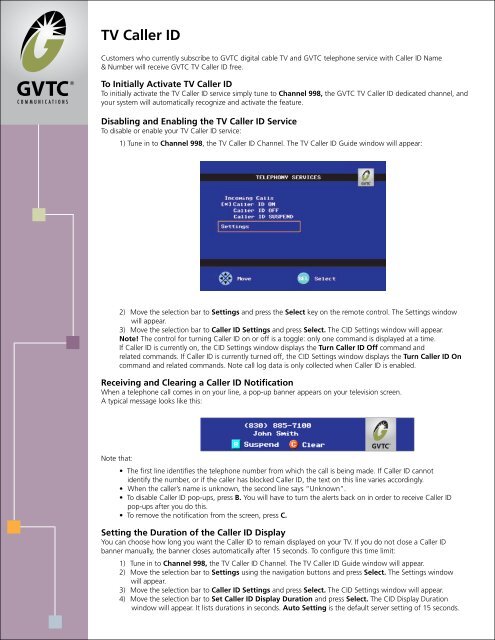
<strong>TV</strong> <strong>Caller</strong> <strong>ID</strong><br />
Customers who currently subscribe to GVTC digital cable <strong>TV</strong> and GVTC telephone service with <strong>Caller</strong> <strong>ID</strong> Name<br />
& Number will receive GVTC <strong>TV</strong> <strong>Caller</strong> <strong>ID</strong> free.<br />
To Initially Activate <strong>TV</strong> <strong>Caller</strong> <strong>ID</strong><br />
To initially activate the <strong>TV</strong> <strong>Caller</strong> <strong>ID</strong> service simply tune to Channel 998, the GVTC <strong>TV</strong> <strong>Caller</strong> <strong>ID</strong> dedicated channel, and<br />
your system will automatically recognize and activate the feature.<br />
Disabling and Enabling the <strong>TV</strong> <strong>Caller</strong> <strong>ID</strong> Service<br />
To disable or enable your <strong>TV</strong> <strong>Caller</strong> <strong>ID</strong> service:<br />
1) Tune in to Channel 998, the <strong>TV</strong> <strong>Caller</strong> <strong>ID</strong> Channel. The <strong>TV</strong> <strong>Caller</strong> <strong>ID</strong> Guide window will appear:<br />
2) Move the selection bar to Settings and press the Select key on the remote control. The Settings window<br />
will appear.<br />
3) Move the selection bar to <strong>Caller</strong> <strong>ID</strong> Settings and press Select. The C<strong>ID</strong> Settings window will appear.<br />
Note! The control for turning <strong>Caller</strong> <strong>ID</strong> on or off is a toggle: only one <strong>com</strong>mand is displayed at a time.<br />
If <strong>Caller</strong> <strong>ID</strong> is currently on, the C<strong>ID</strong> Settings window displays the Turn <strong>Caller</strong> <strong>ID</strong> Off <strong>com</strong>mand and<br />
related <strong>com</strong>mands. If <strong>Caller</strong> <strong>ID</strong> is currently turned off, the C<strong>ID</strong> Settings window displays the Turn <strong>Caller</strong> <strong>ID</strong> On<br />
<strong>com</strong>mand and related <strong>com</strong>mands. Note call log data is only collected when <strong>Caller</strong> <strong>ID</strong> is enabled.<br />
Receiving and Clearing a <strong>Caller</strong> <strong>ID</strong> Notification<br />
When a telephone call <strong>com</strong>es in on your line, a pop-up banner appears on your television screen.<br />
A typical message looks like this:<br />
Note that:<br />
• The first line identifies the telephone number from which the call is being made. If <strong>Caller</strong> <strong>ID</strong> cannot<br />
identify the number, or if the caller has blocked <strong>Caller</strong> <strong>ID</strong>, the text on this line varies accordingly.<br />
• When the caller’s name is unknown, the second line says “Unknown”.<br />
• To disable <strong>Caller</strong> <strong>ID</strong> pop-ups, press B. You will have to turn the alerts back on in order to receive <strong>Caller</strong> <strong>ID</strong><br />
pop-ups after you do this.<br />
• To remove the notification from the screen, press C.<br />
Setting the Duration of the <strong>Caller</strong> <strong>ID</strong> Display<br />
You can choose how long you want the <strong>Caller</strong> <strong>ID</strong> to remain displayed on your <strong>TV</strong>. If you do not close a <strong>Caller</strong> <strong>ID</strong><br />
banner manually, the banner closes automatically after 15 seconds. To configure this time limit:<br />
1) Tune in to Channel 998, the <strong>TV</strong> <strong>Caller</strong> <strong>ID</strong> Channel. The <strong>TV</strong> <strong>Caller</strong> <strong>ID</strong> Guide window will appear.<br />
2) Move the selection bar to Settings using the navigation buttons and press Select. The Settings window<br />
will appear.<br />
3) Move the selection bar to <strong>Caller</strong> <strong>ID</strong> Settings and press Select. The C<strong>ID</strong> Settings window will appear.<br />
4) Move the selection bar to Set <strong>Caller</strong> <strong>ID</strong> Display Duration and press Select. The C<strong>ID</strong> Display Duration<br />
window will appear. It lists durations in seconds. Auto Setting is the default server setting of 15 seconds.
5) Move the selection bar to the duration you prefer and press Select.<br />
6) To exit, press Exit or change to the programming you want to watch.<br />
Using the Call Log<br />
The Call Log lists all calls that have <strong>com</strong>e in on the telephone lines for which you have subscribed to the <strong>Caller</strong><br />
<strong>ID</strong> service. You can view or delete call log entries, and you can save a caller’s phone number to your network<br />
address book.<br />
Viewing Call Log Entries<br />
To view the entries in your call log:<br />
1) Tune in to Channel 998, the <strong>TV</strong> <strong>Caller</strong> <strong>ID</strong> Channel. The <strong>TV</strong> <strong>Caller</strong> <strong>ID</strong> Guide window will appear.<br />
2) In<strong>com</strong>ing Calls is selected by default. Press Select. The Call Log window appears.<br />
• If the Call Log is empty, it displays a message stating No messages.<br />
• If your Call Log service has been disabled, the Call Log displays a message stating Your Call Log<br />
Service is Disabled.<br />
• If the Call Log contains one or more entries, new entries (calls that have occurred since the last time<br />
you viewed the log) are marked with an asterisk (*). The following figure shows a typical Call Log.<br />
Deleting Entries and Saving Contact Information<br />
To delete entries from the Call Log:<br />
1) Display the Call Log as described in the previous procedure.<br />
2) To delete one or more entries, do one of the following:<br />
• Delete one entry — Move the selection bar to the entry and press B on your remote.<br />
• Delete all entries — Press A on your remote.<br />
To save a contact to your personal address book, move the selection bar to the appropriate entry and press Select<br />
on your remote.<br />
Mapping Your Services<br />
<strong>TV</strong> <strong>Caller</strong> <strong>ID</strong> permits you to choose which types of notifications you want each television in your home to receive.<br />
This is called mapping your services. To do this:<br />
1) Tune in to Channel 998, the <strong>TV</strong> <strong>Caller</strong> <strong>ID</strong> Channel. The <strong>TV</strong> <strong>Caller</strong> <strong>ID</strong> Guide window will appear.<br />
2) Move the selection bar to Settings and press Select. The Settings window will appear.<br />
3) Move the selection bar to Map Services and press Select.<br />
4) Choose one of the following:<br />
• Configuration for All Phone Numbers — Configure all phone numbers simultaneously. All phone lines<br />
will be configured identically.<br />
• Configuration Per Phone Number — Configure each phone number individually. Move the selection bar<br />
to each option and press Select to turn each service on or off.<br />
If you should ever receive an error message when attempting to use the <strong>TV</strong> <strong>Caller</strong> <strong>ID</strong> feature, or if you have questions,<br />
please contact GVTC for assistance.<br />
<strong>TV</strong> <strong>Caller</strong> <strong>ID</strong> availability is limited to a maximum of 5 digital boxes connected to 5 televisions. A maximum of 2 phone lines may be programmed to each box.<br />
<strong>TV</strong> <strong>Caller</strong> <strong>ID</strong> information will not be recorded on DVR recordings. Only available to subscribers of GVTC digital cable <strong>TV</strong> and GVTC telephone service with either<br />
<strong>Caller</strong> <strong>ID</strong> name and number or a GVTC Choice package.