LINC FEED 45 - Lincoln Electric - documentations
LINC FEED 45 - Lincoln Electric - documentations
LINC FEED 45 - Lincoln Electric - documentations

You also want an ePaper? Increase the reach of your titles
YUMPU automatically turns print PDFs into web optimized ePapers that Google loves.
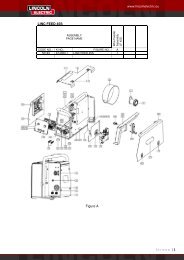
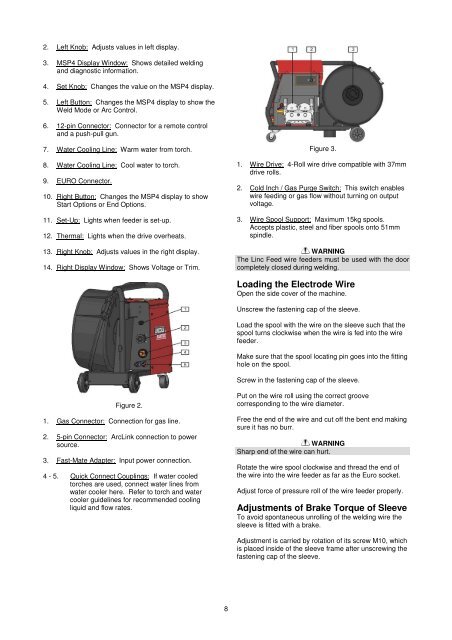
2. Left Knob: Adjusts values in left display.<br />
3. MSP4 Display Window: Shows detailed welding<br />
and diagnostic information.<br />
4. Set Knob: Changes the value on the MSP4 display.<br />
5. Left Button: Changes the MSP4 display to show the<br />
Weld Mode or Arc Control.<br />
6. 12-pin Connector: Connector for a remote control<br />
and a push-pull gun.<br />
7. Water Cooling Line: Warm water from torch.<br />
8. Water Cooling Line: Cool water to torch.<br />
9. EURO Connector.<br />
10. Right Button: Changes the MSP4 display to show<br />
Start Options or End Options.<br />
11. Set-Up: Lights when feeder is set-up.<br />
12. Thermal: Lights when the drive overheats.<br />
13. Right Knob: Adjusts values in the right display.<br />
14. Right Display Window: Shows Voltage or Trim.<br />
Figure 3.<br />
1. Wire Drive: 4-Roll wire drive compatible with 37mm<br />
drive rolls.<br />
2. Cold Inch / Gas Purge Switch: This switch enables<br />
wire feeding or gas flow without turning on output<br />
voltage.<br />
3. Wire Spool Support: Maximum 15kg spools.<br />
Accepts plastic, steel and fiber spools onto 51mm<br />
spindle.<br />
WARNING<br />
The Linc Feed wire feeders must be used with the door<br />
completely closed during welding.<br />
Loading the Electrode Wire<br />
Open the side cover of the machine.<br />
Unscrew the fastening cap of the sleeve.<br />
Load the spool with the wire on the sleeve such that the<br />
spool turns clockwise when the wire is fed into the wire<br />
feeder.<br />
Make sure that the spool locating pin goes into the fitting<br />
hole on the spool.<br />
Screw in the fastening cap of the sleeve.<br />
Figure 2.<br />
1. Gas Connector: Connection for gas line.<br />
2. 5-pin Connector: ArcLink connection to power<br />
source.<br />
3. Fast-Mate Adapter: Input power connection.<br />
4 - 5. Quick Connect Couplings: If water cooled<br />
torches are used, connect water lines from<br />
water cooler here. Refer to torch and water<br />
cooler guidelines for recommended cooling<br />
liquid and flow rates.<br />
Put on the wire roll using the correct groove<br />
corresponding to the wire diameter.<br />
Free the end of the wire and cut off the bent end making<br />
sure it has no burr.<br />
WARNING<br />
Sharp end of the wire can hurt.<br />
Rotate the wire spool clockwise and thread the end of<br />
the wire into the wire feeder as far as the Euro socket.<br />
Adjust force of pressure roll of the wire feeder properly.<br />
Adjustments of Brake Torque of Sleeve<br />
To avoid spontaneous unrolling of the welding wire the<br />
sleeve is fitted with a brake.<br />
Adjustment is carried by rotation of its screw M10, which<br />
is placed inside of the sleeve frame after unscrewing the<br />
fastening cap of the sleeve.<br />
8