

Here - Janome
Here - Janome
Here - Janome

Create successful ePaper yourself
Turn your PDF publications into a flip-book with our unique Google optimized e-Paper software.
JANOME Embroidery Software Instruction Book<br />
Chapter 5 Viewing Designs<br />
35<br />
Design viewing modes<br />
JANOME Embroidery Software provides a number<br />
of viewing modes to selectively display design<br />
details. Show or hide needle penetration points<br />
and connectors. Show or hide selected colors.<br />
• To hide connecting threads, view design in Visualizer<br />
mode.<br />
Needle points<br />
displayed<br />
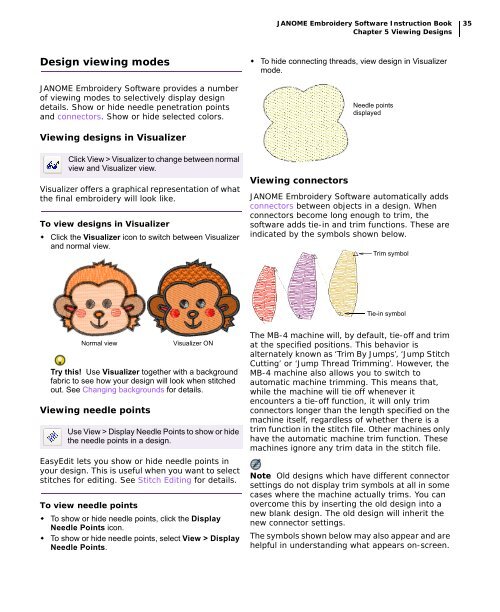
Viewing designs in Visualizer<br />
Click View > Visualizer to change between normal<br />
view and Visualizer view.<br />
Visualizer offers a graphical representation of what<br />
the final embroidery will look like.<br />
To view designs in Visualizer<br />
• Click the Visualizer icon to switch between Visualizer<br />
and normal view.<br />
Viewing connectors<br />
JANOME Embroidery Software automatically adds<br />
connectors between objects in a design. When<br />
connectors become long enough to trim, the<br />
software adds tie-in and trim functions. These are<br />
indicated by the symbols shown below.<br />
Trim symbol<br />
Tie-in symbol<br />
Normal view<br />
Try this! Use Visualizer together with a background<br />
fabric to see how your design will look when stitched<br />
out. See Changing backgrounds for details.<br />
Viewing needle points<br />
Visualizer ON<br />
Use View > Display Needle Points to show or hide<br />
the needle points in a design.<br />
EasyEdit lets you show or hide needle points in<br />
your design. This is useful when you want to select<br />
stitches for editing. See Stitch Editing for details.<br />
To view needle points<br />
• To show or hide needle points, click the Display<br />
Needle Points icon.<br />
• To show or hide needle points, select View > Display<br />
Needle Points.<br />
The MB-4 machine will, by default, tie-off and trim<br />
at the specified positions. This behavior is<br />
alternately known as ‘Trim By Jumps’, ‘Jump Stitch<br />
Cutting’ or ‘Jump Thread Trimming’. However, the<br />
MB-4 machine also allows you to switch to<br />
automatic machine trimming. This means that,<br />
while the machine will tie off whenever it<br />
encounters a tie-off function, it will only trim<br />
connectors longer than the length specified on the<br />
machine itself, regardless of whether there is a<br />
trim function in the stitch file. Other machines only<br />
have the automatic machine trim function. These<br />
machines ignore any trim data in the stitch file.<br />
Note Old designs which have different connector<br />
settings do not display trim symbols at all in some<br />
cases where the machine actually trims. You can<br />
overcome this by inserting the old design into a<br />
new blank design. The old design will inherit the<br />
new connector settings.<br />
The symbols shown below may also appear and are<br />
helpful in understanding what appears on-screen.


