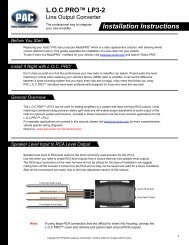
ISGM575 instruction manual - PAC Audio
ISGM575 instruction manual - PAC Audio
ISGM575 instruction manual - PAC Audio

Create successful ePaper yourself
Turn your PDF publications into a flip-book with our unique Google optimized e-Paper software.
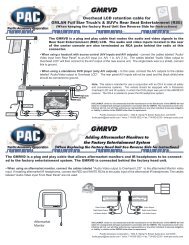
Expand Your Factory Radio<br />
add<br />
iPod ® 08-12-11<br />
Harness Connection<br />
Dip Switches<br />
Port 1 Port<br />
<br />
2 (See Manual)<br />
<br />
USB<br />
<br />
GM<br />
Owner’s Manual<br />
Media Gateway<br />
PXAMG<br />
PGHGM5<br />
iSimple®<br />
A Division of AAMP of America<br />
13190 56th Court Clearwater, FL 33760<br />
Ph. 866-788-4237<br />
support@isimplesolutions.com<br />
©2011 AAMP of Florida, Inc.<br />
www.isimplesolutions.com<br />
Rev. 05-05-08<br />
Inst007
Table of Contents<br />
Pages<br />
1. Introduction 2<br />
2. Precautions 2<br />
3. Compatibility Notes 3<br />
4. Dipswitch Settings 3<br />
5. Installation 4<br />
6. iPod Operation 5-6<br />
7. HD Radio Operation (if equipped) 6<br />
8. Sirius Operation (if equipped)<br />
9. Selecting Aux Input<br />
7<br />
8<br />
10.Selecting Factory Satellite 8<br />
(if equipped)<br />
11. Troubleshooting 9<br />
12. Warranty Info 10
Media Gateway & Optional Add-ons<br />
Factory Radio<br />
Not Included<br />
Media Gateway Harness<br />
Part #: PGHGM5<br />
*The Media Gateway<br />
will only support 2<br />
inputs.<br />
Media Gateway<br />
Part #: PXAMG<br />
Harness Connection<br />
Dip Switches<br />
Port 1 Port<br />
<br />
2 (See Manual)<br />
<br />
USB<br />
<br />
OR<br />
OR<br />
HD Radio<br />
iPod Input<br />
OR<br />
OR<br />
OR<br />
Satellite Radio<br />
ISBT21<br />
AUX Input<br />
1
1. Introduction<br />
Thank you for purchasing the iSimple ® Media Gateway. The Media Gateway is<br />
designed to provide endless hours of listening pleasure from your factory radio.<br />
To ensure that your iPod performs correctly with your radio, we recommend that<br />
you read this entire <strong>manual</strong> before attempting installation of the Media Gateway.<br />
The Media Gateway allows connectivity for iPod, Sirius Satellite Radio tuner<br />
(SCC1 sold seperately) and the HD Radio tuner (HDRT sold separately),<br />
enabling full control of these devices from the factory installed radio.<br />
It also retains original system features such as satellite radio and rear seat<br />
entertainment (if equipped).<br />
2. Precautions<br />
UPDATING iPod FIRMWARE<br />
Updating the firmware prior to installation or future firmware updates for your iPod<br />
may affect the features and functions described in this <strong>manual</strong>.<br />
PREVENTING DAMAGE TO YOUR VEHICLE OR iPod.<br />
To eliminate the risk of an electrical short, we recommend disconnecting the<br />
vehicle’s battery prior to installation. If you do not feel comfortable making these<br />
connections, we suggest you seek professional installation. We recommend that<br />
the iPod be disconnected from the interface when the vehicle is not in use.<br />
PROPER MOUNTING LOCATION<br />
Securely install the interface in a location free from; heat, humidity, moving parts,<br />
sharp metal edges or direct sunlight. We recommend securing the interface to a<br />
suitable location using; double sided tape, Velcro TM or zip-ties.<br />
2
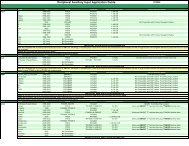
3. Compatibility Notes<br />
Your vehicle MUST either be equipped with, or have the ability to support Satellite<br />
Radio. Please visit www.isimplesolutions.com for the most up to date application<br />
information and to verify your vehicles compatibility.<br />
.4. Dipswitch Settings<br />
Vehicles With Navigation<br />
All Other Vehicles<br />
3
5. Installation<br />
1. When making electrical connections it is always recommended that the vehicle’s<br />
battery be disconnected from the electrical system before performing the<br />
installation.<br />
Please Note: If the radio is equipped with a built in CD<br />
Changer, please remove ALL discs before proceeding to<br />
prevent damage to the radio’s CD mechanism.<br />
2. Carefully remove the trim panels covering the 7mm bolts that secure the radio into<br />
the dash cavity. Remove these bolts, and carefully pull the radio from the dash of<br />
the vehicle. This will provide access to the factory radio connectors where you will<br />
connect the Media Gateway harness.<br />
3. Disconnect the factory 24-Pin harness and 12-Pin harness (if present) from the<br />
back of the radio. Disconnect the antenna from the radio.<br />
4. Connect the 8-Pin iPod docking cable into the first port on the Media Gateway<br />
(farthest away from dipswitches). Carefully run the 11 foot iPod cable behind<br />
the dash to the location where the iPod will be mounted or stored (for example the<br />
glove box or center console). This location will vary based on the vehicle, and the<br />
customer’s prefrence. When running this cable through the dash be sure to secure<br />
it away from moving parts or sharp metal edges that may damage the cable.<br />
5. Connect the 8-Pin auxiliary input cable to the second port (closest to the<br />
dipswitches) on the Media Gateway if an additional auxiliary input is desired.<br />
6. If connecting the HD Radio Tuner (HDRT sold separartely), make the folllowing<br />
connections before connecting the PXAMG to the vehichle. Plug the 3 foot HD<br />
Radio Cable (8-Pin mini-din to 8-Pin mini-din) cable into the second port (closest to<br />
the dipswitches) on the Media Gateway. Connect the other end of this cable into<br />
the HD Radio tuner. Connect the factory antenna cable into the antenna<br />
connection on the HD Radio tuner (HDRT).<br />
7. If connecting the Satellite Radio tuner (SCC1 sold separartely), make the folllowing<br />
connections before connecting the PXAMG to the vehicle. Plug the black end<br />
of the 3 foot ISSR11 (8-Pin mini-din to 8-Pin mini-din; sold seperately) into the<br />
second port (closest to the dipswitches) on the Media Gateway. If you are installing<br />
the Satellite Radio Tuner with the HDRT, connect the ISSR11 cable to the port<br />
farthest from the dipswitches. Connect the gray end of this cable into the Satellite<br />
Radio tuner.<br />
8. If connecting the ISBT21 (sold separartely), make the folllowing<br />
connections before connecting the PXAMG to the vehichle. Plug the 3 foot<br />
ISBT21 Cable (8-Pin mini-din to 8-Pin mini-din) cable into the first port (farthest<br />
from the dipswitches) on the Media Gateway. Connect the other end of this cable<br />
into the ISBT21. Connect the microphone cable into the 3.5 mm<br />
connection on the ISBT21.<br />
4
9. Plug in the male connectors on the PGHGM5 harness into the 24-pin port and 12-<br />
pin port on the back of the radio. Next, connect the factory 24-pin and 12-pin<br />
harness (if available) into the female connectors on the PGHGM5 harness. Be<br />
sure to make a firm connection but do not force it. Plug the Black micro-fit 24-pin<br />
connector on the PGHGM5 harness into the PXAMG Media Gateway box.<br />
10. To complete the installation secure the Media Gateway (PXAMG) and HD Radio<br />
tuner (HDRT) or Satellite Radio tuner (SCC1) into the cavity in the dash behind the<br />
radio. Be sure that the cables and interface modules are not near moving parts or<br />
sharp metal edges as they may damage the cables. To prevent rattling noises<br />
inside the dash, use zip ties, tape, or other fasteners to mount the interfaces<br />
securely.<br />
11. With all connections made, reconnect the vehicle’s battery, insert the key into the<br />
ignition, and turn the vehicle on. Check for proper operation of the Media Gateway<br />
and HD Radio tuner before reinstalling the factory dash panels.<br />
12. Note: The first time you access the Gateway, your radio may display “DEV INIT”<br />
while the device is initializing. If this is displayed, please wait one minute then<br />
cycle the ignition off and on. Then access SAT mode again to begin normal<br />
Gateway operation.<br />
6. iPod Operation<br />
Entering Mode Select Menu<br />
Press the “BAND” button a few times until “XM” is displayed on the screen. Turn<br />
the rotary TUNE KNOB until “IPOD” is displayed. Press “PRESET 6” to select the<br />
displayed mode.<br />
Next Track<br />
Turn the rotary TUNE KNOB clockwise one notch to advance to the next track.<br />
Previous Track<br />
Turn the rotary TUNE KNOB counter-clockwise one notch to move back to the previous<br />
track.<br />
Fast Forward<br />
Press “PRESET 2” repeatedly to fast forward the song that is playing.<br />
Rewind<br />
Press “PRESET 1” repeatedly to rewind the song that is playing.<br />
Entering “BROWSE Menu / Select<br />
Press “PRESET 3” to enter the browse menu or to make a selection while in the<br />
browse menu.<br />
5
Menu UP<br />
Press PRESET 4 to move back one step in the browse menu<br />
Exit Browse menu<br />
After 10 seconds of inactivity the menu will time out and return to normal operation.<br />
Random<br />
Press Preset 6 to turn Random on/off<br />
Repeat<br />
Press Preset 5 to turn Repeat on/off<br />
7. HD Radio Operation<br />
Entering Mode Select Menu<br />
Press the “BAND” button a few times until “XM” is displayed on the screen. Turn<br />
the rotary TUNE KNOB until “HD RADIO” is displayed. Press “PRESET 6” to<br />
select the displayed mode.<br />
Tune Up<br />
Turn the rotary TUNE KNOB clockwise to <strong>manual</strong>ly tune up.<br />
Seek Up<br />
Press the “SEEK>” button to seek up to next available station.<br />
Tune Down<br />
Turn the rotary TUNE KNOB counter-clockwise to <strong>manual</strong>ly tune down.<br />
Seek Down<br />
Press the “
8. Sirius Satellite Radio Operation<br />
Entering Mode Select Menu<br />
Press the “BAND” button a few times until “XM” is displayed on the screen.<br />
Immediately turn the rotary TUNE KNOB to scroll through the available sources.<br />
Once “SIRIUS” is displayed, press “PRESET 6” to select the displayed mode.<br />
Channel Up<br />
Turn the rotary TUNE KNOB clockwise to move up through the channels<br />
Channel Down<br />
Turn the rotary TUNE KNOB counter-clockwise to move down through the channels<br />
Category Up<br />
Press the “SEEK>” button to move up through the categories.<br />
Category Down<br />
Press the “
9.Selecting AUX Input<br />
Entering Mode Select Menu<br />
Press the “BAND” button a few times until “XM” is displayed on the screen.<br />
Immediately turn the rotary TUNE KNOB to scroll through the available sources.<br />
Once “AUX” is displayed, press PRESET 6 to select the displayed mode.<br />
10. Selecting Factory Installed XM<br />
Radio<br />
Entering Mode Select Menu<br />
Press the “BAND” button a few times until “XM” is displayed on the screen.<br />
Immediately turn the rotary TUNE KNOB to scroll through the available sources.<br />
Once “SAT” is displayed, press PRESET 6 to select the displayed mode.<br />
Factory Sat Operation<br />
Refer to the owners’ <strong>manual</strong> that came with your factory radio.<br />
8
11. Troubleshooting<br />
Symptom Cause Remedy<br />
Radio shows iPod<br />
not connected<br />
iPod cable is not<br />
connected to iPod or<br />
Gateway.<br />
Verify the docking cable is connected<br />
to the Media Gateway, and the iPod<br />
I can not correctly<br />
control the iPod<br />
through the radio.<br />
I have updated my<br />
iPod’s firmware and<br />
still have control<br />
issues<br />
I don’t see iPod artist<br />
or song information<br />
on the screen<br />
I can’t use my iPod’s<br />
click wheel to select<br />
music<br />
The Media Gateway<br />
does not recognize<br />
the HD Radio tuner<br />
(HDRT)<br />
Radio shows “DEV<br />
INIT”<br />
When I listen to the<br />
factory AM or FM<br />
radio there is only<br />
static, no audio.<br />
No AM or FM<br />
reception using the<br />
HD Radio source<br />
HD Radio station<br />
quality fluctuates or is<br />
lost randomly<br />
The iPod firmware<br />
may be out of date.<br />
Sometimes the<br />
iPods needs to be<br />
reset<br />
The radio is<br />
displaying a different<br />
text field<br />
The iPod is in<br />
external control<br />
mode. This allows<br />
text to be displayed<br />
on the radio screen<br />
The HD tuner<br />
was not properly<br />
connected when<br />
the PXAMG was<br />
first connected and<br />
initialized.<br />
Gateway device is<br />
initializing<br />
Factory antenna<br />
cable is connected<br />
to the HD Radio<br />
tuner.<br />
Factory antenna<br />
cable is not<br />
connected to the HD<br />
Radio tuner (HDRT)<br />
The HD Tuner is<br />
temporarily losing<br />
reception of the<br />
Digital HD Radio<br />
broadcast signal<br />
Update iPod firmware for free at http://<br />
www.apple.com/ipod/download<br />
Press and hold the click wheel (center<br />
button) and the menu button for 10<br />
seconds. This will reboot the iPod.<br />
YOU WILL NOT LOSE MUSIC on the<br />
iPod by doing this reset<br />
Press the Text / Scan button to see<br />
text<br />
Press the Aux / Sat button and select<br />
AUX 2 source to control the iPod<br />
<strong>manual</strong>ly using the click wheel<br />
HDRT must be connected before the<br />
PXAMG is powered on. Disconnect<br />
the PXAMG from the vehicles harness<br />
for 5 minutes. Verify the 8 pin DIN<br />
HDRT cable is securely connected<br />
at both ends before reconnecting the<br />
vehicle harness.<br />
This only occurs the first time the<br />
PXAMG is powered on. Wait a few<br />
minutes, cycle ignition off and on then<br />
enter SAT Mode.<br />
Use Gateway to access HD Radio<br />
source. This will provide all AM and<br />
FM reception for your vehicle.<br />
Remove from factory radio, connect<br />
into HDRT module. Note* some<br />
vehicles need to use the supplied<br />
antenna adaptor to make this<br />
connection.<br />
This is expected performance. The<br />
Digital HD Radio playback will resume<br />
in areas of higher broadcast signal<br />
strength.<br />
9
12. Warranty<br />
One Year Limited Warranty<br />
The quality controls used in the manufacture of this product will ensure your<br />
satisfaction. This warranty applies only to the original purchaser of this product<br />
from an authorized iSimple ® dealer. This warranty covers any supplied or<br />
manufactured parts of this product that, upon inspection by iSimple ® authorized<br />
personnel, is found to have failed in normal use due to defects in material<br />
or workmanship. This warranty does not apply to installation expenses.<br />
Attempting to service or modify this unit, operating this unit under conditions<br />
other than the recommended voltage will render this WARRANTY VOID.<br />
Unless otherwise prescribed by law, iSimple ® shall not be liable for any<br />
personal injury, property damage and or any incidental or consequential<br />
damages of any kind (including water damage) resulting from malfunctions,<br />
defects, misuse, improper installation or alteration of this product. All<br />
parts of this iSimple ® product are guaranteed for a period of 1 year as follows:<br />
Within the first 12 months from date of purchase, subject to the conditions<br />
above, iSimple ® will repair or replace the product at their discretion, if it is defective<br />
in material or workmanship providing it is returned to an Authorized iSimple ®<br />
dealer, with PROOF OF PURCHASE from an authorized iSimple ® dealer.<br />
Warning:<br />
This equipment may be reset by unintentional electrostatic discharge during<br />
operation. Exposure to direct sunlight or extreme heat may cause damage or<br />
malfunction.<br />
FCC Class B Radio Frequency<br />
Interference Statement<br />
This equipment has been tested and found to comply with the limits for a Class<br />
B digital device, pursuant to Part 15 of FCC rules. These limits are designed to<br />
provide reasonable protection against harmful interference in a residential installation.<br />
This equipment generates, uses, and can radiate radio frequency energy<br />
and, if not installed and used in accordance with the <strong>instruction</strong>s, may cause<br />
harmful interference to radio communications. However, there is no guarantee<br />
that interference will not occur in a particular installation. If this equipment does<br />
cause harmful interference to radio or television reception, which can be determined<br />
by turning the equipment off and on, the user is encouraged to try to correct<br />
the interference by one or more of the following measures:<br />
1. Re-orientate or relocate the receiving antenna.<br />
2. Increase the separation between the equipment and receiver.<br />
3. Connect the equipment into an outlet on a circuit different from<br />
that of which the receiver is connected.<br />
4. Consult the dealer or an experienced radio / television technical for help.<br />
Notice : The changes or modifications not expressly approved by the party responsible<br />
for compliance could void the user authority to operate the equipment.<br />
10
Notes<br />
____________________________________________________<br />
_ ____________________________________________________<br />
_ ____________________________________________________<br />
_ ____________________________________________________<br />
_ ____________________________________________________<br />
_ ____________________________________________________<br />
_ ____________________________________________________<br />
_ ____________________________________________________<br />
_ ____________________________________________________<br />
_ ____________________________________________________<br />
_ ____________________________________________________<br />
_ ____________________________________________________<br />
_ ____________________________________________________<br />
_ ____________________________________________________<br />
_ ____________________________________________________<br />
_ ____________________________________________________<br />
_ ____________________________________________________<br />
_ ____________________________________________________<br />
_ ____________________________________________________<br />
_ ____________________________________________________<br />
_ ____________________________________________________<br />
_ ____________________________________________________<br />
_ ____________________________________________________<br />
_ ____________________________________________________<br />
_ ____________________________________________________<br />
11
www.isimplesolutions.com<br />
For Best Performanc e Have It<br />
Professionally Installe d.