Aanbrengen SABA Crackfill
Aanbrengen SABA Crackfill
Aanbrengen SABA Crackfill

You also want an ePaper? Increase the reach of your titles
YUMPU automatically turns print PDFs into web optimized ePapers that Google loves.
Info sheet 357<br />
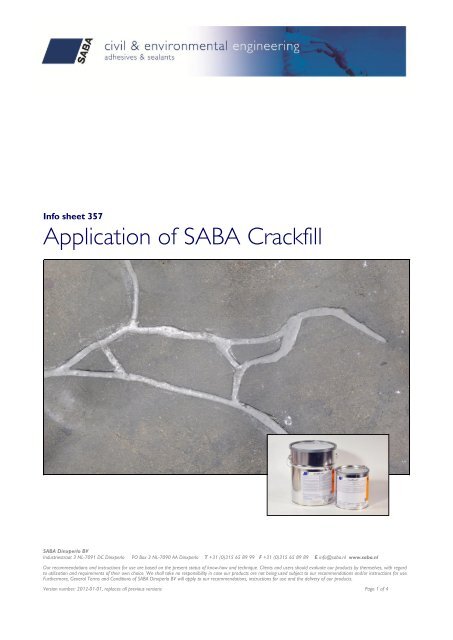
Application of <strong>SABA</strong> <strong>Crackfill</strong><br />
<strong>SABA</strong> Dinxperlo BV<br />
Industriestraat 3 NL-7091 DC Dinxperlo PO Box 3 NL-7090 AA Dinxperlo T +31 (0)315 65 89 99 F +31 (0)315 65 89 89 E info@saba.nl www.saba.nl<br />
Our recommendations and instructions for use are based on the present status of know-how and technique. Clients and users should evaluate our products by themselves, with regard<br />
to utilization and requirements of their own choice. We shall take no responsibility in case our products are not being used subject to our recommendations and/or instructions for use.<br />
Furthermore, General Terms and Conditions of <strong>SABA</strong> Dinxperlo BV will apply to our recommendations, instructions for use and the delivery of our products.<br />
Version number: 2012-01-01, replaces all previous versions Page 1 of 4
1. Structure and dimensions of <strong>SABA</strong> <strong>Crackfill</strong><br />
<strong>SABA</strong> <strong>Crackfill</strong> is used to repair static (not (no longer) moving) cracks in concrete floors and as a top seal for<br />
<strong>SABA</strong> Double Joint C. See info sheet 354 Application of <strong>SABA</strong> Double Joint system. This info sheet uses the first<br />
application, the repair of static cracks, as an example. <strong>SABA</strong> <strong>Crackfill</strong> is used in the following way to repair cracks:<br />
<strong>SABA</strong> <strong>Crackfill</strong><br />
The cracks must first be cut into a triangular shape (app. 10 x 10 mm). Follow the line of the crack as accurately as<br />
possible.<br />
2. General instructions for applying <strong>SABA</strong> <strong>Crackfill</strong><br />
To apply <strong>SABA</strong> <strong>Crackfill</strong>, the following must be done:<br />
2.1 Check the conditions<br />
Measure one after the other:<br />
a) The ambient temperature, this must be between +5 ºC and +35 ºC<br />
b) The relative air humidity<br />
c) The temperature of the surfaces to which the sealant must bond. The dew-point is derived using the values<br />
measured in steps b) and c) and information from the dew-point table in info sheet 003. The temperature of<br />
the bonding surfaces must be at least 3 °C above the dew-point.<br />
d) The moisture percentage of the bonding surfaces must not be higher than 15 on the Protimeter<br />
Info sheet 003 'Humidity measurements and dew-point determination' describes in detail how the conditions can be<br />
checked.<br />
2.2 Clean the bonding surfaces<br />
Thoroughly remove all dust or grit from the (cut) joints. If necessary, thoroughly degrease the bonding surfaces, for<br />
instance using Sabaclean 22.<br />
<strong>SABA</strong> Dinxperlo BV<br />
Industriestraat 3 NL-7091 DC Dinxperlo PO Box 3 NL-7090 AA Dinxperlo T +31 (0)315 65 89 99 F +31 (0)315 65 89 89 E info@saba.nl www.saba.nl<br />
Our recommendations and instructions for use are based on the present status of know-how and technique. Clients and users should evaluate our products by themselves, with regard<br />
to utilization and requirements of their own choice. We shall take no responsibility in case our products are not being used subject to our recommendations and/or instructions for use.<br />
Furthermore, General Terms and Conditions of <strong>SABA</strong> Dinxperlo BV will apply to our recommendations, instructions for use and the delivery of our products.<br />
Version number: 2012-01-01, replaces all previous versions Page 2 of 4
2.3 Prime the concrete surfaces<br />
Pour the B Component of <strong>SABA</strong> Primer H 17 into the packaging of the A Component and mix it until the liquid is<br />
homogenous. The primer is now ready to use.<br />
Carefully apply <strong>SABA</strong> Primer H 17 to the bonding surfaces using a brush. Ensure that all bonding surfaces are covered<br />
and that there are no breaks in the primer layer. Work carefully, spills give stains.<br />
Note:<br />
Take account of the open time of the primer used! The open time is the time within which the sealant must be<br />
applied. After being applied, <strong>SABA</strong> Primer H 17 must dry for at least 30 minutes, before <strong>SABA</strong> <strong>Crackfill</strong> can be applied.<br />
But do not wait longer than 6 hours, as the primer will then no longer work (in which case new primer must be<br />
applied).<br />
Apply <strong>SABA</strong> Primer H 17 to the bonding surfaces<br />
2.4 Mix and apply <strong>SABA</strong> <strong>Crackfill</strong><br />
Packaging<br />
<strong>Crackfill</strong> 2-litre sets<br />
<strong>Crackfill</strong> 6-litre set<br />
Mixing time (in minutes)<br />
app. 3 min.<br />
app. 5 min.<br />
Pour the B Component of <strong>SABA</strong> <strong>Crackfill</strong> into the packaging of the A Component and mix the entire mass for several<br />
minutes using a drill with a mixing spiral (until the mass is homogenous). <strong>SABA</strong> <strong>Crackfill</strong> is now ready to use.<br />
Mix <strong>SABA</strong> <strong>Crackfill</strong><br />
Apply <strong>SABA</strong> <strong>Crackfill</strong><br />
Inject the mixed <strong>SABA</strong> <strong>Crackfill</strong> into the cracks using a sealant gun. Fill the crack flush with the surface with <strong>SABA</strong><br />
<strong>Crackfill</strong>.<br />
<strong>SABA</strong> Dinxperlo BV<br />
Industriestraat 3 NL-7091 DC Dinxperlo PO Box 3 NL-7090 AA Dinxperlo T +31 (0)315 65 89 99 F +31 (0)315 65 89 89 E info@saba.nl www.saba.nl<br />
Our recommendations and instructions for use are based on the present status of know-how and technique. Clients and users should evaluate our products by themselves, with regard<br />
to utilization and requirements of their own choice. We shall take no responsibility in case our products are not being used subject to our recommendations and/or instructions for use.<br />
Furthermore, General Terms and Conditions of <strong>SABA</strong> Dinxperlo BV will apply to our recommendations, instructions for use and the delivery of our products.<br />
Version number: 2012-01-01, replaces all previous versions Page 3 of 4
2.5 Finish<br />
<strong>SABA</strong> <strong>Crackfill</strong> is self-levelling and does not need to be finished.<br />
2.6 Allow to cure<br />
After approximately 24 hours, <strong>SABA</strong> <strong>Crackfill</strong> can be walked on (dependent on the temperature). It is advisable to<br />
take measures to ensure that <strong>SABA</strong> <strong>Crackfill</strong> is not walked on or driven over while it is curing, for instance by<br />
cordoning off the area using tape, or cones.<br />
3. References<br />
<br />
<br />
<br />
<br />
<br />
<br />
Safety Data Sheet <strong>SABA</strong> <strong>Crackfill</strong><br />
Product Data Sheet <strong>SABA</strong> <strong>Crackfill</strong><br />
<strong>SABA</strong> Pre-treatment Civil & Environmental Engineering<br />
Info sheet 003 Humidity measurements and dew-point determination<br />
Info sheet 318 Application of <strong>SABA</strong> Double Joint<br />
Info sheets of <strong>SABA</strong> application equipment<br />
<strong>SABA</strong> Dinxperlo BV<br />
Industriestraat 3 NL-7091 DC Dinxperlo PO Box 3 NL-7090 AA Dinxperlo T +31 (0)315 65 89 99 F +31 (0)315 65 89 89 E info@saba.nl www.saba.nl<br />
Our recommendations and instructions for use are based on the present status of know-how and technique. Clients and users should evaluate our products by themselves, with regard<br />
to utilization and requirements of their own choice. We shall take no responsibility in case our products are not being used subject to our recommendations and/or instructions for use.<br />
Furthermore, General Terms and Conditions of <strong>SABA</strong> Dinxperlo BV will apply to our recommendations, instructions for use and the delivery of our products.<br />
Version number: 2012-01-01, replaces all previous versions Page 4 of 4